Transformations
- Home
- FlightPath
- Transformations
- Transformations
Transformations allow you to modify data as it flows from the source to target fields. A transformation contains one or more functions that are chained together. For example, a simple transformation could be to convert the contents of a string input into uppercase characters. If the source field contains “us”, then the target field would be set to “US” if this transformation were applied. There are over 90 pre-built functions available in the Data Mapper. You can extend this list by adding your own custom functions.
A transformation can be applied to any type of mapping. Whenever a mapping between at least one source field and at least one target field is created, the Transformation Center is displayed. Depending on the type of mapping, a default transformation may be created. For example, a one-to-many mapping will display a transformation with a Split function. If you are mapping a field that is not part of a collection into a field that is part of a collection, a Copy To function is displayed, with the intent to copy the value into the first index of the collection (0).
You can edit an existing function by clicking the edit button or add a function by clicking the “+” button.
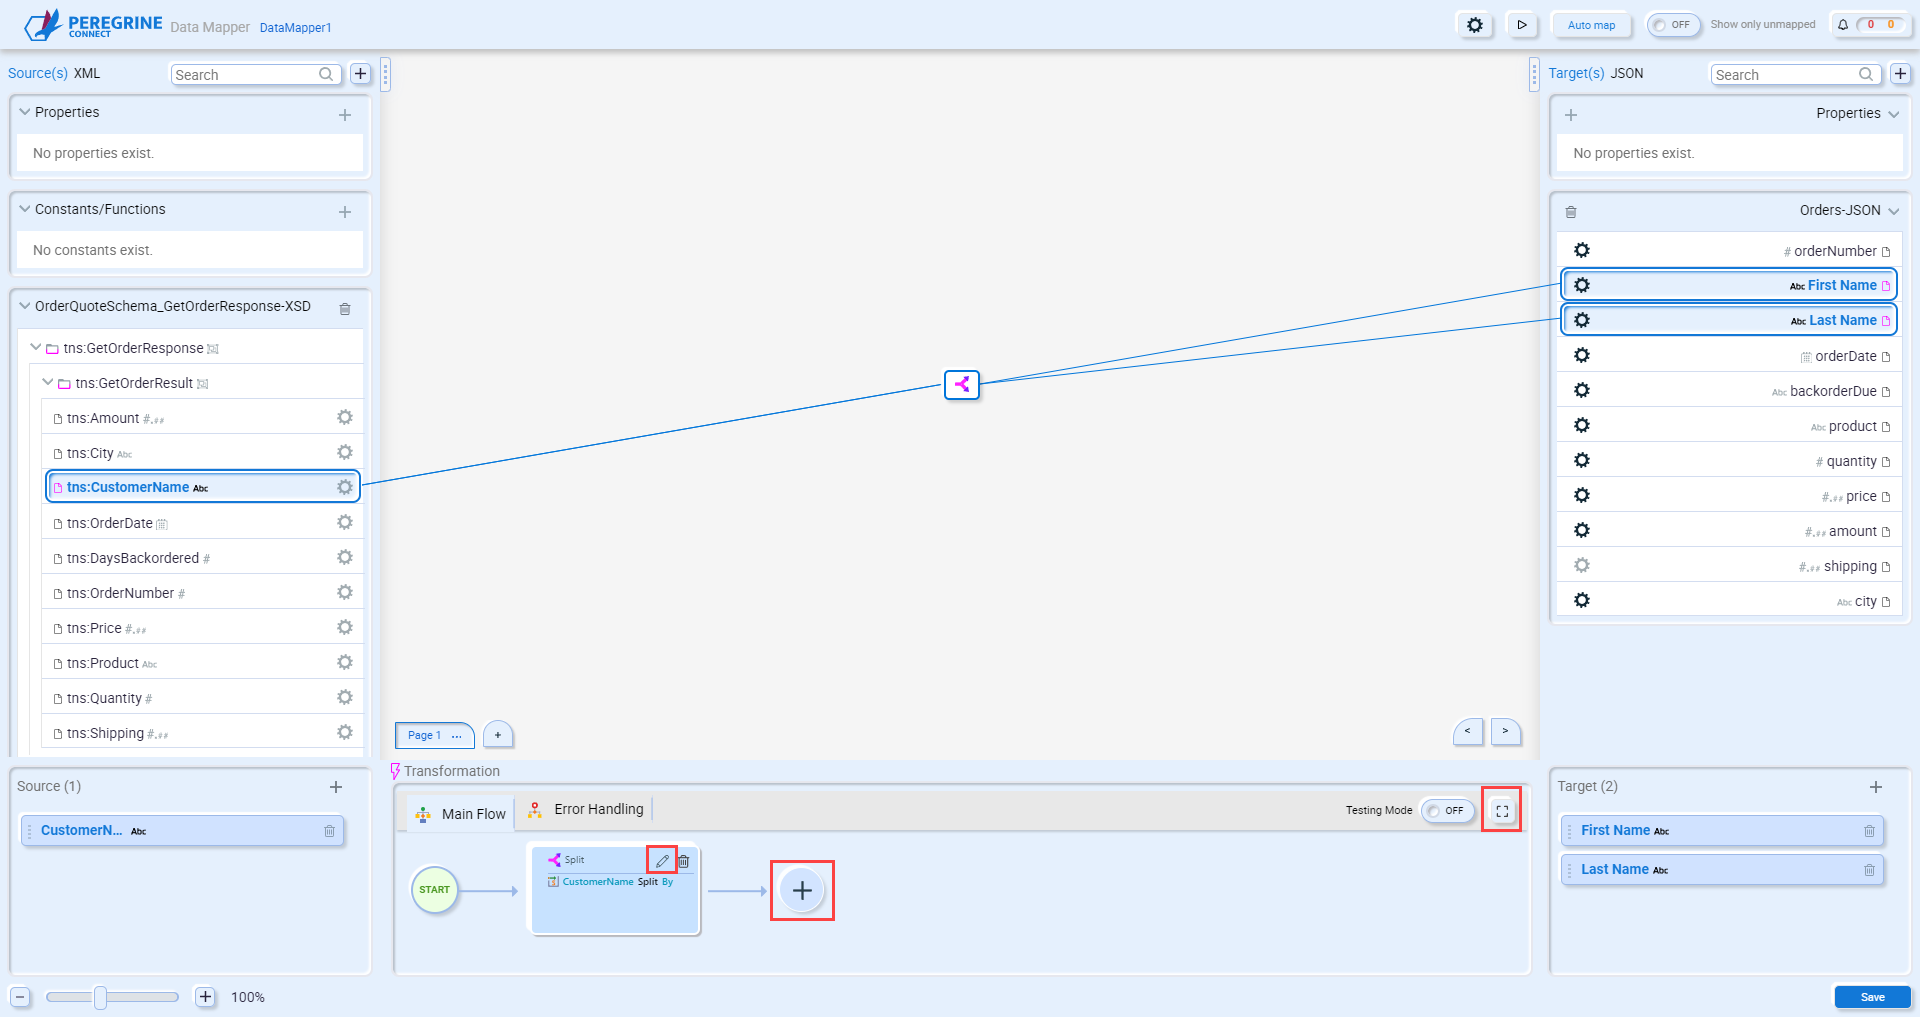
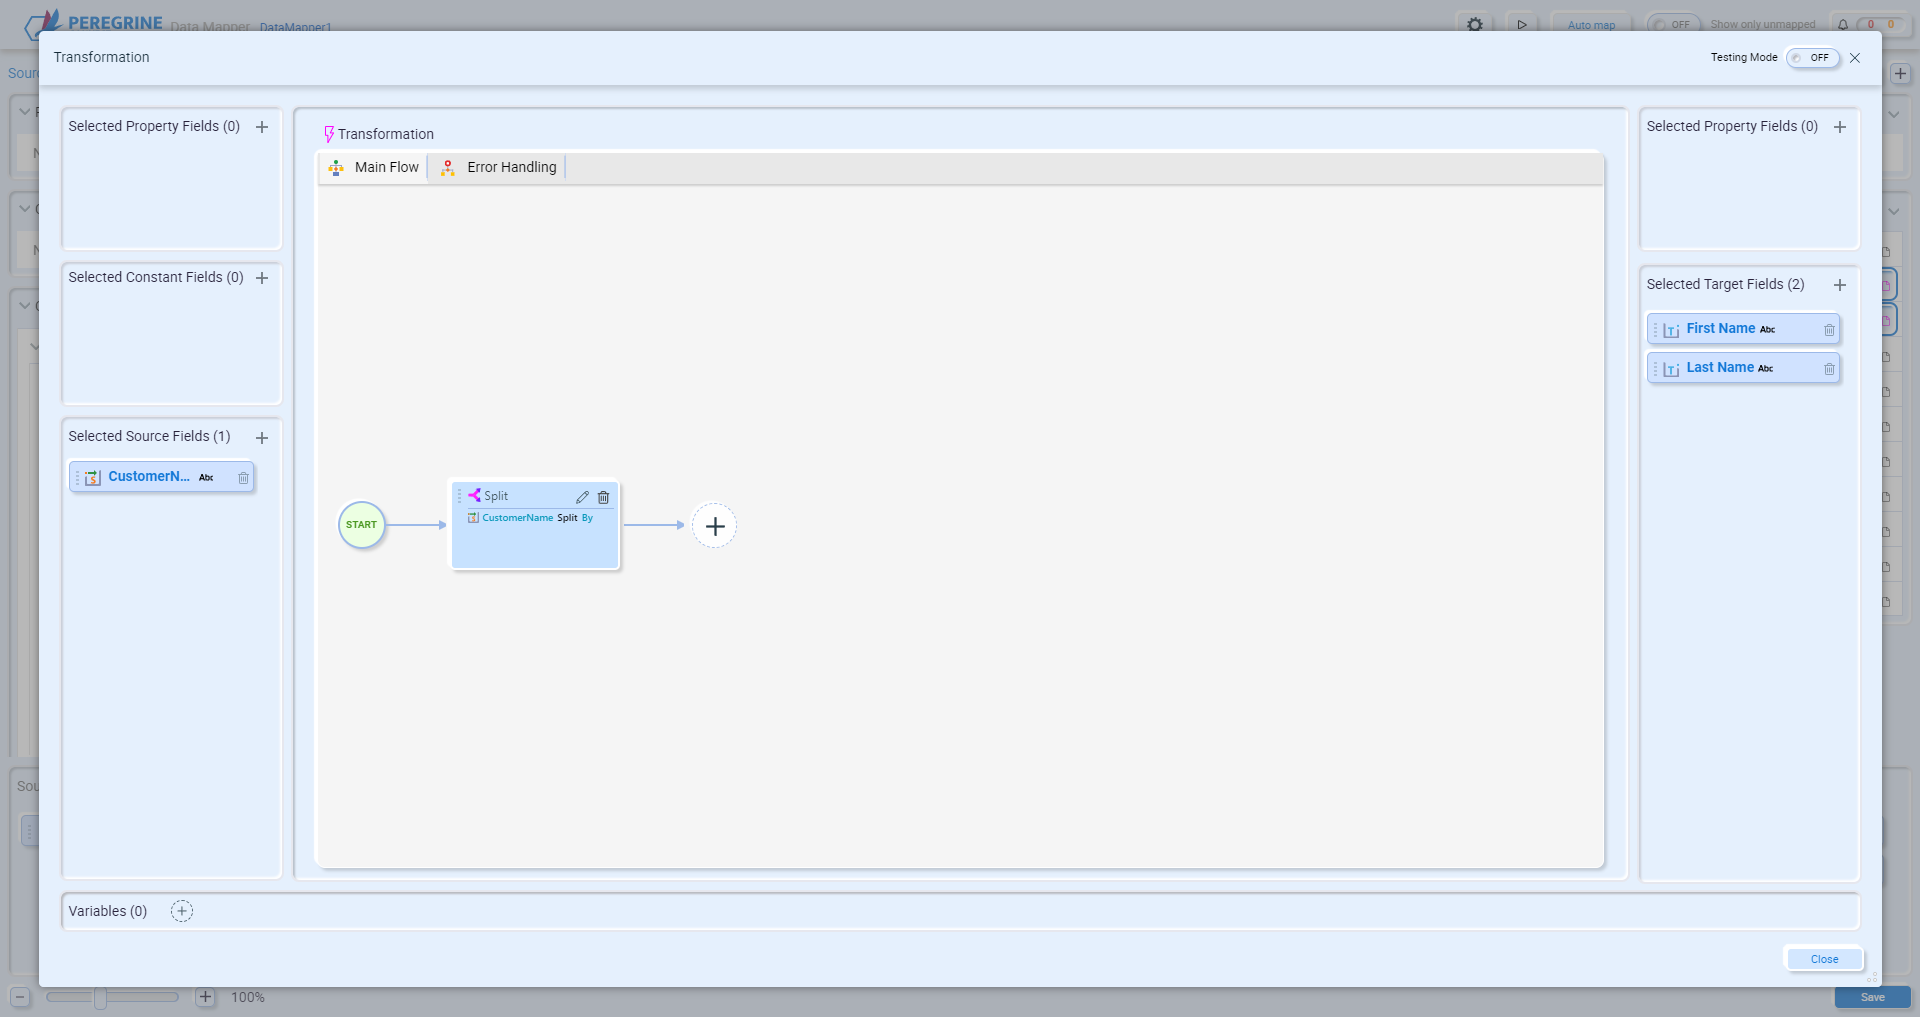
The Transformation Center can be expanded by clicking the ![]() button:
button:
When adding a function to the transformation, the Function wizard will appear:
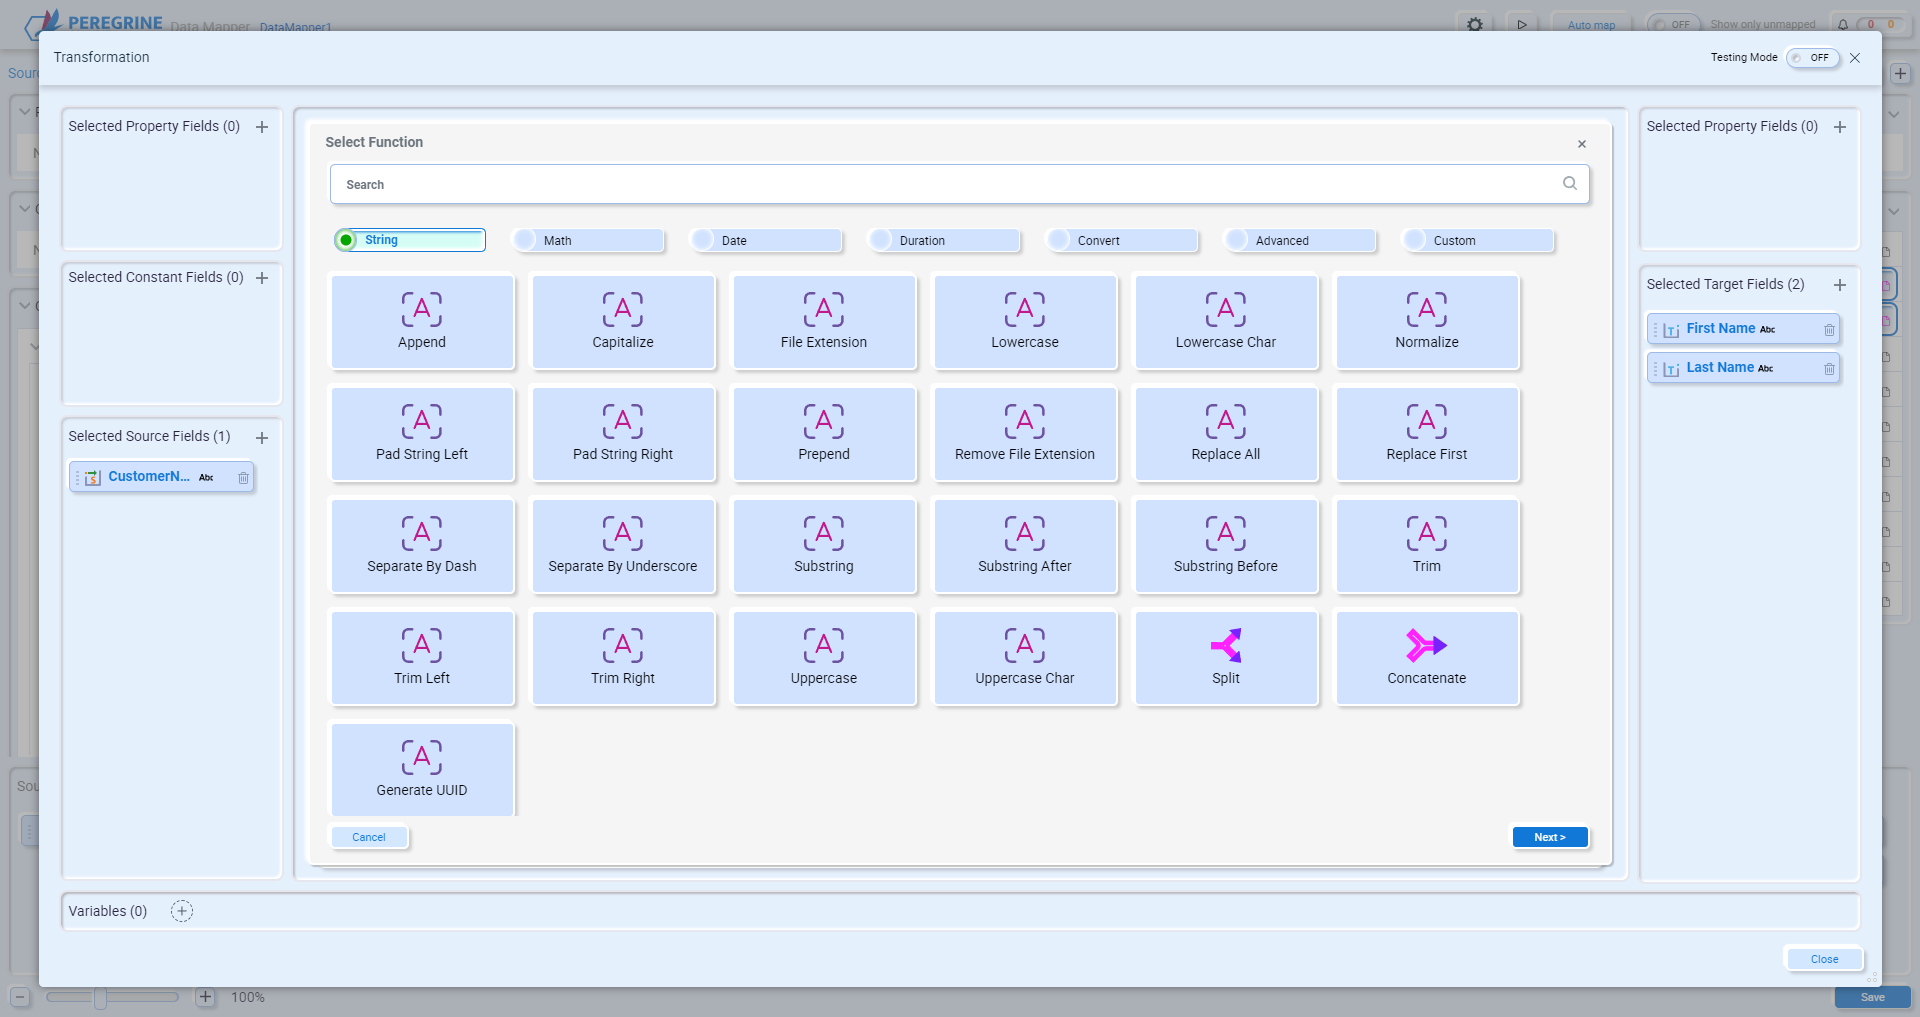
Select the function you want to use, like the Uppercase function, and click Next:
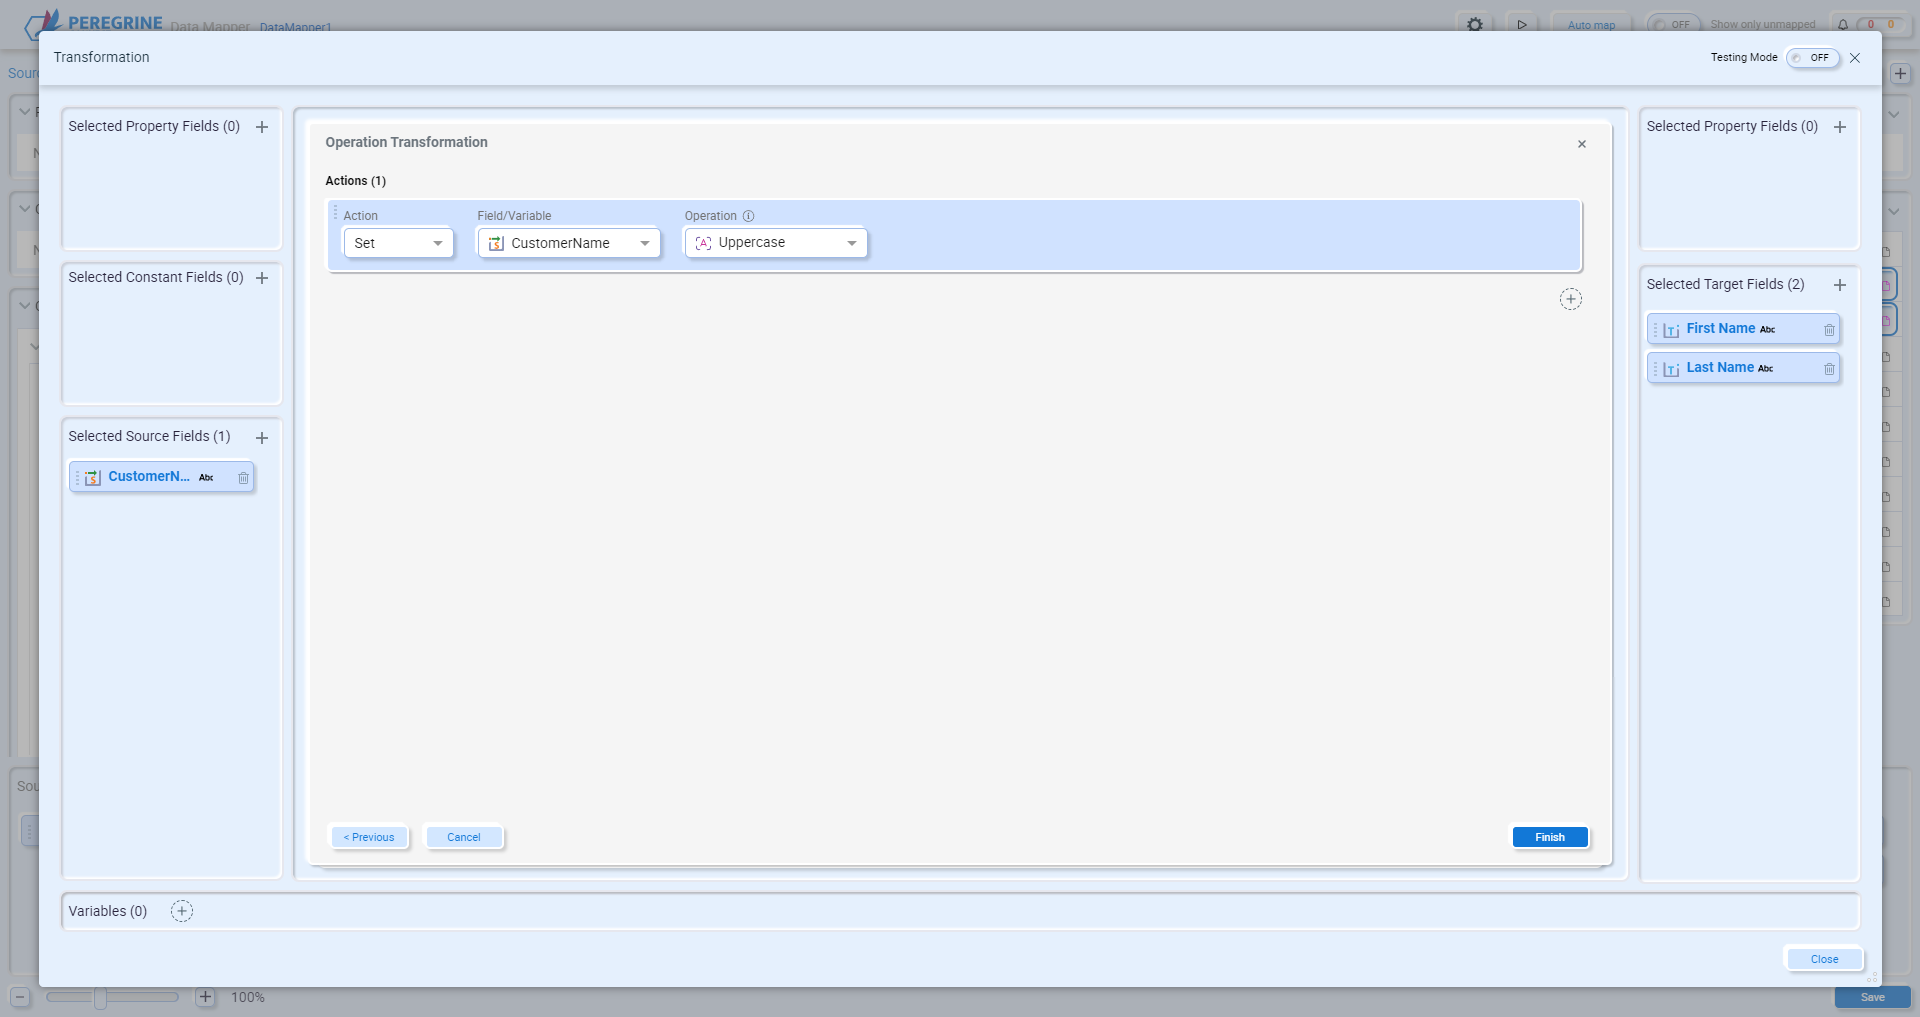
Set the properties for the function click Finish:
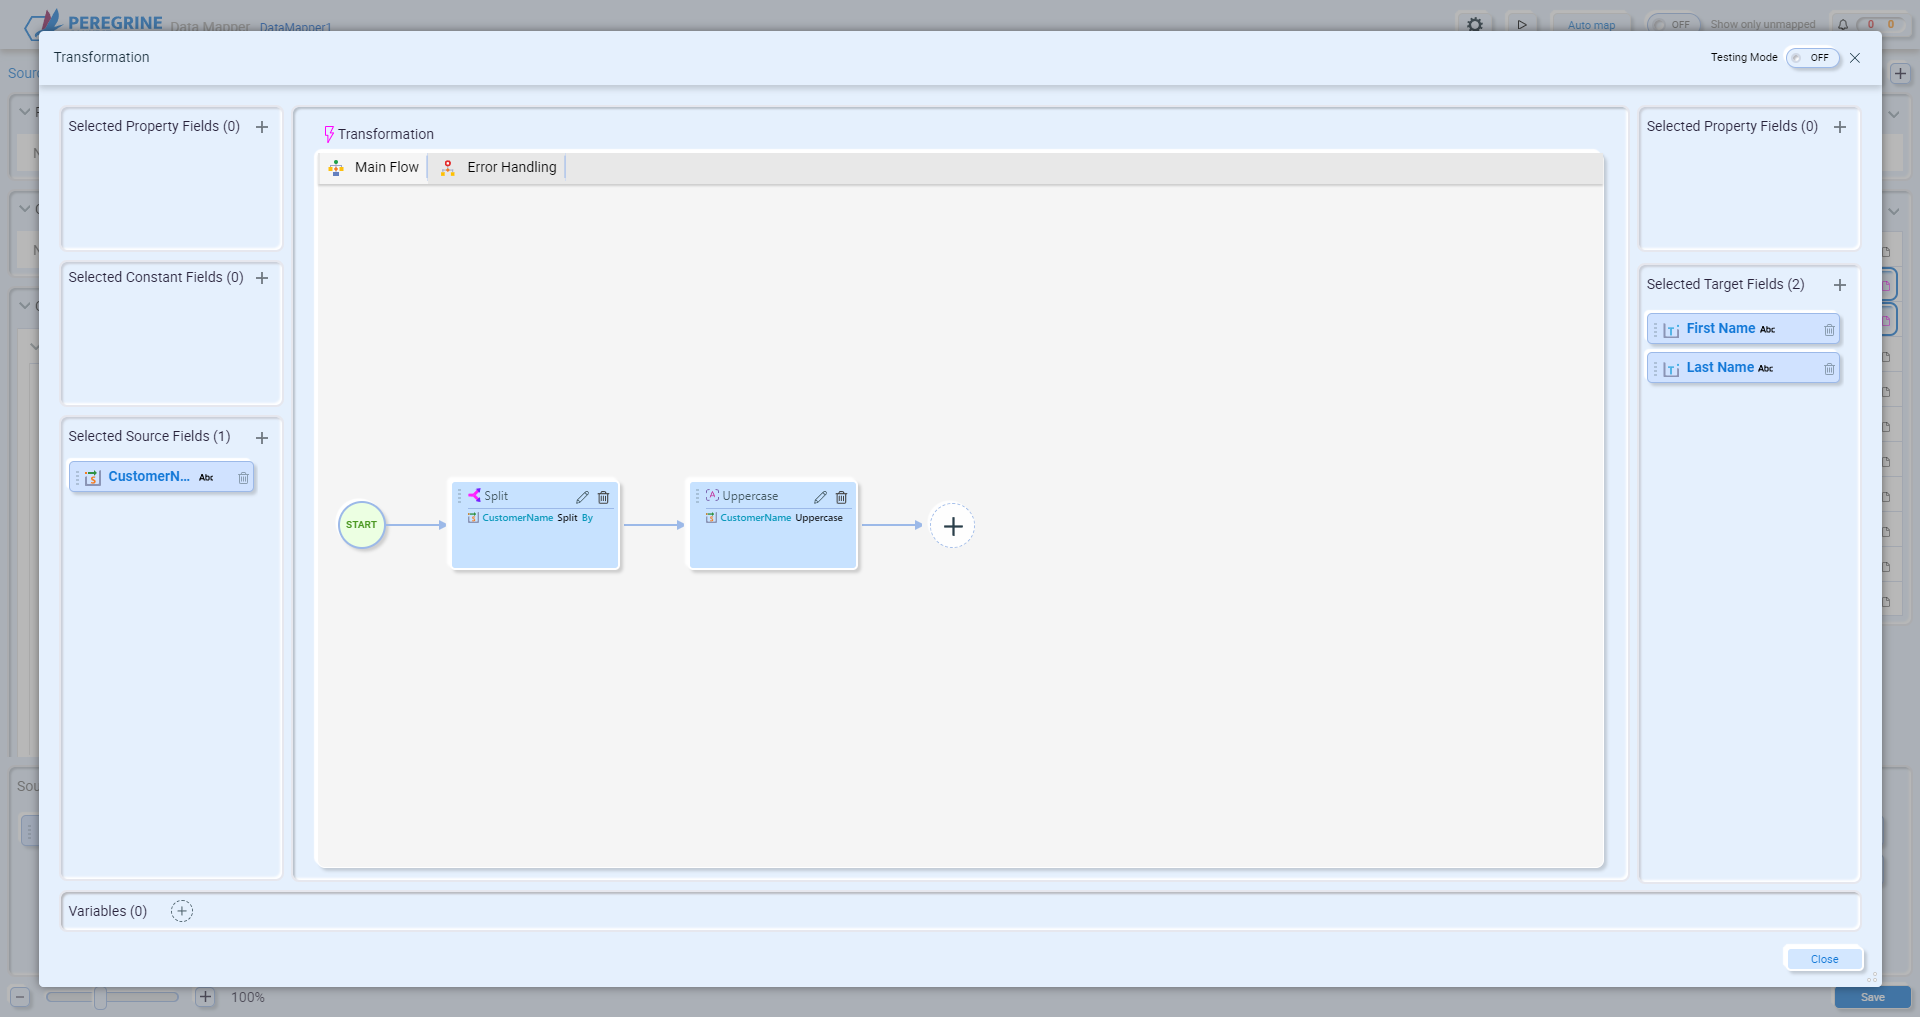
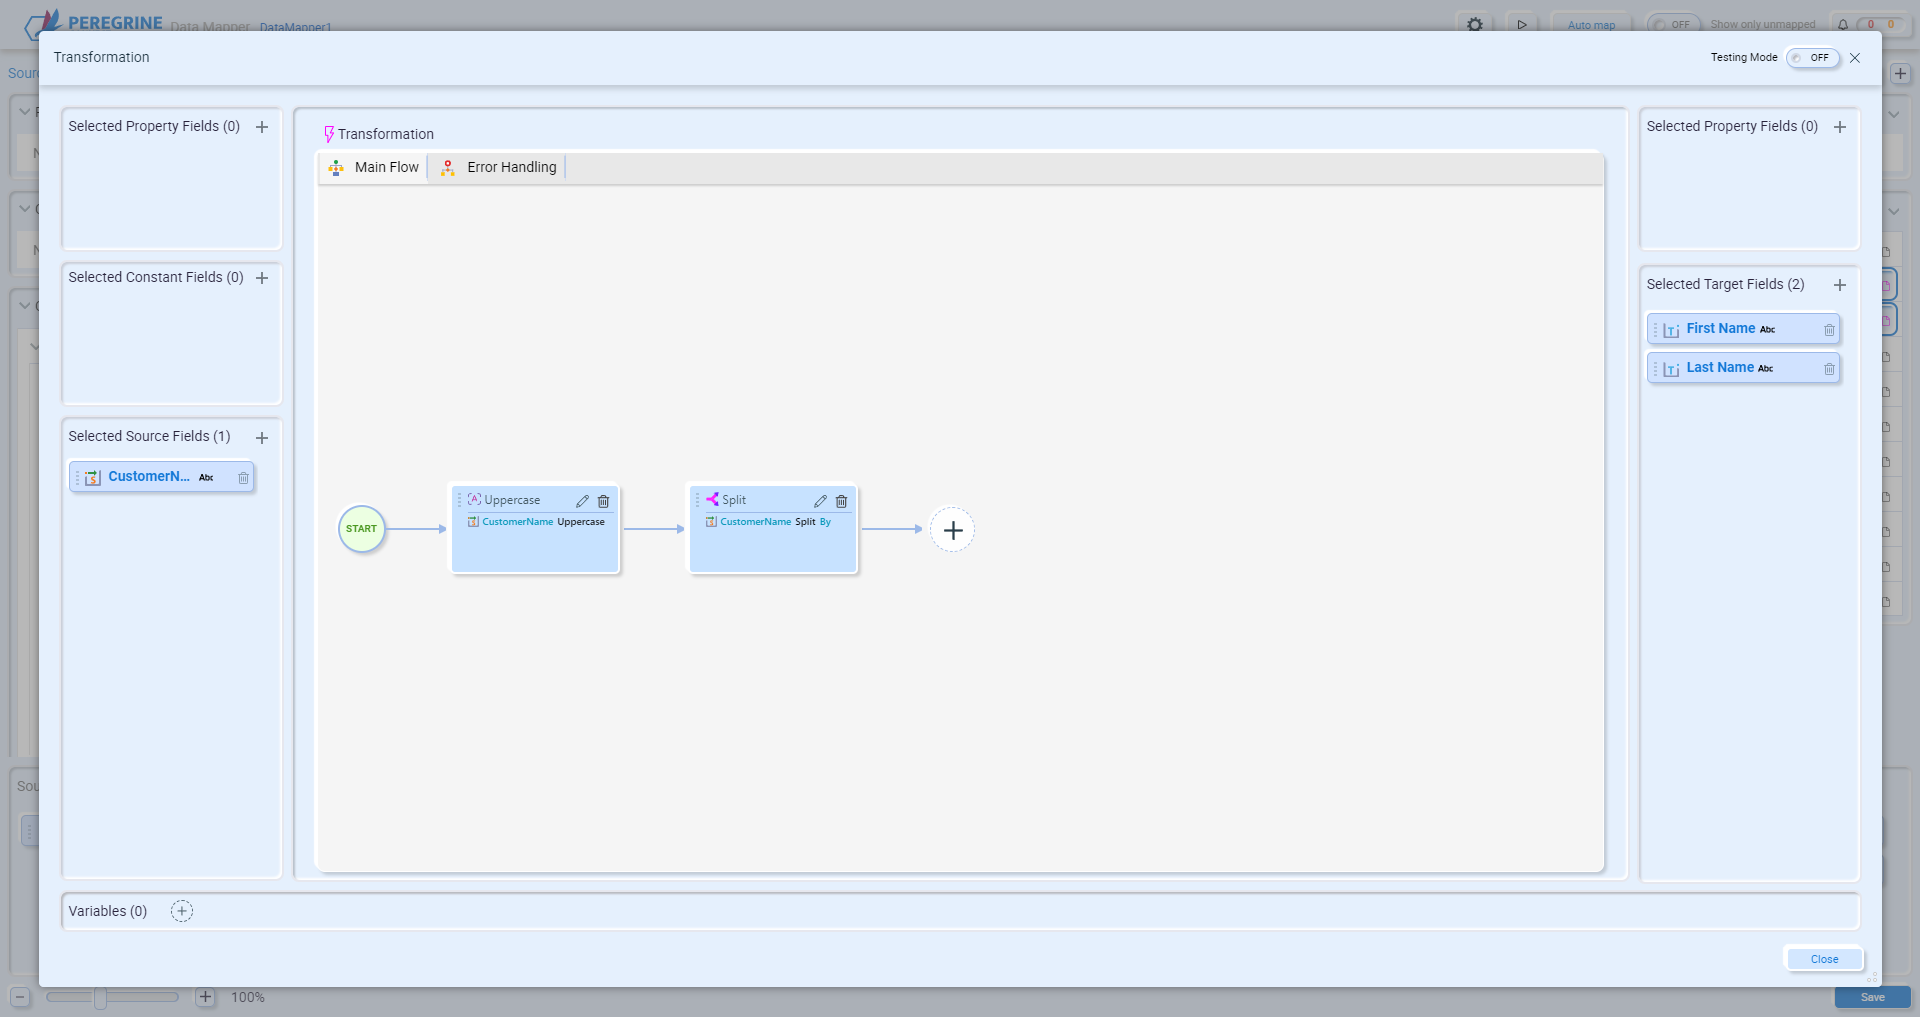
Most functions only apply to a single field. In this example, the Uppercase function can be applied to the source field, customerName, or one of the two target fields, First Name or Last Name. If you want to uppercase both the First Name and Last Name target fields, then you can reorder the functions by clicking and dragging the Uppercase function to the beginning. With this order, the entire customerName contents will be uppercased before the split occurs, and both target fields will receive uppercased text. If you only want one of the target fields to be uppercased, then leave the Uppercase function as the last function and edit it to select the appropriate target field to uppercase. For this example, the Uppercase function is moved to the beginning:
Add additional functions by clicking the “+” button in the Transformation Wizard. When you are finished, click the Close button.
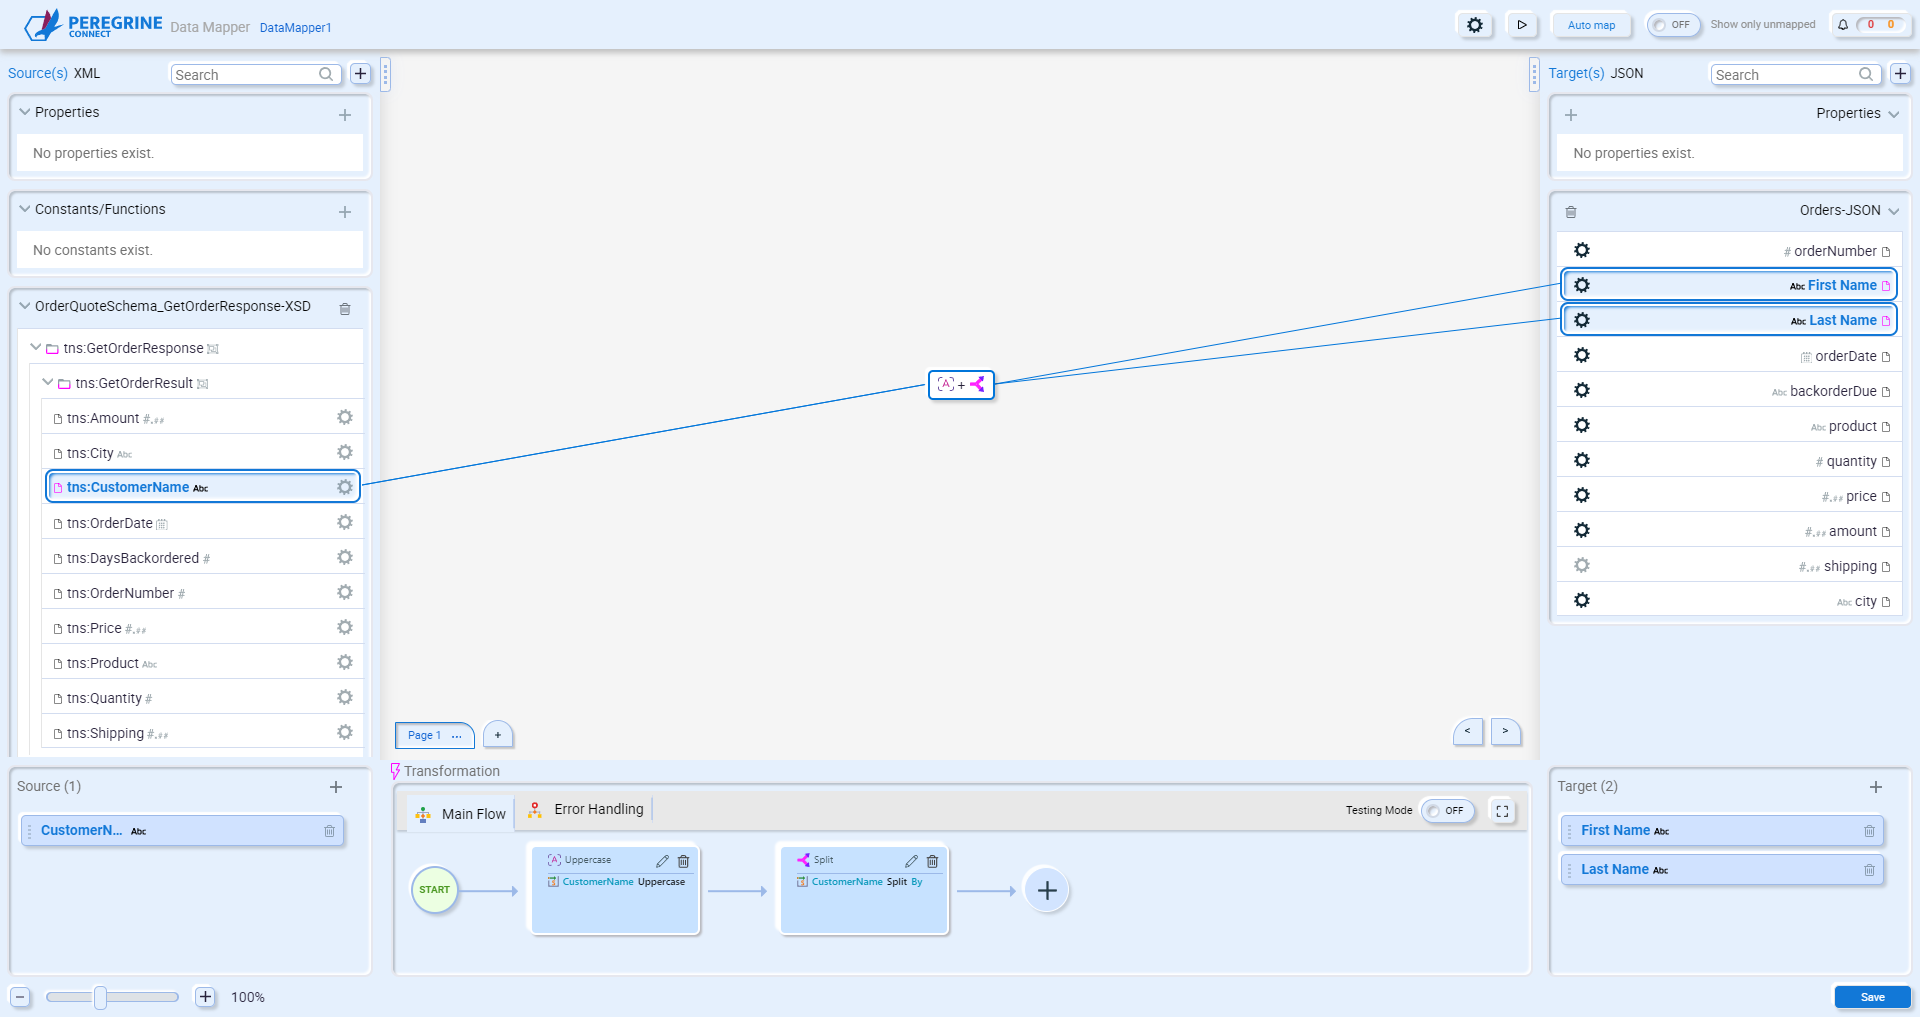
The map will be updated to display that there are functions being used, and the Transformation Center will display each function:
See Functions to get a complete list of all the available functions.
Transformation Center
The Transformation Center is where you add or remove functions, source and target fields, and message properties, environment variables, and constants. Once a map is made between source and target fields, the Transformation Center becomes accessible at the bottom the Data Mapper:
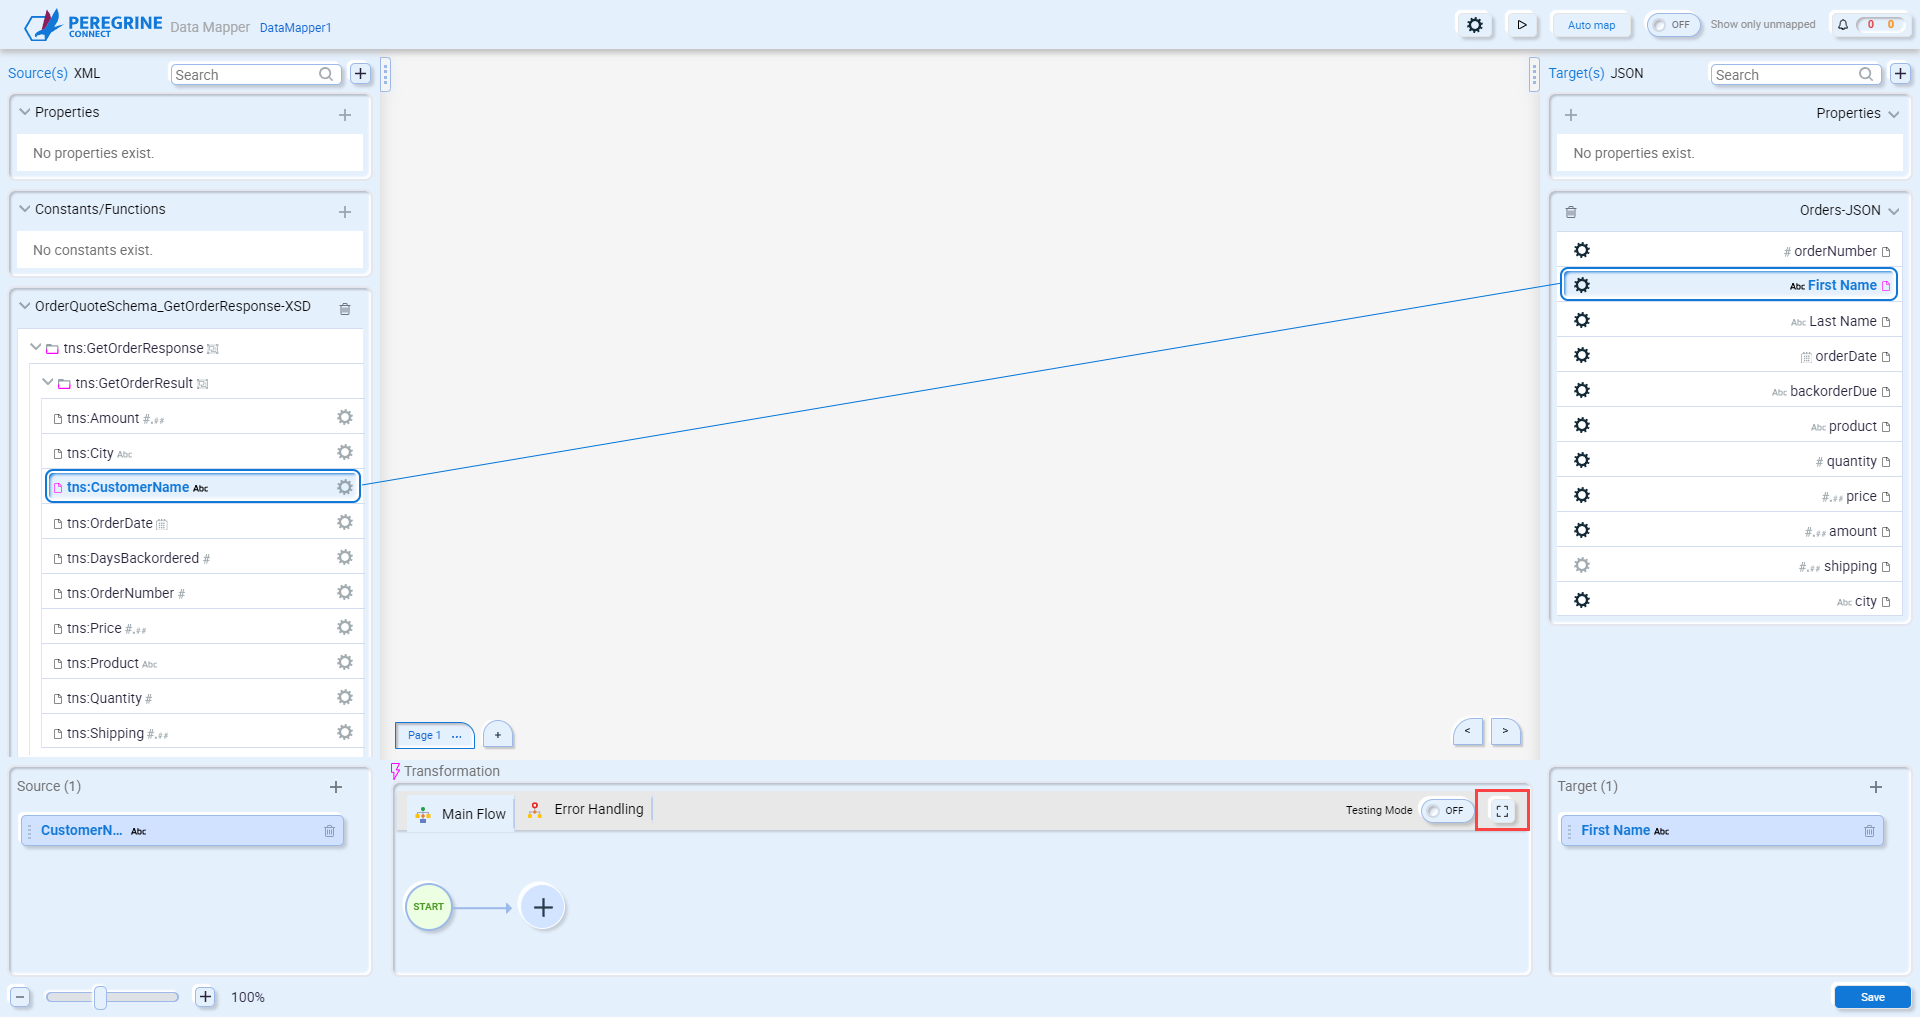
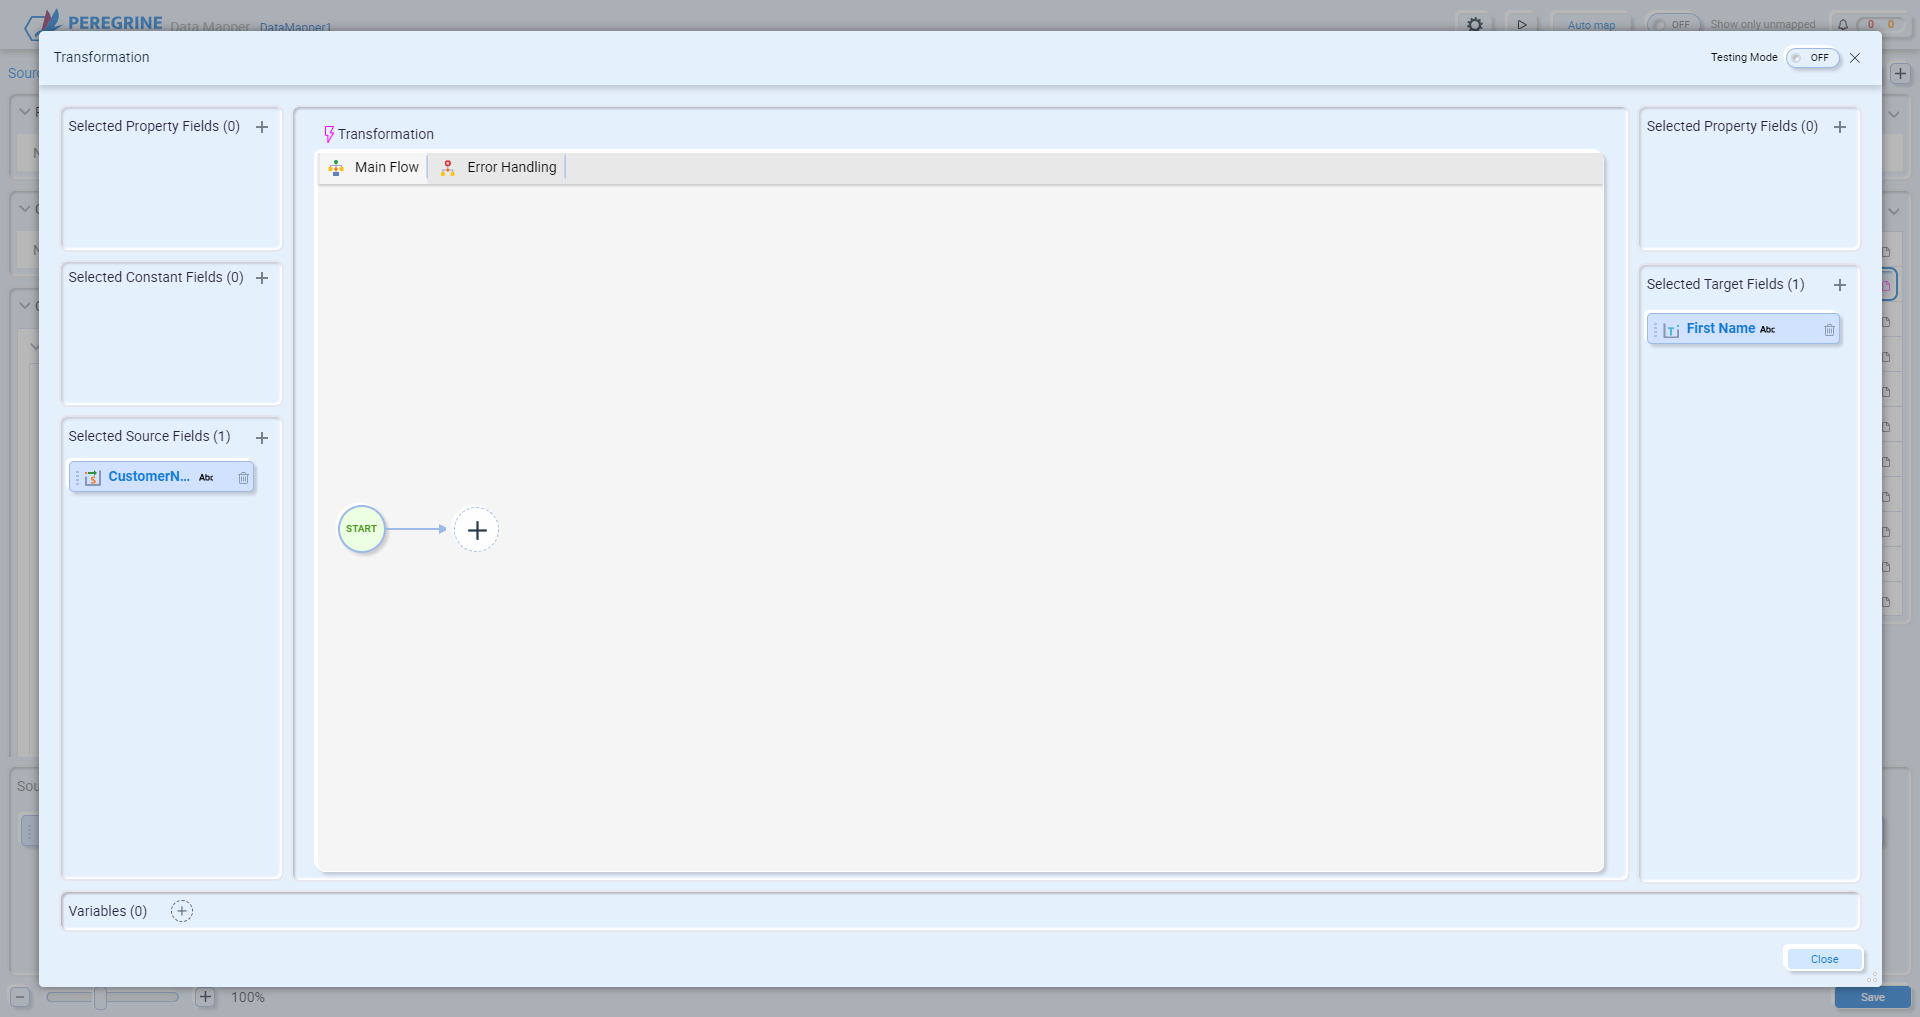
The Transformation Center can be expanded to full-screen by clicking the Expand button highlighted in red:
Fields, Properties and Constants
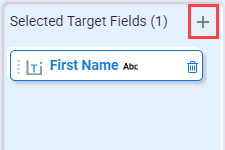
On the left side of the Transformation Center, all selected properties, constants and source fields are displayed. On the right side, all selected properties and target fields are displayed. If you want to include additional source or target fields, or properties and constants, just click the plus “+” button next to the type you want to add. For example, I want to add an additional target field to my map, so I click the “+” button next to Selected Target Fields:
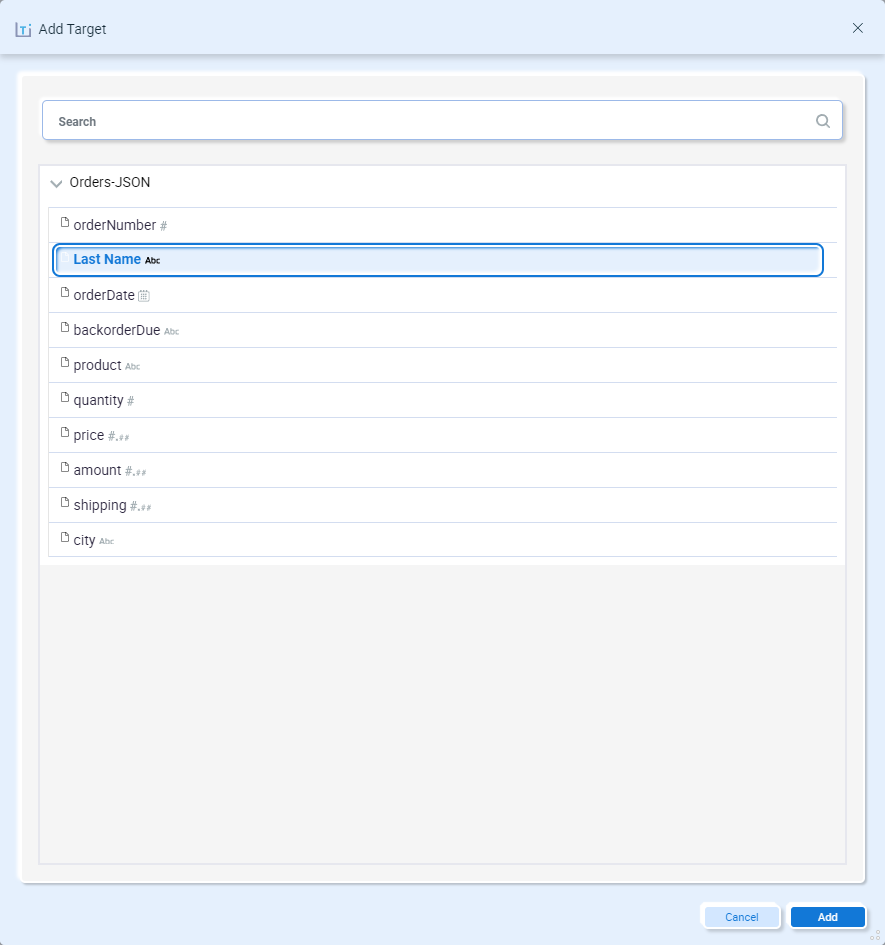
A list of the remaining unmapped fields will be displayed. Here you can select the field(s) to add and click the Add button:
You can also add properties and constants, even if they haven’t been created yet. For example, to create a new Constant, click the “+” button next to Selected Constant Fields and select “Create New”:
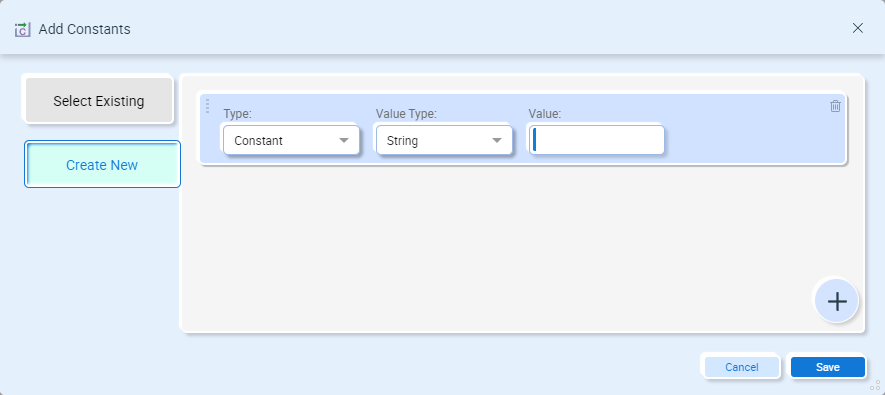
Enter the value and click the Save button. This constant will also be added to the main Data Mapper page and can be used anywhere else it is needed.
Variables
At the bottom of the Transformation Center you can add variables that can be used within this transformation. Variables can be used as inputs or outputs to most functions. To create a variable, click the “+” button next to “Variables”:
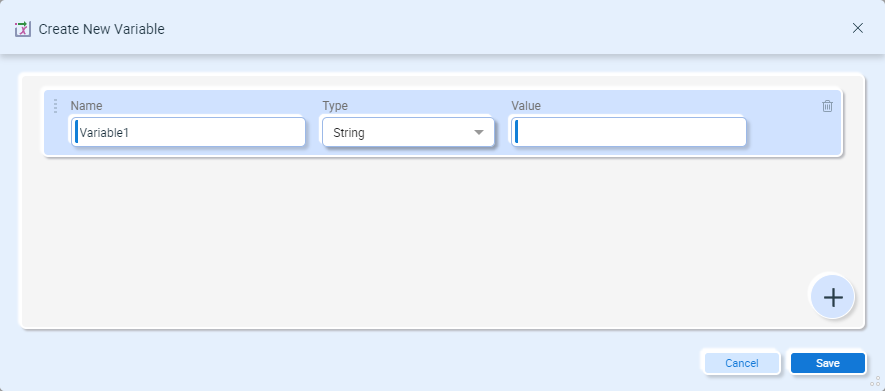
Provide each variable a name, type, and a default value. The default value is required. You can add multiple variables to the transformation, but variables cannot be shared between different individual mappings.
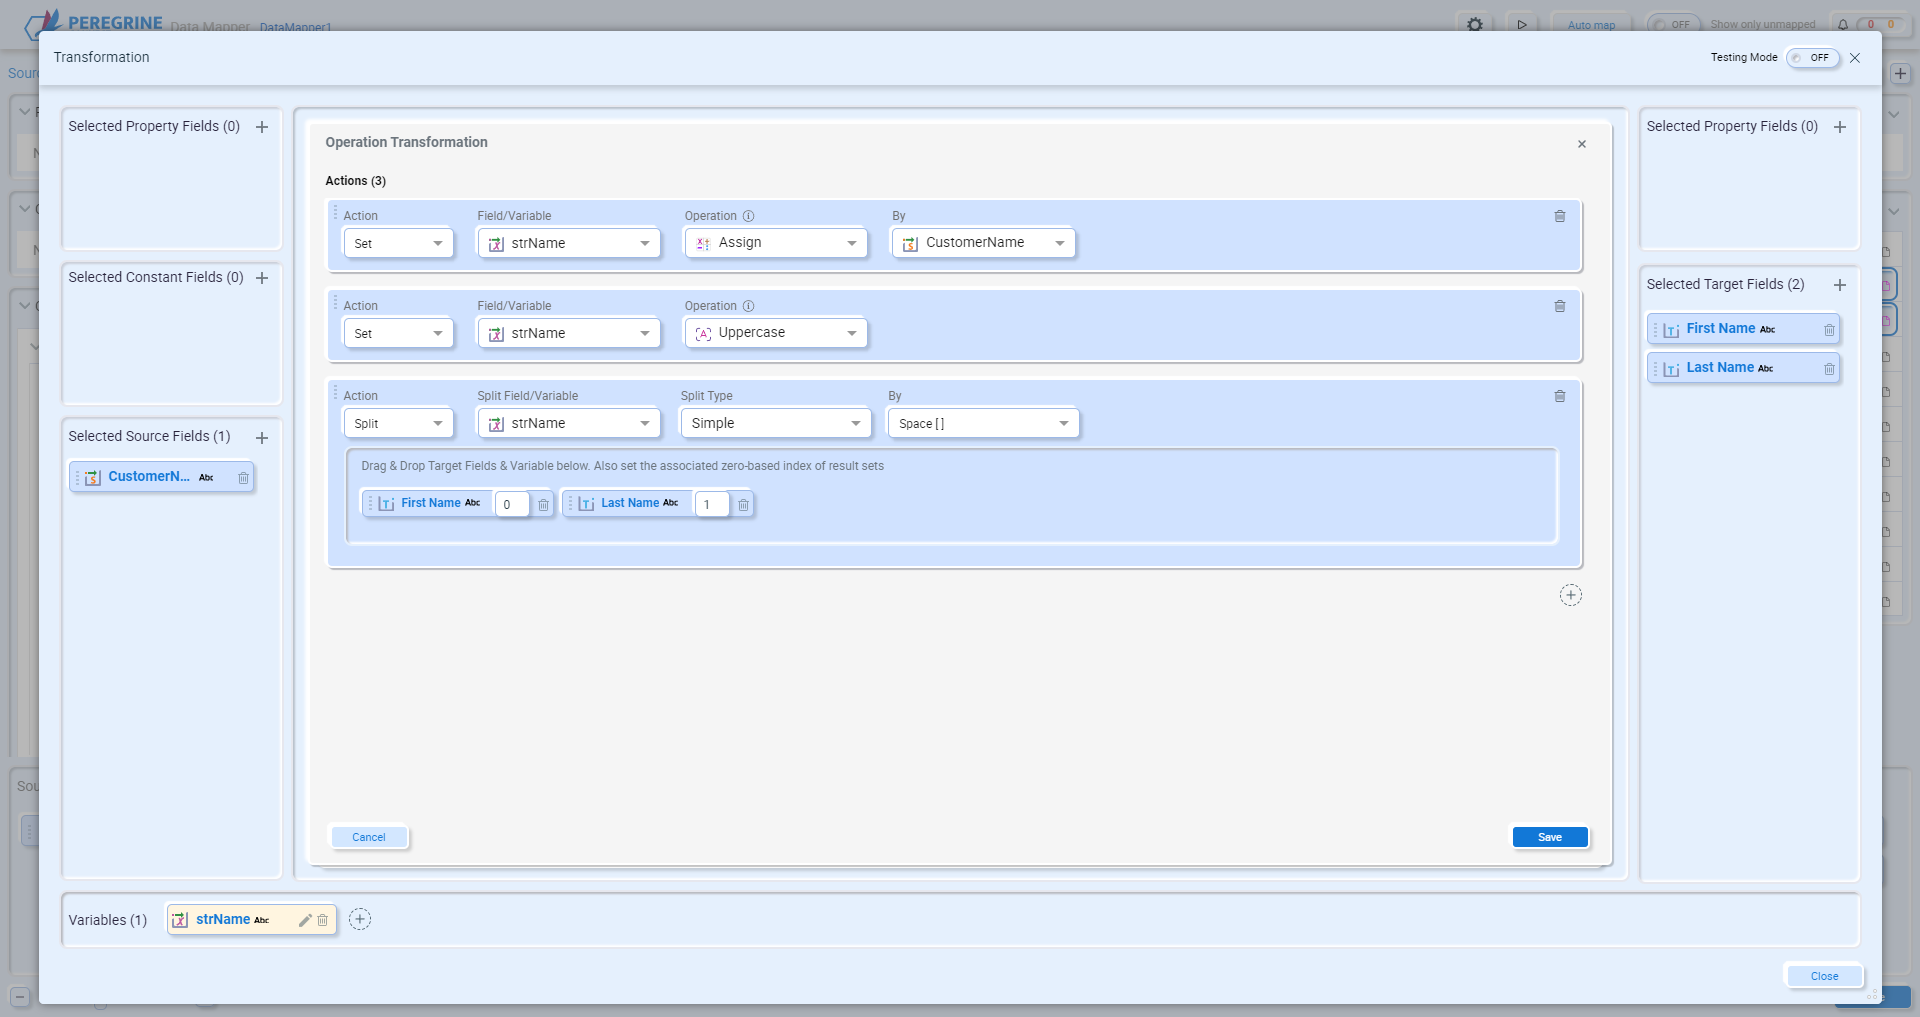
In the following transformation, a string variable called strName was added. In the Transformation actions, strName is assigned the value of the source field CustomerName, and then the value of strName is converted using the Uppercase function. Finally, the Split function is used to split the contents of strName into two target fields, First Name and Last Name:
Main Flow
The Main Flow tab of the Transformation Center is where you add all your transformation functions. To add a function, click the “+” button:
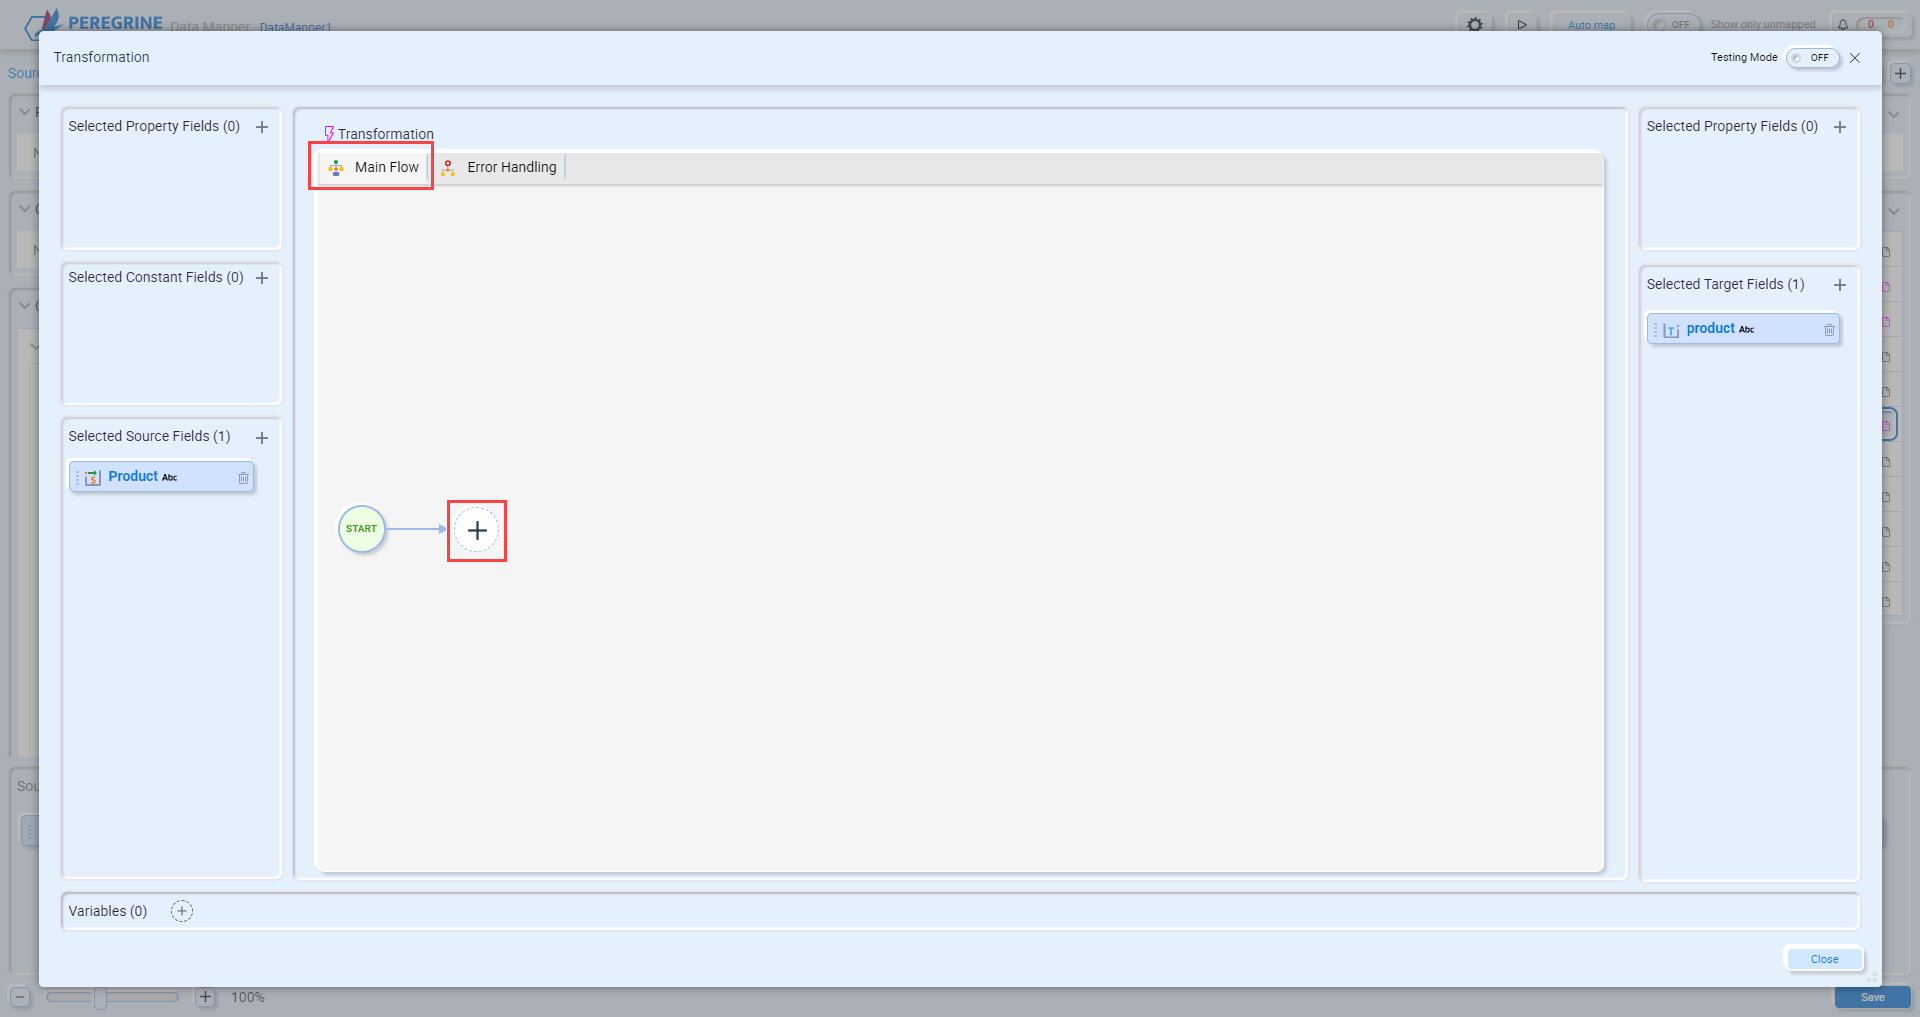
This will open the Select Function wizard allowing you to browse the list of available functions you can use. For more information, see the section Functions.
Transformations are a combination of simple and advanced functions. Simple functions, like Assign, Uppercase and Split, can be combined as demonstrated in the example above. However, each of these functions could also be defined separately:
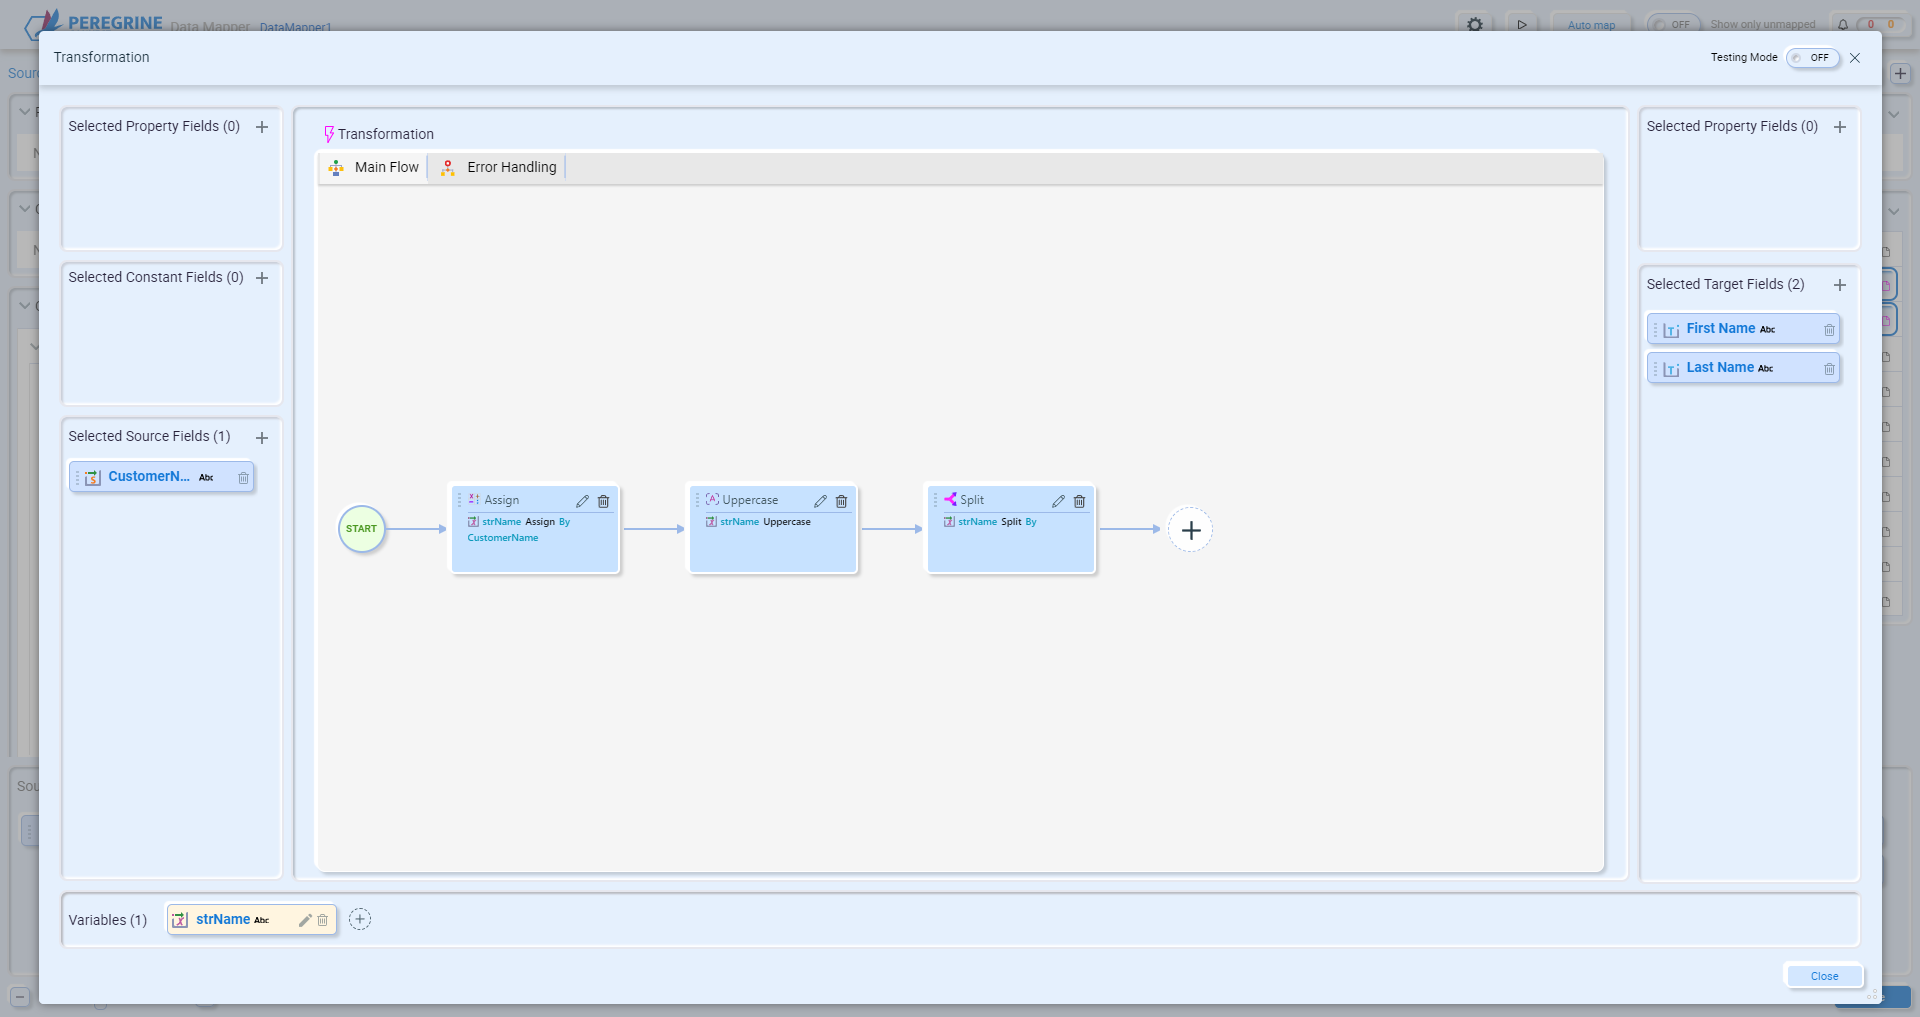
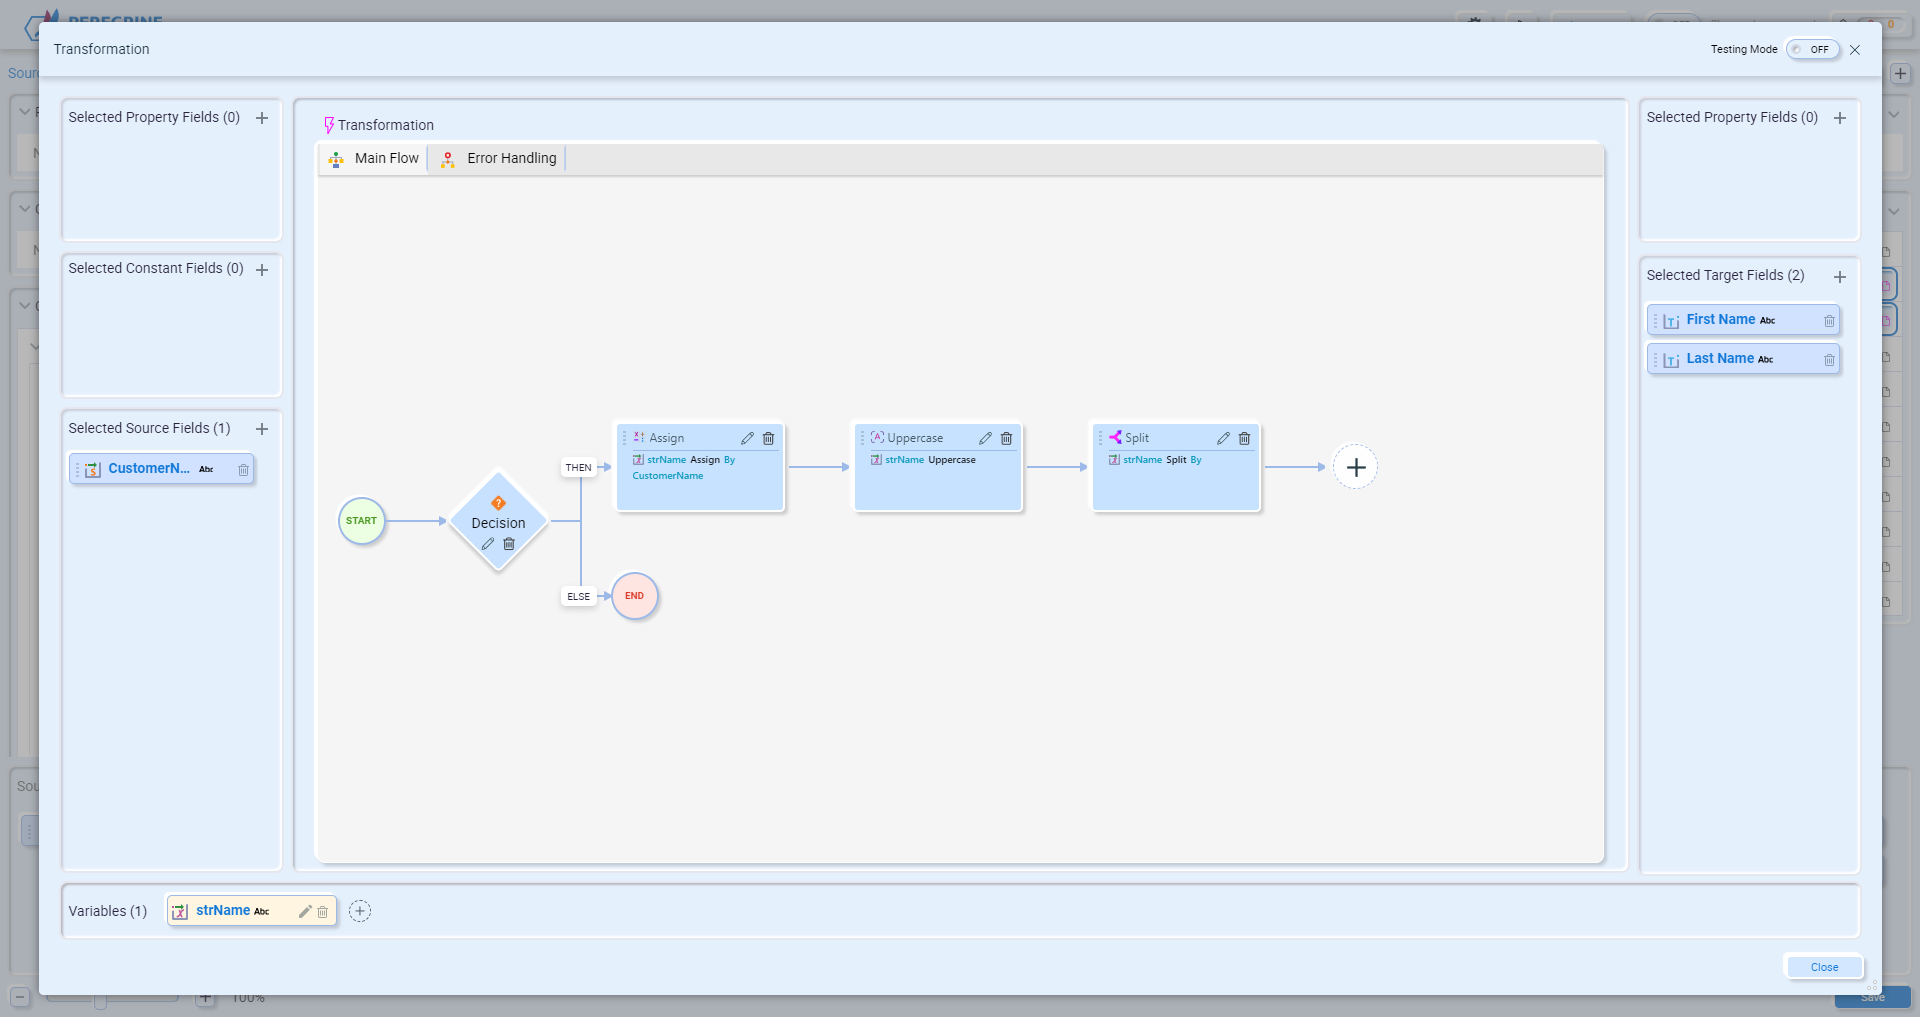
There is no right or wrong way to add multiple simple functions in a transformation. However, the advanced functions like Decision and Database Lookup, cannot be combined with other functions and must appear on the Main Flow individually:
Help
Clicking on the icon with symbol ![]() on the top right-hand corner of the shape title displays more help on that operation.
on the top right-hand corner of the shape title displays more help on that operation.
Error Handling
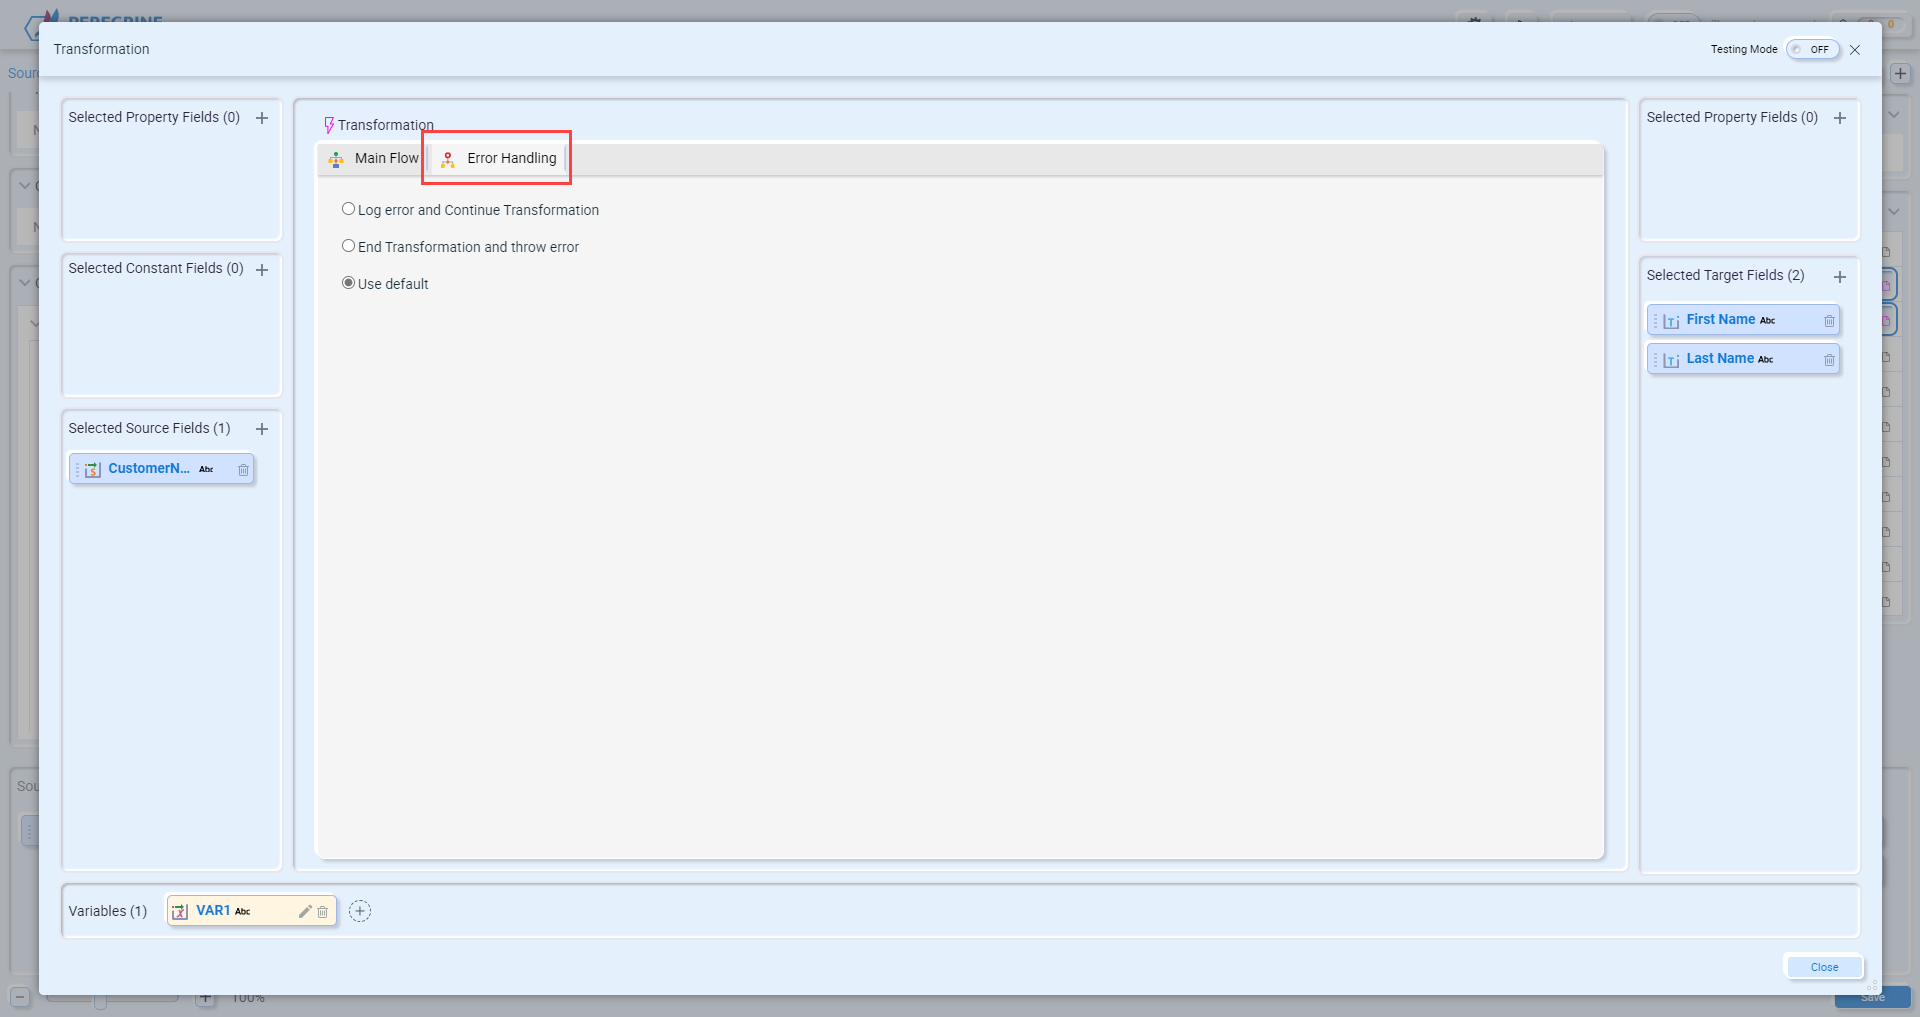
The error handling tab of the Transformation Center is where you can set how transformation errors are handled by the Data Mapper.
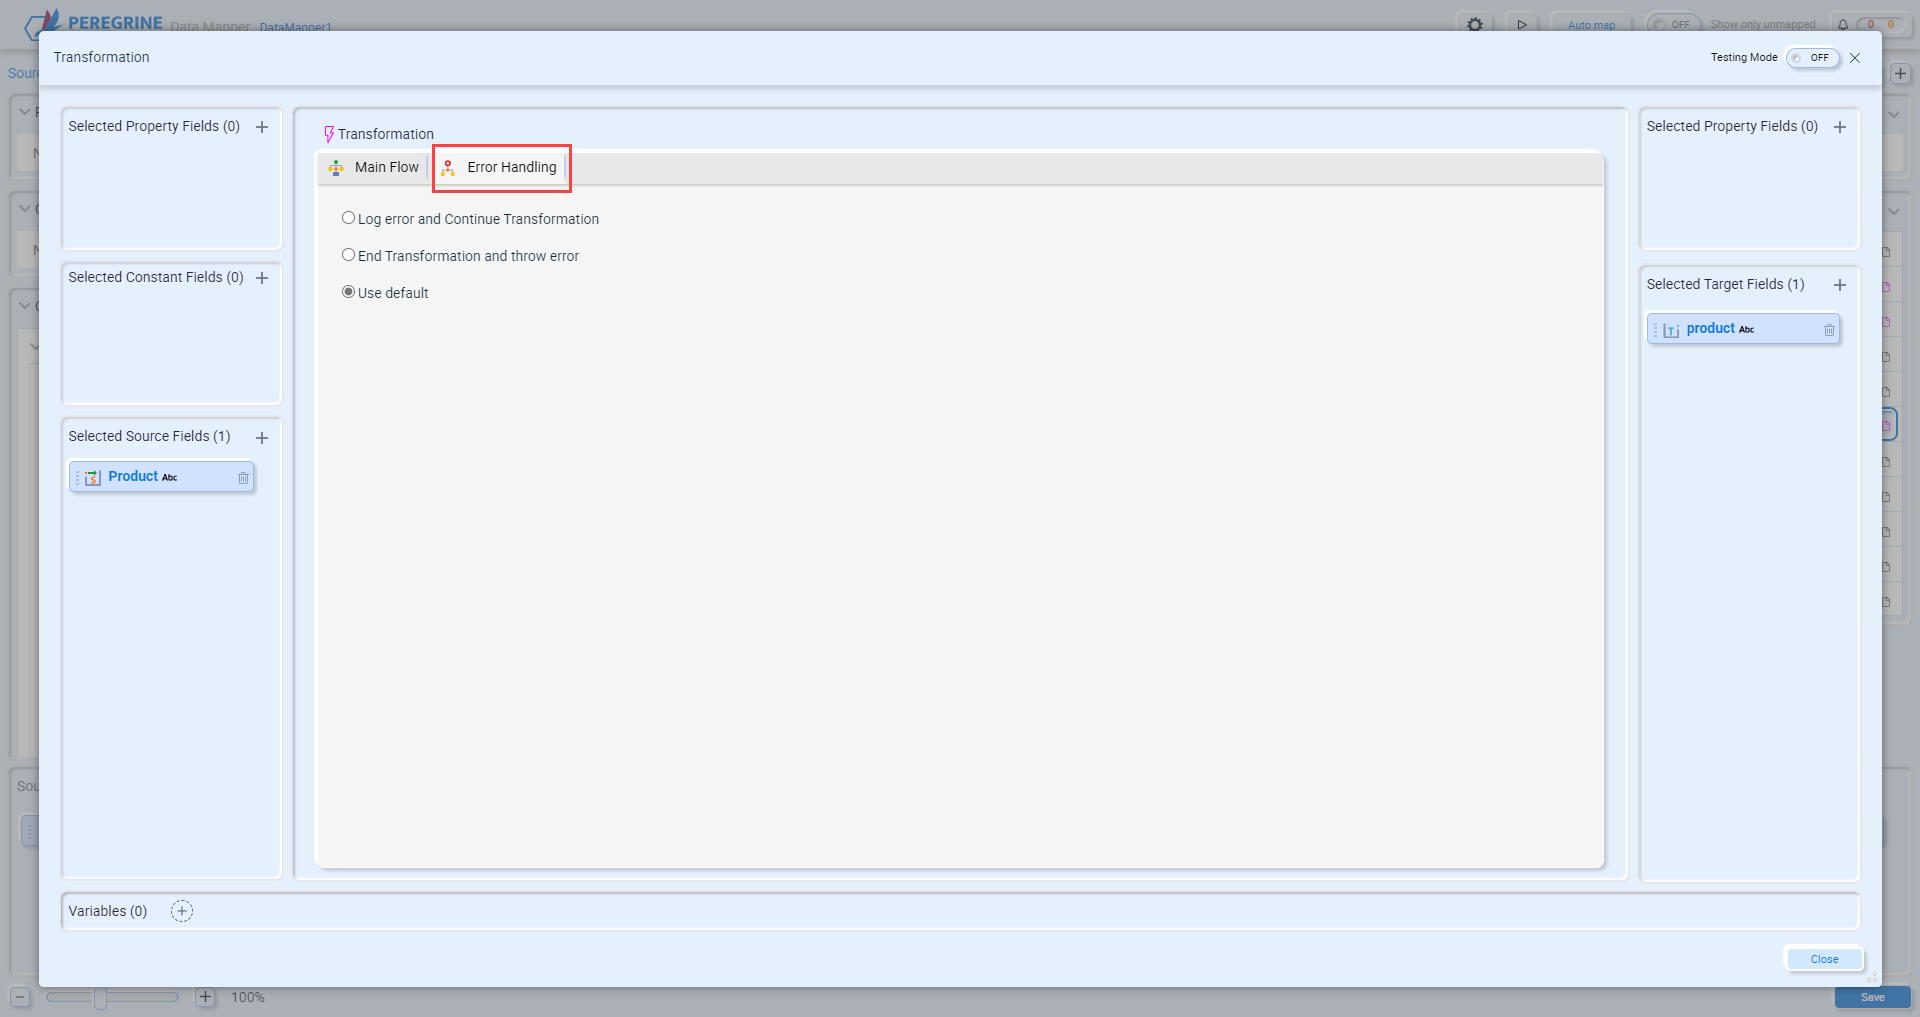
These settings are specific to this transformation. You can decide that any errors will be logged, but the Data Map will continue to execute or you can decide that if this transformation fails, an exception should be thrown and the Data Map will not continue. See the section Handling Errors for more information.
Functions
Transformations consist of one or more functions. There are 8 different types of functions:
- Operation Transformations
- Set Variable
- Decision
- If Condition
- Table Looping
- Database Lookup
- C# Custom Script
- External Assembly
- Custom Expression
- Custom Functions
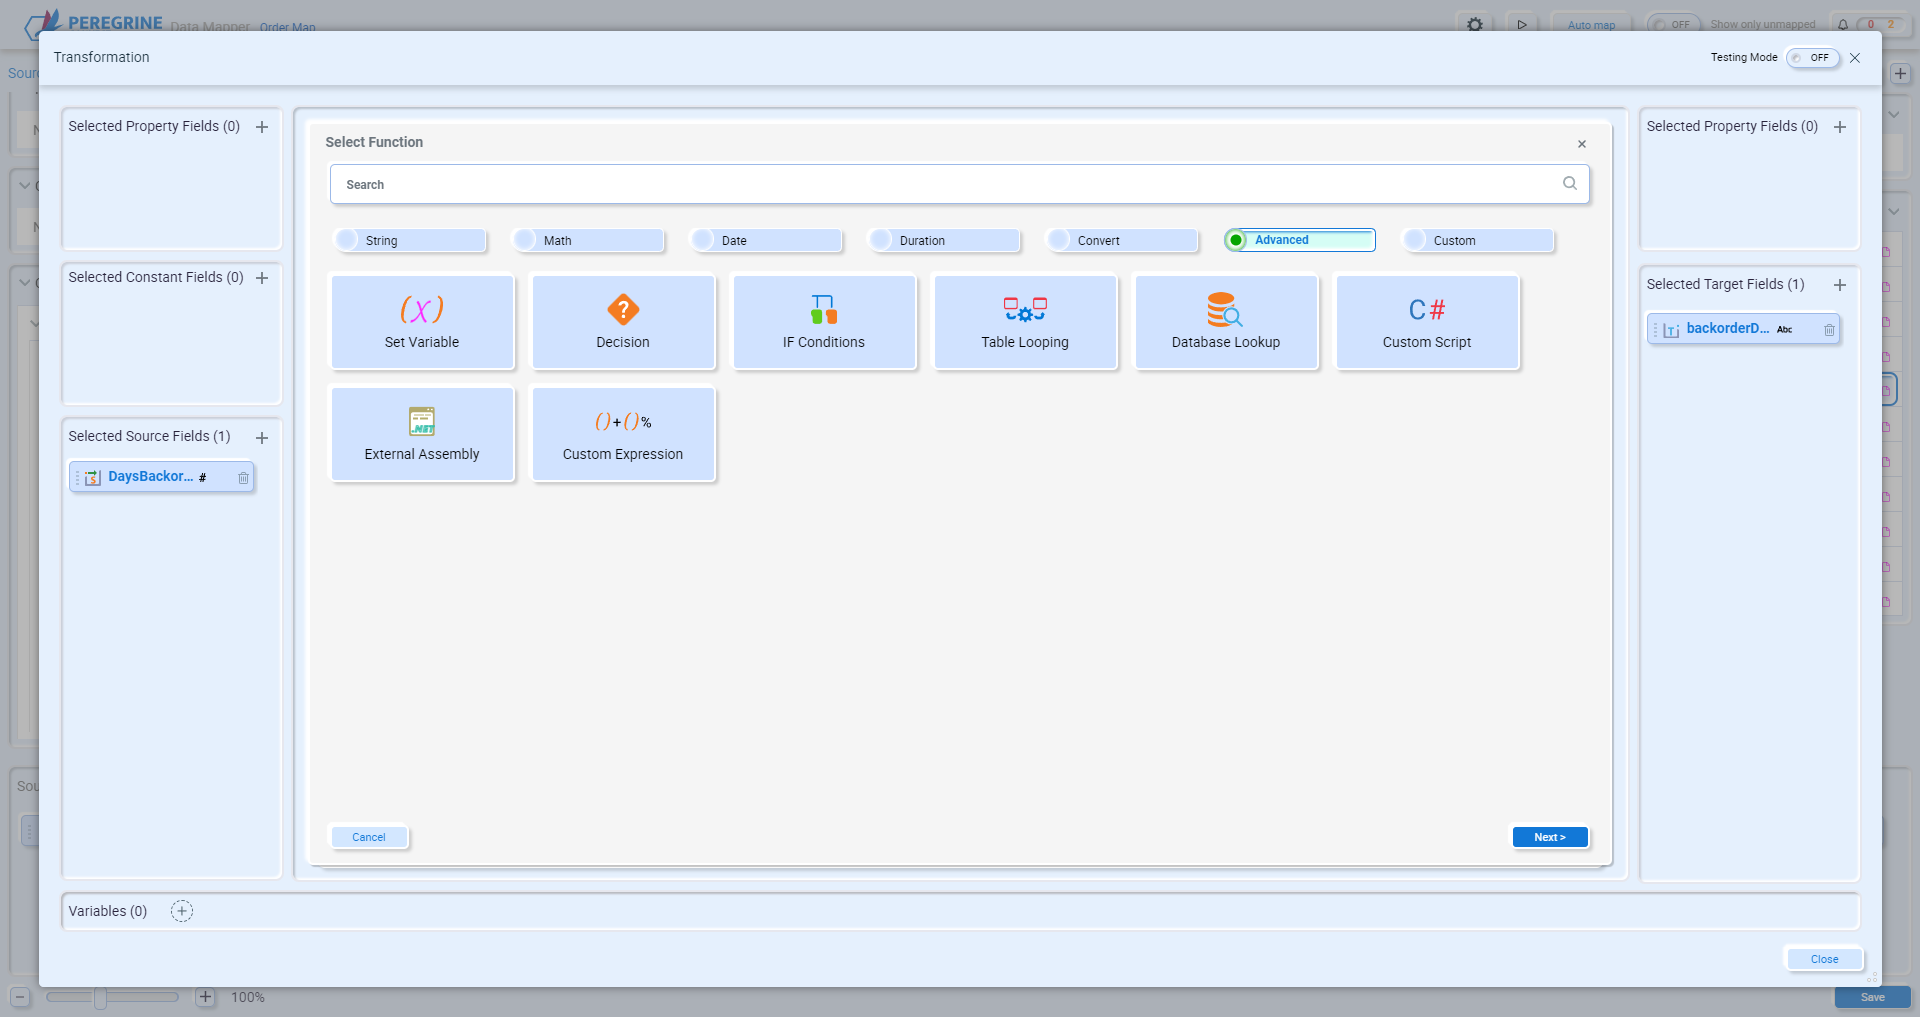
The String, Math, Date, Duration and Convert functions are all considered Operation Transformations. The other function types can be found in the Advanced and Custom groups.
Operation Transformations
Operation Transformation functions perform basic logic with Set, Split and Concat actions. Set actions are used to perform String, Math, Date, Duration and Conversion operations. The Split action is used to split the contents of a field or variable into multiple outputs. The Concat action is used to combine multiple fields or variables into a single field or variable.
An Operation Transformation function consists of one or more Actions – which defines which operation to apply to which field or variable, along with any additional properties necessary to complete the operation. The Actions are performed in order from top to bottom. For example, this is an example of a single Operation Transformation function consisting of a Set (Uppercase) and a Split Action:
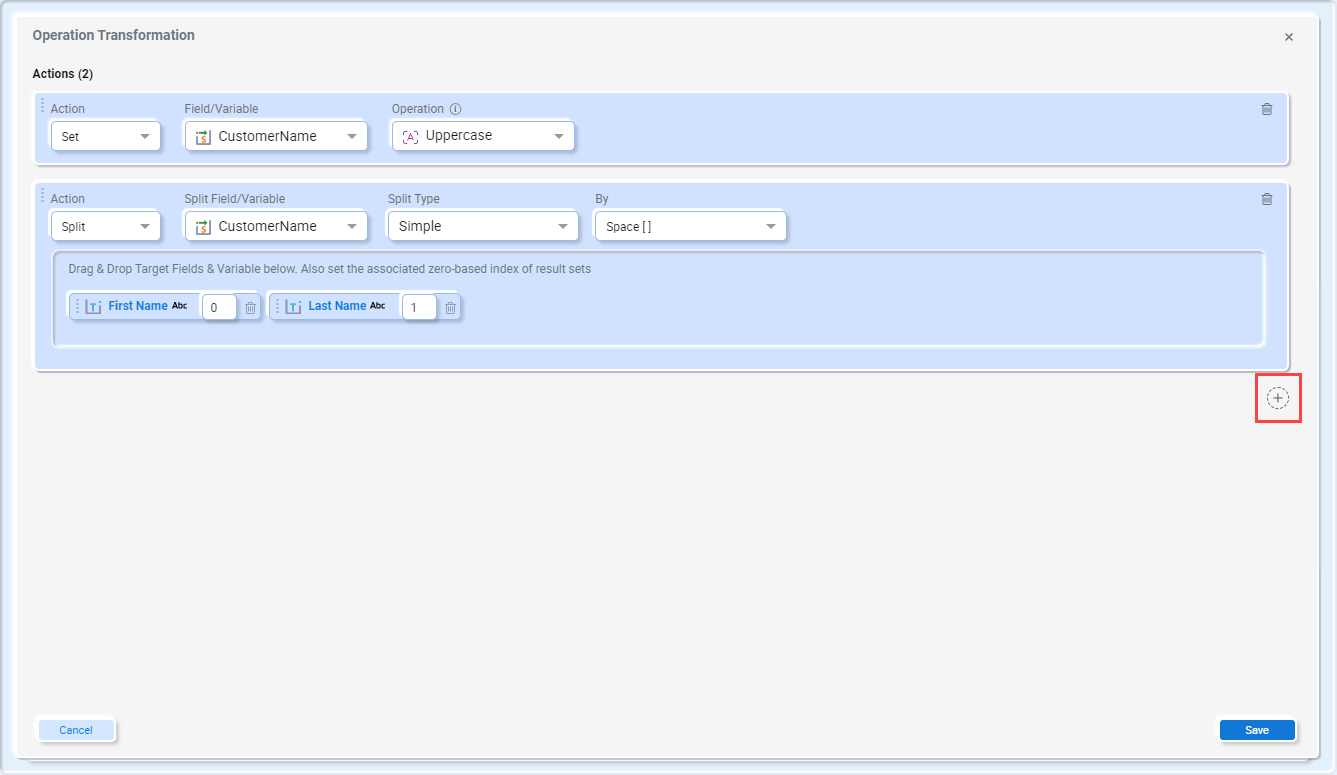
In this example, the Uppercase operation is applied to the customerName source field. Then the Split Action is applied to the customerName field, with the results being applied to the First Name and Last Name target fields.
Typically, if you only need to perform Set, Split or Concat actions in your transformation, you only need one function with all the Actions included in it. However, this Operation Transformation could also have been defined across two separate functions, one containing the Set and the other containing the Split.
Actions can be added to an existing Operation Transformation function by clicking the “+” button and can be deleted by clicking the garbage can icon on the Action to delete. Actions can also be reordered by dragging them into the desired order.
Set Variable
The Set Variable advanced function is a shortcut to the Assign function from the Math functions list. It’s included in the Advanced functions list because it supports assigning values to any type – strings, numbers, Boolean, etc. When selecting the Set Variable function and clicking Next, you’ll get the Operation Transformation editor: 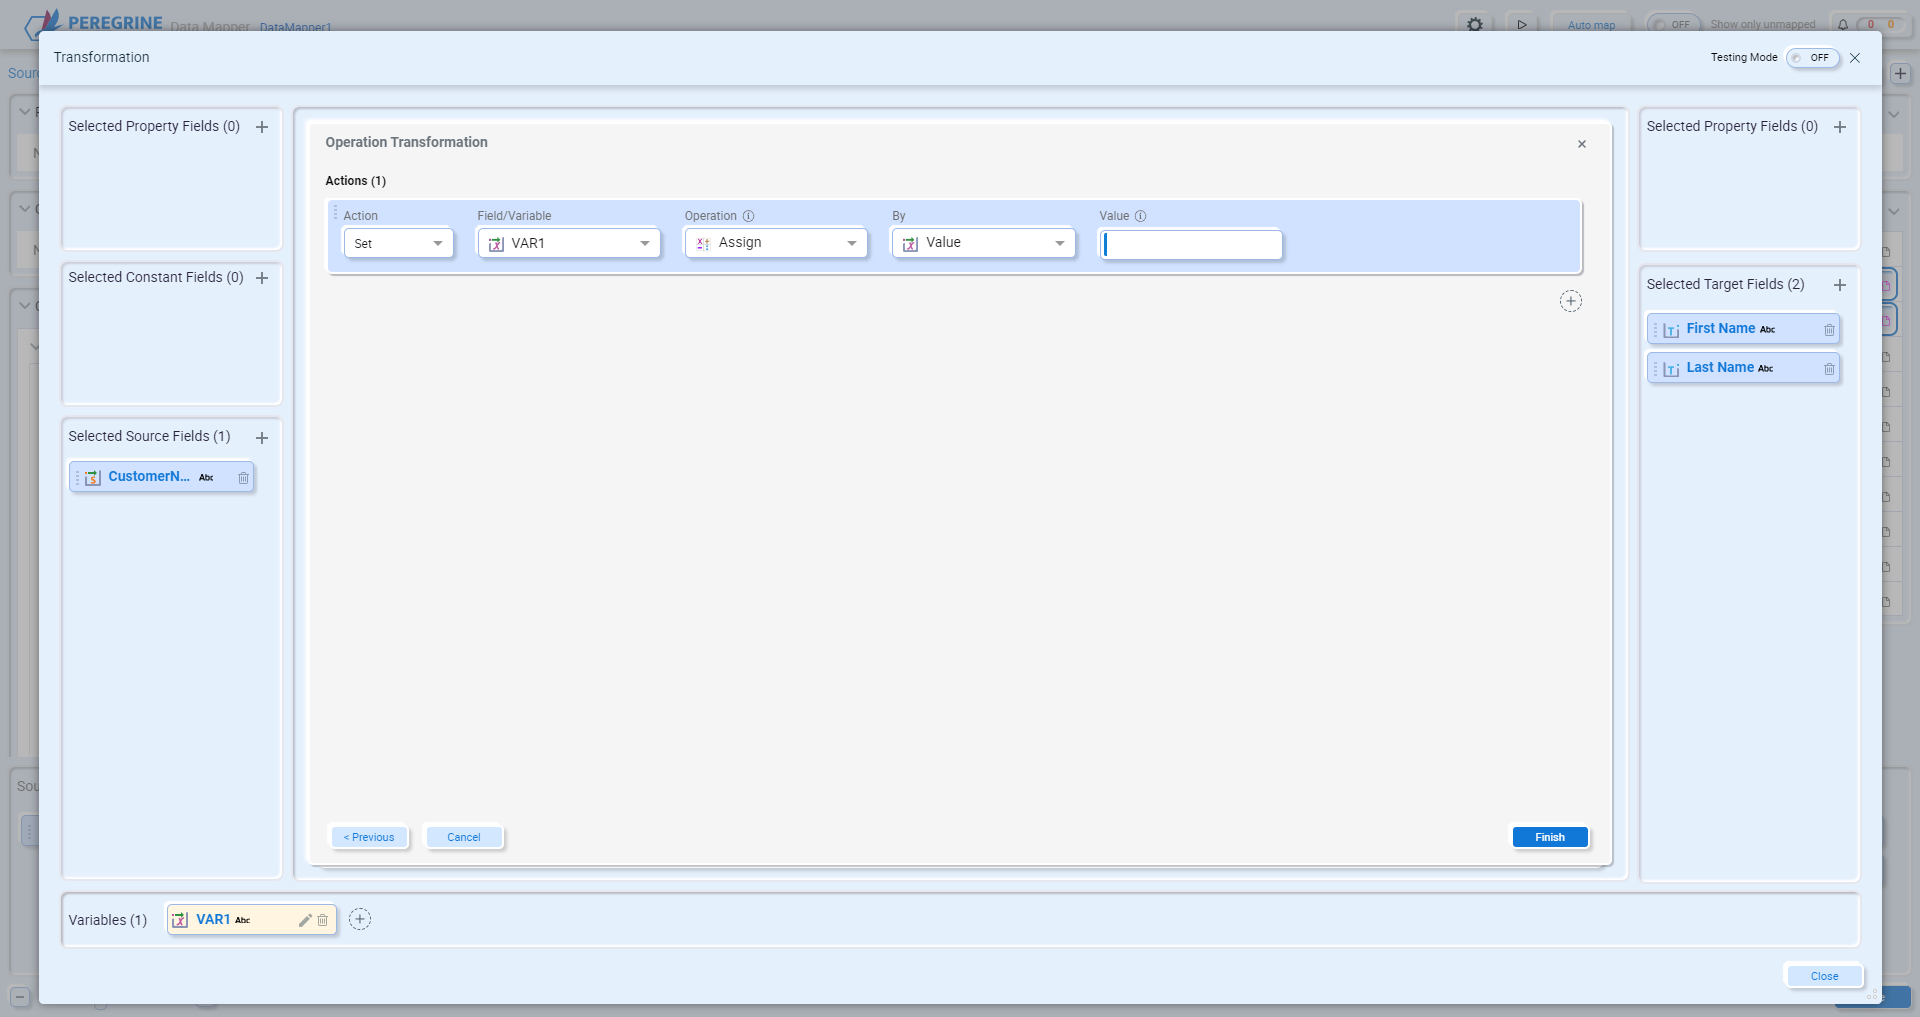
From here you can add any number of Actions to perform on the source or target fields.
Decision
The Decision function is a graphical If-then-else operation that can added directly to the Transformation Editor. It can be used to create different flows for the mapping based on the content. When selecting the Decision function, you are initially asked to provide the condition(s) to check against:
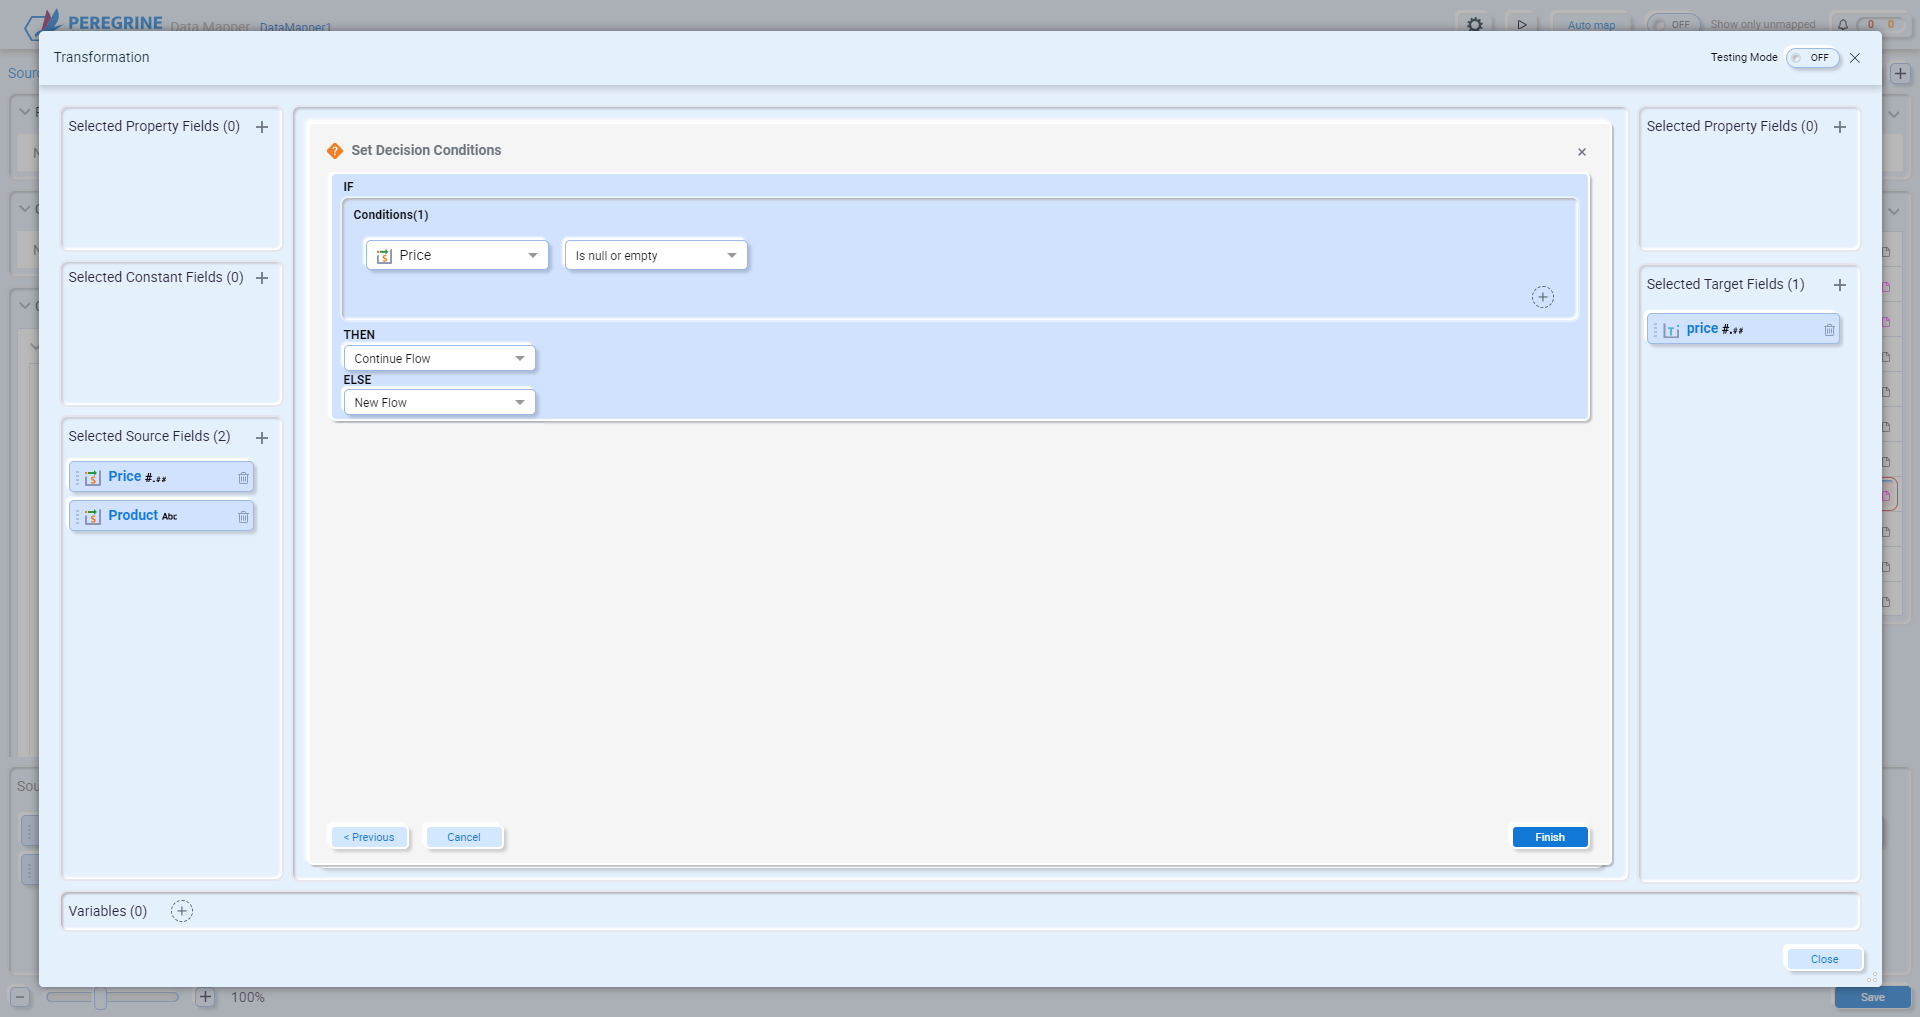
The “THEN” actions are “Continue Flow” and “End Flow”, and the “ELSE” actions are “New Flow” and “End Flow”. The “End Flow” option causes the mapping to end, with no value being mapped to the target field(s). Only one of “Then” and “Else” can select “End Flow”. The other must include a flow to map to the target field(s).
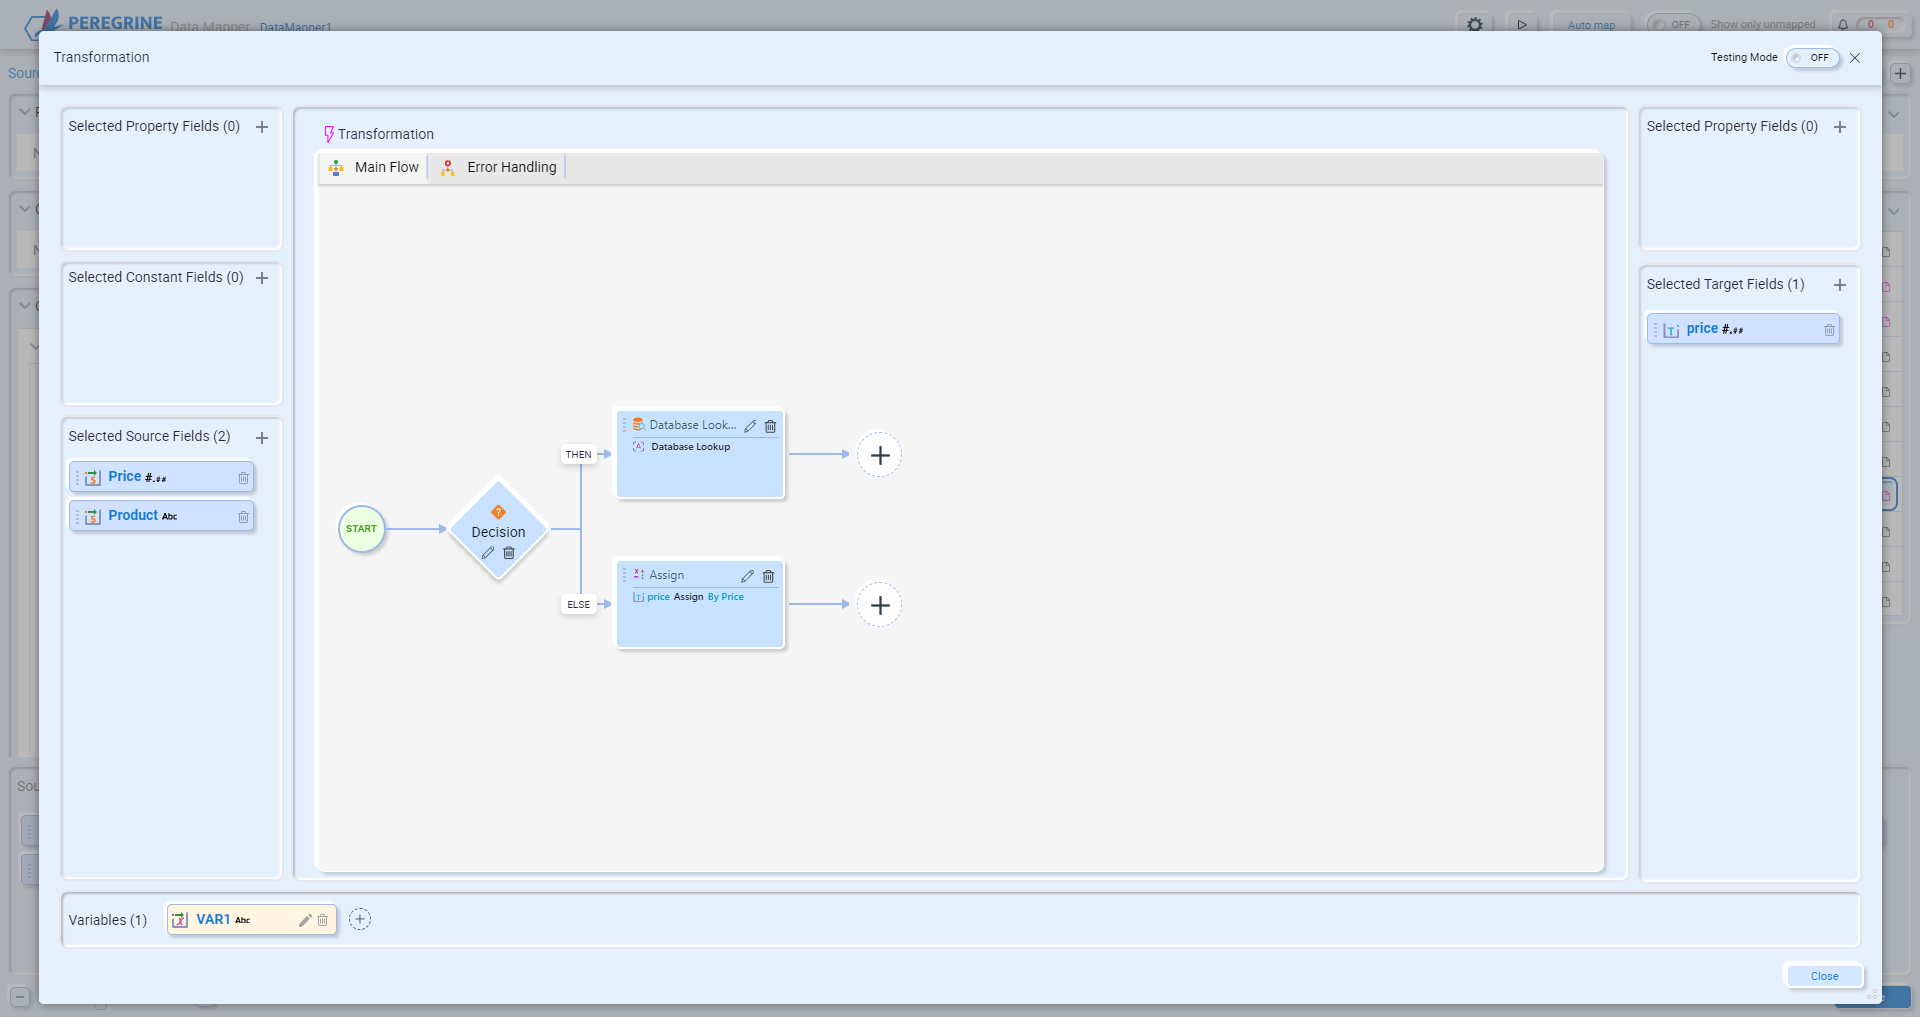
In the above example, the source document’s Price field is checked for being null or empty. For the “THEN” action the flow will continue and for the “ELSE” action a new flow will be created. Clicking the Finish button will display the new flow(s):
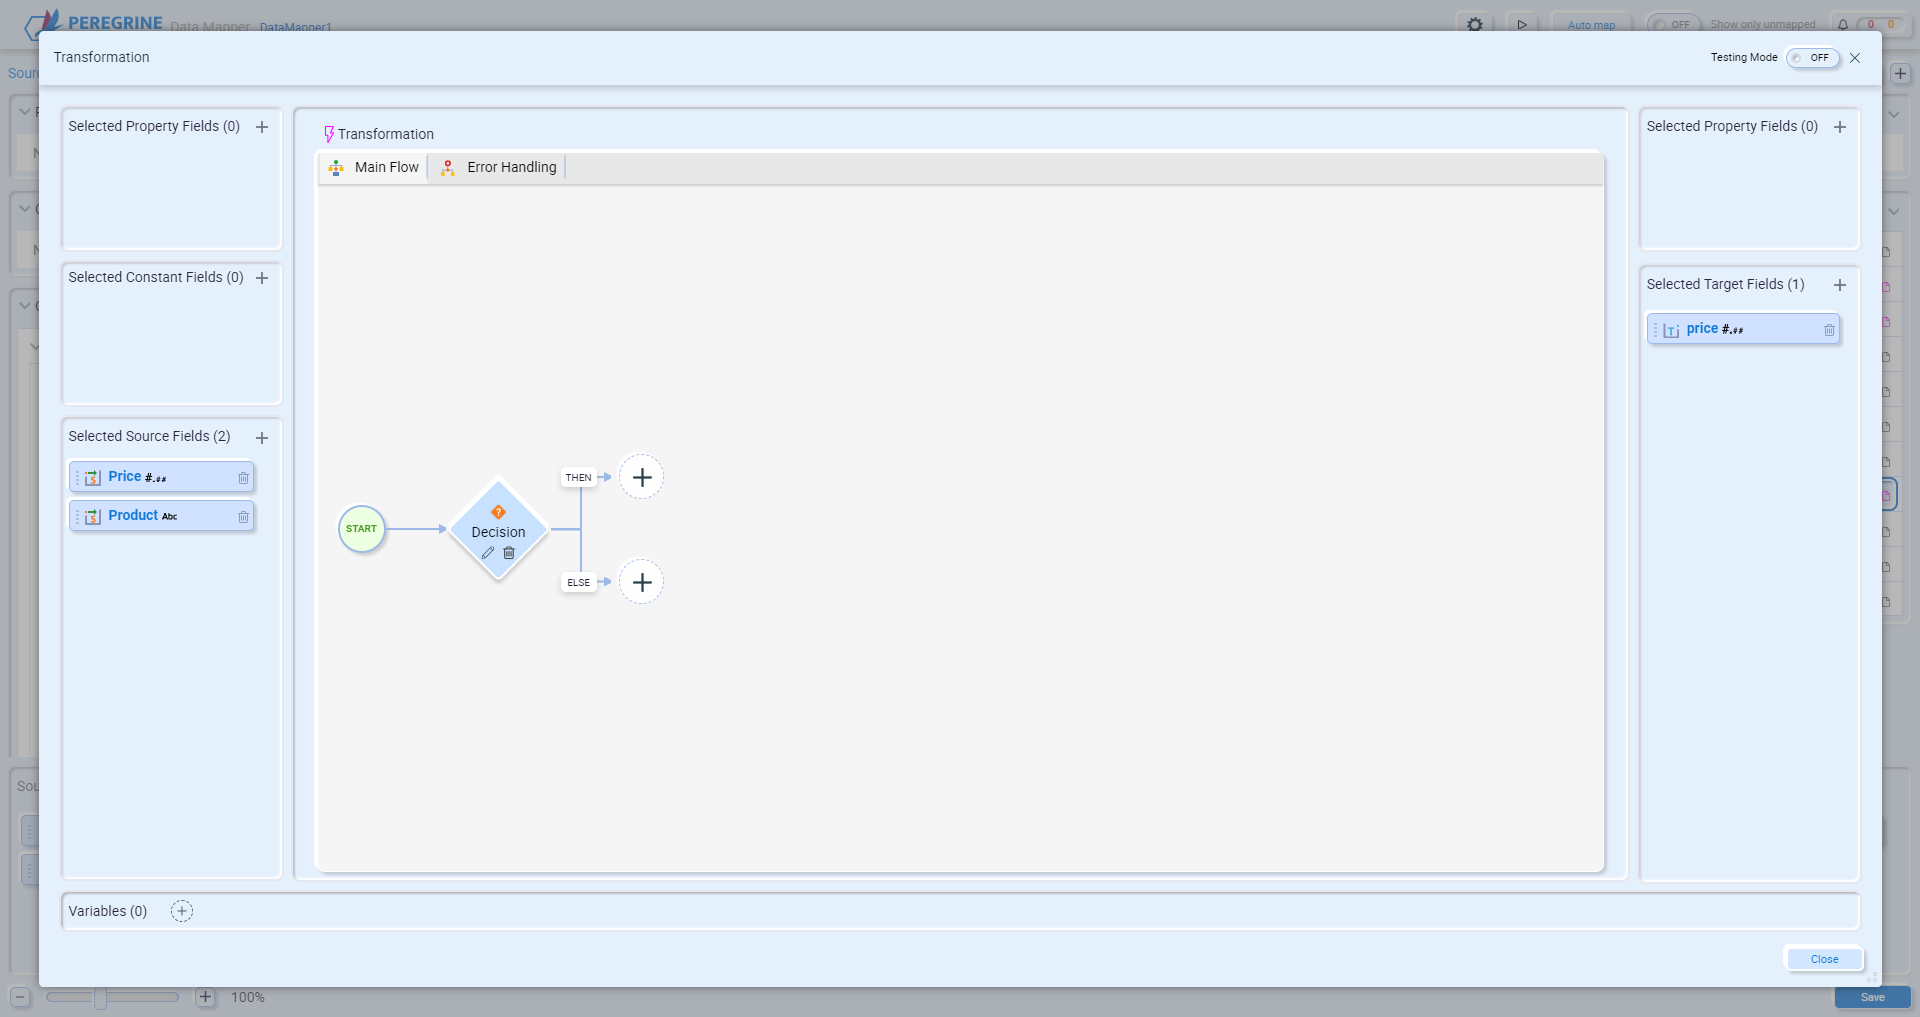
Based on the results of the condition, you can add additional functions to each flow. For example, if the Price is null or empty, you might want to perform a database lookup to retrieve the price, but if the source price contains a value, you can directly assign it to the target price:
If Condition
The If Condition function provides a no-code if-then-else operation. Use this condition to check the value of a field or variable, and then perform Actions in the “then” and “else” sections You can add multiple conditions to the “If” statement, with the option to match all the conditions, one of them or more:
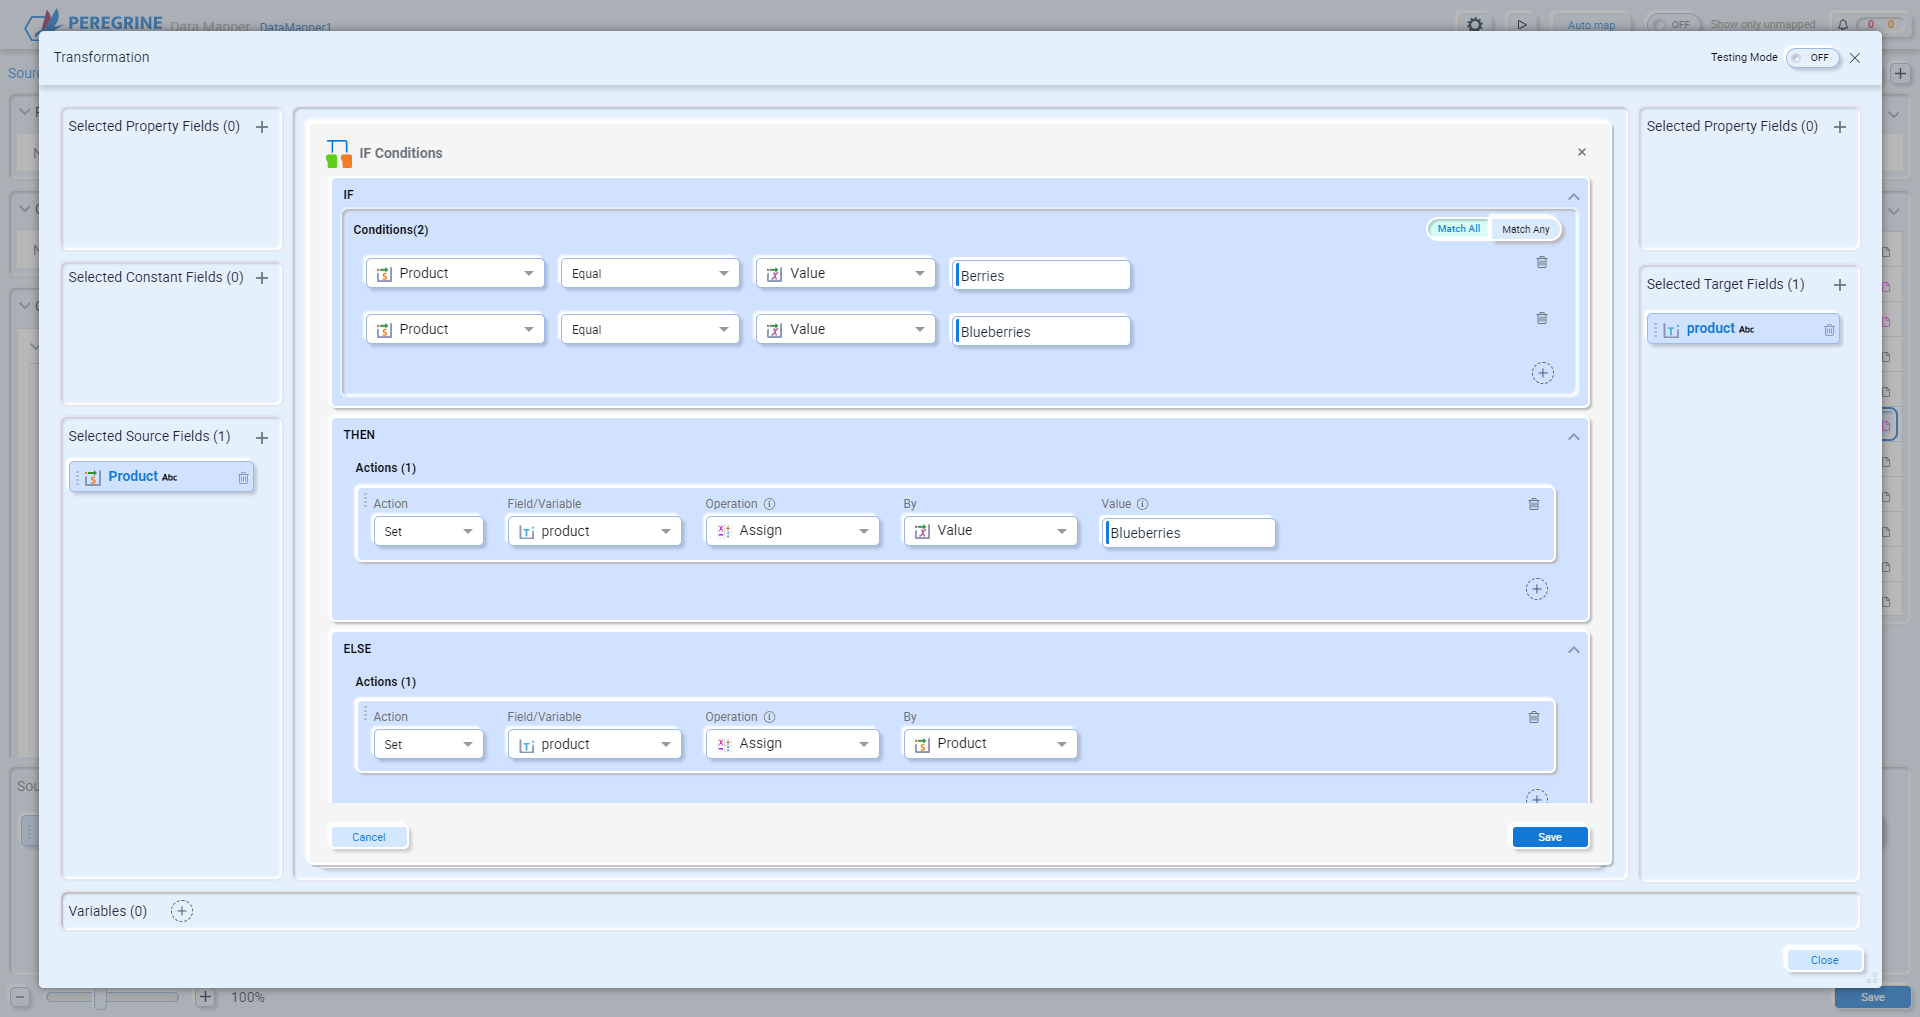
In the above example, if the source field “product” is equal to “Berries” or “Blueberries”, then the target field “product” will be set to “Blueberries”. Otherwise, the target field “product” will be set to the same values as the source field “product”.
The biggest difference between the Decision function and the IF Conditions is that the Decision function allows you to add advanced operations such as a Database Lookup or Custom Script to the Transformation, whereas the IF Conditions allow for the use of simple Operation Transformations (Split, Concat and Set functions).
Table Looping
In the context of data mapping, table looping refers to the conversion of relatively flat data into a repeating, structured format. For example, the following input JSON contains two addresses:
{
   "BillingStreet": "200 Spectrum Center Dr.",
   "BillingCity": "Irvine",
   "BillingState": "CA",
   "BillingPostalCode": "92618",
   "BillingCountry": "USA",
   "ShippingStreet": "200 Spectrum Center Dr.",
   "ShippingCity": "Irvine",
   "ShippingState": "CA",
   "ShippingPostalCode": "92618",
   "ShippingCountry": "USA",
}
The desired output is JSON with an array of addresses:
{
   "addressBook": {
      "items": [
         {
            "addressBookAddress": {
               "city": "Irvine",
               "addr1": "200 Spectrum Center Dr.",
               "zip": "92618",
               "country": {
                  "id": "USA"
               },
               "state": "CA"
            },
            "defaultShipping": false,
            "defaultBilling": true
         },
         {
            "addressBookAddress": {
               "city": "Irvine",
               "addr1": "200 Spectrum Center Dr.",
               "zip": "92618",
               "country": {
               "id": "USA"
               },
               "state": "CA"
            },
            "defaultShipping": true,
            "defaultBilling": false
         }
      ]
   }
}
The table looping function provides a no-code solution for this type of scenario, providing you with a drag and drop UI that allows you to select all the source fields that need to be mapped, which target fields to map them to, and how to group them together.
Prior to using the Table Looping function, select the source and target fields that will be used in the function. You can select multiple source and target fields by holding the CTRL button while selecting each one. If you forget to select a source or target field you can always add them in the function wizard. After selecting the source and target fields, add a function to the Transformation Center, select the Table Looping function from the Advanced function list and click Next:
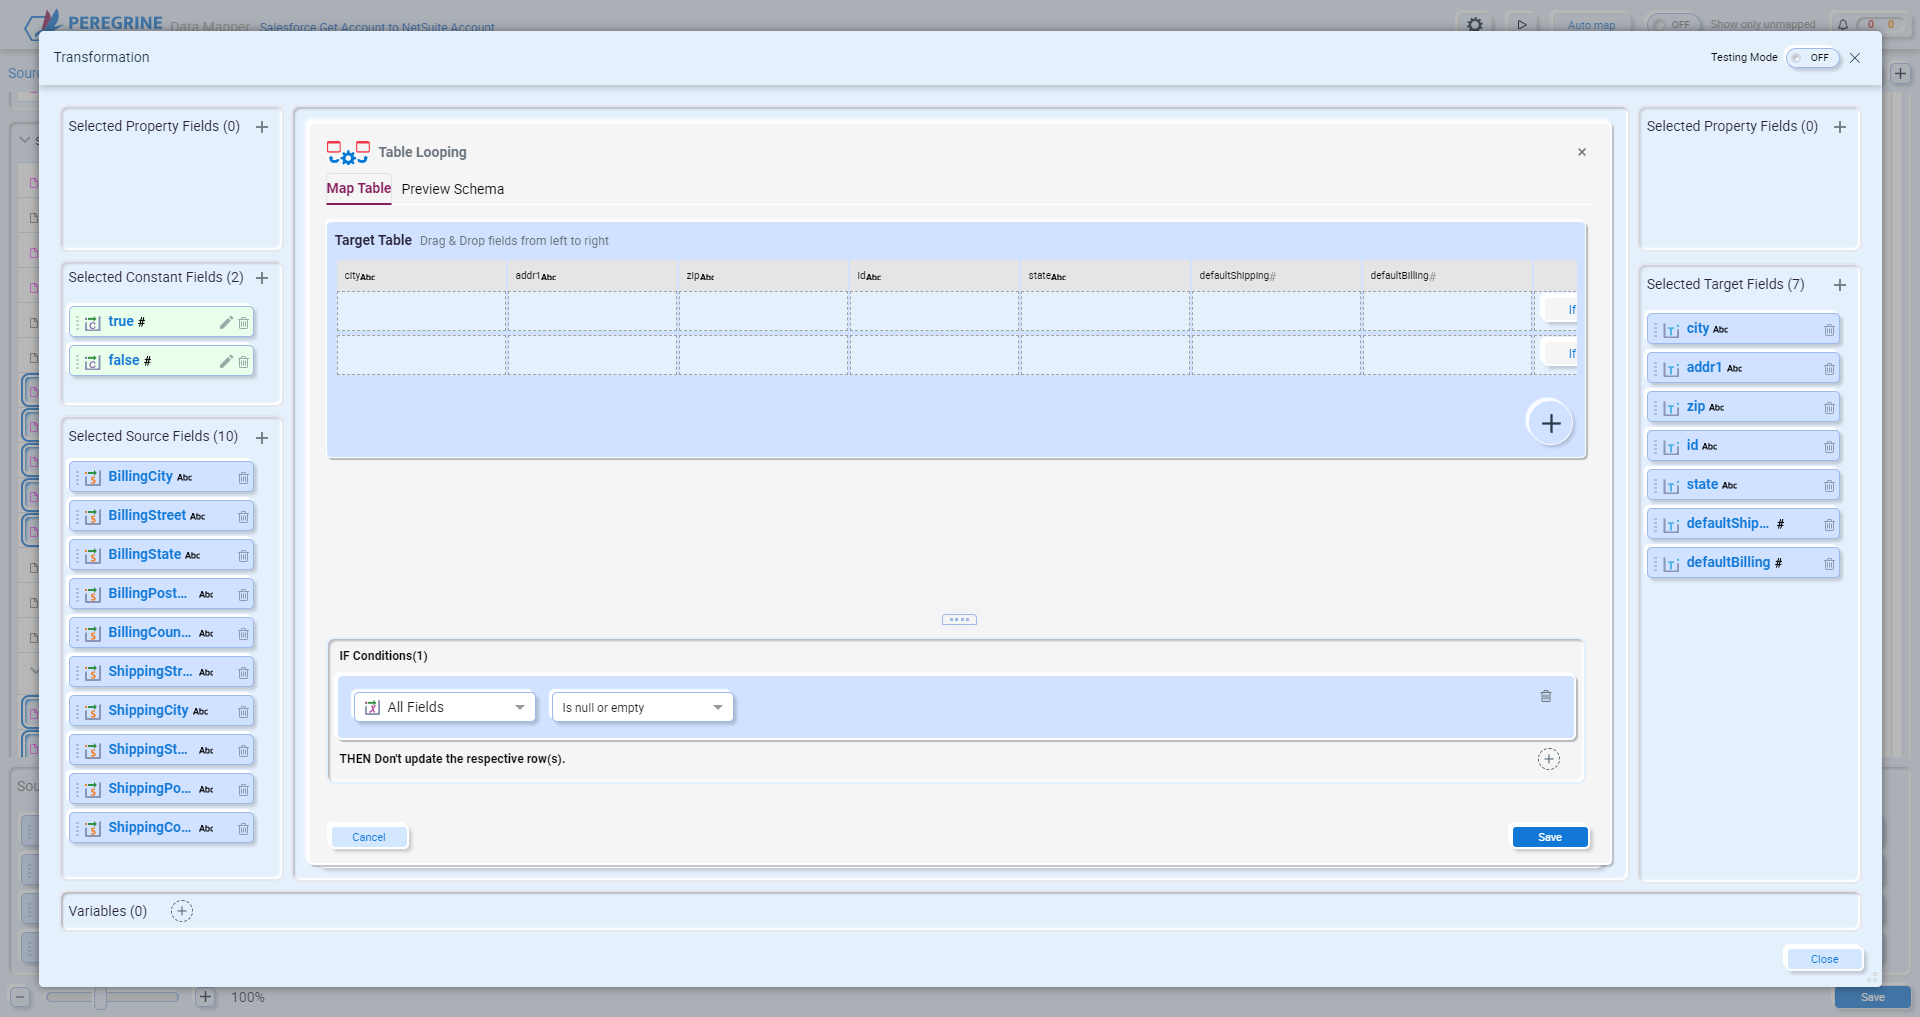
In this example, ten fields have been selected from the source document and two constant fields have been created. Seven fields have also been selected from the target document. The selected target fields are automatically displayed in the target table section of the screen. Adding or removing target fields will automatically refresh the target table.
Note – Variables cannot be used as target fields with the Table Looping function, and Target Property Fields, if used, will only contain the last value mapped to it as part of the table looping process.
From the list of Selected Property, Constant and Source fields, and any Variables included in the transformation, drag, and drop the fields onto the target table, with each row creating the required output structure:
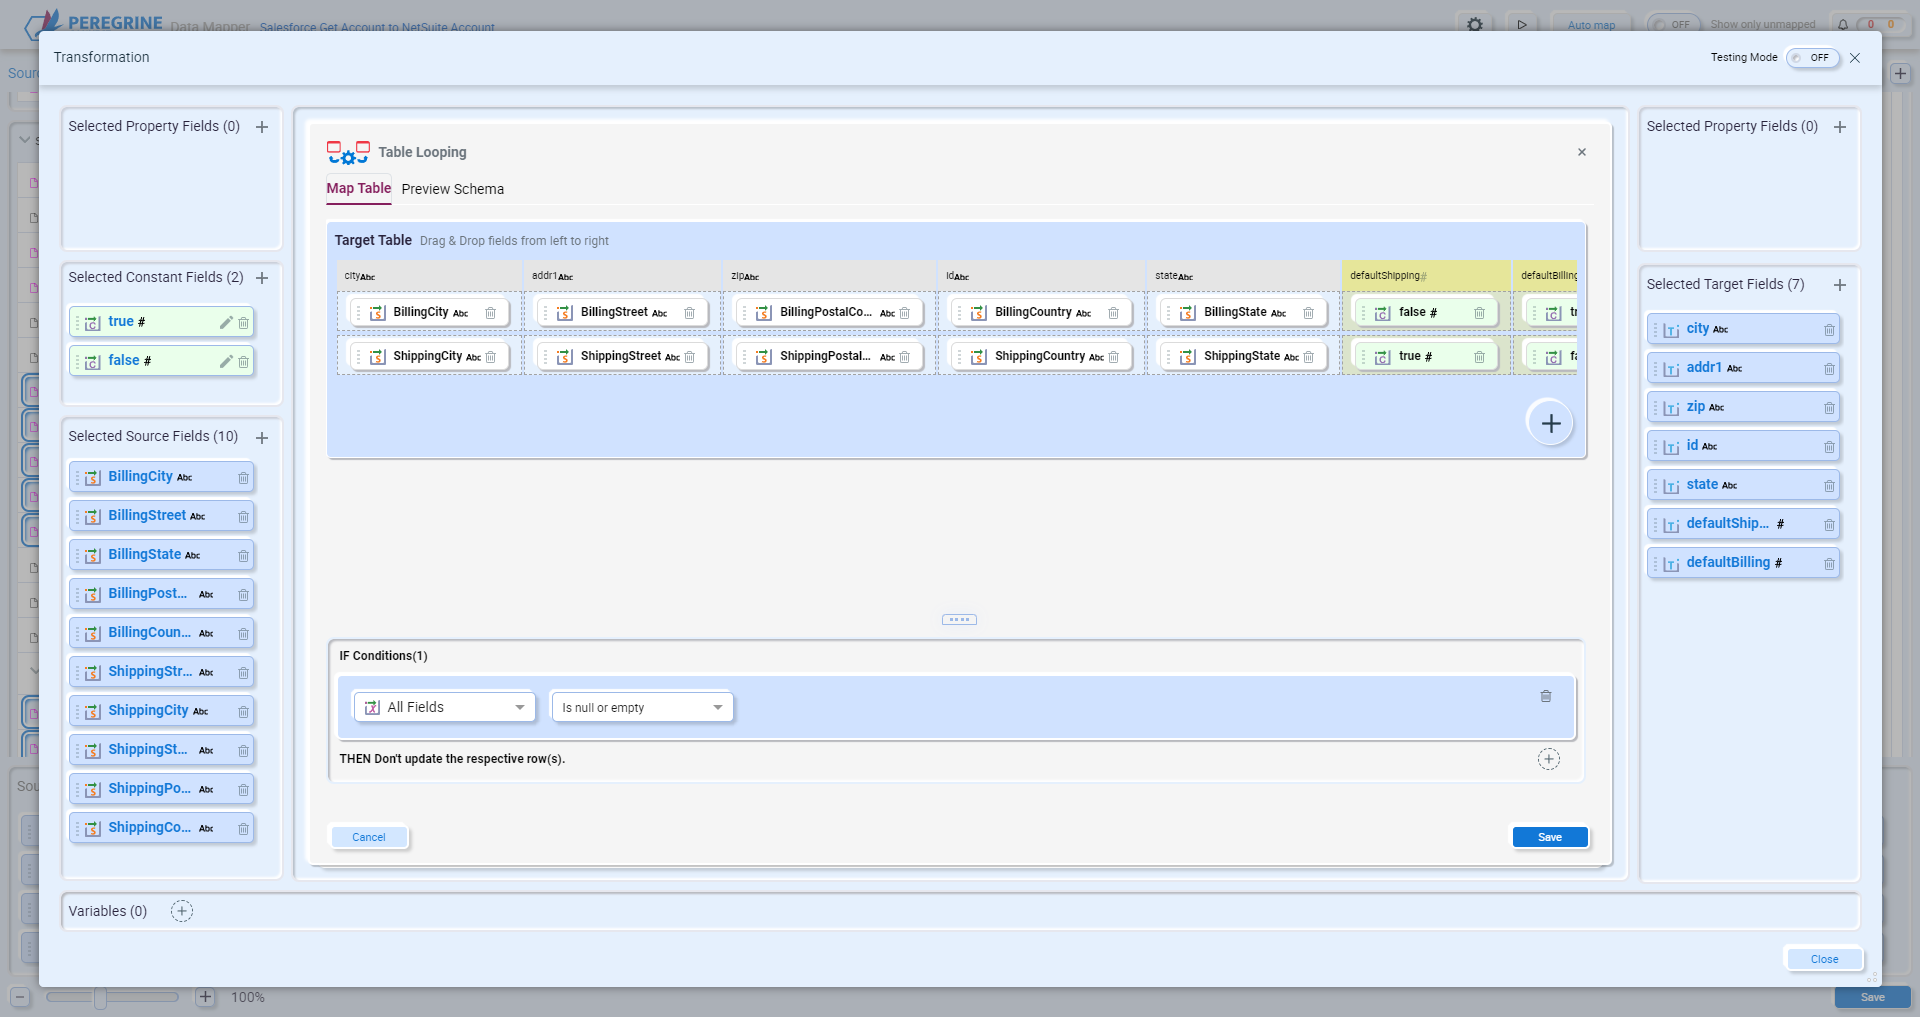
If additional target rows are required, click the plus “+” button in the Target Table.
There are two types of conditions that can be applied to the Table Looping function – conditions that apply to every row and conditions that apply to a single row. The conditions that are applied to every row are found directly below the Target Table area:

The above condition will be applied to each row – if all the fields are null or empty, then the row will not be included in the output. You can add or delete conditions. When using more than one condition you have the option to Match Any or Match All of the conditions to determine if the row will be included in the output.
The last column of the Target Table contains a button for row-level conditions. You can apply a condition to a specific row:

Clicking the If button will display the Row Condition editor:
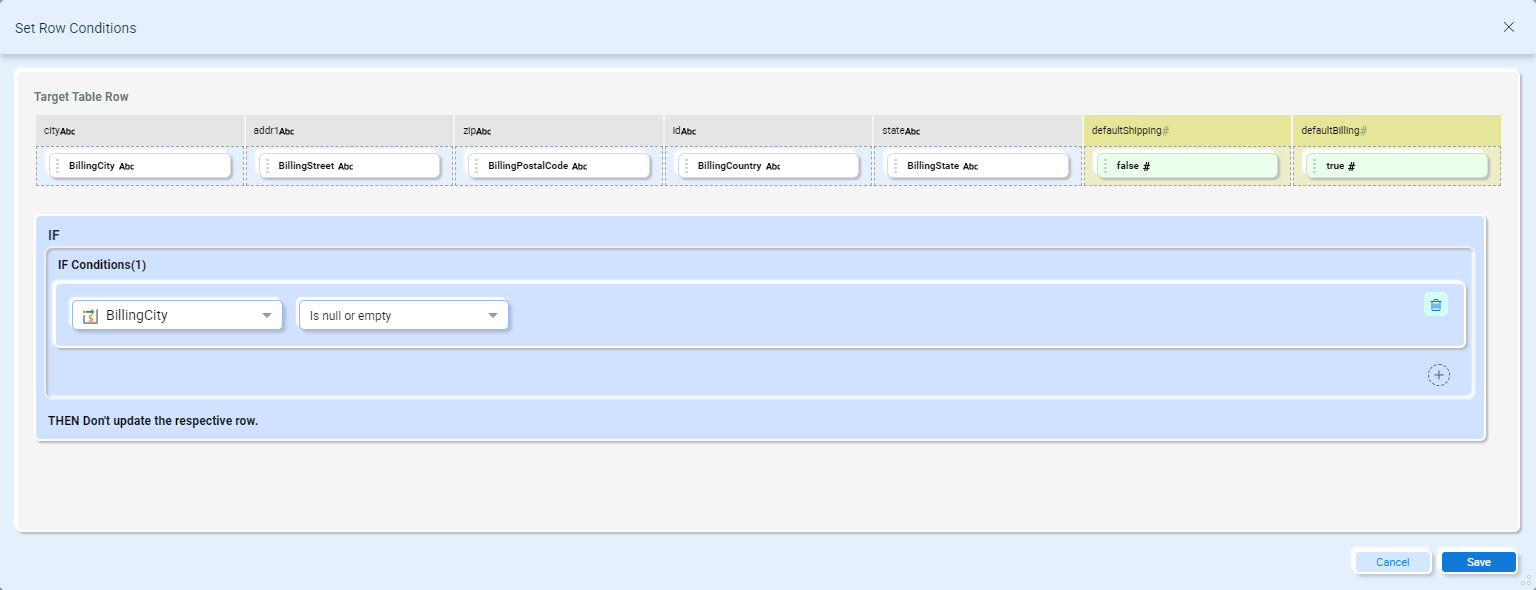
Here you can set a condition that applies only to the specific row. In this example, if the BillingCity source field is null or empty, don’t output the row. When you are done adding row conditions, click the Save button.
When you are done editing the Table Looping function, click the Save button. To see the results of the Table Looping function, enable Testing Mode and enter the source values. Click start to see the results:
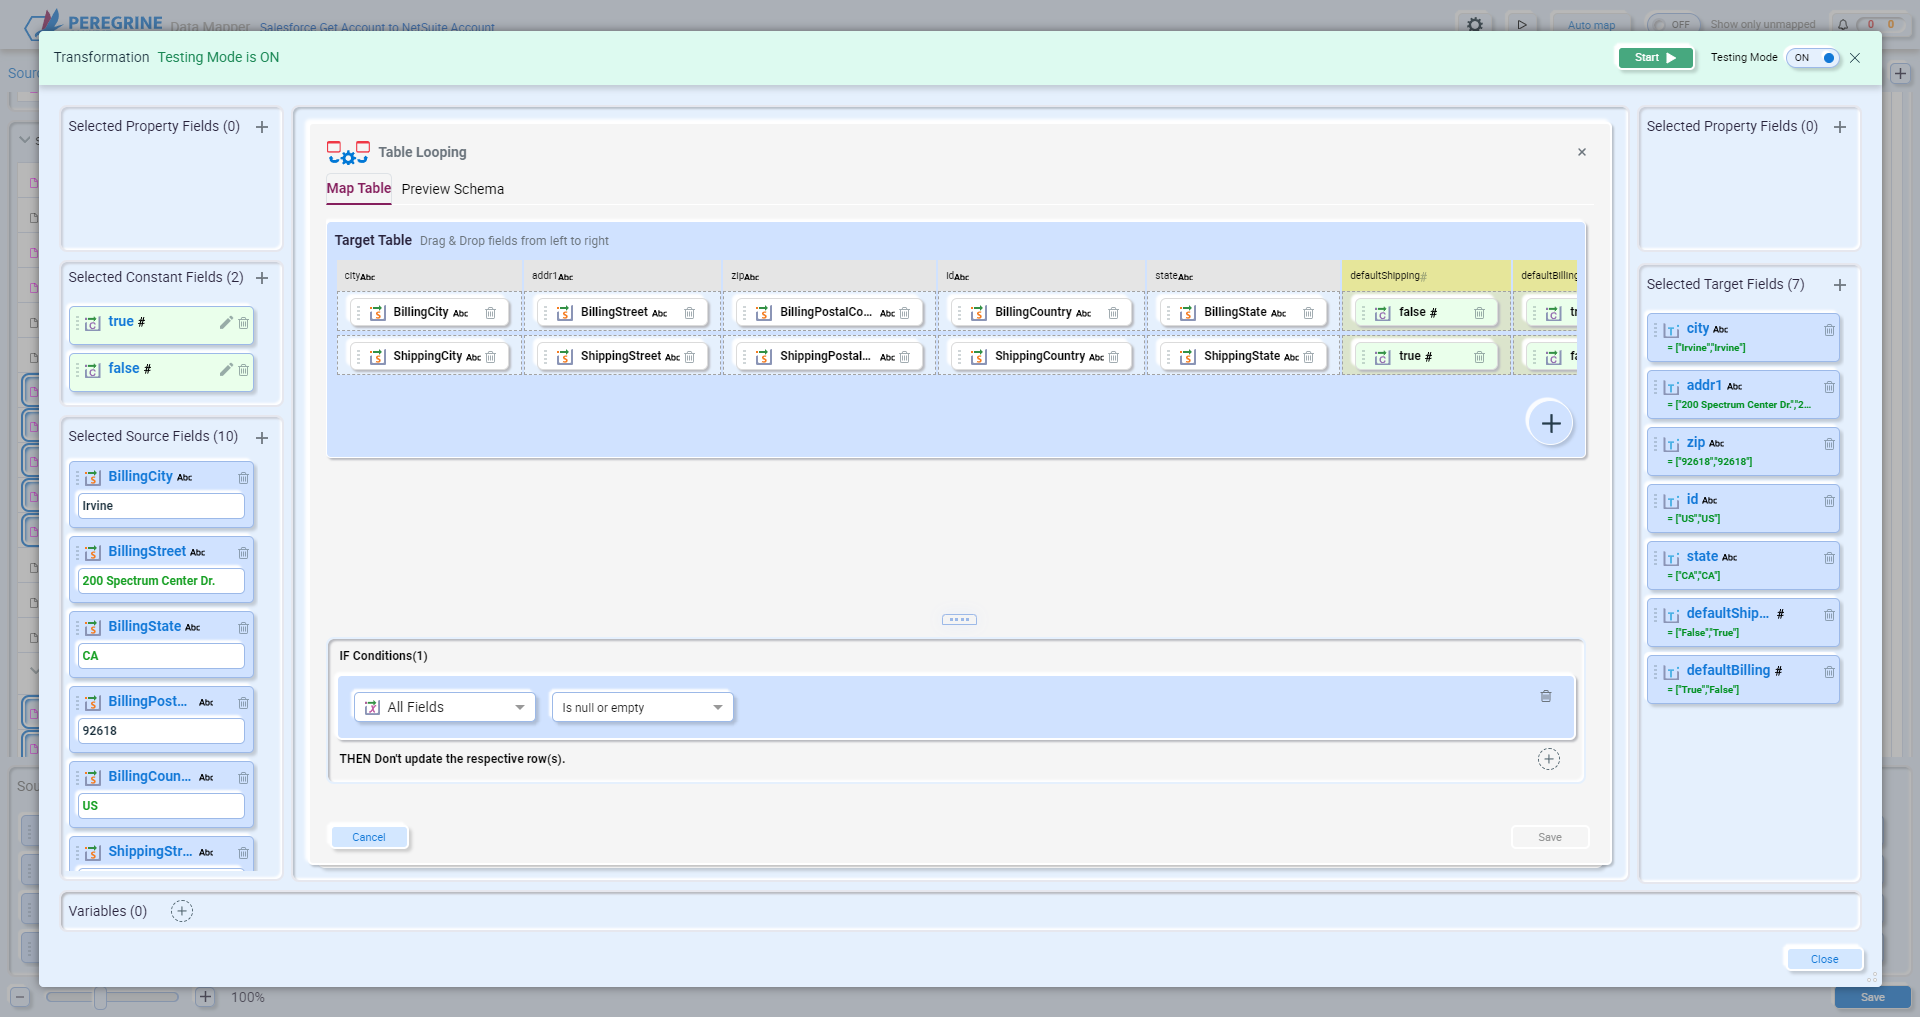
In Testing Mode, the output results are displayed as an array of values for each target field.
Database Lookup
One of the more common requirements during data transformation is to retrieve additional data from an external source. The Database Lookup function provides you with the ability to retrieve data from a database using message properties, environment variables, source fields or variables as lookup values. You can use the results of the lookup to populate target fields or variables.
To use the Database Lookup function, select it from the Advanced function list and click Next.
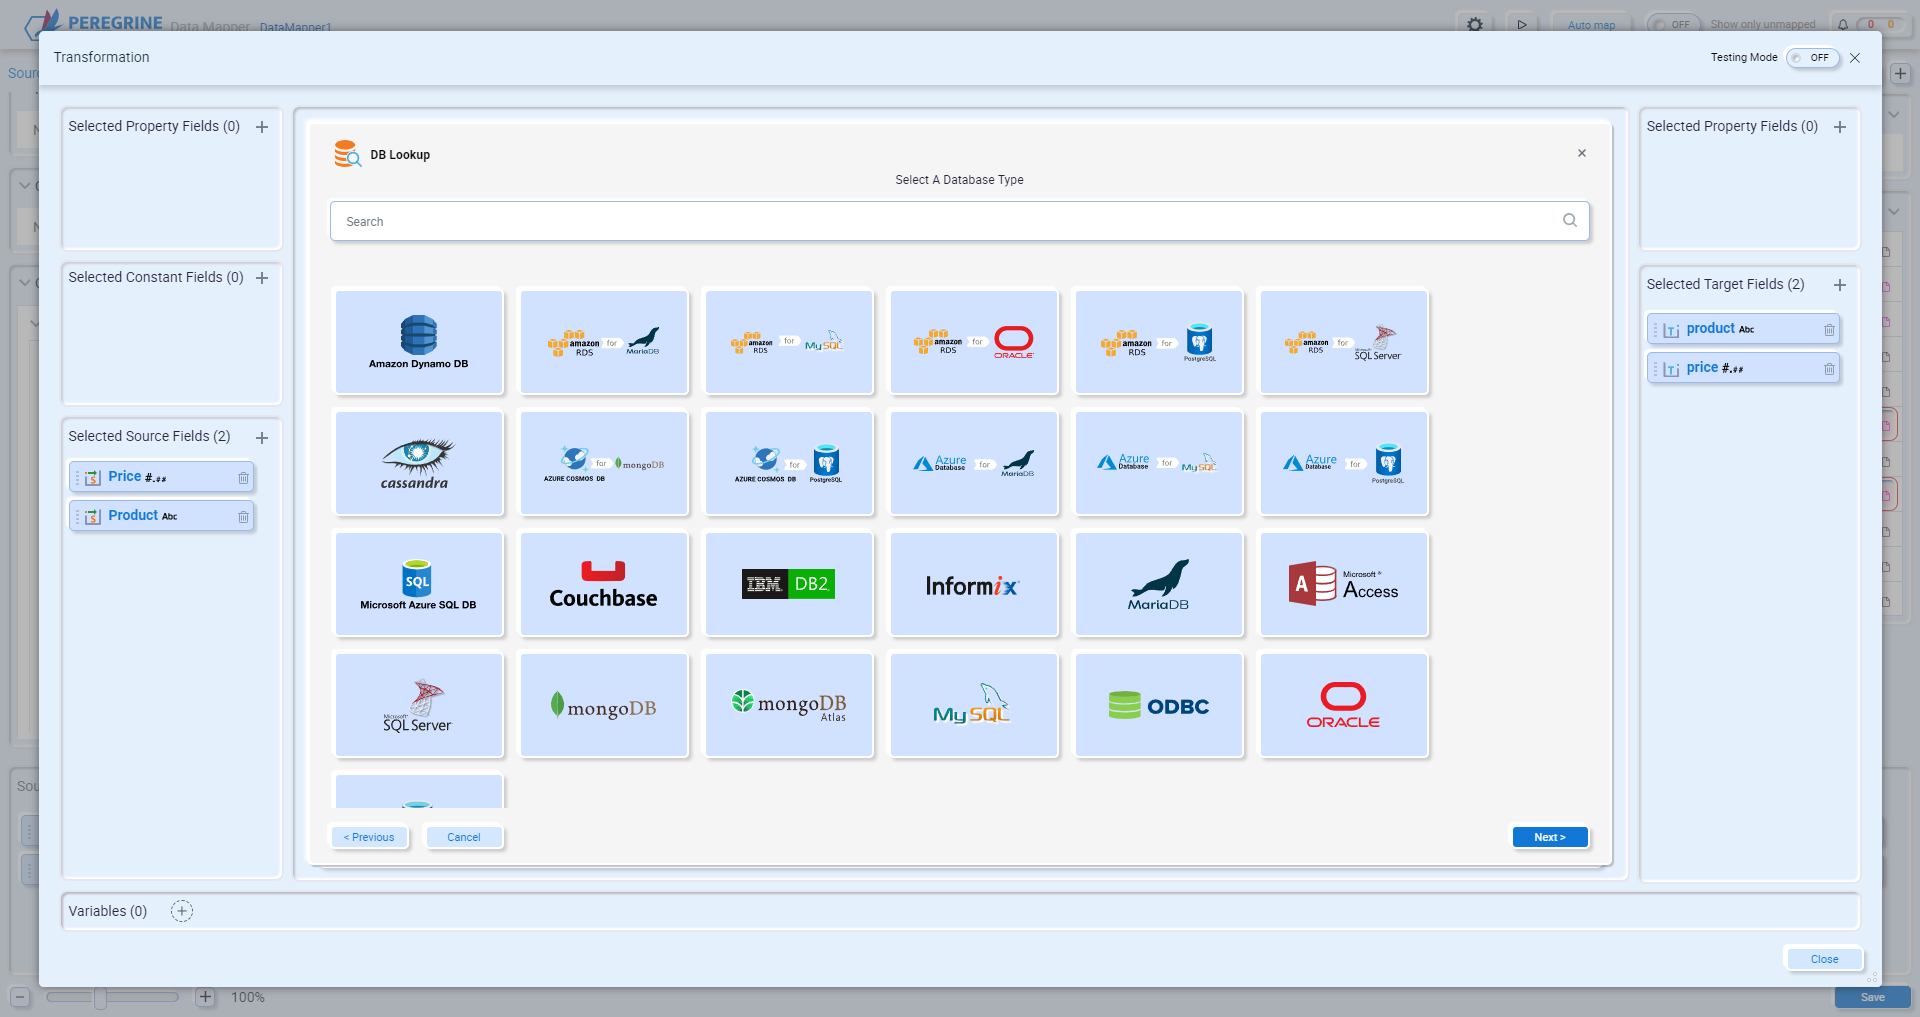
Select the database type you want to use and click Next.
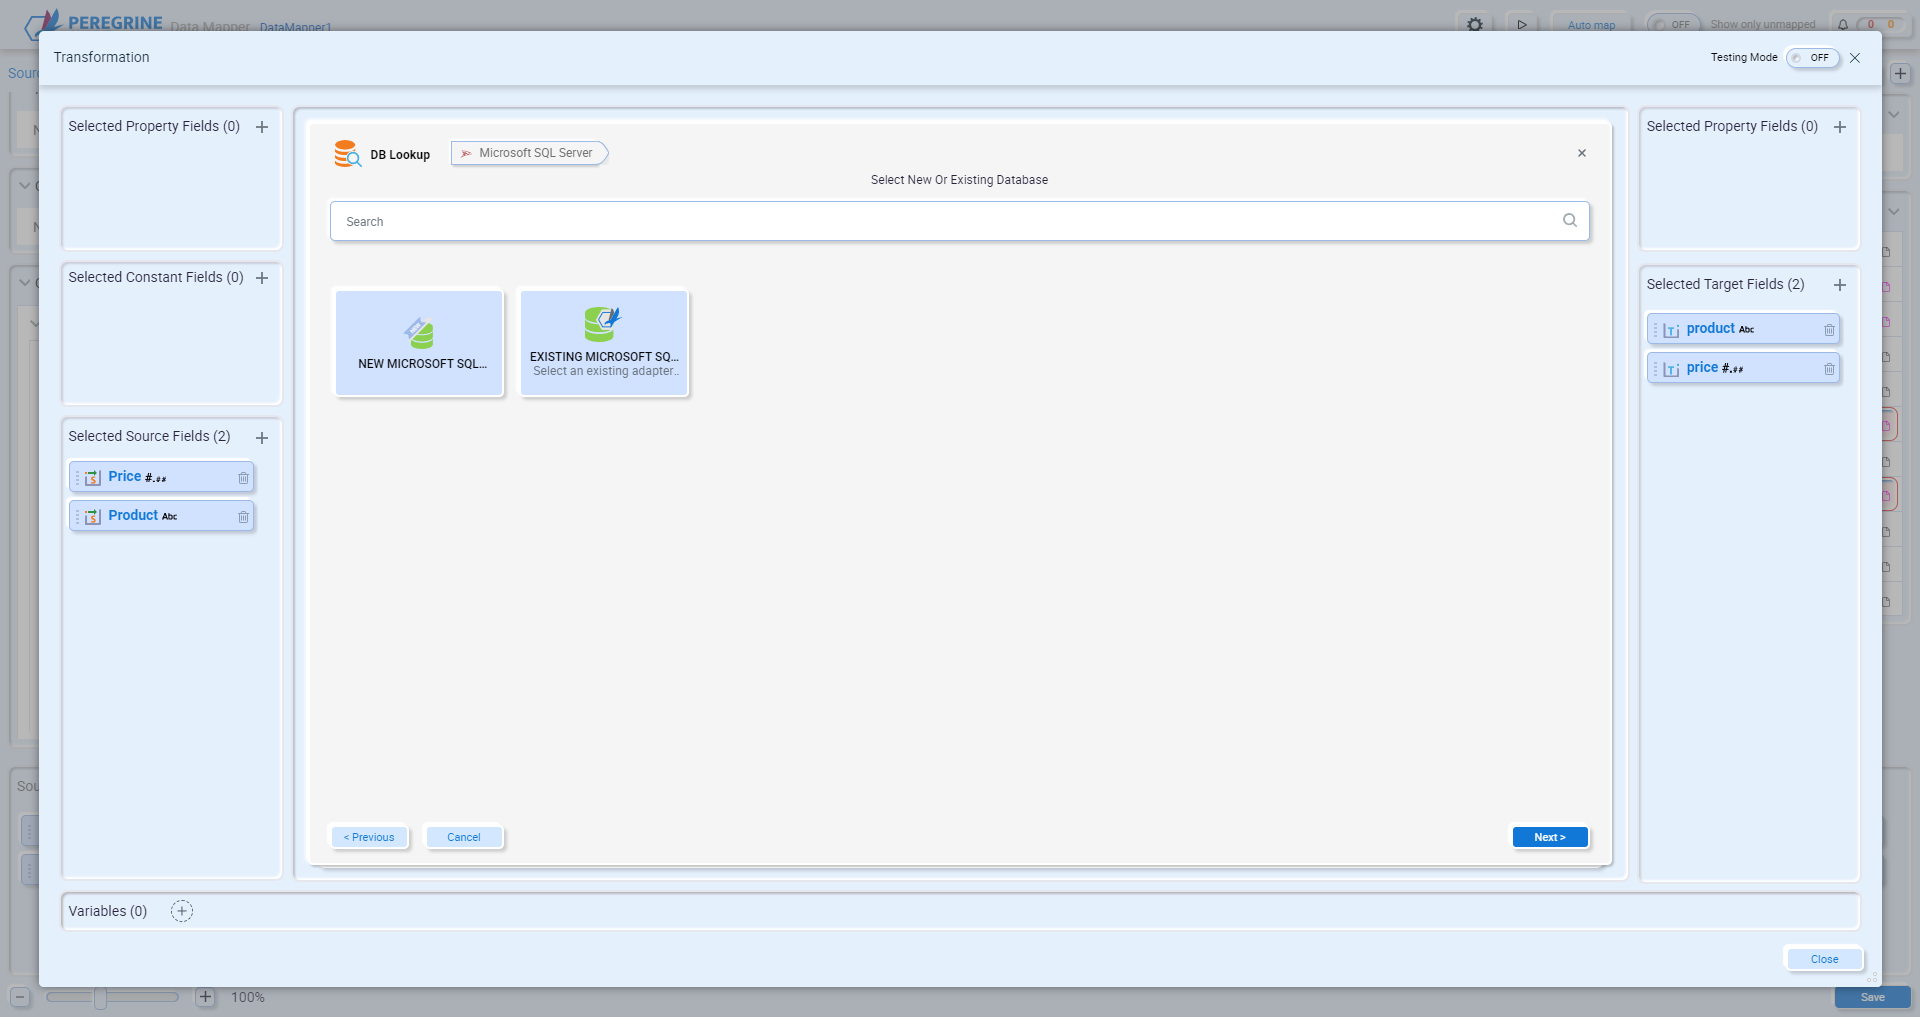
You can either create a new database connection or select an existing connection from previously created adapter endpoints. Select the New Connection option and click Next.
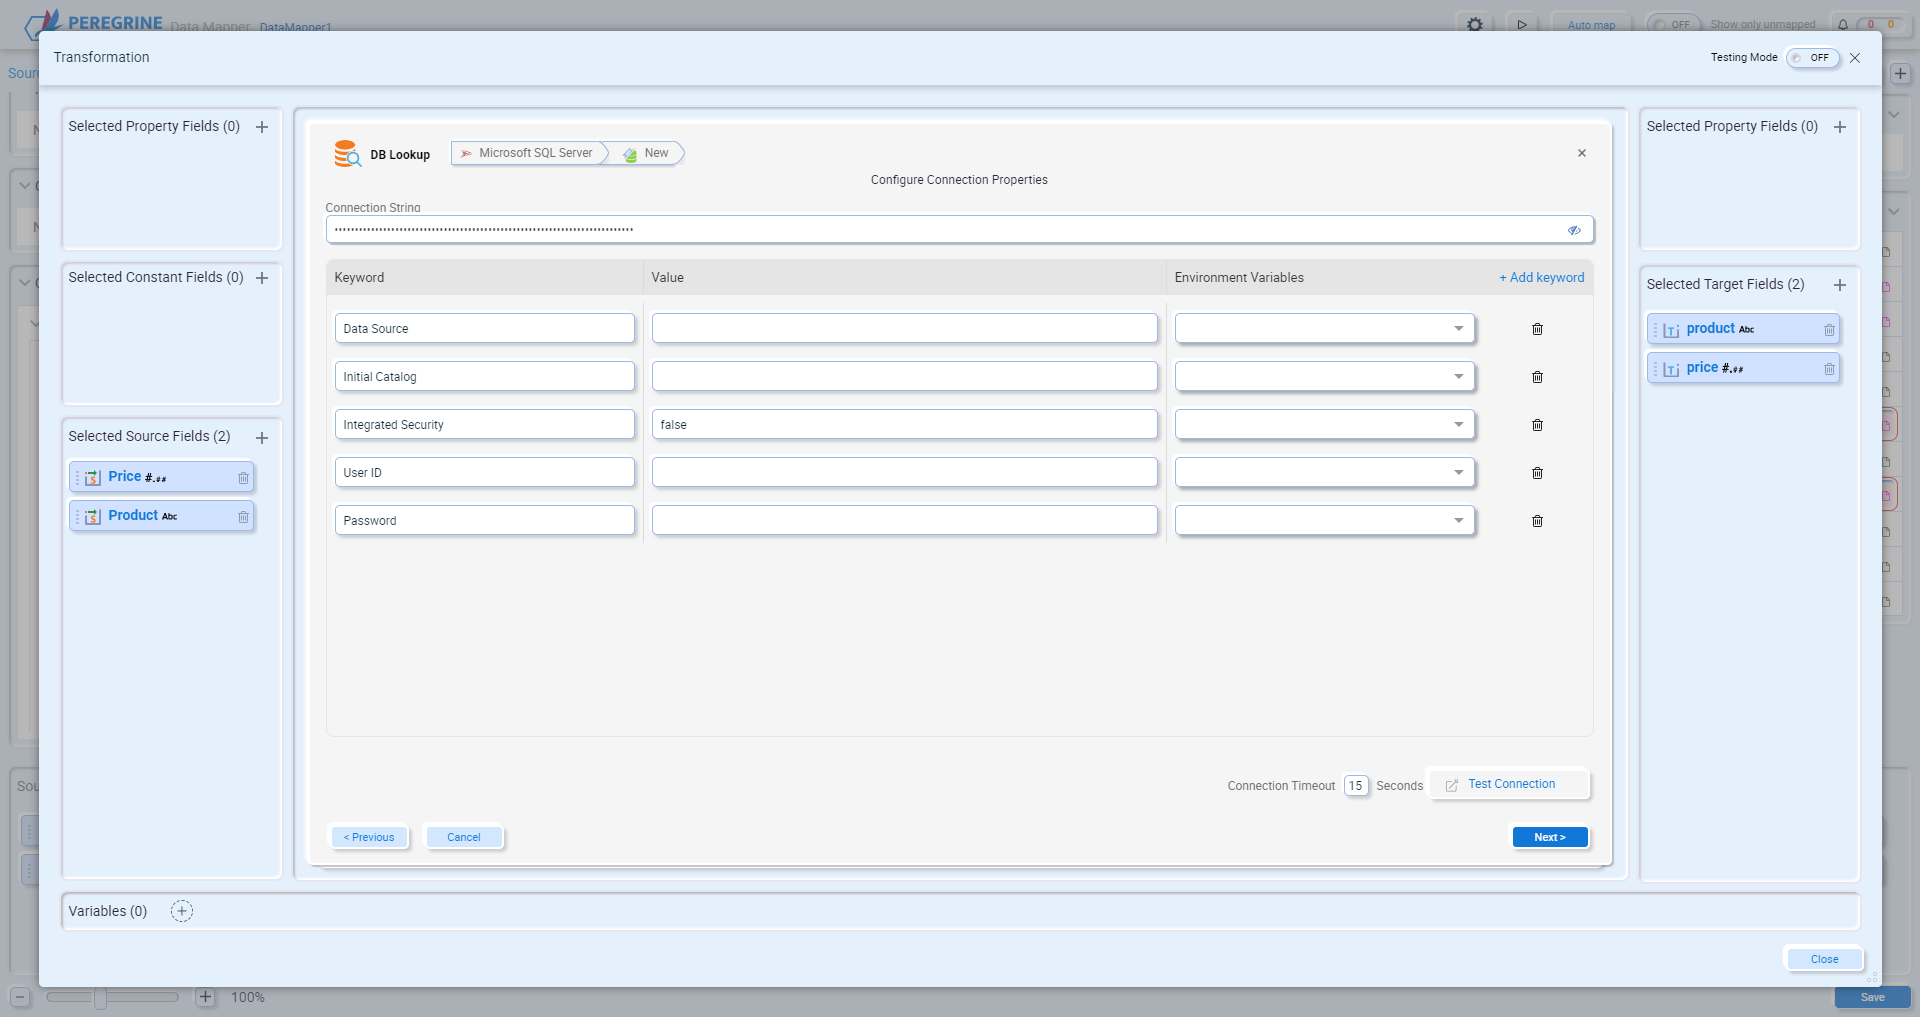
Set the connection properties required for your database. Add and remove keywords as needed. When you have finished setting the keywords you can test the connection. If the connection is successful, click Next.
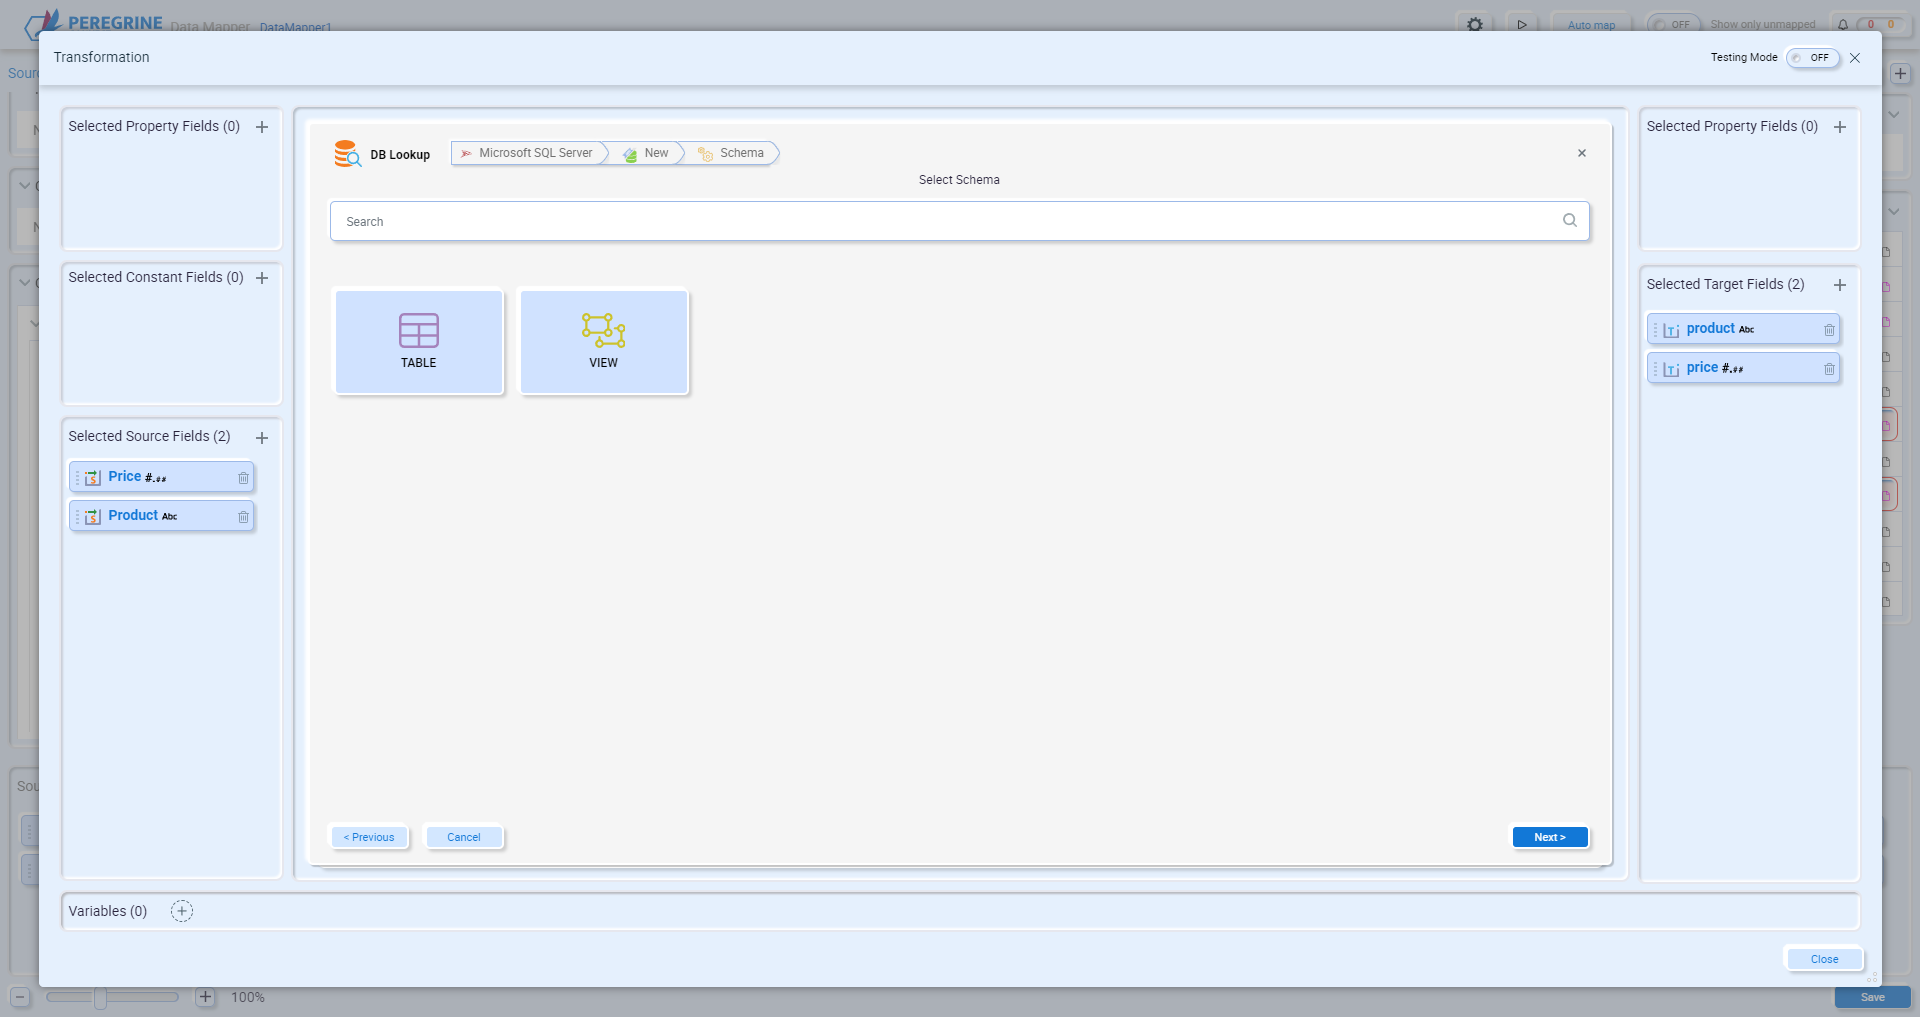
The database lookup function works with both tables and views. Select the one you want to use and click Next.
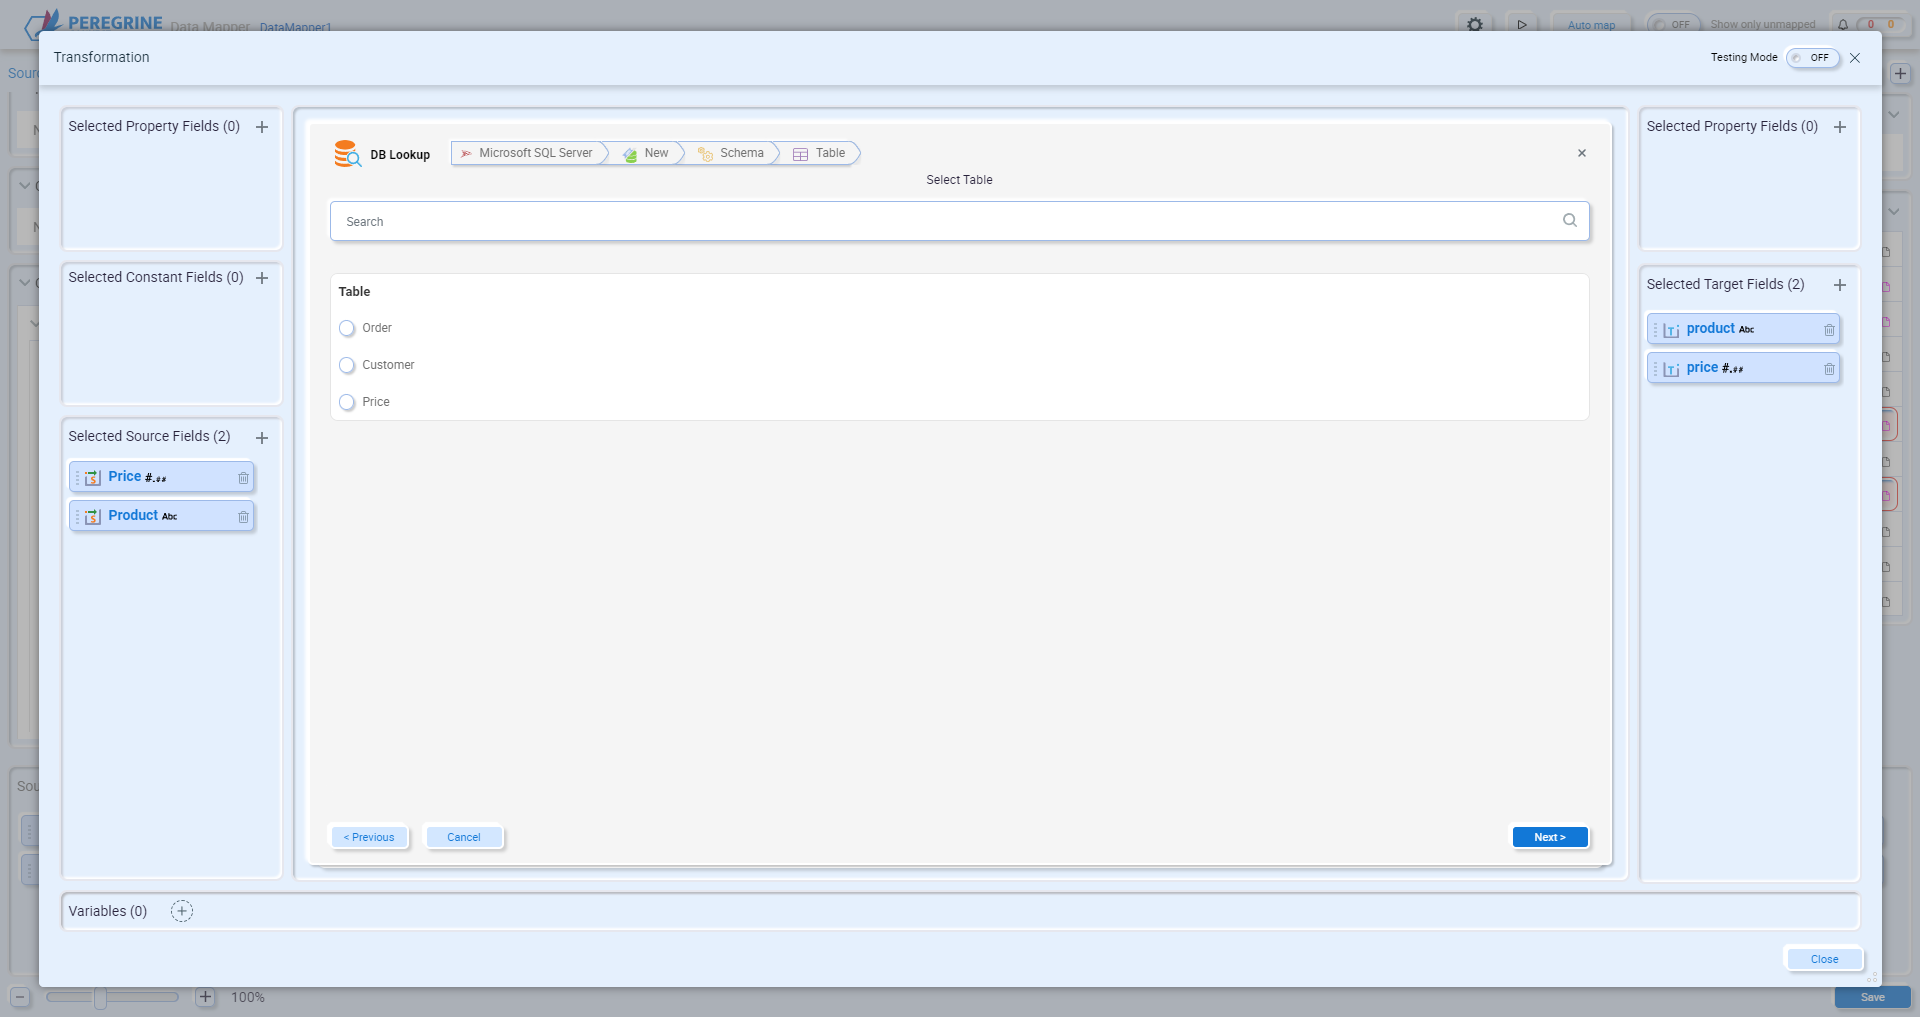
Select the table or view you want to lookup data from and click Next.
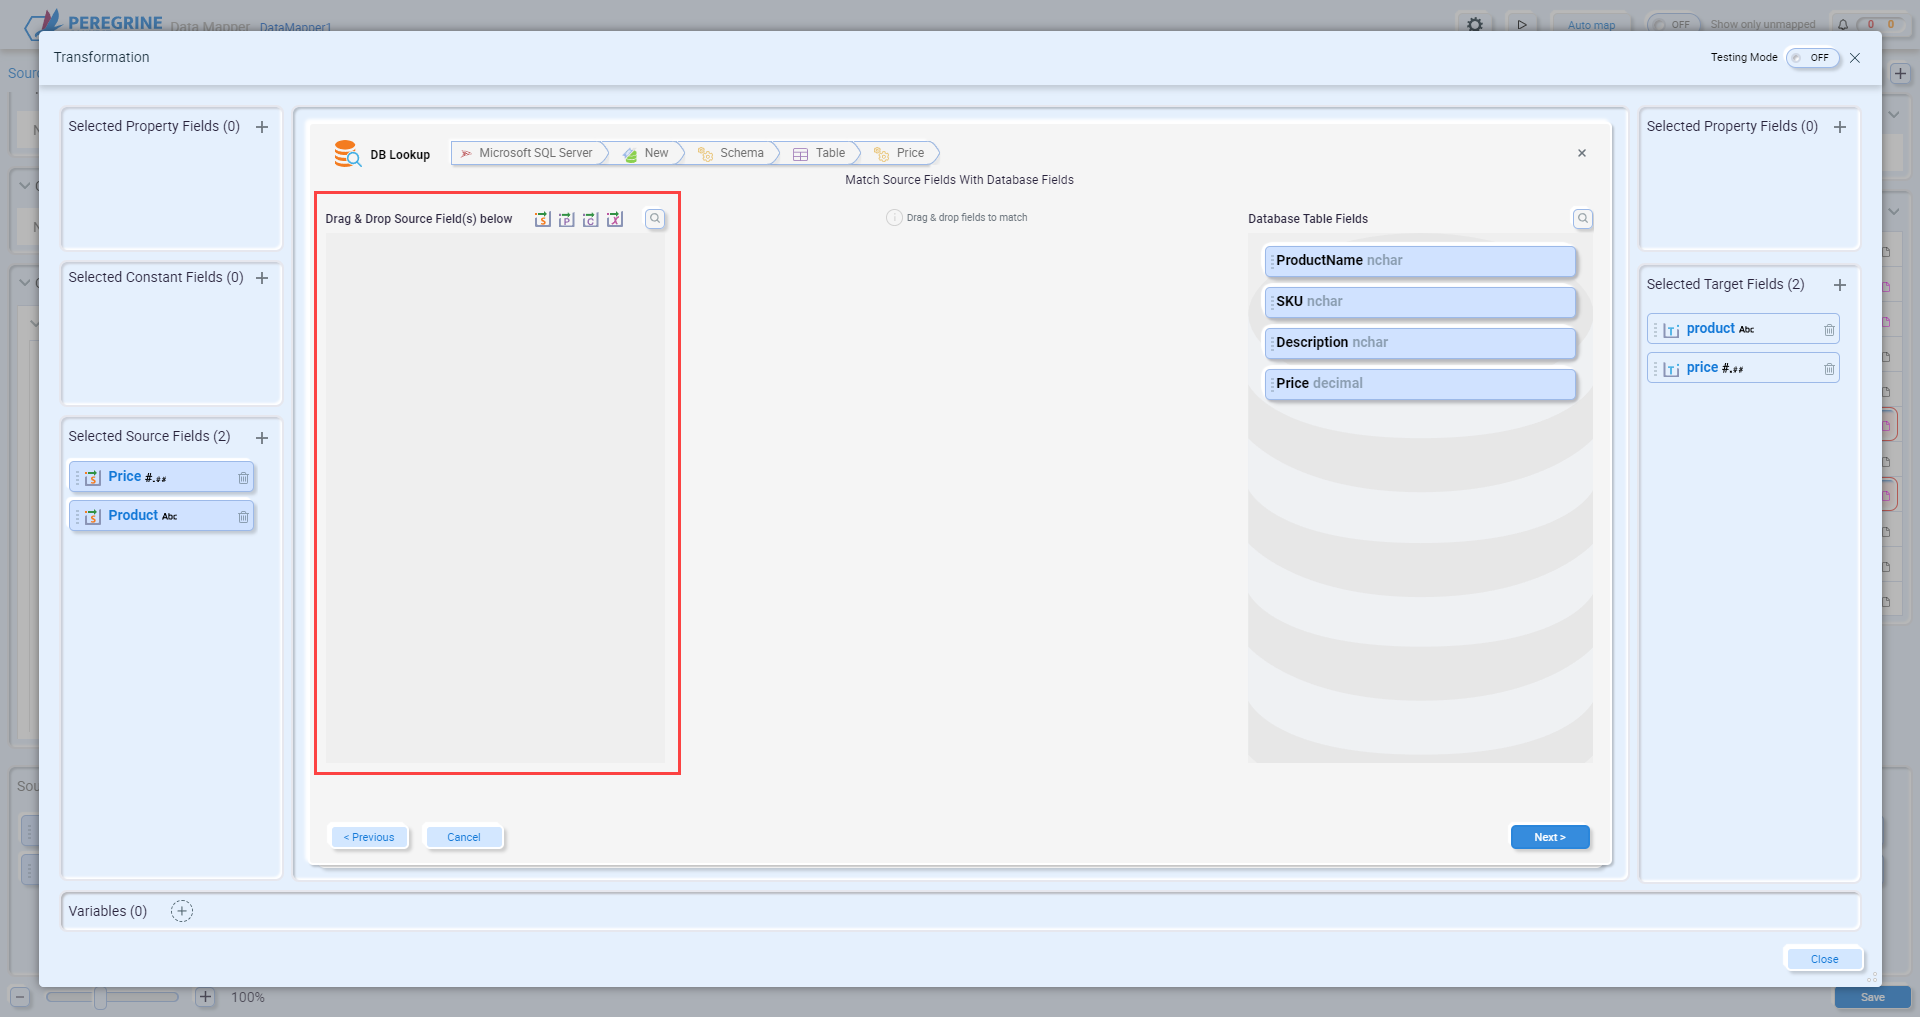
On this page, you will add the source fields or variables that will be used as the lookup keys. Drag and drop them onto the area outlined in red. You must associate the source fields with their corresponding database table fields by clicking the source field and the table field:
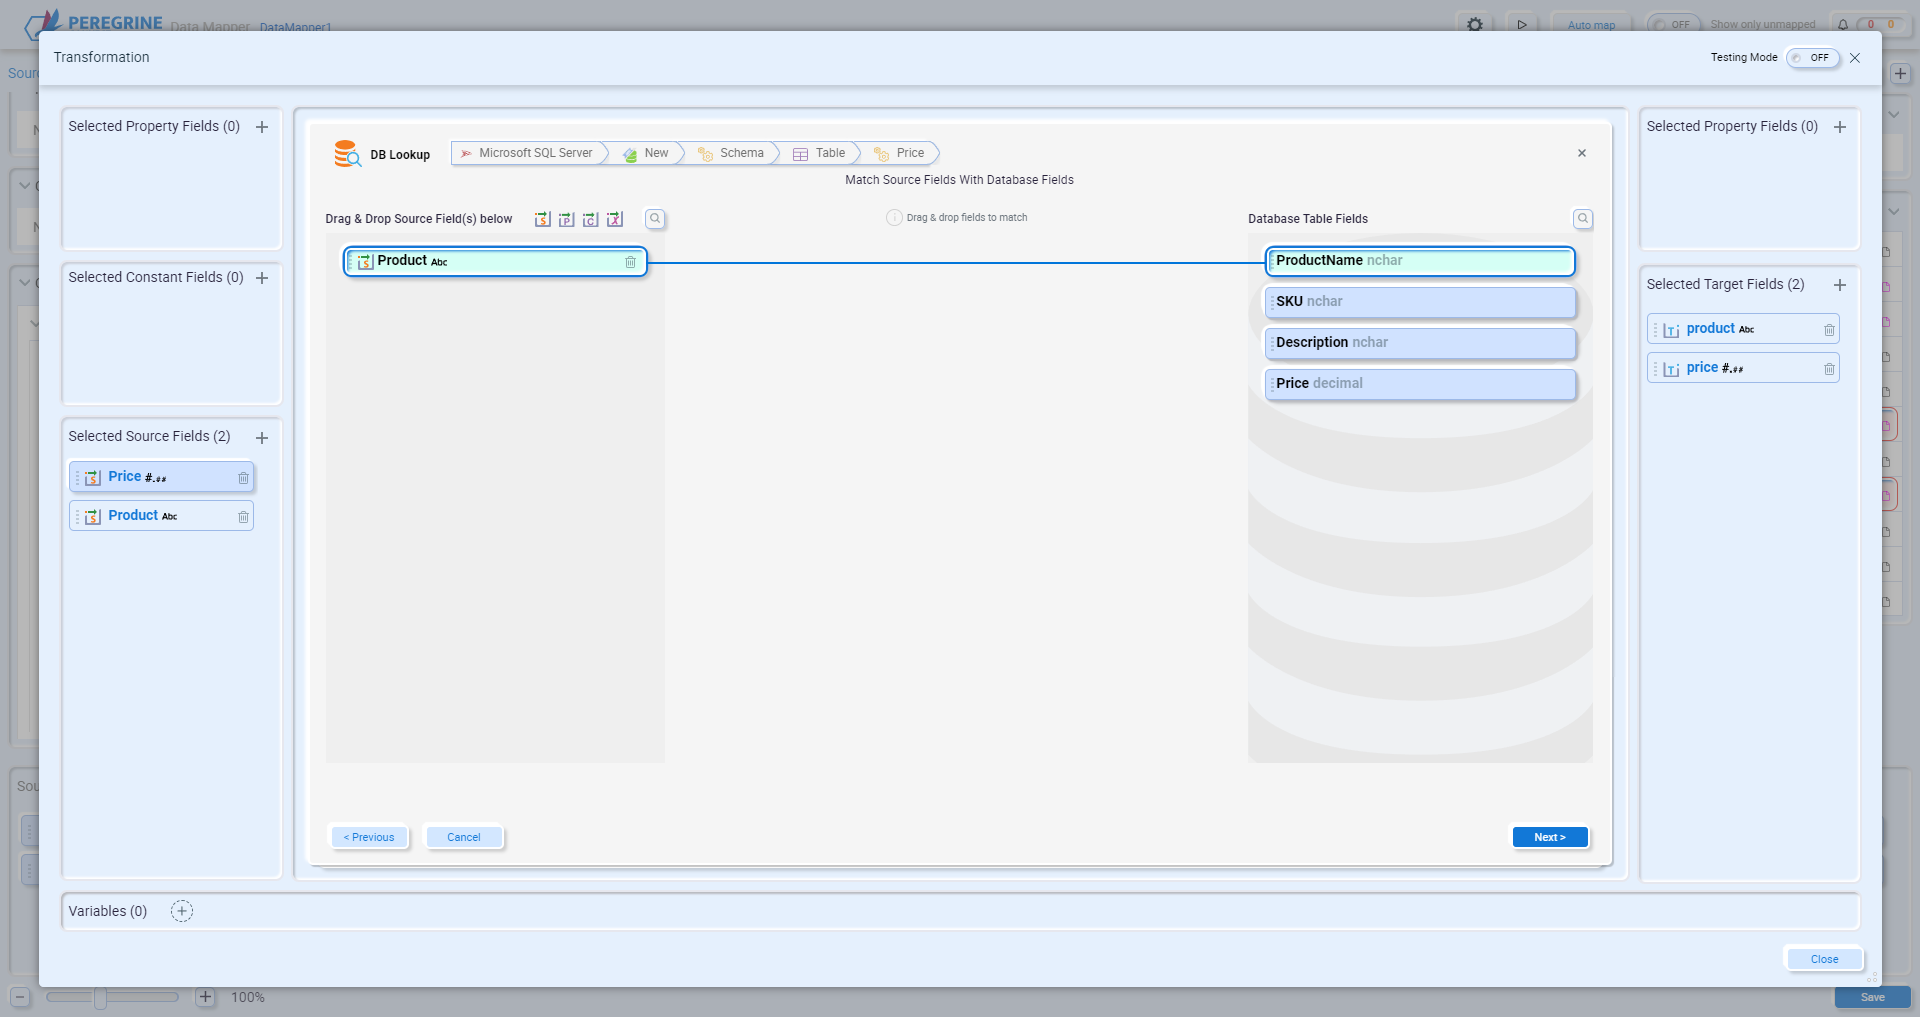
After you have completed all the mappings, click Next.
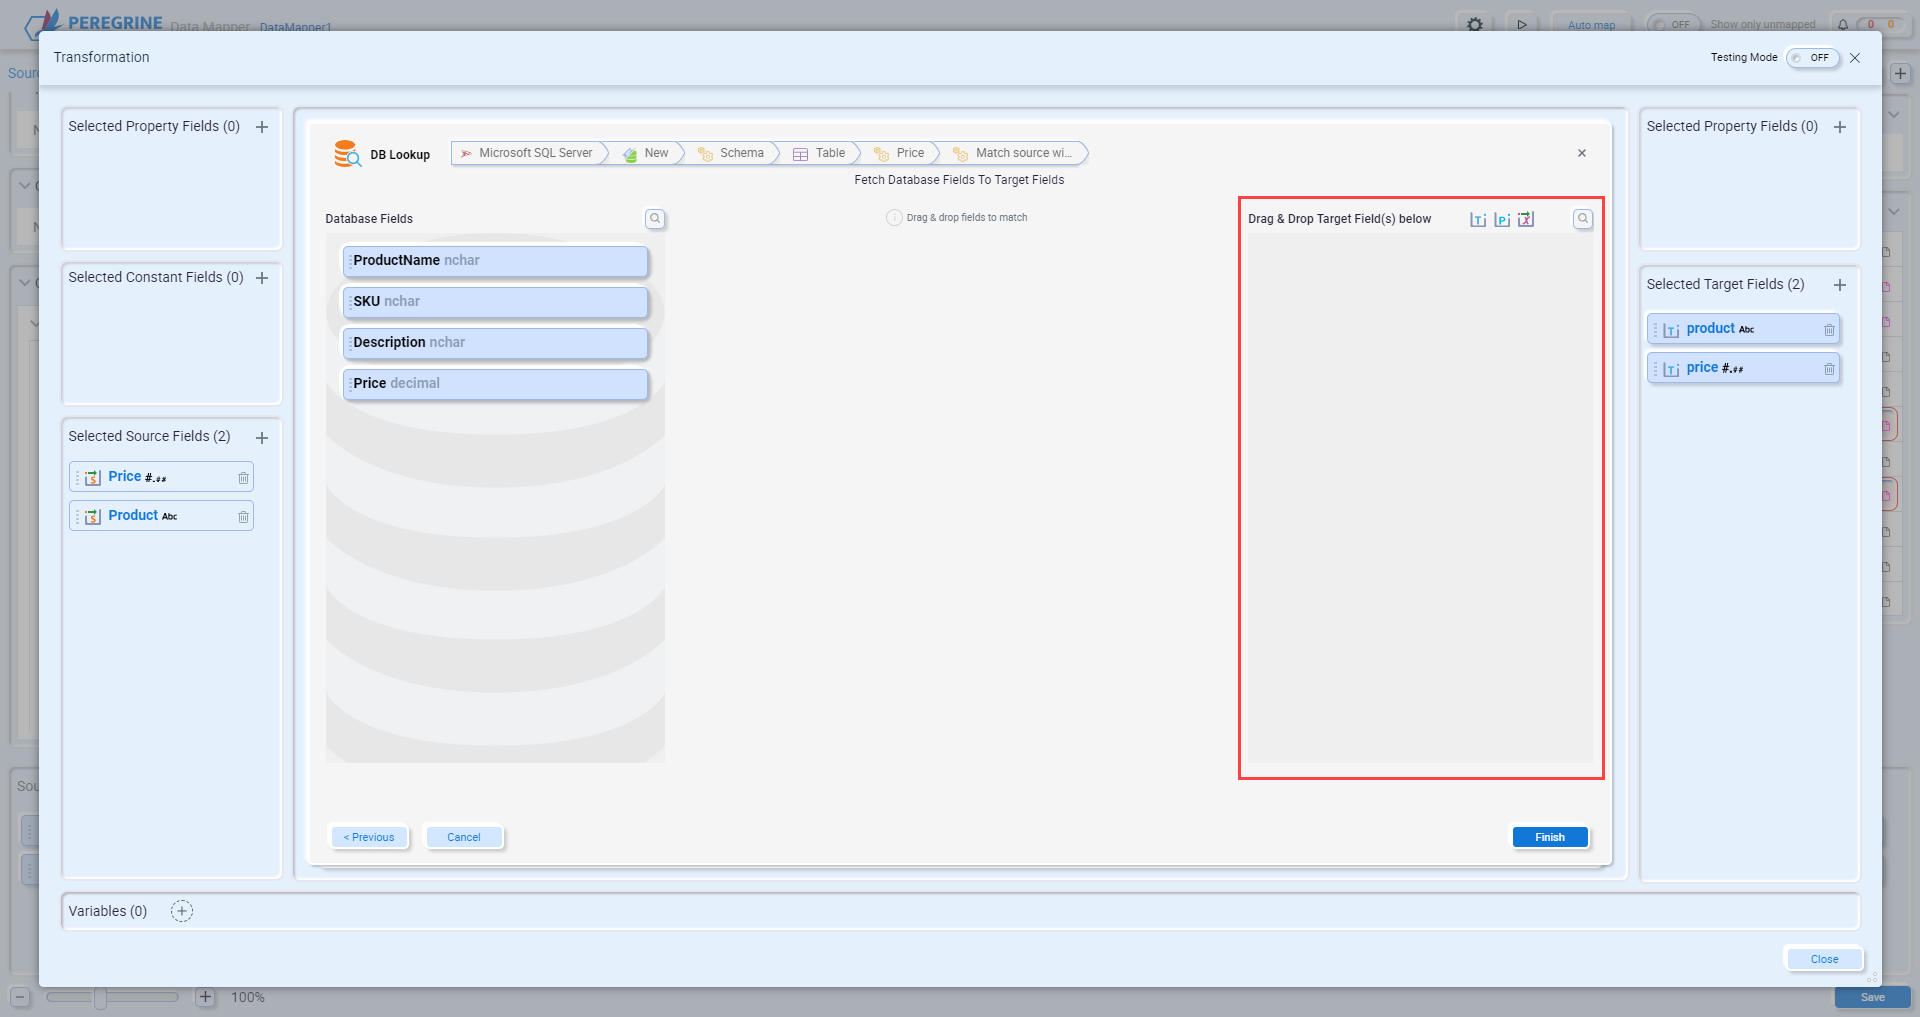
On this page, you will add the target fields or variables that will receive the lookup values. Drag and drop them onto the area outlined in red. You must associate the database table fields with their corresponding target fields by clicking the table field and the target field:
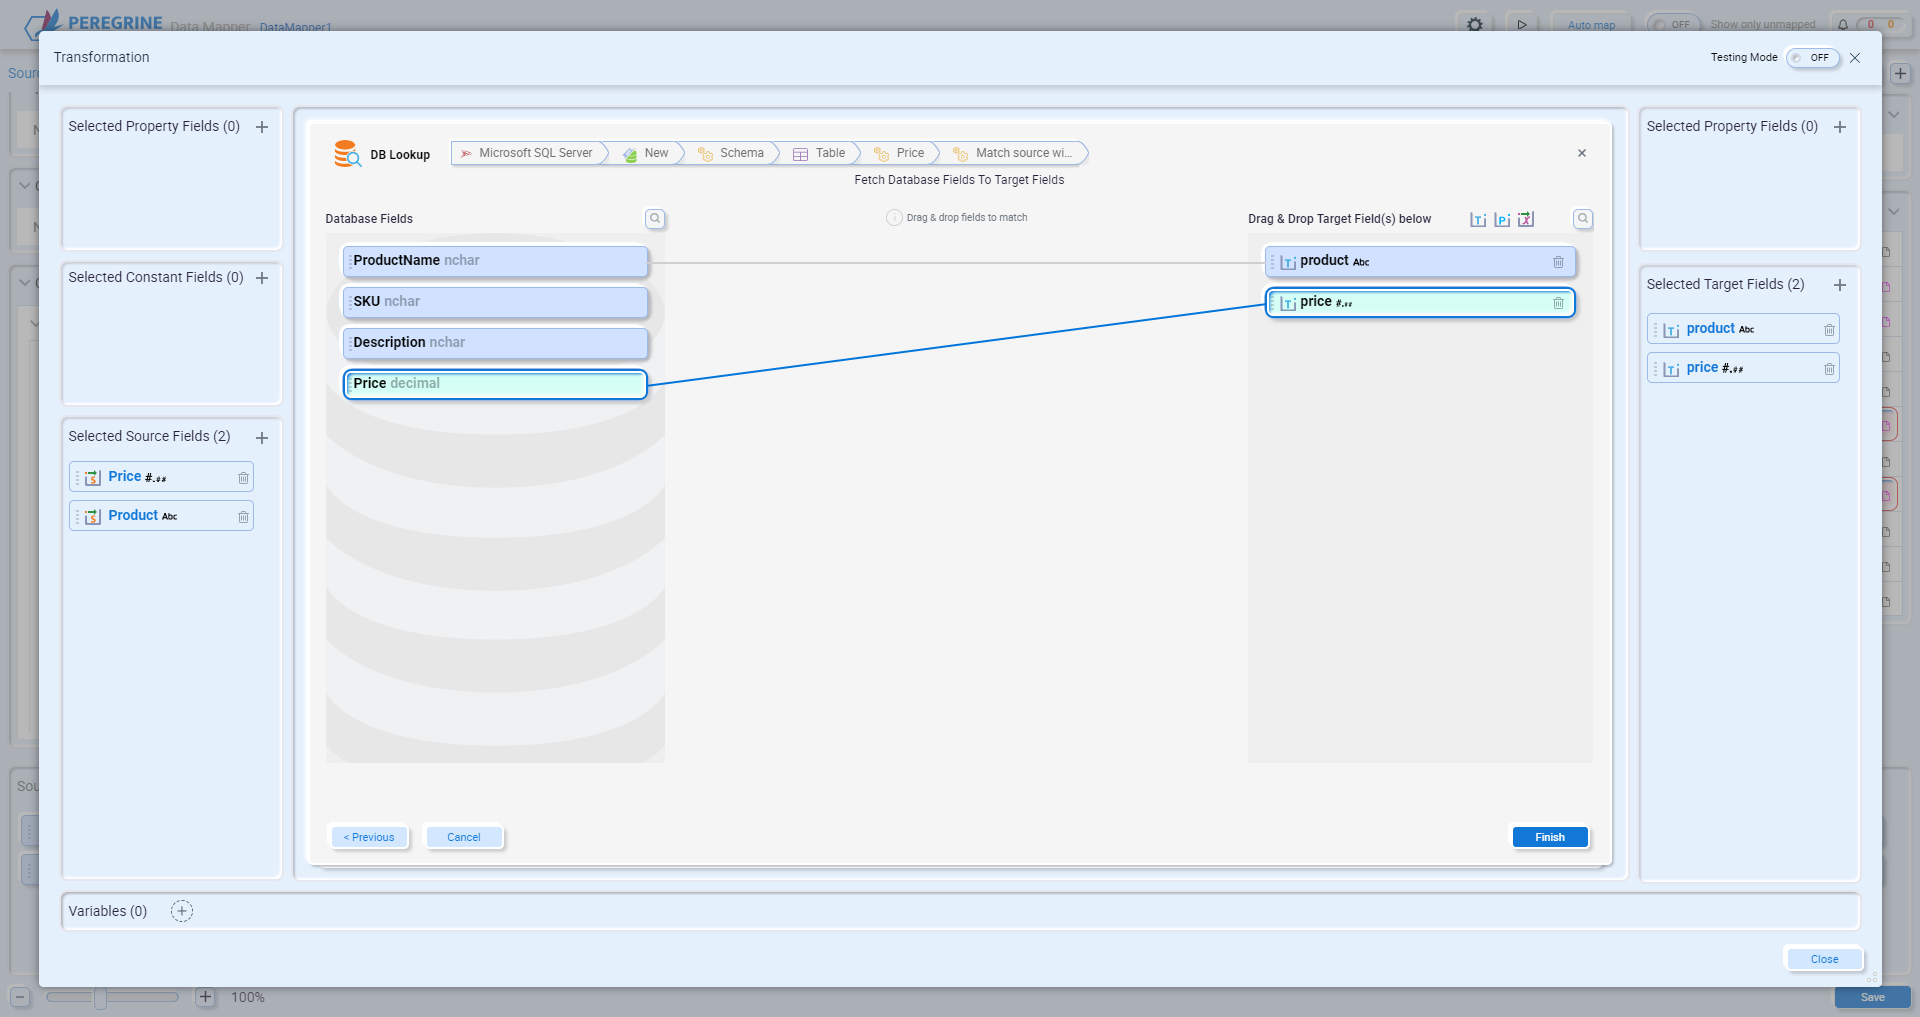
After you have completed all the mappings, click Finish.
Note – when executing this function, if the database lookup returns multiple rows an error will be generated.
C# Custom Script
The C# Custom Script function allows you to write C# code to execute more complex transformation logic that can’t be completed using one of the built-in functions. When you first open the C# Custom Script editor, the function definition will reflect the selected source and target fields:
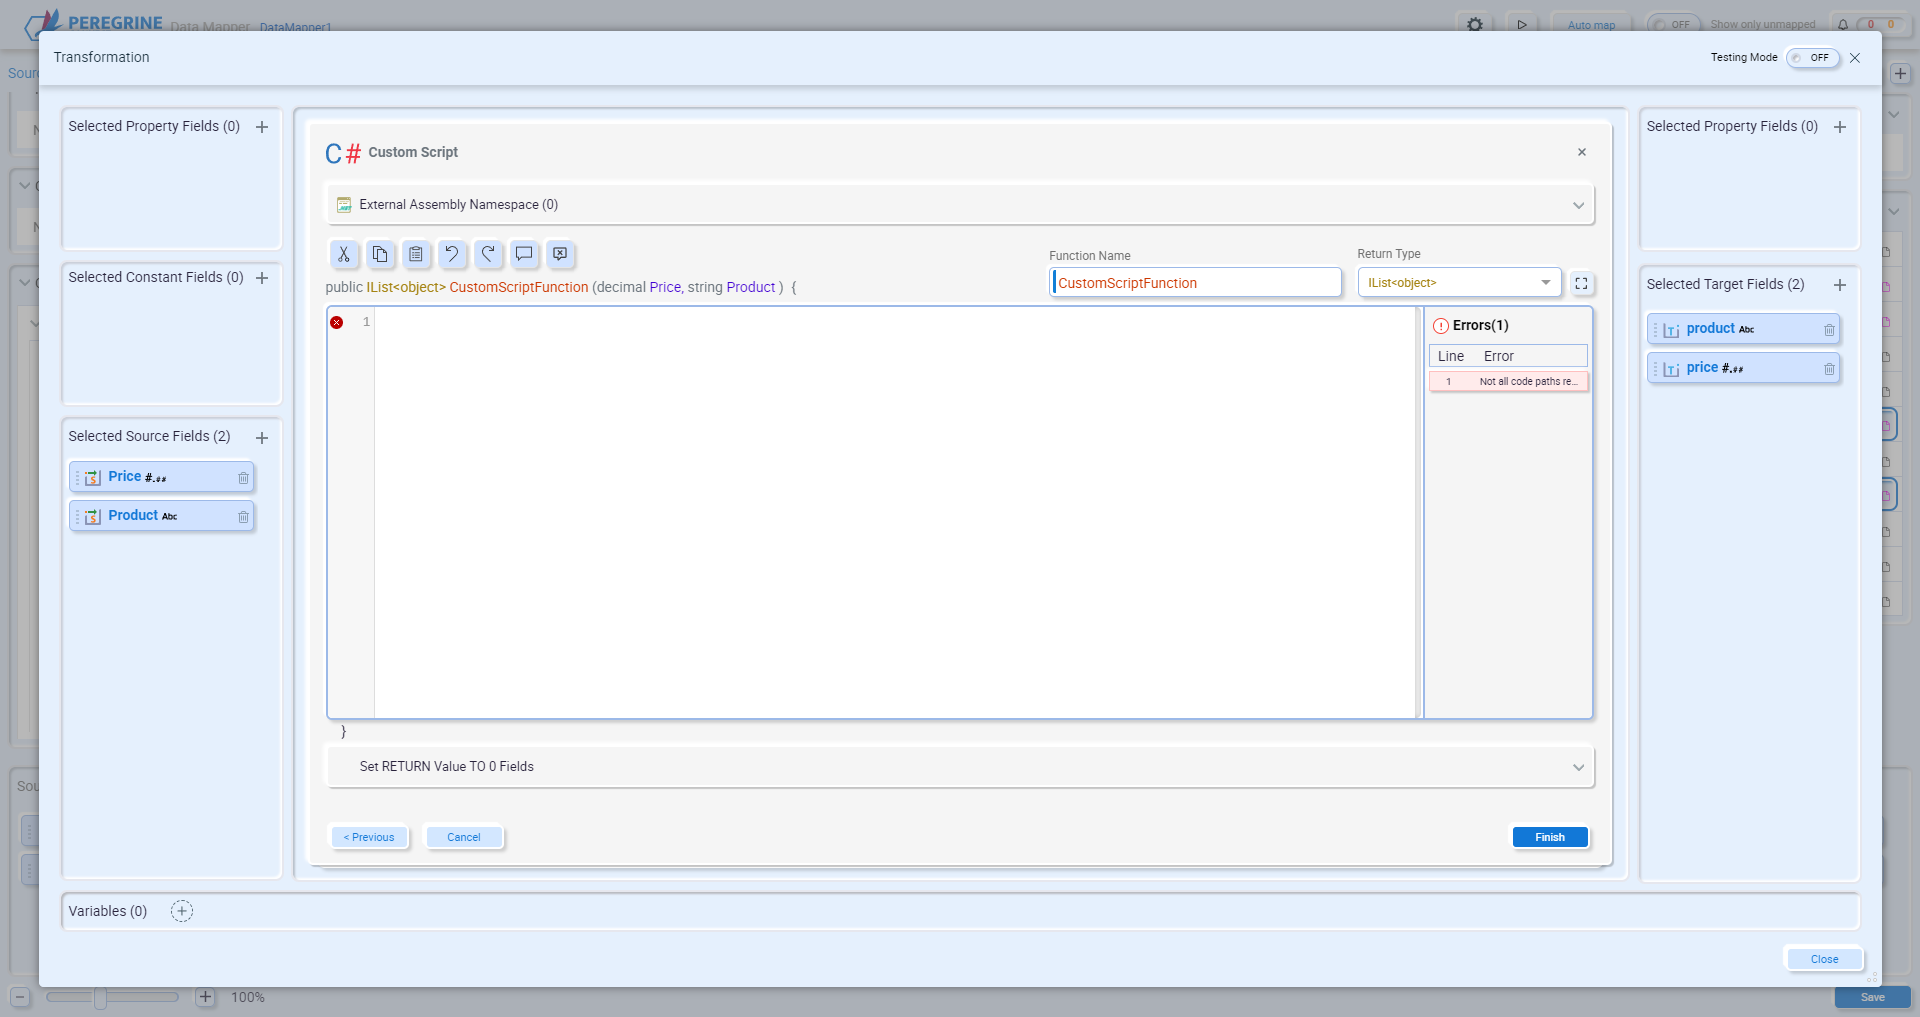
In the image above, there are two input parameters reflecting the source fields “product” and “price”. Target field and variables are not set in the C# code. They are set using the return value of the function. The return value above is an IList<object>, as there are multiple target fields. The return type can be changed if you only want to set the value of a single target field or variable. You might want to do this if your transformation has multiple target fields, but you only want the result of the C# script to be applied to one of them. To determine which target fields and/or variables are set based on the return value of the function, expand the section labeled Set RETURN Value TO:
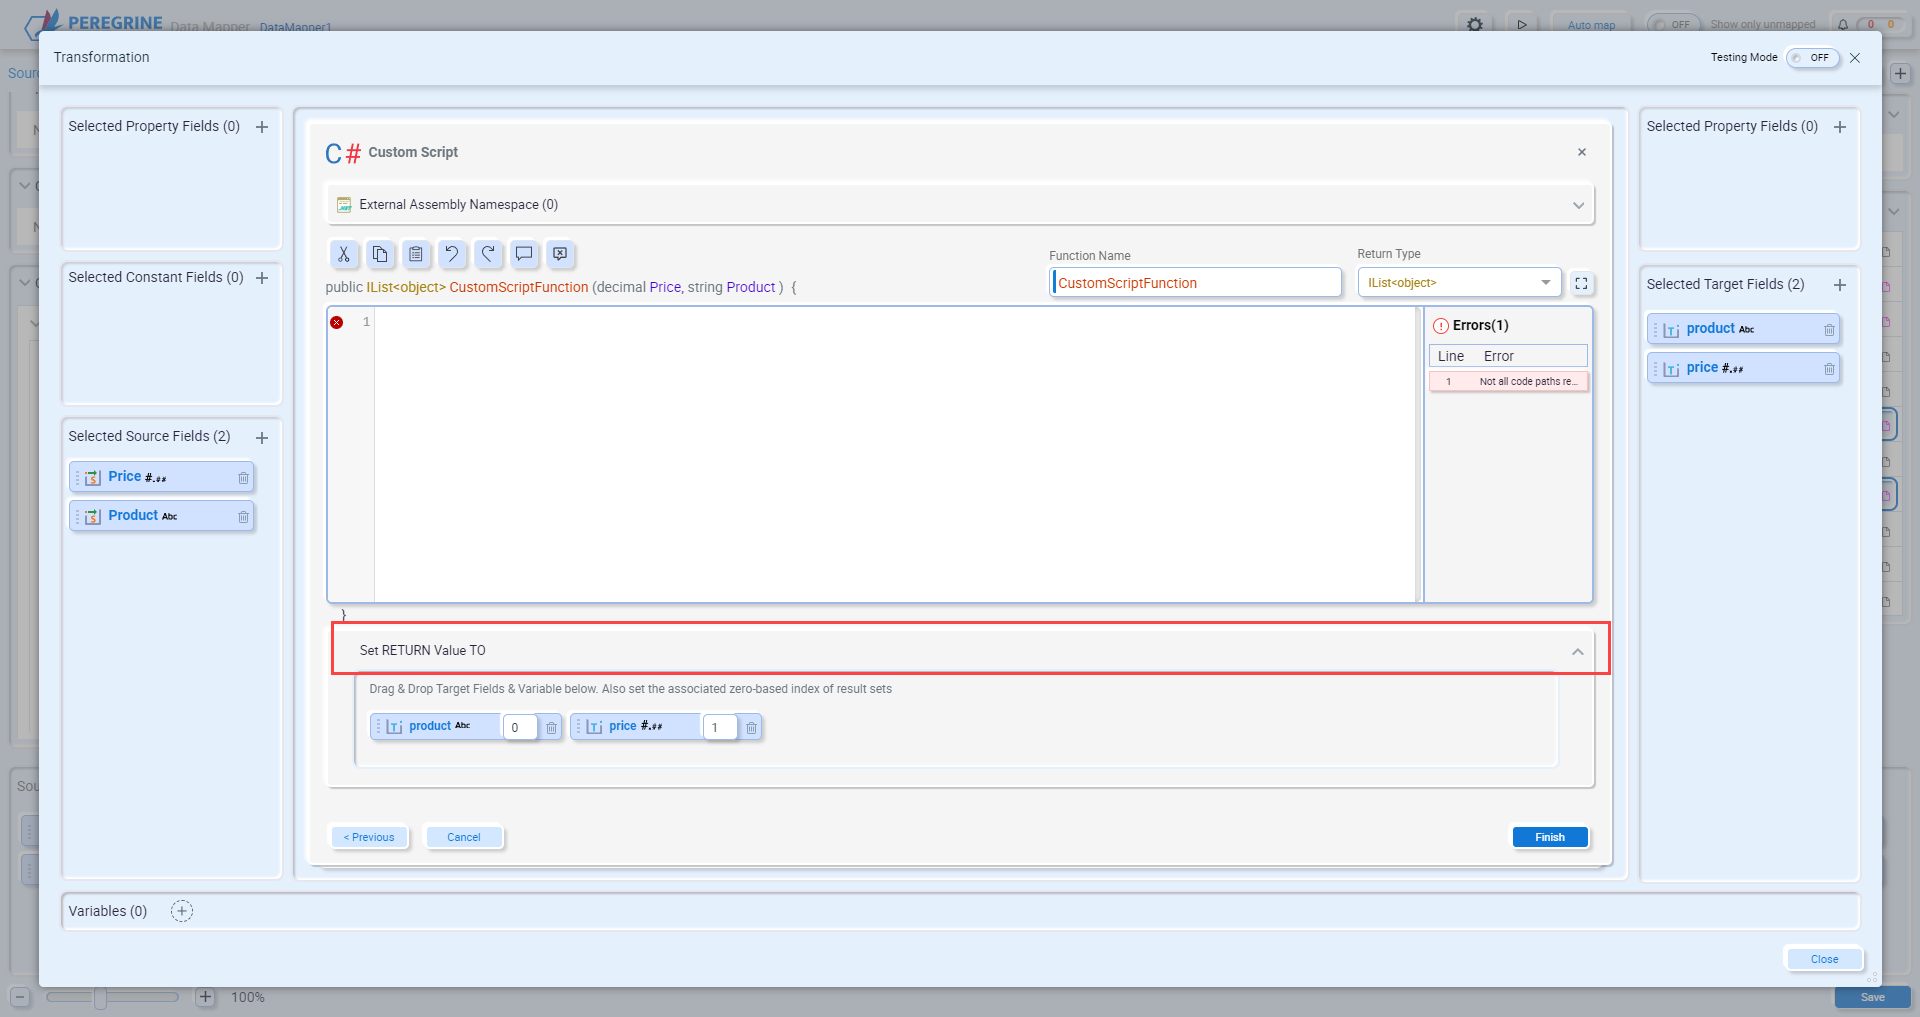
Drag and drop the target field(s) or variable(s) you want to set into this area. If the return type is an IList<object>, then you will also set the index of the list items to set to the field or variable.
The C# Custom Script editor also allows you to utilize external assemblies. To add an external assembly, expand the section labeled External assembly Namespace. Under Assembly, click Import an External Assembly:

Navigate to the folder containing the assembly you want to use and select it. Then select the namespace containing the class you want to access. Click the plus sign to add the reference:

Once you add the assembly, the file will automatically be copied into the \DataMapper\CustomScripts folder of the Neuron ESB instance folder.
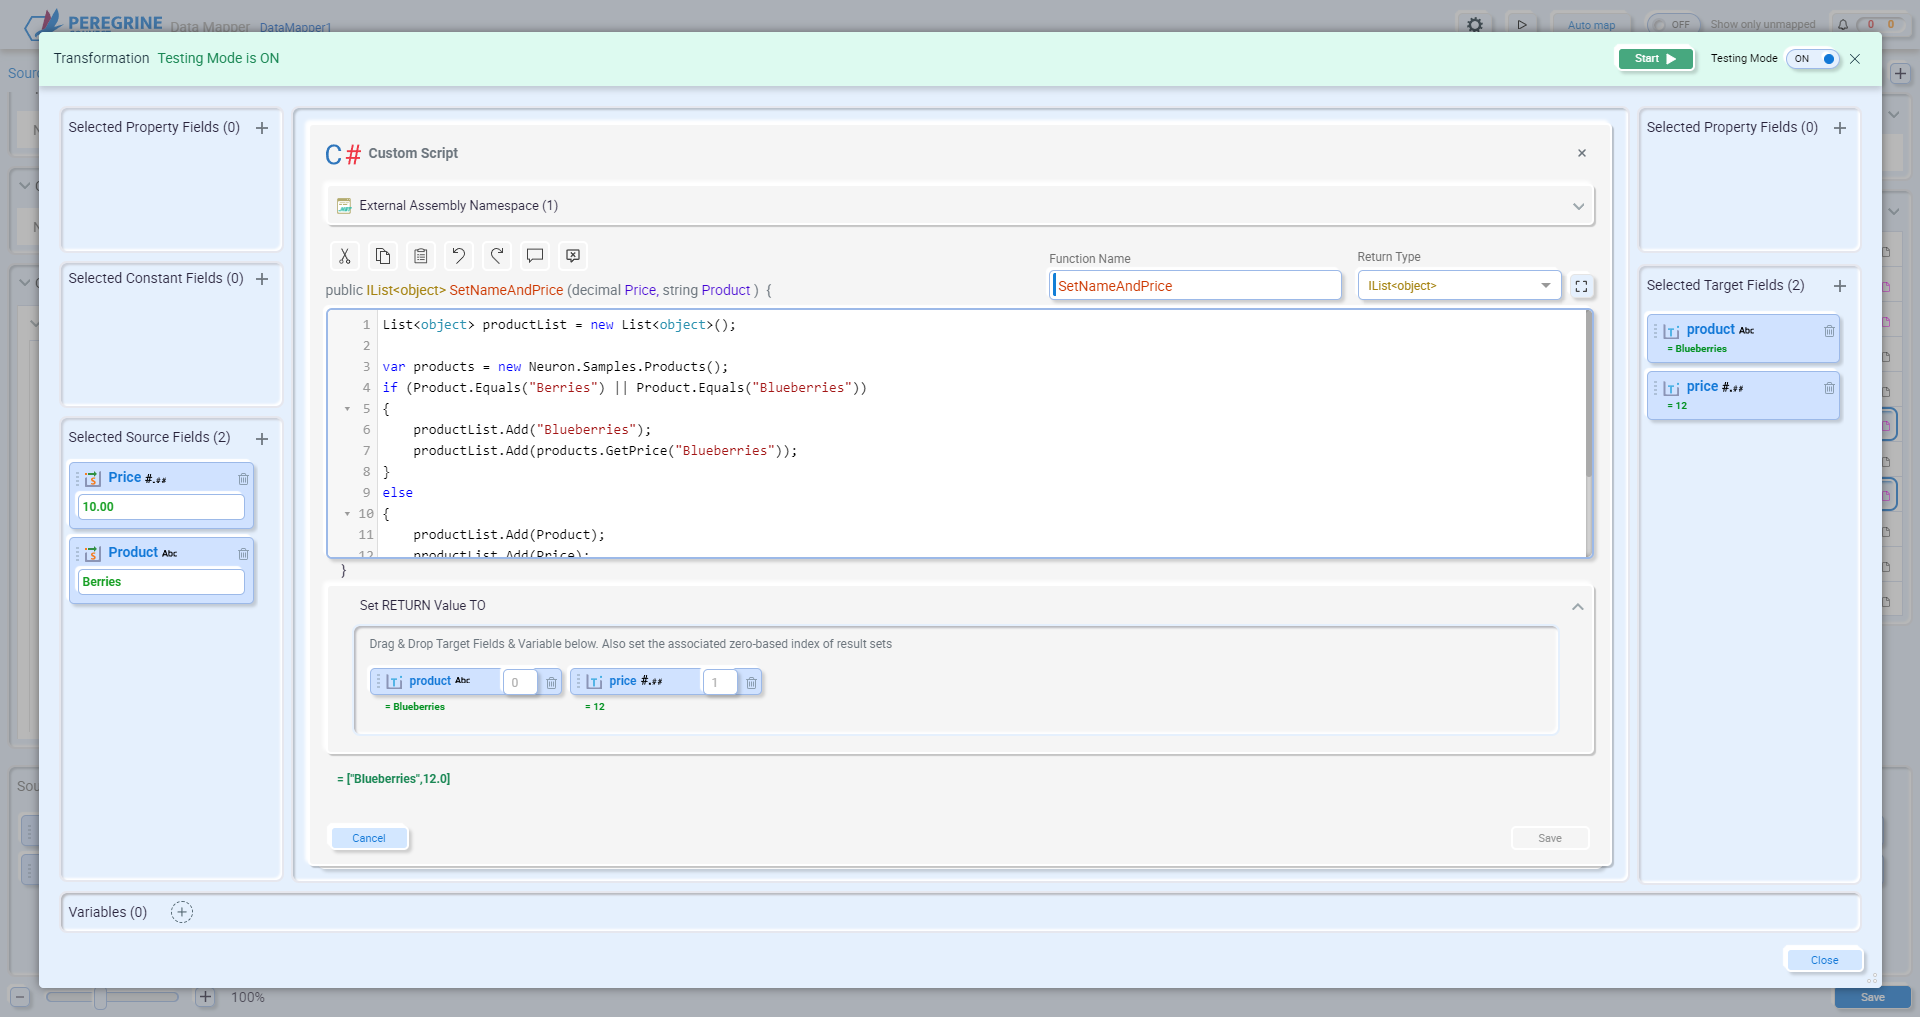
After adding the assembly reference, you can access the classes in the namespace by fully qualifying them:
var products = new Neuron.Samples.Products();
productList.Add(products.GetPrice("Blueberries"));
Save the C# Custom Script by clicking the Save button:
External Assembly
The External Assembly function provides a no-code solution to executing functions contained in an external .NET assembly. This allows users to reuse complex code in their data maps without having to copy it into a C# Scripting function. To use the External Assembly function, select it from the Advanced function list and click Next.
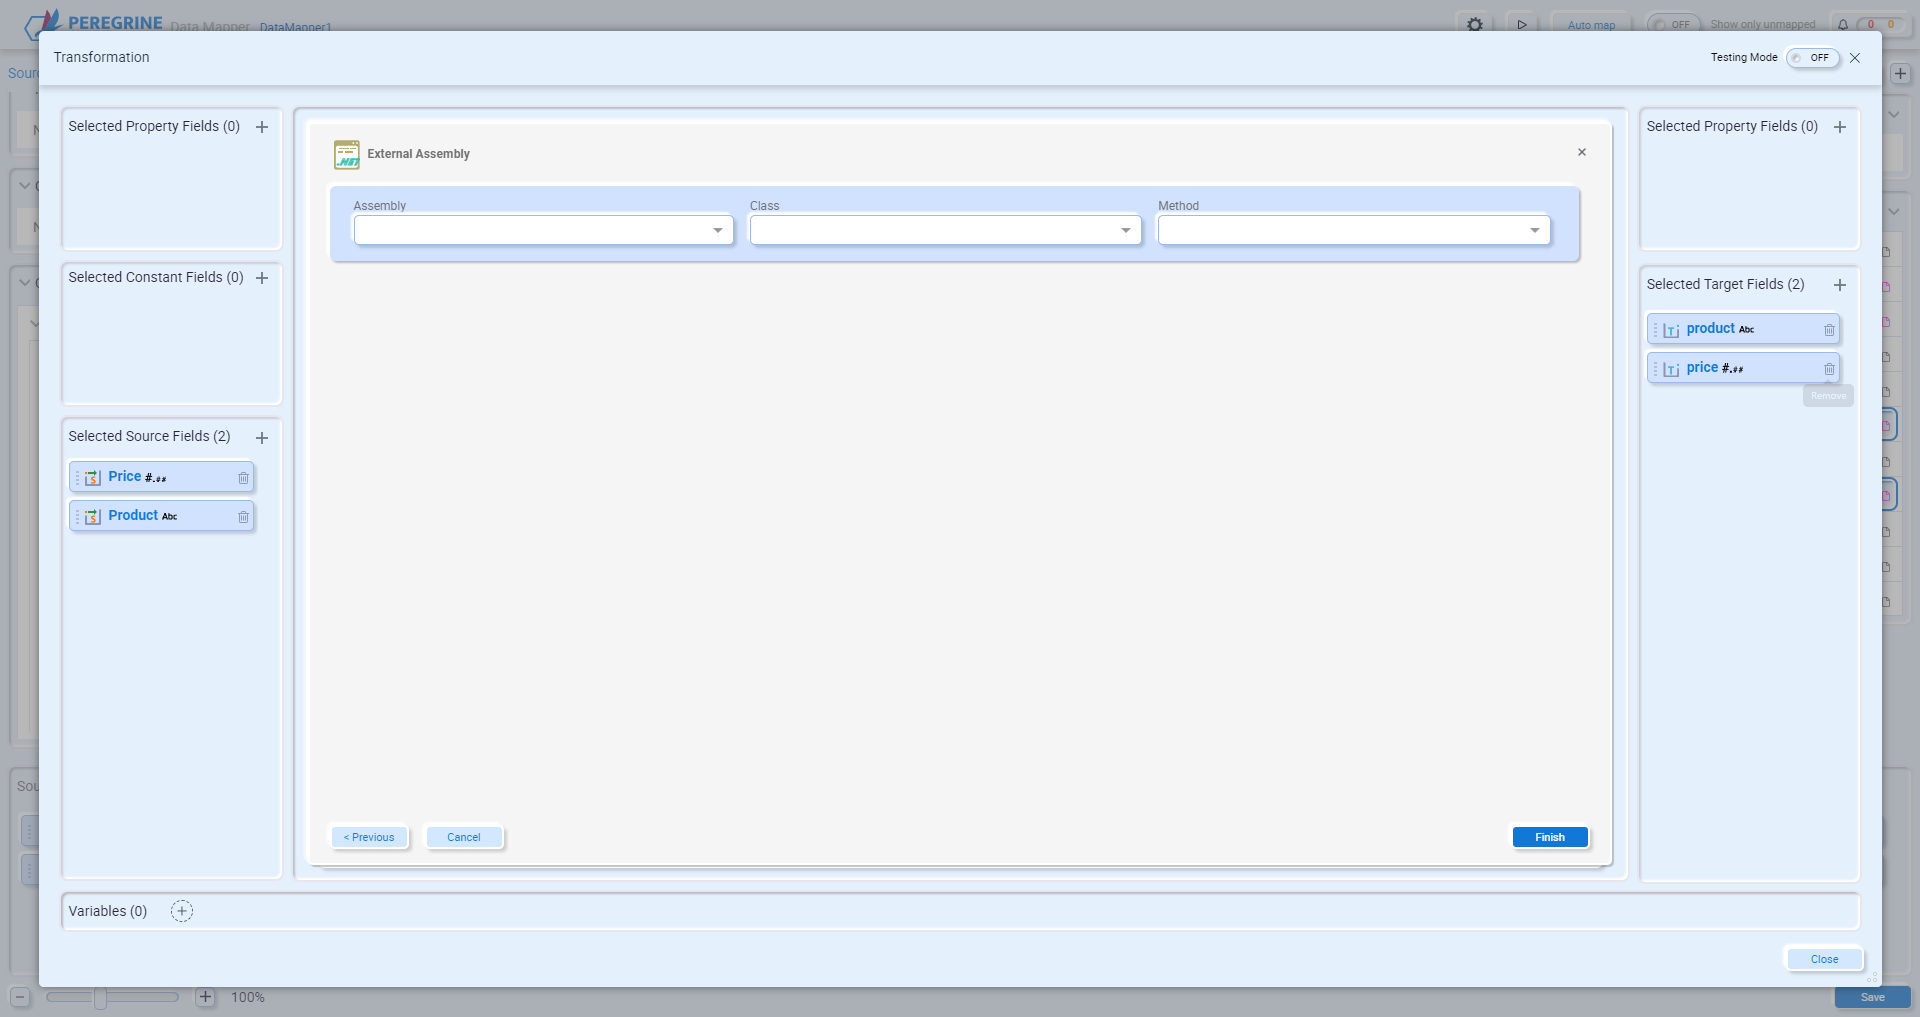
In the Assembly drop-down list, add an assembly by selecting Import an Existing Assembly. Navigate to the folder containing the assembly you want to use and select it. Click Open.
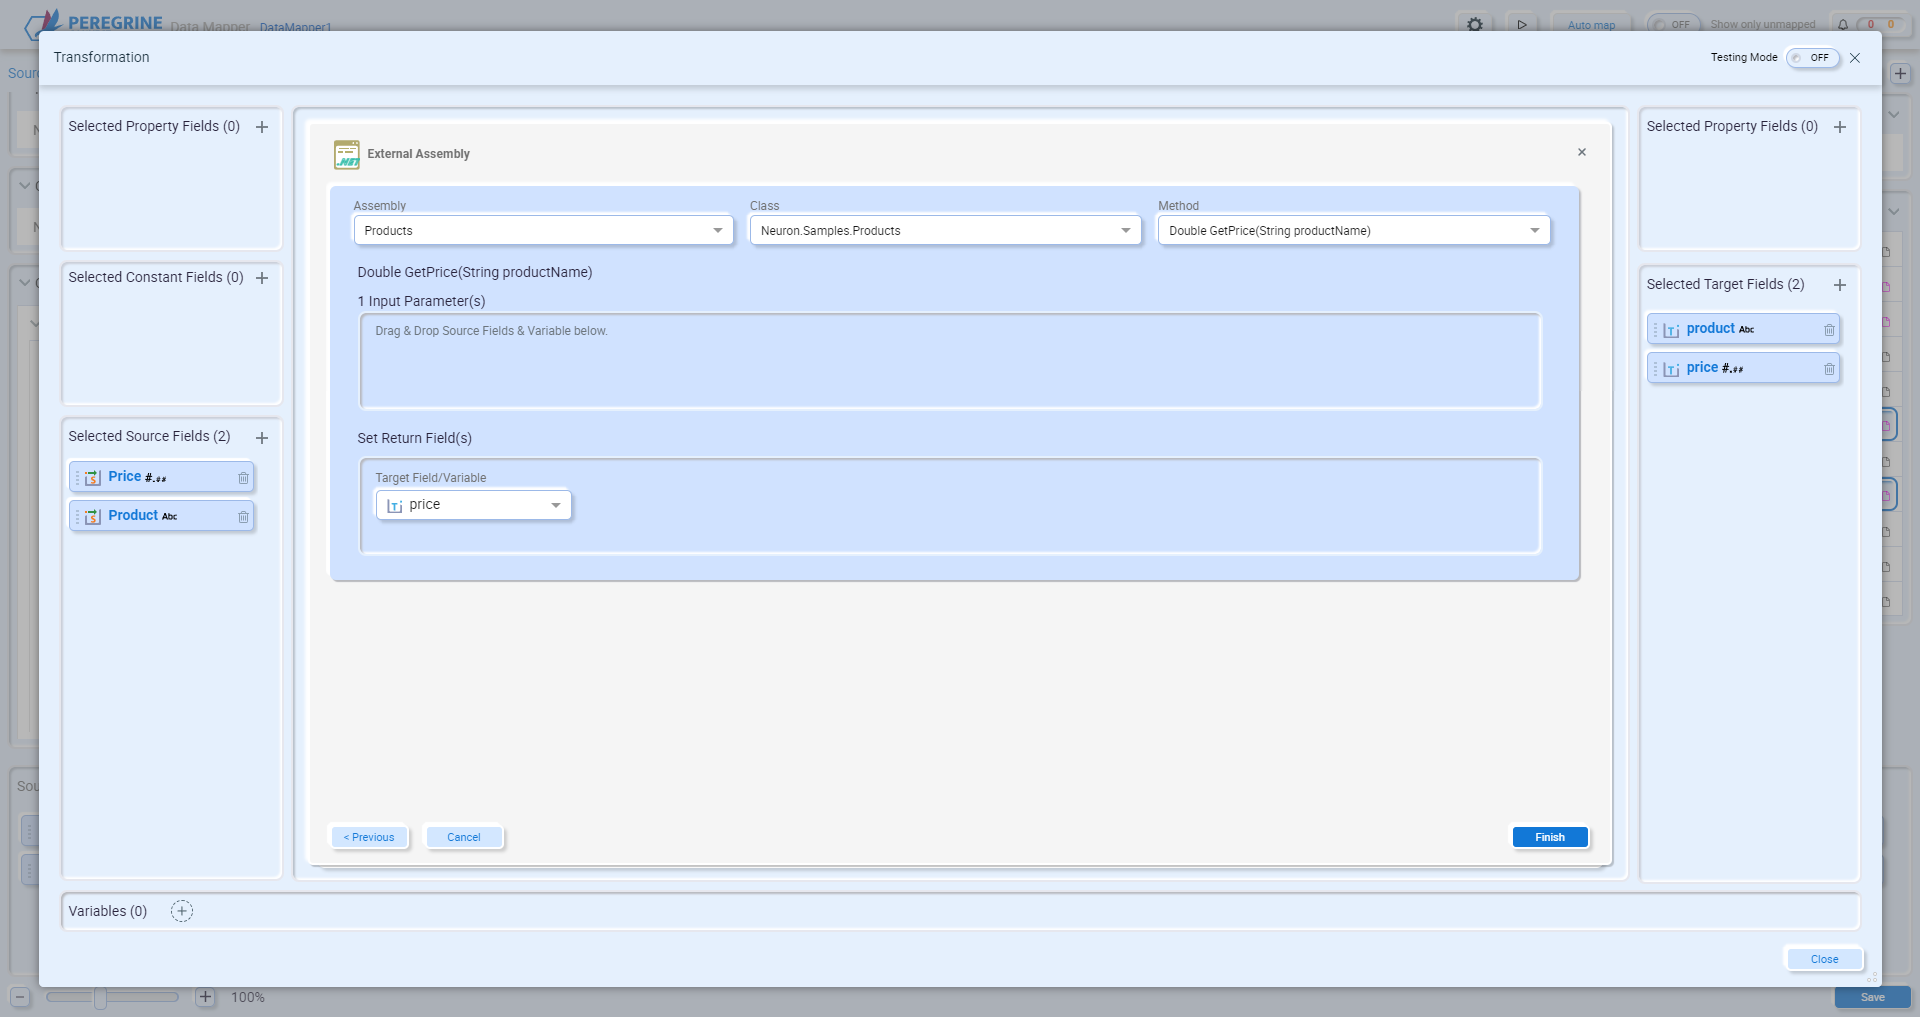
The public classes from the assembly will be displayed in the Class drop-down list. When you select a class the list of public methods in that class will then be displayed in the Method drop-down list.
If the selected method has any input parameters, you will need to drag a source, property or constant field or a variable onto the Input Parameter(s) area. Make sure to order the added fields in the correct order of the parameters.
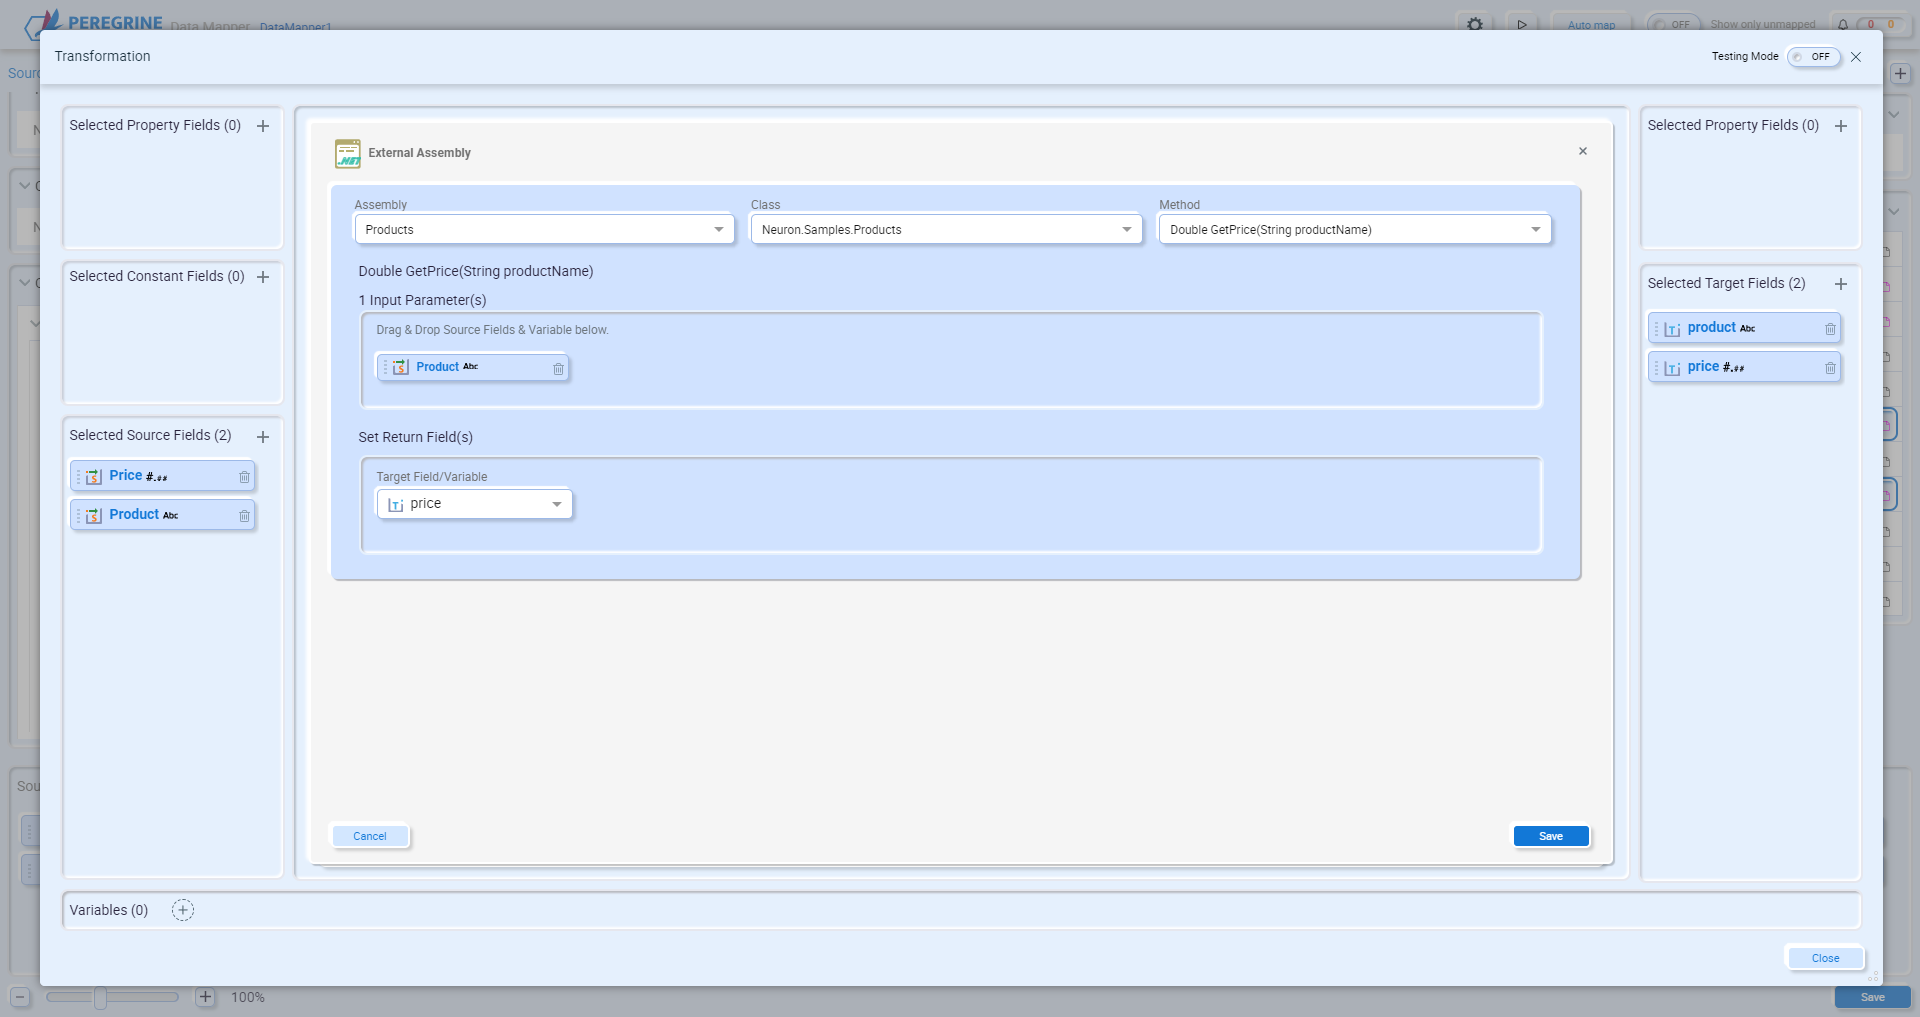
Click Finish to save the transformation.
Note – Requirements for External Assemblies
- Only supports .NET classes containing a default constructor or no constructor.
- Supports static classes and methods.
- Does not support parameterless methods.
- Does not support out or ref parameters.
- The return value and input parameters must use one of the following types:
- bool
- byte
- char
- Datetime
- decimal
- double
- float
- int
- long
- sbyte
- short
- string
- uint
- ulong
- ushort
- Duration
- IList<object>
Custom Expression
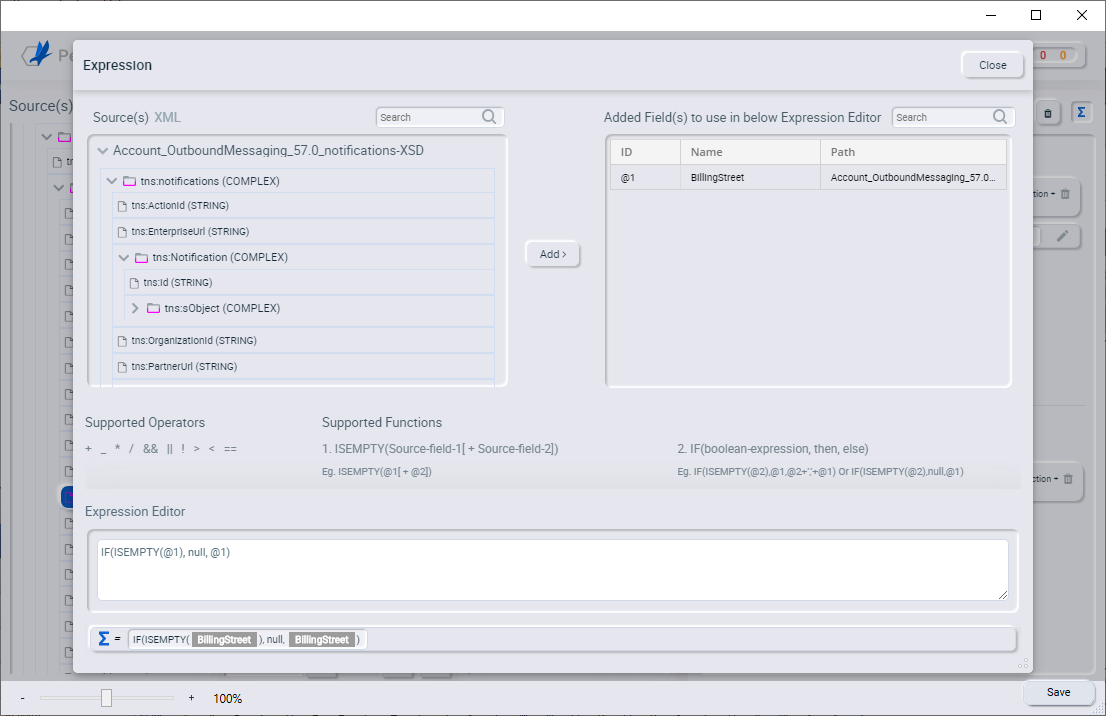
The Custom Expression function is provided for backwards compatibility with Data Maps created in Neuron ESB version 3.7.5. If you created a Data Map in that release, and then upgraded to 3.8 or newer, any conditional expressions used will be migrated to Custom Expressions.
Expression Editor in Neuron ESB 3.7.5:
The same expression migrated to the Custom Expression function in Neuron ESB 3.8 and newer:
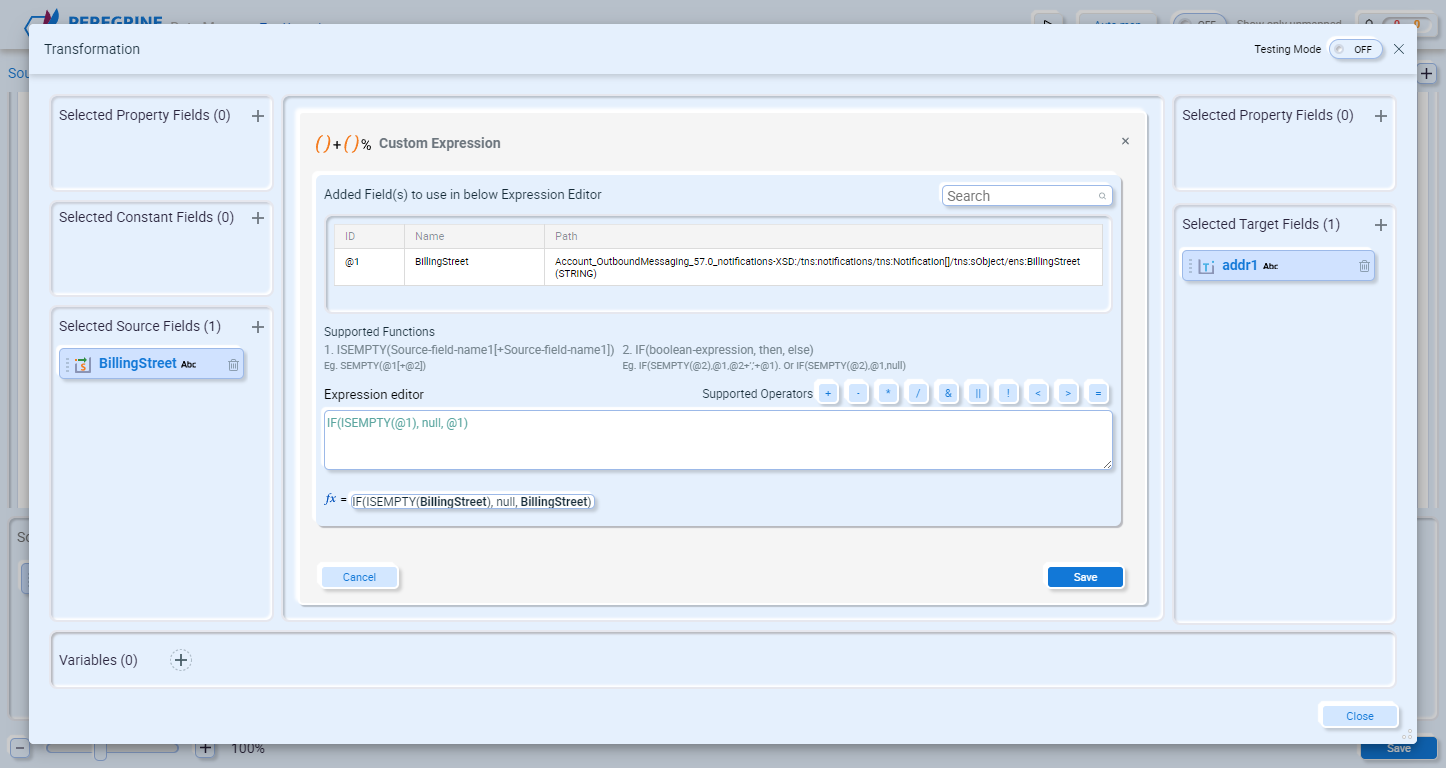
This functionality is currently not being deprecated, but you should not continue to develop new expressions with this function.
Custom
If you find yourself reusing the same C# code in a Custom Script, or you have some complex logic that would be easier to implement in a separate .NET assembly, you can create your own custom functions to use in the Data Mapper. Once a custom function is added to the Data Mapper it will be available for other maps.
Creating a custom function is easy. Open Visual Studio and create a new .NET Standard 2.0 class library:
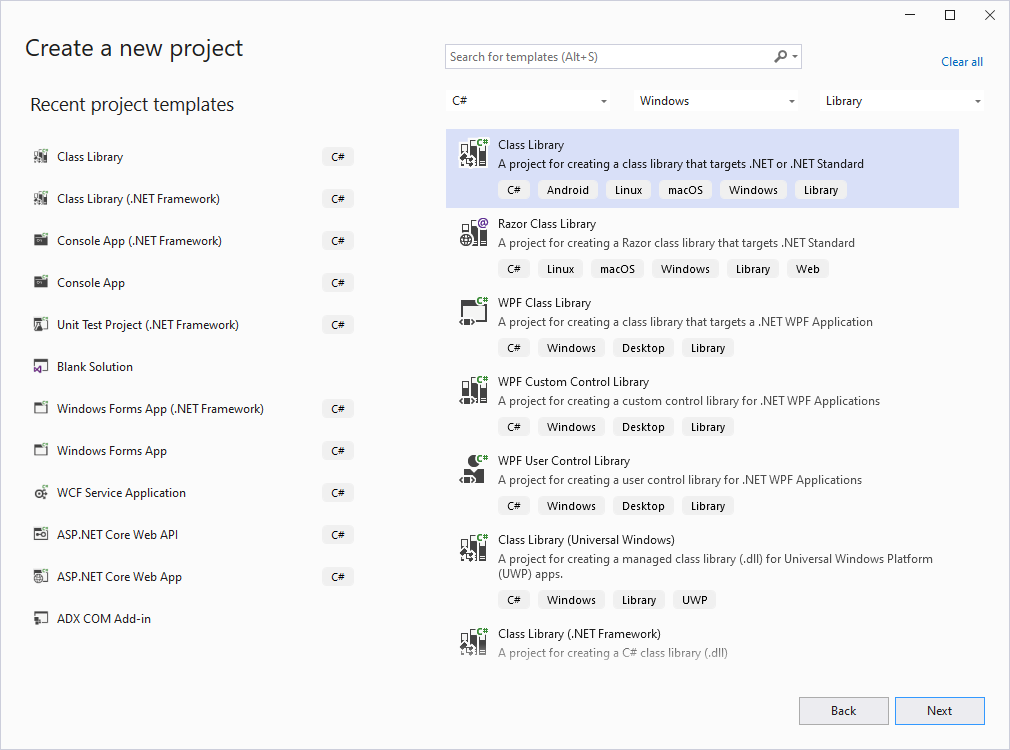
Add references to the following Peregrine Data Mapper assembly files:
- <Neuron Install Location>\<Instance>\Peregrine.DataMapper.Model.dll
- <Neuron Install Location>\<Instance>\Peregrine.DataMapper.Api.dll
The following steps create a function called CharacterCount, which will count the number of times a specified character appears in a string.
- Create a new class file called CharacterCountFunction.cs and replace the default code with the following which defines the function name and its input fields:
using System;
using System.Linq;
using Peregrine.DataMapper.Api.Spi;
using Peregrine.DataMapper.Model;

namespace Peregrine.Samples.DataMapper.Functions
{
    [DataMapperActionMetadata("CharacterCount", "Counts the number of instances of a specific character in a string", "")]
    public class CharacterCount : Peregrine.DataMapper.Model.Action
    {
        [DataMapperActionProperty("Character", "Character to count", EFieldType.CHAR)]
        public char Character { get; set; }
    }
}
The custom function is marked with attributes throughout the code. Notice in the above code that the custom function class is annotated with the following attribute:
[DataMapperActionMetadata("CharacterCount ", "Counts the number of instances of a specific character in a string", "")]In the DataMapperActionMetadata attribute, the first parameter is the display name of the function, and the second parameter is the description of the function.
The Character property is also decorated with an attribute:
[DataMapperActionProperty("Character", "Character to count", EFieldType.CHAR)]
public char Character { get; set; }
In the DataMapperActionProperty attribute, the first parameter is the display name of the function argument, and the second parameter is the description of the argument.
- Now add a second class to CharacterCountFunction.cs. This class defines the implementation of the CharacterCount function:
public class CharacterCountService : IDataMapperFieldAction
{
   /// <summary>
   /// Count the instances of a character in a string
   /// </summary>
   /// <param name="characterCount">CharacterCount contains the character to count</param>
   /// <param name="input">Input field string value</param>
   /// <returns></returns>
   /// <exception cref="System.ArgumentException"></exception>
   [DataMapperActionProcessor(SourceType = EFieldType.STRING, TargetType = EFieldType.INTEGER)]
   public int CharacterCountFunction(CharacterCount characterCount, String input)
   {
      if (characterCount == null)
      {
         throw new System.ArgumentException("A function must be specified");
      }
      if (characterCount.Character == '\0')
      {
         throw new System.ArgumentException("A character is required");
      }
      if (String.IsNullOrEmpty(input))
      {
         return 0;
      }

      return input.Count(f => f == characterCount.Character);
   }
}
The CharacterCountService class must implement the IDataMapperFieldAction interface, indicating that it contains methods taking the first parameter as any function derived from the Action base class and the second parameter as the input field value on which the function is applied. In the example above, the CharacterCountFunction method returns the number of occurrences of the character in the input string. Additionally, The CharacterCountFunction function is annotated with the DataMapperActionProcessor attribute. The SourceType and TargetType parameters define the data types for the input and output of the custom function, respectively.
- Build the solution in Visual Studio.
- In the Data Mapper, select an existing or create a new link between a source string and target integer (number) field.
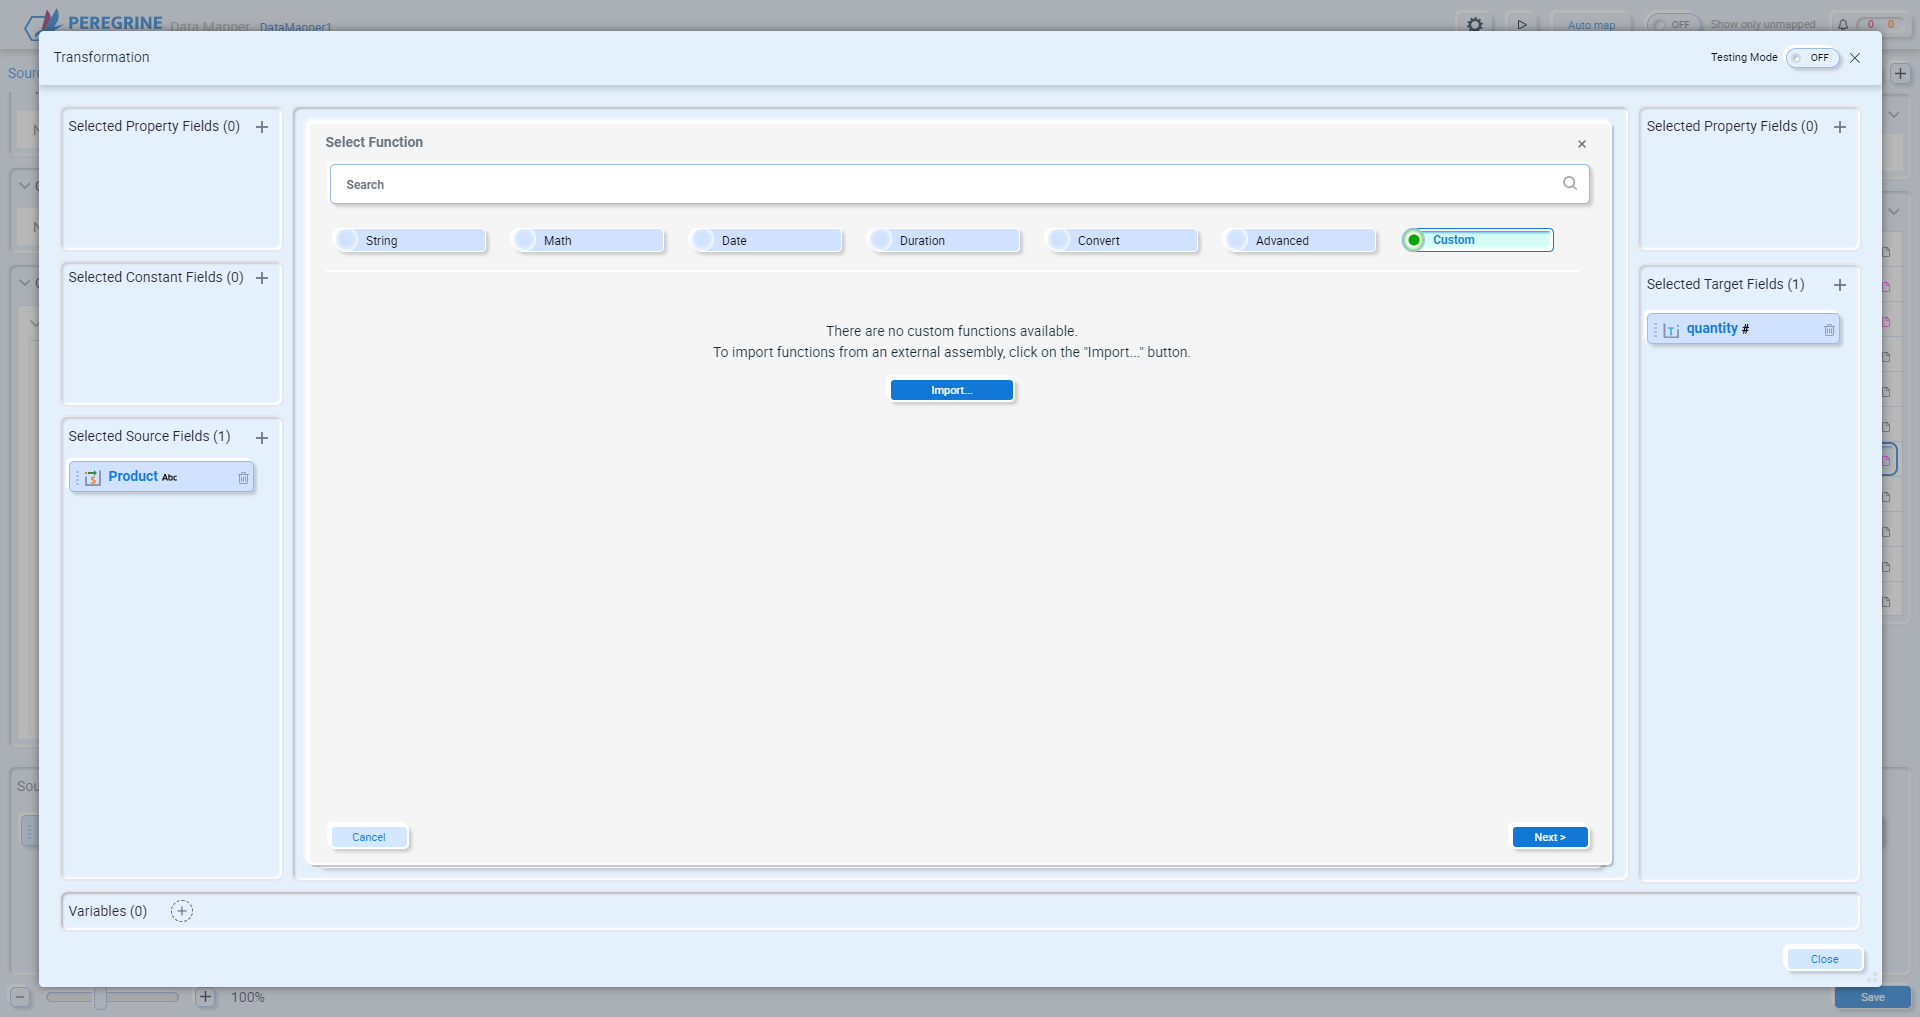
- In the Transformation Center, add a new function and click “Custom”:
` 
- Click the Import… button:
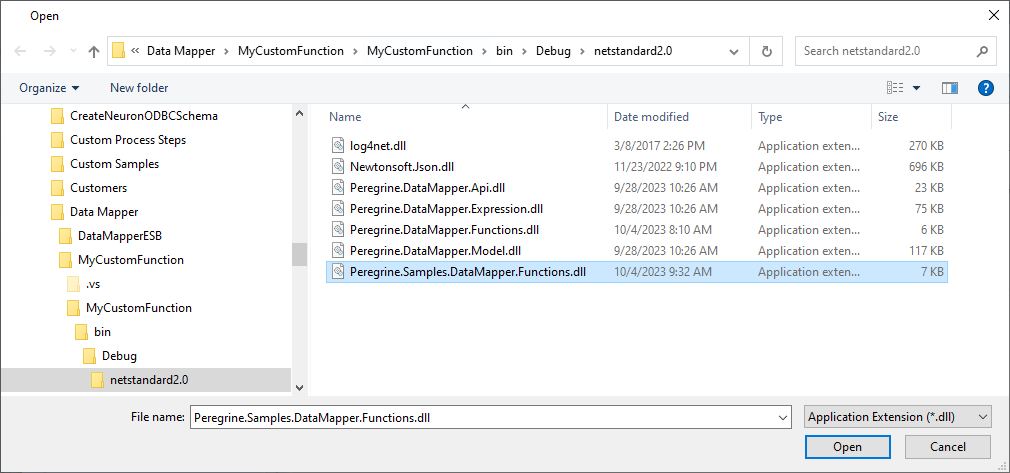
- Navigate to and select the .NET assembly containing your custom function(s) and click Open:
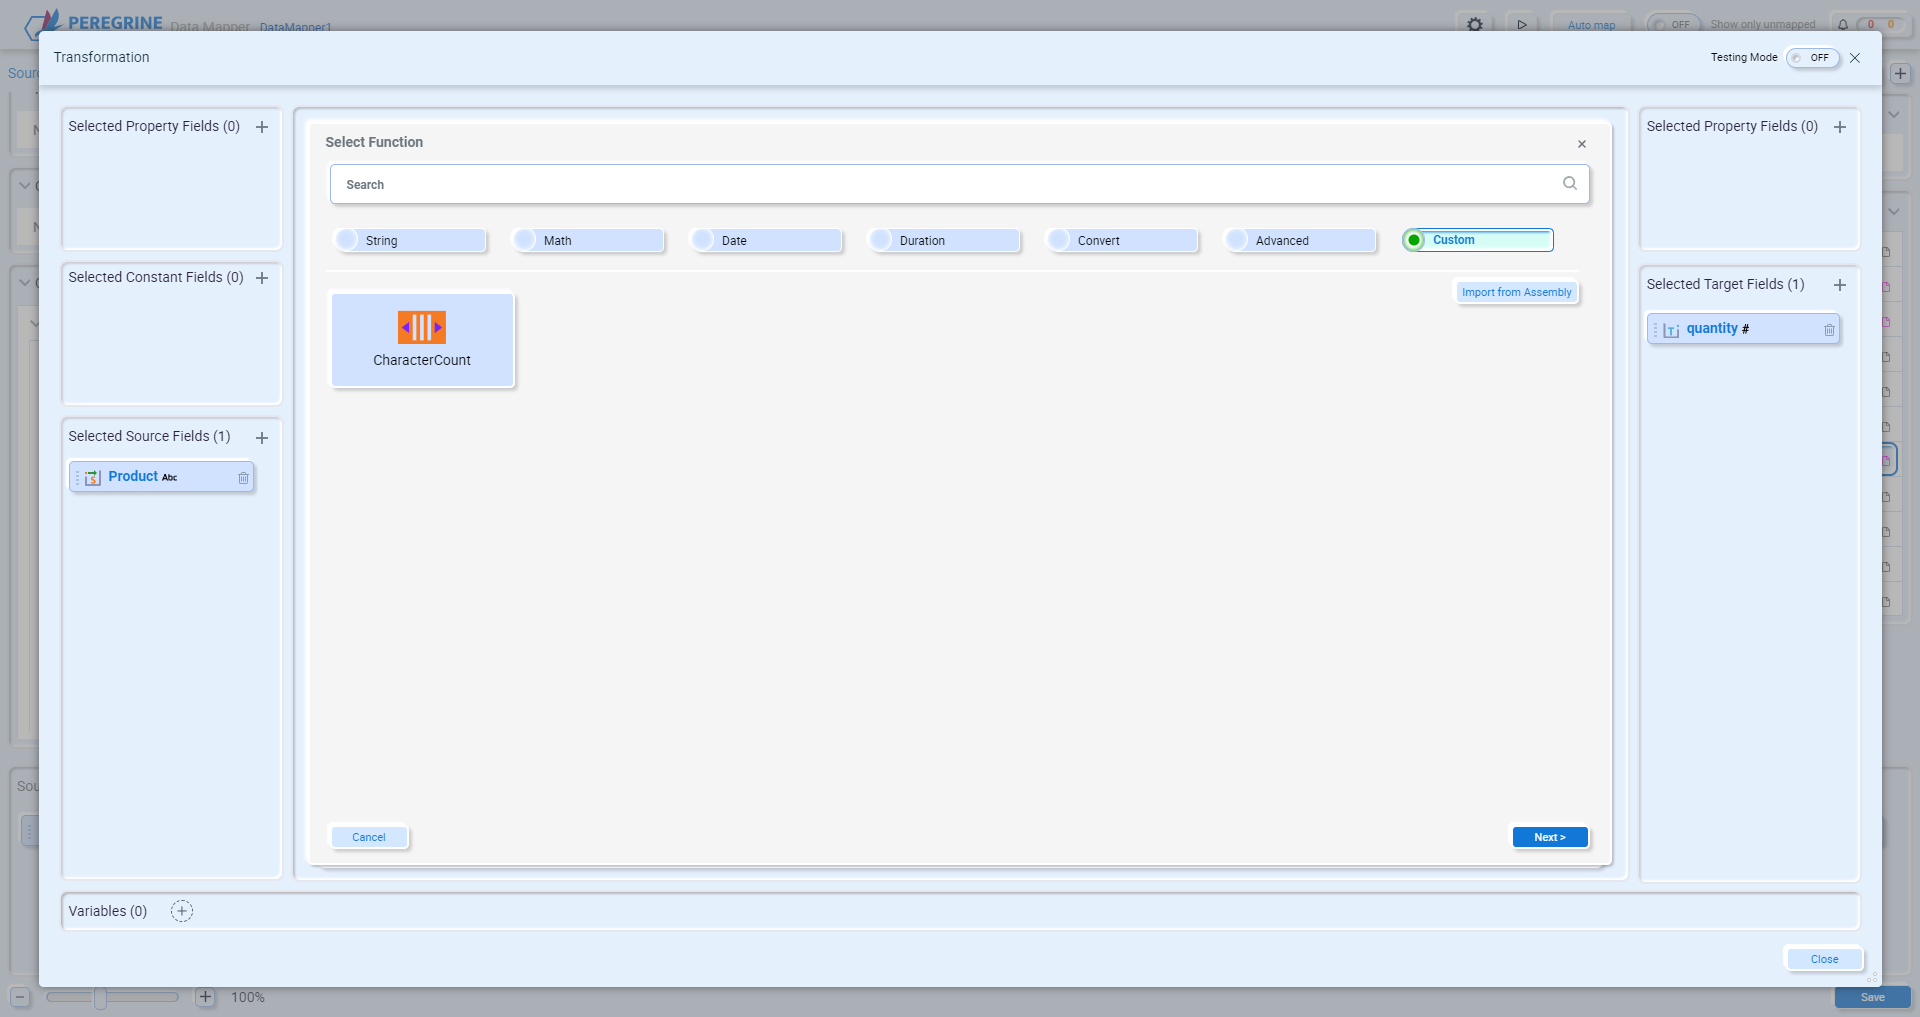
- Each of the custom functions in the assembly will be displayed. Select the function you want to use and click Next.
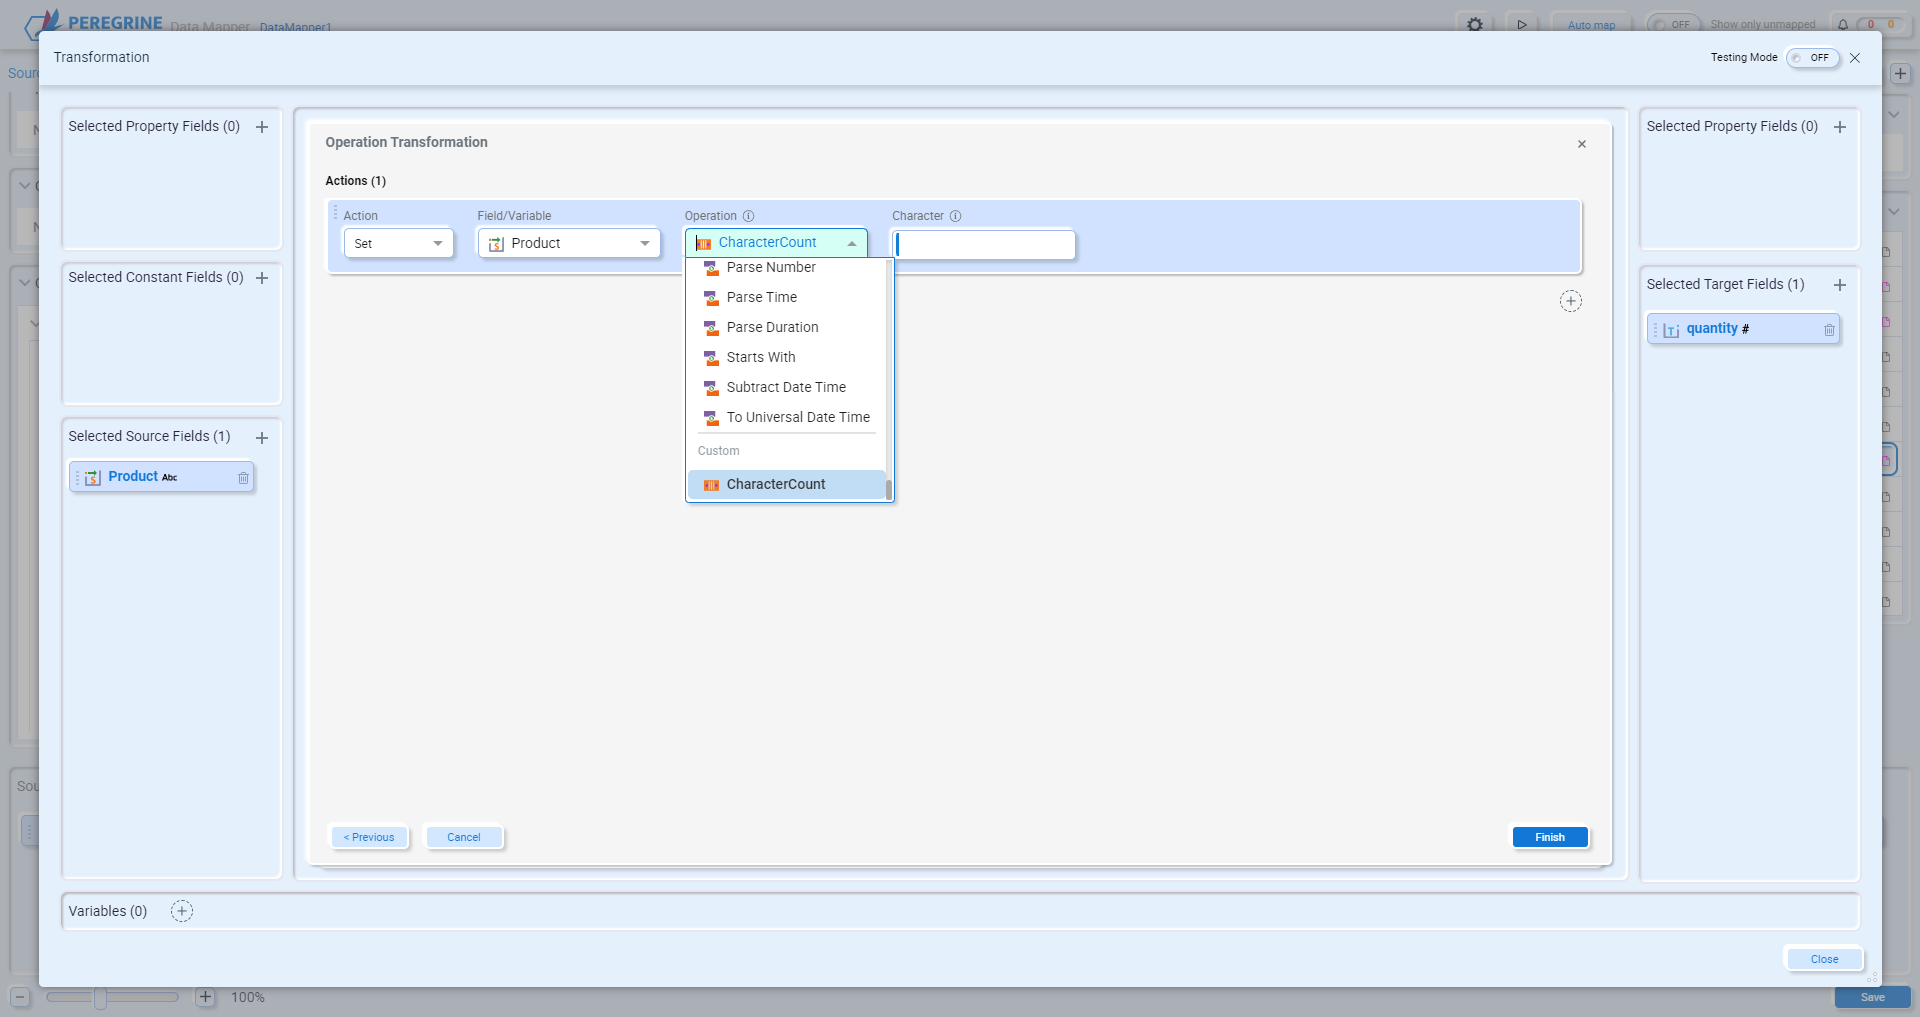
- Configure the function parameters. In this example you can select which source field or variable to use as an input and which character to count. Set these values and click Finish.
- Test your function by enabling Testing Mode. To enable Testing Mode, toggle the switch in the upper right corner of the Transformation editor:
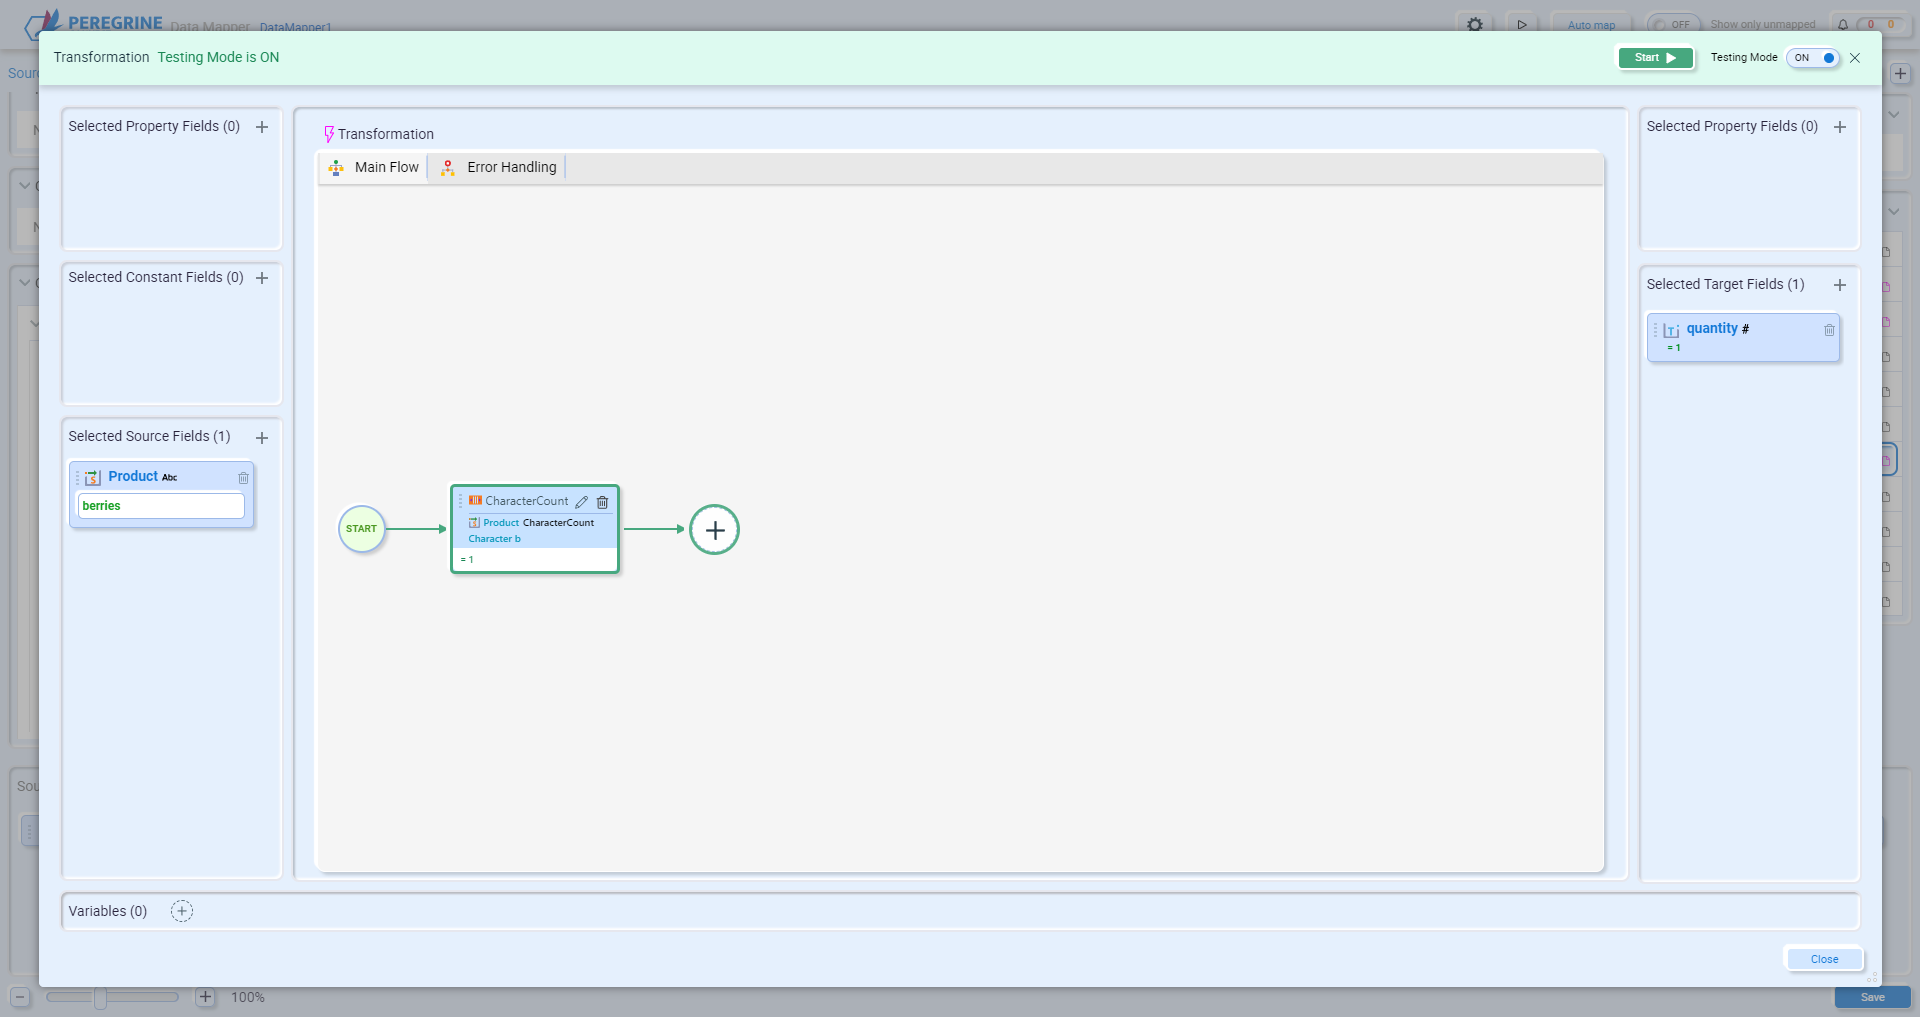
- Enter a string that contains the character you want to count in the selected source field. Click the Start button to see the results of the custom function.
When you import a new assembly containing custom functions, the Data Mapper copies that assembly from the location you selected it from to the location <Neuron Install Location>\<Instance>\DataMapper. Whenever the Data Mapper is opened from this same Neuron instance, the custom functions will automatically be loaded. If you open the Data Mapper using a different Neuron instance, or on a different computer, you will need to reimport the custom functions. If you don’t want to use the UI to import the functions, you can manually copy the assembly(s) to <Neuron Install Location>\<Instance>\DataMapper. The same is true for the runtime – any Neuron instance on any server from which you want to execute the maps that use the custom functions will also need a copy of the assemblies. We currently do not automatically deploy custom assemblies across environments.
Function Reference
Data transformation involves converting data from one format to another, usually from a source system’s format to the desired format of a destination system. Within the Data Mapper, you have the option to apply transformations to one or multiple fields. These transformations are essentially functions executed on the chosen field(s).
Split
The Split function is used to separate a single string into multiple parts based on a specified delimiter. This can be helpful when you have a string that contains multiple values separated by a common character, such as a comma, semi-colon, pipe, or any other character. The are three split types – simple, custom, and advanced.
Simple
A simple split allows you to split the source field by one of the characters provided in a list.

In the above example, if customerName contains “John Doe”, then First Name will receive “John” and Last Name will receive “Doe”.
- Action – Select “Split”.
- Field/Variable – Select a source field or the variable you wish to split.
- Split Type – “Simple”.
- By – Select the character to split the string by.
Custom
A custom split allows you to split the source field by any string of one or more characters.

In the above example, if customerName contains “JohnasdDoe”, then First Name will receive “John” and Last Name will receive “Doe”.
- Action – Select “Split”.
- Field/Variable – Select a source field or the variable you wish to split.
- Split Type – “Custom”.
- By – Enter a string to split the source field by.
Advanced
A custom split allows you to split the source field by any string using a regular expression.
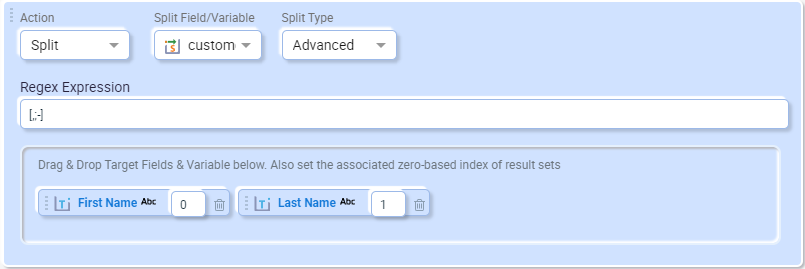
In the above example, the regular express is [,;-]. If customerName contains “John,Doe”, “John;Doe”, or “John-Doe”, then First Name will receive “John” and Last Name will receive “Doe”.
- Action – Select “Split”.
- Field/Variable – Select a source field or the variable you wish to split.
- Split Type – “Advanced”.
- Regular Expression – The regular expression that will be applied to the input string for splitting.
Concat
The Concat function is used to combine multiple strings into a single field adding the specified separator between each string. This can be helpful when you want to combine multiple fields into a single target field. The are three concat types – simple, custom, and advanced.
Simple
A simple concat allows you to combine multiple source fields and variables into a single target field or variable, using the selected character between each source field/variable.

In the above example, if First Name contains “John” and Last Name contains “Doe”, then customerName target field will receive “John Doe”.
- Action – Select “Concat”.
- Field/Variable – Select multiple source fields or the variables you wish to combine.
- Split Type – “Simple”.
- By – Select the character to separate the combined values.
Custom
A custom concat allows you to combine the source fields using any string of one or more characters to separate the combined values.
 In the above example, if First Name contains “John” and Last Name contains “Doe”, then customerName target field will receive “John – Doe”. The “By” characters are a dash with a space before and after.
- Action – Select “Concat”.
- Field/Variable – Select multiple source fields or the variables you wish to combine.
- Split Type – “Custom”.
- By – Enter a string to separate the combined values.
Advanced
A custom split allows you to combine the source fields using a custom format. This is similar to using String.Format in C#.
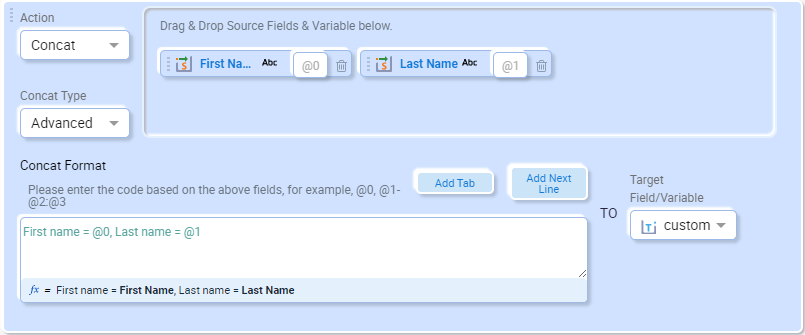
In the above example, if First Name contains “John” and Last Name contains “Doe”, then customerName target field will receive “First name = John, Last name = Doe”.
- Action – Select “Concat”.
- Field/Variable – Select multiple source fields or the variables you wish to combine.
- Split Type – “Advanced”.
- Concat Format – Enter the format to apply to the combined values.
The Concat Format can be any text. The placeholders for the source fields and variables start with the “@” sign. Each of the source fields and variables are listed with their placeholder value. For example, the First Name source field is @0. Similar to String.Format, the placeholders can be used in any order as well as multiple times in the format string. Tabs and New Line characters can be added using the buttons above the format text area.
Copy To
The Copy To function is used to copy the value of a source field or variable to one or more indexes of a repeating target field. This is useful for simple copying of data from a flat structure into a more complicated structure with repeating elements. This function will automatically be added to any mapping between a non-repeating field and a repeating field. It can be found under the “Math” category of functions and will only be visible when the mapping is between a non-repeating field and a repeating field.

In the above example, the contexts of the source field zip will be copied into the first occurrence of the BillingPostalCode target field.
- Action – Select “Copy To”.
- Field – Select the target field you wish to copy the value to.
- From Field/Variable – Select the source field or variable you wish to copy the value from.
- Indexes – A comma-separated indexes of the repeating item the value is being copied to. The index is zero-based.
Repeat
The Repeat function will use the value of a source field or variable to create a repeating target field a specified number of times. This is useful for simple copying of data from a flat structure into a more complicated structure with repeating elements. This function can be found under the “Math” category of functions and will only be visible when the mapping is between a non-repeating field and a repeating field.

- Action – Select “Repeat”.
- Field – Select the target field you wish to copy the value to.
- From Field/Variable – Select the source field or variable you wish to copy the value from.
- Count – The number of instances of the target field to create with the source field’s value.
Notes About Set Operations
Set Operations allow you to modify the contents of a field or variable, returning the result in that same field or variable. This example uses the Uppercase operation:
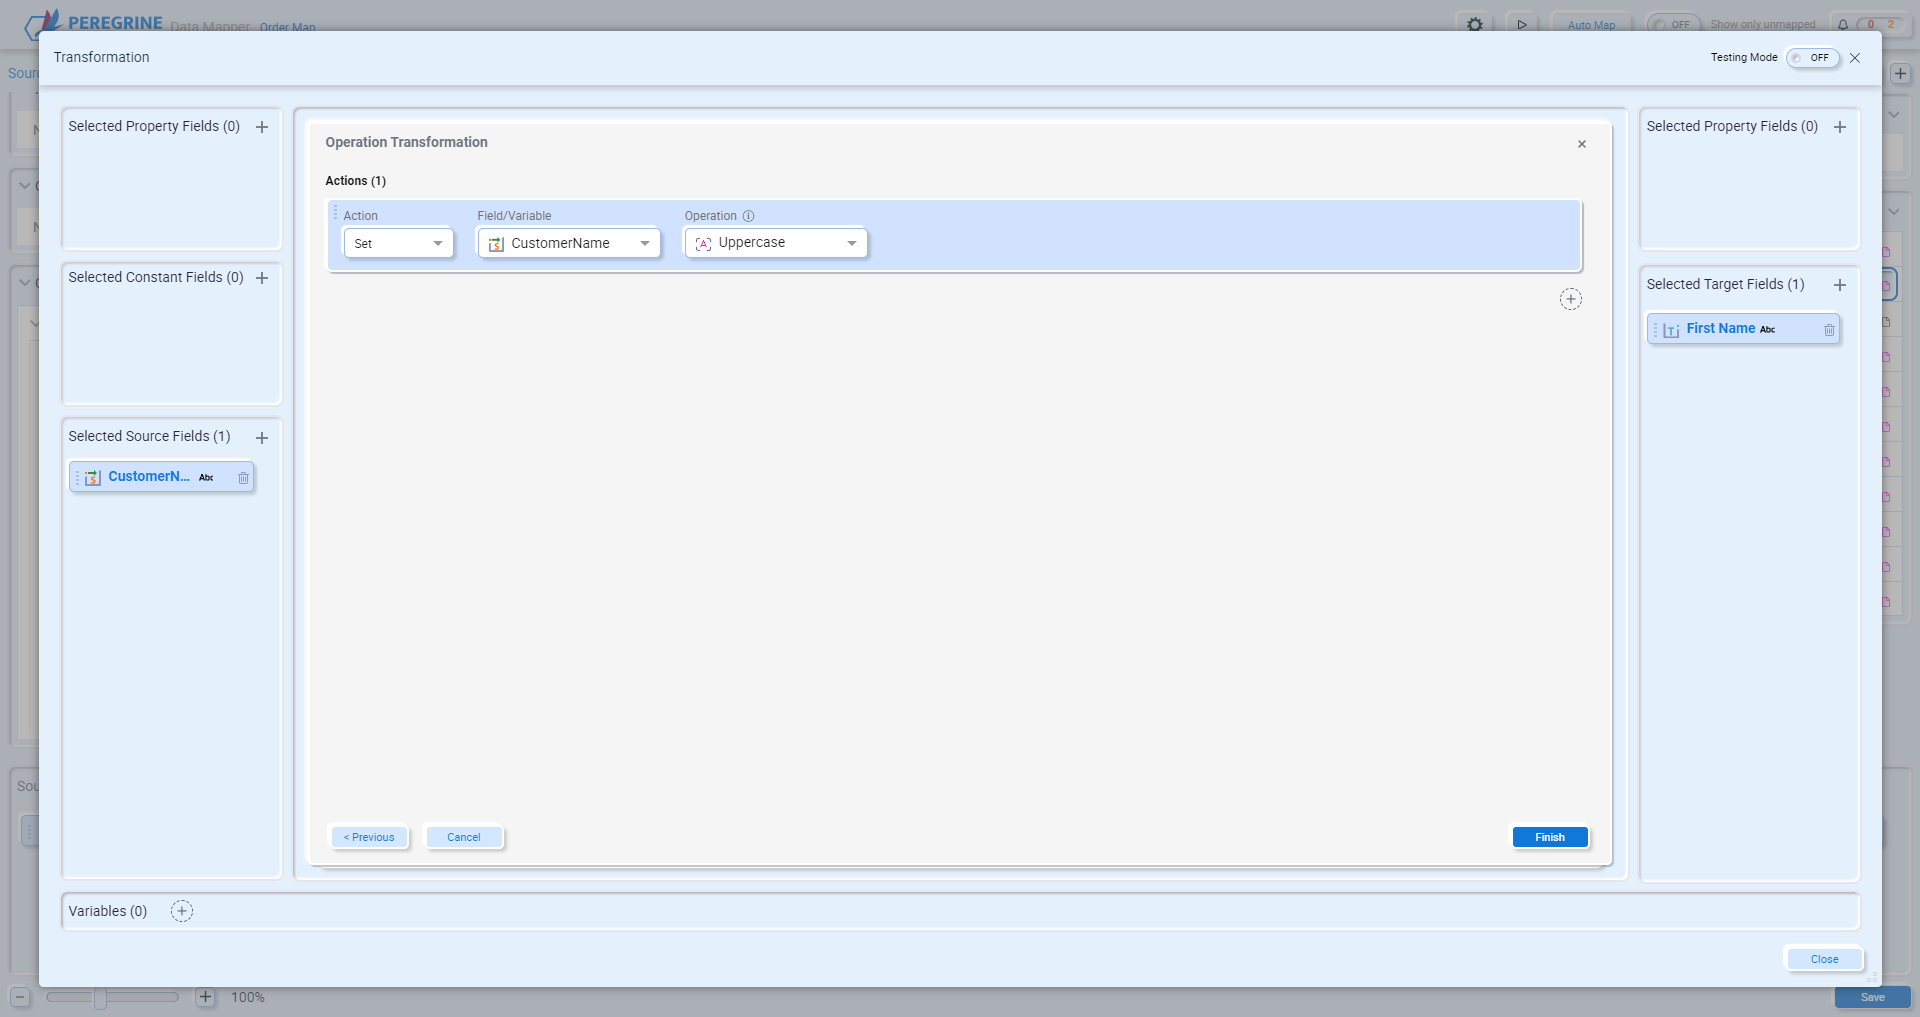
In this example, the Uppercase operation is applied to the contents of the source field CustomerName. After the operation is applied to CustomerName, the result is then mapped to the target field First Name. In this example you could also perform the Uppercase operation on the target field and achieve the same result:
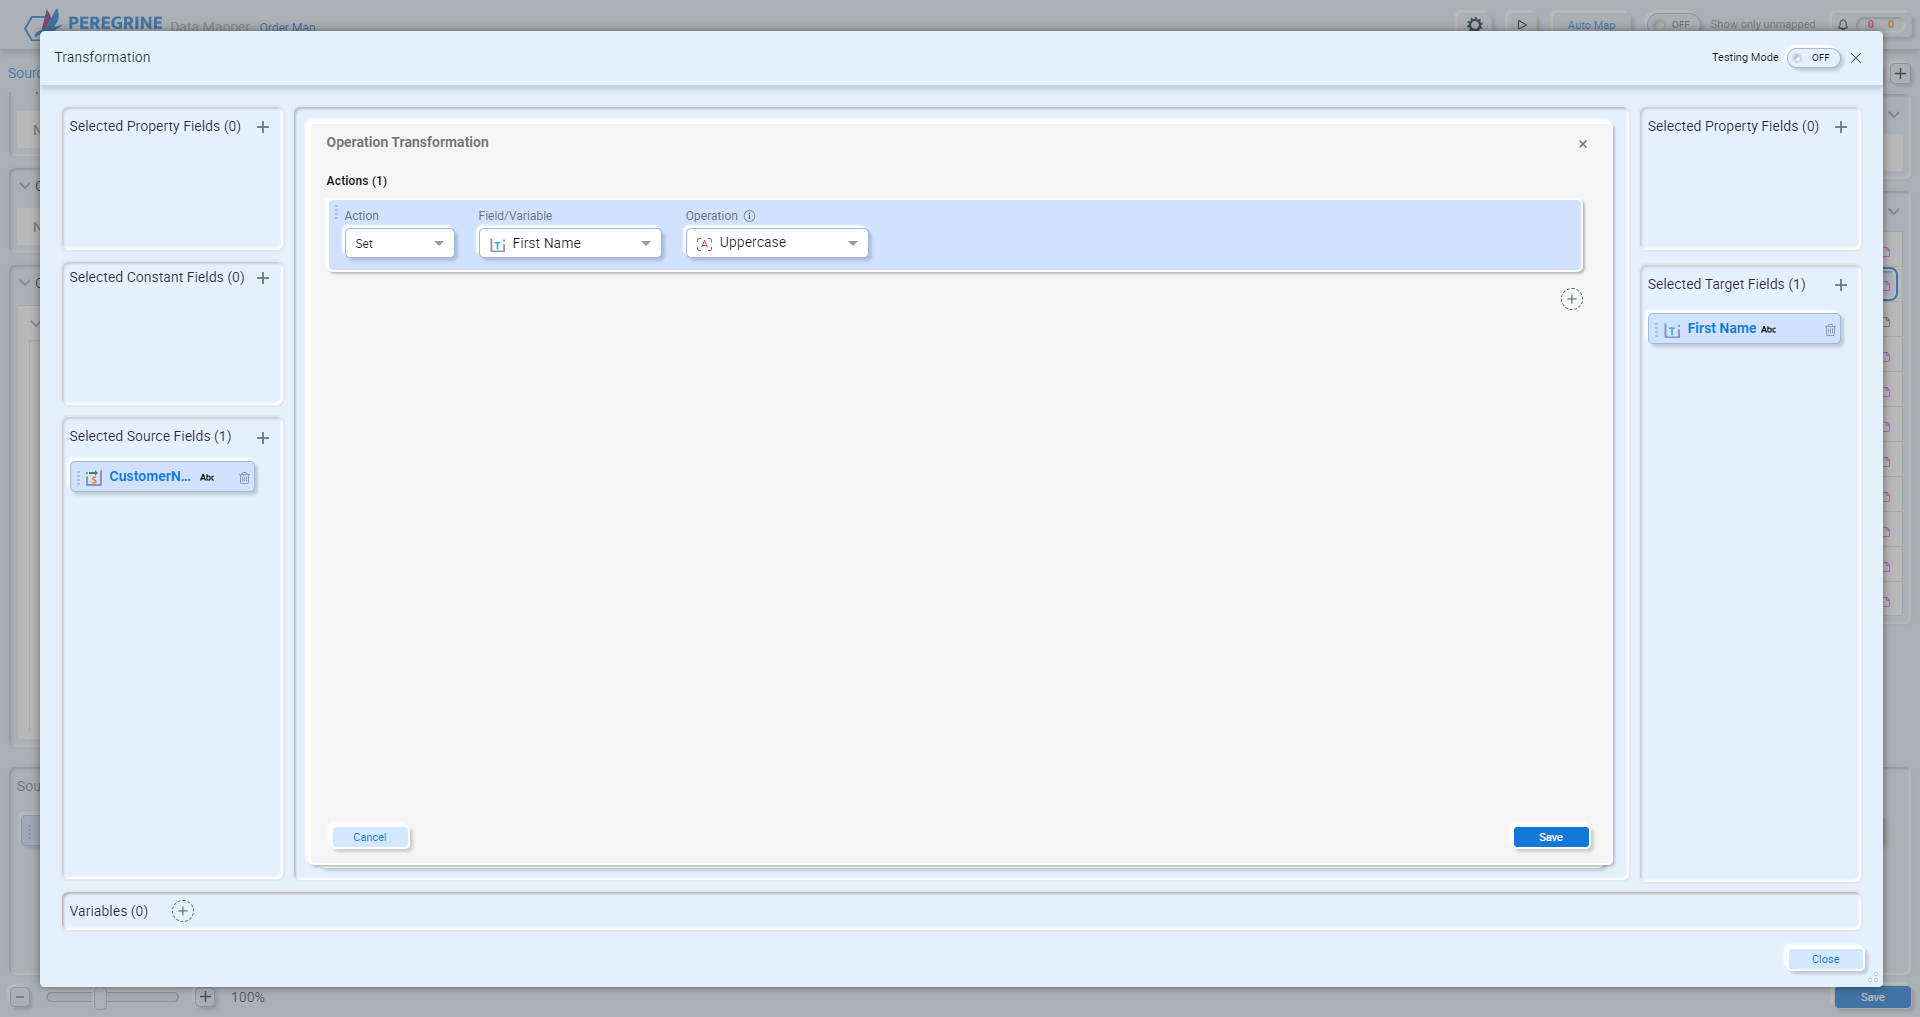
In one-to-one mappings as shown above, operations performed on source fields are executed before the source field is mapped to the target field. Operations performed on target fields are executed after the source field is mapped to the target field. Either way the target field has the desired result.
Now consider this many-to-one mapping:
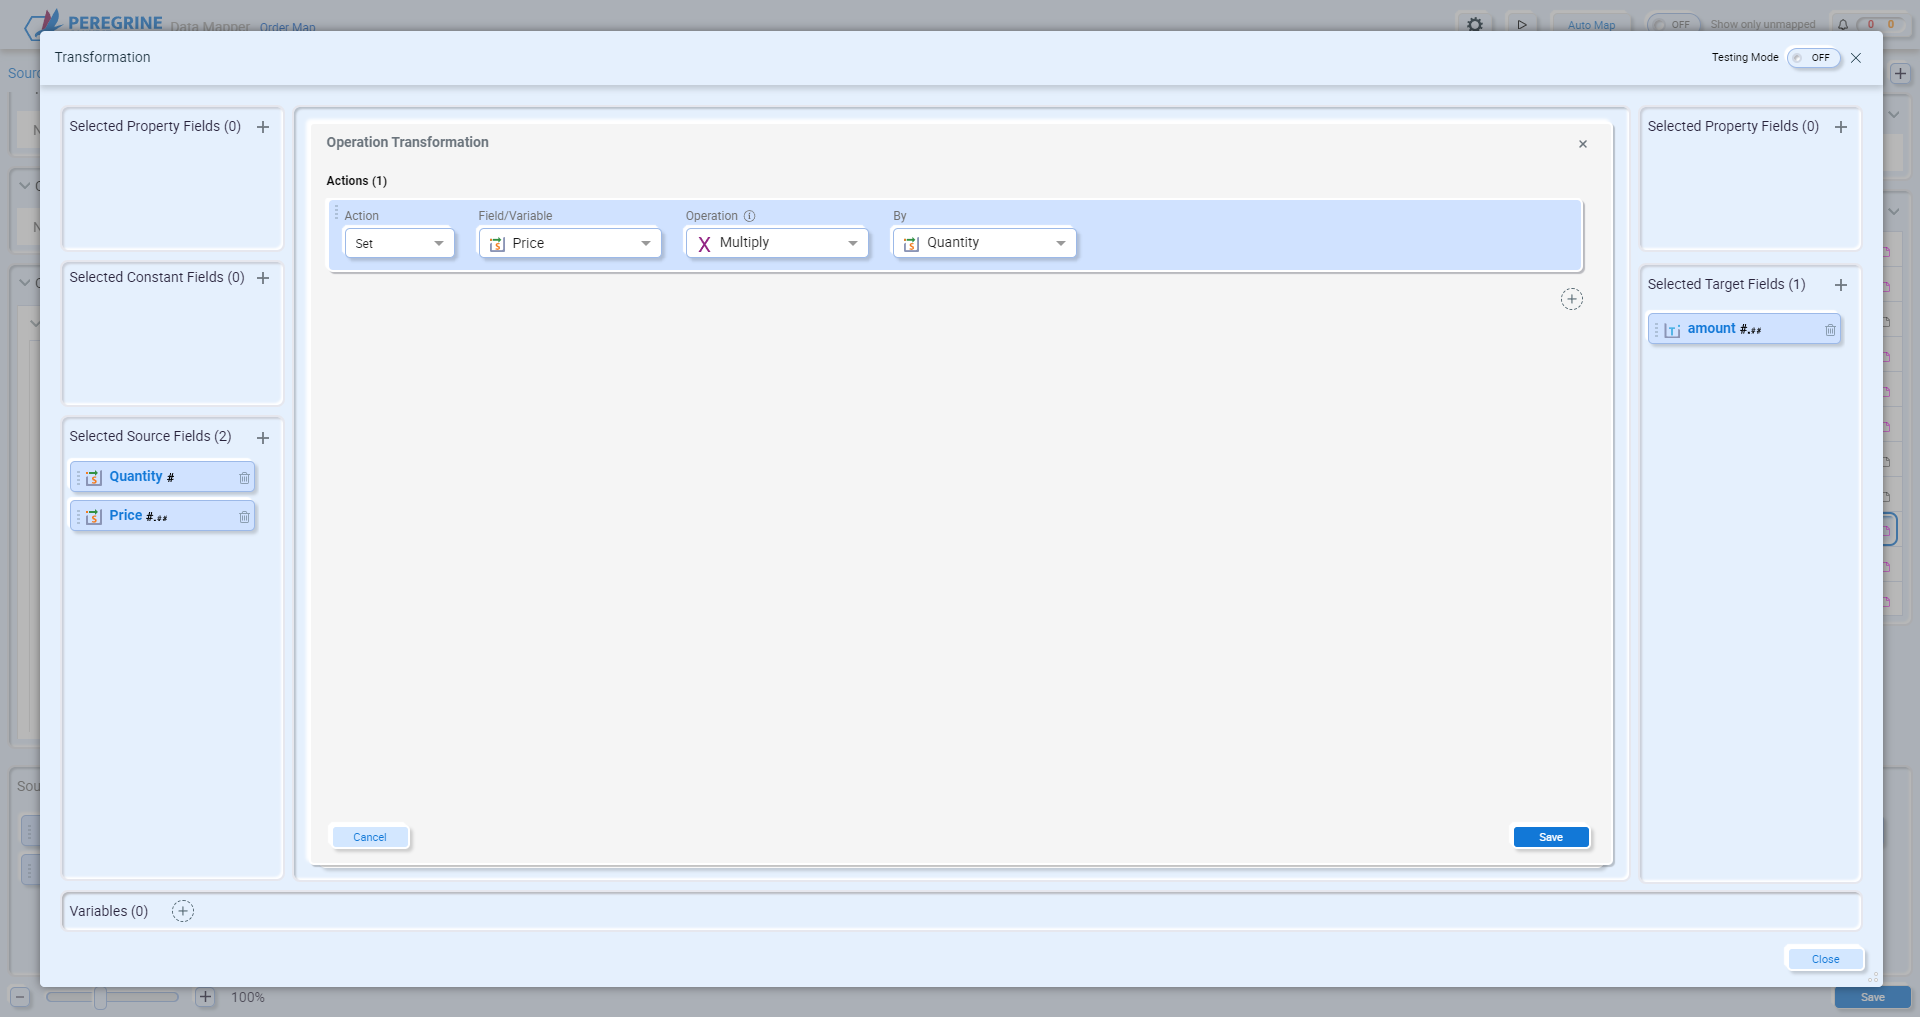
In this example you want to multiply the source fields Price and Quantity and set the target field as the result. The above example achieves this. The Multiply Operation multiplies the source field Price by the source field Quantity. The target field amount is set to the result. When there is a many-to-one mapping with Set operations, unless you explicitly assign the target field to a value, the value of the last source field listed will be mapped to the target field. In the example above, since Price is the last source field listed, it’s value, after the operations(s) are applied, will be mapped to the target field amount. If Quantity were the last field listed, then it’s value would be mapped.
The best practice is to always assign the desired value or field to the target field:
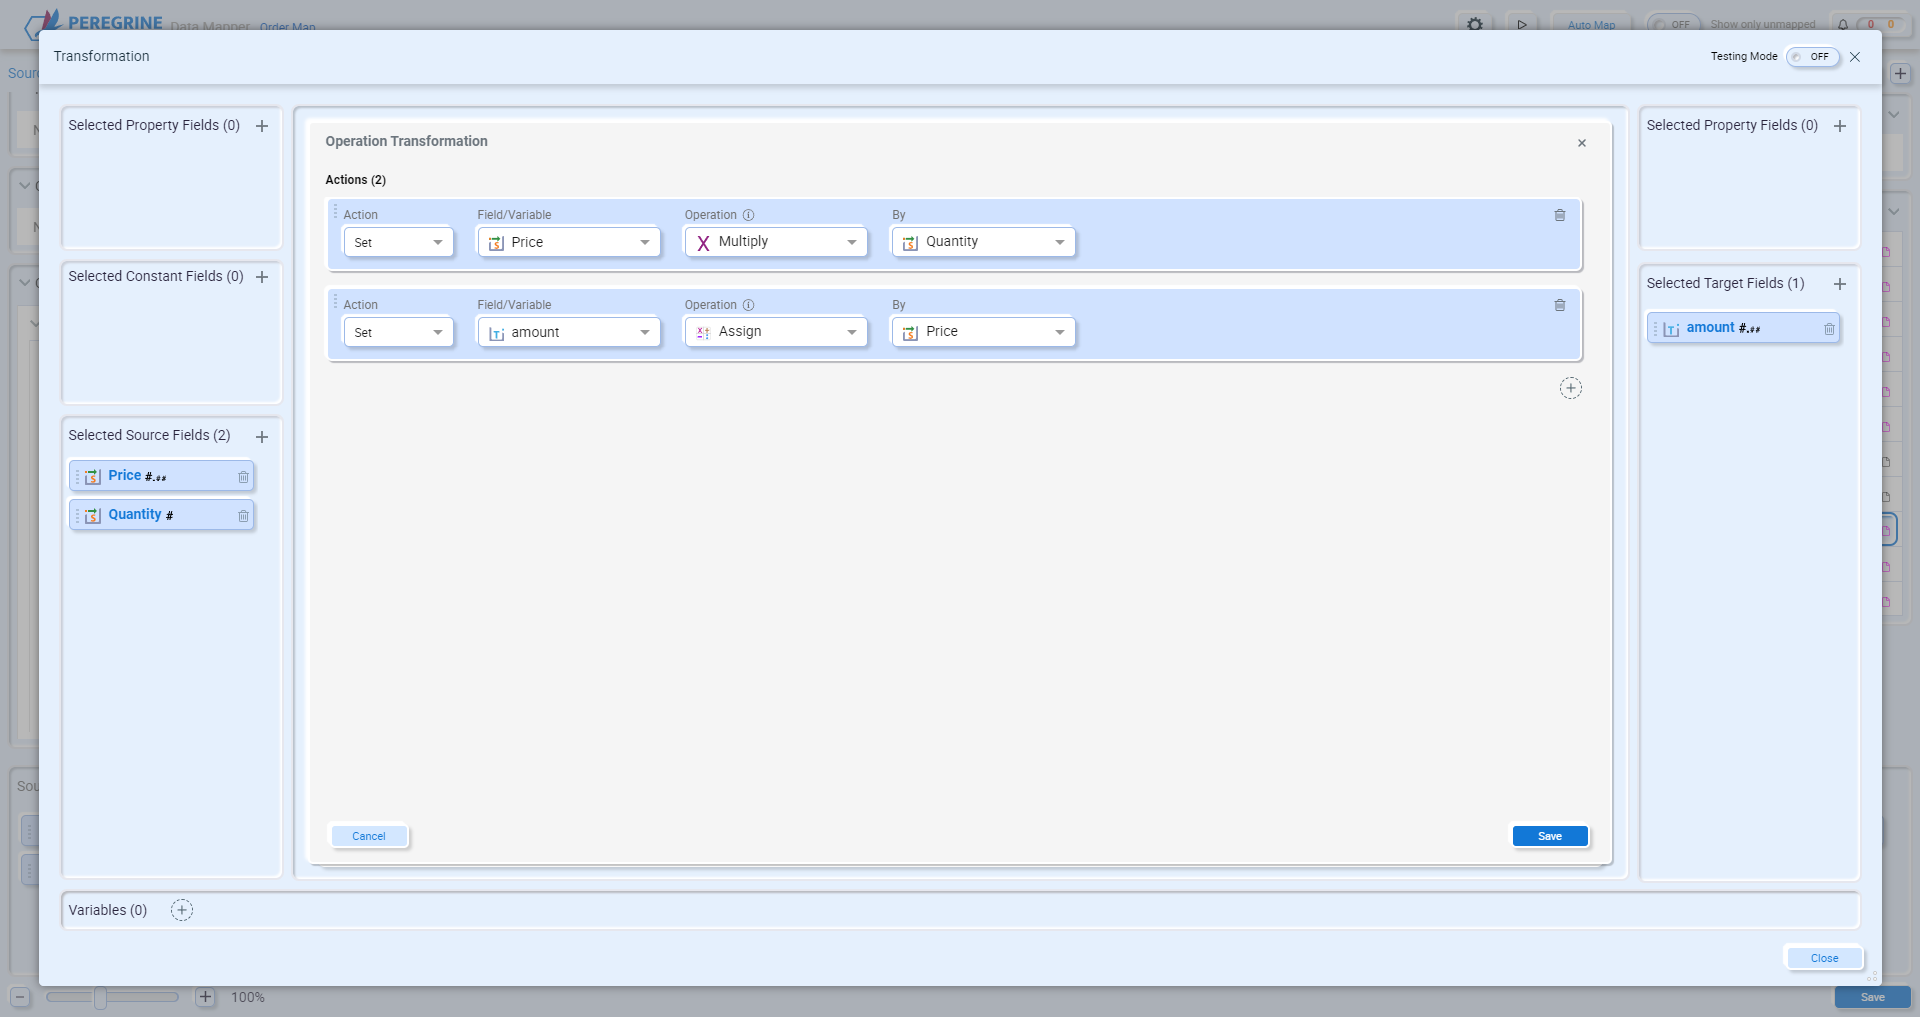
This assures the correct value is mapped to the target field regardless of the order of source fields.
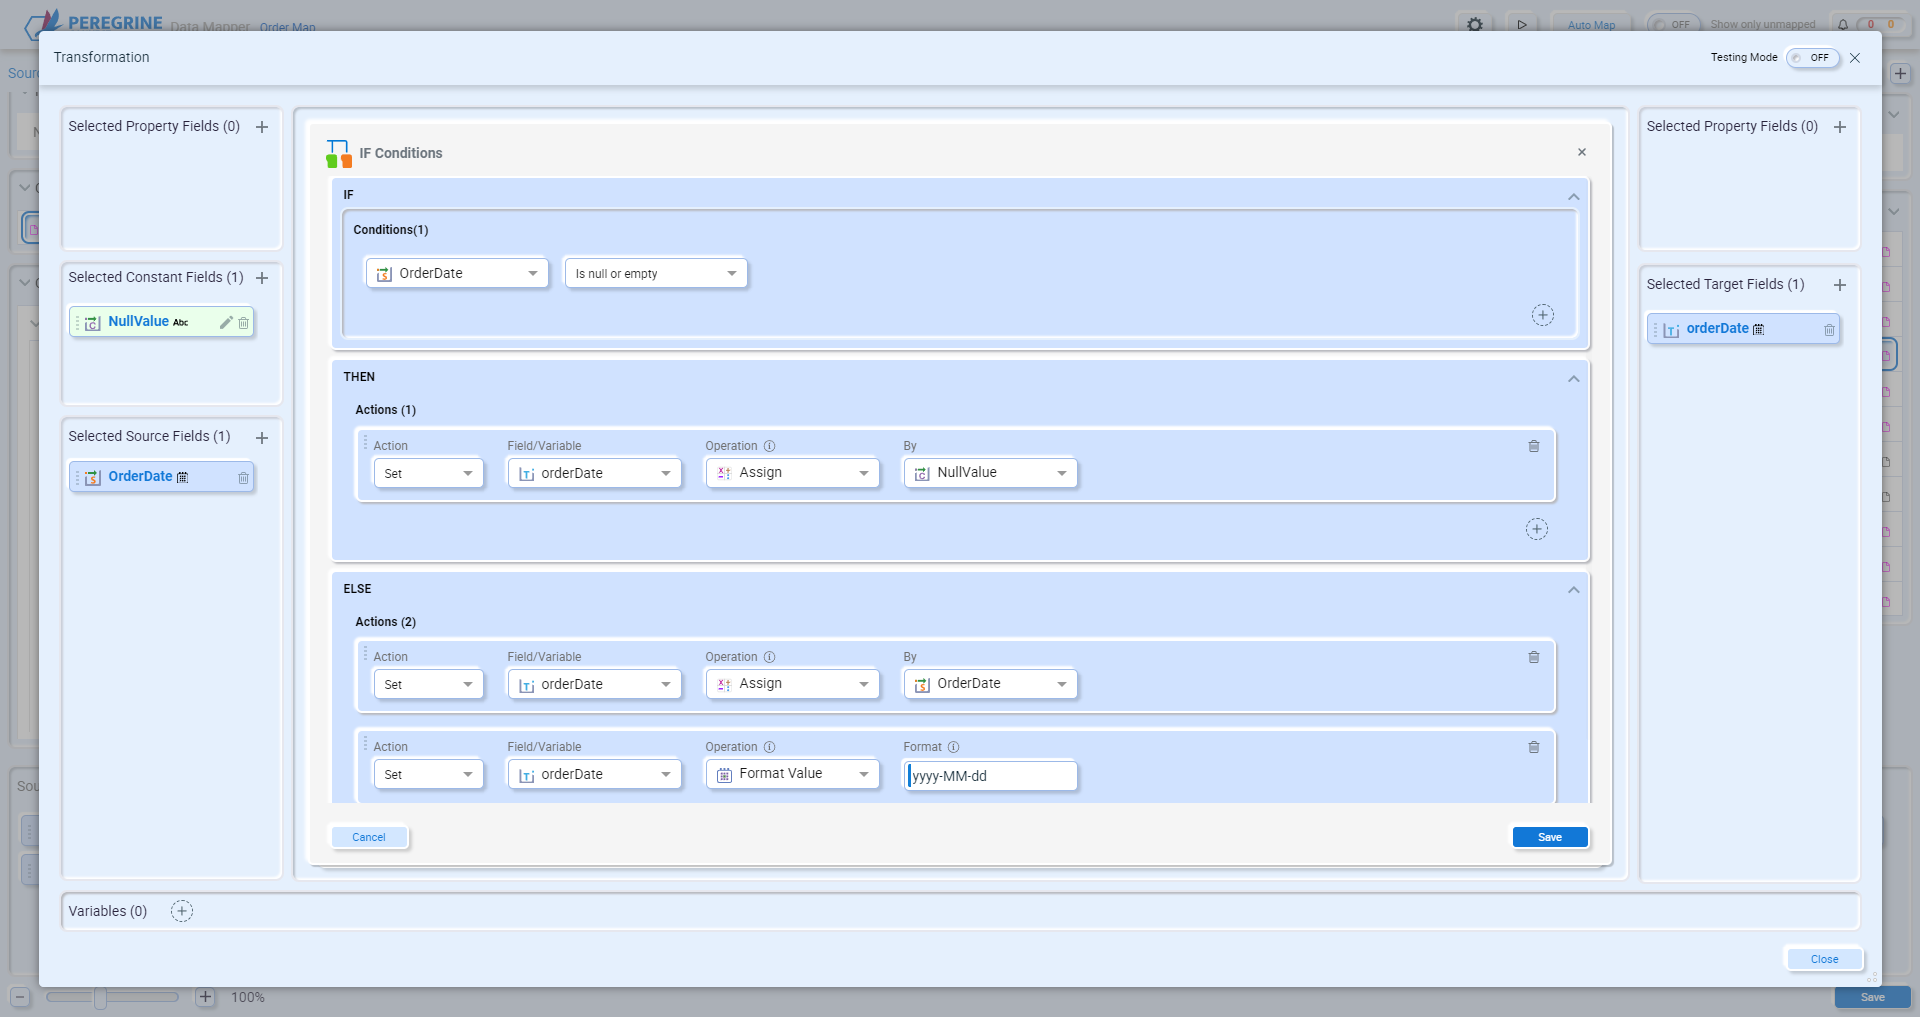
When using the If Condition to evaluate a field or variable and then perform actions based on the result, values are not mapped to target fields before operations are applied. You should always assign the value to the target field before any other operations are performed against it:
String Functions
Append
Extends the string field’s value by appending additional characters at the end of its current value.

In the above example, if product contains “Berries”, then the target will receive “BerriesABC”.
- Action – Select “Set” for the Append operation.
- Field/Variable – Select a source or target field, or the variable you wish to append the string to.
- Operation – “Append”.
- String – Enter the value to append to the field or variable.
Capitalize
Converts the first character of a string to an uppercase letter and all other characters to lowercase.

For example, if product contains “berries”, then the target will receive “Berries”.
- Action – Select “Set” for the Capitalize operation.
- Field/Variable – Select a source or target field, or the variable you wish to capitalize the first letter of.
- Operation – “Capitalize”
File Extension
Returns the file extension from a filename string.

For example, if product contains “Berries.txt”, then the target will receive “txt”.
- Action – Select “Set” for the File Extension operation.
- Field/Variable – Select a source or target field, or the variable you wish to retrieve the file extension from.
- Operation – “File Extension”
Lowercase
Converts all the characters in a string to lowercase.

For example, if product contains “BERRIES”, then the target will receive “berries”.
- Action – Select “Set” for the Lowercase operation.
- Field/Variable – Select a source or target field, or the variable you wish to convert to all lowercase.
- Operation – “Lowercase”
Lowercase Char
Converts a single character to lowercase.

For example, if product contains “Berries”, then the target will receive “berries”.
- Action – Select “Set” for the Lowercase Char operation.
- Field/Variable – Select a source or target field, or the variable you wish to convert to lowercase.
- Operation – “Lowercase Char”
Note – The selected field/variable must only contain a single character or an error will occur.
Normalize
Replaces consecutive spaces in a string with a single space and removes leading/trailing spaces.

For example, if product contains “ Pint of Berries ”, then the target will receive “Pint of Berries”.
- Action – Select “Set” for the Normalize operation.
- Field/Variable – Select a source or target field, or the variable you wish to normalize.
- Operation – “Normalize”
Pad String Left
Pads a string on the left side with the specified character unit the string size reaches a total length. If the total length is less than the length of the input string, the input string will remain unchanged.

In the above example, if product contains “Berries”, then the target will receive “ZZZBerries”.
- Action – Select “Set” for the Pad String Left operation.
- Field/Variable – Select a source or target field, or the variable you wish to left-pad.
- Operation – “Pad String Left”
- Pad Character – The character to left-pad the string with.
- Total Length – The total length of the string after the padding character is added.
Pad String Right
Pads a string on the right side with the specified character unit the string size reaches a total length. If the total length is less than the length of the input string, the input string will remain unchanged.

In the above example, if product contains “Berries”, then the target will receive “BerriesZZZ”.
- Action – Select “Set” for the Pad String Right operation.
- Field/Variable – Select a source or target field, or the variable you wish to right-pad.
- Operation – “Pad String Right”
- Pad Character – The character to right-pad the string with.
- Total Length – The total length of the string after the padding character is added.
Prepend
Adds the specified string to the beginning of the selected field/variable.

In the above example, if product contains “Berries”, then the target will receive “ABCBerries”.
- Action – Select “Set” for the Prepend operation.
- Field/Variable – Select a source or target field, or the variable you wish to prepend a string to.
- Operation – “Prepend”
- String – The string to prepend.
Remove File Extension
Removes the file extension from a filename string.

For example, if product contains “Berries.txt”, then the target will receive “Berries”.
- Action – Select “Set” for the Remove File Extension operation.
- Field/Variable – Select a source or target field, or the variable you wish to retrieve the filename from.
- Operation – “Remove File Extension”
Replace All
Replaces all occurrences of a specified string with a new value.

In the above example, if product contains “ABCDEFABC”, then the target will receive “DEFDEFDEF”.
- Action – Select “Set” for the Replace All operation.
- Field/Variable – Select a source or target field, or the variable you wish to replace all instances of a value with a different value.
- Operation – “Replace All”
- Match – The string value to replace.
- New String – The value that will be used to replace the matched string.
Replace First
Replaces the first occurrence of a specified string with a new value.

In the above example, if product contains “ABCDEFABC”, then the target will receive “DEFDEFABC”.
- Action – Select “Set” for the Replace First operation.
- Field/Variable – Select a source or target field, or the variable you wish to replace the first instance of a value with a different value.
- Operation – “Replace First”
- Match – The string value to replace.
- New String – The value that will be used to replace the matched string.
Separate by Dash
Replaces all occurrences of whitespace, colons, underscores, plus signs and equal signs in a string with a dash character.

For example, if product contains “Blue+Berries”, then the target will receive “Blue-Berries”.
- Action – Select “Set” for the Separate by Dash operation.
- Field/Variable – Select a source or target field, or the variable you wish to replace all occurrences of whitespace, colons, underscores, plus signs and equal signs in a string with a dash character.
- Operation – “Separate by Dash”
Separate by Underscore
Replaces all occurrences of whitespace, colons, dashes, plus signs and equal signs in a string with an underscore character.

For example, if product contains “Blue+Berries”, then the target will receive “Blue_Berries”.
- Action – Select “Set” for the Separate by Underscore operation.
- Field/Variable – Select a source or target field, or the variable you wish to replace all occurrences of whitespace, colons, dashes, plus signs and equal signs in a string with an underscore character.
- Operation – “Separate by Underscore”
Substring
Returns a substring from a string, from the specified start index to the to end index.

In the example above, if the input string is “abcdefghij”, the result would be “cdef”.
- Action – Select “Set” for the Substring operation.
- Field/Variable – Select a source or target field, or the variable you wish to retrieve a substring from.
- Operation – “Substring”
- Start Index – The zero-based starting character position of the substring to return.
- End Index – The zero-based ending character position of the substring to return. The default value of the end index is the length of the string. If the end index is greater than the length of the string, all the characters after the start index are returned.
Substring After
Returns a substring from a string, starting after the first occurrence of a specified match string, from specified index to the end index.

In the example above, if the input string is “abcdefghijk”, the result would be “ghij”.
- Action – Select “Set” for the Substring After operation.
- Field/Variable – Select a source or target field, or the variable you wish to retrieve a substring from.
- Operation – “Substring After”
- Start Index – The zero-based starting character position of the substring to return, after the matched value.
- End Index – The zero-based ending character position of the substring to return. The default value of the end index is the length of the string. If the end index is greater than the length of the string, all the characters after the start index are returned.
- Match – The string to match.
Note – if there isn’t a match, the entire input string is returned.
Substring Before
Returns a substring from a string, ending before the first occurrence of a specified match string, from specified index to the end index.

In the example above, if the input string is “abcdefghijk”, the result would be “cdef”.
- Action – Select “Set” for the Substring Before operation.
- Field/Variable – Select a source or target field, or the variable you wish to retrieve a substring from.
- Operation – “Substring Before”
- Start Index – The zero-based starting character position of the substring to return, before the matched value. If the matched value is found before the start index, an error will be returned.
- End Index – The zero-based ending character position of the substring to return. The default value of the end index is the length of the string before the matched value. If the end index is greater than the length of the string before the matched value, only the characters after the start index until the matched value are returned.
- Match – The string to match.
Note – if there isn’t a match, the entire input string is returned.
Trim
Removes leading and trailing whitespace from the string.

For example, if the input string is “ abcd “, the result would be “abcd”.
- Action – Select “Set” for the Trim operation.
- Field/Variable – Select a source or target field, or the variable you wish to trim whitespace from.
- Operation – “Trim”
Trim Left
Removes leading whitespace from the string.

For example, if the input string is “ abcd “, the result would be “abcd ”.
- Action – Select “Set” for the Trim Left operation.
- Field/Variable – Select a source or target field, or the variable you wish to trim whitespace from.
- Operation – “Trim Left”
Trim Right
Removes trailing whitespace from the string.

For example, if the input string is “ abcd “, the result would be “ abcd”.
- Action – Select “Set” for the Trim Right operation.
- Field/Variable – Select a source or target field, or the variable you wish to trim whitespace from.
- Operation – “Trim Right”
Uppercase
Converts all characters in a string to uppercase.

For example, if the input string is “abcd“, the result would be “ABCD”.
- Action – Select “Set” for the Uppercase operation.
- Field/Variable – Select a source or target field, or the variable you wish to convert to uppercase.
- Operation – “Uppercase”
Uppercase Char
Converts a single character to uppercase.

For example, if the input string is “a“, the result would be “A”.
- Action – Select “Set” for the Absolute Value operation.
- Field/Variable – Select a source or target field, or the variable you wish to convert to uppercase.
- Operation – “Uppercase Char”
Note – The selected field/variable must only contain a single character or an error will occur.
|
String |
Split |
Creates an array of substrings by splitting the input string based on a delimiter |
|
String |
Concatenate |
Concatenates one or more instances of a string |
|
String |
Generate UUID |
Returns a GUID |
Generate UUID
Returns a new universally unique identifier (UUID).

For example, the target will receive a new UUID, such as “186e069e-f4f9-49fc-8778-8b0f2d1585a6”.
- Action – Select “Set” for the Generate UUID operation.
- Field/Variable – Select any source field
- Operation – “Lowercase”
Math Functions
Absolute Value
Returns the absolute value of a number.

For example, if the value of quantity is -4, the result would be 4.
- Action – Select “Set” for the Absolute Value operation.
- Field/Variable – Select a source or target field, or the variable you wish to return the absolute value from.
- Operation – “Absolute Value”
Add
Adds a fixed value, or the value of another field or variable, to the selected field/variable.
Adding a fixed value:

In the above example, if quantity is 5, the result would be 6.
- Action – Select “Set” for the Add operation.
- Field/Variable – Select a source or target field, or a variable to add a value to.
- Operation – “Add”
- By – “Value”
- Number – Enter the fixed value to add to the source field/variable.
Adding the value of another field or variable:

In the above example, if quantity is 5 and the variable ExtraQuantity is 6, the result would be 11.
- Action – Select “Set” for the Add operation.
- Field/Variable – Select a source or target field, or a variable to add a value to.
- Operation – “Add”
- By – Select a field or variable (other than “Value”).
Assign
Sets the selected field/variable to either a fixed value or the value of another field or variable.
Assigning a fixed value:

In the above example, the target field price is set to 100.00.
- Action – Select “Set” for the Assign operation.
- Field/Variable – Select a source or target field, or a variable to assign the value to.
- Operation – “Assign”
- By – “Value”
- Value – Enter the fixed value to set to the source field/variable.
Adding the value of another field or variable:

In the above example, the target field price is set to the value of the variable ExtendedPrice.
- Action – Select “Set” for the Assign operation.
- Field/Variable – Select a source or target field, or a variable to assign the value to.
- Operation – “Assign”
- By – Select a field or variable (other than “Value”).
Ceiling
Returns the smallest integer which is greater than or equal to the field/variable.

For example, if price is set to 5.25, the return value is 6.
- Action – Select “Set” for the Ceiling operation.
- Field/Variable – Select a source or target field, or a variable to use as the input to the operation.
- Operation – “Ceiling”
Divide
Divides the selected field/variable by a fixed value, or the value of another specified field or variable.
Dividing by a fixed value:

In the above example, if the price is 8, the result would be 2.
- Action – Select “Set” for the Divide operation.
- Field/Variable – Select a source or target field, or a variable to divide by a value.
- Operation – “Divide”
- By – “Value”
- Number – Enter the fixed value to divide the source field/variable by.
Dividing by the value of another field or variable:

In the above example, if price is 25 and the variable Quantity is 5, the result would be 5.
- Action – Select “Set” for the Divide operation.
- Field/Variable – Select a source or target field, or a variable to divide by a value.
- Operation – “Divide”
- By – Select a field or variable (other than “Value”).
Floor
Returns the highest integer which is lower than or equal to the field/variable.

For example, if price is set to 5.25, the return value is 5.
- Action – Select “Set” for the Floor operation.
- Field/Variable – Select a source or target field, or a variable to use as the input to the operation.
- Operation – “Floor”
Modulo
Returns the remainder of a division operation.
Dividing by a fixed value:

In the above example, if the price is 8, the result would be 3.
- Action – Select “Set” for the Modulo operation.
- Field/Variable – Select a source or target field, or a variable to divide by a value.
- Operation – “Modulo”
- By – “Value”
- Number – Enter the fixed value to divide the source field/variable by.
Dividing by the value of another field or variable:

In the above example, if price is 23 and the variable Quantity is 5, the result would be 3.
- Action – Select “Set” for the Modulo operation.
- Field/Variable – Select a source or target field, or a variable to divide by a value.
- Operation – “Modulo”
- By – Select a field or variable (other than “Value”).
Multiply
Multiplies the selected field/variable by a fixed value, or the value of another specified field or variable.
Multiplying by a fixed value:

In the above example, if the price is 3, the result would be 15.
- Action – Select “Set” for the Multiply operation.
- Field/Variable – Select a source or target field, or a variable to multiply by a value.
- Operation – “Multiply”
- By – “Value”
- Number – Enter the fixed value to Multiply the source field/variable by.
Multiplying by the value of another field or variable:

In the above example, if price is 5 and the variable Quantity is 10, the result would be 50.
- Action – Select “Set” for the Multiply operation.
- Field/Variable – Select a source or target field, or a variable to multiply by a value.
- Operation – “Multiply”
- By – Select a field or variable (other than “Value”).
Round
Rounds selected field/variable to the nearest integer or to the specified number of decimal places.

For example, if quantity is set to 5.49, the return value is 5.
- Action – Select “Set” for the Round operation.
- Field/Variable – Select a source or target field, or a variable to use as the input to the operation.
- Operation – “Round”
- Digits – The number of decimal places to round to.
Square Root
Returns the square root of the selected field/variable.

For example, if price is set to 9, the return value is 3.
- Action – Select “Set” for the Square Root operation.
- Field/Variable – Select a source or target field, or a variable to use as the input to the operation.
- Operation – “Square Root”
Subtract
Subtracts a fixed value, or the value of another field or variable, from the selected field/variable.
Subtracting a fixed value:

In the above example, if quantity is 5, the result would be 4.
- Action – Select “Set” for the Subtract operation.
- Field/Variable – Select a source or target field, or a variable to subtract a value from.
- Operation – “Subtract”
- By – “Value”
- Number – Enter the fixed value to subtract from the source field/variable.
Subtracting the value of another field or variable:

In the above example, if quantity is 10 and the variable DamagedQuantity is 5, the result would be 10.
- Action – Select “Set” for the Subtract operation.
- Field/Variable – Select a source or target field, or a variable to subtract a value from.
- Operation – “Subtract”
- By – Select a field or variable (other than “Value”).
Date Functions
Add Days
Adds a specified number of days to a DateTime value.

In the above example, if orderDate is “10/16/2023 8:30:00 AM”, the result would be “2023-10-21T08:30:00.000-04:00”.
- Action – Select “Set” for the Add Days operation.
- Field/Variable – Select a source or target field, or a variable to add the number of days to.
- Operation – “Add Days”
- Days – Enter the number of days to add to the source field/variable.
Add Duration
Adds a fixed duration, or a duration in another field or variable to a DateTime value.
Adding a fixed duration:

In the above example, if orderDate is “10/16/2023 8:30:00 AM”, the result would be “2023-10-16T10:00:00.000-04:00”.
- Action – Select “Set” for the Add Duration operation.
- Field/Variable – Select a source or target field, or a variable to add a duration to.
- Operation – “Add Duration”
- By – “Value”
- Duration – Enter the duration value to add to the source field/variable.
Adding the duration of another field or variable:

In the above example, if orderDate is “10/16/2023 8:30:00 AM” and ExtraTime has a string value of “2:00:00” (two hours), the result would be “2023-10-16T010:30:00.000-04:00”.
- Action – Select “Set” for the Add Duration operation.
- Field/Variable – Select a source or target field, or a variable to add a duration to.
- Operation – “Add Duration”
- By – Select a field or variable (other than “Value”).
Note – the format for the duration is [d.]hh:mm:ss[.fffffff]. The day and millisecond values are optional.
Add Milliseconds
Adds a specified number of milliseconds to a DateTime value.

In the above example, if orderDate is “10/16/2023 8:30:00 AM”, the result would be “2023-10-16T08:30:00.101-04:00”.
- Action – Select “Set” for the Add Milliseconds operation.
- Field/Variable – Select a source or target field, or a variable to add the number of milliseconds to.
- Operation – “Add Milliseconds”
- Milliseconds – Enter the number of milliseconds to add to the source field/variable.
Note – this add function supports whole and partial millisecond values, i.e. 100.5.
Add Minutes
Adds a specified number of minutes to a DateTime value.

In the above example, if orderDate is “10/16/2023 8:30:00 AM”, the result would be “2023-10-16T08:35:00.000-04:00”.
- Action – Select “Set” for the Add Minutes operation.
- Field/Variable – Select a source or target field, or a variable to add the number of minutes to.
- Operation – “Add Minutes”
- Minutes – Enter the number of minutes to add to the source field/variable.
Add Months
Adds a specified number of months to a DateTime value.

In the above example, if orderDate is “10/16/2023 8:30:00 AM”, the result would be “2023-11-16T08:30:00.000-05:00”.
- Action – Select “Set” for the Add Months operation.
- Field/Variable – Select a source or target field, or a variable to add the number of months to.
- Operation – “Add Months”
- Months – Enter the number of months to add to the source field/variable.
Add Seconds
Adds a specified number of seconds to a DateTime value.

In the above example, if orderDate is “10/16/2023 8:30:00 AM”, the result would be “2023-10-16T08:30:30.000-04:00”.
- Action – Select “Set” for the Add Seconds operation.
- Field/Variable – Select a source or target field, or a variable to add the number of seconds to.
- Operation – “Add Seconds”
- Seconds – Enter the number of seconds to add to the source field/variable.
Add Years
Adds a specified number of years to a DateTime value.

In the above example, if orderDate is “10/16/2023 8:30:00 AM”, the result would be “2028-10-16T08:30:00.000-04:00”.
- Action – Select “Set” for the Add Years operation.
- Field/Variable – Select a source or target field, or a variable to add the number of years to.
- Operation – “Add Years”
- Years – Enter the number of years to add to the source field/variable.
Format Value
Converts a DateTime value into a specified format string.

In the above example, if orderDate is “10/16/2023 8:30:00 AM”, the result would be “10/16/23”.
- Action – Select “Set” for the Format Value operation.
- Field/Variable – Select a source or target field, or a variable to apply the format to.
- Operation – “Format Value”
- Format – The format string to apply to the source field/variable.
Note – Use .NET date and time format strings:
https://learn.microsoft.com/en-us/dotnet/standard/base-types/custom-date-and-time-format-strings
Subtract Duration
Subtracts a specified duration from a DateTime value.
Subtracting a fixed duration:

In the above example, if orderDate is “10/16/2023 8:30:00 AM”, the result would be “10/16/2023 7:00:00 AM -04:00”.
- Action – Select “Set” for the Subtract Duration operation.
- Field/Variable – Select a source or target field, or a variable to subtract a duration from.
- Operation – “Subtract Duration”
- By – “Value”
- Duration – Enter the duration value to subtract from the source field/variable.
Subtracting the duration of another field or variable:

In the above example, if orderDate is “10/16/2023 8:30:00 AM” and LeadTime has a string value of “2:00:00” (two hours), the result would be “2023-10-16T006:30:00.000-04:00”.
- Action – Select “Set” for the Subtract Duration operation.
- Field/Variable – Select a source or target field, or a variable to subtract a duration from.
- Operation – “Subtract Duration”
- By – Select a field or variable (other than “Value”).
Note – the format for the duration is [d.]hh:mm:ss[.fffffff]. The day and millisecond values are optional.
Current Date Time
Returns the current date and time on the local computer, with the offset set to the local time’s offset from Coordinated Universal Time (UTC).

For example, if the date were October 16th, 2023 @ 2:30 PM in the US Eastern Time Zone, the returned DateTime would be “2023-10-16T14:30:00.000-04:00”.
- Action – Select “Set” for the Current Date Time operation.
- Field/Variable – Select a source or target field, or a variable set to the current Date Time
- Operation – “Current Date Time”
Duration Functions
The duration functions can take as an input either a string or a duration field/variable. The duration functions support both the .NET TimeSpan and the ISO 8601 duration formats. The .NET TimeSpan format is [-][d.]hh:mm:ss[.fffffff]. The elements in the square brackets are optional. The ISO 8601 format is PnYnMnDTnHnMnS, where:
- Y = years
- M = months
- W = weeks
- D = days
- T = delineator between dates and times, necessary to disambiguate between months and minutes
- H = hours
- M = minutes
- S = seconds
When a duration or string type is used as an input to a duration function, the function checks to see if the value is in ISO 8601 format or .NET TimeSpan format. If it’s neither, an error is thrown. Durations in ISO 8601 format are converted to a .NET TimeSpan before the operation is completed. When using the function tester, you will see the function results in the .NET TimeSpan format. However, the output of the transformation is converted into ISO 8601 format. If you want the output in .NET TimeSpan format, using the Duration Format Value function to convert it.
Add Days
Adds a specified number of days to a duration value.

In the above example, if BackorderDuration is “P5D” (5 days), the result would be “P6D” (6 days).
- Action – Select “Set” for the Add Days operation.
- Field/Variable – Select a source or target field, or a variable to add the number of days to.
- Operation – “Add Days”
- Days – Enter the number of days to add to the source field/variable.
Add Duration
Adds a fixed duration, or a duration in another field or variable to a duration value.
Adding a fixed duration:

In the above example, if BackorderDuration is “PT6H” (6 hours), the result would be “PT18H” (18 hours).
- Action – Select “Set” for the Add Duration operation.
- Field/Variable – Select a source or target field, or a variable to add a duration to.
- Operation – “Add Duration”
- By – “Value”
- Duration – Enter the duration value to add to the source field/variable.
Adding the duration of another field or variable:

In the above example, if BackorderDuration is “3.00:00:00” (3 days) and ExtraTime has a string value of “P1D” (one hour), the result would be “P4D” (4 days).
- Action – Select “Set” for the Add Duration operation.
- Field/Variable – Select a source or target field, or a variable to add a duration to.
- Operation – “Add Duration”
- By – Select a field or variable (other than “Value”).
Note – you can interchange ISO 8601 and .NET TimeSpan values for these operations.
Add Hours
Adds a specified number of hours to a duration value.

In the above example, if BackorderDuration is “5:00:00” (5 hours), the result would be “PT11H” (11 hours).
- Action – Select “Set” for the Add Hours operation.
- Field/Variable – Select a source or target field, or a variable to add the number of hours to.
- Operation – “Add Hours”
- Hours – Enter the number of hours to add to the source field/variable.
Add Milliseconds
Adds a specified number of milliseconds to a duration value.

In the above example, if BackorderDuration is “5:00:00” (5 hours), the result would be “PT5H0.5S” (5 hours, ½ seconds).
- Action – Select “Set” for the Add Milliseconds operation.
- Field/Variable – Select a source or target field, or a variable to add the number of milliseconds to.
- Operation – “Add Milliseconds”
- Milliseconds – Enter the number of milliseconds to add to the source field/variable.
Add Minutes
Adds a specified number of minutes to a duration value.

In the above example, if BackorderDuration is “5:00:00” (5 hours), the result would be “PT5H5M” (5 hours, 5 minutes).
- Action – Select “Set” for the Add Minutes operation.
- Field/Variable – Select a source or target field, or a variable to add the number of minutes to.
- Operation – “Add Minutes”
- Minutes – Enter the number of minutes to add to the source field/variable.
Add Seconds
Adds a specified number of seconds to a duration value.

In the above example, if BackorderDuration is “5:00:00” (5 hours), the result would be “PT5H30S” (5 hours, 30 seconds).
- Action – Select “Set” for the Add Seconds operation.
- Field/Variable – Select a source or target field, or a variable to add the number of seconds to.
- Operation – “Add Seconds”
- Seconds – Enter the number of seconds to add to the source field/variable.
Format to ISO 8601
Converts a duration value into an ISO 8601 formatted value, i.e. PnYnMnDTnHnMnS

For example, if BackorderDuration is set to 10.06:30:00, the result would be P10DT6H30M.
- Action – Select “Set” for the Format to ISO 8601 operation.
- Field/Variable – Select a source or target field, or a variable to convert to an ISO 8601 format.
- Operation – “Format to ISO 8601”
Format Value
Converts a duration value into a specified TimeSpan format string.

In the above example, if BackorderDuration is “5:00:00” (5 hours), without the Format Value function the result would be “PT5H30S” (5 hours, 30 seconds). With the Format Value function, the result will be “00.05:00:30.0000”.
- Action – Select “Set” for the Format Value operation.
- Field/Variable – Select a source or target field, or a variable to apply the format to.
- Operation – “Format Value”
- Format – The format string to apply to the source field/variable.
Note –The format options for TimeSpan can be derived from “[d.]hh:mm:ss[.fffffff]”.
Subtract Duration
Subtracts a specified duration from a duration value.
Subtracting a fixed duration:

In the above example, if BackorderDuration is “5:00:00” (5 hours), the result would be “PT4H” (4 hours).
- Action – Select “Set” for the Subtract Duration operation.
- Field/Variable – Select a source or target field, or a variable to subtract a duration from.
- Operation – “Subtract Duration”
- By – “Value”
- Duration – Enter the duration value to subtract from the source field/variable.
Subtracting the duration of another field or variable:

In the above example, if BackorderDuration is “5:00:00” (5 hours) and ExtraTime has a string value of “PT4H” (4 hours), the result would be “PT1H” (1 hour).
- Action – Select “Set” for the Subtract Duration operation.
- Field/Variable – Select a source or target field, or a variable to subtract a duration from.
- Operation – “Subtract Duration”
- By – Select a field or variable (other than “Value”).
Note – you can interchange ISO 8601 and .NET TimeSpan values for these operations.
Conversion Functions
Convert Area Unit
Converts an area from one unit of measurement to another.

- Action – Select “Set” for the Convert Area Unit operation.
- Field/Variable – Select a source or target field, or a variable to convert.
- Operation – “Convert Area Unit”
- From – The unit of measurement to convert from:
- To – The unit of measurement to convert to:
Supported from and to units of measurement:
- Square Meter
- Square Mile
- Square Foot
Convert Distance Unit
Converts a distance from one unit of measurement to another.

- Action – Select “Set” for the Convert Distance Unit operation.
- Field/Variable – Select a source or target field, or a variable to convert.
- Operation – “Convert Distance Unit”
- From – The unit of measurement to convert from:
- To – The unit of measurement to convert to:
Supported from and to units of measurement:
- Meter
- Mile
- Yard
- Foot
- Inch
Convert Mass Unit
Converts a mass from one unit of measurement to another.

- Action – Select “Set” for the Convert Mass Unit operation.
- Field/Variable – Select a source or target field, or a variable to convert.
- Operation – “Convert Mass Unit”
- From – The unit of measurement to convert from:
- To – The unit of measurement to convert to:
Supported from and to units of measurement:
- Kilogram
- Pound
To Big Decimal
Converts the selected Field/Variable to a Big Decimal value.

In the above example, the value in variable strDecimal is converted to a Big Decimal value before mapping it to a target field or variable.
- Action – Select “Set” for the To Big Decimal operation.
- Field/Variable – Select a source or target field, or a variable to convert to a Big Decimal.
- Operation – “To Big Decimal”
To Big Integer
Converts the selected Field/Variable to a Big Integer value.

In the above example, the value in variable strInteger is converted to a Big Integer value before mapping it to a target field or variable.
- Action – Select “Set” for the To Big Integer operation.
- Field/Variable – Select a source or target field, or a variable to convert to a Big Integer.
- Operation – “To Big Integer”
To Boolean
Converts the selected Field/Variable to a Boolean value.

In the above example, the value in variable strBoolean is converted to a Boolean value before mapping it to a target field or variable.
- Action – Select “Set” for the To Boolean operation.
- Field/Variable – Select a source or target field, or a variable to convert to a Boolean.
- Operation – “To Boolean”
To Date
Converts the selected Field/Variable to a date value.

In the above example, the value in variable strDate is converted to a Date value before mapping it to a target field or variable.
- Action – Select “Set” for the To Date operation.
- Field/Variable – Select a source or target field, or a variable to convert to a Date.
- Operation – “To Date”
To Double
Converts the selected Field/Variable to a Double value.

In the above example, the value in variable strDouble is converted to a Double value before mapping it to a target field or variable.
- Action – Select “Set” for the To Double operation.
- Field/Variable – Select a source or target field, or a variable to convert to a Double.
- Operation – “To Double”
To Float
Converts the selected Field/Variable to a Float value.

In the above example, the value in variable strFloat is converted to a Float value before mapping it to a target field or variable.
- Action – Select “Set” for the To Float operation.
- Field/Variable – Select a source or target field, or a variable to convert to a Float.
- Operation – “To Float”
To Integer
Converts the selected Field/Variable to an Integer value.

In the above example, the value in variable strInteger is converted to an Integer value before mapping it to a target field or variable.
- Action – Select “Set” for the To Integer operation.
- Field/Variable – Select a source or target field, or a variable to convert to an Integer.
- Operation – “To Integer”
To Local Date Time
Converts the selected Field/Variable to a local date and time value.

In the above example, the value in variable strDate is converted to a DateTime value, including the offset, before mapping it to a target field or variable.
- Action – Select “Set” for the To Local Date Time operation.
- Field/Variable – Select a source or target field, or a variable to convert to a DateTime.
- Operation – “To Local Date Time”
To Long
Converts the selected Field/Variable to a Long value.

In the above example, the value in variable strLong is converted to a Long value before mapping it to a target field or variable.
- Action – Select “Set” for the To Long operation.
- Field/Variable – Select a source or target field, or a variable to convert to a Long.
- Operation – “To Long”
To Short
Converts the selected Field/Variable to a Short value.

In the above example, the value in variable strShort is converted to a Short value before mapping it to a target field or variable.
- Action – Select “Set” for the To Short operation.
- Field/Variable – Select a source or target field, or a variable to convert to a Short.
- Operation – “To Short”
To String
Converts the selected Field/Variable to a String value.

In the above example, the value in variable myNumber is converted to a String value before mapping it to a target field or variable.
- Action – Select “Set” for the To String operation.
- Field/Variable – Select a source or target field, or a variable to convert to a String.
- Operation – “To String”
To Time
Converts the selected Field/Variable to a DateTime value.

In the above example, the value in variable strDate is converted to a DateTime value before mapping it to a target field or variable.
- Action – Select “Set” for the To Time operation.
- Field/Variable – Select a source or target field, or a variable to convert to a Time.
- Operation – “To Time”
Convert Volume Unit
Converts a volume from one unit of measurement to another.

- Action – Select “Set” for the Convert Volume Unit operation.
- Field/Variable – Select a source or target field, or a variable to convert.
- Operation – “Convert Volume Unit”
- From – The unit of measurement to convert from:
- To – The unit of measurement to convert to:
Supported from and to units of measurement:
- Cubic Meter
- Liter
- Cubic Foot
- Gallon (US Fluid)
Day of Month
Returns the current day of the month, from 1 to 31.

- Action – Select “Set” for the Day of Month operation.
- Field/Variable – Select a source or target field, or a variable to set to the day of the month.
- Operation – “Day of Month”
Day of Week
Returns the current day of the week from 0 to 6, where 0 represents Sunday and 6 represents Saturday.

- Action – Select “Set” for the Day of Week operation.
- Field/Variable – Select a source or target field, or a variable to set to the day of the week.
- Operation – “Day of Week”
Day of Year
Returns the current day of the year, from 1 to 366.

- Action – Select “Set” for the Day of Year operation.
- Field/Variable – Select a source or target field, or a variable to set to the day of the year.
- Operation – “Day of Year”
Ends With
Returns true if the selected Field/Variable ends with the specified value, otherwise false.

In the above example, if Product ends with “berry”, the value true will be returned.
- Action – Select “Set” for the Ends With operation.
- Field/Variable – Select a source or target field, or a variable to compare.
- Operation – “Ends With”
- String – The value to check if the Field/Variable ends with.
Equals
Returns true if the selected Field/Variable equals the specified value, otherwise false.

In the above example, if Product is “Apples”, the value true will be returned.
- Action – Select “Set” for the Equals operation.
- Field/Variable – Select a source or target field, or a variable to compare.
- Operation – “Equals”
- String – The value to check if the Field/Variable is equal to.
Index Of
Returns the zero-based index of the first occurrence of the specified text in the selected Field/Variable, otherwise a value of -1.

In the above example, if Product is “DEFABCDEFABC”, the value 3 will be returned.
- Action – Select “Set” for the Index Of operation.
- Field/Variable – Select a source or target field, or a variable to compare.
- Operation – “Index Of”
- String – The value to find the first index of in the Field/Variable.
Is Null
Returns true if the specified Field/Variable is null, otherwise false.

- Action – Select “Set” for the Is Null operation.
- Field/Variable – Select a source or target field, or a variable to check if null.
- Operation – “Is Null”
Last Index Of
Returns the zero-based index of the last occurrence of the specified text in the selected Field/Variable, otherwise a value of -1.

In the above example, if Product is “DEFABCDEFABC”, the value 9 will be returned.
- Action – Select “Set” for the Last Index Of operation.
- Field/Variable – Select a source or target field, or a variable to compare.
- Operation – “Last Index Of”
- String – The value to find the first index of in the Field/Variable.
Length
Returns the length of the string value of the specified Field/Variable, -1 if it’s null.

- Action – Select “Set” for the Length operation.
- Field/Variable – Select a source or target field, or a variable to get the length of.
- Operation – “Length”
Parse Boolean
Converts the selected string Field/Variable to a Boolean value.

- Action – Select “Set” for the Parse Boolean operation.
- Field/Variable – Select a source field, target field, or variable to convert to a Boolean value.
- Operation – “Parse Boolean”
Notes – The Parse Boolean function performs the .NET bool.Parse() function:
- String ‘True’ (case insensitive) returns True
- String ‘False’ (case insensitive) returns False
- String (null or empty) returns False
- 0 returns False
- 1 returns True
- Any other values will throw an error
Parse Date
Converts the selected string Field/Variable to a DateTime value using the specified format.

In the example above, if OrderDate contains “2023-10-31”, it will be converted to a DateTime representing “2023-10-27T00:00:00.000-04:00”.
- Action – Select “Set” for the Parse Date operation.
- Field/Variable – Select a source field, target field, or variable to convert to a DateTime.
- Operation – “Parse Date”
- Format – The format of the input string containing the date.
Parse Date Time
Converts the selected Field/Variable to a DateTime value using the specified format.

In the example above, if OrderDate contains “2023-10-27T10:04:25.000-04:00”, it will be converted to a DateTime representing “2023-10-27T10:04:25.000-04:00”.
- Action – Select “Set” for the Parse Date Time operation.
- Field/Variable – Select a source field, target field, or variable to convert to a DateTime.
- Operation – “Parse Date Time”
- Format – The format of the input string containing the date-time.
Parse Number
Converts the selected Field/Variable to a Number value.

- Action – Select “Set” for the Parse Number operation.
- Field/Variable – Select a source field, target field, or variable to convert to a Number value.
- Operation – “Parse Number”
Parse Time
Converts the selected Field/Variable to a DateTime value using the specified format.

In the example above, if TimeStr contains “15:33:23”, it will be converted to a DateTime representing “2023-11-01T15:33:23.000-04:00”.
- Action – Select “Set” for the Parse Date Time operation.
- Field/Variable – Select a source field, target field, or variable to convert to a DateTime.
- Operation – “Parse Date Time”
- Format – The format of the input string containing the date-time.
Note – The new DateTime value will consist of Today’s date, local time zone and the converted time string.
Parse Duration
Converts the selected Field/Variable to a Duration value.

In the example above, if BackorderDuration contains the ISO 8601-formatted duration of P10DT6H30M (10 days, 6 hours and 30 minutes), it will be converted to the TimeSpan-formatted value of 10.06:30:00.
- Action – Select “Set” for the Parse Duration Time operation.
- Field/Variable – Select a source field, target field, or variable to convert into a duration value.
- Operation – “Parse Duration”
Starts With
Returns true if the selected Field/Variable starts with the specified value, otherwise false.

In the above example, if Product starts with “Laptop”, the value true will be returned.
- Action – Select “Set” for the Ends With operation.
- Field/Variable – Select a source or target field, or a variable to compare.
- Operation – “Starts With”
- String – The value to check if the Field/Variable starts with.
Subtract Date Time
Subtracts a fixed DateTime or the DateTime in another Field/Variable from the specified Field/Variable.
Subtracting a fixed DateTime:

In the above example, if orderDate is “10/16/2023 8:30:00 AM”, the result would be “10/16/2023 7:00:00 AM -04:00”.
- Action – Select “Set” for the Subtract Duration operation.
- Field/Variable – Select a source or target field, or a variable to subtract a duration from.
- Operation – “Subtract Duration”
- By – “Value”
- Duration – Enter the duration value to subtract from the source field/variable.
Subtracting the duration of another field or variable:

In the above example, if orderDate is “10/16/2023 8:30:00 AM” and LeadTime has a string value of “2:00:00” (two hours), the result would be “2023-10-16T006:30:00.000-04:00”.
- Action – Select “Set” for the Subtract Duration operation.
- Field/Variable – Select a source or target field, or a variable to subtract a duration from.
- Operation – “Subtract Duration”
- By – Select a field or variable (other than “Value”).
Note – the format for the duration is [d.]hh:mm:ss[.fffffff]. The day and millisecond values are optional.
To Universal Date Time
Converts the selected Field/Variable to Coordinated Universal Time (UTC).

In the above example, the value in variable strDate is converted to a UTC DateTime value before mapping it to a target field or variable.
- Action – Select “Set” for the To Universal Date Time operation.
- Field/Variable – Select a source or target field, or a variable to convert to a DateTime.
- Operation – “To Universal Date Time”
Testing Transformations
It’s useful to test transformations while building them. To do that, select the mapping you want to test and enable Testing Mode:
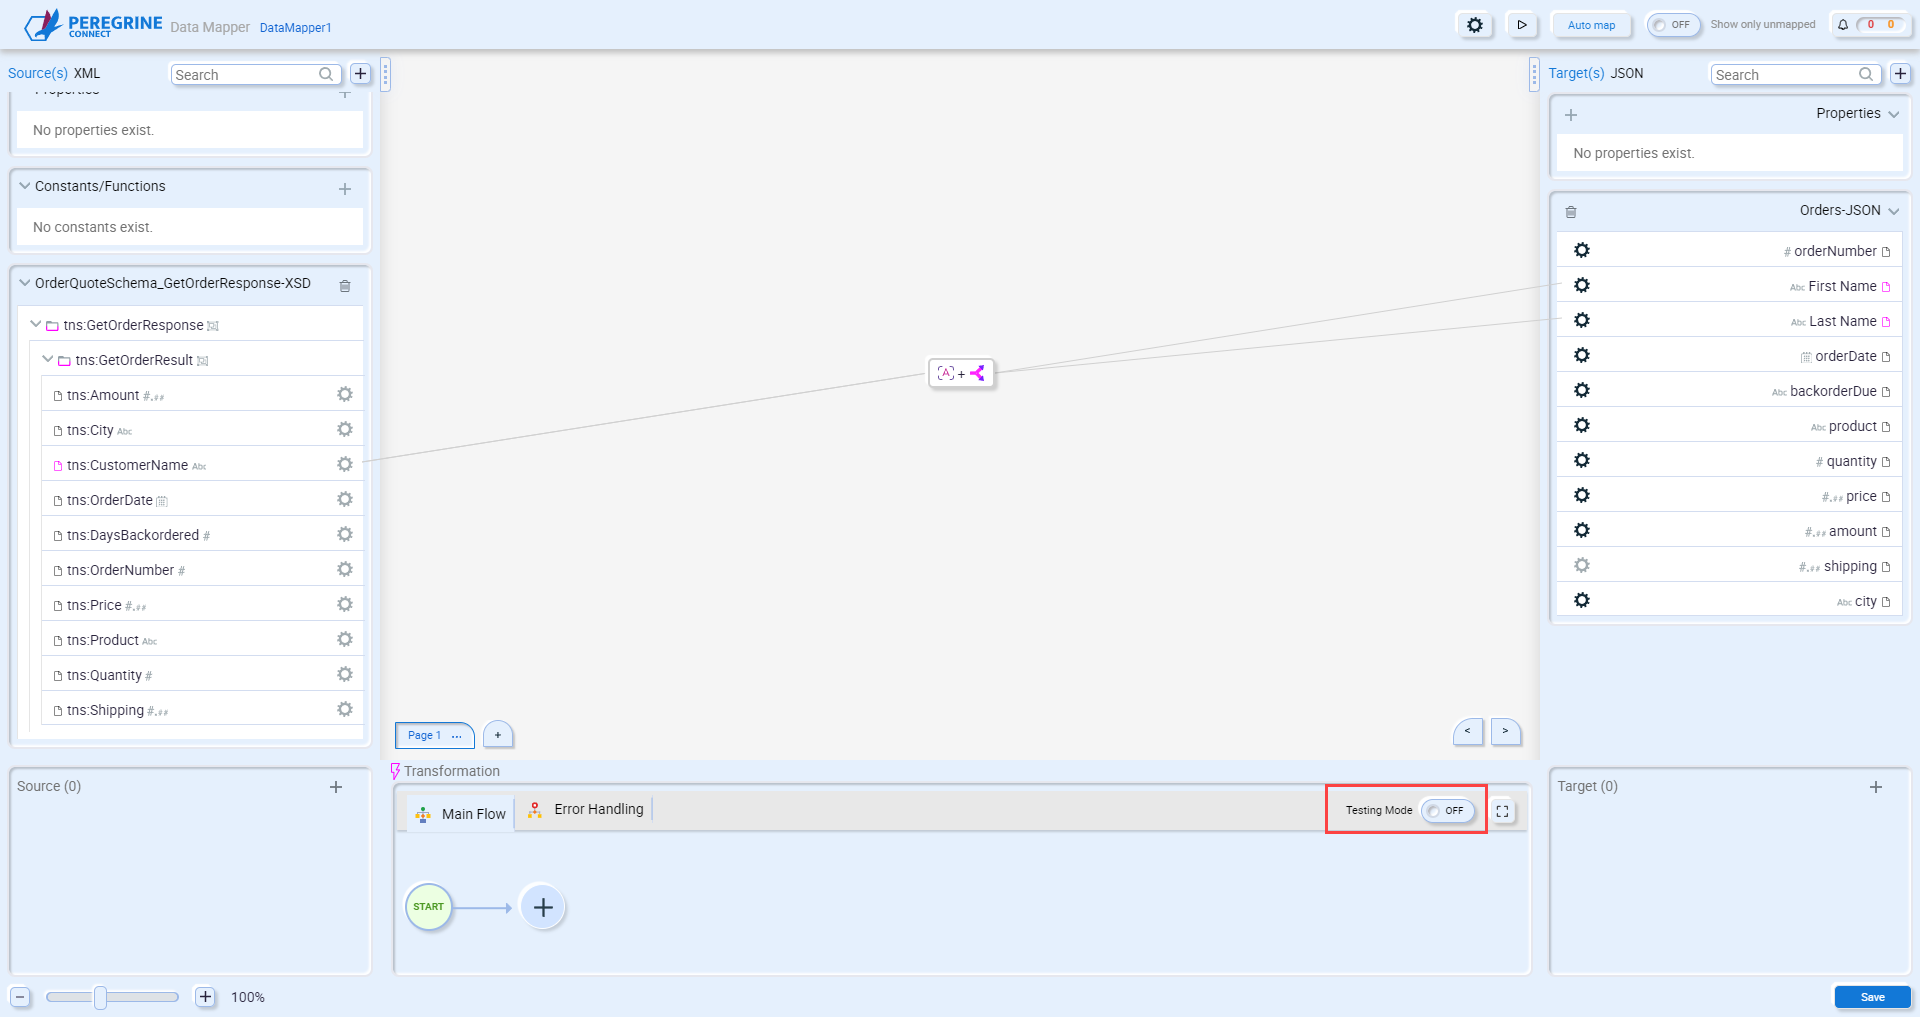
Testing Mode can also be enabled when you expand the transformation:
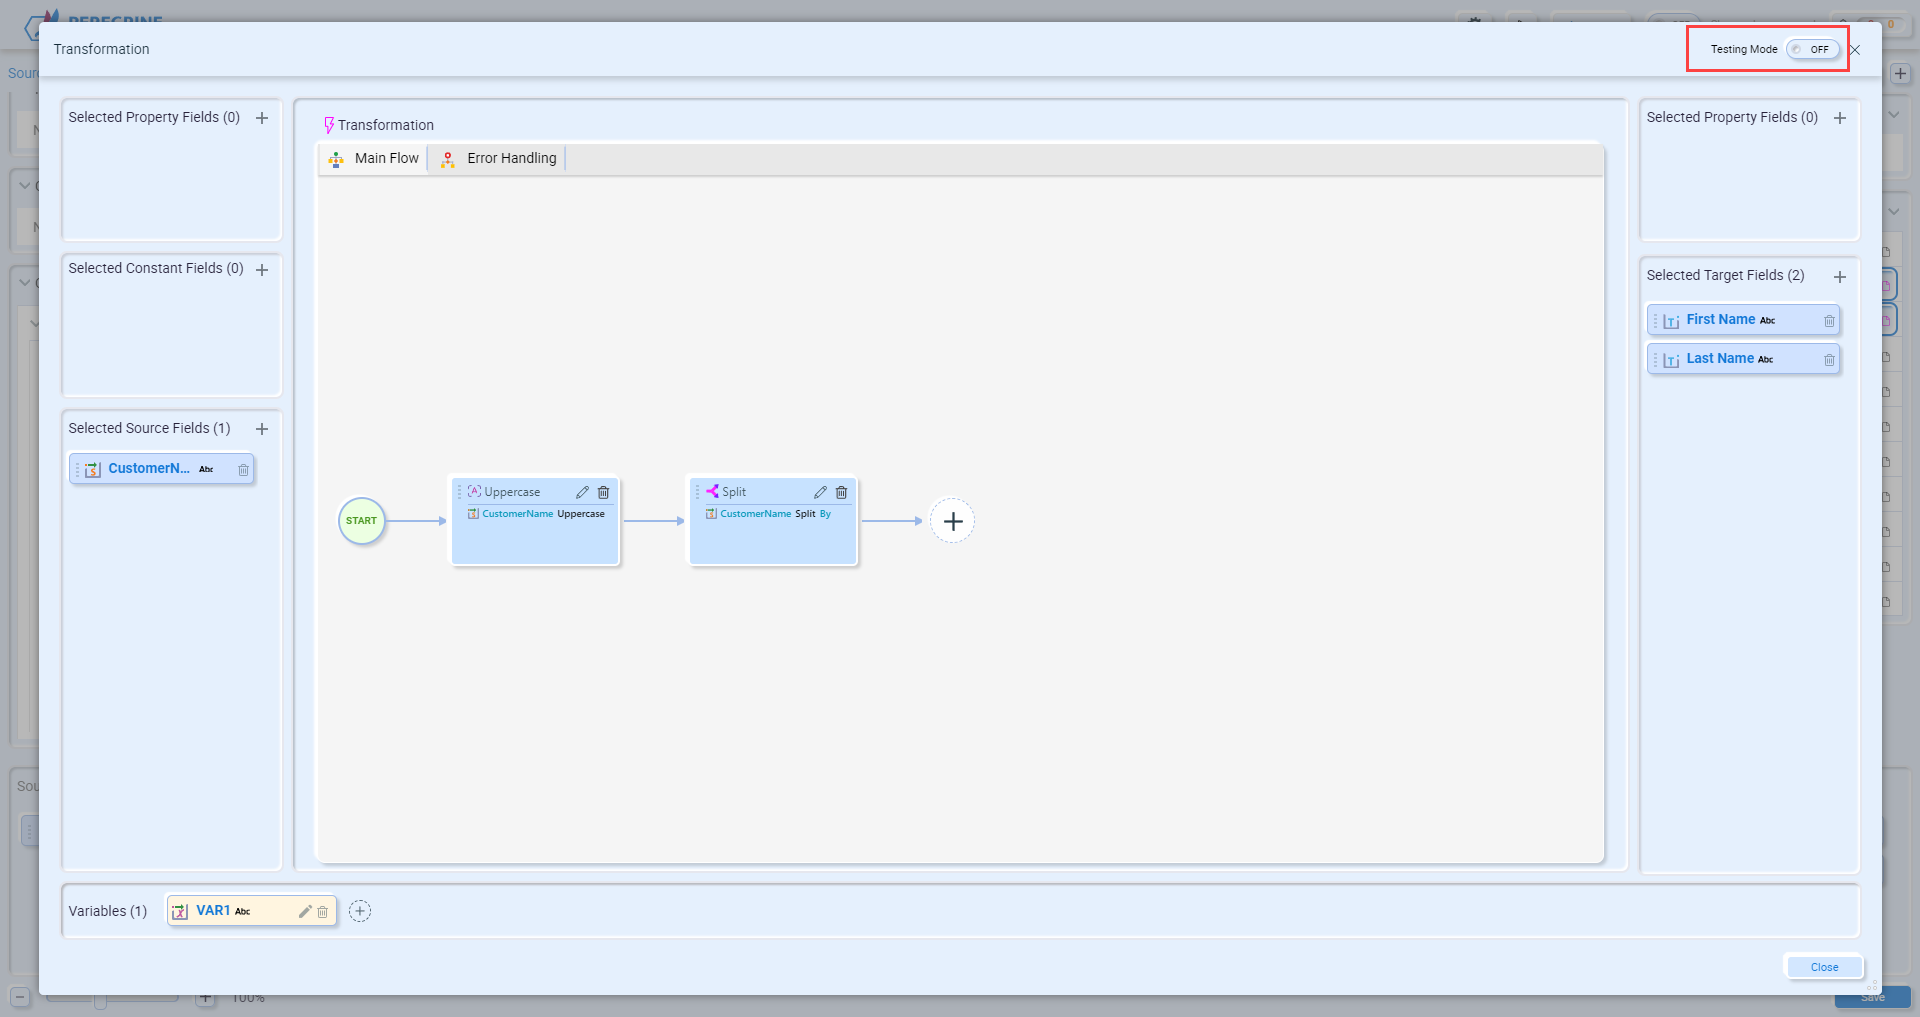
For each source field, enter a value to test with. Click the Start button to execute the transformation. The resulting values will be displayed with the target fields:
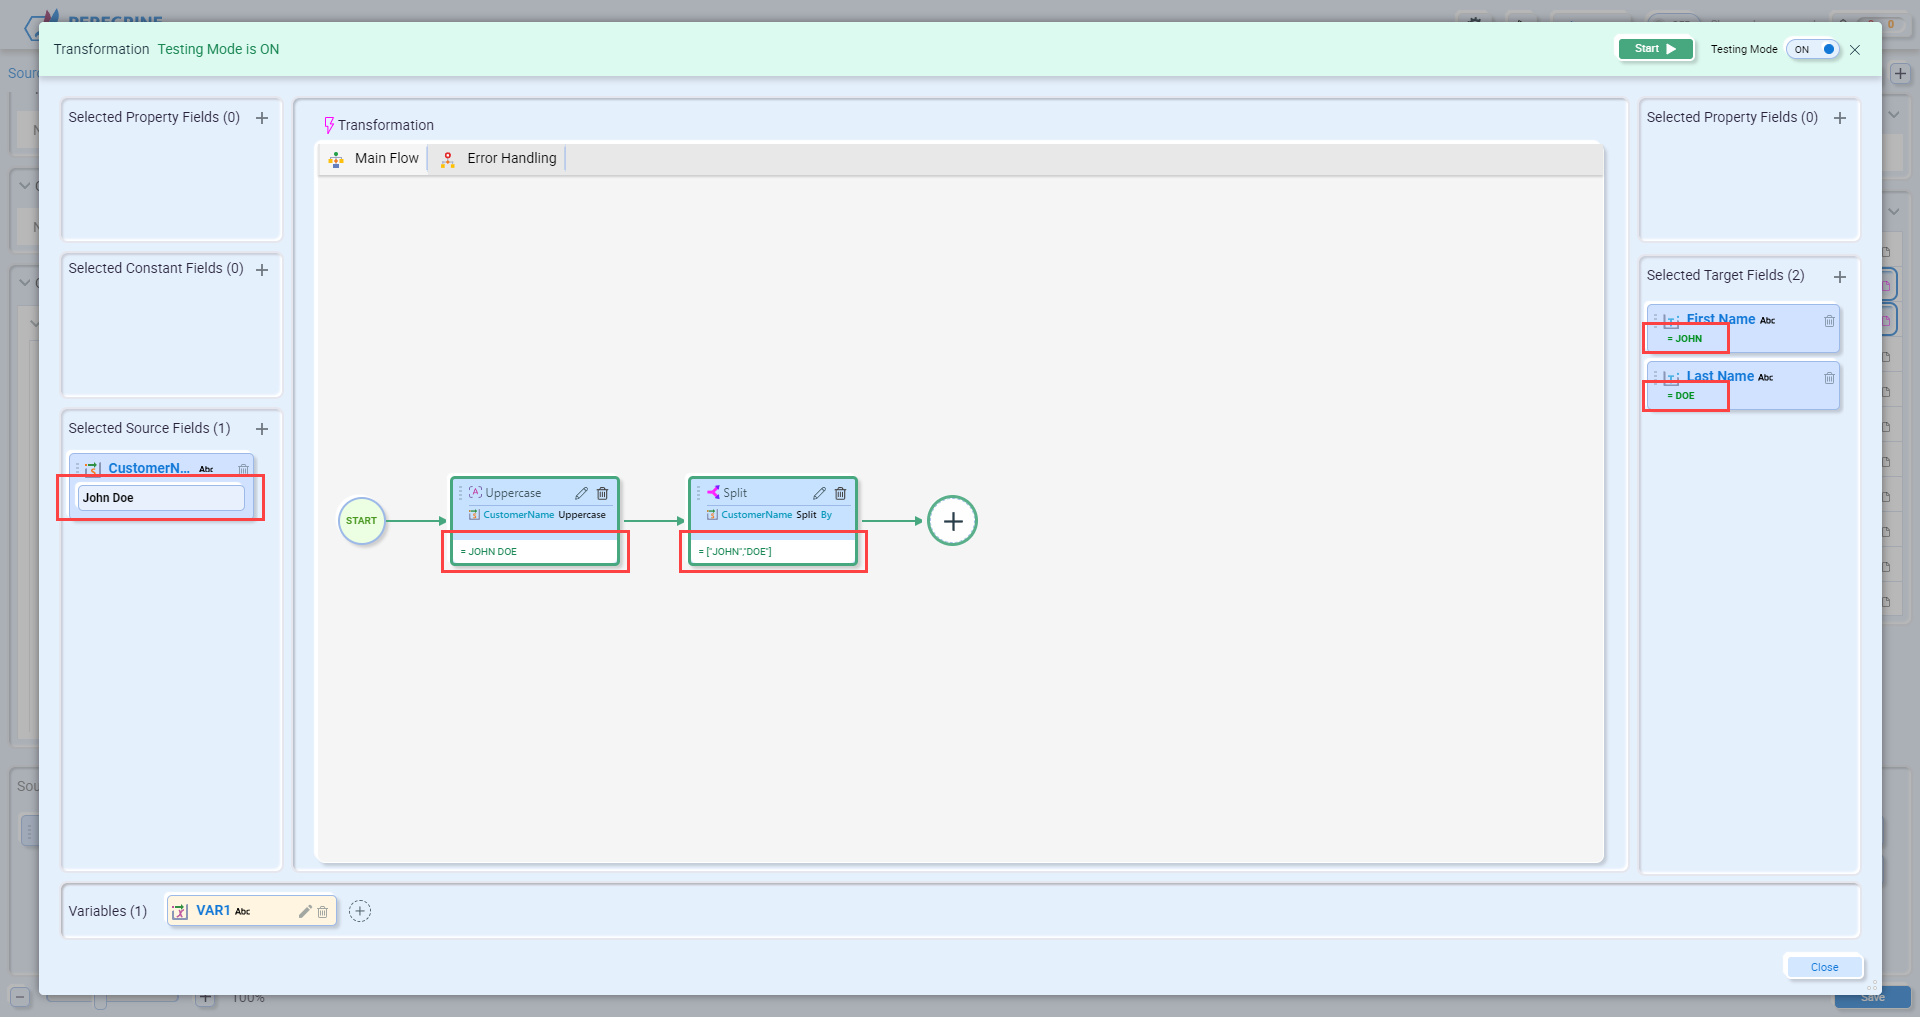
Handling Errors
Not all source documents are perfect. Sometimes they are missing data, or the date they do contain is either incorrect or not the data type you were expecting. The Data Mapper provides two options on how to handle errors that occur while mapping source to target fields:
- Log error and continue transformation – when an individual mapping between source and target fields fails, the Data Mapper would log the error in a log file and the mapping would continue.
- End transformation and throw error – when an individual mapping between source and target fields fails, an exception would be thrown, and the mapping would end.
The error handling settings are available globally, and by default would be applied to each mapping. You can also set the error handling option on each individual mapping. For example, for most of the mappings you might want the map to continue when an error occurs. However, there may be a few individual mappings that, when they fail, you want the entire data map to fail and throw an exception.
Global Transformation Error Option
To set the global option on how to handle errors, click on the Settings icon at the top of the Data Mapper:

This will display the Map Settings screen:
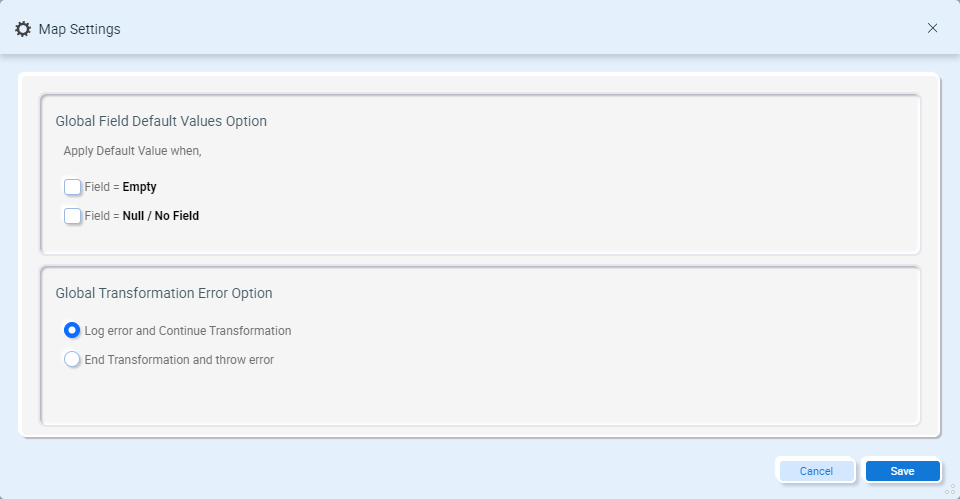
The default error handling option for all new maps is “Log error and continue transformation”. If you want to change how errors are handled, select the other option, and click the Save button. The selected value will be the option applied to each individual mapping by default.
Individual Transformation Error Handling
Each individual mapping contains an error handling option in the Transformation Center. To see the error handling options, click the Error Handling tab in the Transformation Center:

For each new mapping, the error handling will default to the global setting. To change the error handling behavior for this specific mapping, select one of the other options. This tab is also available when you expand the Transformation Center:
