CRM 4.0 Subscription Adapter
- Home
- Neuron ESB
- Development
- Developing Neuron Applications
- Connecting to External Systems
- Adapters
- Neuron Adapters
- CRM 4.0 Subscription Adapter
Overview
The CRM subscription adapter is designed to support asynchronously modifying data contained in Microsoft CRM 4.0.
Requirements
An on-premise Microsoft CRM 4.0 installation (the adapter does not support CRM Online or partner-hosted solutions).
Installation
Configure the Domain User
Create a new user for the adapter by following the steps in the topic Create a Domain User.
Create roles in Microsoft Dynamics CRM 4.0
The following steps will allow one to create the appropriate security role which can be assigned to the CRM user.
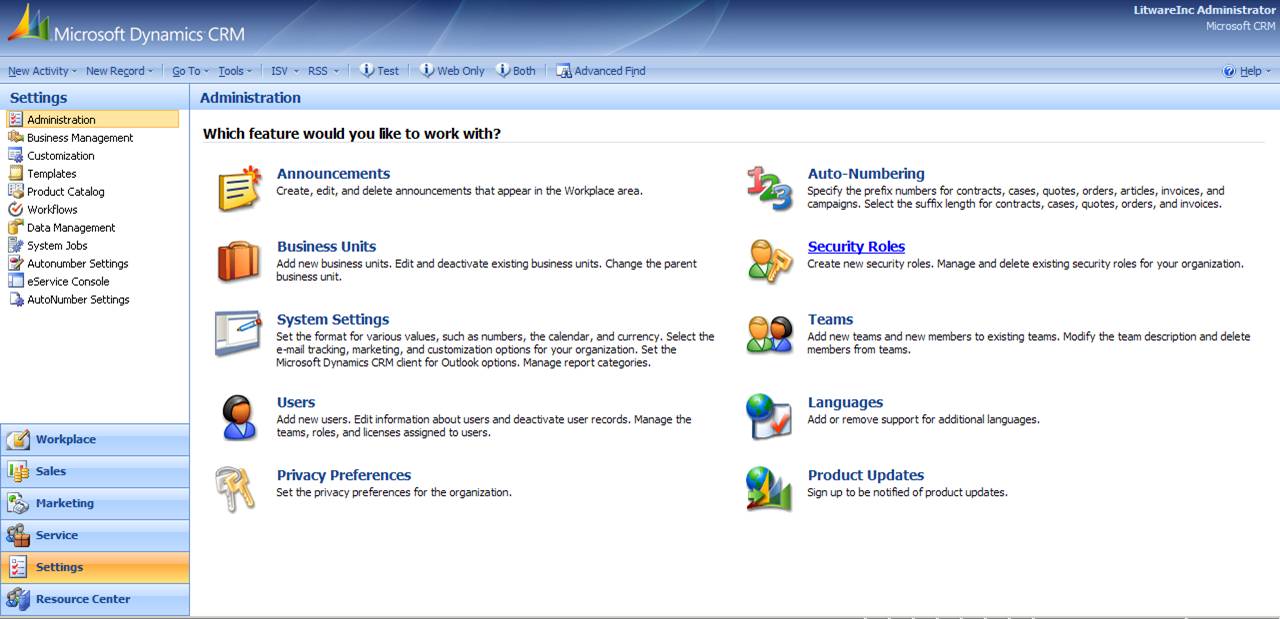
Open CRM with a user having access to creating roles and users in CRM. Then, click on Settings->Administrator->Security Roles.
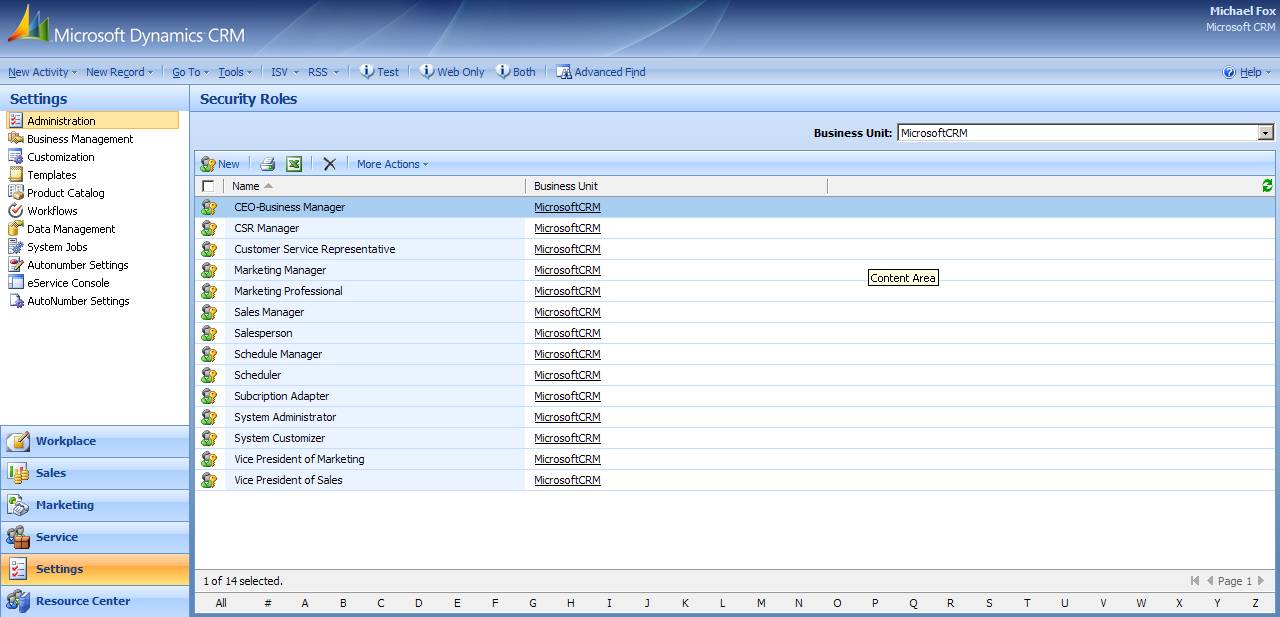
All the security roles will be displayed and one will need to copy the privileges assigned to the System Administrator. Click System Administrator from the roles grid.
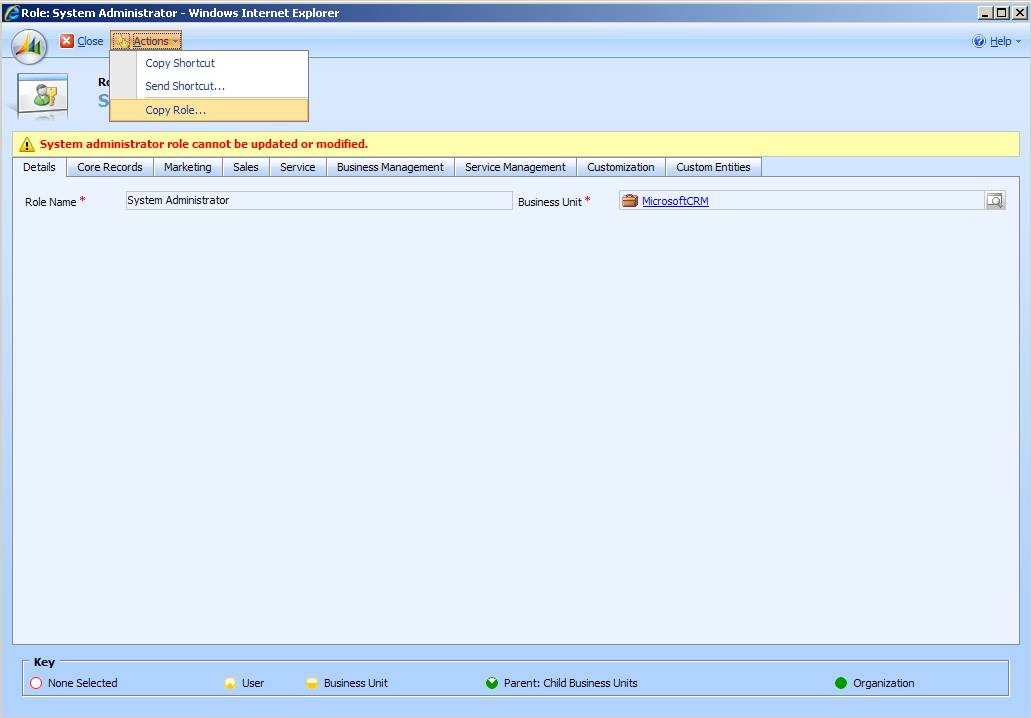
Click on Action->Copy Role
The Copy Role link will open a new link to create the role in CRM. Specify the Role Name & Save and Close the page and shown below.
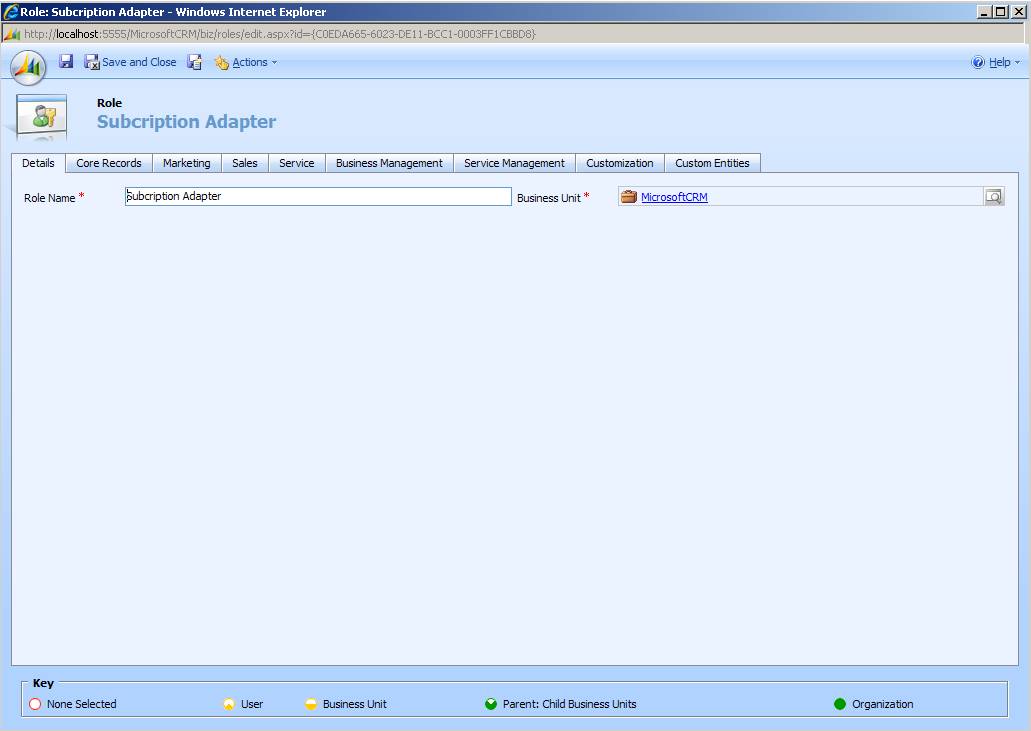
Disable the Customization and Configuration
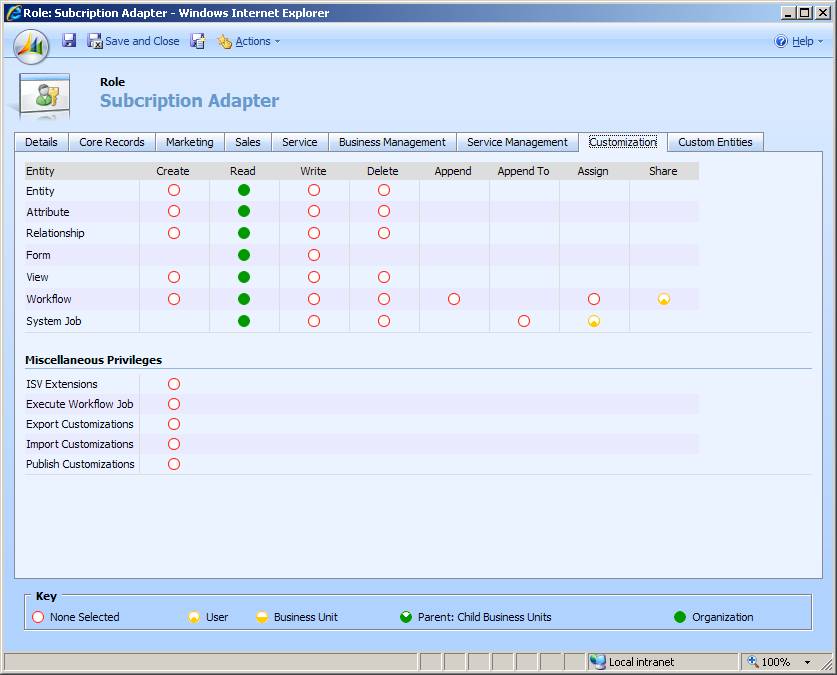
Now you will see the newly created role in CRM’s security roles list.
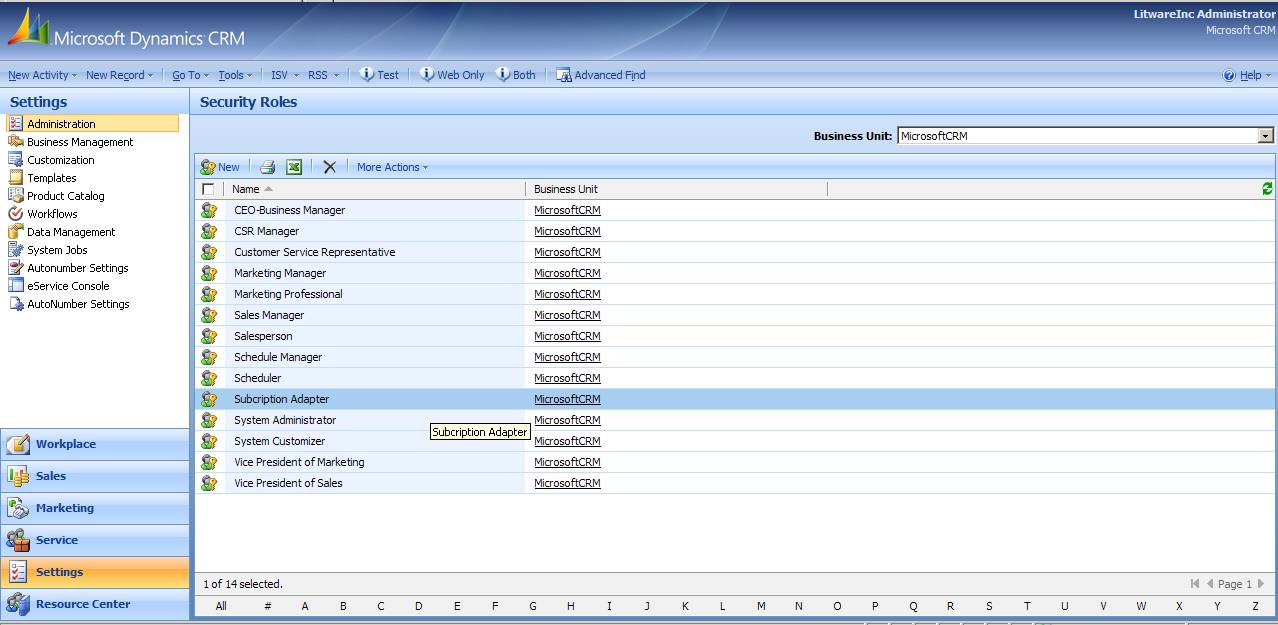
Create User in Microsoft Dynaics CRM 4.0 & Assign Roles
To create a CRM user click Settings->Administrator->Users
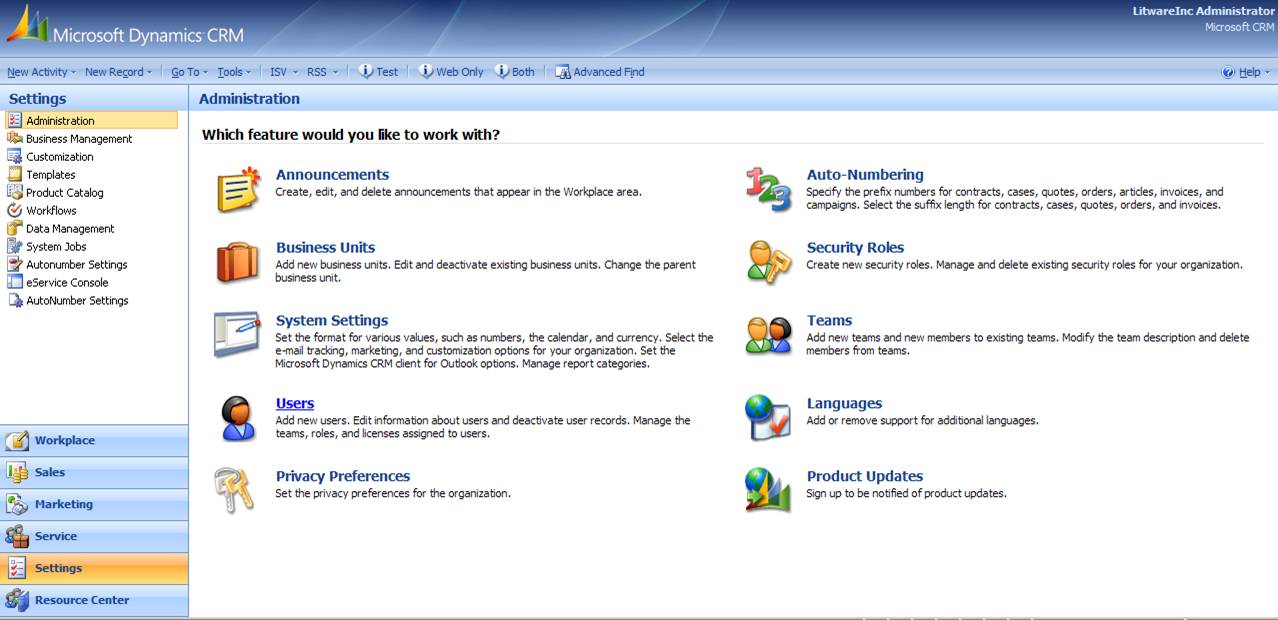
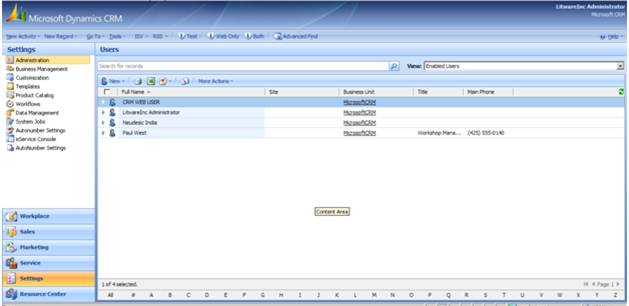
After clicking the User link, it will pen the user grid. Click the New button to create a new user.
The new user page will be displayed. Please enter the Domain Logon Name and move the focus off the control. Doing this will cause the details to be retrieved from active directory.
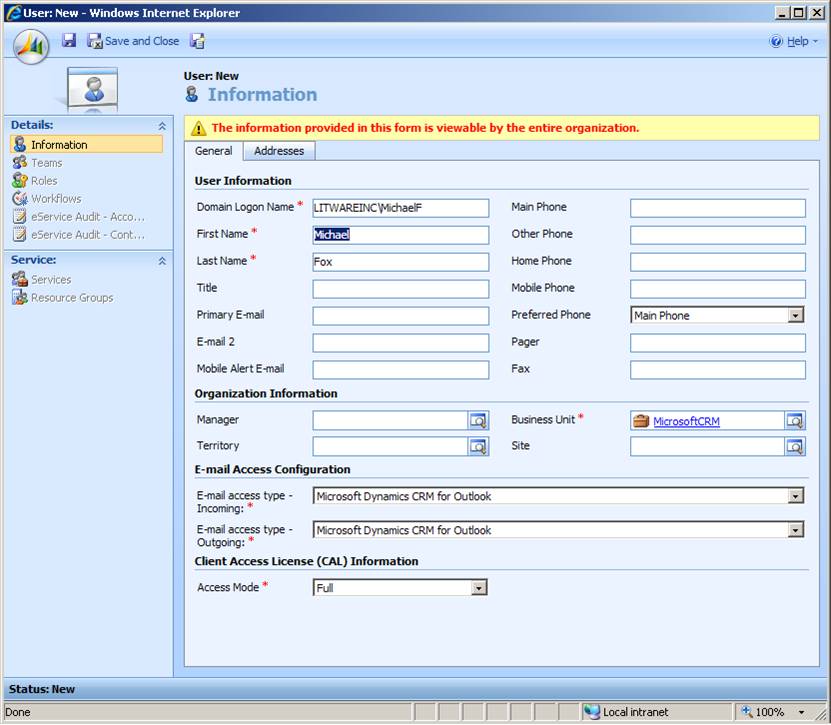
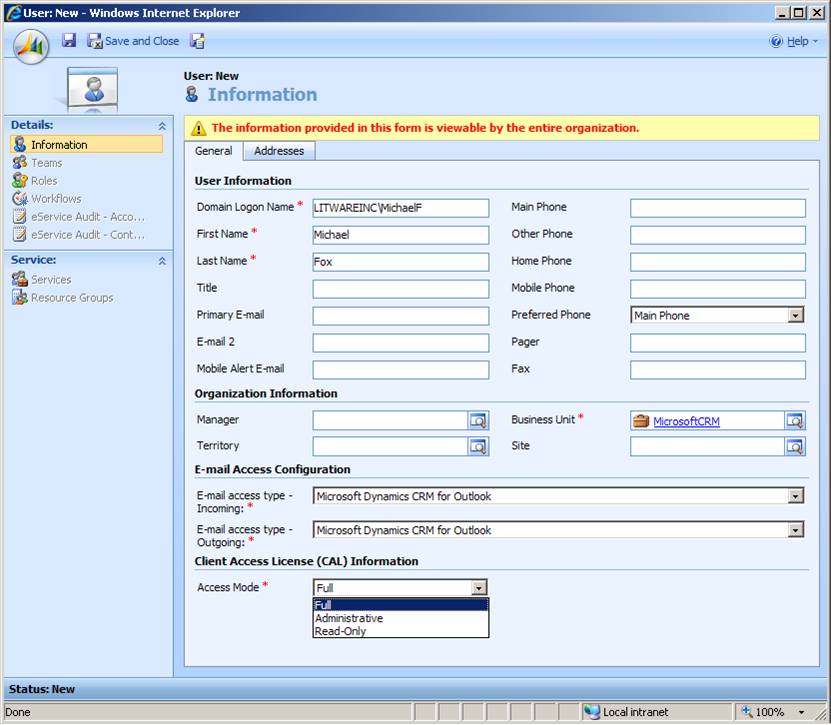
Select the access mode Full, which will give full rights to the newly created user.
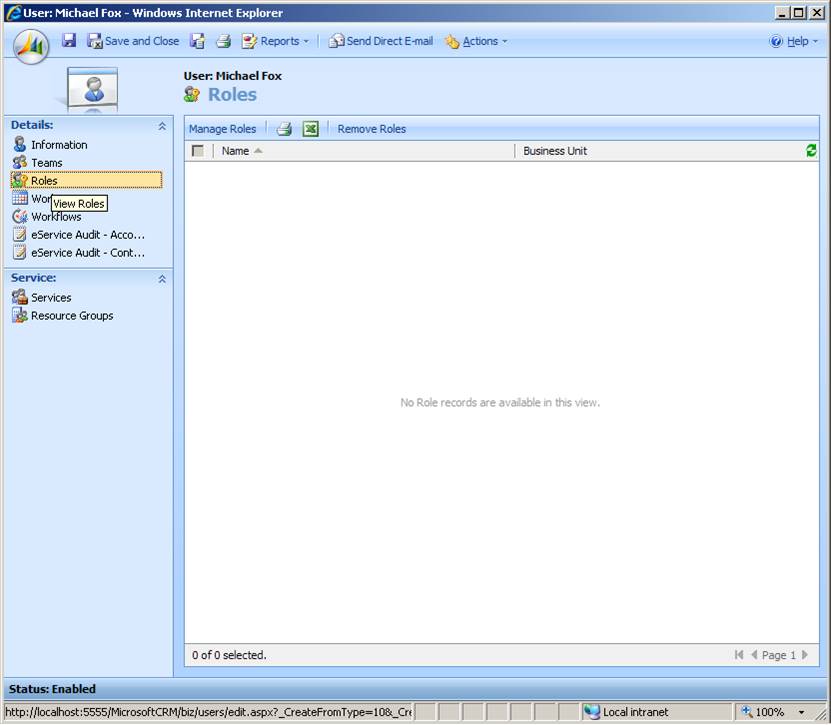
Click the Save button which will creat the user. Then, click the Roles link to assign roles to the user.
Select the newly created role and click OK e.g. newly created Subscription Adapter role had been selected.
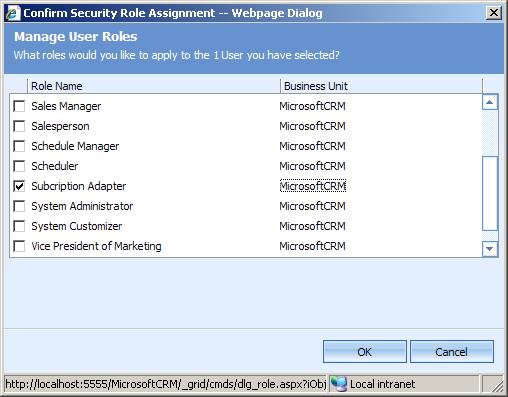
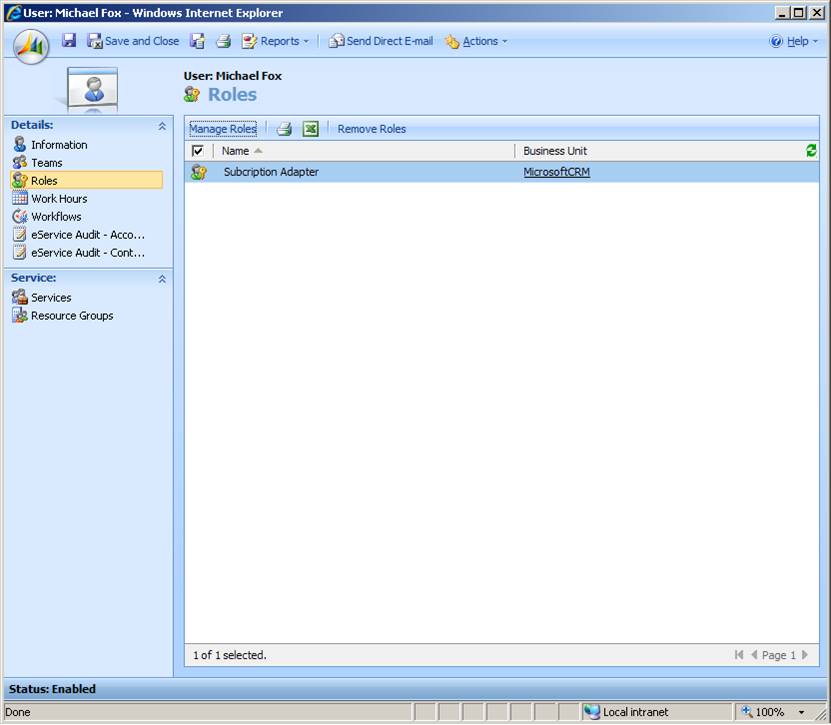
The assigned role will appear in the Roles section of the user. Save & Close the user. The role will now appear in the user grid as shown below.
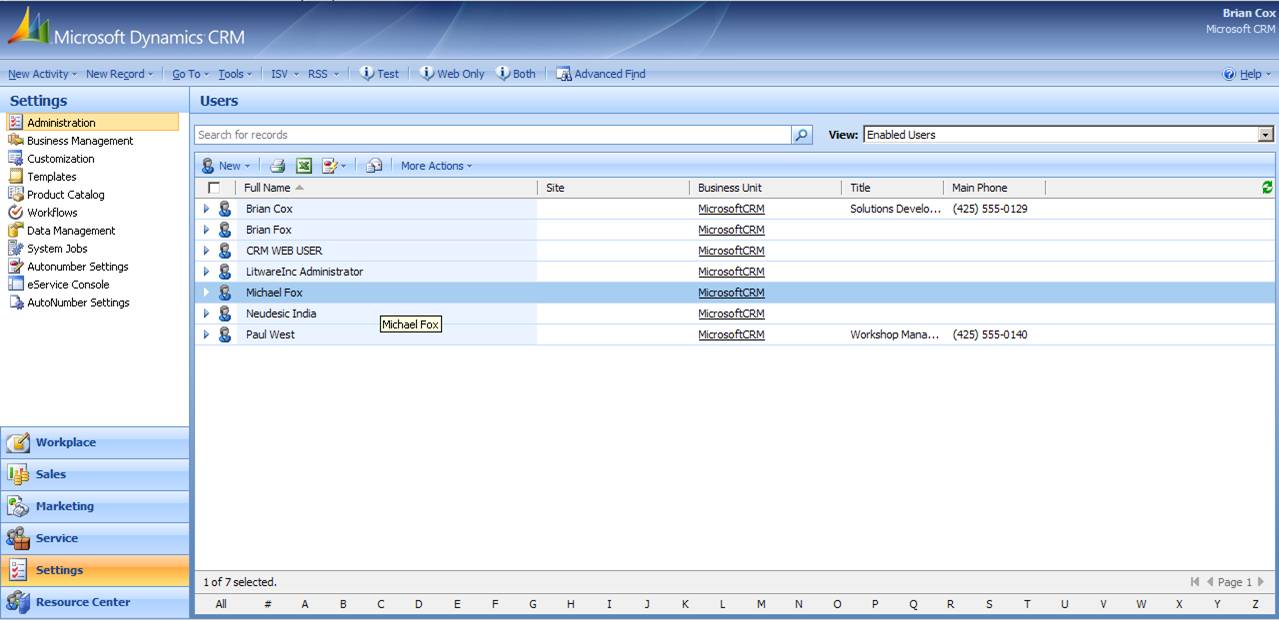
The newly created user will appear in Microsoft Dynamics CRM 4.0 user grid.
Configure MS CRM Web Service User Credentials
The following are the ways a user credentials can be configured to call CRM Web services.
- User can run Neuron windows service using CRM user credentials.
- User can add the CRM user to the Security -> Authentication -> Credentials list.
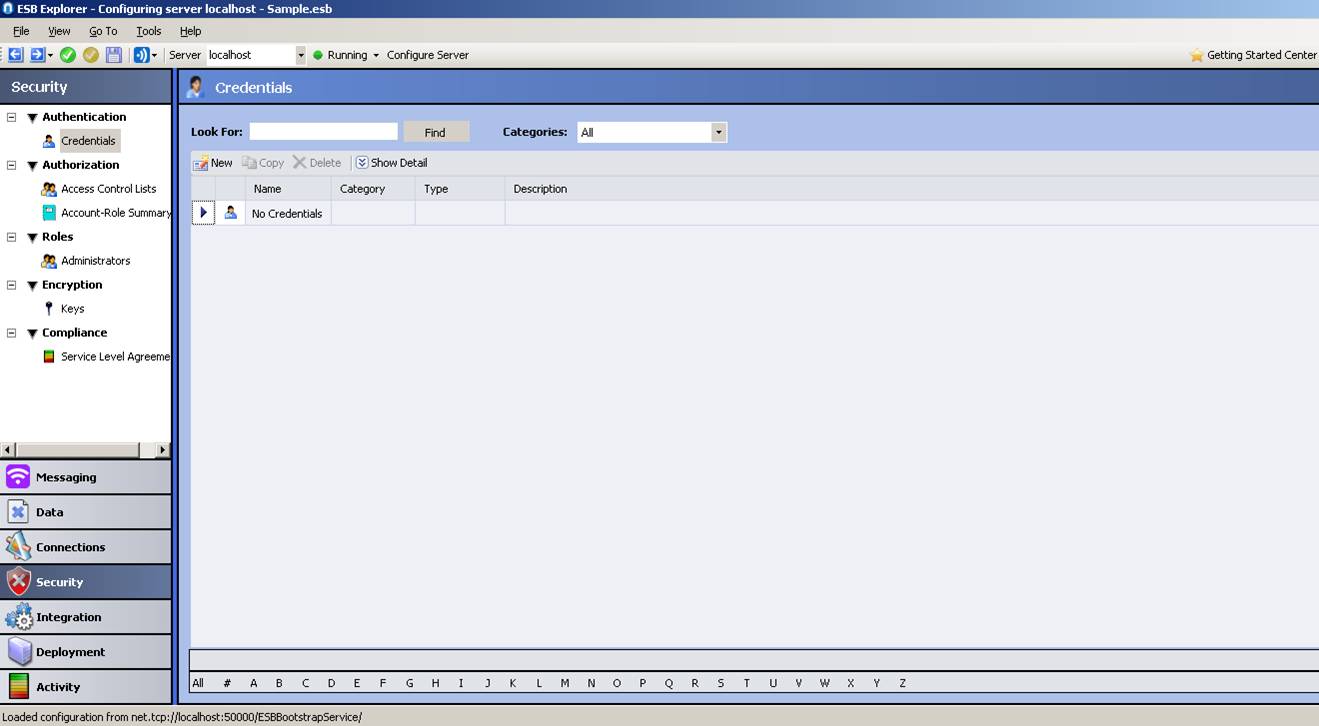
Open the Neuron ESB Explorer and navigate to Secutiry -> Authentication -> Credentials.
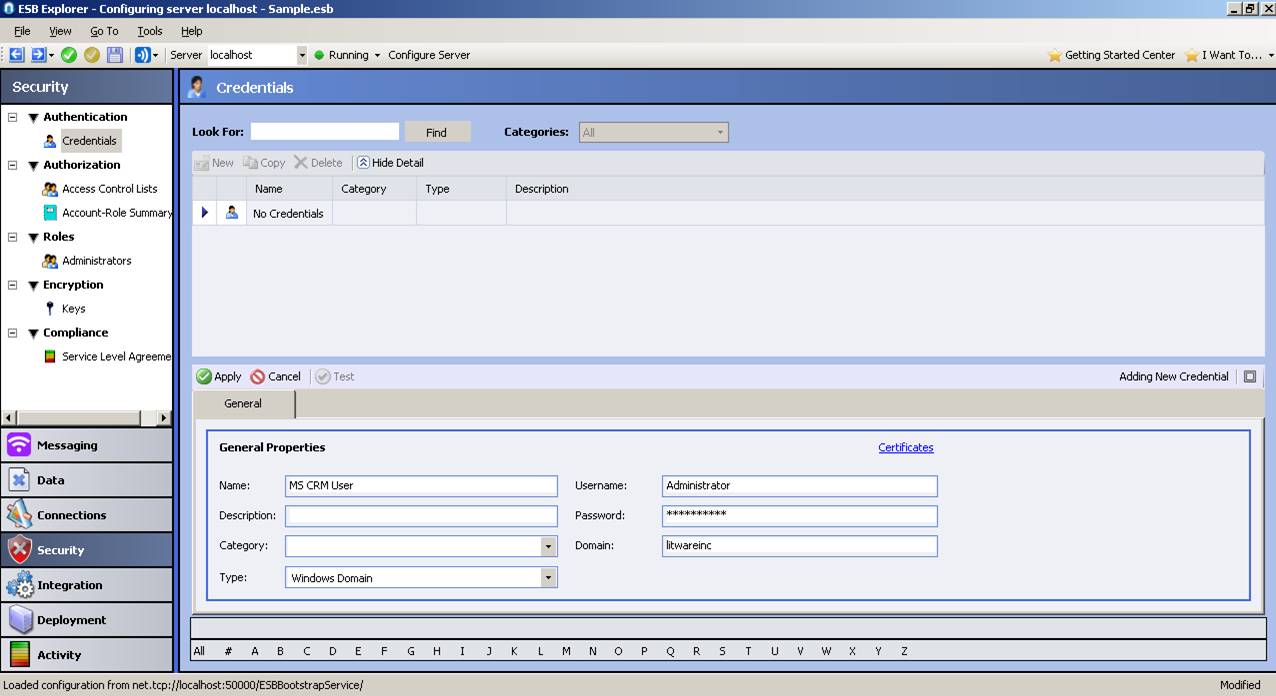
Click on the New button to add CRM user credentials. Select Windows Domain from the type list and provide the user name, password, and domain information, then click apply. After this one should save the Neuron configuration.
Configure Subscription Adapter Walk Through
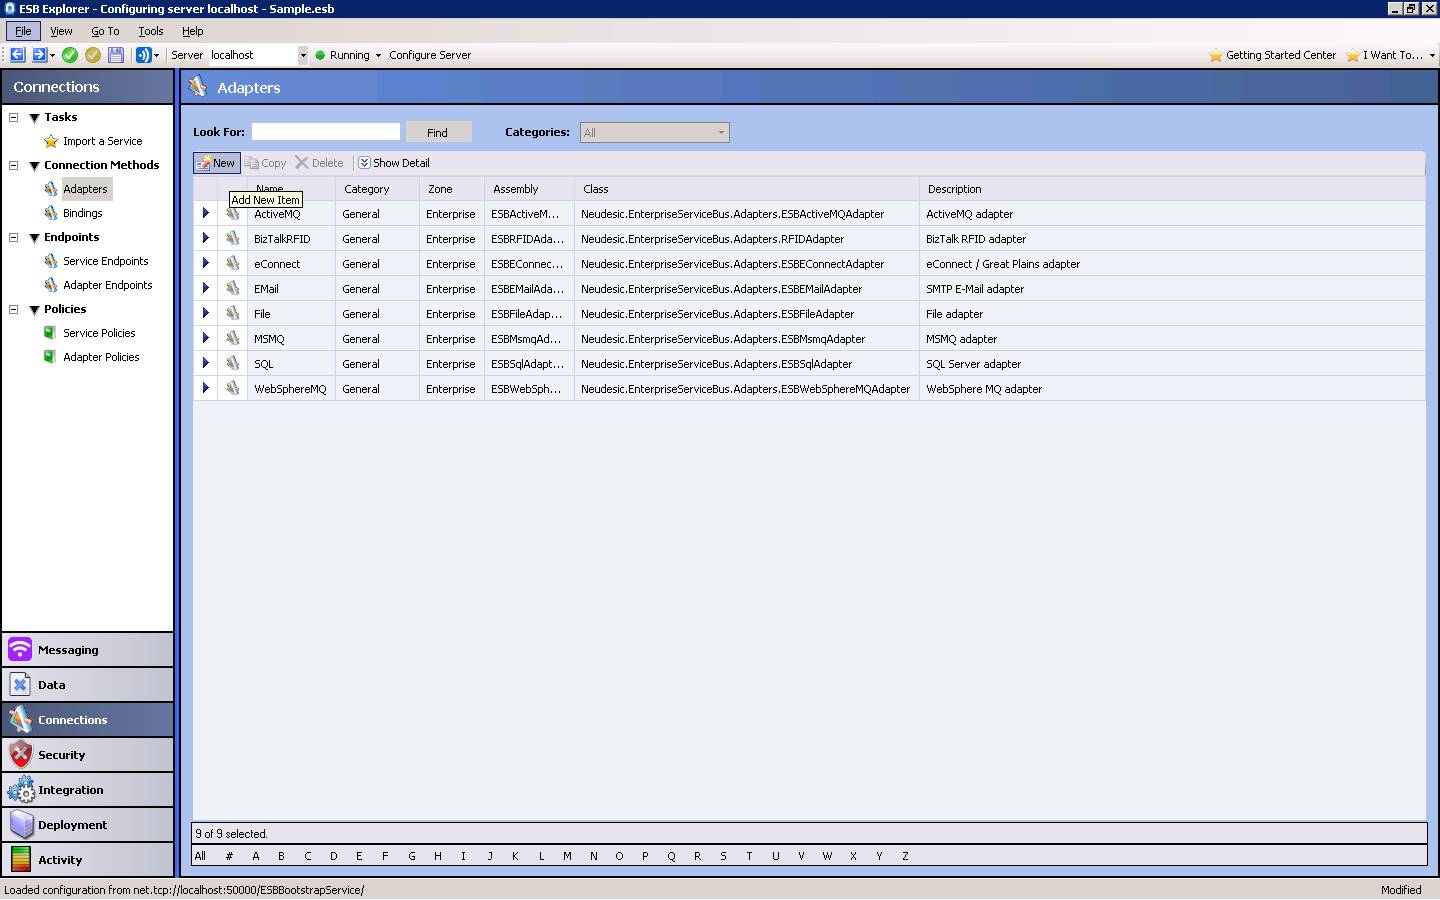
Use the Neuron ESB Explorer and navigate to the Connections -> Adapters view. If the CRM Subscription adapter does not already appear in the adapters list, then please click on the New button to add the CRM subscription adapter assembly.
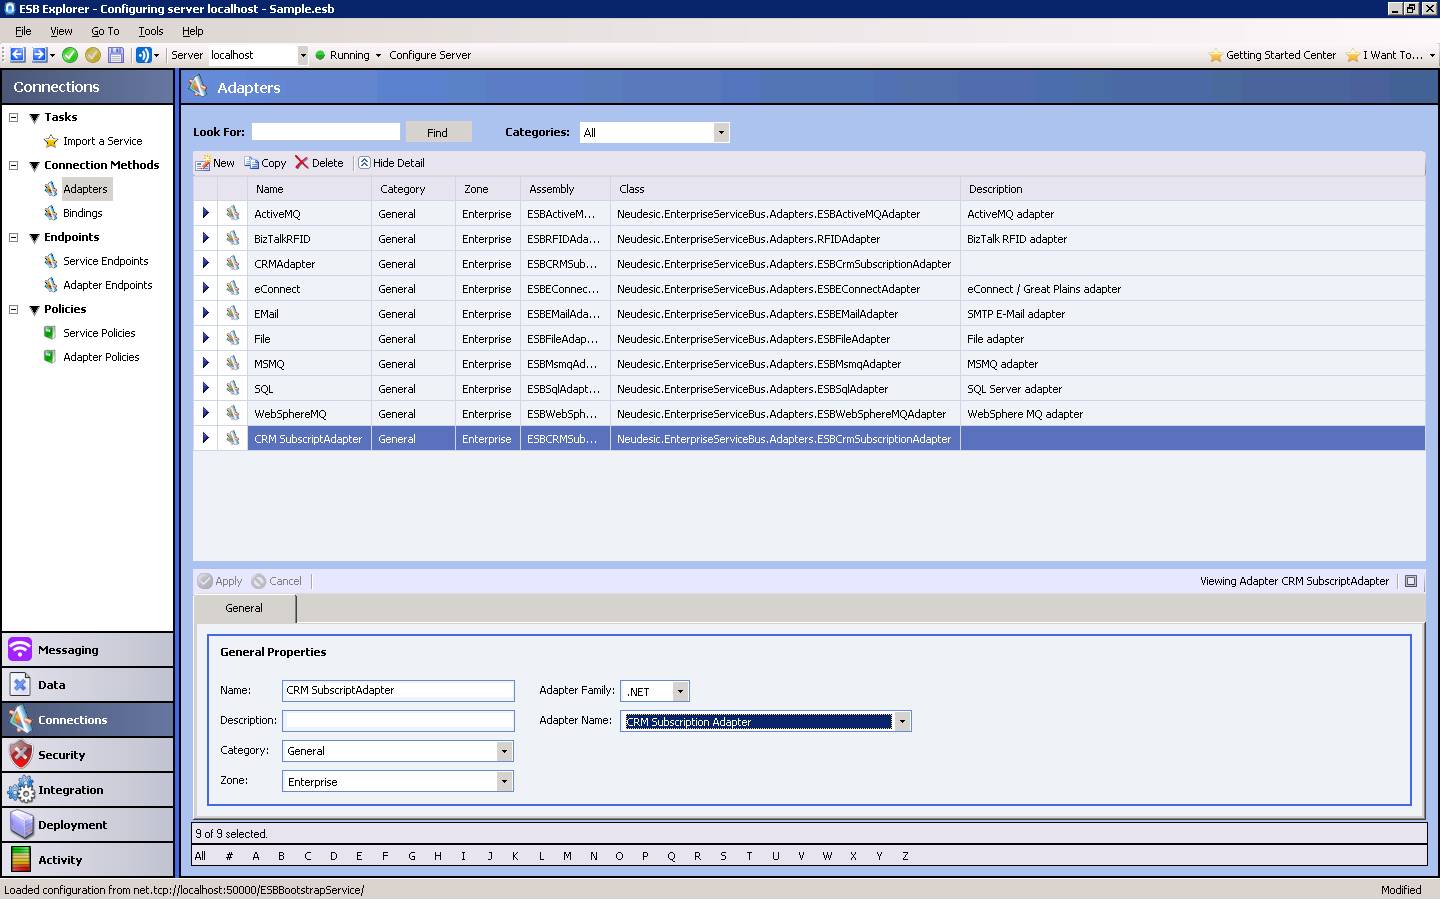
Select the CRM Subscription adapter from the Adapter Name drop down list, give the adapter an appropriate name, then click the Apply button.
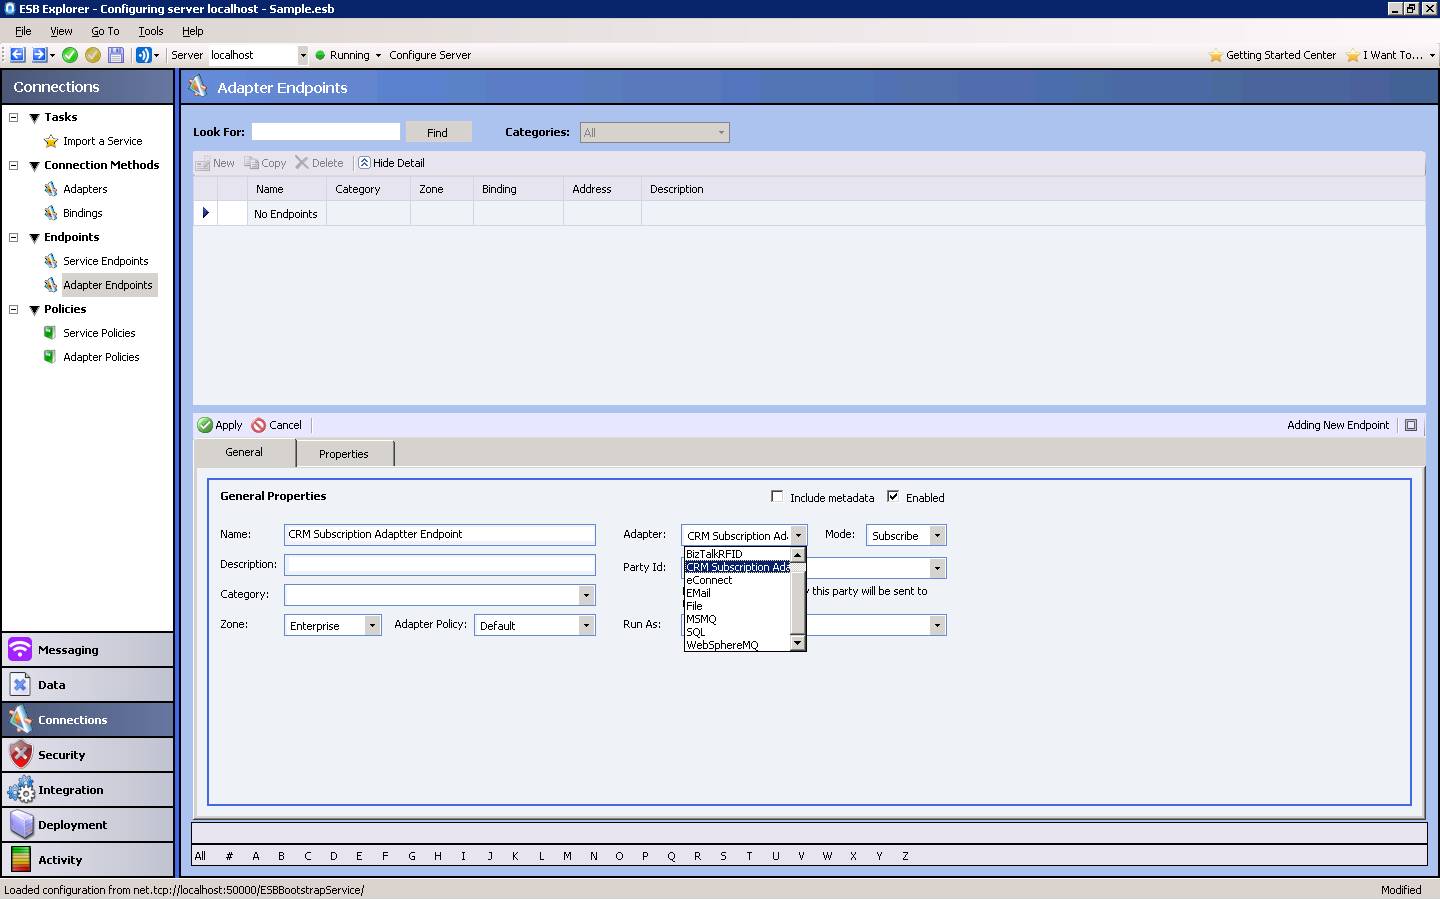
Now, select the Adapter Endpoints item to create an endpoint based on the CRM Subscription adapter that was just created. Click the New button and select the CRM Subscription Adapter from the Adapter drop down list. Set the mode to Subscribe and configure the Party Id which is the party used to receive messages from Neuron.
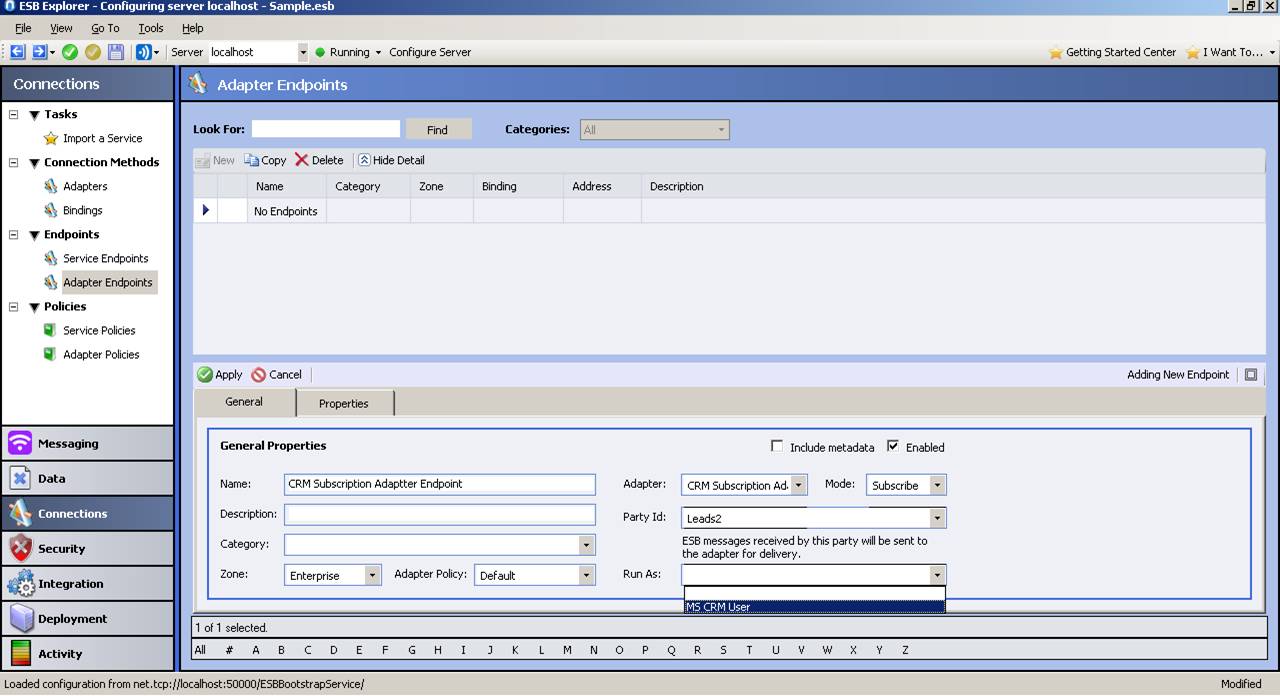
Configure the Run As to use the appropriate credentials, which will be used by the adapter when connecting to CRM.
Click on the properties tab to configure the adapter properties that are essential for the adapter to work properly.
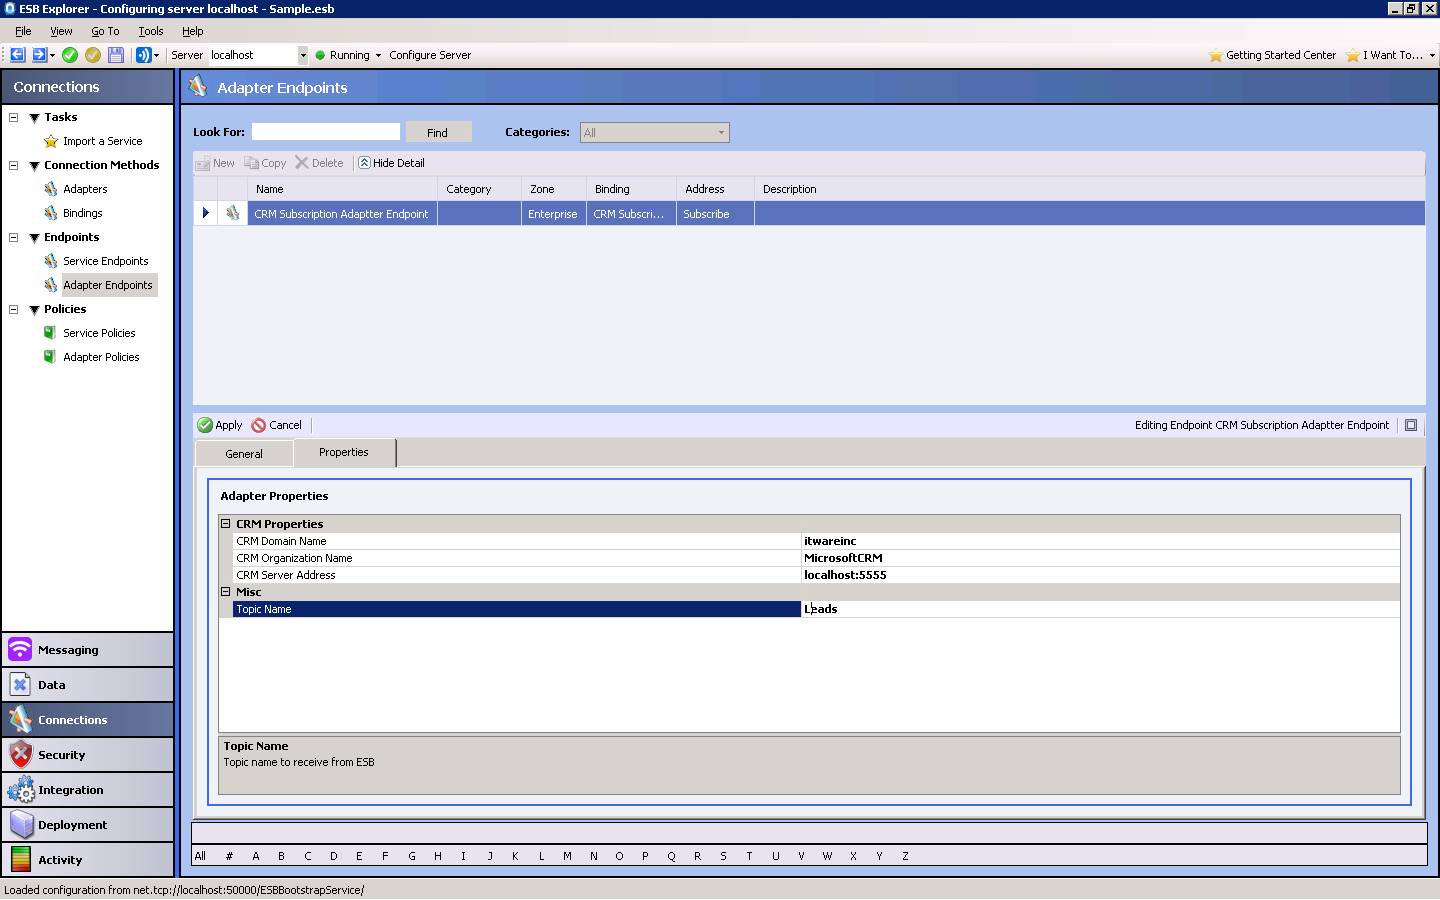
Click the apply button, and then save the Neuron configuration.
Troubleshooting
Microsoft Dynamics CRM lets you create trace files that monitor the actions that are performed by Microsoft CRM. Trace files are helpful when you have to troubleshoot error messages or other issues in Microsoft CRM.
You can create unmanaged trace files and managed trace files. The information in the unmanaged trace files and in the managed trace files is determined by required and optional registry entries that you create manually. You create these registry entries on the Microsoft CRM server or on the computer that is running the Microsoft CRM client for Microsoft Office Outlook after you install Microsoft CRM or the Microsoft CRM client for Outlook.
5. Enable / Disable MS CRM 4. 0 Tracing
5.1 Required Registry Entries
| Name | Type | Data value | Notes |
| TraceEnabled | DWORD | A value of 0 or 1 | If you use a value of 0, tracing is disabled. If you use a value of 1, tracing is enabled. |
| TraceDirectory | String | C:\CRMTrace | The TraceDirectory registry entry specifies the directory for the trace log files. The directory must exist, and the user who starts the Microsoft CRMAppPool must have full control over this directory. When you install Microsoft CRM, the default user is NT AUTHORITY\NETWORK SERVICE. |
| TraceRefresh | DWORD | A number between zero and 99 | When the data is changed, the trace settings in the other trace registry entries are applied. |
5.2 Optional Registry Entries
| Name | Type | Data value | Notes |
| TraceCategories | String or Multi-String | Category.Feature:TraceLevel | The TraceCategories registry entry is a combination of a category, a feature, and a trace level. You can specify multiple categories, features, and trace levels. Separate each combination by using a semicolon. For a list of categories, features, and trace levels and for sample combinations that are valid, see the “Trace level values” section. |
| TraceCallStack | DWORD | A value of 0 or 1 | If you use a value of 0, the call stack is not included in the trace file. If you use a value of 1, the call stack is included in the trace file. |
| TraceFileSizeLimit | DWORD | A size between 1 and 100 megabytes | The TraceFileSizeLimit registry entry specifies the maximum size of trace files. New files are created when the limit is reached. |
If you do not create the optional registry entries, the default data values are used. For more information about the default data values, see the “Default data values for optional registry entries” section. If you create the registry entries but do not specify data values for the registry entries, tracing will not work.
5.3 Microsoft Dynamics CRM 4.0 trace log file locations
When you create a trace in Microsoft Dynamics CRM 4.0, the TraceDirectory registry key is ignored. For tracing on the Microsoft Dynamics CRM 4.0 server, the trace log file is created in the following folder:
<Drive>\Program Files\Microsoft Dynamics CRM\Trace
For tracing on the Microsoft Dynamics CRM 4.0 client for Microsoft Office Outlook and for tracing on Microsoft Dynamics CRM 4.0 Data Migration Manager, the trace log file is created in the following folder:
<Drive>\Documents and Settings\InstallingUser\Application Data\Microsoft\MSCRM\Traces
5.4 Registry Entry Locations
The Microsoft CRM server tracing registry entries are located in the following registry sub key:
HKEY_LOCAL_MACHINE\SOFTWARE\MICROSOFT\MSCRM
The Microsoft CRM client for Outlook tracing registry entries are located in the following registry sub key:
HKEY_CURRENT_USER\SOFTWARE\MICROSOFT\MSCRMClient
The Microsoft CRM Data Migration Manager tracing registry entries are located in the following registry sub key:
HKEY_LOCAL_MACHINE\SOFTWARE\MICROSOFT\DATAMIGRATIONWIZARD
5.5 Complete List of Category Values for the TraceCategories Registry Entry
- Application.*
- Application.Outlook
- Exception
- ObjectModel
- ParameterFilter
- Platform.*
- Platform.ImportExportPublish
- Platform.Sdk
- Platform.MetadataPlatform.Sql
- Platform.Workflow
- Platform.Soap
- SchedulingEngine.*
- Unmanaged.*
- Unmanaged.Outlook
- Unmanaged.Platform
- Unmanaged.Sql
5.6 Trace Level Values
Here is a complete list of valid trace level values for TraceCategories:
- Off
- Error
- Warning
- Info
- Verbose
Note: A message is logged only if the trace level for the category is equal to or greater than the level of the message. For example, a trace level of Warning logs messages that have a level of Warning and of Error. A trace level of Info logs messages that have a level of Info, Warning, and Error. A trace level of Verbose logs all messages. You should only use a trace level of Verbose for short durations.
Sample category and trace level combinations:
*: Verbose
Logs all messages in all categories.
Application.*: Error
Logs all messages that have a level of Error for the Application.* category
Platform.*: Warning
Logs all messages that have a level of Warning or Error for the Platform.* category.
5.7 Default Data Values for Optional Registry Values
- TraceCategories.* : Error
- TraceCallStack:0
- TraceFileSizeLimit:5
6. Enable Neuron Tracing
Open Neuron ESB Explorer and connect.
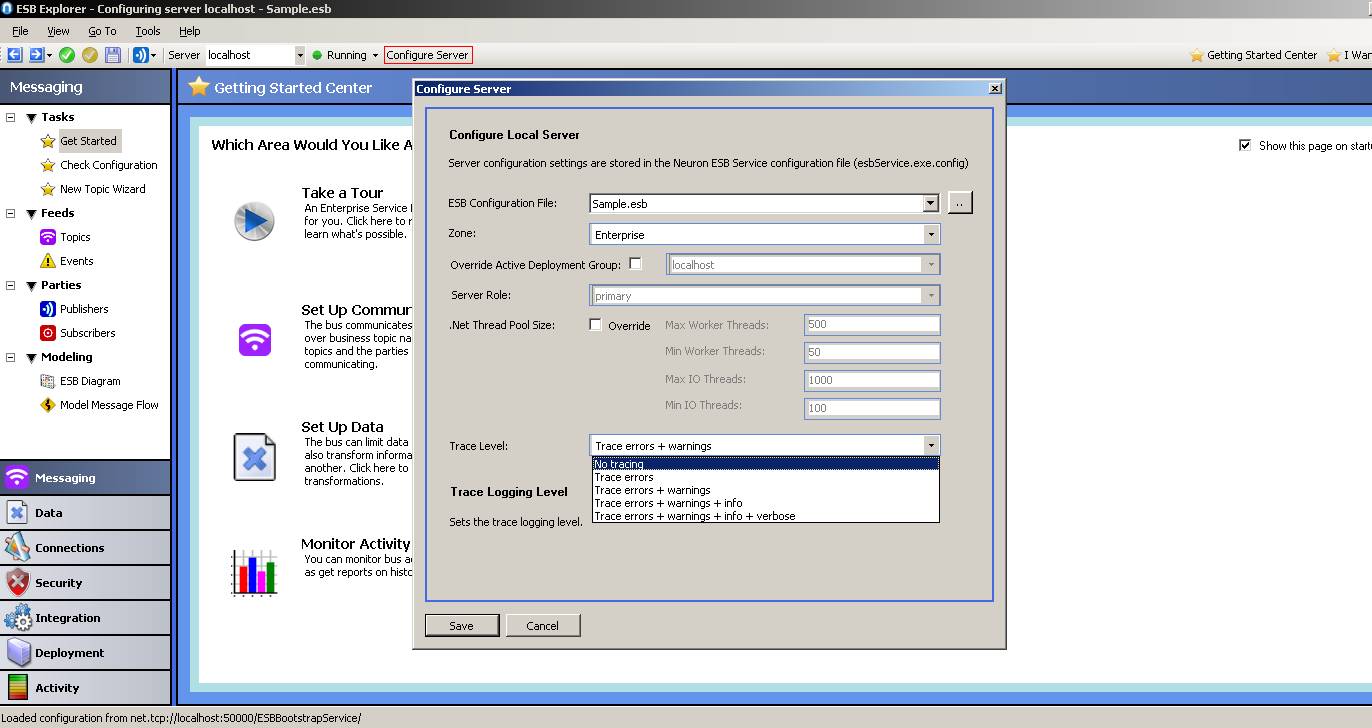
Click on Configure Server to configure the trace level for the Neuron ESB Service. Note: All log files are written to the following location:
<InstallDir>\logs\
The Neuron ESB Service will have to be restarted to apply any changes with the trace level.
Supported Modes
The CRM Subscription adapter supports a single mode of communication.
Subscribe
The CRM adapter will listen for datagram command messages on a topic and process the commands asynchronously. The subscribe mode can be used to create, update, and delete records within CRM.
Configuration
The subscribe mode of the CRM adapter requires the following properties to be configured: Organization Name, Server Address.
Property Table
| Property Name | Required | Description |
| Organization Name | Yes | The name of the organization within CRM to use when processing commands. |
| Server Address | Yes | The server name and port number of the Microsoft CRM 4.0 server that will receive command messages (example: “mycrmserver:80”). |
Messages
SaveCrmRecord Command
The SaveCrmRecord command allows data to be created and updated within CRM. Individual properties to be saved are passed as name value pairs within the command body.
Sample Message:
<NeuronCrmAdapterMessage>
  <CrmCommandsTransactional="false">
    <SaveCrmRecordallowCreate="false" id="contact1" entity="contact"   identityfield="contactid">
      <propertyname="emailaddress1" value="first.last@domain.com" typename="String" />
      <propertyname="birthdate" value="04/11/1982 12:00:00 AM" typename="CrmDateTime" />
      <propertyname="firstname" value="John" typename="String" />
      <propertyname="lastname" value="Smith" typename="String" />
      <propertyname="donotemail" value="false" typename="CrmBoolean" />
      <propertyname="contactid" value="{80C4BC51-C91E-DE11-B893-0003FF2A866D}" typename="Key" />
      <propertyname="creditlimit" value="10000" typename="CrmMoney" />
      <propertyname="department" value="Neudesic Sales" typename="String" />
    </SaveCrmRecord>
  </CrmCommands>
</NeuronCrmAdapterMessage>
| Attribute | Required | Description |
| allowCreate | No | Specifies whether the specified record should be created if it does not already exist. |
| entity | Yes | The type of CRM entity to update. |
| identityfield | Yes | The name of the identity field used by the entity. |
| id | Yes | A unique name for the command. |
DeleteCrmRecord Command
The DeleteCrmRecord command allows data to be deleted from CRM.
Sample Message:
<NeuronCrmAdapterMessage>
  <CrmCommandsTransactional="true">
    <DeleteCrmRecordentity="contact" value="{50B5D846-9E14-DE11-B893-0003FF2A866D}" />
  </CrmCommands>
</NeuronCrmAdapterMessage>
| Attribute | Required | Description |
| entity | Yes | The type of CRM entity to update. |
| value | No | The identifier of the entity to be deleted. |
| lookupid | No | The identifier of a lookup used to locate the record to be deleted (see DeleteCrmRecord Command with Lookup). |
SetCrmState Command
The SetCrmState command allows the state of specific entities in CRM to be updated.
Sample Message:
<NeuronCrmAdapterMessage>
  <CrmCommandsTransactional="false">
    <SetCrmStateentity="contact" value="{50B5D846-9E14-DE11-B893-0003FF2A866D}" statuscode="0" statecode="Active"/>
  </CrmCommands>
</NeuronCrmAdapterMessage>
| Attribute | Required | Description |
| entity | Yes | The type of CRM entity to update. |
| value | No | The identifier of the entity to be deleted. |
| lookupid | No | The identifier of a lookup used to locate the record to be deleted (see DeleteCrmRecord Command with Lookup). |
| statuscode | Yes | Supported values:contractcancelincidentResolvedopportunityWonLostquoteClosedsalesordercancel |
SaveCrmRecord Command with Lookup
Lookups can be combined with the SaveCrmRecord command to associate related records with an entity. To use a lookup, insert a Lookup node in the request and use typename “Lookup” and the attribute lookupid in the property XML to reference the lookup element.
Lookup element
| Attribute | Required | Description |
| id | No | Specifies whether the specified record should be created if it does not already exist. |
| entity | Yes | The type of CRM entity to update. |
| lookupfield | Yes | The name of the field to be looked up by the query. |
searchfield element
| Attribute | Required | Description |
| name | Yes | The name of the field to compare in the query. |
| value | Yes | The value of the field to compare in the query. |
| operator | Yes | The operator to use for the field comparison. For details on supported operators, see https://technet.microsoft.com/en-us/library/aa681013.aspx. |
Sample Message:
<NeuronCrmAdapterMessage>
  <CrmCommandsTransactional="true">
    <Lookups>
      <Lookupid="accountid" entity="account" lookupfield="accountid">
        <searchfieldname="accountid" value="{D04D44AD-36D0-DC11-AA32-0003FF33509E}" operator="equal" />
      </Lookup>
      <Lookupid="contactid" entity="contact" lookupfield="contactid">
        <searchfieldname="contactid" value="{0820590A-37D0-DC11-AA32-0003FF33509E}" operator="equal" />
      </Lookup>
    </Lookups>
    <SaveCrmRecordallowCreate="true" id="account" entity= "account" identityfield= "accountid">
      <propertyname = "accountnumber" value ="101010101010" typename = "String" />
      <propertyname = "address1_city" value ="Irvine" typename = "String" />
      <propertyname = "address1_country" value ="USA" typename = "String" />
      <propertyname = "name" value ="John Smith" typename = "String" />
      <propertyname = "creditlimit" value ="10000" typename = "CrmMoney" />
      <propertyname = "isprivate" value ="True" typename = "CrmBoolean" />
      <propertyname = "industrycode" value ="1" typename = "Picklist" />
      <propertyname = "territorycode" value ="1" typename = "Picklist" />
      <propertyname = "description" value ="Sample Account" typename = "String" />
      <propertyname = "telephone1" value ="100007" typename = "String" />
      <propertyname = "parentaccountid" lookupid ="accountid" typename = "Lookup" />
      <propertyname = "primarycontactid" lookupid ="contactid" typename = "Lookup" />
    </SaveCrmRecord>
  </CrmCommands>
</NeuronCrmAdapterMessage>
DeleteCrmRecord Command with Lookup
Lookups can be combined with the DeleteCrmRecord command to query for an entity to delete.
Lookup element
| Attribute | Required | Description |
| id | No | Specifies whether the specified record should be created if it does not already exist. |
| entity | Yes | The type of CRM entity to update. |
| lookupfield | Yes | The name of the field to be looked up by the query. |
searchfield element
| Attribute | Required | Description |
| name | Yes | The name of the field to compare in the query. |
| value | Yes | The value of the field to compare in the query. |
| operator | Yes | The operator to use for the field comparison. For details on supported operators, see https://technet.microsoft.com/en-us/library/aa681013.aspx. |
Sample Message:
<NeuronCrmAdapterMessage>
  <CrmCommandsTransactional="true">
    <Lookups>
      <Lookupid="accountid1" entity="account" lookupfield="accountid">
        <searchfieldname="accountid" value="{00562C06-A508-DE11-924F-0003FF2A866D}" operator="equal" />
      </Lookup>
    </Lookups>
    <DeleteCrmRecordentity="account" lookupid="accountid1" />
  </CrmCommands>
</NeuronCrmAdapterMessage>
SetCrmState Command with Lookup
Lookups can be combined with the SetCrmState event to query for an entity to update.
Lookup element
| Attribute | Required | Description |
| id | No | Specifies whether the specified record should be created if it does not already exist. |
| entity | Yes | The type of CRM entity to update. |
| lookupfield | Yes | The name of the field to be looked up by the query. |
searchfield element
| Attribute | Required | Description |
| name | Yes | The name of the field to compare in the query. |
| value | Yes | The value of the field to compare in the query. |
| operator | Yes | The operator to use for the field comparison. For details on supported operators, see https://technet.microsoft.com/en-us/library/aa681013.aspx. |
Sample Message:
<NeuronCrmAdapterMessage>
  <CrmCommandsTransactional="false">
    <Lookups>
      <Lookupid="accountid1" entity="account" lookupfield="accountid">
        <searchfieldname="accountid" value="{50882229-7523-DE11-B893-0003FF2A866D}" operator="equal" />
      </Lookup>
    </Lookups>
    <SetCrmStateentity="account" lookupid="accountid1" statuscode="0" statecode="Active"/>
  </CrmCommands>
</NeuronCrmAdapterMessage>
SaveCrmRecord with Multi-Valued Properties
CRM party list properties multiple values can be saved by using the multivalueproperty node within the command body. Within the multivalueproperty node, each value can be specified using a propertyvalue node. The multivalueproperty node can only be used with CRM party lists.
Sample Message:
<NeuronCrmAdapterMessage>
  <CrmCommandsTransactional="true">
    <SaveCrmRecordallowCreate="true" id="fax" entity= "fax" identityfield= "activityid">
      <propertyname = "subject" value = "Sample Fax" typename = "String" />
      <propertyname = "faxnumber" value = "100007" typename = "String" />
      <propertyname = "actualend" value = "1/1/2009 12:30:00 AM" typename = "CrmDateTime" />
      <propertyname = "scheduledstart" value = "1/1/2009 12:00:00 AM" typename = "CrmDateTime" />
      <propertyname = "scheduledend" value = "1/1/2009 12:30:00 AM" typename = "CrmDateTime" />
      <propertyname = "actualstart" value = "1/1/2009 12:00:00 AM" typename = "CrmDateTime" />
      <propertyname = "description" value = ".....Sample FAX....." typename = "String" />
     <propertyname = "ownerid" value ="{9BF5E0DF-65C1-DC11-B67A-0003FFBB057D}" typename = "Owner" />
      <multivaluepropertytypename="PartyList" name="to">
        <propertyvaluevalue="{0820590A-37D0-DC11-AA32-0003FF33509E}" typename="Lookup" reference="contact" />
      </multivalueproperty>
      <multivaluepropertytypename="PartyList" name="from">
        <propertyvaluevalue="{D44D44AD-36D0-DC11-AA32-0003FF33509E}" typename="Lookup" reference="account" />
      </multivalueproperty>
    </SaveCrmRecord>
  </CrmCommands>
</NeuronCrmAdapterMessage>