Using the NetSuite PSA Add-In
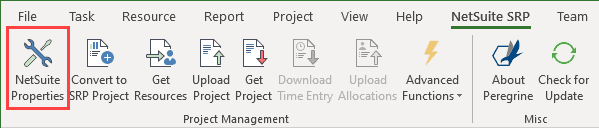
NetSuite Properties
The NetSuite properties are required for communication with NetSuite. These include your personal login information and your organization’s account properties. These properties must be entered prior to using any of the features that communicate with NetSuite PSA. Whenever you open Microsoft Project for the first time, you will be prompted to enter these properties when you click on any of the buttons that communicate with NetSuite PSA. All the properties except for the password can be saved so you don’t have to enter them every time you start Microsoft Project.
To view the NetSuite Properties, click the NetSuite Properties button:
NetSuite Security
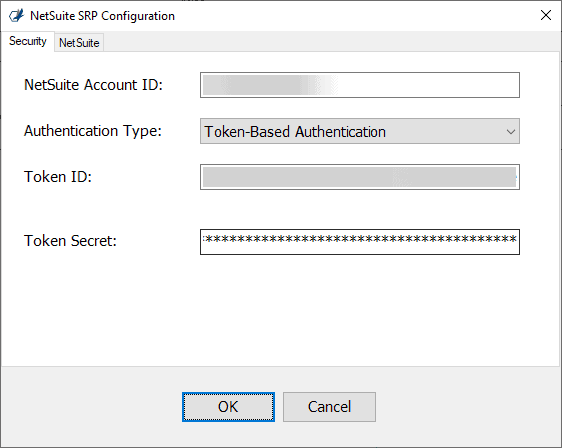
The NetSuite PSA Add-in supports Token-Based Authentication (TBA) for security when communicating with NetSuite.
Note – Previous versions of the add-in supported username/password authentication. Due to changes implemented by NetSuite, username/password authentication is no longer supported for newer customers. The option to use username/password authentication is still available for legacy customers that started using the add-in prior to the NetSuite enforcing this limitation.
Token-Based Authentication
NetSuite requires using Token-Based Authentication (TBA) when connecting to NetSuite from third-party products like the NetSuite PSA Add-in for Microsoft Project. If your NetSuite Administrator requires you to connect via TBA, then they will either provide you with a Token ID and Token Secret or with instructions on how to create them yourself from within NetSuite.
When using TBA, enter the Token ID and Token Secret into their respective text boxes. These values will automatically be saved for future use. You do not need to select a role with TBA because the Token ID and Token Secret are created for a specific user and role in NetSuite.
NetSuite Settings
The NetSuite tab displays several properties that are used when communicating to NetSuite. Click on the NetSuite tab to view and modify these properties.
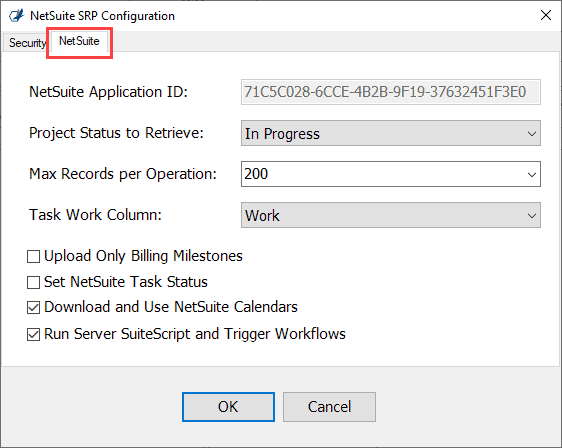
- NetSuite Application ID – This is a standard value that is used by the Add-In when communicating to NetSuite. This value cannot be changed.
- Project Status to Retrieve – This property can be used to filter the list of projects that you can download from NetSuite PSA. The default value is <All>, which would result in all projects with any status to be returned when you click on the Get Project button. If you click on the down arrow next to the text box a list of project statuses will be displayed that you can select from.
- Max Records per Operation – This property is provided as way to improve performance when working with large projects. Default value is 200. This does not mean that you are restricted to any limit. This just means that the add-in will only try to send or receive 200 records at a time. If there are more than 200 records, the add-in will make multiple calls until the total number of records are processed. Typically, you will not need to change this value.
- Task Work Column – When mapping Microsoft Project tasks to NetSuite, the MSP Work column is used to set the estimated (or planned) work field in NetSuite. You can change that behavior so that the MSP duration column is used instead by setting this field to Duration.
The next three properties are check boxes:
- Upload Only Billing Milestones – when this property is checked, the “Upload Project” button will create a project in NetSuite but will only upload the project tasks that are marked as “Upload to NetSuite”. This is a feature customers can use when they are managing large projects in Microsoft Project, but in NetSuite they are using the Milestone Billing feature that bills customers based on milestones instead of time entries. See the section titled “Billing Milestones” for more information.
- Set NetSuite Task Status – When this property is checked, then the status of the NetSuite task is set based on the Percent Work Complete value for the Microsoft Project task:
- 0% – Not Started
- 1% – 99% – In Progress
- 100% – Completed
- Run Server SuiteScript and Trigger Workflows – Sets whether or not any server-side SuiteScripts are executed or workflows are triggered when the add-in is adding or updating records in PSA. Checking this box may significantly impact performance, depending on how many server-side scripts your organization has configured for your project, project task and resource allocation records. This property is checked by default. Check with somebody within your organization that is familiar with your NetSuite customizations before unchecking this option.
In previous versions of the add-in there was another property, called “Resource Allocations Enabled”, which would indicate if the resource allocations feature in NetSuite has been enabled for your organization. The add-in now detects when certain features are enabled that would affect how it interacts with NetSuite.
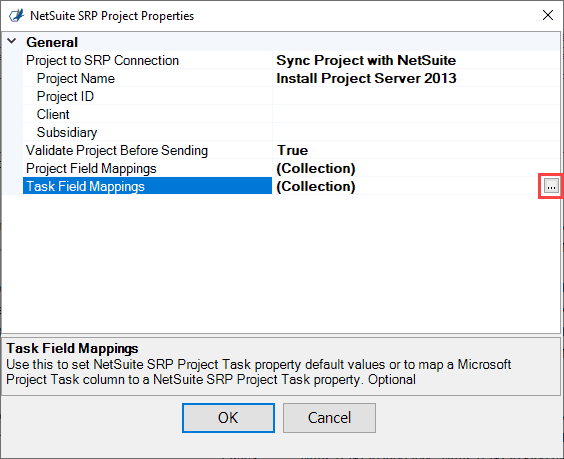
Convert to PSAProject/PSAProject Properties
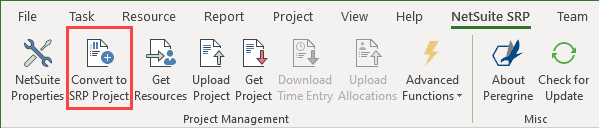
Prior to uploading a project from Microsoft Project to NetSuite PSA, it needs to be “converted”. This conversion is necessary because not all Microsoft Project settings have an exact match in NetSuite SRP. The conversion will also download all your NetSuite SRP calendars into Microsoft Project so that you can use them instead of the default Microsoft Project calendars. Finally, the conversion will attempt to validate that all the resources used in your Microsoft Project are also available in NetSuite SRP. If any of these steps fail, a report will be provided with instructions on how to fix them.
Once your project has been converted to a NetSuite SRP Project, this button will be renamed “SRP Project Properties”. You can change the project and task properties at any time once converted.
Click the Convert to SRP Project button:
The NetSuite SRP Project Properties dialog will open:
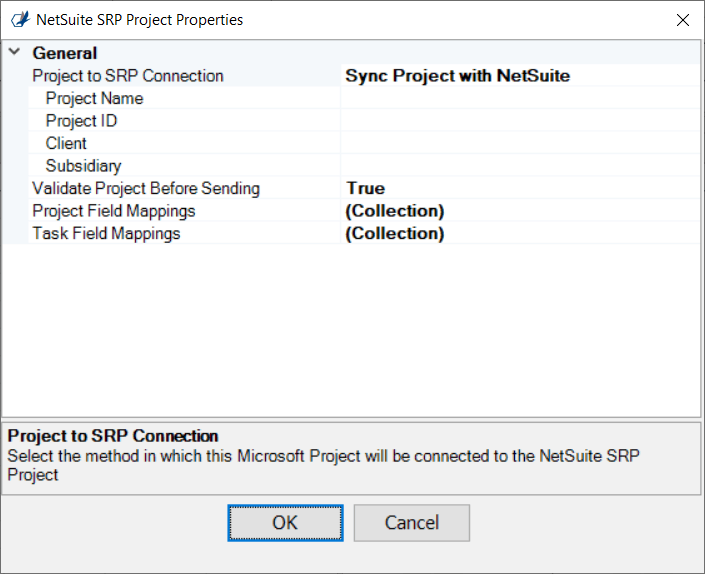
This dialog displays several properties that are specific to a NetSuite SRP Project. The properties displayed will vary depending on whether you are syncing or linking with NetSuite SRP.
Sync Project with NetSuite
For the property “Project to SRP Connection”, when you select “Sync Project with NetSuite” you can download or upload project tasks, get time entries and upload allocations. This is the option you will choose when you want to use Microsoft Project to create or update a project in NetSuite SRP.
When you select the “Sync” option, the form displays the following properties:
- Project Name – If you download a project, this is the name of the project from NetSuite SRP. If you plan to upload this project, you can set the project name that will be used NetSuite here. If you don’t enter a name, the add-in will use the Microsoft Project’s name.
- Project ID – This is the internal ID of the project in SRP. This field will be empty if you have not yet uploaded the project to SRP. If this field is set, and you delete the value, you will have to perform another get to sync the Microsoft Project with SRP.
- Client – You can select a NetSuite client from this dropdown list to assign to the project. In some NetSuite accounts, this is required when creating a project.
- Subsidiary – If your NetSuite account utilizes subsidiaries, select the appropriate subsidiary from this dropdown list. In some NetSuite accounts, this is required when creating a project.
- Validate Project before Sending – When set to true, the project and tasks will be validated for conformance to NetSuite SRP. For example, the task constraints used in Microsoft Project are checked to see if they are supported by NetSuite SRP.
- Additional Project Properties – Allows you set additional NetSuite SRP project-level properties. See the section Setting Additional Properties below.
- Project Task Default Values – Allows you set additional NetSuite SRP task-level properties. See the section Setting Additional Properties below.
Link with NetSuite SRP Project Only
For the property “Project to SRP Connection”, when you select “Link with NetSuite SRP Project Only” you can only upload allocations. You cannot upload or download project tasks or download time entries. This is the option you will choose when you only want to manage resources with Microsoft Project and do not want to make changes to the project tasks.
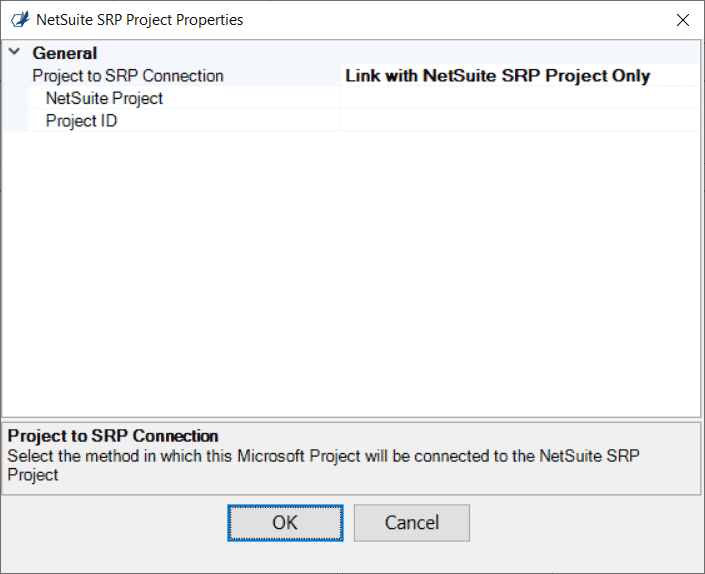
When you select the “Link” option, the form displays the following properties:
NetSuite Project – This is where you select the NetSuite Project that you want to link to. This is a dropdown list that downloads the list of projects from NetSuite.
Project ID – This is the internal ID of the project in SRP. This field will be empty until you select a NetSuite Project
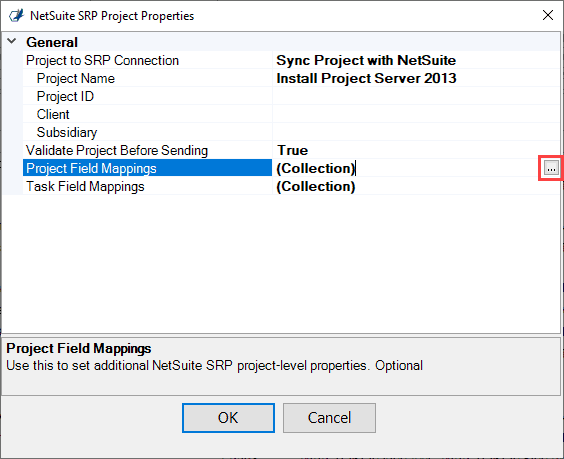
Setting Additional Properties
When uploading projects to, or downloading projects from SRP you may want to set additional project-level or task-level properties than those in automatically set by the add-in. This dialog provides you with the ability to set those properties.
Project-level Properties
To set additional properties that are part over the overall project record in NetSuite SRP, click the ellipsis button for Additional Project Properties:
After clicking this button the Project Properties Collection Editor is displayed.
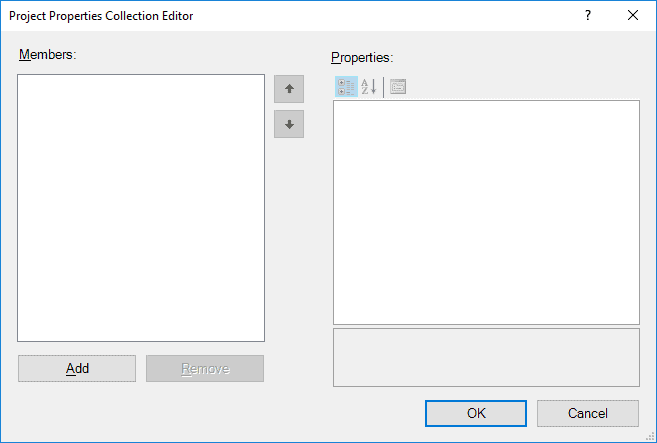
To set a project-level property, click the Add button:
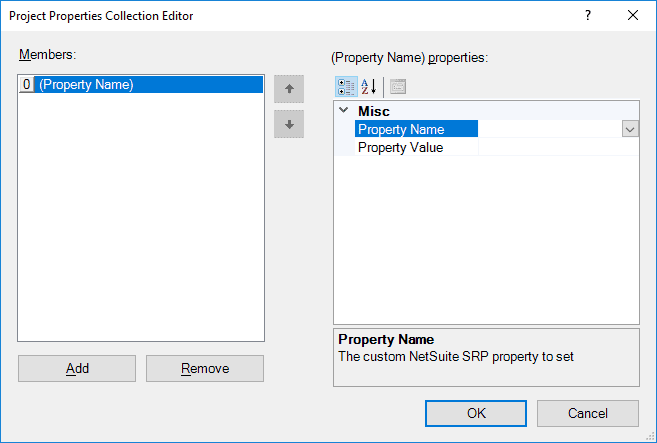
- Click on the down-arrow next to Property Name. A list of project-level properties that can be set are displayed. This list includes custom properties that have been added to your NetSuite account’s Project record. The custom properties are downloaded from your NetSuite account. There may be a slight delay during this process.
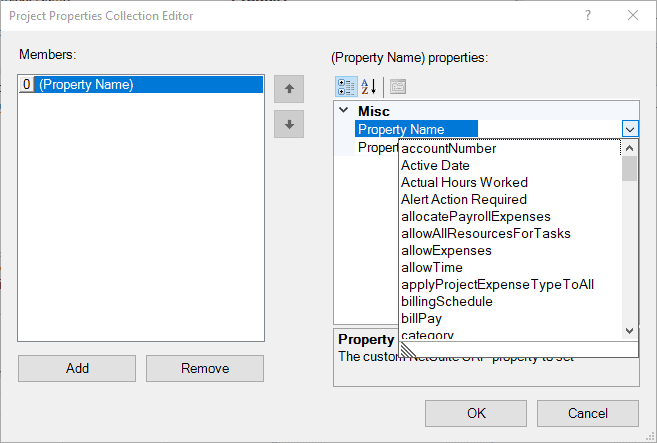
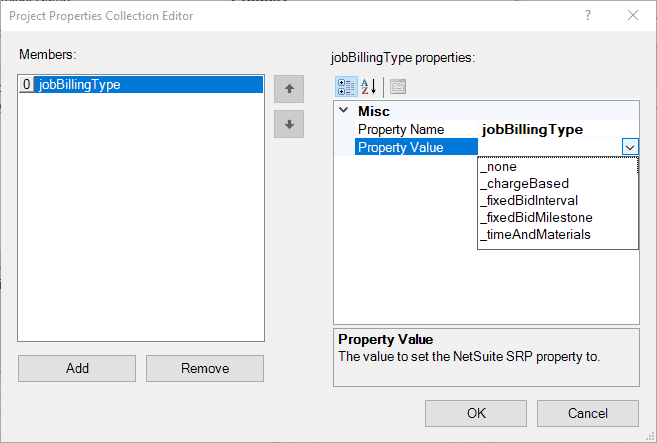
If the property you select in the dropdown list is a reference to another record or list item, the Property Value field will also be a dropdown and contain the values you can select from. If the property you select is a string or number you will have to manually type the value to use.
When you are done adding additional project properties, click the OK button.
Task-level Properties
To set additional properties on a project task record in NetSuite SRP, click the ellipsis button for Project Task Default Values:
After clicking this button the Task Properties Collection Editor is displayed.
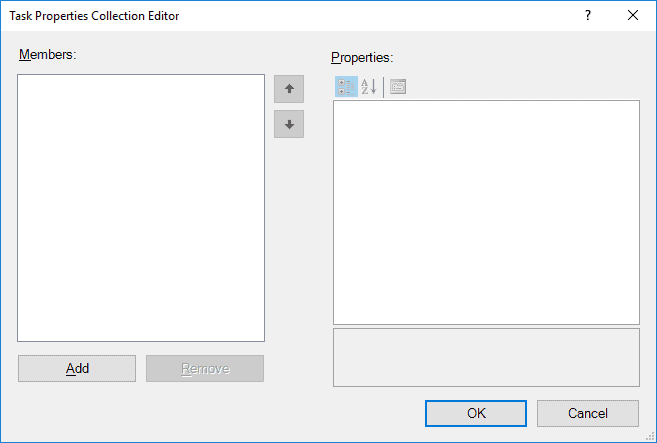
To set a task-level property, click the Add button:
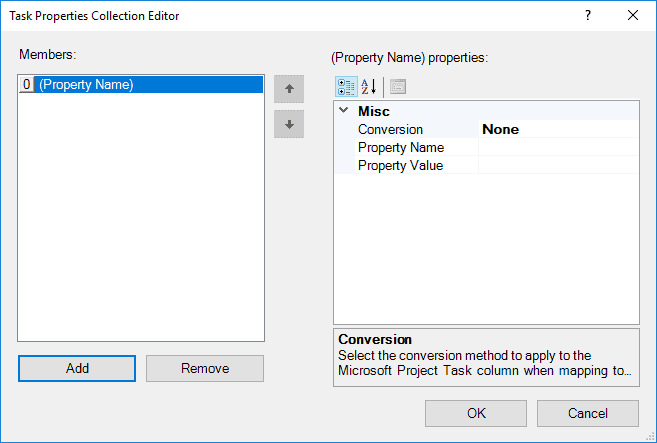
- Click on the down-arrow next to Property Name. A list of task-level properties that can be set are displayed. This list includes custom properties that have been added to your NetSuite account’s Project Task record. The custom properties are downloaded from your NetSuite account. There may be a slight delay during this process.
- If the property you select in the dropdown list is a reference to another record or list item, the Property Value field will also be a dropdown and contain the values you can select from. If the property you select is a string or number, you have two choices:
- Enter a default value that will be applied to every task record in the SRP project
- Map a Microsoft Project Task column value to the SRP Task record.
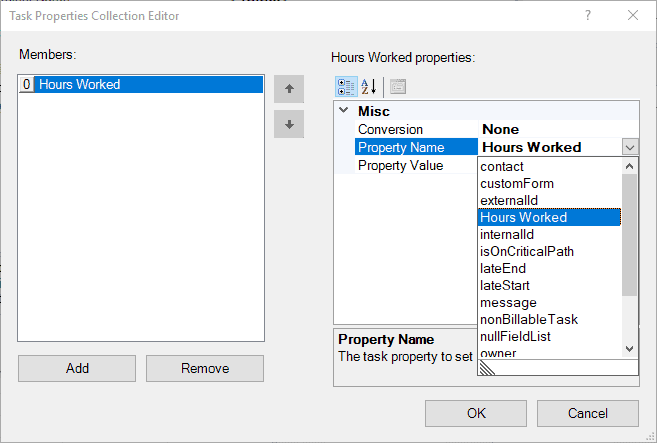
To map a Microsoft Project task column value, you first need to find the correct name of the column to use. It is not the name you typically see in Microsoft project. You’ll have to find the name from this list:
https://msdn.microsoft.com/en-us/vba/project-vba/articles/task-object-project
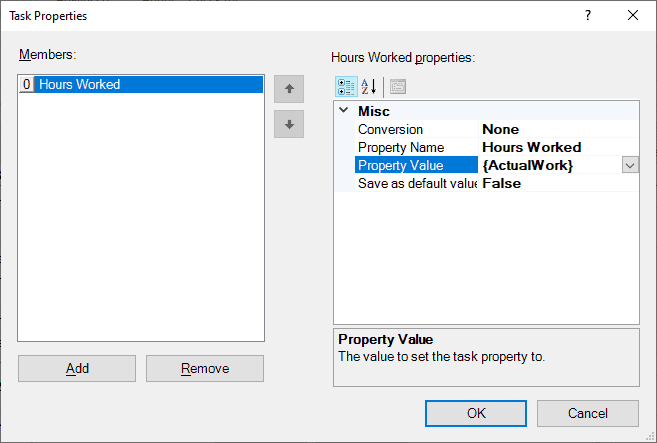
For example, if you want to map the Actual Work property from Microsoft Project to a custom field in SRP called Hours Worked, the correct name of the field to use is ActualWork (no spaces). You will enter this value inside curly braces, i.e. {ActualWork}.
- When you are done adding additional project properties, click the OK button.
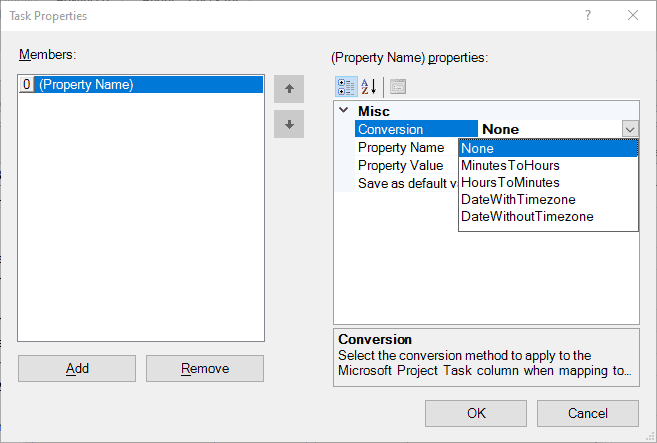
Property Conversions
When mapping task-level properties, you may have to perform a conversion from the value in Microsoft Project to the field in NetSuite. Conversion from numbers to strings and strings to numbers happen automatically (if converting a string to a number, this would assume the Microsoft Project task value is a valid number). However, there are instances where time values are stored as minutes in Microsoft Project, but stored as hours in NetSuite, or vice-versa. You may also need to pass date-time values from Microsoft Project to NetSuite. When passing a date-time value, you may need to send the local time zone with the value so NetSuite correctly interprets the date when it’s received. The add-in provided the following conversions:
None
Minutes to Hours
Hours to Minutes
Date with Time Zone
Date without Time Zone
I additional conversion are needed, submit a support ticket to open a discussion about adding it.
Completing the “Conversion” to a NetSuite Project
When you click the OK button, the following actions/changes will be applied to your Microsoft Project:
- If the Validate Project Before Sending property is true, the project and its tasks will be validated for any problems that cannot be converted into a project or task in NetSuite.
- The NetSuite work calendars will be downloaded and added to Microsoft Project.
- The Microsoft Project default calendar will be set to the NetSuite default calendar
- Each resource used in Microsoft Project will be checked to see if it exists in NetSuite. This check is based on the name of the resource use in MSP matching a name of a resource in NetSuite. Sometimes, partial matches will work.
- If any resources in MSP are not found in NetSuite, a report will be provided stating which ones are missing. The add-in does not create or modify resources in NetSuite.
- For each resource in MSP that is found in NetSuite, the following information will be downloaded from NetSuite and applied to the resource in MSP:
- The Name is set to the first, middle and last names combined together
- Email Address
- Standard Rate
- Calendar – the resource calendar is changed to match the calendar used by the resource in NetSuite
- File->Options->Schedule->Hours per day – set to the hours per day used by the default NetSuite calendar
- File->Options->Schedule->Hours per week – set to the value of hours per day used by the default NetSuite calendar multiplied by the number of work days per week used by the default NetSuite calendar.
Once the project and resource calendars, and the Hours per Day and Hours per Week properties are set, you should not change them. For the add-in to work correctly, the calendars used in Microsoft Project must match the calendars used in NetSuite. Even if you do change the values, the calendars and properties will be downloaded and set as stated above each time you open the SRP Properties dialog and click the OK button, as well as whenever you upload or download a project.
Get Resources
This button will allow you to download all project resources from your NetSuite account into Microsoft Project. This step is not necessary, but helpful. You can always manually type-in the names of the resources that you want to use. If you manually add resources you will need to make sure the names you add match the resource names in NetSuite SRP.
Upload Project
This button will take the Microsoft Project and upload it to NetSuite SRP. If the Microsoft Project does not exist in SRP a new project will be created. If the Microsoft Project was either 1) previously uploaded to SRP, or 2) initially downloaded from SRP using the Get Project button, then the NetSuite Project will be updated.
Uploading a New Project
When uploading a new project into NetSuite SRP, the add-in will first create a new project record in NetSuite SRP and then create all the tasks. If the Resource Allocations feature is not enabled in NetSuite SRP the task assignments will also be created at this time.
Prior to clicking the Upload Project button, you should verify your project resources match the resource names in NetSuite SRP. The add-in will verify each resource against NetSuite SRP before uploading the project. If any Microsoft Project resources are not found in NetSuite SRP, you will be provided a report like this:
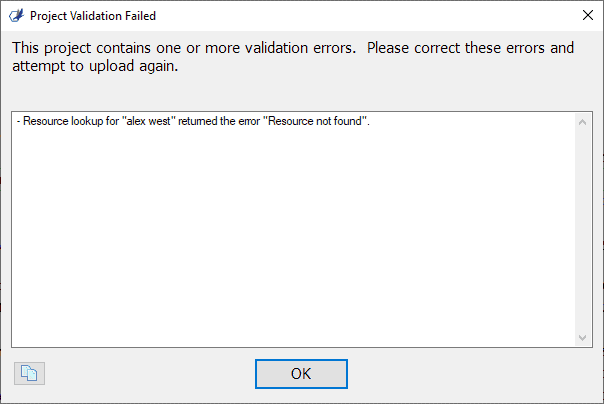
When this occurs, you should compare the name of the resource in the report to the name of the resource you intend to use in NetSuite SRP and then modify the name in Microsoft project. The project will not upload until all resources match. The add-in does not add new resources to NetSuite SRP.
See Field Mappings between Microsoft Project and NetSuite SRP in the appendix for details on how Microsoft Project is mapped to NetSuite SRP.
Uploading an Existing Project
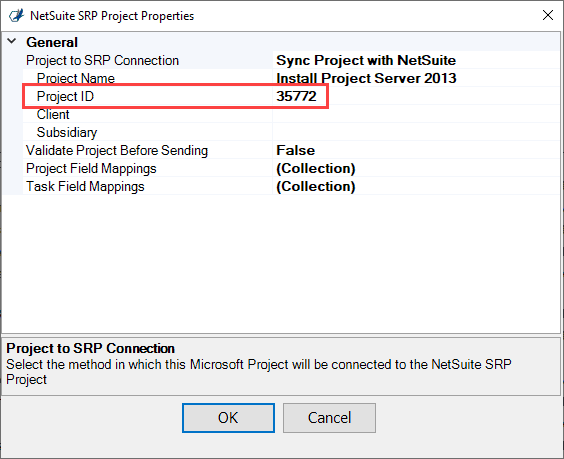
When uploading a project that has been either previously uploaded into NetSuite SRP or was previously downloaded from SRP, the current Microsoft Project will be used to update the project in NetSuite SRP. Note – this is not a two-way synchronization between Microsoft Project and NetSuite SRP. This feature will only update the NetSuite SRP Project based on changes to Microsoft Project. Two-way synchronization is not supported. To see if your Microsoft Project has already been uploaded to NetSuite SRP, click on the SRP Project Properties button. If the Project to SRP Connection is set to “Sync Project with NetSuite” and the Project ID property has a value, your project has been previously uploaded.
If you do not see a button labeled SRP Project Properties and instead see Convert to SRP Project, then your project has not been previously uploaded (or you need to perform an advanced Get).
When uploading an existing project to NetSuite SRP, the add-in will first compare the task structure and specific fields in each of the existing tasks in the SRP project to the Microsoft Project. Based on the previously saved NetSuite Task IDs, the add-in will determine which tasks in SRP should be deleted, added and updated.
One potential problem that may be encountered when you upload an existing project is when you have a different task hierarchy in Microsoft Project vs. NetSuite SRP. For example, if you have a milestone task named “ERP Implementation”, with a subtask named “Travel” in Microsoft Project, but in NetSuite SRP both tasks, “ERP Implementation” and “Travel”, are considered subtasks at the same level. This may cause an error during the syncing process. In this case you will need to manually update either Microsoft Project or NetSuite SRP to make sure the task hierarchies match.
Get Project
The Get Project button can be used for these scenarios:
Download a project from NetSuite SRP into Microsoft Project
Refresh a project in Microsoft Project that was previously uploaded
Match an existing Microsoft Project with an existing NetSuite SRP Project
Link an existing Microsoft Project with an existing NetSuite SRP Project
Download a Project
To download a project from NetSuite SRP, create a new document in Microsoft Project and click on the NetSuite SRP tab. Click the Get Project button. A list of projects will be retrieved from NetSuite SRP. The list can be filtered by project status. That setting can be set on the NetSuite Properties button.
When the list of projects is displayed, select the project you want to download and click the Open button. Depending on the size of the project it could take a while to download. A dialog will be displayed indicating which step in the process the download is in.
You may receive this warning while downloading:
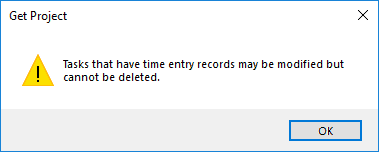
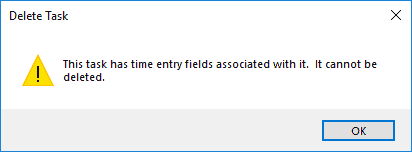
This means that the project you’re downloading has tasks with time entries enter against them in NetSuite SRP. You cannot delete the tasks that have time entries entered, but you can modify them. Microsoft Project will display an error if you try to delete one of these tasks:
Time entries are not downloaded when you perform a Get Project. To set the actual work hours in Microsoft project you will need to perform the Download Time Entries function.
Resources and task assignments are downloaded. You can see the resources and their standard rates listed in the Resource Sheet report.
Projects that have been downloaded from NetSuite SRP can be modified in Microsoft Project and uploaded again to NetSuite SRP.
Refresh a Project
If you have a Microsoft Project that has already been uploaded into NetSuite, the “Download Project” button is renamed to “Refresh Project”. If the project is updated directly in NetSuite or via some other means, clicking the Refresh Project button will download those changes into Microsoft Project. This will allow you to keep the Microsoft Project version of the project up-to-date with what’s in NetSuite.
Download Project Header Record Only
If you have a Microsoft Project that you’ve been using to create & manage tasks, and there is an existing “empty” project in NetSuite SRP for this same project, you can download the project header from NetSuite SRP into your existing Microsoft Project. After downloading the project header record you can upload all your project tasks and resource allocations into the NetSuite SRP project.
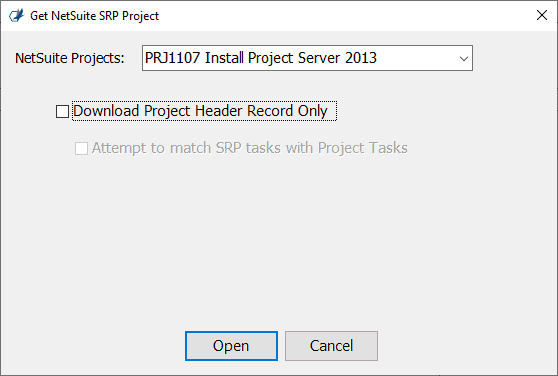
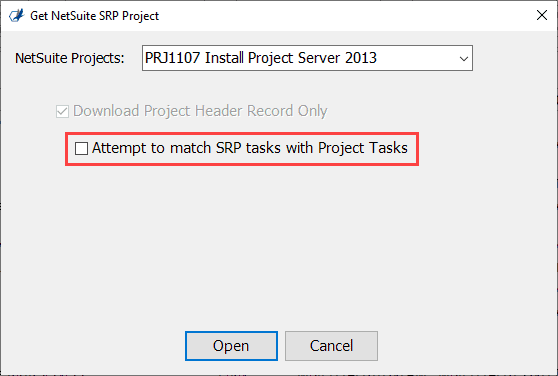
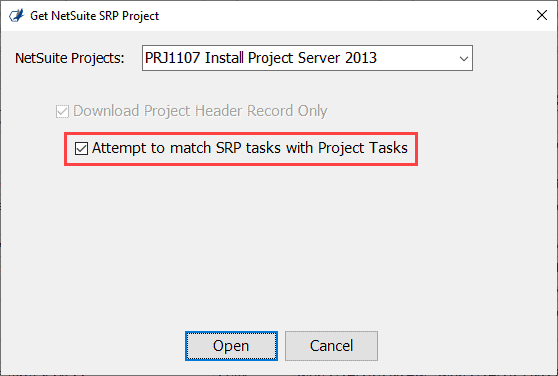
To download the project header, open the Microsoft Project that contains the full project you want to upload. Click on the NetSuite SRP tab and then on the Get Project button. When presented with the list of available projects in NetSuite SRP, select the project you want to download the header record for. Make sure you uncheck the box labeled Attempt to match SRP tasks with Project Tasks. This option is checked by default and is used when you are trying to “merge” Microsoft and NetSuite SRP projects together (see below):
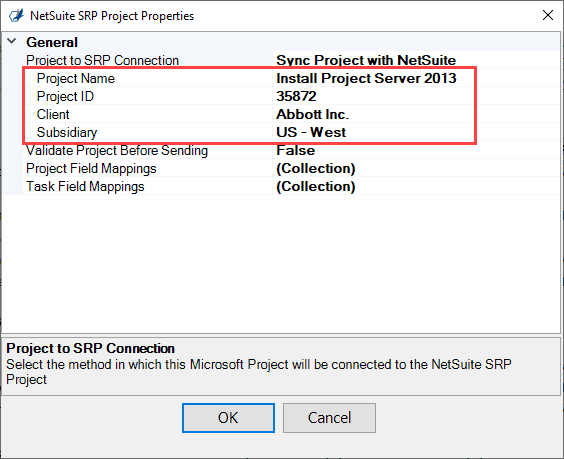
After selecting the project, click the Open button. You can verify the project header was successfully downloaded by looking at the SRP Project Properties. The Project Name and Project ID will have a value. The Client and Subsidiary may also have values:
If you want, you can now upload the project using the Upload Project button. However, before you upload the project you should verify the Microsoft Project resources already exist in NetSuite.
Match Existing Project Tasks
This option allows you to take an existing Microsoft Project and match its tasks with the tasks in an existing NetSuite SRP project, so that you can make future changes to the Microsoft Project version and upload those changes to NetSuite SRP. To match your Microsoft Project with and SRP project, open the Microsoft Project that contains the full project you want to match. Click on the NetSuite SRP tab and then on the Get Project button. When presented with the list of available projects in NetSuite SRP, select the project you want to match tasks with. Make sure you check the box labeled Attempt to match SRP tasks with Project Tasks:
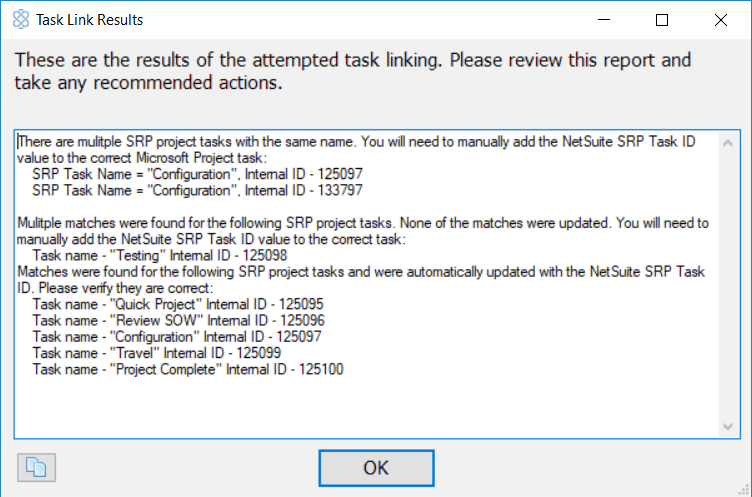
After selecting the project, click the Open button. When synchronizing project tasks, the list of NetSuite SRP project tasks are downloaded and compared to the tasks in Microsoft Project using the task name. For each NetSuite SRP project task:
If the SRP task name matches the Microsoft Project task name, then the Microsoft Project task is linked to the task in NetSuite SRP.
If there are multiple SRP tasks with the same name, they will not be matched with a Microsoft Project task.
If the SRP task name matches multiple Microsoft Project task names, it will not be matched with a Microsoft project task.
If the SRP task name does not match a Microsoft Project task name, nothing will happen.
When the process completes a report will be displayed showing which tasks were successfully matched and which ones failed due to any of the reasons above:
Any tasks that are not matched will require manual intervention:
For SRP tasks that don’t have a match in Microsoft Project, you will need to manually add the SRP task to Microsoft Project. The add-in will not automatically add them.
For tasks with the duplicate names, you can either change the names of the tasks in Microsoft Project and SRP to ensure they are unique, or you can manually set the NetSuite Task ID for the task in Microsoft Project to be equal to the SRP task ID it should be matched with. When you perform a Get Project the NetSuite Task ID column is automatically added to the Gantt Chart view:

The report displays the SRP task IDs that are not matched or are duplicates. If you know which NetSuite SRP task matches the Microsoft Project task, you can manually type-in the NetSuite Task ID into this column and the Microsoft Project task will be matched with that SRP task for future uploads.
One potential problem that may be encountered when you attempt to match Microsoft Project tasks with NetSuite SRP tasks is when you have a different task hierarchy in Microsoft Project vs. NetSuite SRP. For example, if you have a milestone task named “ERP Implementation”, with a subtask named “Travel” in Microsoft Project, but in NetSuite SRP both tasks, “ERP Implementation” and “Travel”, are considered subtasks at the same level. This may cause an error during the syncing process. In this case you will need to manually update either Microsoft Project or NetSuite SRP to make sure the task hierarchies match.
Download Time Entry
In NetSuite SRP tasks, actual work is calculated based on time entries against the task. The Download Time Entry feature allows you to retrieve the actual work performed on tasks in Microsoft Project that are matched with NetSuite SRP tasks. Time entries can be downloaded on any Microsoft Project that was previously connected to a NetSuite SRP project through either the Get Project or Upload Project features. The add-in will download all the time entries in SRP for the given project and apply the actual work entered for each time entry against the appropriate task in the project.
Note – this feature fully refreshes the actual time for each resource on each task in Microsoft Project. All previously entered values for Actual Time in Microsoft Project will be set to zero before setting the time entries. See Time Entry Mappings in the appendix for more details.
Upload Allocations
The Upload Allocations button is only enabled when the Resource Allocations feature in NetSuite is enabled. The add-in checks which features are enabled every time you start Microsoft Project.
If you do not have the resource allocations feature in NetSuite SRP, then project task assignments are automatically created when you perform an Upload Project and you do not have to perform an Upload Allocations. If you have the resource allocations feature, then when you perform an Upload Project the project task assignments are not created automatically. They can only be created with you perform the Upload Allocations.
When you perform an Upload Allocations, all existing resource allocations are deleted and then recreated based on the resource assignments in Microsoft Project. See Resource Allocation Mappings for more information.