Securing Client Connectors with OAuth Sample
This sample will show you how to setup a Client Connector secured with OAuth. The easiest way to setup a Client Connector with OAuth is with the help of Peregrine Connect Management Suite (PeregrineMS). You may also setup OAuth using an external provider such as AWS, Azure, Google or any other generic OAuth provider such as Thinktecture’s Identity Server 4. In this sample, both PeregrineMS and Azure AD providers are illustrated.
If you intend to use the Azure AD OAuth provider, then you will need an Azure cloud subscription with an Active Directory setup. You will also need to configure an Application Registration and get the Application Id and Application Secret as well as the token endpoint URL.
Overview
If you implement Client Connectors in Neuron for access by parties external to your organization, you should consider implementing OAuth to secure access to them. Other ways of access control include basic, digest and Integrated Windows authentication. These are suitable for internal access control. However, as a good practice, both internal and external access control should be implemented with OAuth.
When using OAuth with Client Connectors, any caller of the Client Connector will need to obtain an OAuth token and include that token in all requests to it.
This sample Visual Studio solution shows you how to get a token and use it to call a Client Connector that is secured with OAuth. It includes samples for both the PeregrineMS OAuth Provider and the Azure AD OAuth provider.
Supporting this sample is a Neuron ESB Configuration that has Client Connectors configured with PeregrineMS and Azure AD OAuth providers.
Neuron ESB Configuration
The Neuron ESB Configuration for this sample consists of two Client Connectors, one each for PeregrineMS and Azure Active Directory Authentication. Each of them is configured to execute the Business Process named OAuthSecuredProcess. That process includes a code step that shows how to use a decoded token to get the audience, scope, claims and other items in the token for use in business logic.
When using PeregrineMS as the Client Connector OAuth provider, no other Neuron ESB configuration is required except selecting it in Client Connector. The remaining configuration is done in PeregrineMS, under API Management.
Open and Start the Neuron ESB Configuration
The configuration used for this sample is named OAuthSecureProcess. If you haven’t ready opened and started the Neuron ESB configuration, see the article Using the Neuron Samples to get started.
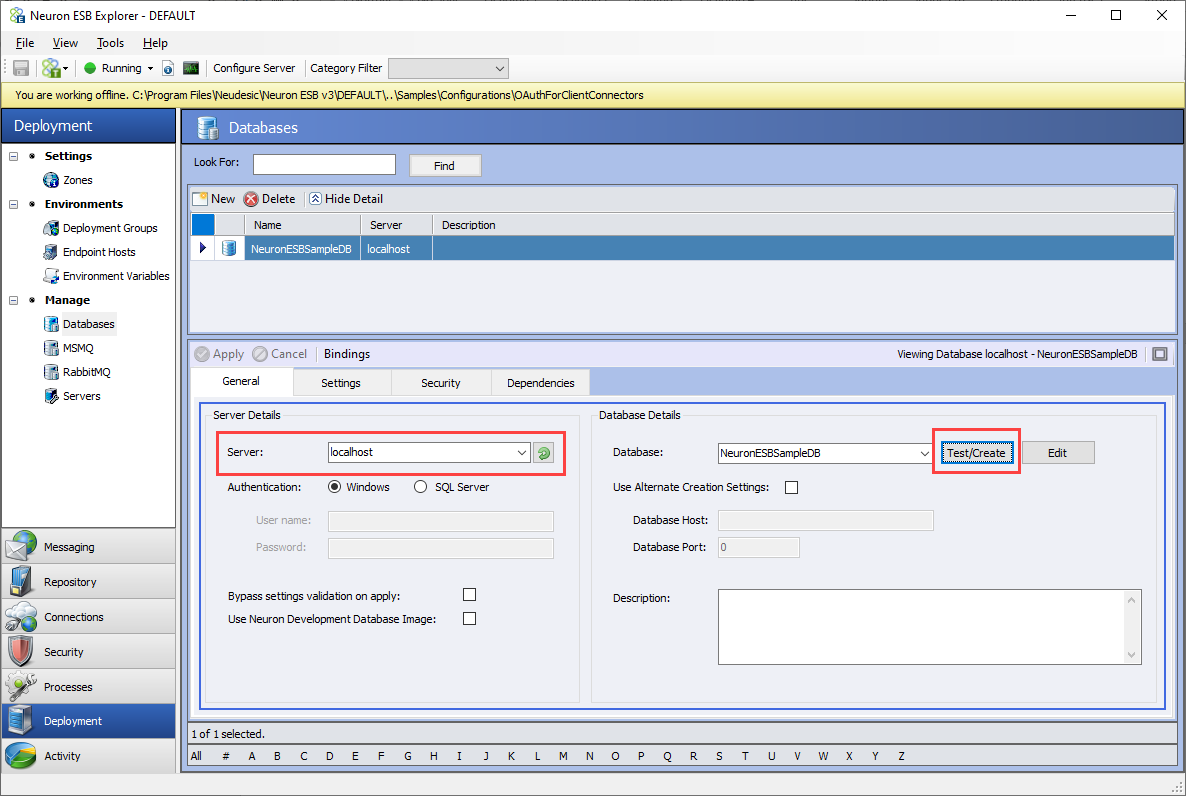
This sample requires a Neuron ESB database be configured. The configuration already includes a database; you need to create the database and configure the security to ensure the Neuron ESB runtime has access to it. To create the database, in Neuron ESB Explorer, navigate to Deployment->Databases. There is already a database configured for the local machine, using a non-SQL Server Express Edition. Select the database “NeuronESBSampleDB”. Modify the Server property to match your database server and edition. Click the Test/Create button to create the database on the server specified:
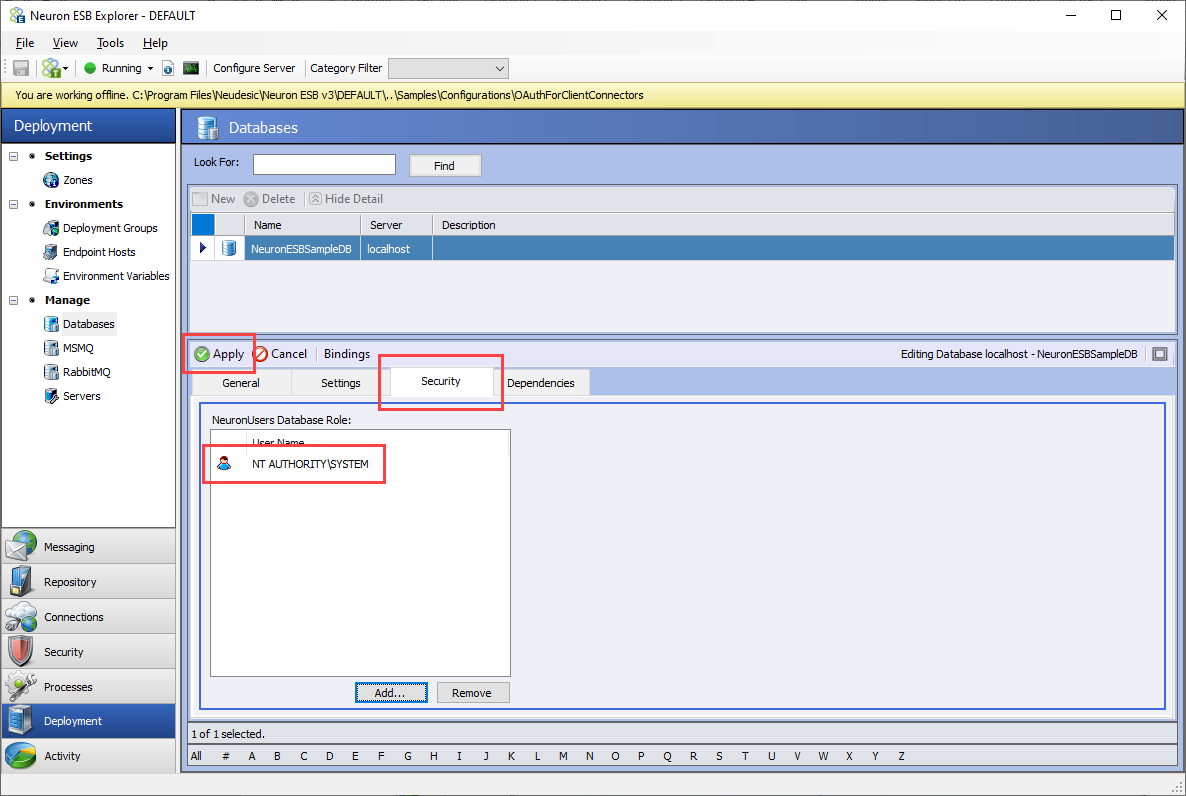
After the database is created, click on the Security tab and add the account that the Neuron ESB runtime is configured to use (i.e. SYSTEM). Click the Apply button when you are done:
Save your changes and restart the Neuron ESB service.
Using PeregrineMS as the OAuth Provider
To use PeregrineMS as the OAuth provider in a Client Connector, PeregrineMS must be installed and an environment must be created for your Neuron ESB instance that is hosting this sample. See the section Managing Environments in the Peregrine Connect Management Suite 1.1 documentation. You must select the option “Enable Neuron Event Processor” when configuring the Neuron ESB runtime, or enable (start) the Neuron environment using PeregrineMS (this option automatically enables the Neuron Event Processor).
For more information on using PeregrineMS as an OAuth provider, see the article “Securing Client Connectors with OAuth”.
Create an API Resource
The first step in using PeregrineMS as an OAuth provider is to create an API Resource. When creating an API Resource, you define which Client Connectors are included with the API Resource, and define the scope(s) and which user claims that should be included in the access token.
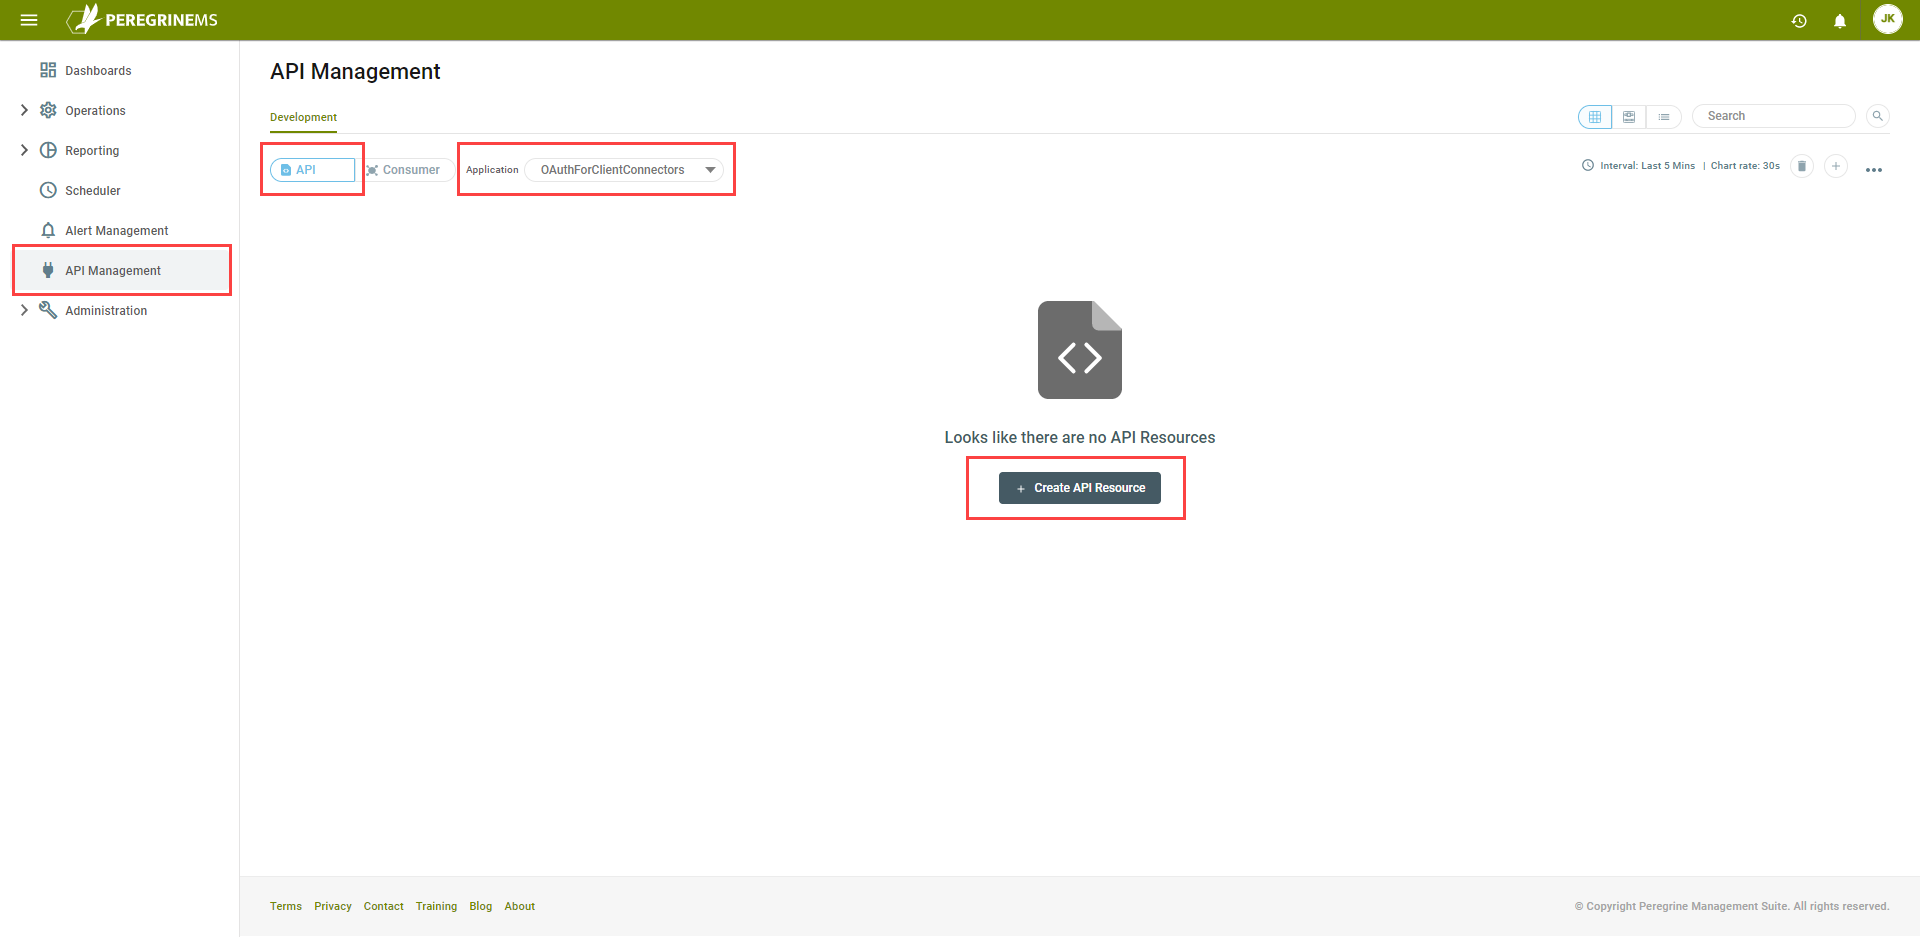
In PeregrineMS, click on API Management in the left navigation bar to display the API Management configuration. Click on the API toggle button, select the Application “OAuthForClientConnectors”, then click the Create API Resource button to add a new API Resource:
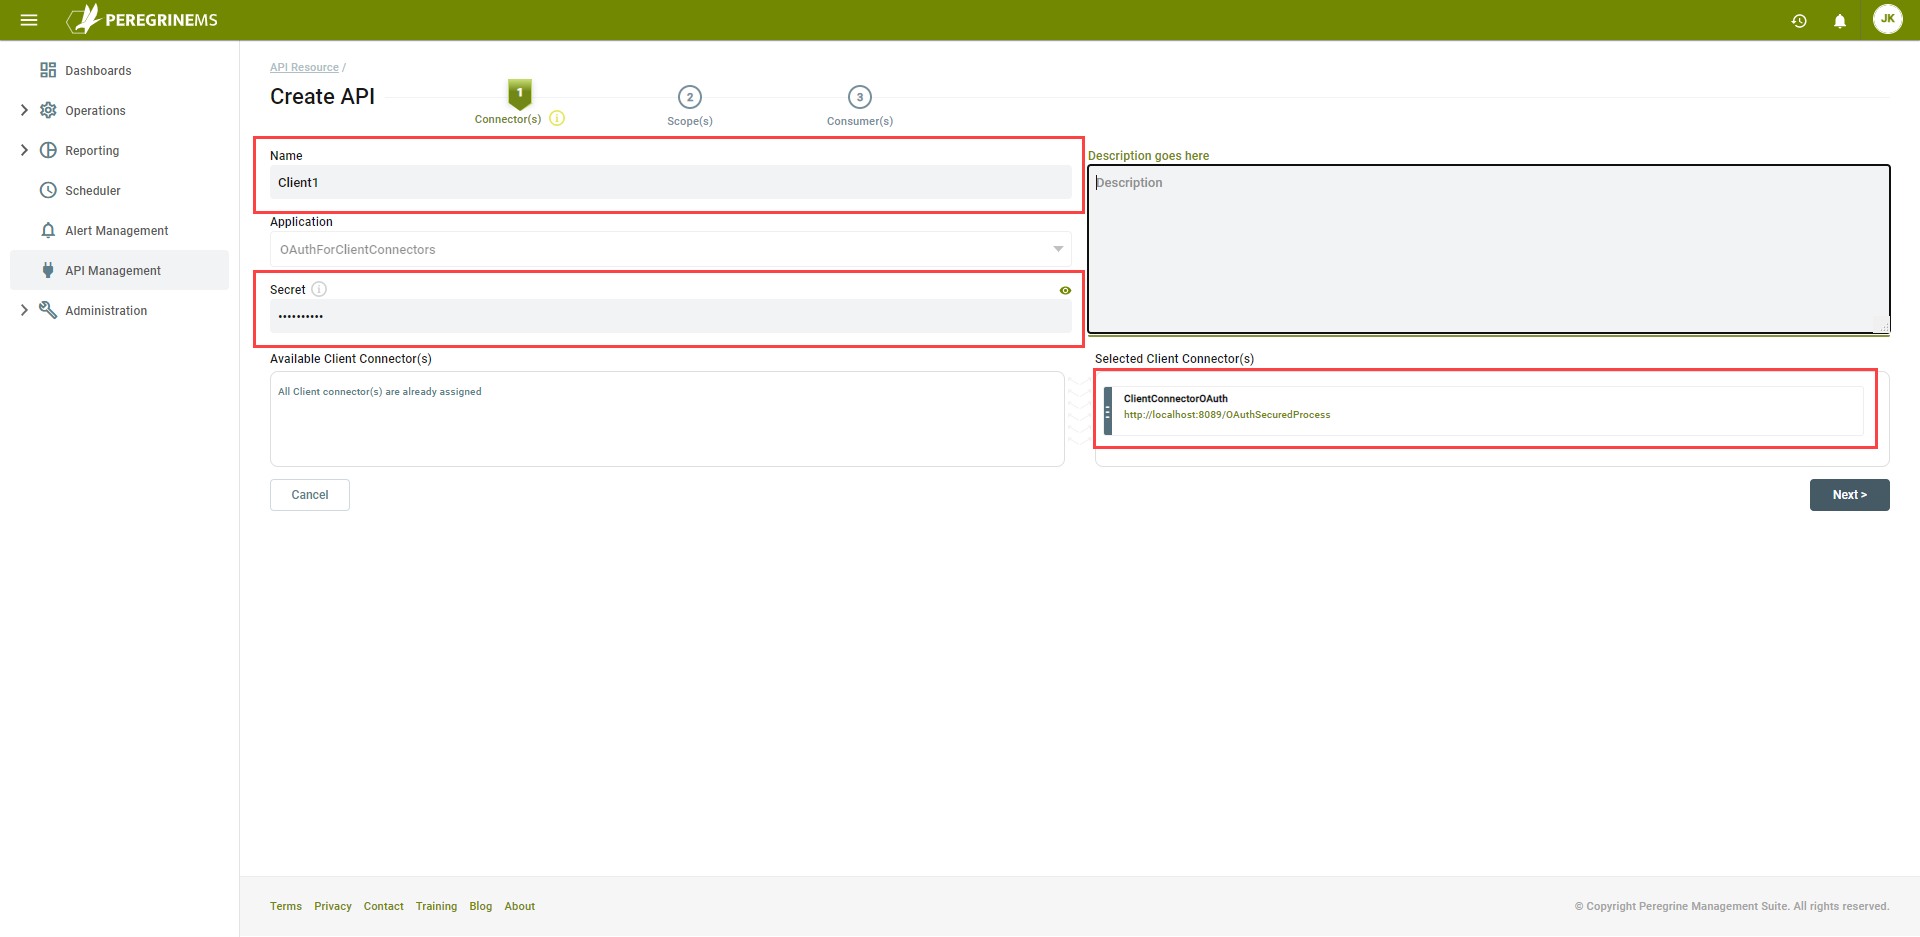
Configure an API Resource called Client1 and enter a value for the Secret. Under Available Client Connector(s) drag “ClientConnectorOAuth” to the Selected Client Connector(s) list. Click the Next button:
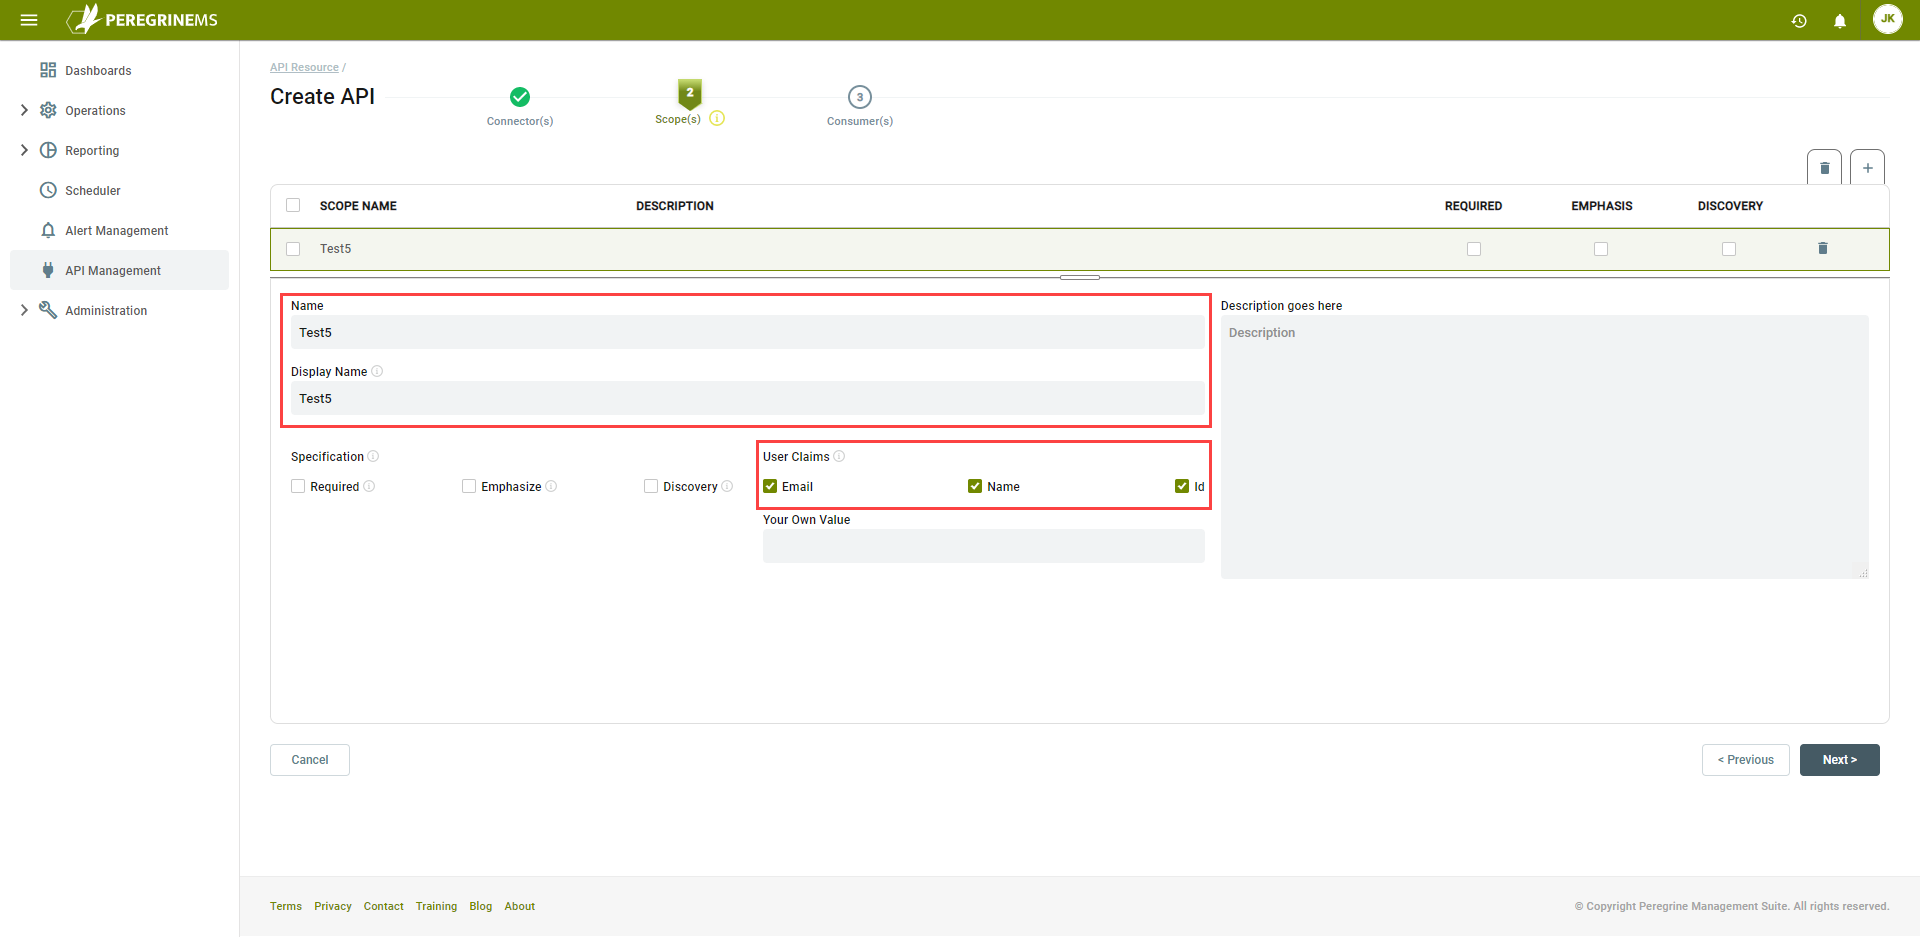
Create a scope called Test5. Under User Claims, select Email, Name and Id. Leave the other check boxes unchecked. Click the Next button:
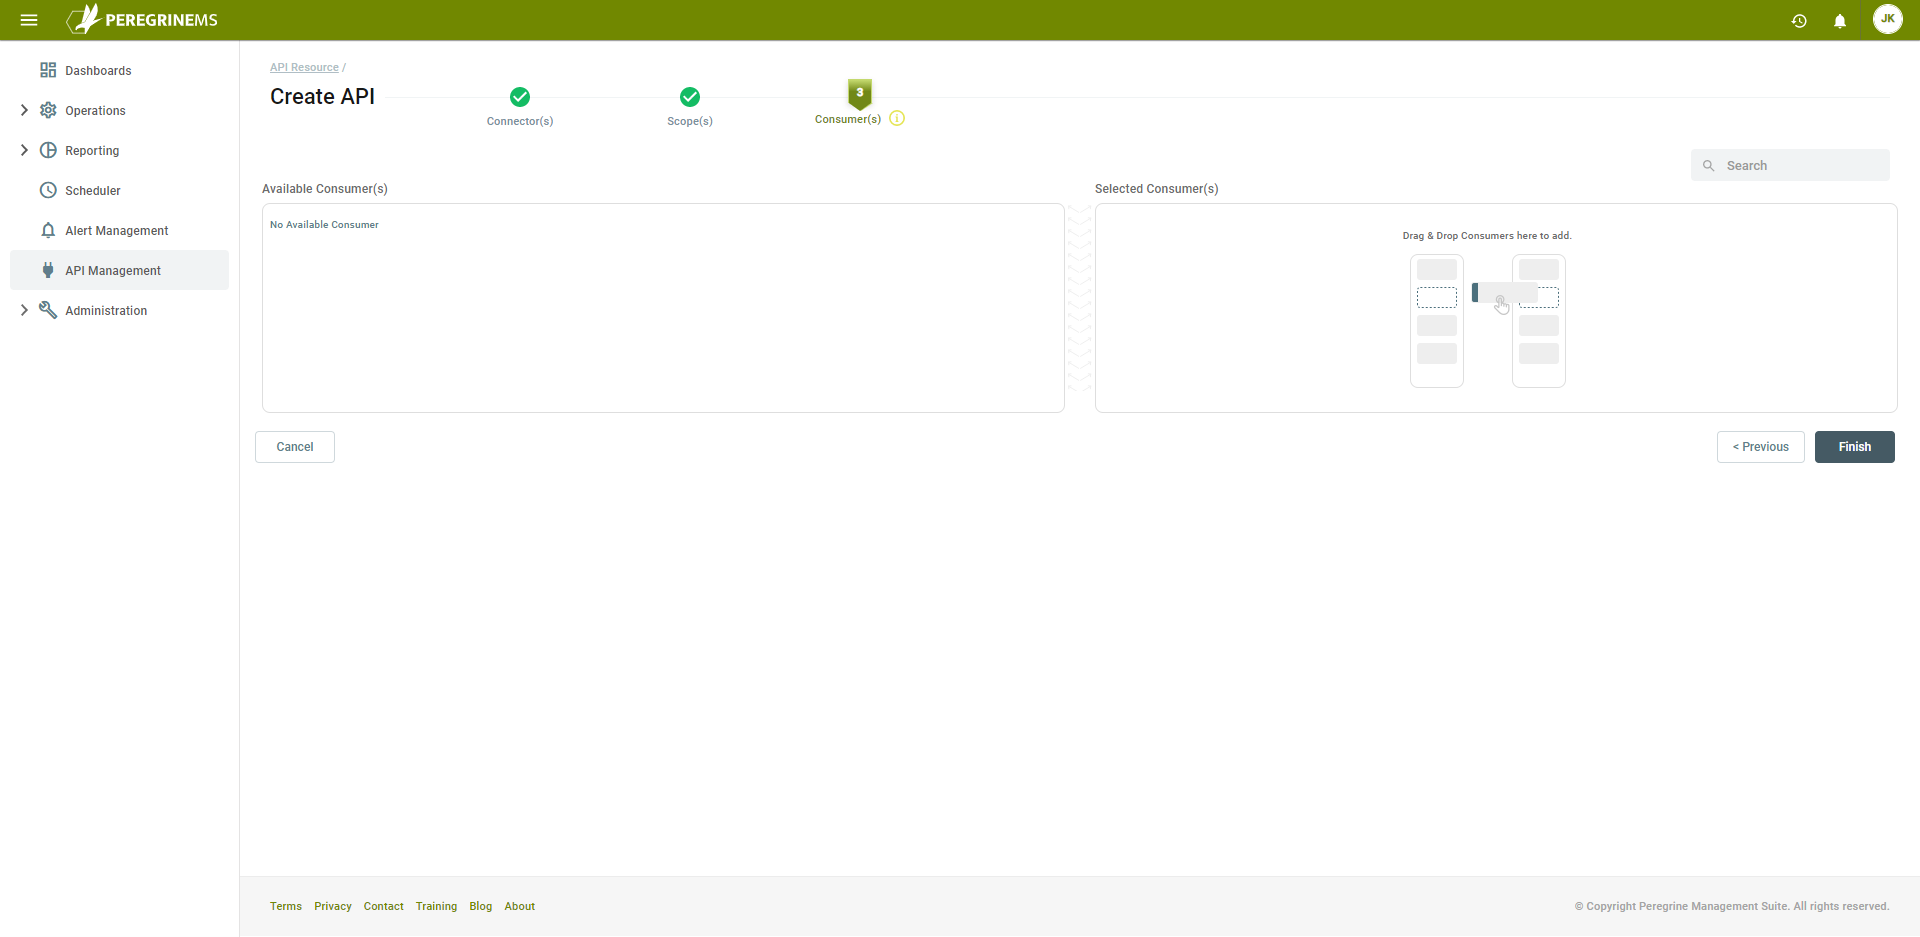
This last step, Consumer(s), can be skipped. You don’t have any consumers defined yet. You will do that after clicking the Finish button:
Create a Consumer
The second step in using PeregrineMS as an OAuth provider is to create consumers of the API Resource. When creating a consumer, you define which APIs the consumer can access and which scopes to include with the token. You also chose which Grant Type(s) the consumer can use for obtaining a token.
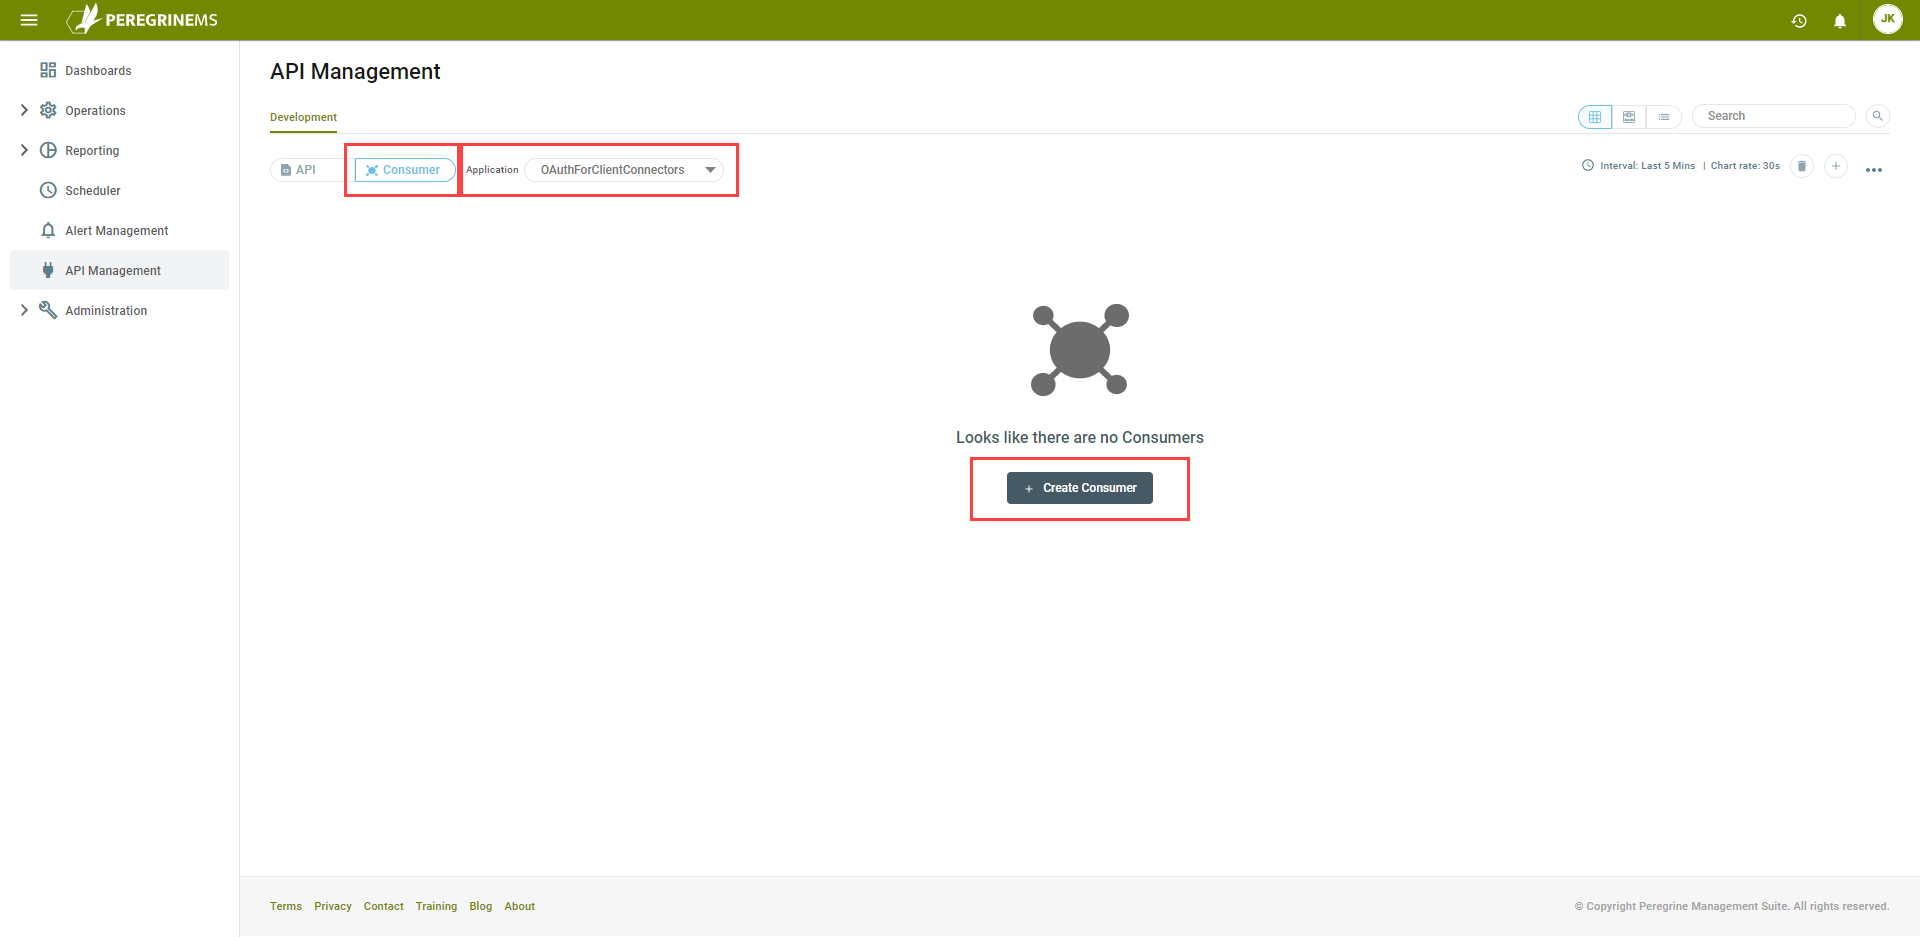
In the API Management configuration, click on the Consumer toggle button, select the Application “OAuthForClientConnectors”, then click the Create Consumer button to add a new consumer:
Set the Name and Id of the consumer “ConsumerforESBClientServices” and set the Grant Type to “Client Credential”. Click the Edit icon in the API section to select the API Resource you created earlier:
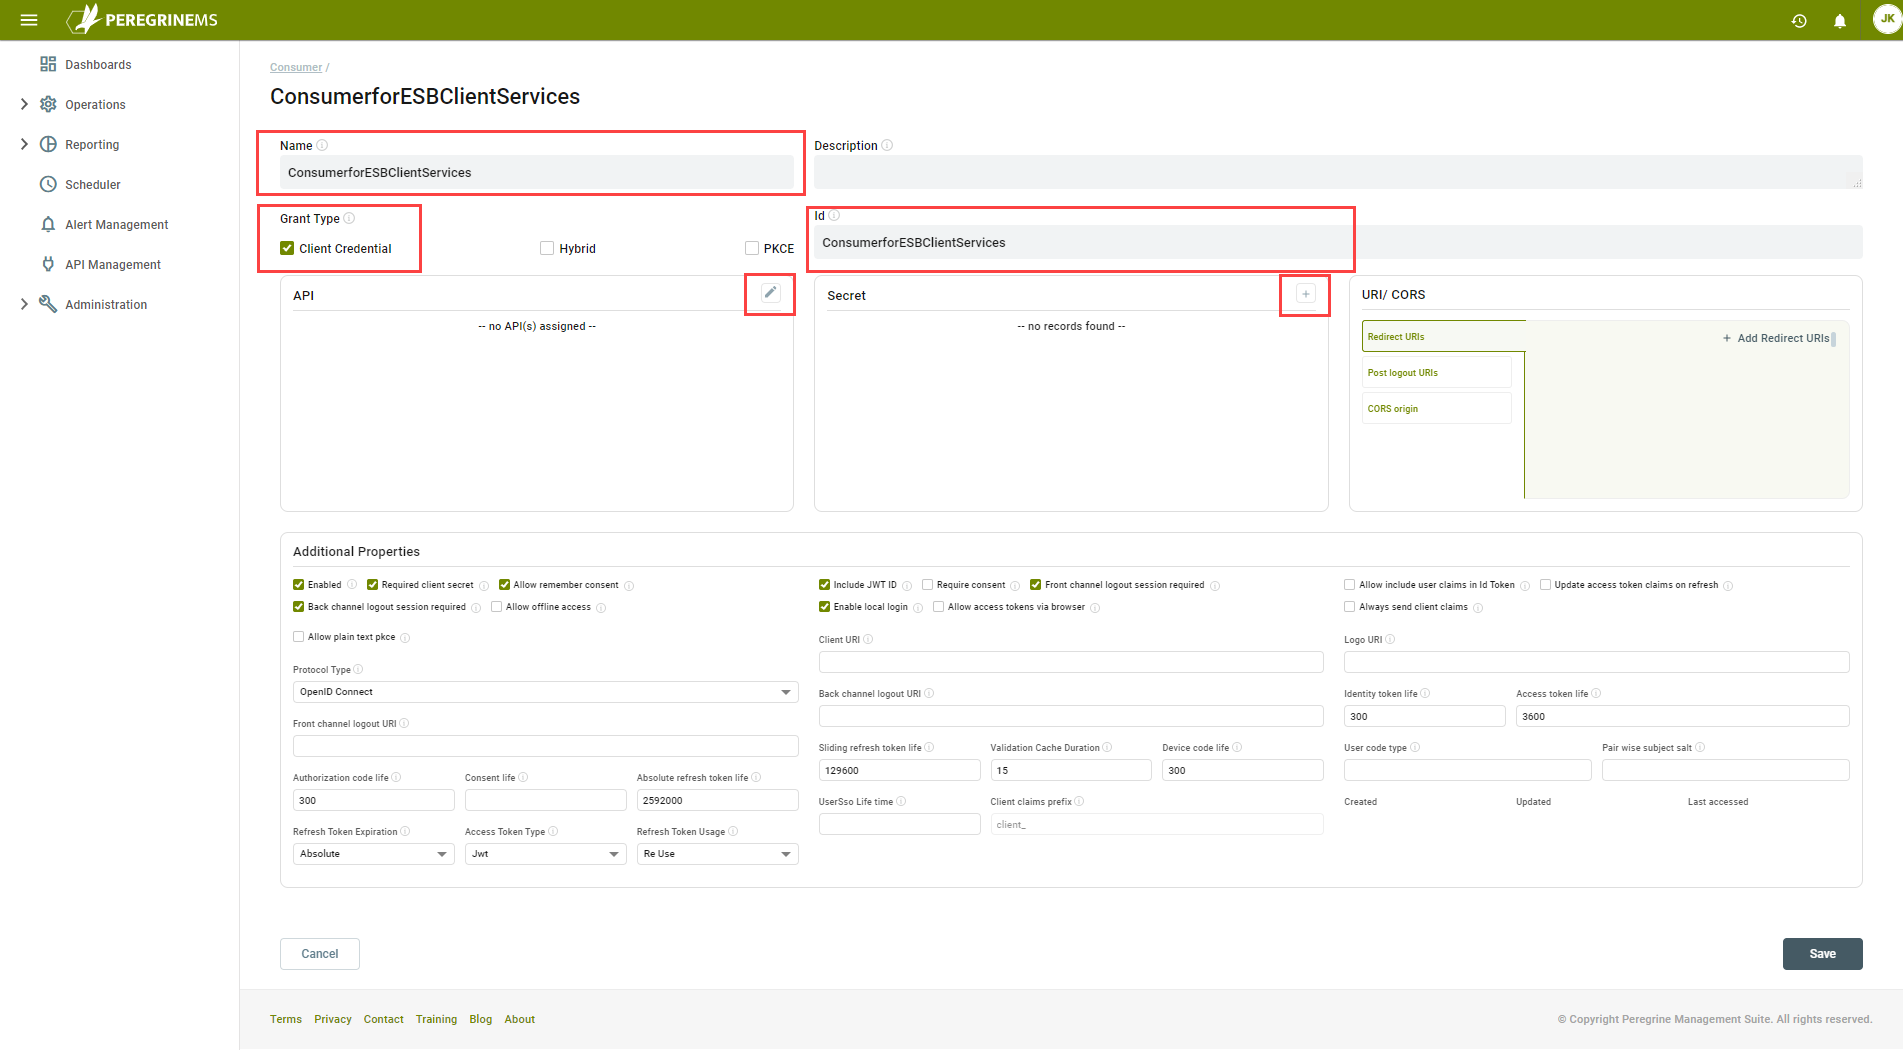
In the Manage API Resource window, click the Assign button next to the API Resource you want the consumer to have access to:

For the assigned API Resource, select the Scope(s) you want included in the token:
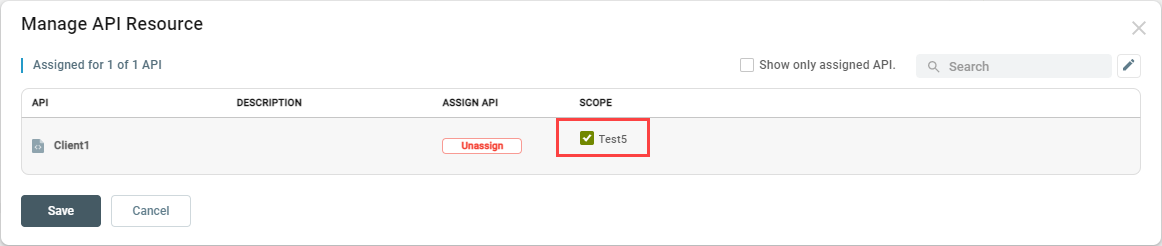
If there are multiple scopes listed, you can select none, all or any number of them. Click the Save button.
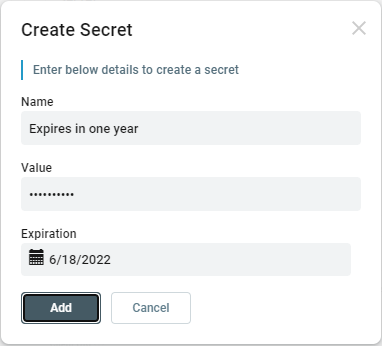
Now click the Add (“+”) button in the Secret section. Set the Name to “Expires in one year”, set the Value to “pass@word1” and set the Expiration to a date one year in the future. The value should be a unique string of characters, but for this sample we are using “pass@word1” as it is already set in the web.config of the Visual Studio solution we provided as a test consumer application. Click the Add button:
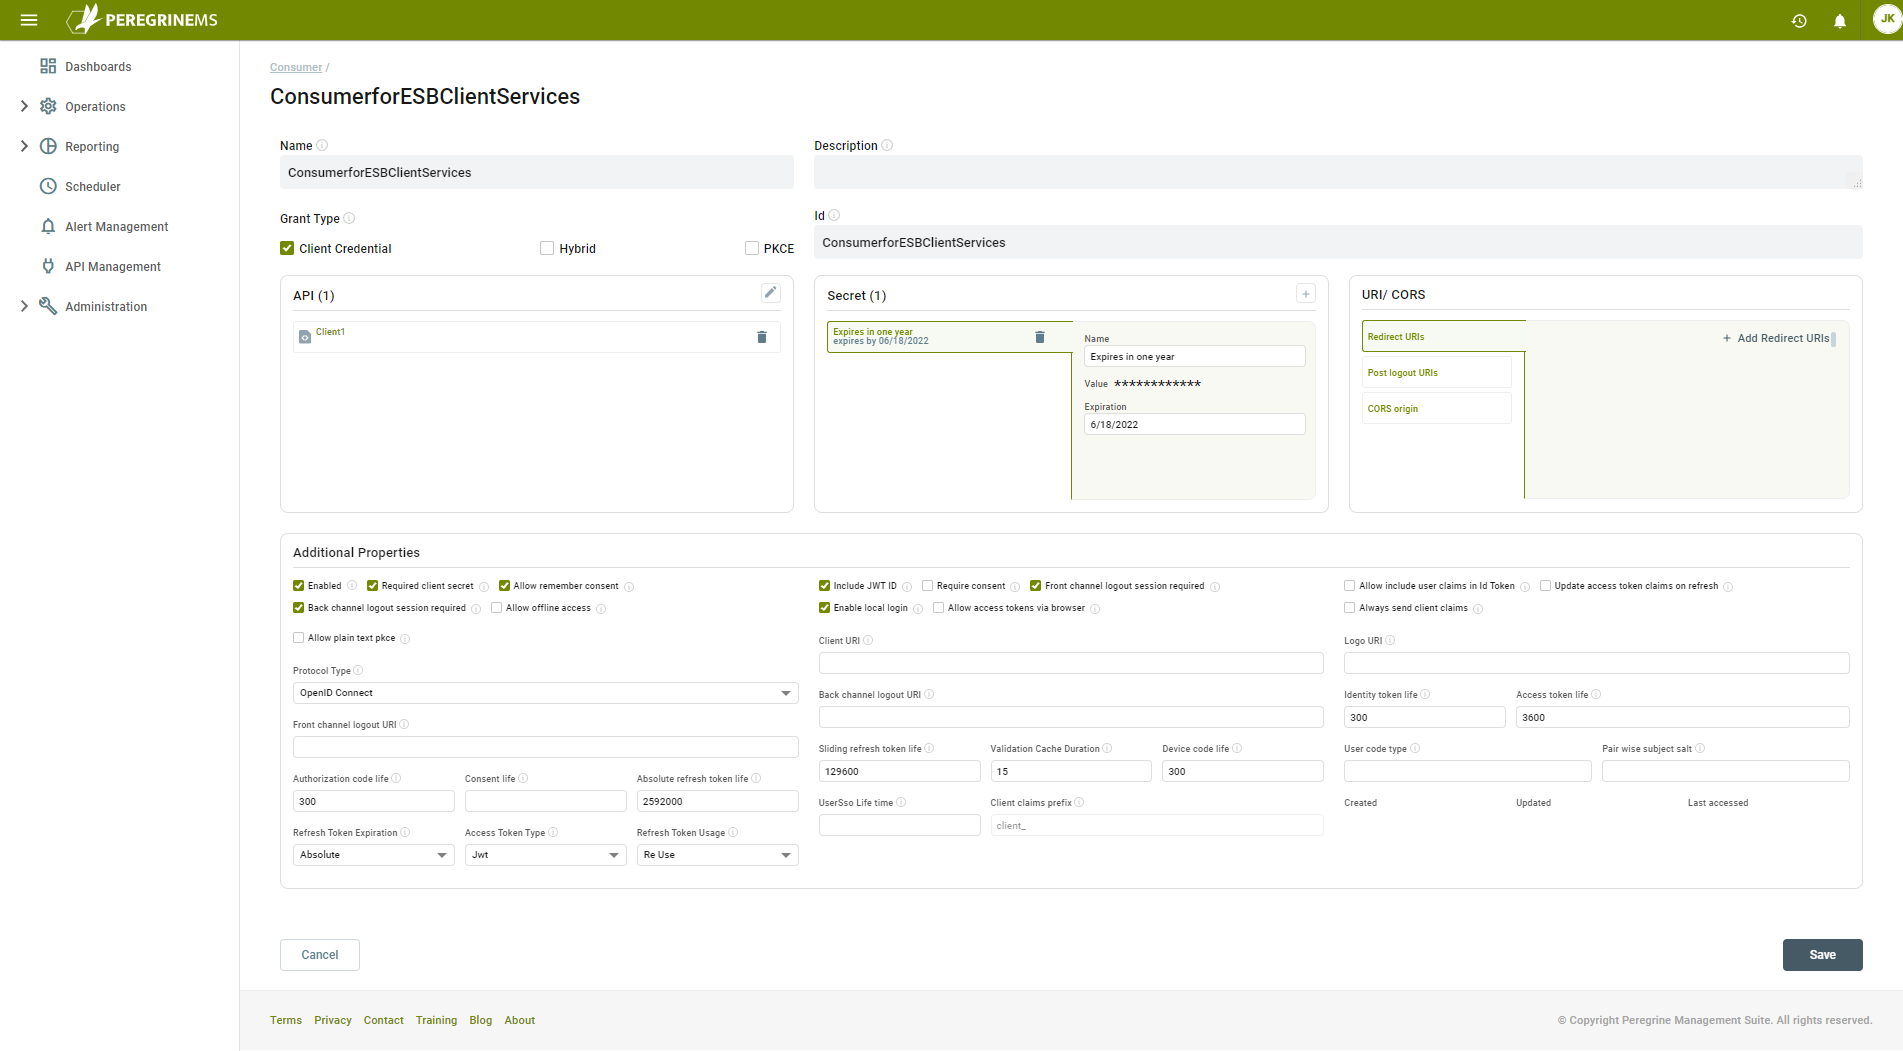
The values under Additional Properties do not need to be modified for this sample. You consumer configuration should look like the image below. Click the Save button:
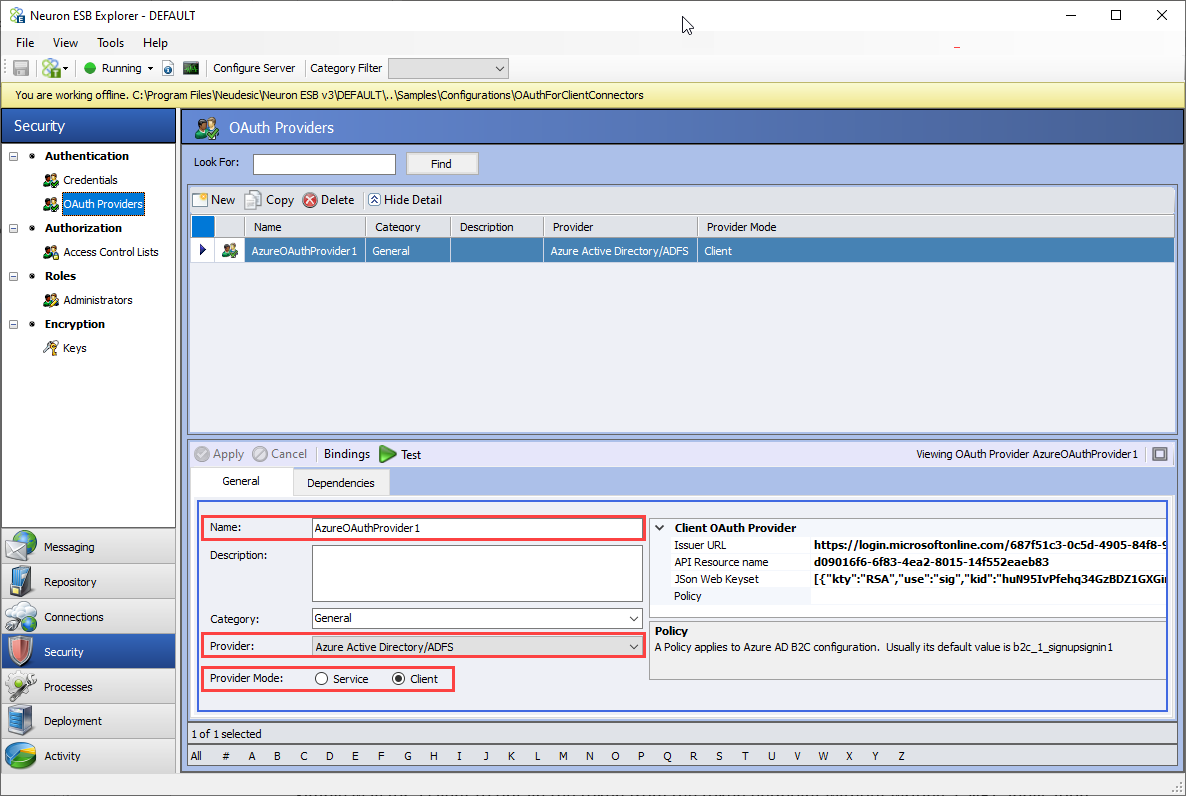
Using Azure AD as the OAuth Provider
The part of the sample is optional. If you want to test using Azure Active Directory as an OAuth provider, complete the following steps.
For Azure AD testing, provision an application in your organization’s Active Directory and save the API Resource Name, Issuer URL and the Json Web keyset values from the Azure AD application configuration screens.
In Neuron ESB Explorer, client OAuth Providers are defined in Security->OAuth Providers. A provider named “AzureOAuthProvider1” has already been added to the sample configuration. Modify this OAuth Provider by replacing the values in the property grid with your own values saved from your Azure AD application configuration. Click the Apply button and then Save your changes.
For details on setting up Azure Active Directory refer to Microsoft Documentation:
Client Application Configuration
Once the Client Connectors are secured with OAuth in the Neuron solution, any calls to the Client Connector endpoint from a consumer application must include the OAuth token in the format “Bearer <Token>” in the Authorization Header.
A simple way to obtain a token from the token endpoint without writing a .NET application is to use a tool such as Postman to issue a request for a token as shown below:
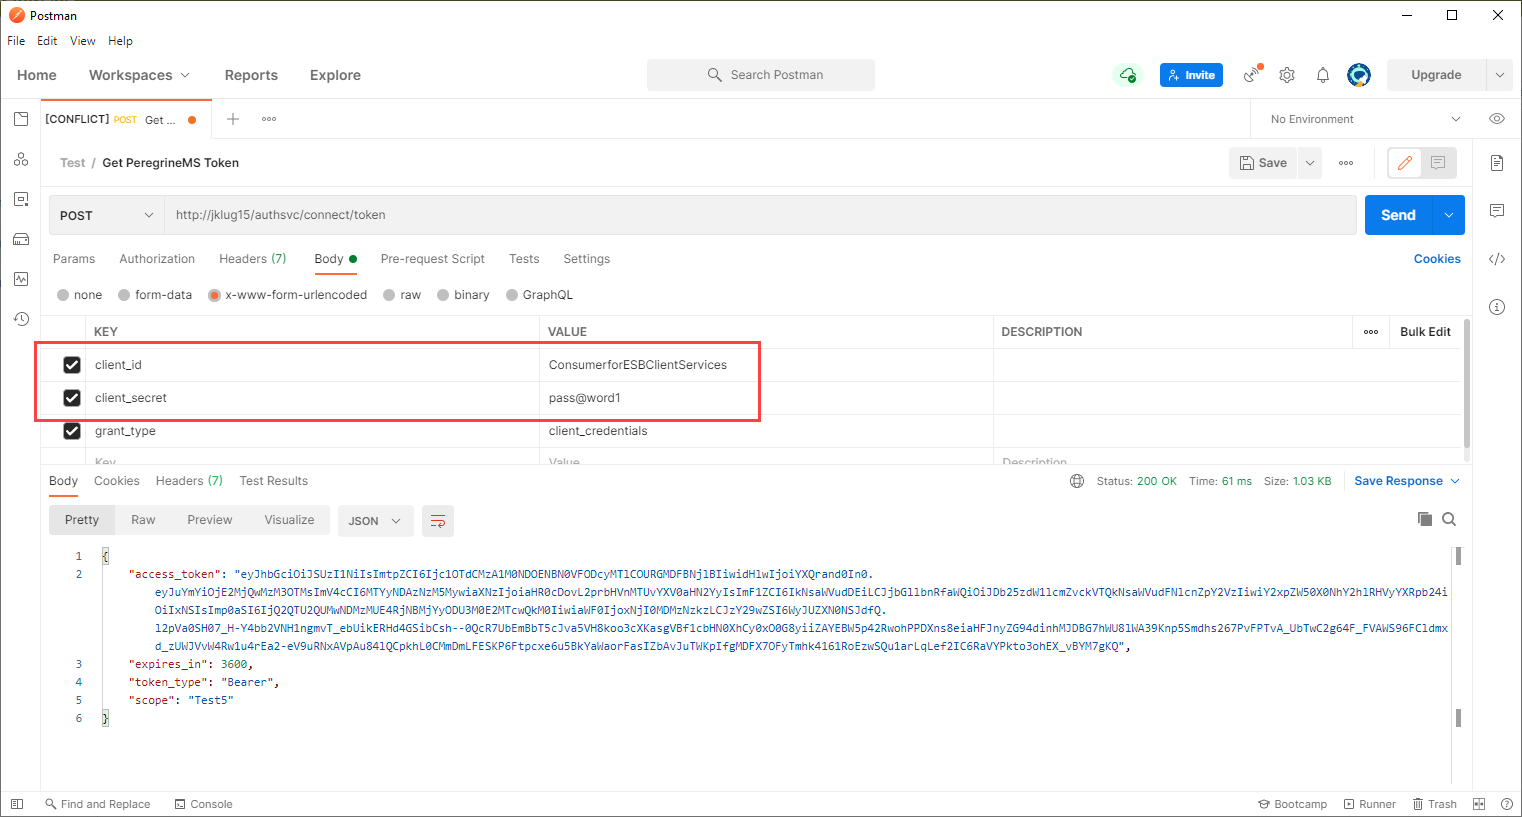
The client_id is the name of the consumer and the client_secret is the value of the secret you set when creating the consumer.
The included Visual Studio sample application shows how a consumer of Neuron ESB Client connectors may implement functionality to get the required OAuth token that must be passed in the Authorization Header. This sample stores the cliend ID and Secret in an unencrypted format in the web.config file. In production they need to be stored securely by the consumer application. The ASP.NET IIS Registration tool (aspnet_regiis.exe) can be used to accomplish this in a web.config file.
Before running the Visual Studio sample, you need to update the URLs to point the consumer application to your PeregrineMS OAuth URLs and the Neuron ESB Client Connector URLs. In the Web.config file, find all instances of (PeregrineMSServer) and replace with your PeregrineMS server name, and replace all instances of (PeregrineMSPort) with the port number. Also replace all instances of (NeuronESBServer) with you Neuron ESB server name. You don’t need to update the ports for these URLs as they are defined in the Client Connectors.
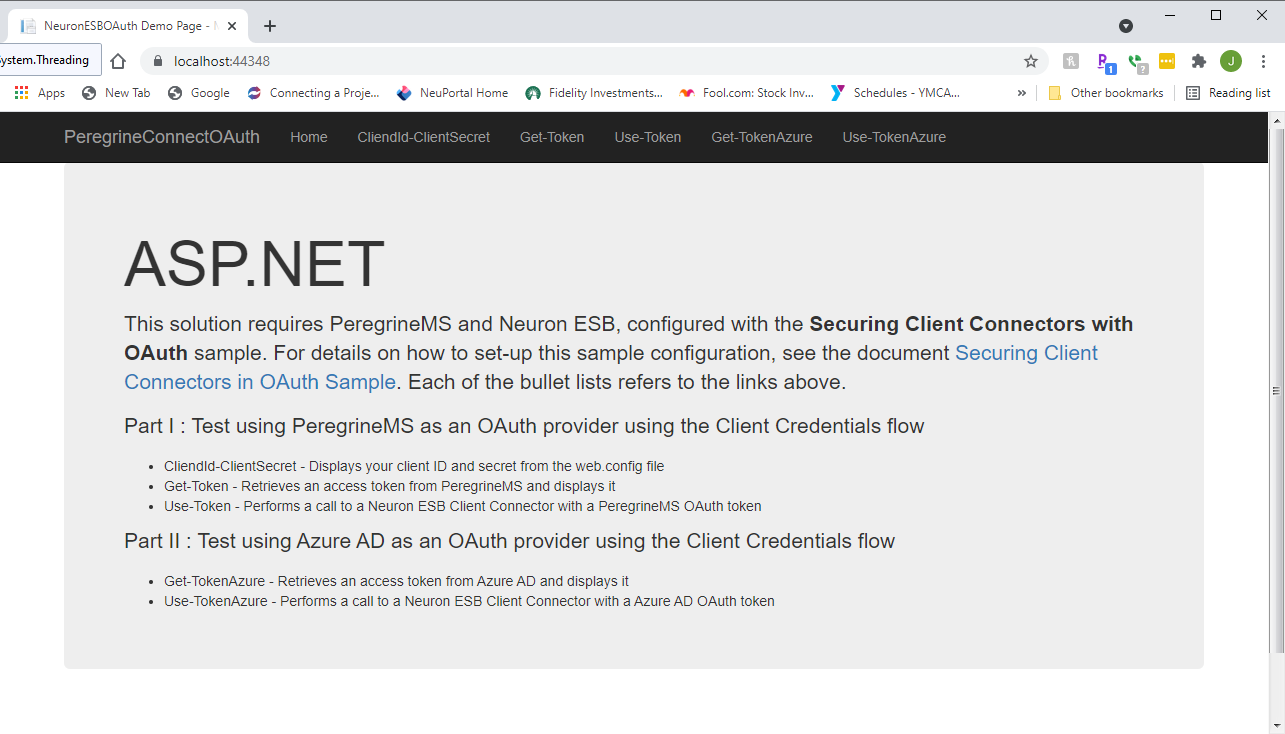
To start the Visual Studio solution:
- If not already open, open the solution NeuronOAuthConsumerSample.sln located at:
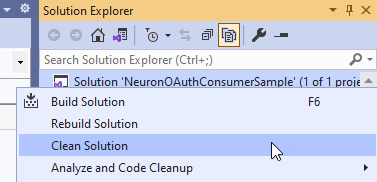
<Neuron ESB Install Folder>\ Samples\Services\RESTServices\ClientOAuth - In the Solution Explorer, right-click the solution node and select Clean Solution:
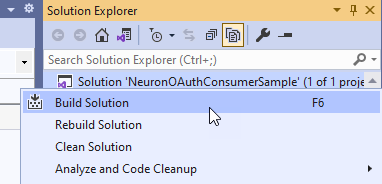
- In the Solution Explorer, right-click the solution node and select Build Solution:
- Press F5 to run the solution, and follow the instructions on the home page: