Scheduler
The Scheduler in Peregrine Management Suite implements the Quartz Scheduler mechanism. For more details on Quartz refer to their documentation https://www.quartz-scheduler.net/documentation/.
Before diving into scheduler, it is necessary to understand some terms associated with this functionality.
Job
A Neuron business process or a custom assembly that has been scheduled to run using the Management Suite’s scheduler option.
Job Data Dictionary or Job Data Map
A structure containing input data that is passed in for every execution of the scheduled job.
Trigger
A condition to be met when the job is supposed to execute, such as, specific time of day.
Calendar
A structure defining days to exclude or include when firing the trigger associated with job.
Base Calendar
A Base calendar can be used as a common base for different calendars where they share some common criteria for excluded days (e.g., Saturday excluded in base, but other calendars can have Friday or Sunday excluded depending on region).
History
Record of all successful or failed executions of the scheduled job.
Request
A message that is passed into start the job execution.
Job data
Data such as parameters to be passed into the Job execution method.
Previous Job data
It is data from job definition and previous job respectively such as last execution time, last exception, response etc.
Jobs can be of two types. Neuron Business process that is scheduled to run as a batch job or a custom assembly that implements IPeregrineJob interface from the Neuron ESB SDK. You can accomplish most tasks from Neuron Business Process. You may use custom assembly if you require some references that cannot be added to the Neuron Business Process, or you want the freedom to implement your own logic using a solution developed with Visual Studio.
Business Process scheduled as Job
When you select Job Type as Business Process Job, a list of Neuron Business Processes in the currently selected application appears under Neuron Entity. You may select a business process to be run according to a calendar and trigger as shown below. For each job, you may use existing or add new calendar and trigger. With a combination of calendar and trigger you can control exactly what times the jobs will run and on what days.
Custom Job
You can create an application library (DLL) containing a type that implements the IPeregrine job interface. Refer to included samples for an example. At time of deployment, copy this DLL into the Neuron Instance folder under the Peregrine Jobs sub-folder.
When this assembly is present it will appear as a job type in the dropdown box for the create job screen.
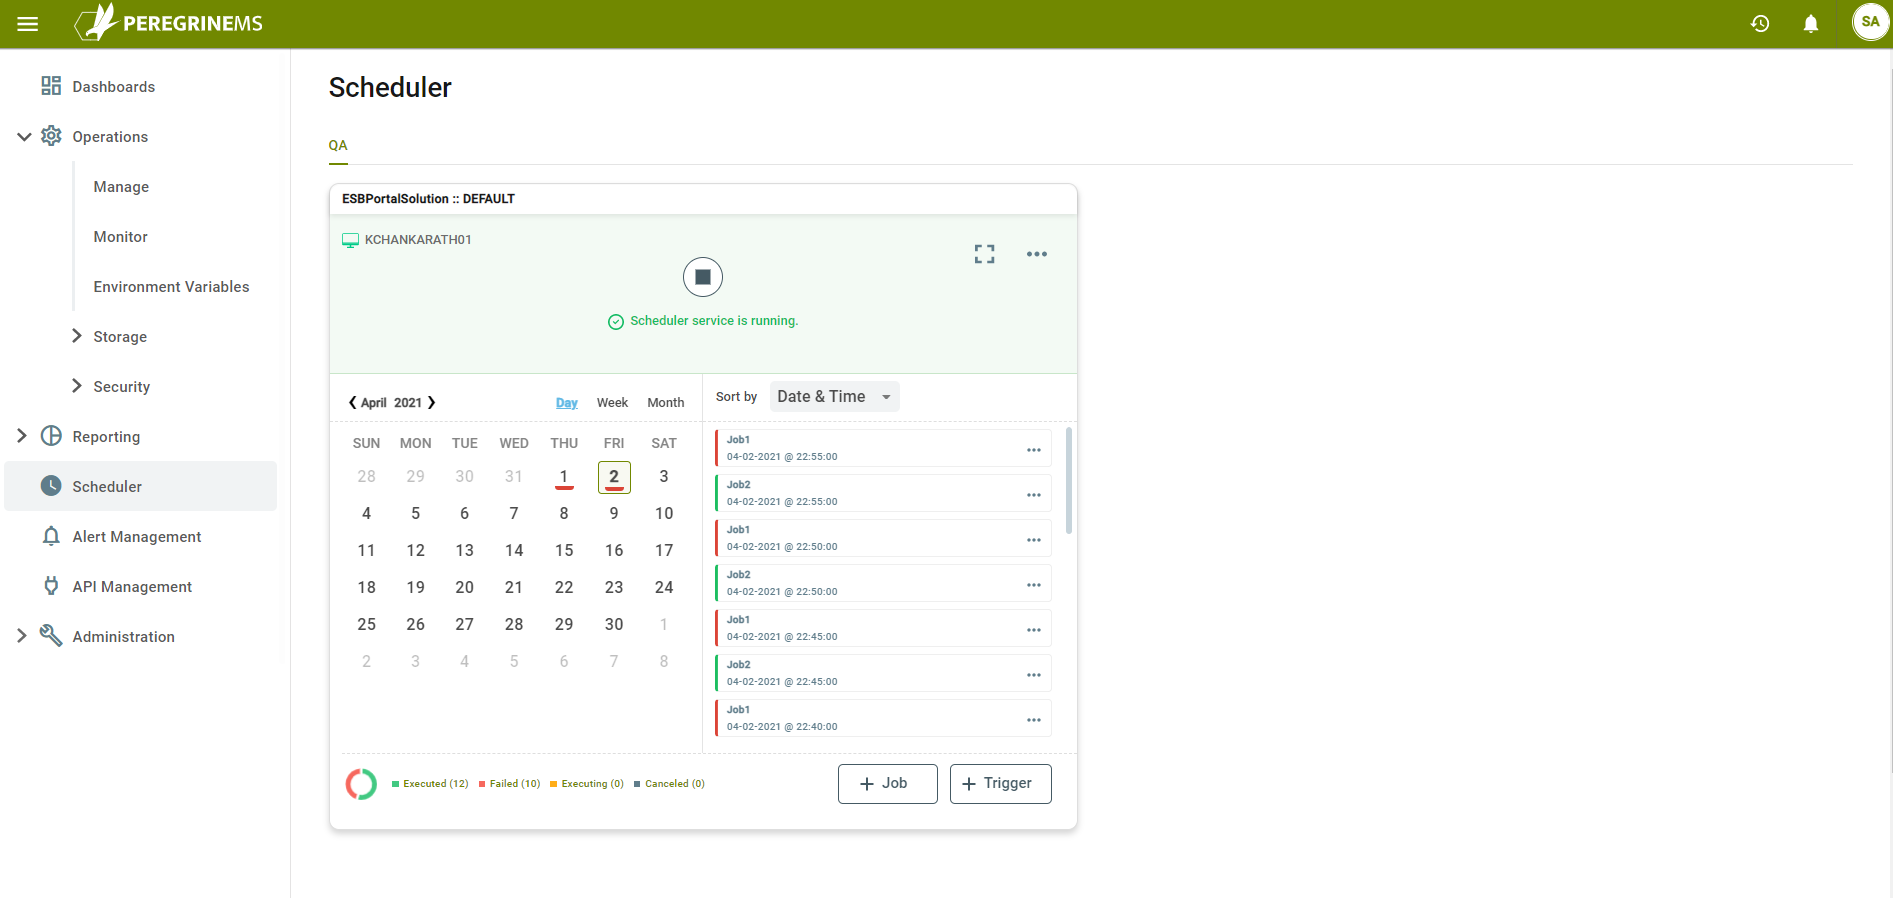
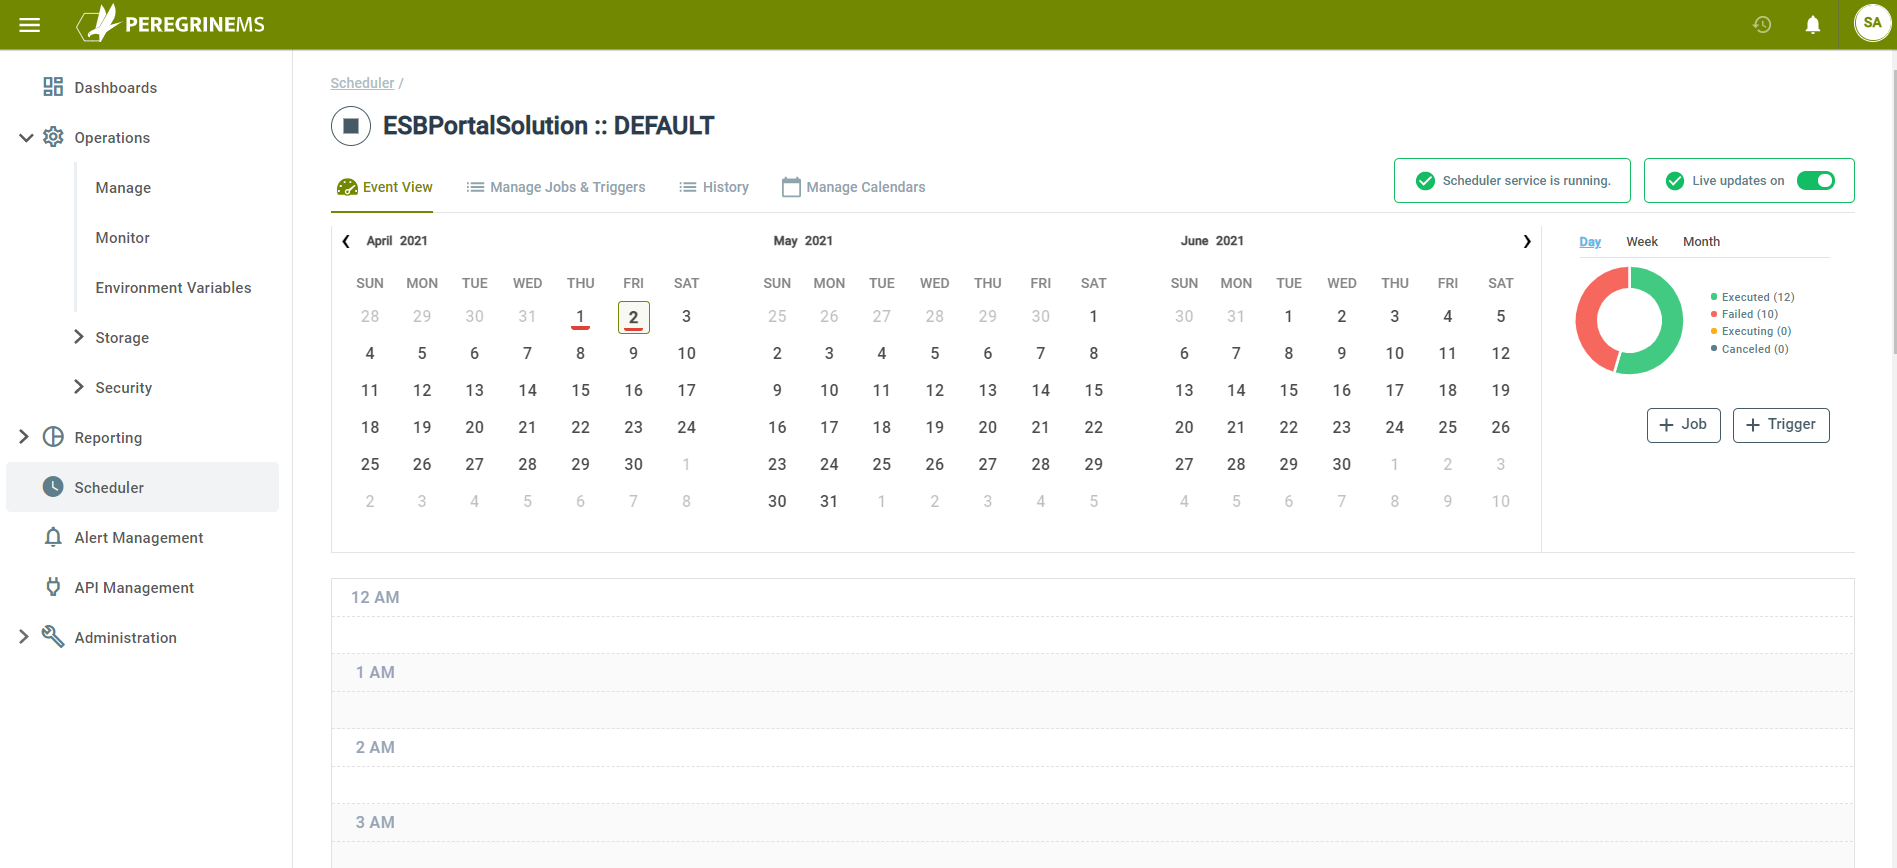
Job Card View, Event View and List View
The Job Card view provides summary of recent jobs on a calendar as shown below. The top row shows the status of scheduler service and provides button to start/stop the scheduler service.
Second row shows the calendar and the recently executed/executing/failed or cancelled jobs to the right of it.
You can start adding new jobs and triggers from the buttons in the last row of this view.
Event View
When you expand the card view, it expands to Job Event View shown above.
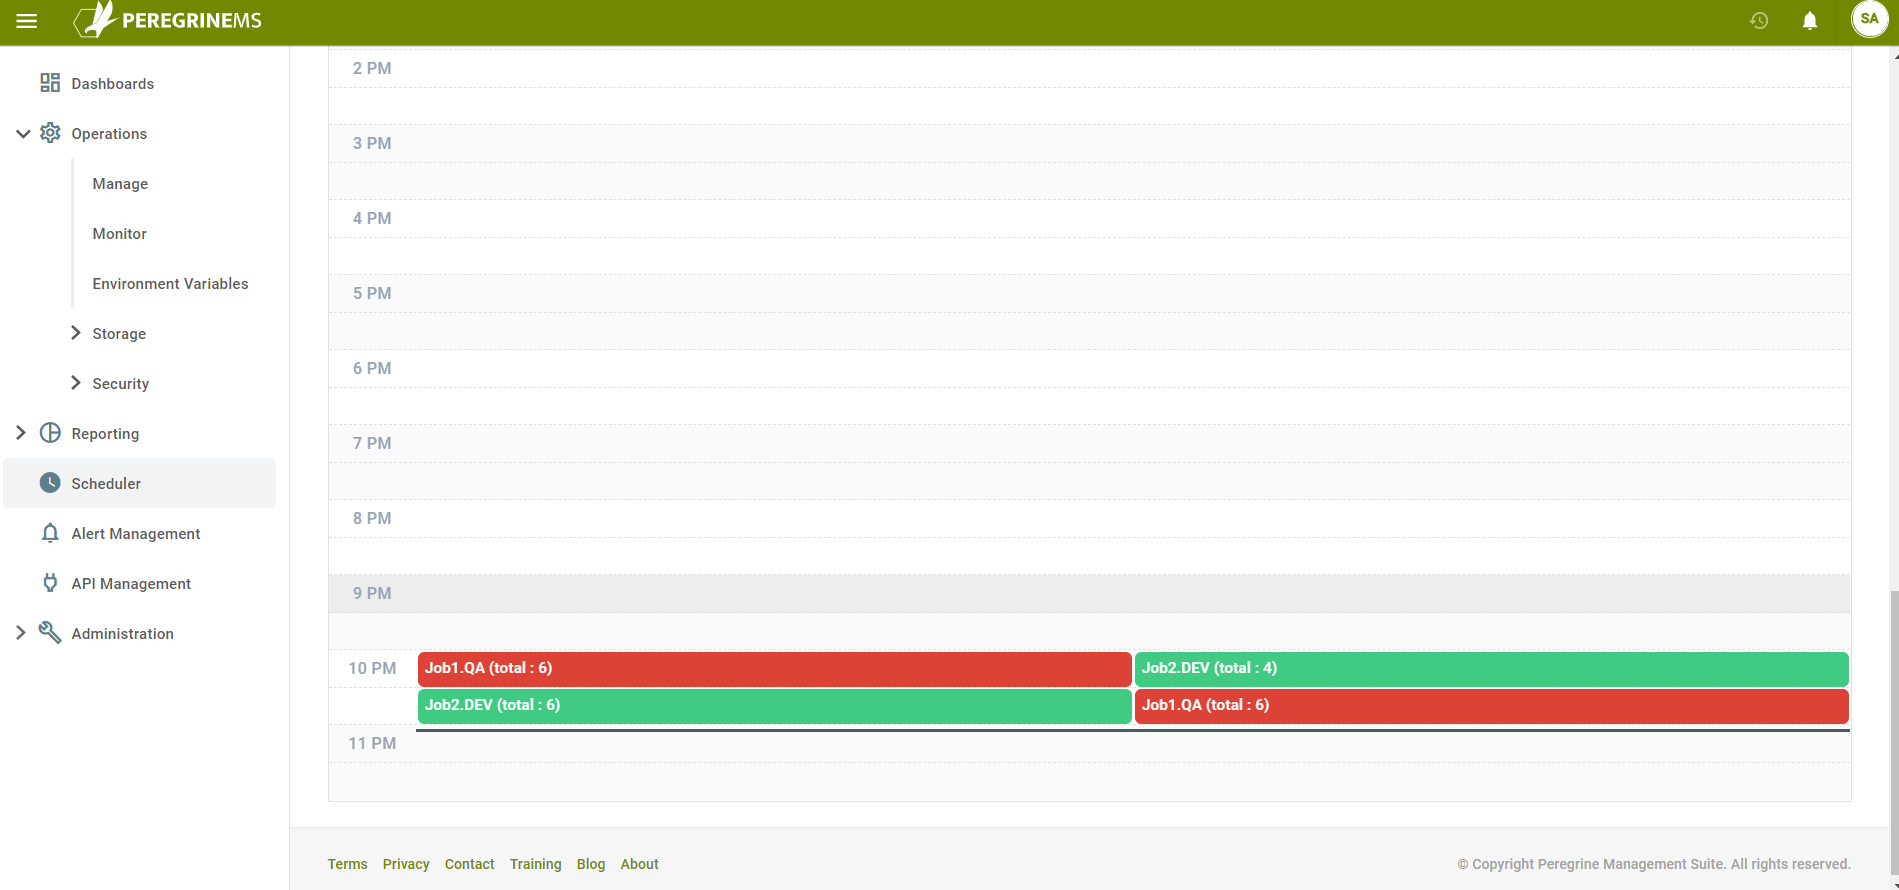
Job event view provides an intuitive calendar like interface to show the scheduled and executed jobs. Using this page, you can navigate to job definition, history, triggers and calendars. You may toggle between event view and list view. List view provides more details in tabular format and is searchable.
Event view shows three months calendar with running/recently completed/cancelled/failed jobs on the calendar as well as in a pie chart in the right-hand top corner. There are two buttons below to create a new job or a new trigger for an existing job.
On the top of List view on the right-hand side, you can see if scheduler service is running or not and whether or not the page keeps refreshing with latest data (live updates are on). The Management Suite prompts you to turn off live updates when editing so as to pause page refreshes while you are editing on it.
List View
When you select Manage jobs and triggers, you see the List view of jobs.
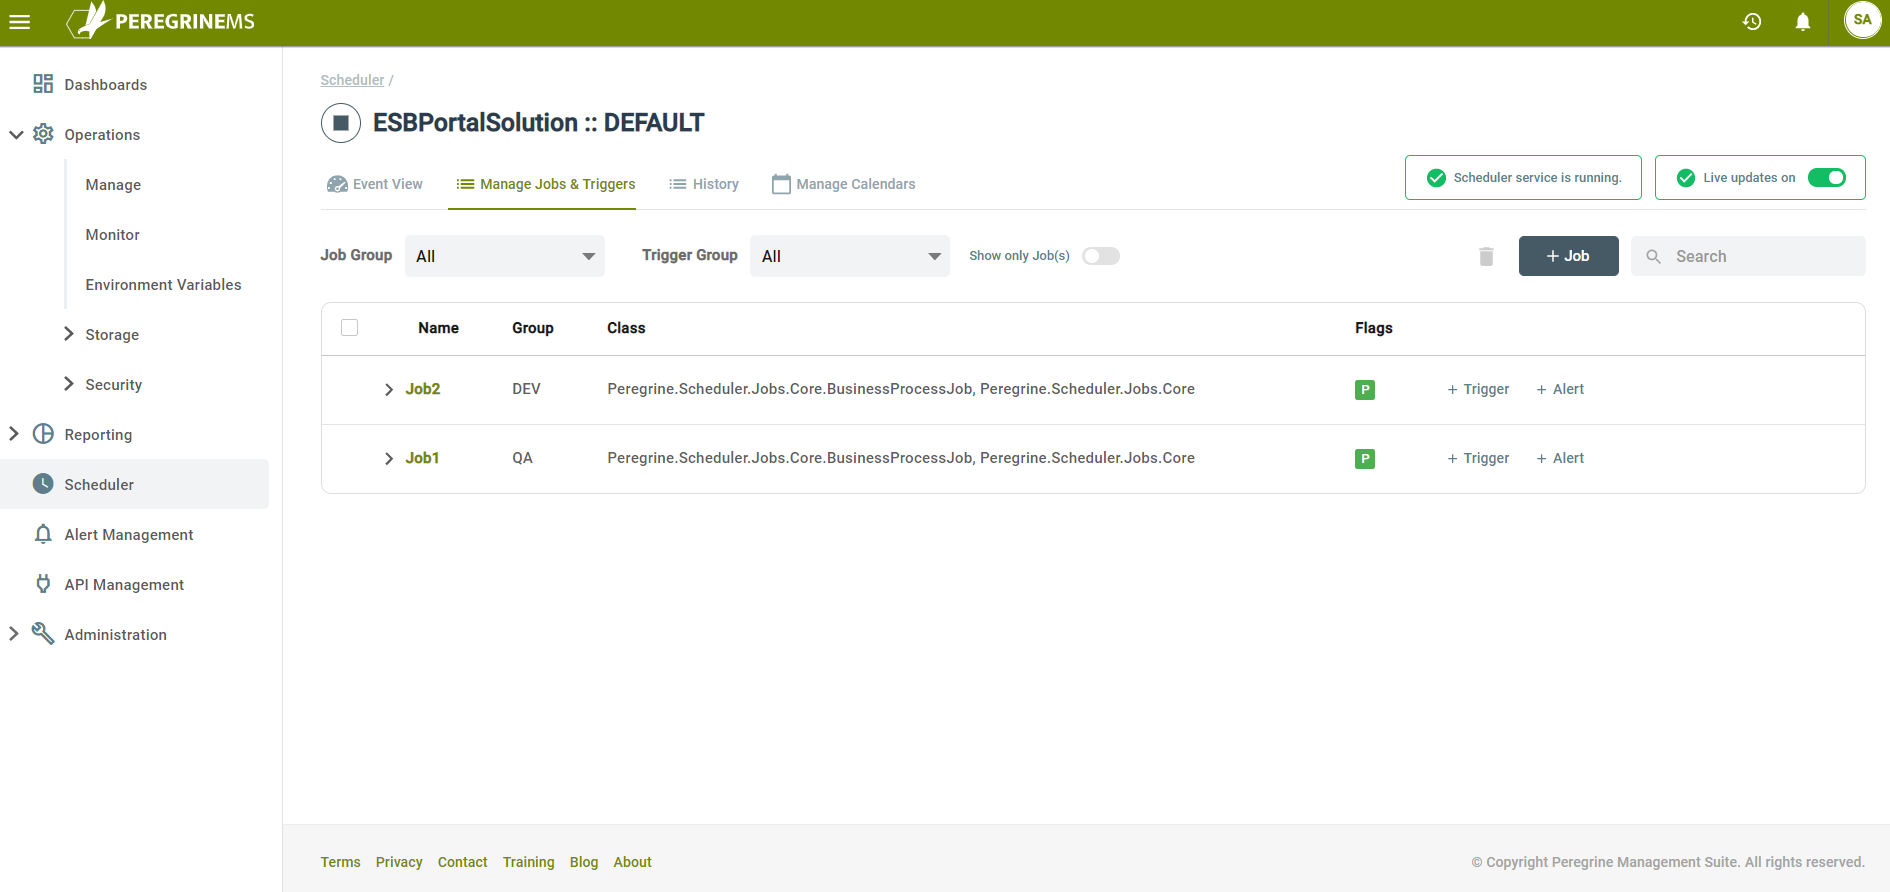
Job group and trigger group are logical constructs to make related jobs and trigger appear as a group when managing them. You can filter the records shown using the drop-down boxes for Job Group and Filter Group when you have many jobs and triggers. The show only jobs switch lets you show only jobs without the associated triggers when it is on. The Add Job button on the top right-hand corner launches the Job definition wizard that is described in the next two sections.
In each row of the jobs, you can see the following columns
Job Name – Name assigned to the job
Group – Group assigned to the job
Class – Class this value is always the same for Business Process Jobs. For custom jobs it is the name of the custom class that implements custom job
Flags – The value of this flag is always P for Persist Job Data. There is an option for c flag to allow concurrent execution that is currently not supported.
Buttons to add Trigger and add Alert for when job executes – You can add new triggers and alerts to the currently selected job by using these buttons.
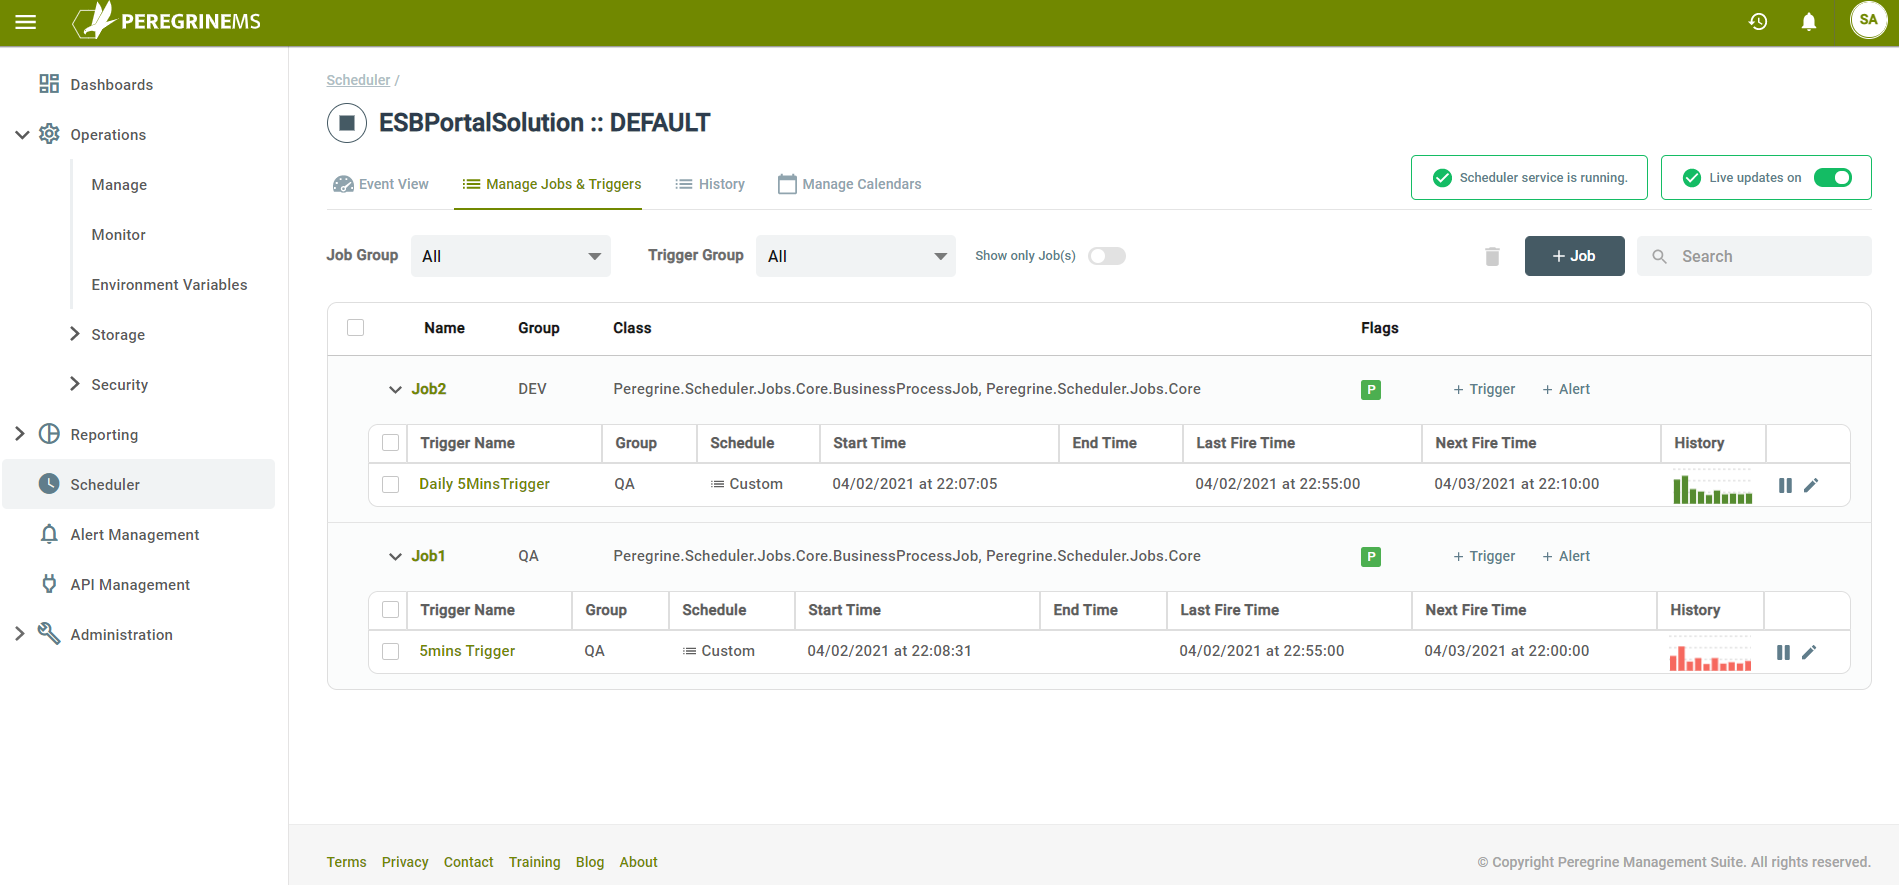
Under each job row you can see the triggers created for the jobs. A job can have multiple triggers and schedules as well as multiple calendars associated with it. Trigger row has following columns.
Trigger Name – Trigger Name assigned by You.
Group – Group name assigned by You
Schedule – Name of the custom schedule or in-built schedule such as daily etc.
Start Time – Start time when trigger is in effect
End Time – End time when trigger is in effect
Last Fire Time – Last time the trigger fired to execute the job
Next Fire Time – Next schedule time when the trigger will fire.
History – Mini history of job execution on a time scale with job execution times and color codes showing job result (green – success, red-failure)
Buttons to pause and edit the trigger – Using these buttons you can pause and edit the trigger. Trigger editing screen is described in the next section.
Add/Edit Job and Trigger with Job Creation Wizard
A wizard like interface steps you through the following screens. You also have the ability edit each part independently with same screens after job is initially created from the Manage Jobs and Triggers screen. You can also independently add triggers to existing jobs. The screens to add and edit are same as the ones you see in the wizard, so they are described only as a part of the wizard steps documentation below.
A job definition has three steps. The Job definition itself, associate a calendar to the job and create a trigger for the job. The following screen shows the job definition.
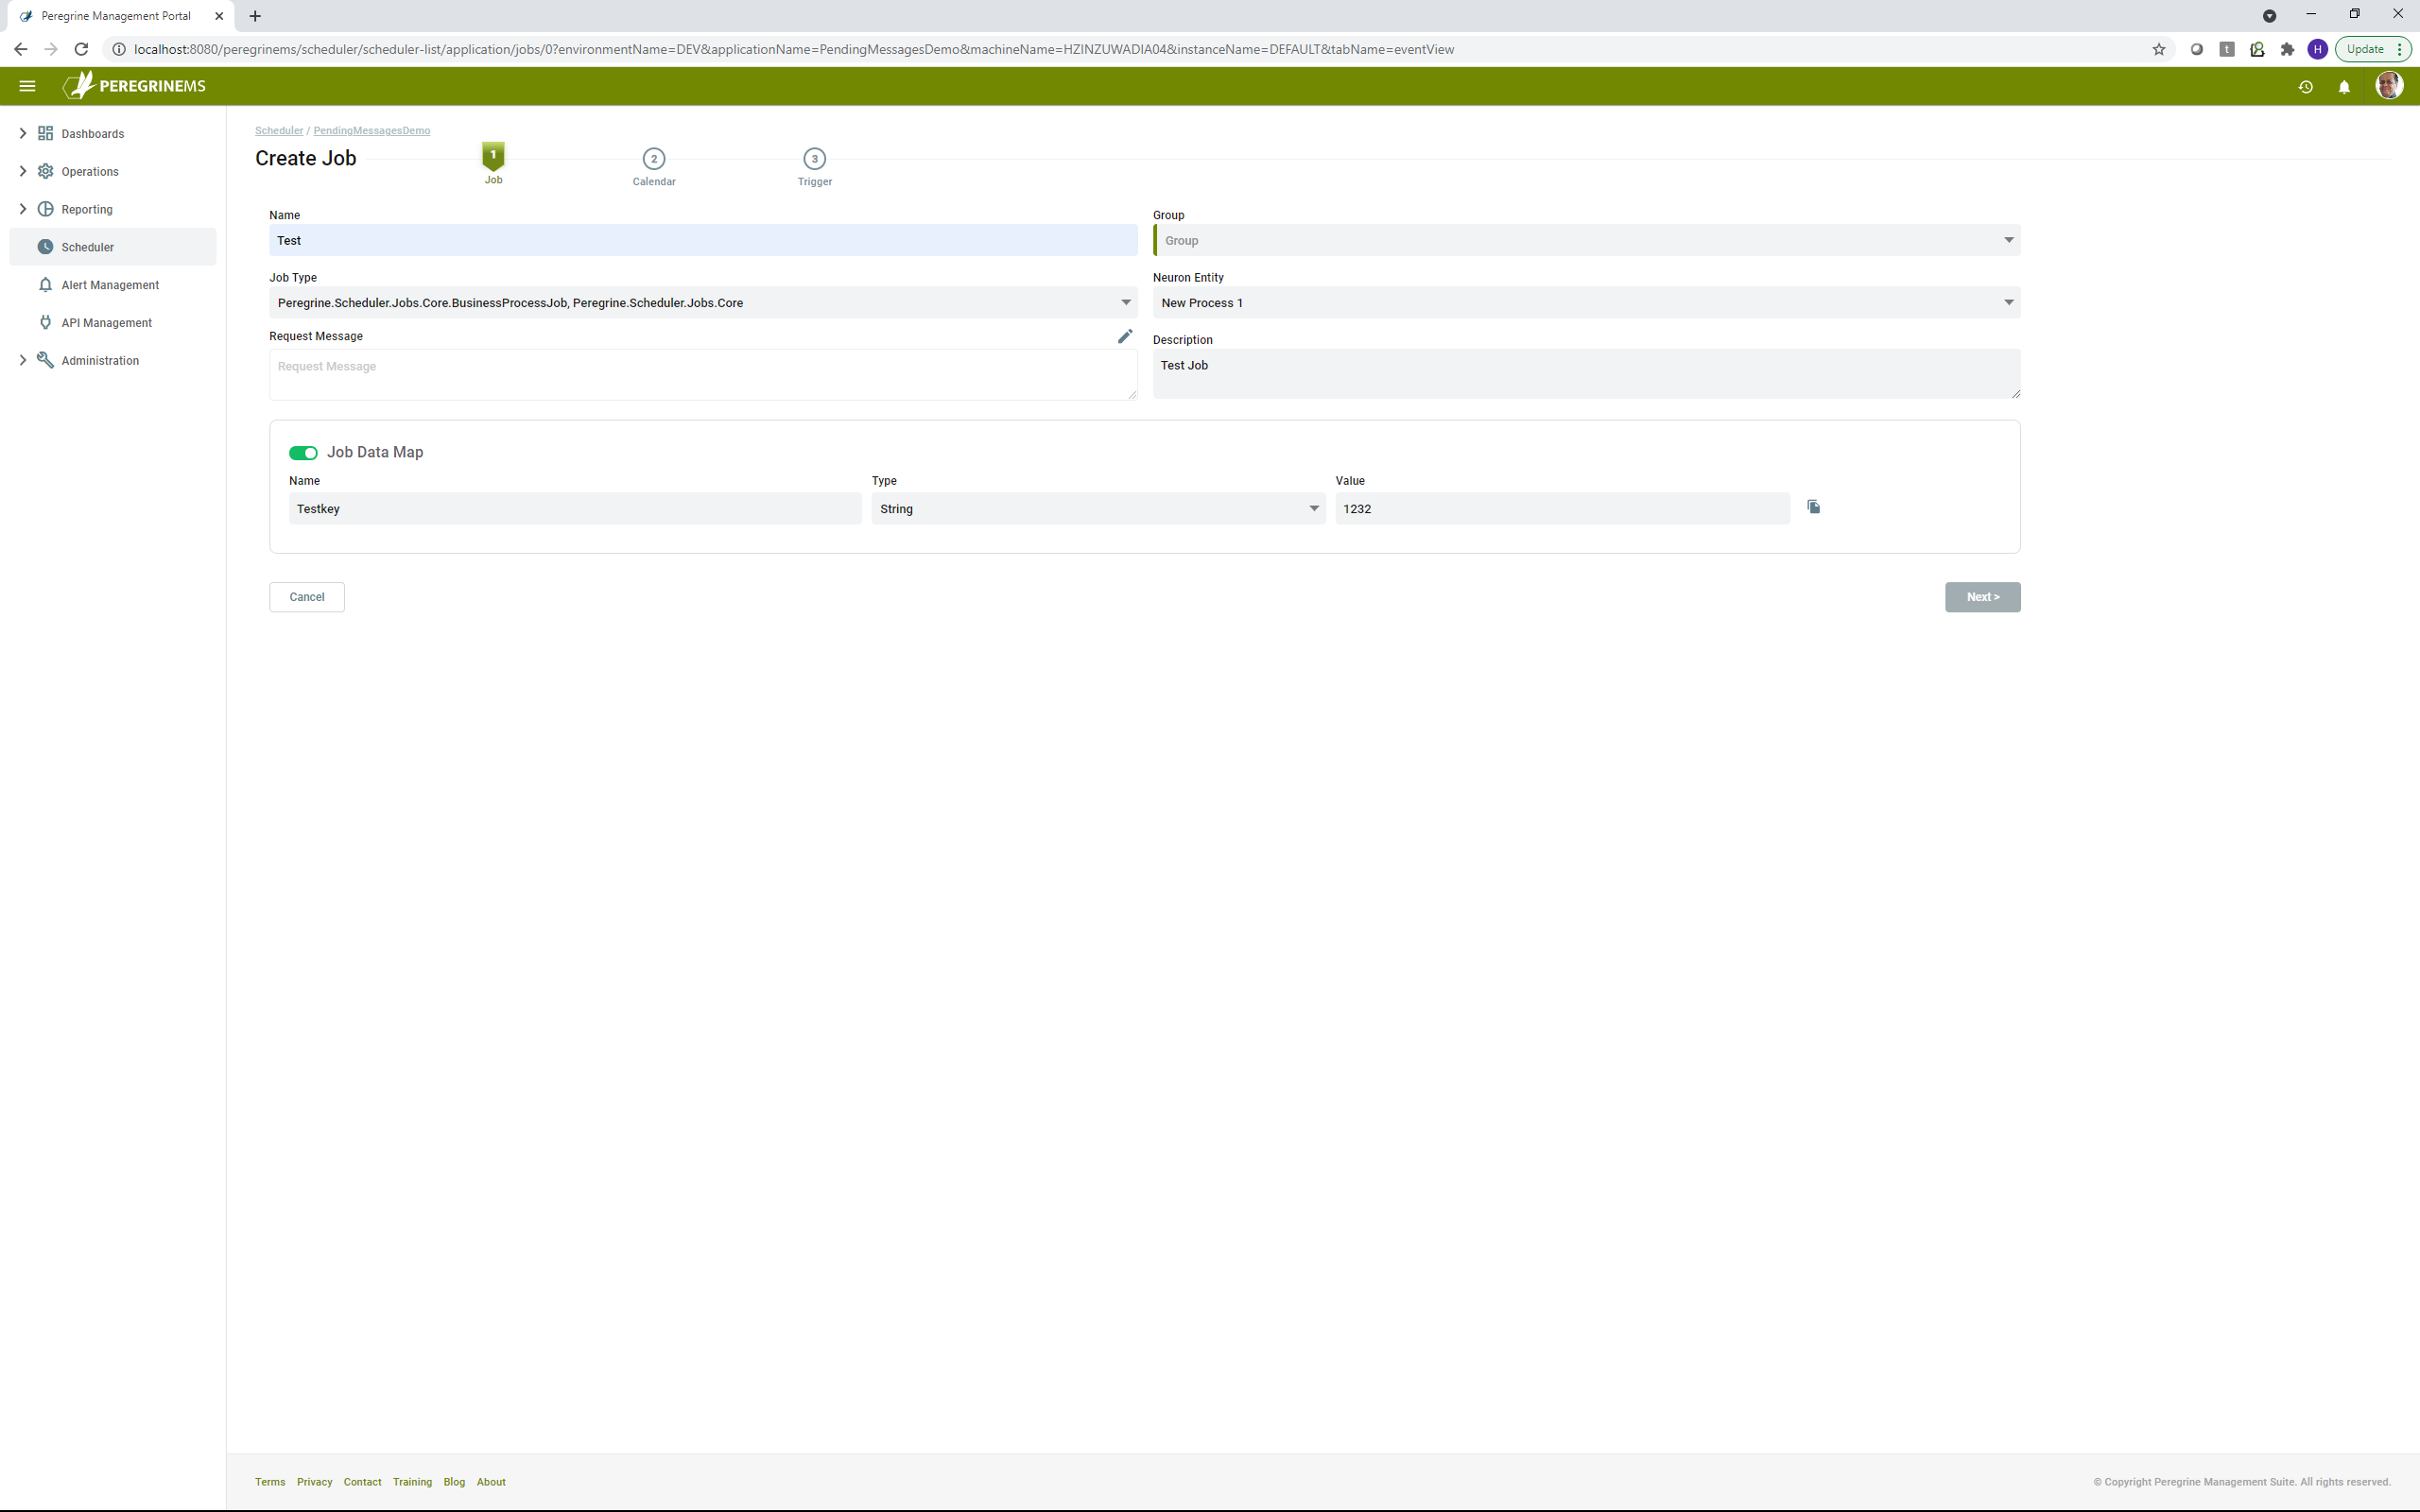
Name – You can assign a name to the job.
Group – You can assign a new or existing group to the job.
Job Type – If you are creating a business process job then leave the default. If you are creating a custom job, see the custom job section for instructions on selecting custom job type.
Neuron Entity – You can select an existing business process in the current application using the drop-down box provided if you are using a business process job type.
Request Data – You can optionally pass a request message containing the whatever data you need to pass in using the Request Data. You can edit the request message when you click edit icon next to the Request data label.
Job Data Map – You can optionally pass an array of values for use during Job Execution. These can be used to pass parameters such as URLs, UNC Paths, Connection Strings, API Keys etc. Each data map entry consists of Name, data type and value for that entry. For adding and removing entries, use the buttons located to the right of each Job Data Map entry.
Next step in creating job is assigning a calendar to the job from existing calendars created as per the section on Manage Calendars.
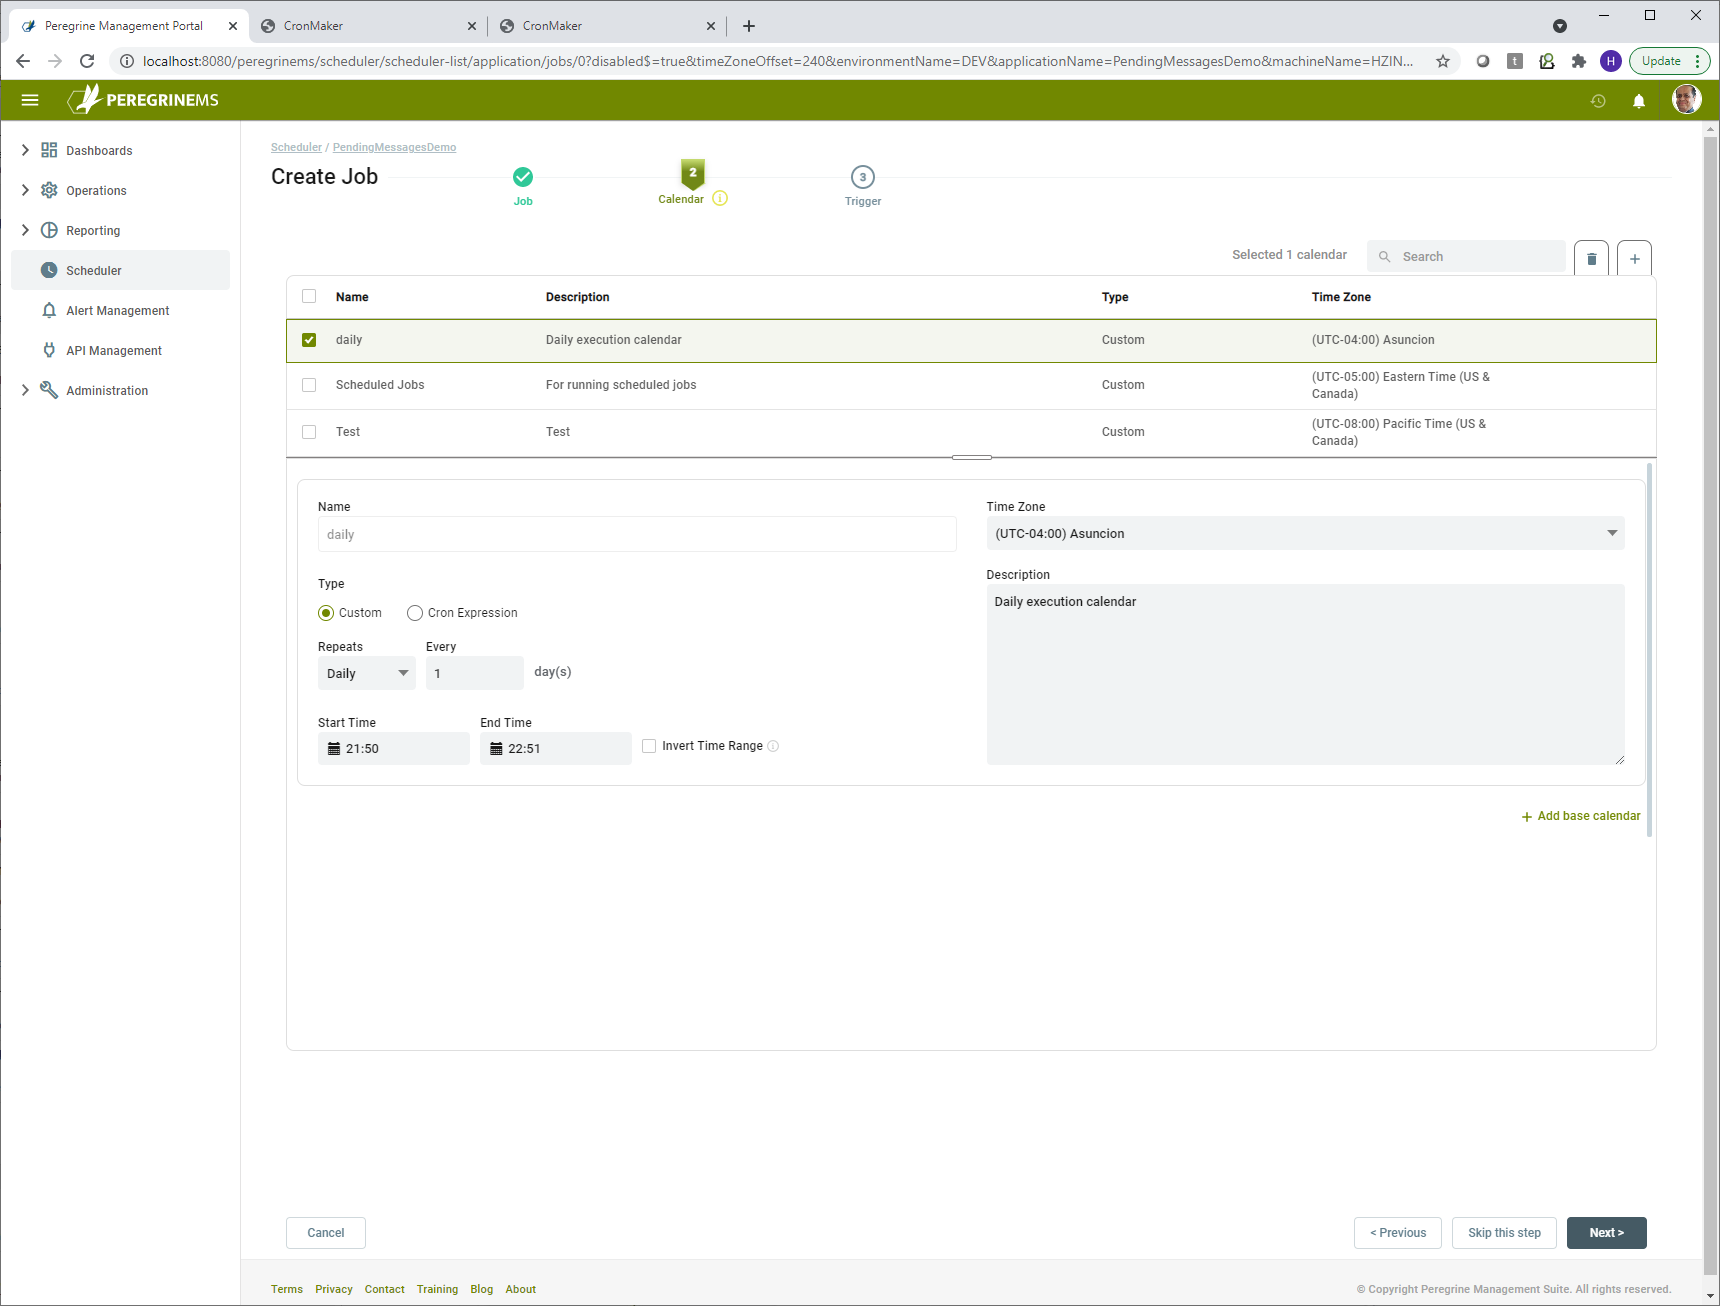
This part shows all the existing calendars and you can pick on from these. Checking the box in this first column shows details of the selected calendar to make it easier to see the full calendar definition.
You can also side track to add a new calendar here and continue. See the manage calendars section for creating and editing calendars.
Each row for calendar shows the calendar name, description, type (Custom or Cron expression) and the Time Zone. In details, you can also see the start time and end time.
You can continue creating trigger without picking a calendar, if your trigger is a simple trigger with no exclusions.
Next you can create a trigger. On this screen you can see the following options.
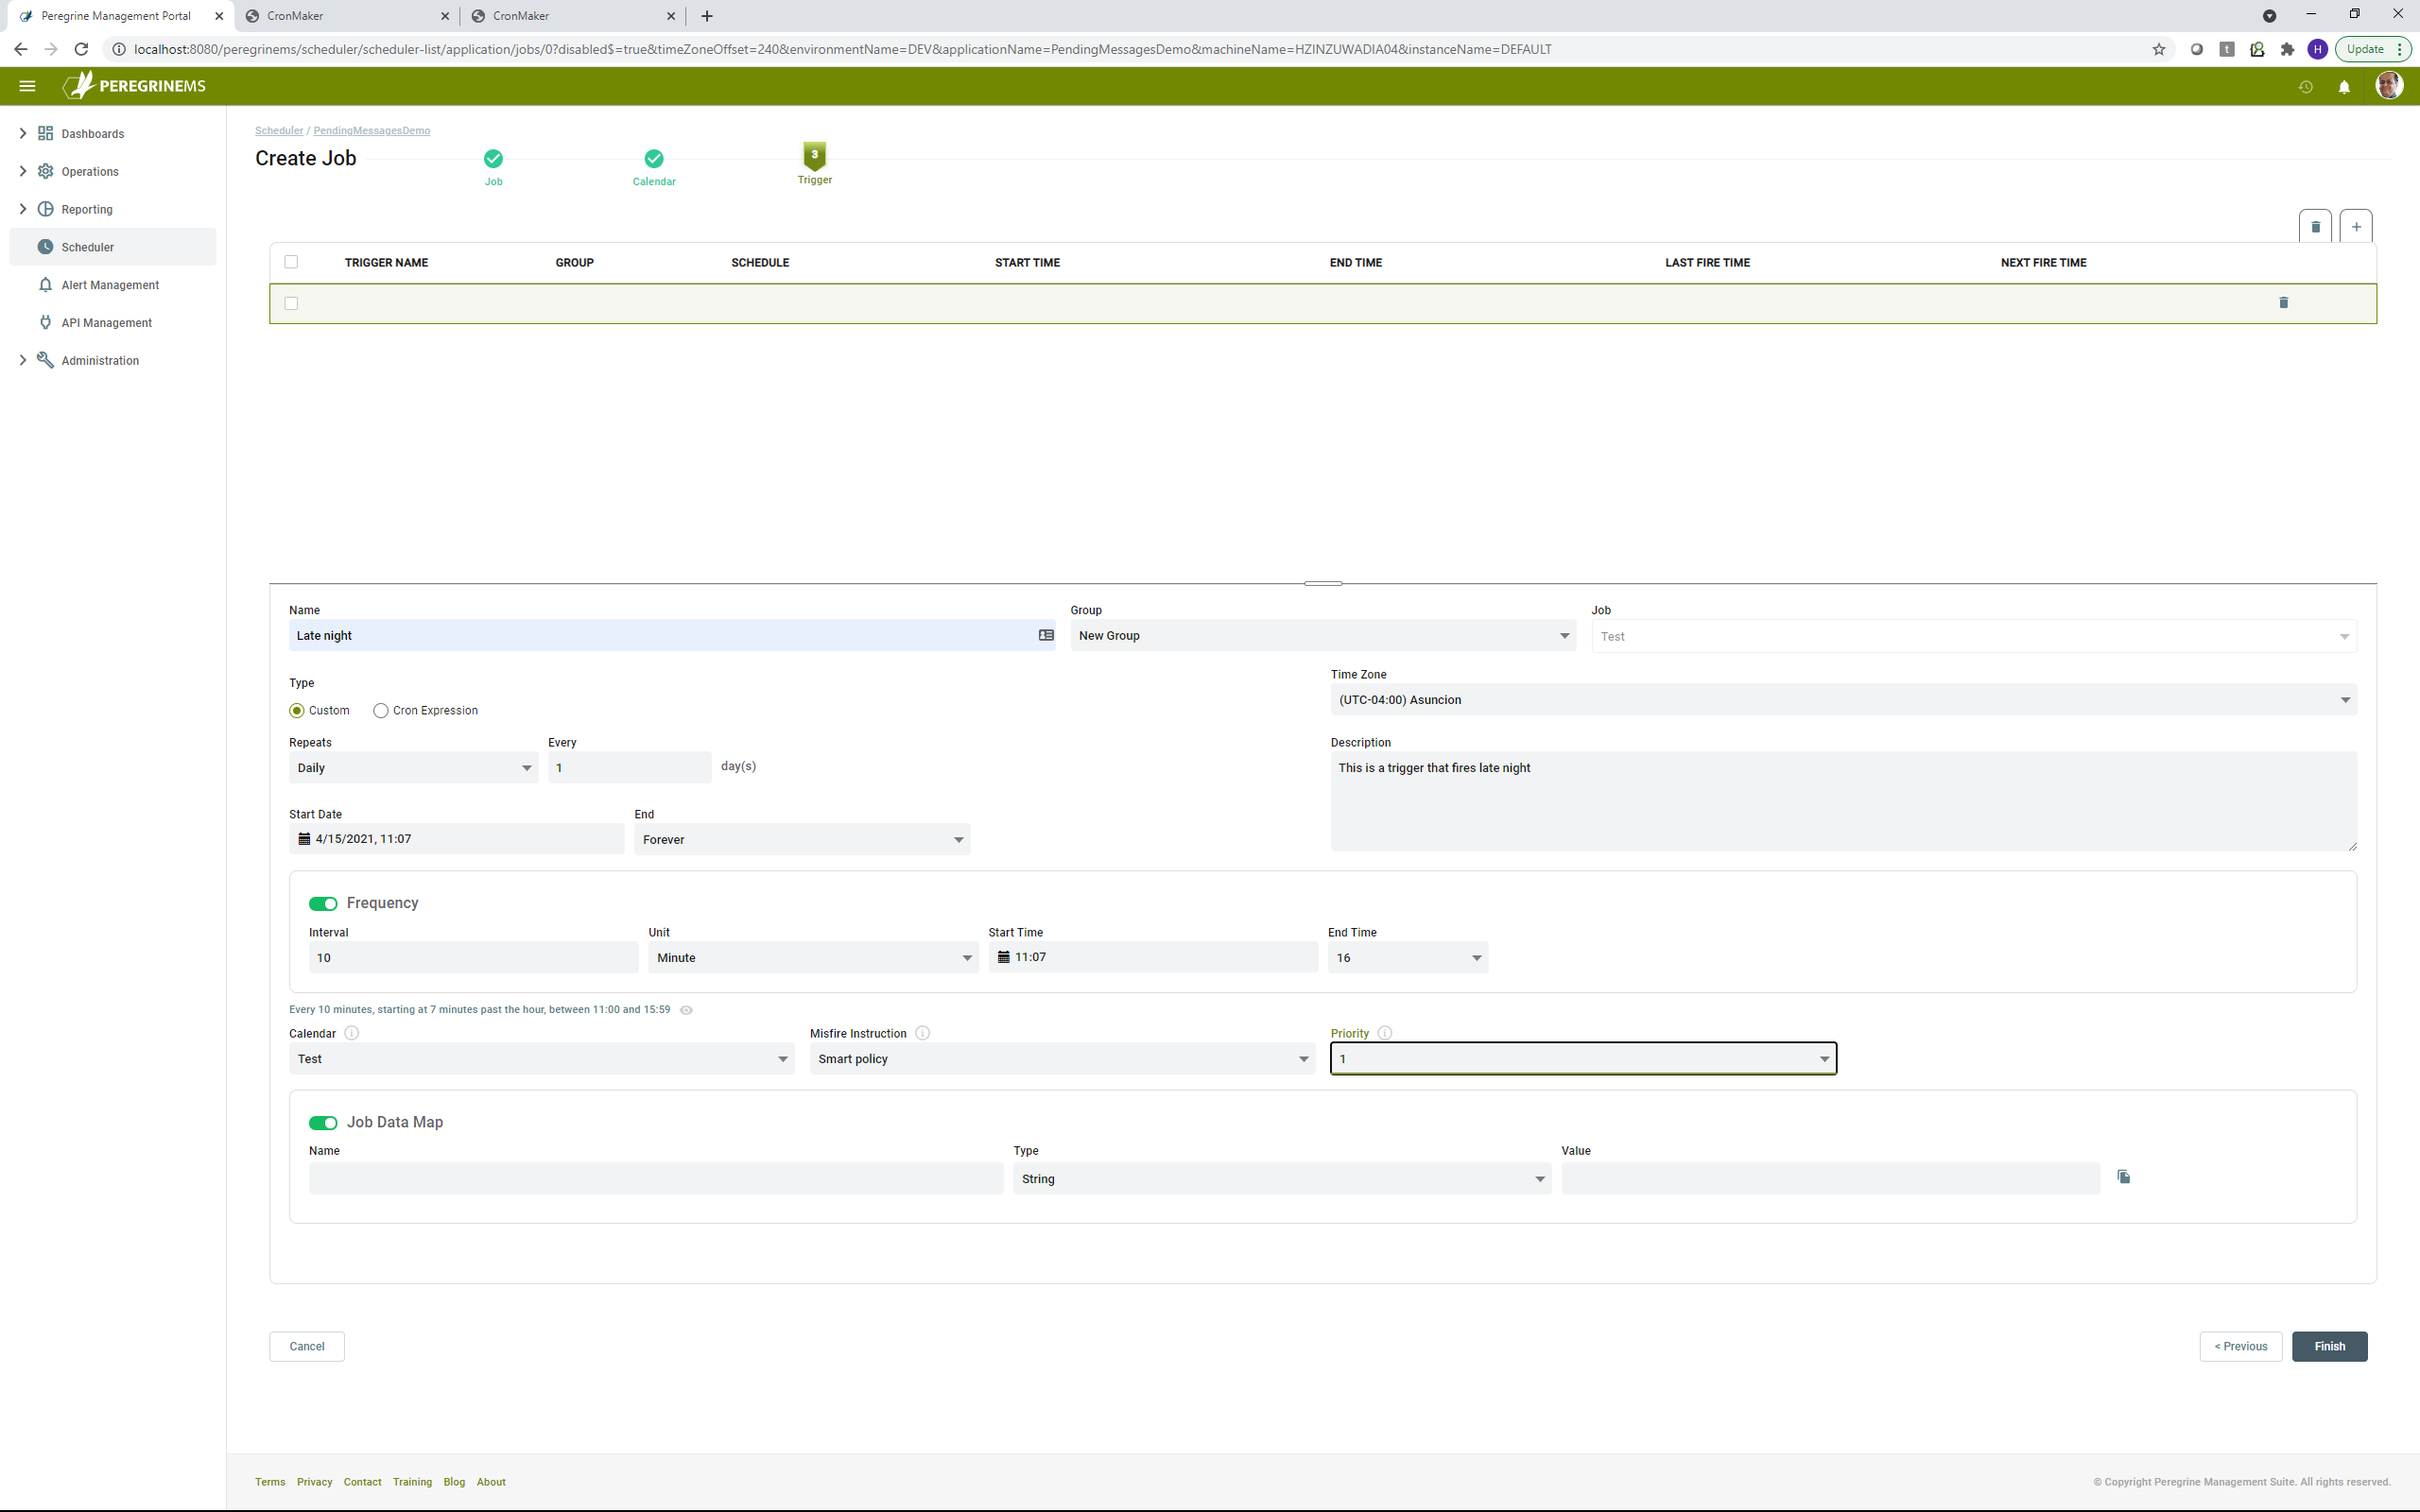
Trigger Name – You can assign a unique name to the trigger
Group – You can assign the trigger to a new group or pick existing group from drop-down.
Job – The job with which this trigger is associated (Job created in the first step of the wizard)
Type – Trigger can be of type custom or cron expression. When it is custom, you can select Repeats – Daily, Weekly, Monthly or Yearly and specify the count of every how many days, months, weeks or years it occurs. When type is cron you can use the provided link to cronmaker web page to create a cron expression that meets your need. https://Cronmaker.com
Time Zone – You can associate a time zone with this job to indicate how all start and end times are interpreted.
Description – You can associate a description with your trigger
Start Date – Start date when the trigger is effective
End – End date if you selected by date in the drop-down. Otherwise it can be forever
Frequency – You can turn this switch on or off to show / hide additional frequency during the day.
Interval – Specify the number of hours/minutes/seconds
Unit – select hours/minutes or seconds
Start Time – Start time when the frequency applies
End Time – End time when the frequency applies
Calendar – Calendar you selected in the step 2 of the job creation wizard
Misfire Instruction – When the job’s trigger condition is missed due to host being down or too busy, this specifies what should happen.
Fire once now – Should fire as soon as possible when the host is back up
Never – should not fire
Smart Policy – It is based on Quartz.Net scheduler definition of smart policy. Please refer this link for details. https://quartznet.sourceforge.io/apidoc/1.0/html/html/db52f1c3-cf33-e58d-55ef-719d9257d753.htm
- If the Repeat Count is 0, then the instruction will be interpreted as FireNow.
- If the Repeat Count is RepeatIndefinitely, then the instruction will be interpreted as RescheduleNowWithRemainingRepeatCount. WARNING: using MisfirePolicy.SimpleTrigger.RescheduleNowWithRemainingRepeatCount with a trigger that has a non-null end-time may cause the trigger to never fire again if the end-time arrived during the misfire time span.
- If the Repeat Count is > 0, then the instruction will be interpreted as RescheduleNowWithExistingRepeatCount.
Priority – Priority associated with the job when trying to execute conflicting jobs at the same time and host is too busy. Higher value of priority jobs will get preference.
Job Data Map – Each trigger for a job can optionally have its own data associated with it in Job Data Map. Job Data Map provided at the trigger level overrides the Job Data Map provided at the Job Level.
Add Alert Rule
You can create alert for Peregrine Job Scheduler using this screen. The user interface for creating Alert rule is same as that described under Alert Management.
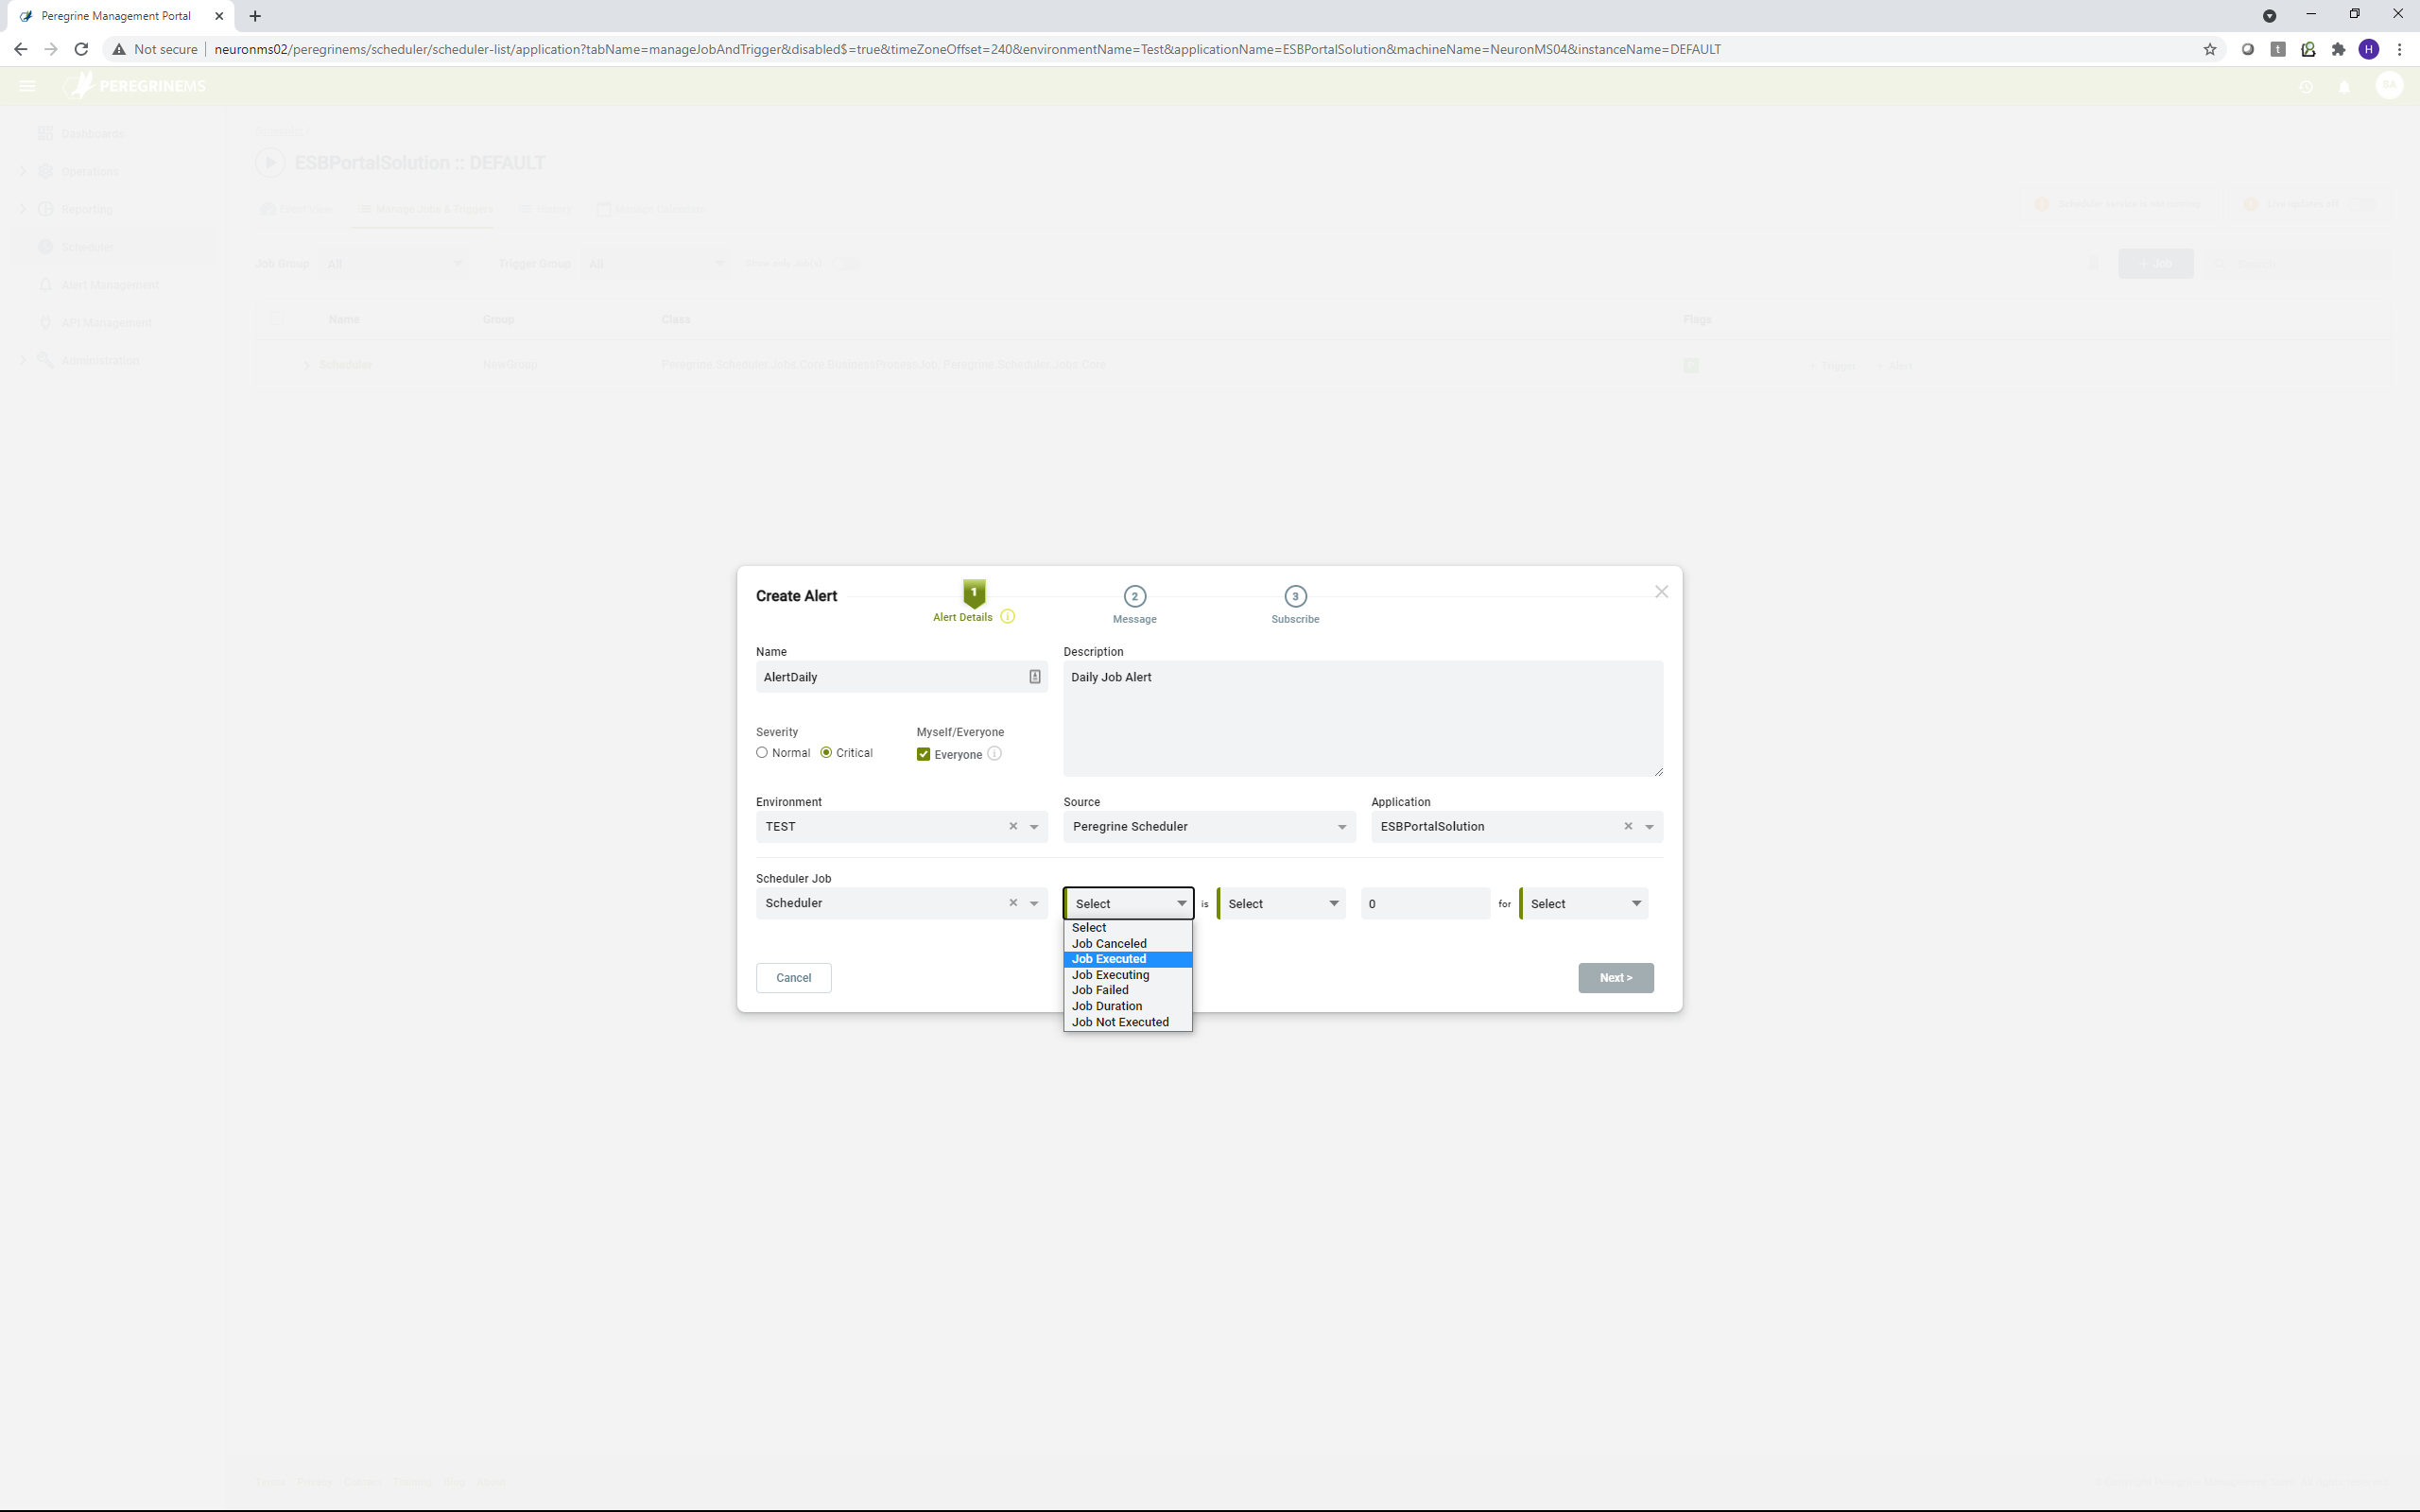
You can setup alerts on counts of Job Executed, Job Cancelled, Job Failed, Job Executing. You can also setup alerts for the Job Duration and duration of Job Not Executed.
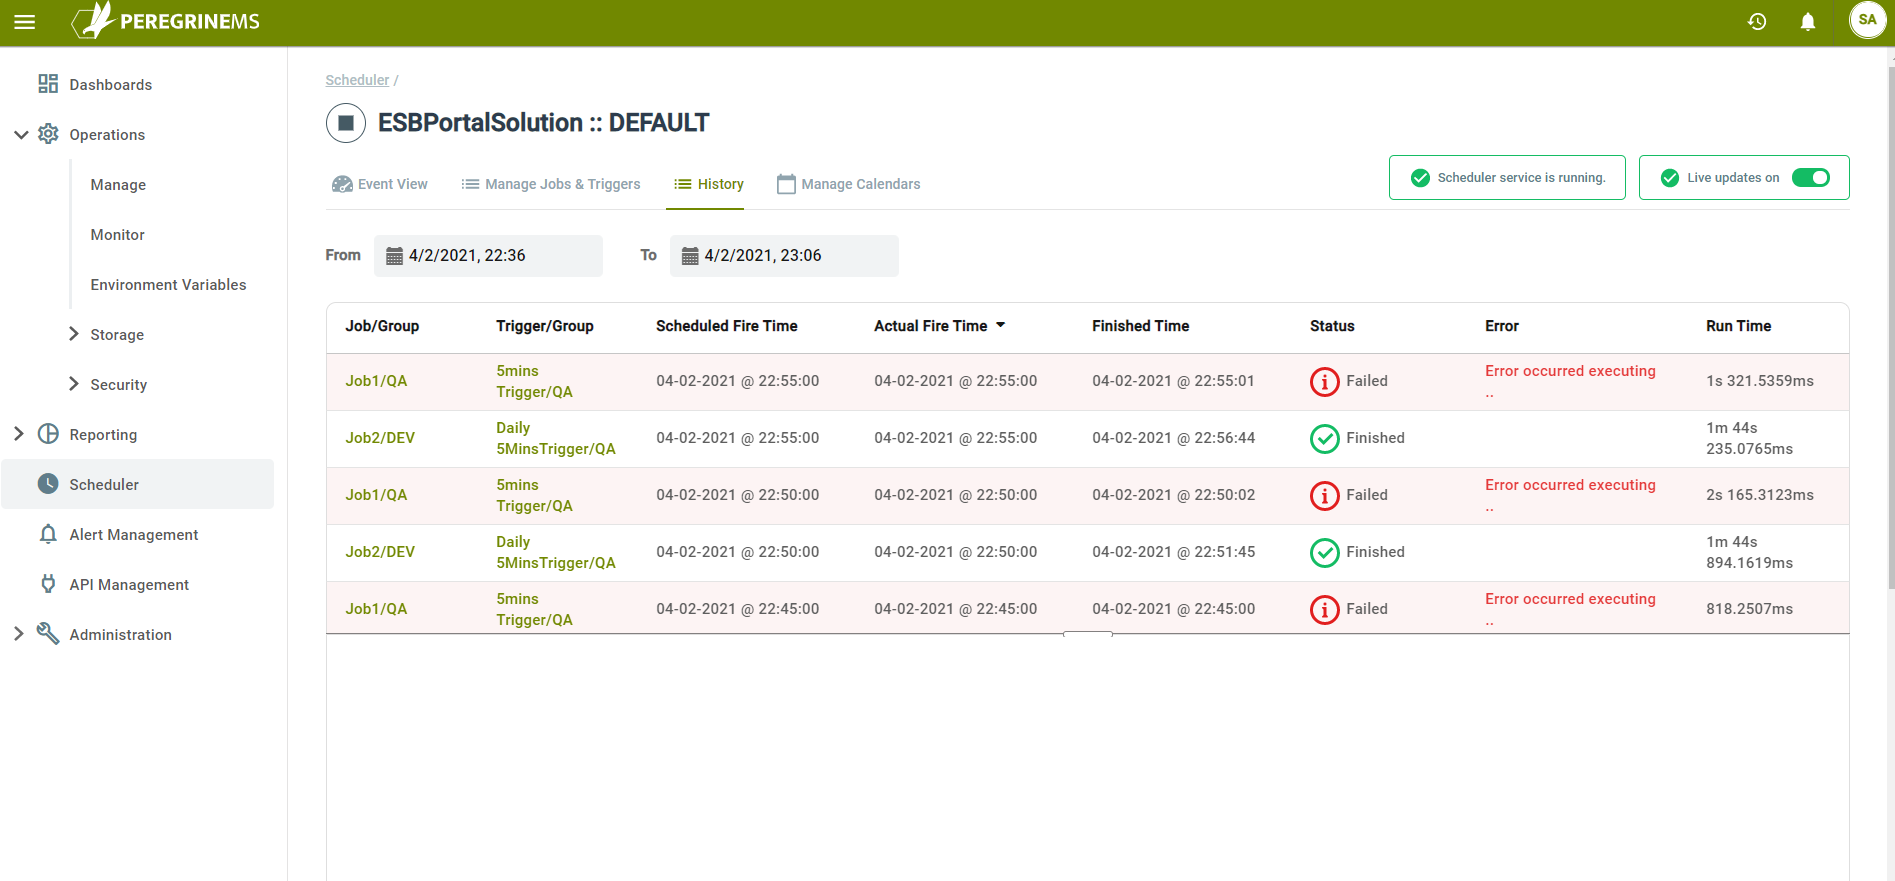
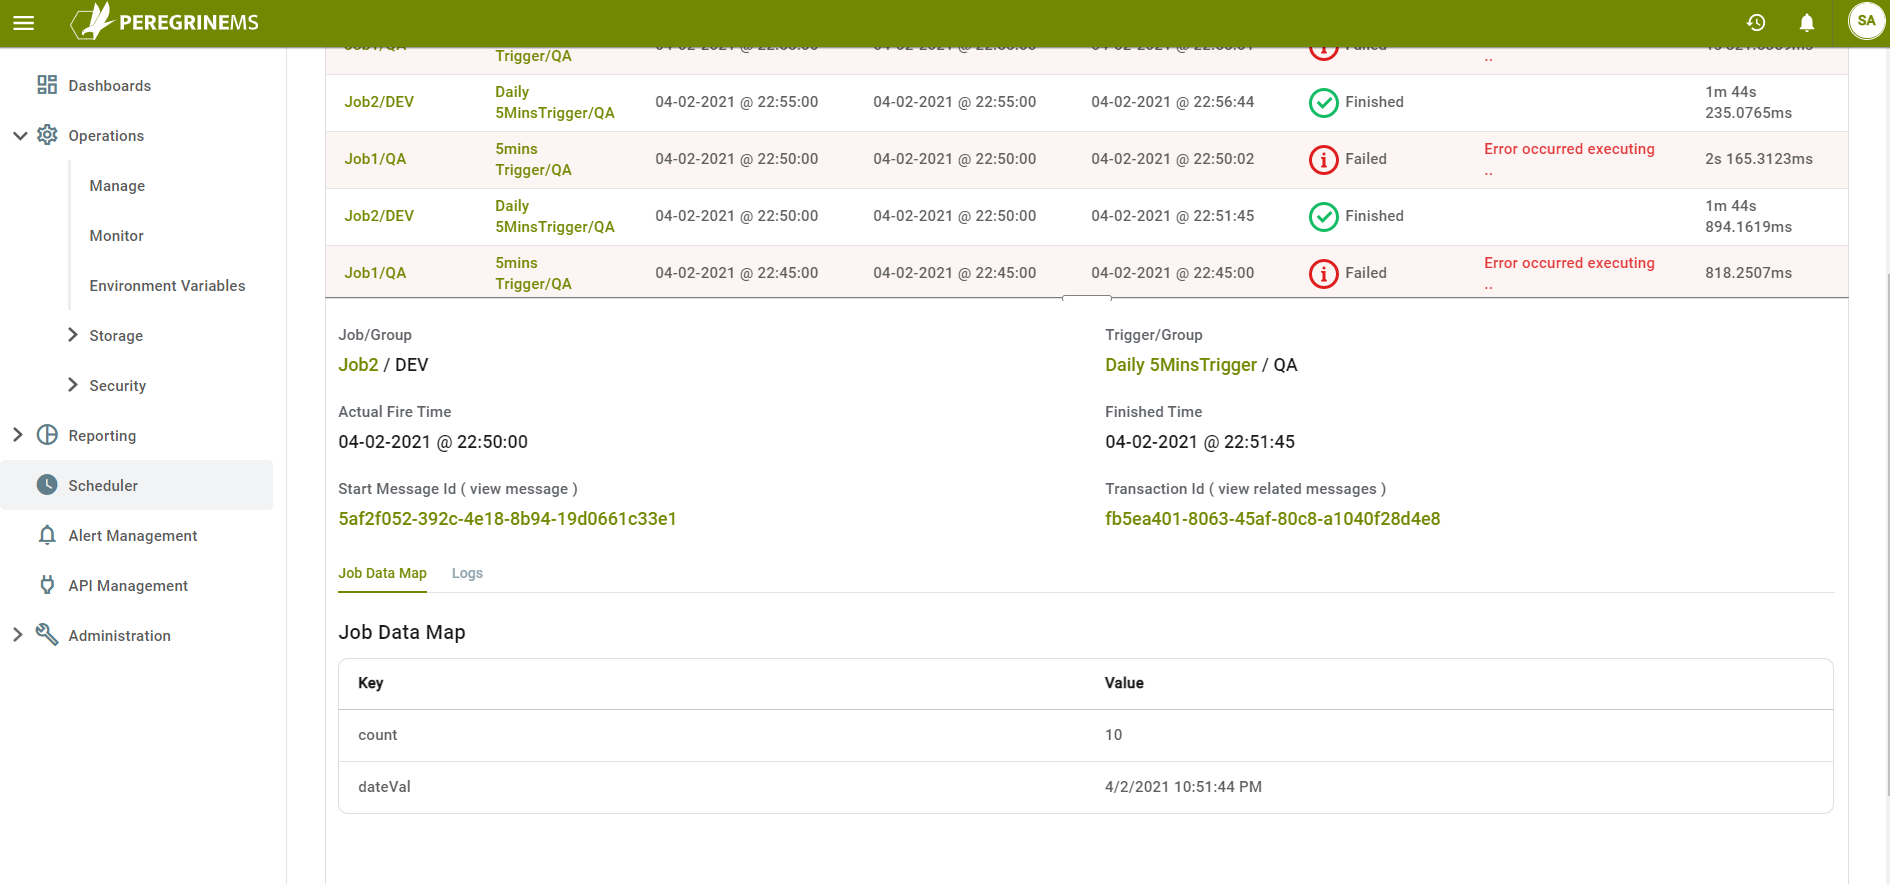
Job Execution History
Job History lists all successful and failed runs for scheduled jobs. You may rerun failed jobs using the Job History. You can also see the data associated with the job execution for the previously executed job instances.
Following screens show the job execution history grid and the details for a failed execution and a successful execution.
Job/Group – Name of the Job and name of the group it belongs to
Trigger/Group – Name of the trigger and name of the group it belongs to
Scheduled Fire Time – The time for firing of the job as per schedule
Actual Fire Time – The time when the job fired. Note that this may be different based on policy and availability of scheduler at the scheduled time
Finish Time – Time when the job finished
Status – Status of the job whether Finished, Failed, Cancelled etc.
Error – If any error occurred during execution, it will show here and details in the details pane below for the selected record.
Run time – Total time taken to run the job
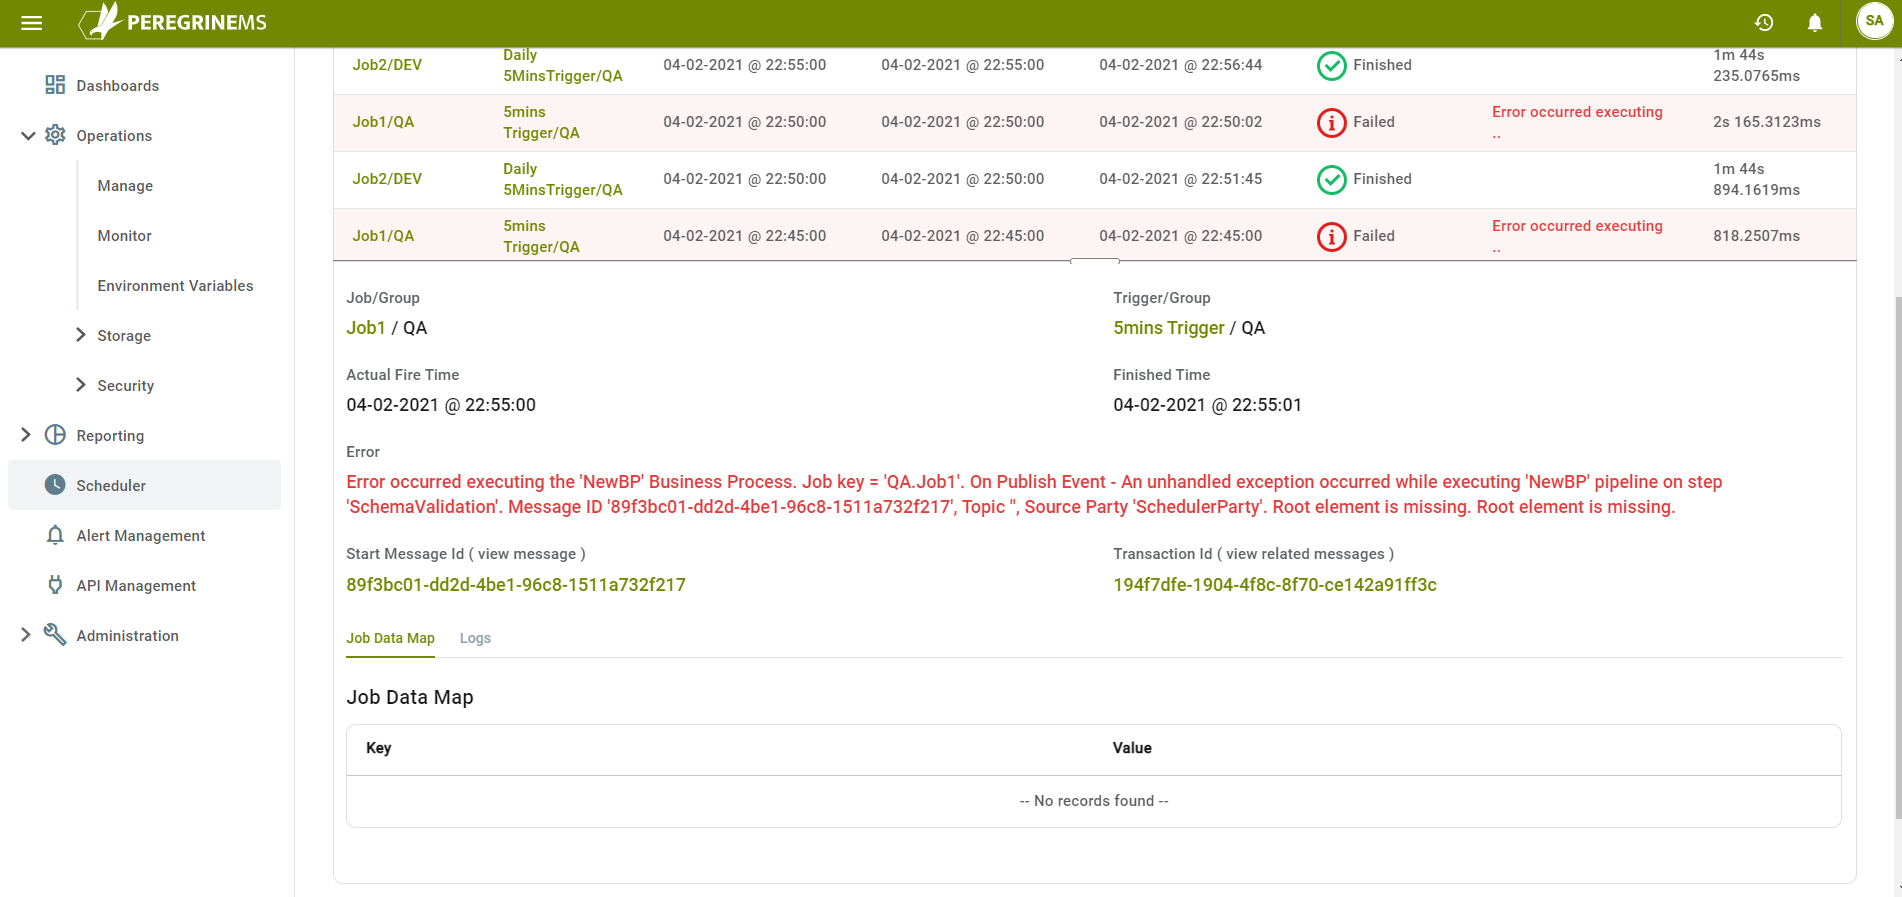
In addition to the above, the detail pane shows the following:
Error Message – If any
Start Message Id – Id with a link to view this message in the message viewer
Transaction Id – Id with a link to view all related messages in this job using message viewer
Job Data Map – Shows the key and value of Job data map.
Logs – Show the actual log entries from the process run using the scheduled job
Note – for description of Message Viewer, refer to the Message Tracking article.
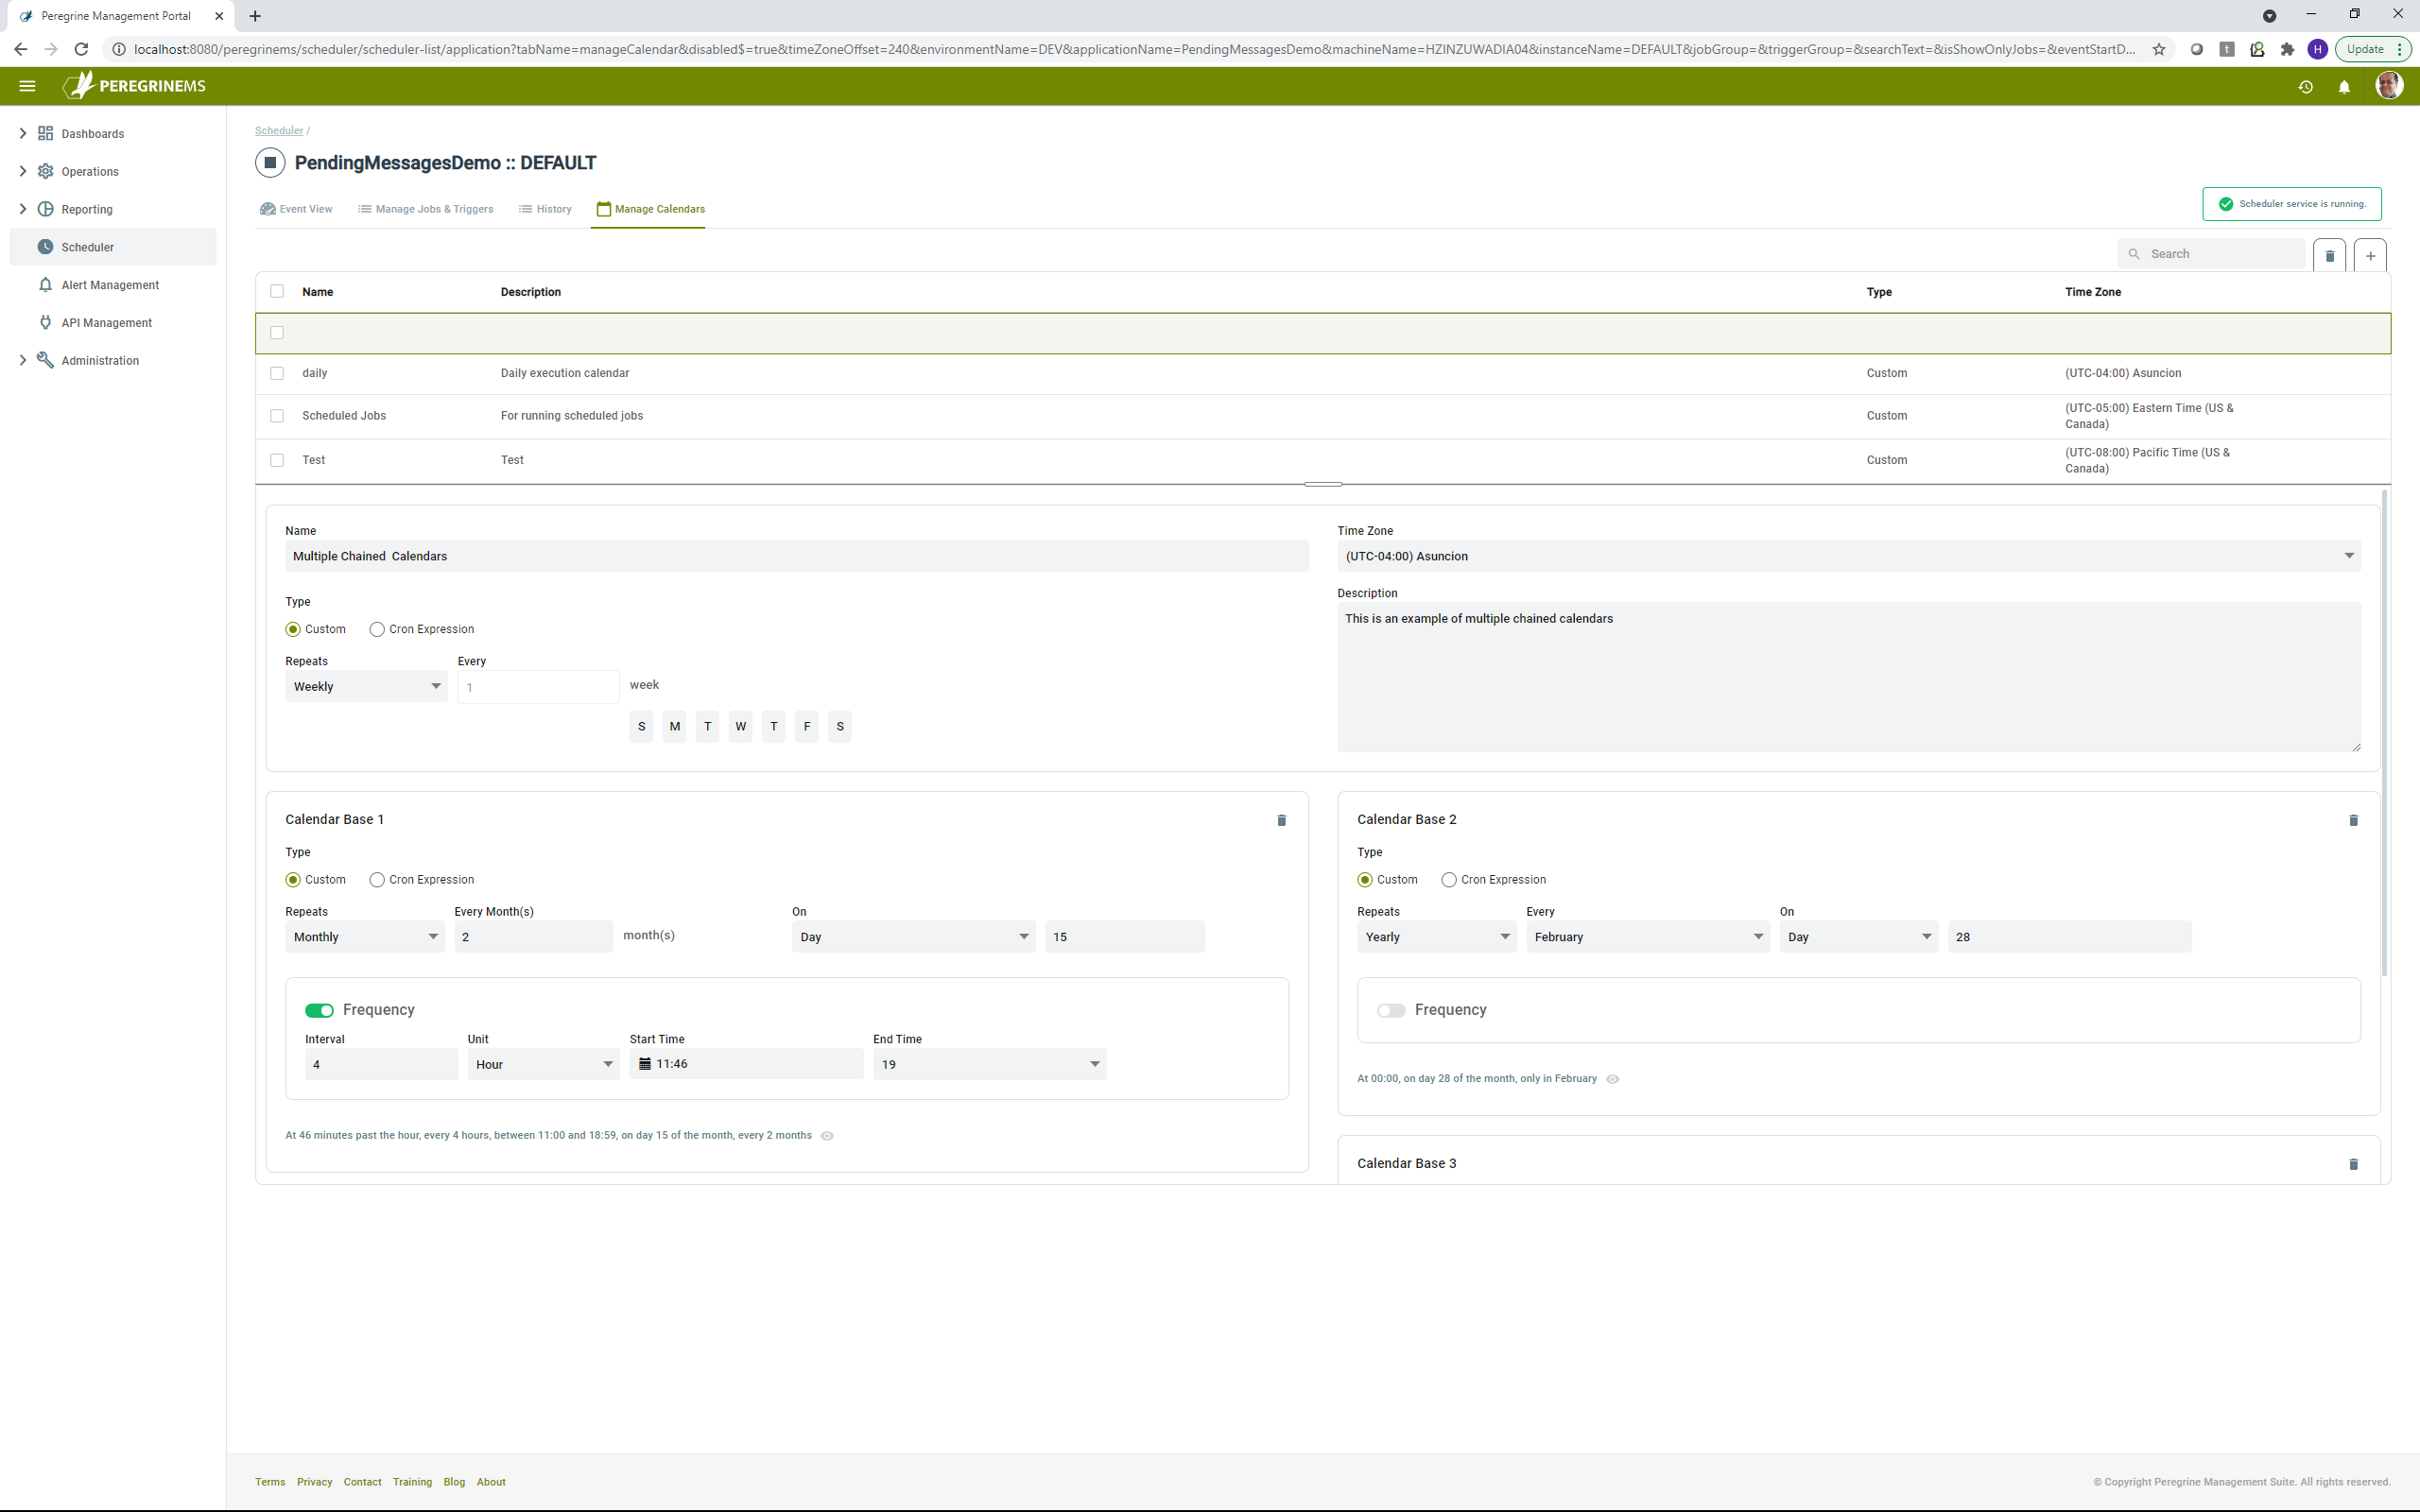
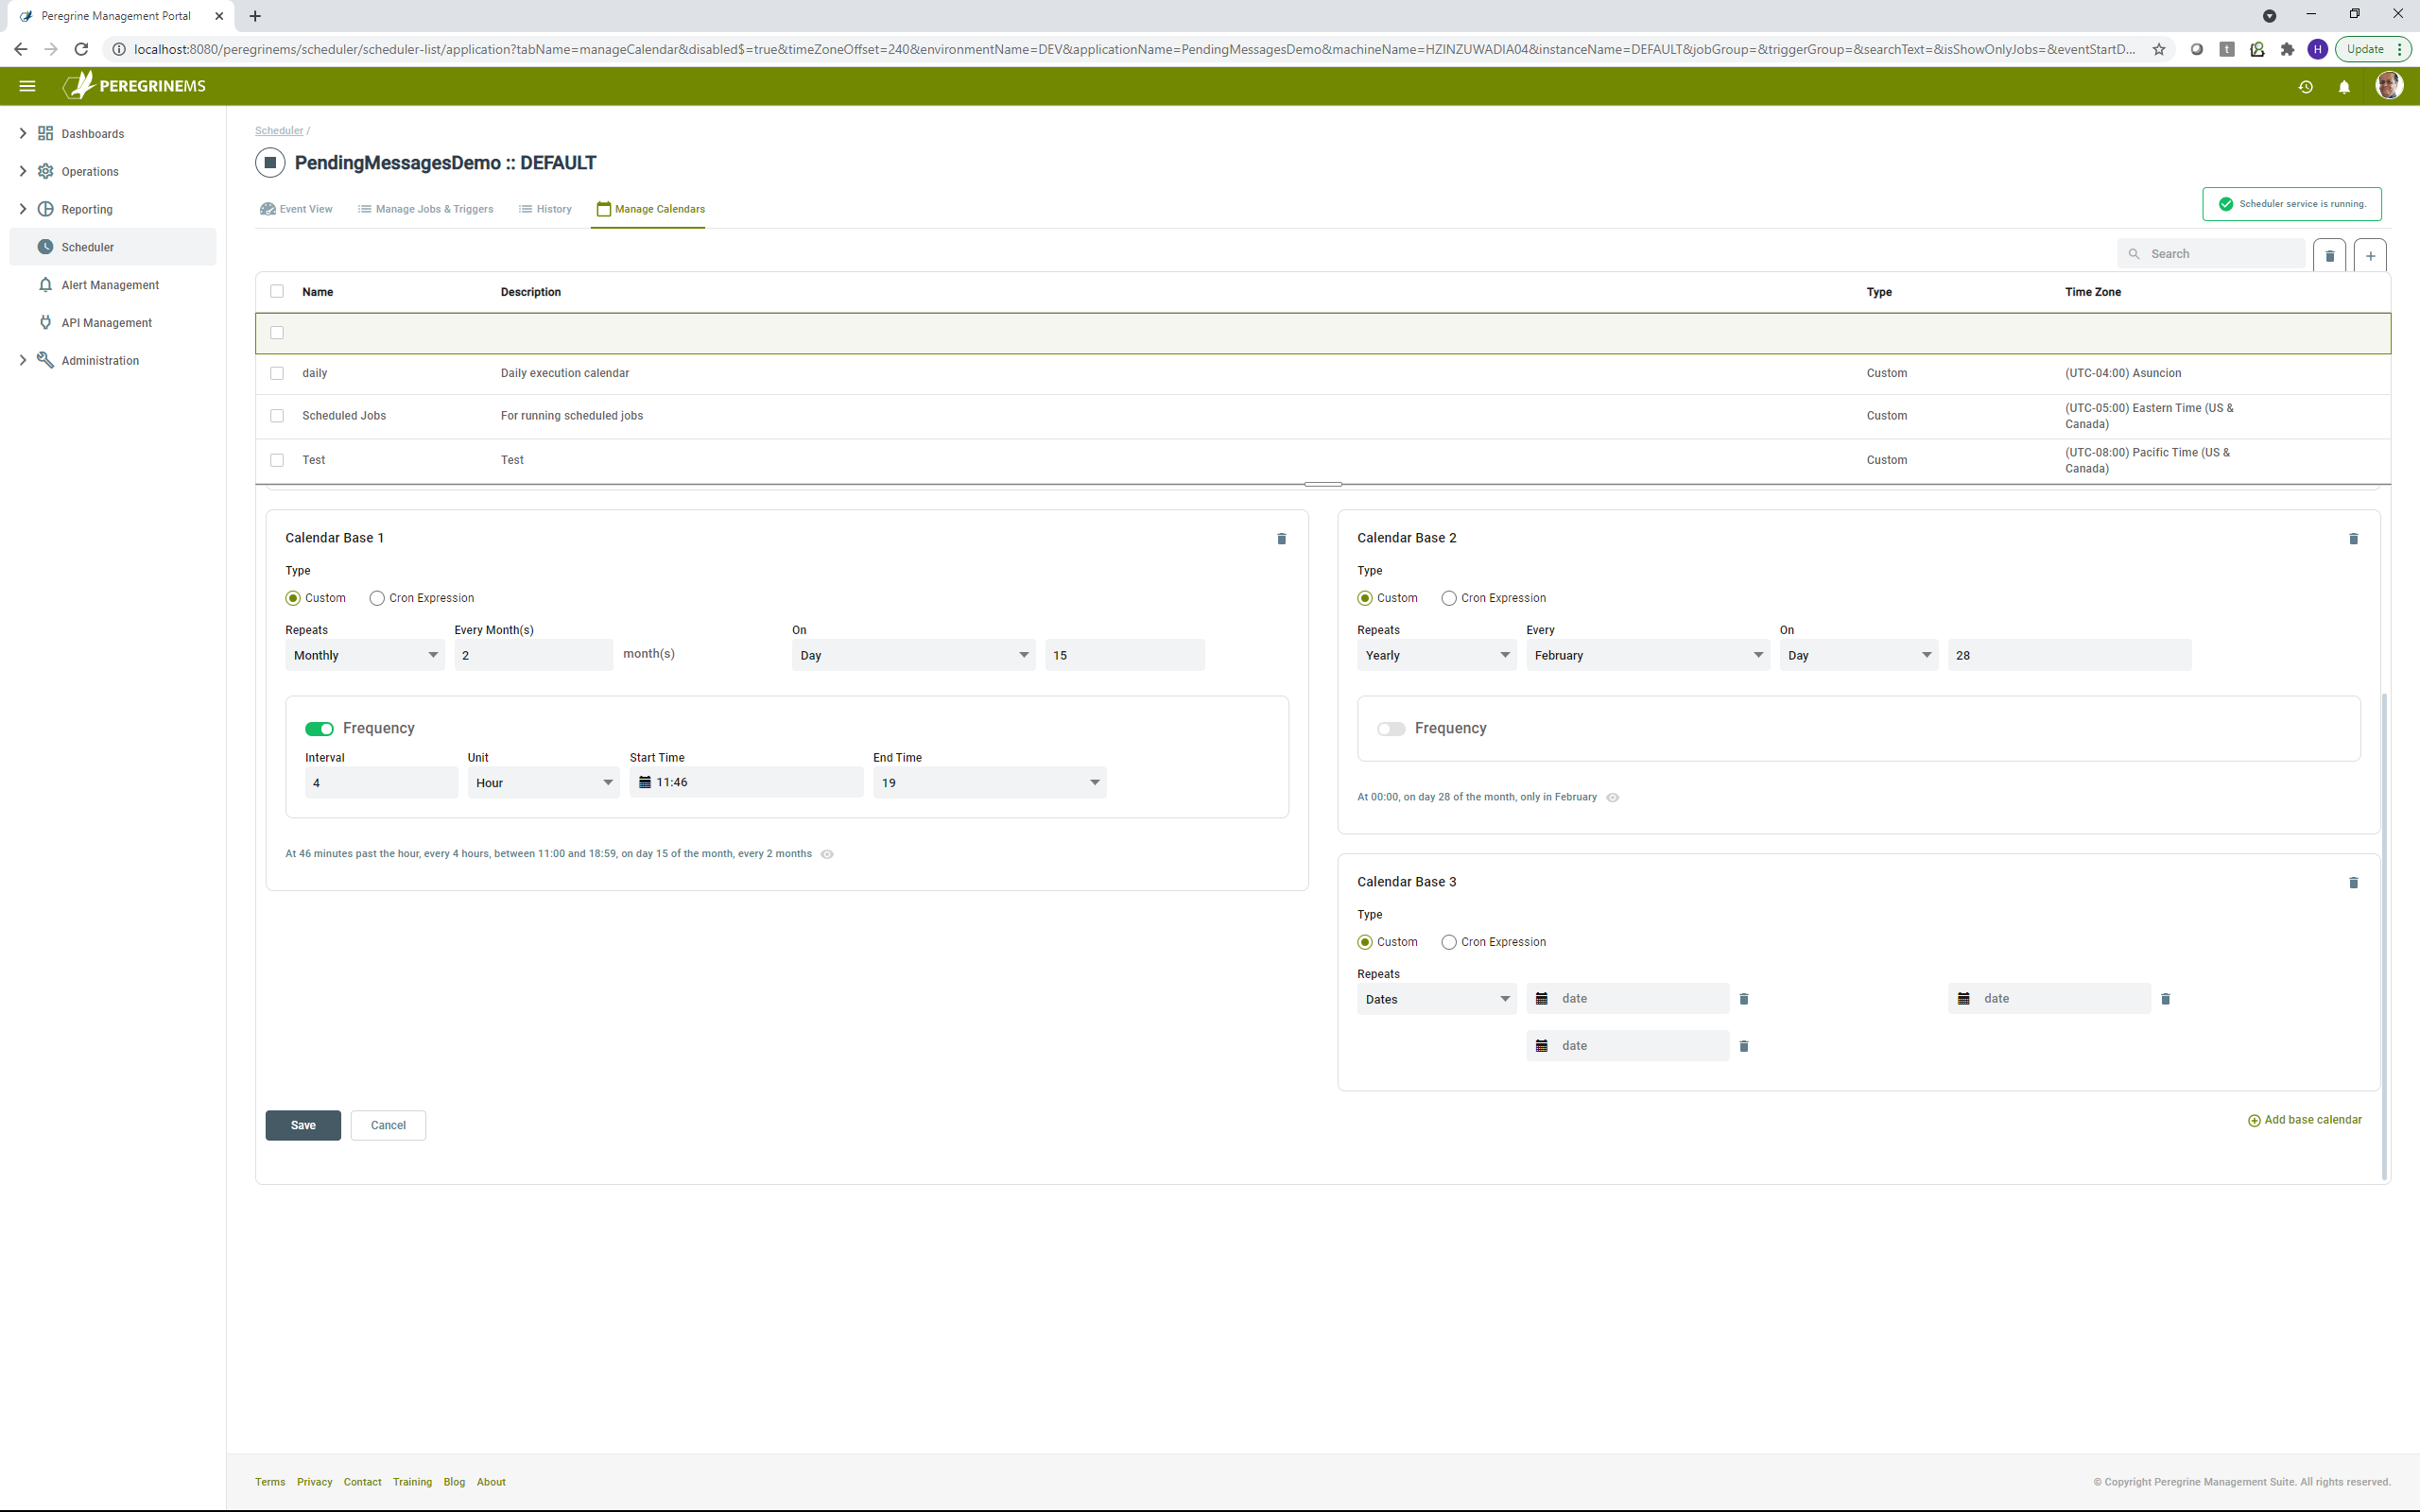
The Management Suite job scheduler is based on Quartz job scheduling system. A unique feature of Quartz job scheduling is the number of different ways you can customize calendars to specify exactly when a job should or should not execute.
Using Manage Calendars, you can create or edit calendars. Each calendar can be chained to any number of base calendars as shown in the screens below.
Name, Time Zone, Description and Type are already described in the previous section.
Depending on type of repeating entry chosen, you can have different ways of excluding time periods such as days of the week in the main calendar. Base calendar base 1 shows further days of month in a monthly repeat. Base calendar base 2 shows further days of year and month. Base calendar base 3 shows days of the year as custom dates to provide for local and regional holidays that do not occur on a fixed date every year.