Appendix B – Remote Environment Setup
When managing remote environments that are not on the same network (such as cloud environments), additional setup below may be required.
Opening Local and Cloud Firewall Ports
You will need to open the following ports (provided you didn’t change the default ports)
51002 (Neuron Discovery), 51005 (EPS Service management port), 9200 (Elastic Search), 5672, 15672 (RabbitMQ protocol and UI ports), 1433 (SQL Server port) if your SQL Server is on the remote VM. File and Printer Sharing Port 445, Power Shell remoting ports 5985 for http and 5986 for https.
You need to open these ports on the cloud firewall (inbound) as well as on the remote machine’s firewall and Peregrine Management Suite Host firewall (outbound).
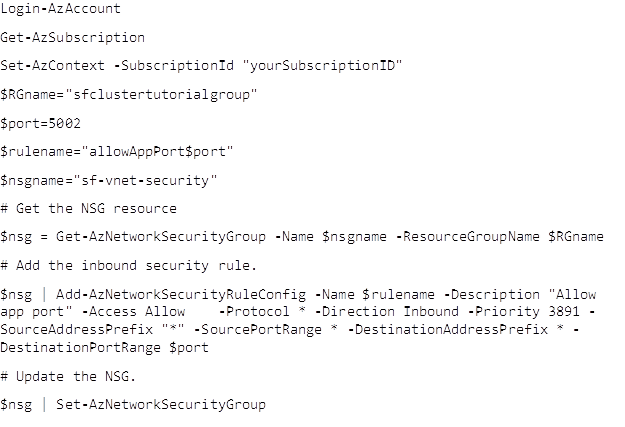
Example PowerShell commands to Open NSG Port on Azure:
https://docs.microsoft.com/en-us/azure/virtual-machines/windows/nsg-quickstart-powershell
https://winaero.com/open-port-windows-firewall-windows-10/
Example PowerShell Commands to open windows firewall port:
New-NetFirewallRule -DisplayName 'My port' -Profile 'Private' -Direction Inbound -Action Allow -Protocol TCP -LocalPort 5002Setting up remote login using local accounts on the remote VM
Run the following command on Elevated Command Prompt. Reboot the Remote VM.
reg add HKLM\SOFTWARE\Microsoft\Windows\CurrentVersion\Policies\system /v LocalAccountTokenFilterPolicy /t REG_DWORD /d 1 /f'Enable PowerShell Remoting
Peregrine MS will try to enable PowerShell Remoting for you if you have opened port 445 as per the above instructions.
To enable it manually, run the following PowerShell Command on the remote VM.
Enable-PSRemoting -ForcePeregrine Management Suite Host DNS Name Setup
Remote machines need to be able to connect to Peregrine Management suite for getting information about the configured environments and to use Peregrine MS as an OAuth and Identity Provider in client connectors. Peregrine Management Suite host needs to have a static IP and a public accessible DNS name for this to work. If you are using a Peregrine MS host with dynamic IP, you may need to use some dynamic DNS provider and free DNS name provider such as Dynu.com and looseyourip.com.
Remote Machine DNS Name Setup
When the remote machine is in cloud, its DNS name will have the cloud provider domain unless you assigned it your domain name. This DNS name will not match the actual machine name.
In that case, you will need to create an entry in the peregrine MS host machine’s windows/System32/drivers/etc/hosts file for the remote machine’s IP address and its machine name (as opposed to the DNS name by which you access it).
Secure PowerShell Remoting
Run the following commands on the remote machine.
$Cert = New-SelfSignedCertificate -CertstoreLocation Cert:\LocalMachine\My -DnsName "myHost"
Export-Certificate -Cert $Cert -FilePath C:\temp\cert
Enable-PSRemoting -SkipNetworkProfileCheck -Force
Get-ChildItem WSMan:\Localhost\listener | Where -Property Keys -eq "Transport=HTTP" | Remove-Item -Recur
Remove-Item -Path WSMan:\Localhost\listener\listener*
New-Item -Path WSMan:\LocalHost\Listener -Transport HTTPS -Address * -CertificateThumbPrint $Cert.Thumbprint –Force
Enable port 5986 in the cloud and remote machine firewall as per the first section in this Appendix
Download the exported certificate and add it to the Peregrine MS trusted Root CA.
Import-Certificate -Filepath "C:\temp\cert" -CertStoreLocation "Cert:\LocalMachine\Root"Note: To use secure PowerShell remoting, the following entry needs to be modified in the file <Peregrine Install Folder>\Deploy\services\installsvc\PowershellScripts\SharedFunctions.ps1
return new-PSSession -ComputerName $computerName -credential $cred -UseSSL -ErrorAction StopNo PowerShell Remoting
If you do not want to enable PowerShell Remoting, you can still use Peregrine MS for monitoring without enabling the Environment. You will need to do the following one-time setup.
Open SQL Server Management studio and run the Following query in the PeregrineHybridDB.
USE [PeregrineHybridDb]
GO
UPDATE [dbo].[Environments]
SET
[IsDisabled] = 0
WHERE Name = <Environment Name>
GO
Update the appsettings.config and NeuronEventProcessor.exe.config files respectively in the Instance Folder and the Neuron Event Process folder under the Neuron Installation Directory. Set the value of key=”NeuronHybridManagementSuiteHost” to the PeregrineMS URL along with Port Number e.g http(s)://myhost.mydomain.com:8080. Set the value of key=”NeuronHybridFeaturesEnabled” to “True”
We will be shipping an Environment Setup/Migration wizard that can automate much of this setup required for Azure Cloud environments using the Azure Automation Agent and PowerShell runbooks.