Marketo Connector
Enable connectivity with the Marketo Connector. Allowing users to interface with marketing data through calls to add/update leads, manage campaigns, run analytics, and track opportunities.
Introduction
Marketing in the brave new services world is different. Marketo excels at on-line Lead Management, email, consumer, customer base and mobile marketing processes for your service based products. The Neuron ESB Marketo adapter enables you to connect to the entirety of Marketo’s Software as a Service product line through your Neuron ESB integration infrastructure. Modernizing your own marketing efforts couldn’t be easier than with Marketo and the Neuron ESB Marketo adapter.
The Neuron ESB Marketo adapter can function as either a publishing or subscribing endpoint to the bus. Using the subscriber model, the Marketo adapter enables connectivity with the Marketo API, allowing users to interface with marketing data through calls such as add/update leads, manage campaigns, run analytics and track opportunities.
Marketo can also Interact directly with Neuron ESB Marketo Adapter via its WebHook feature in Publish mode. Using the WebHook feature, Marketo can send a notification to Neuron ESB. For example Customer Inactivity, Duplicate prevention, Reminders for meetings prior to demo are all publish mode scenarios.
The Neuron ESB Marketo adapter facilitates full bi-directional integration between Marketo and all of your business critical processing systems through your Neuron ESB integration infrastructure.
Before reading this document
If you are not familiar with Neuron ESB Adapters, take a moment to consult our online help: https://www.peregrineconnect.com/documentation-kb/adapter-overview/. This document assumes you have the following knowledge:
- What adapters are and how they are leveraged in Neuron ESB
- Register a Neuron ESB Adapter within a Neuron ESB Solution
- Create an Adapter Endpoint in a Neuron ESB Solution
- Set a Neuron ESB Adapter Endpoint Properties
- Invoke a Neuron ESB Adapter Endpoint
Adapter Registration and Setup
The first step in using the Marketo adapter is to register the adapter in the Neuron ESB explorer adapter registration screen, after which you may create the Marketo Adapter endpoint. Then you may configure the various Marketo related property settings (as shown in the picture below):
Adapter Properties
ClientId: Client ID of Marketo account
Client Secret: Client Secret Key for Marketo Account
Endpoint URL: Marketo Account based Organizational URL, which you will use to interact with Marketo
WebHook URL: A user-defined and locally-hosted URL that the Neuron ESB adapter for Marketo uses to host a connection which receives HTTP requests from Marketo. The WebHook URL must be local to the Neuron installation (i.e. sit on the server that Neuron ESB’s host is running). Therefore, the Neuron ESB server can optionally expose the WebHook URL directly inside the DMZ or could be linked from an external facing load balancer or Proxy through the firewall. Messages sent from Marketo to Neuron will be published to the Neuron Topic that is associated with the Neuron ESB Marketo adapters Publisher Party. You must also configure the WebHook URL within Marketo to point to your external facing service (whether that be the Neuron ESB server itself or a proxy for the server).
Publish Topic: The publish mode Topic of the message that is sent to the bus.
Using Metadata Generation Wizard
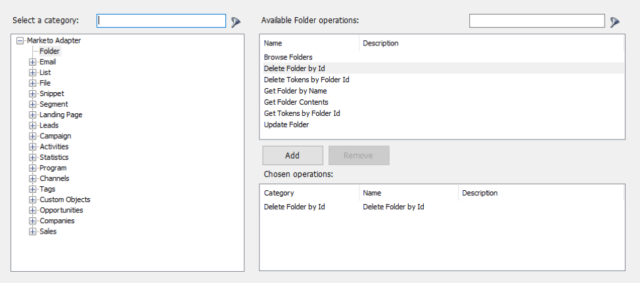
Using the Metadata Generation wizard, you can automatically generate message schema for any desired Marketo REST API call. As shown below, Neuron ESB provides the ability to select Marketo REST API’s from a list.
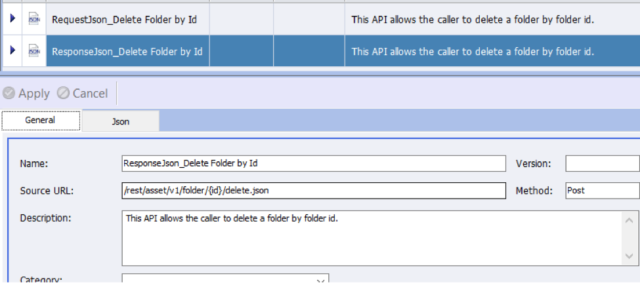
The wizard will create JSON Request and Response documents for the selected operation.
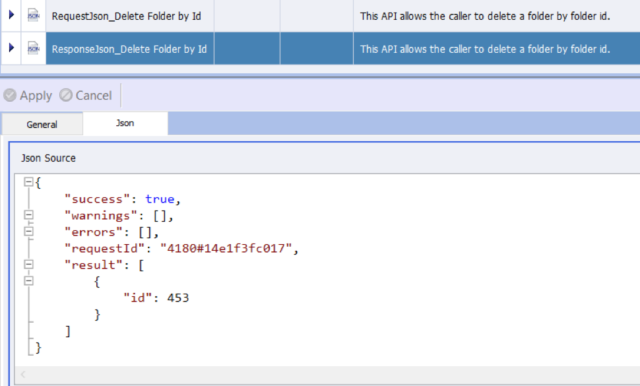
On the JSON tab, you’ll find the response or request document as show below.
You may use this document within the C# Code step in a process or workflow to set the ESBMessage http properties. For example:
Using Http Utility
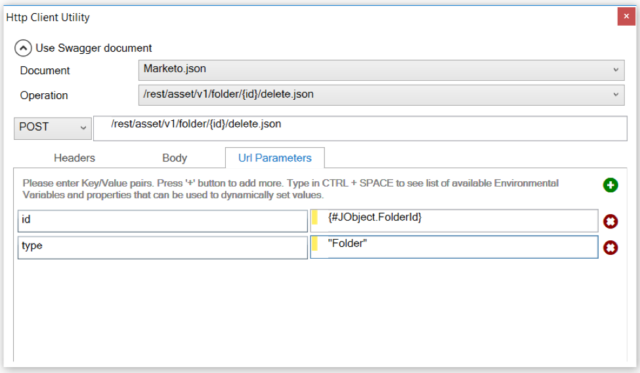
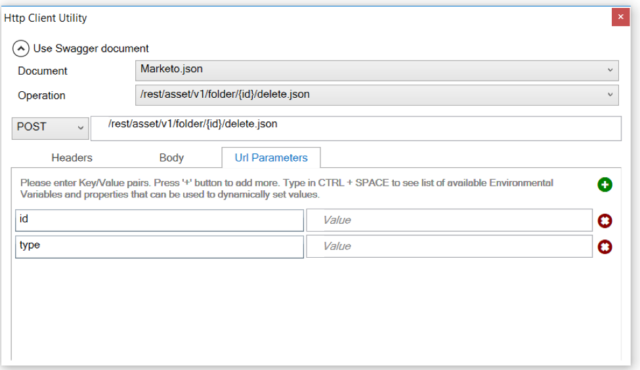
Alternatively, you can use the new “Http Utility” shape in the Process Designer. This HTTP Utility shape supports the selection of a Swagger document and then exposes a list of supported operations. Select the appropriate operation parameters from a dopr list to set up the ESBMessage as shown below:
Adapter Modes
Subscribe Mode
In Subscribe mode, the Marketo adapter receives messages that it subscribes to from the Neuron ESB message bus. The subscriber is chosen from the drop down menu on the General tab of the adapter endpoint. The adapter sends its subscribed messages on to Marketo. Each message must be properly formatted JSON (the Metadata Generation Wizard and/or HTTP Utility process step are useful here). In subscribe mode no reply messages from Marketo are expected.
Solicit Response Mode
In Solicit Response mode, the adapter will listen for messages sent over the bus to the topic chosen and expect a response back from Marketo. The semantic should be “request” for the message subscribed from the bus. Marketo will automatically send back a response to the message containing information about the message such as error codes or the actual message body that was sent.
Publish Mode
In Publish mode, the Marketo adapter will receive messages sent from Marketo to the WebHook URL that corresponds to that set up in the Marketo configuration. Once a message is received, the adapter will publish it to the Neuron ESB message bus. See WebHook URL under “Adapter Registration and Setup” for more information about how to use the WebHook URL.
Request-Reply Mode
Just as with Publish mode, in Request-Reply mode the Neuron ESB Marketo adapter receives messages from Marketo that are sent to its corresponding Marketo WebHook URL. The difference is that Marketo expects a reply from adapter. The adapter waits for the reply to be sent back on the bus and then it will forward that reply back to Marketo. The message that is originally sent to the user’s Marketo WebHook URL will have a “request” semantic. The message that is sent back from the subscriber should use the “reply” semantic.
Read more about Peregrine Connect
-
Rabbit MQ Topics
Marketo Connector Enable connectivity with the Marketo Connector. Allowing users to...
-
Port Sharing
Marketo Connector Enable connectivity with the Marketo Connector. Allowing users to...
-
The Integration Journey to...
The Integration Journey to Digital Transformation with Peregrine Connect
-
Saving Time and Money by...
Neuron ESB Application Integration and Web Service Platform: A Real-World Example...
-
Neo PLM
Marketo Connector Enable connectivity with the Marketo Connector. Allowing users to...
-
Loomis Case Study
Loomis Chooses Peregrine Connect as Their No/Low-Code Integration Platform:...
-
Decision Test Data Mapping
- Use decisions to drive the execution of...
-
Map Testing
Learn how to utilize FlightPath's testing functions...

