Overview
Delivering Integration solutions is difficult. With long delivery cycles, complex and changing requirements the chances of success for that project go down dramatically. What if we could deliver faster and safer to attack this problem head on? DevOps has grown from the simple concept of merging the development and operations aspects of software, traditionally in conflict, to fundamentally shift how we deliver Integration solutions. DevOps brings a strategy focused on delivering software at a rapid pace with safety and consistency.
This guide walks you through the setup of DevOps Pipelines for Neuron ESB Solutions and details how your developer can be more successful in achieving the best possible outcome in delivering Integration projects in an Agile environment.
DevOps Pipeline Design Guidelines
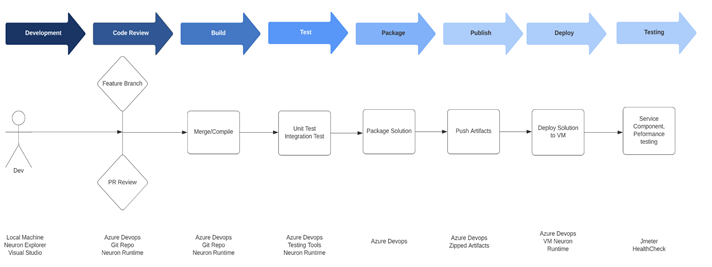
The below diagram depicts an effective and typical DevOps Lifecycle on delivering integration assets in lower/upper environments.
Developer Local environment
- Developers writes code in their feature branch locally. Developers push their code to the remote feature branch daily even if his work is not complete.
- Developers will have all necessary software/tools to perform local testing before finishing their task
- All code check-ins must have unit tests
Feature Branch build
- DevOps will automatically run compile/test once a feature branch is created in the remote repository.
- DevOps will push this information back to git branch and will be visible with the commit message
- This will only compile and test, it will not publish changes to Artifactory or any other environment
- A successful build is one of the criteria for a PR to be eligible for merge
- Developer will get a notification through email/Integrated Messaging system for a failed build
- There will be no direct check in to the master/develop branch ever.
Pull Requests/Peer Review
- All Check-ins should follow best practices laid out in the document
- Pull requests will be raised frequently for small changes.
- All team members will be added for review of pull requests. All parties who have a stake in the feature will also be invited for review.
- Anyone can review a PR
- A minimum of 2 reviewers should approve the PR for it to be eligible for merge.
- Developers are responsible for fixing all merge conflicts and ensuring PR is a clean merge eligible
- Reviewers should put all of their comments/thoughts on the PR in the Bitbucket UI itself, if a side discussion is needed a comment will be added about it before or after the discussion. (E.g. “We had a F2F review for this portion of the code and these are the discussion points/action items.”)
- Notifications should be enabled (email/Hipchat) for all PR actions (comments/approval/merges)
- PRs for large code changes should be raised early with “WIP” (Work in Progress) label to enable early discussions
- All code merges to develop will be considered “Production Ready” and should be thoroughly reviewed before approving
- Once PR is approved and PR build is successful, it can be merged either by the one who raised the PR or a designated team member.
Build Stage
- Azure DevOps is our chosen build tool
- DevOps will fetch changes directly from git branch through webhooks (Push from git) as trigger to start the build
- The server running Azure DevOps will have all the tools installed and configured for compiling the build
- Failed builds for feature branches will have notifications enabled
- Critical builds like master branch build will have notifications for start/success and failures
Test Stage
- Azure DevOps will be used to run unit and integration tests
- Azure DevOps will be used to trigger quality gates (Sonar)
- All test results will be published in one tool (Sonar)
- Builds will be failed for any unit/integration test failures (Zero tolerance)
- Builds will fail if it does not meet required quality thresholds (E.g. 0 Critical issues, 80% code coverage etc.)
- Build failure notifications will include brief stats about tests
- There will be no compromise on tests. No bypassing of testing for critical time dependent changes.
Package
- Build package will be generated by Azure DevOps
- Code for package generation will be provided by the development team
- Package should only include necessary binaries and config files
- All provided libraries should be excluded from package
Publish
- Only develop and master branch builds will be published to Artifactory
- All builds from develop branch will be snapshot builds and will not be tagged
- All builds from master branch will be release builds and will have incremental version numbers
- At this stage, the build version will also be tagged back to Bitbucket for tracking purposes
- All deployments should fetch artifacts from antifactory and not Azure DevOps or any local copy
CI Environment
- There will be a dedicated CI environment for initial automated integration/functional testing
- This will be a scaled down production-like infrastructure
- All applications necessary for project will be installed in this environment automatically after a successful build
Ready for Deploy
- After all tests are complete, package will be marked as Ready for Prod in the configuration document with all compatible versions in the whole system
- This Ready for Prod version will be used for creating test environments as well
- No changes will be made to package/configuration after this stage for use in any environment including production
- If there is a change required, the whole cycle starts from the beginning
Functional Test
- Automated functional test will be executed on the CI environment
- This FTS will include all critical paths tested at the minimum and can include any regression items deemed important.
- Functional test can also be a smoke test for every deploy + Full suite test which is invoked nightly.
- This functional smoke test should run for less than 5 mins to keep the pipeline moving fast
Performance Test
- There will be a scaled down version of performance test executed in CI
- Only application performance will be tested here and not network latency etc.
- This performance test will run for less than 5 mins to keep the pipeline moving fast
Setting up Azure DevOps
This section will walk you through creating and setting-up an Azure DevOps project. If you do not have an Azure DevOps account, follow these steps to Sign up, sign in to Azure DevOps. Once you have an Azure DevOps account you will also need to add an organization. An organization is how you manage a collection of projects in Azure DevOps. Follow these steps to Create an organization or project collection.
Create a new Azure DevOps Project
When you navigate to your organization at https://dev.azure.com/<organization_name>, you are prompted to create a new project. An organization can have multiple projects and each project can have multiple source control repositories. A typical Neuron ESB solution usually includes the Neuron ESB configuration, custom adapters, and custom business process steps. When designing your source control solution, you can choose to include all Neuron ESB solutions in a single Azure DevOps project or to separate the assets across multiple projects. For example, if you have two Neuron ESB solutions, the assets for each solution can each be in their own project, in a single project across two repositories, or a single project with one repository.
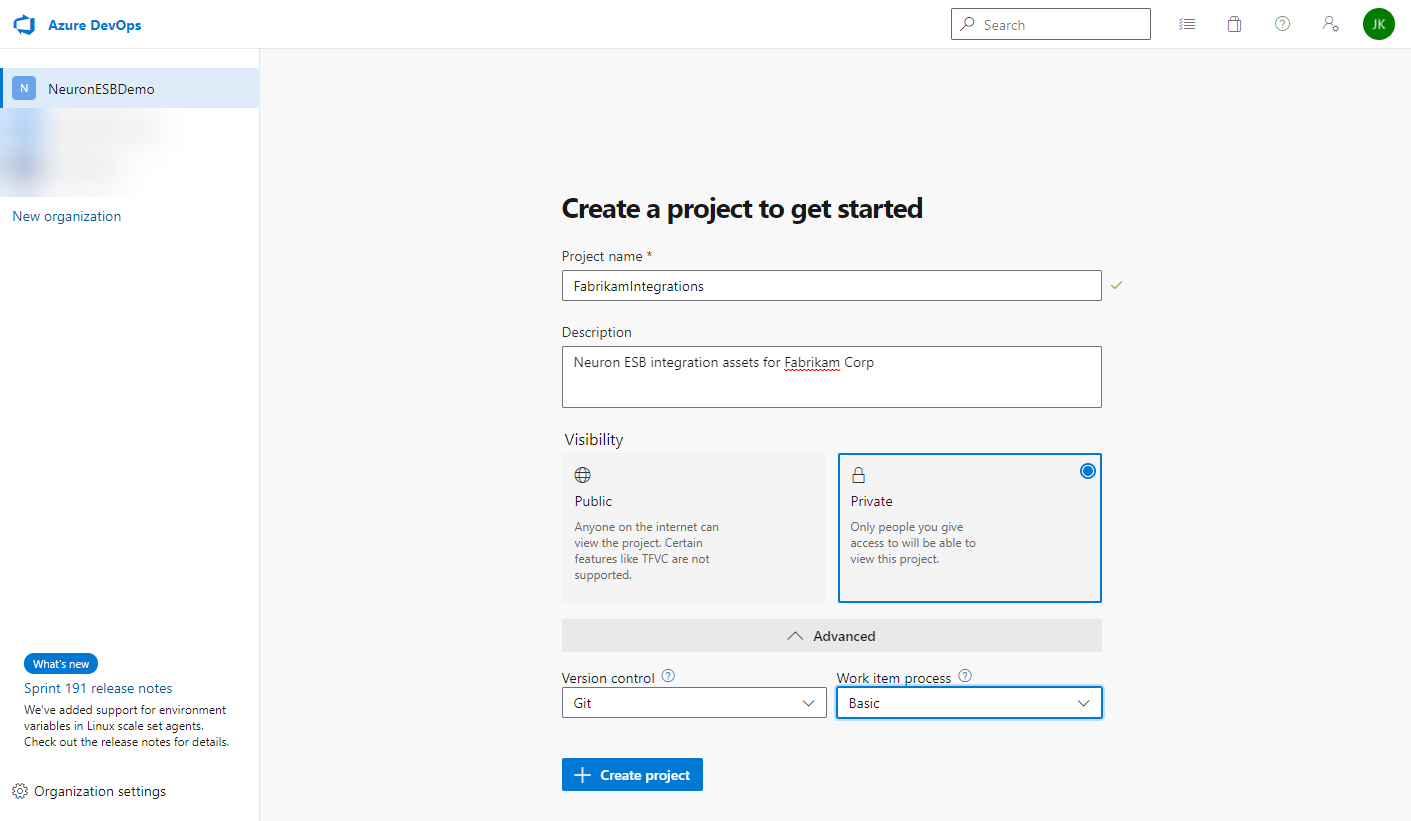
To create a new project:
- Enter a project and description
- Set the visibility to Private
- Set the version control to Git
- Set the work item process to match your company’s business needs
- Click the Create Project button:
For more information on setting-up and configuring projects in Azure DevOps, click here.
Create the Neuron ESB Solution Git Repository
The first repository you create will contain the Neuron ESB solution.
To create a new repository:
- From the repo drop-down, click New Repository:

- In the Create a new repository dialog, verify that Git is the repo type and enter a name for your new repo. You can also add a README and create a .gitignore for the type of code you plan to manage in the repo. A README contains information about the code in your repo. The .gitignore file tells Git which types of files to ignore, such as temporary build files from your development environment. Even though this repo will contain a Neuron ESB solution, if you plan to manage the repo with any third party tools other than Git command-line tools (i.e. Visual Studio), add a .gitignore for that tool.
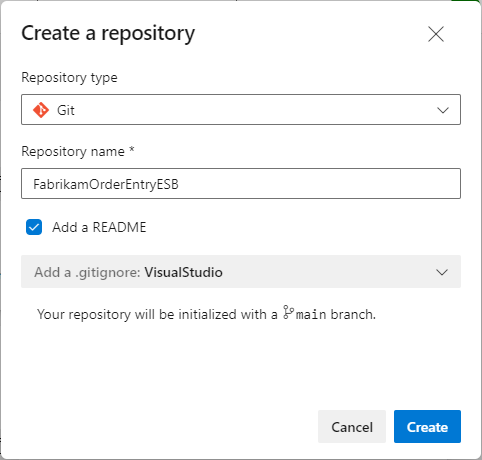
- Click the Create button.
Once you’ve created a repo, you can setup policies for the main branch. For example, you can require a minimum number of approvals before pull requests can be completed. You can also require pull requests to have a linked work item for traceability.
To set the branch policies:
- Verify the new repo is selected in the repo drop-down.
- Click Branches from the left navigation menu.
- Click the ellipsis button to the right of the main branch.
- Select Branch policies:

- Turn on the option for Require a minimum number of reviewers and set the minimum number of reviewers required.
- Turn on the option for Check for linked work items and whether they are required or optional.
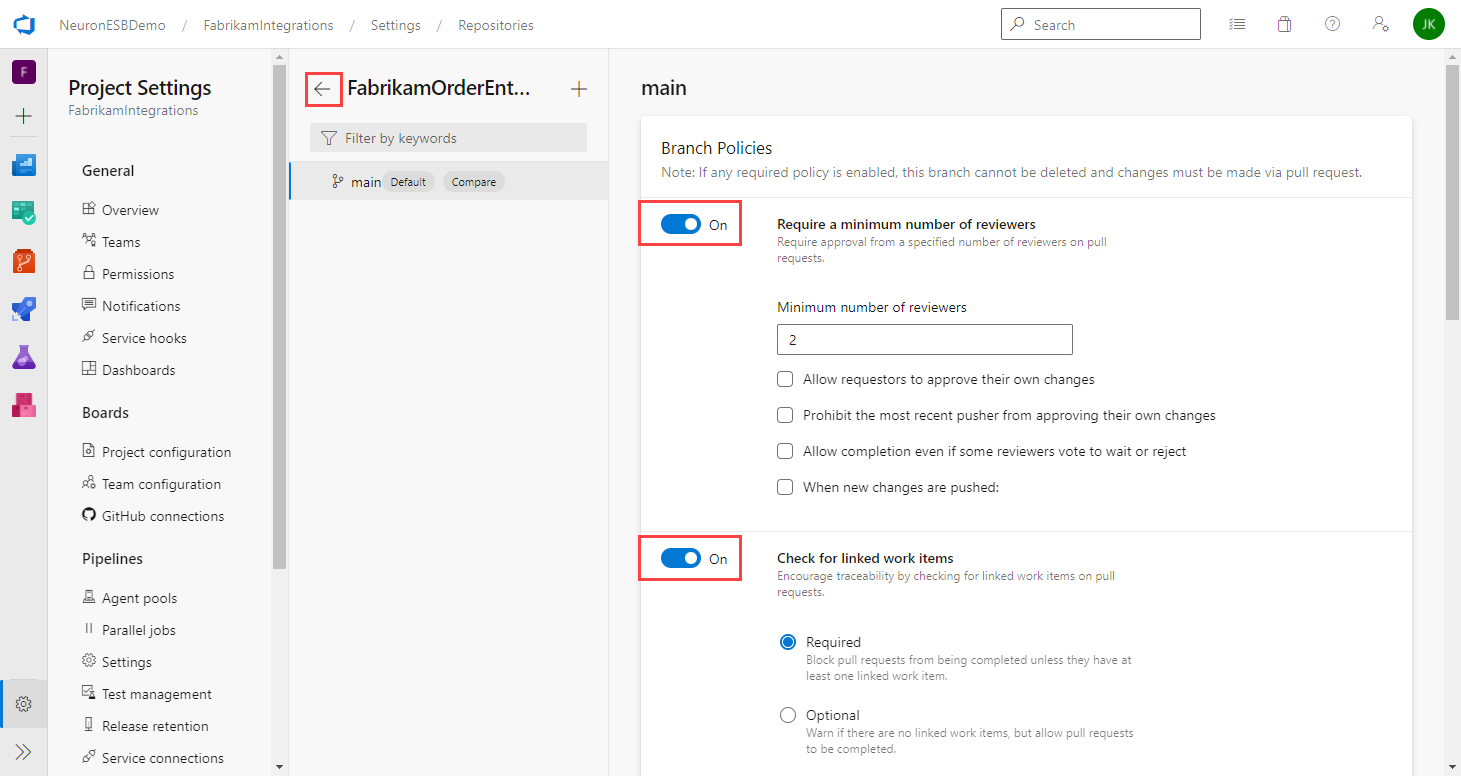
- There isn’t a save button. Just click the back arrow next to the branch name.
Neuron ESB Development
This section focuses on the steps to create a Neuron ESB solution and adding it to the Azure DevOps repository you created earlier.
Clone the Repository
To close the repository to the local development machine:
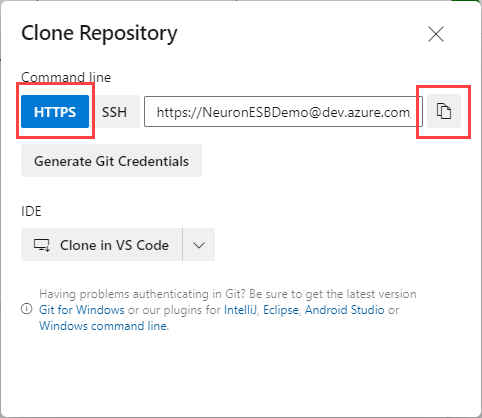
- Navigate back to Repos, verify the Neuron ESB solution repo is selected and click the Clone button.

- Click HTTPS, then the copy button to copy the repo URL to the clipboard.
- Open a Git command prompt.
- Navigate to the folder you want to store your Neuron ESB solution folder. For example, C:\NeuronESBDevelopment.
- Type the following command to clone the Git repository:
git clone <URL copied in step 2>
For example:

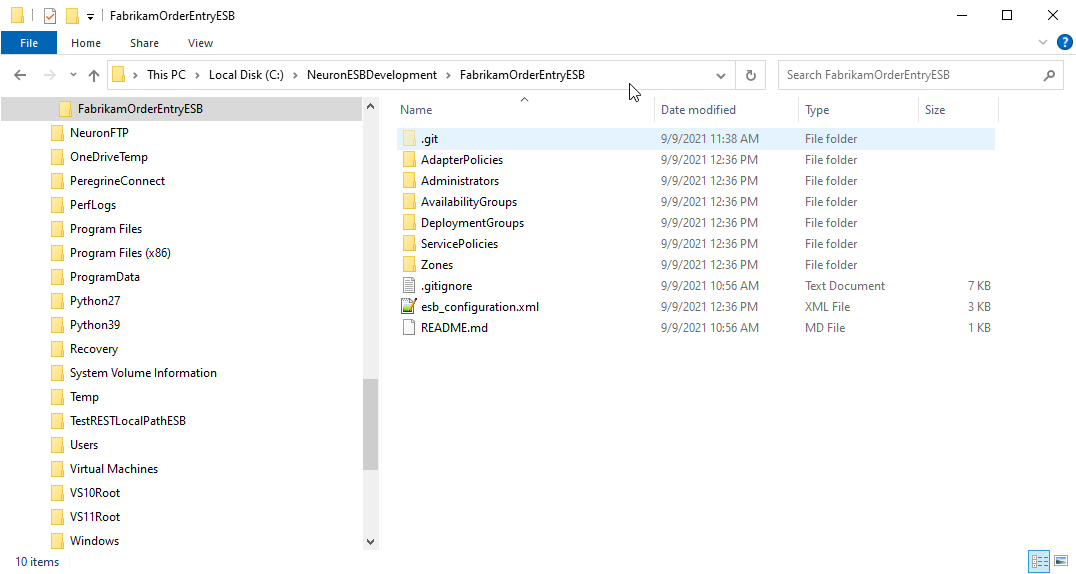
- A folder will be created with the same name as the repo created in Azure DevOps.
Create a Feature Branch
There are various branching strategies you can use for development. Some of the most common one are documented here. For this paper we will use feature branches with the naming convention “feature/feature-name”.
- In the Git command prompt, navigate to the repo folder.
- Create a feature branch using the following command:
git branch “feature/feature-name”
For example:

- Checkout the feature branch using the following command:
git checkout “feature/feature-name”
For example:

Save Neuron ESB Solution
After you checkout the feature branch, you can save (or copy) the Neuron ESB solution to the repo folder. If you haven’t created the Neuron ESB solution yet, open Neuron ESB Explorer and create a new solution. Click File->Save As and save the new solution to the repo folder.
If you’ve already created the Neuron ESB solution, copy or move it to the repo folder:
Commit and Push Changes
At any point during development, you can commit and push your changes to the feature branch. To commit the changes, use the following commands from the root of the repo folder:
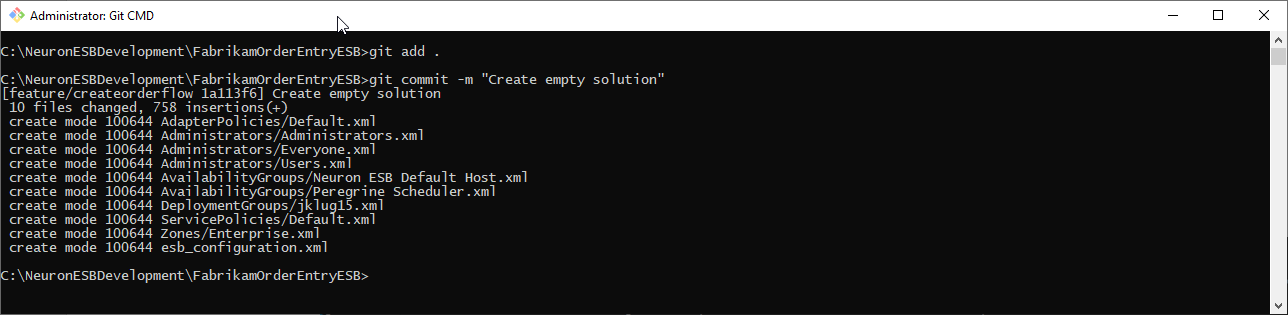
git add .
git commit -m “<commit comments>”
For example:
After committing the changes, you push them to the remote repository. Use the following command to push the changes:
git push -–set-upstream origin feature/feature-name
For example:
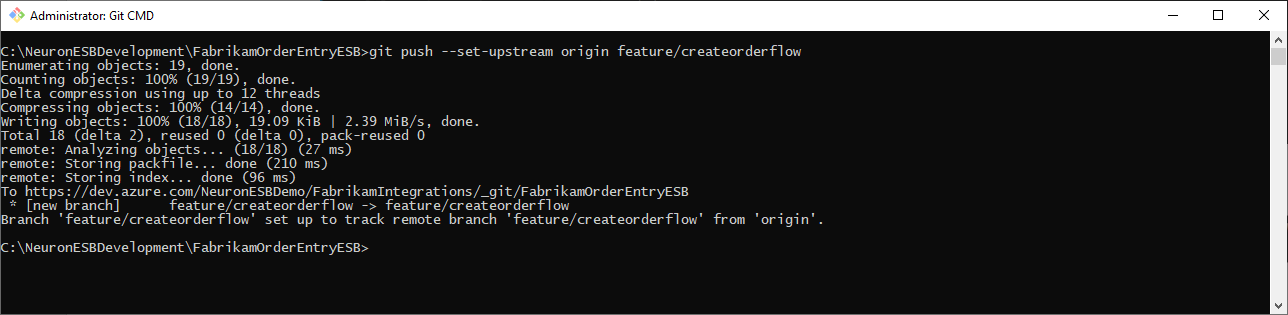
If the push was successful, you will see the branch in Azure DevOps repo:
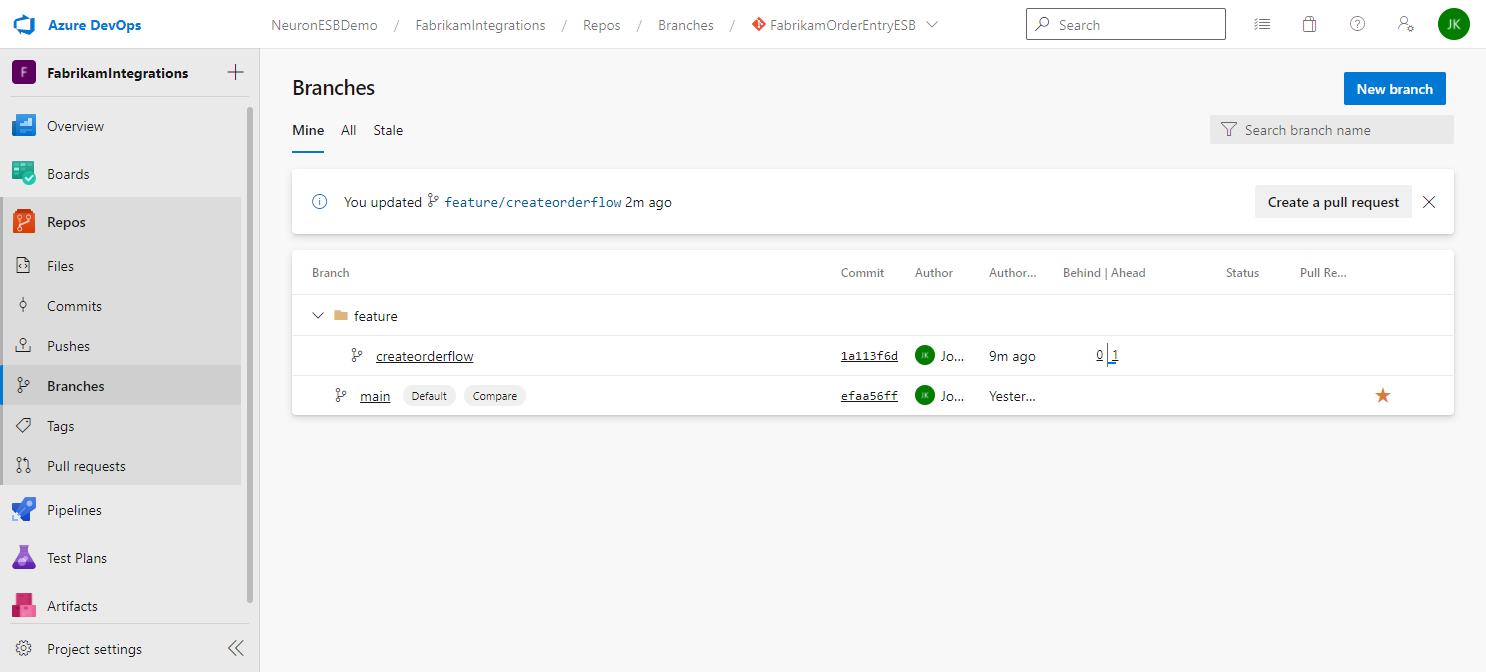
You can repeat these steps as often as you feel is necessary to push changes to your feature to the remote repository. The changes aren’t merged into the main branch until you complete a pull request.
Merge Changes to First Branch
To merge the changes into the main branch, create a pull request in Azure DevOps. For more information on pull requests in Azure DevOps, click here.
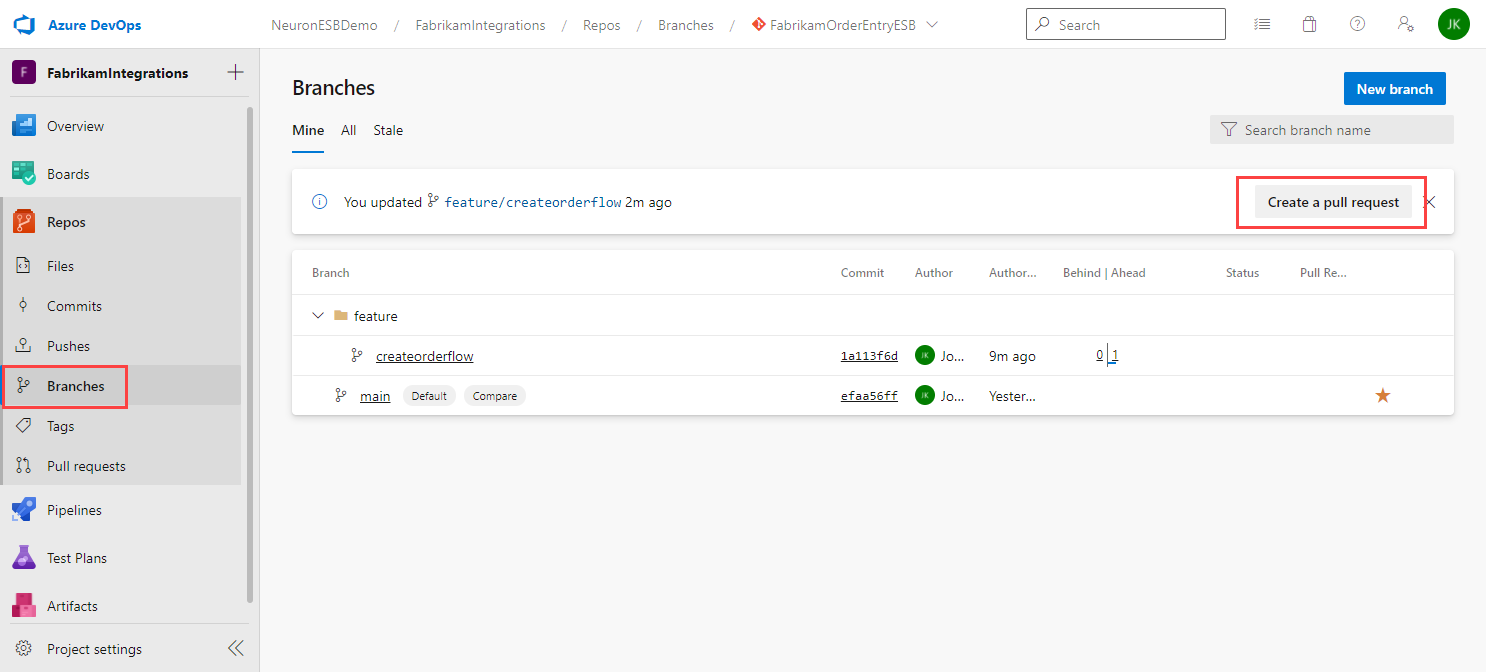
- In Azure DevOps, navigate to Branches in your repository.
- Click Create a pull request
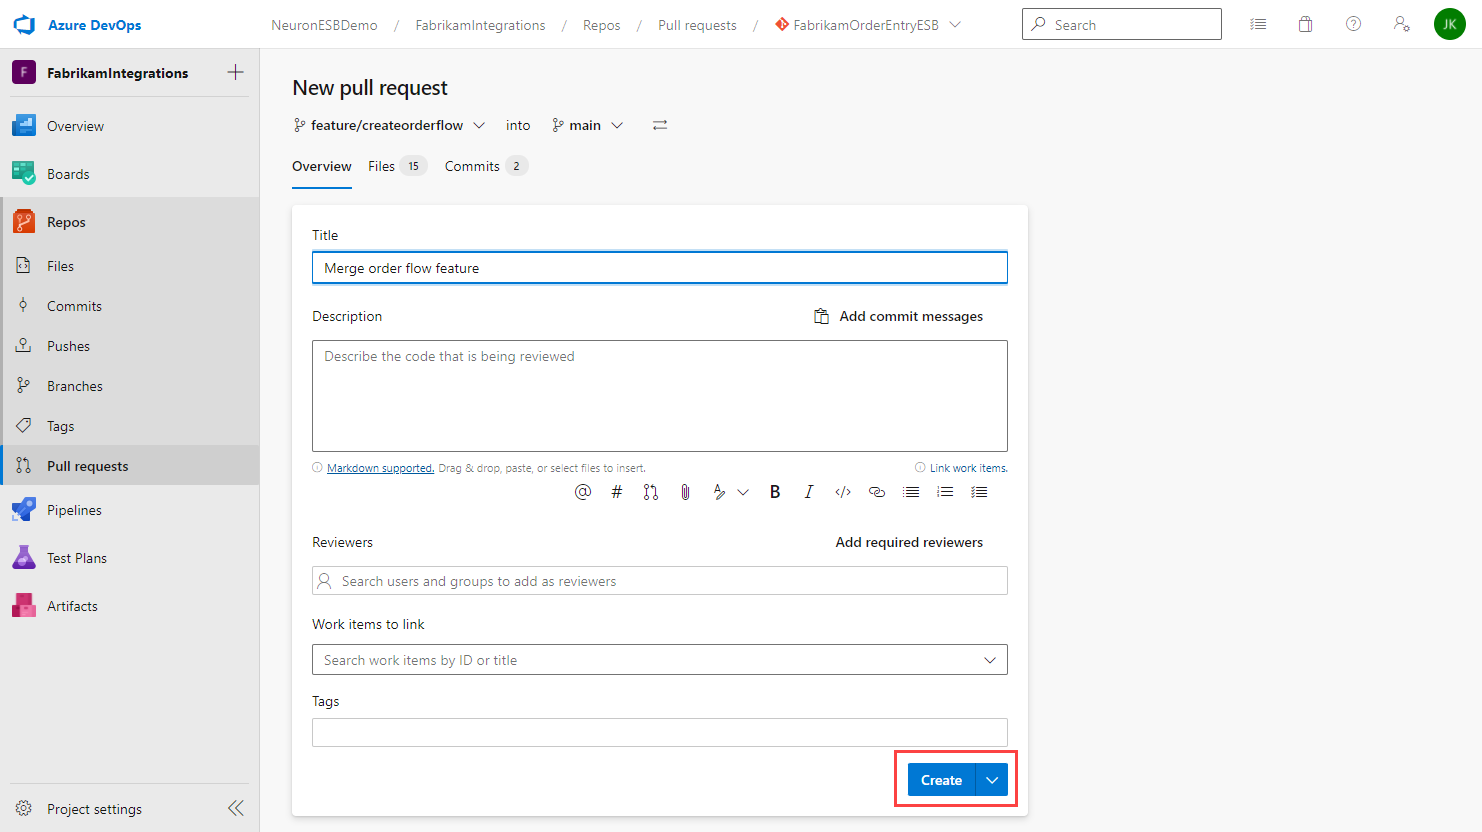
- When creating a pull request, provide a thorough description of your check-in to assist any reviewers assigned to approve the pull request. As part of the review process, reviewers can look at the changes and provide feedback, and may ask the developer to make additional changes. Once the review process is done, the reviewer(s) will approve the request and the changes will be ready to be merged by the developer.
- Add any reviewers to the request. You can also click the Add required reviewers link to automatically add all of them.
- Select the work item(s) to link to this pull request.
- Add any tags you want associated with this pull request.
- Click the Create button.
- All reviewers will be notified of the pull request. Depending on the main branch policies, a minimum number of approvals may be required before the pull request can be completed.
- On the pull request details page you will see the status of the pull request based on the main branch policy. For example, if the policy requires 2 approvals and you only have one, you will see that another approval is still required.
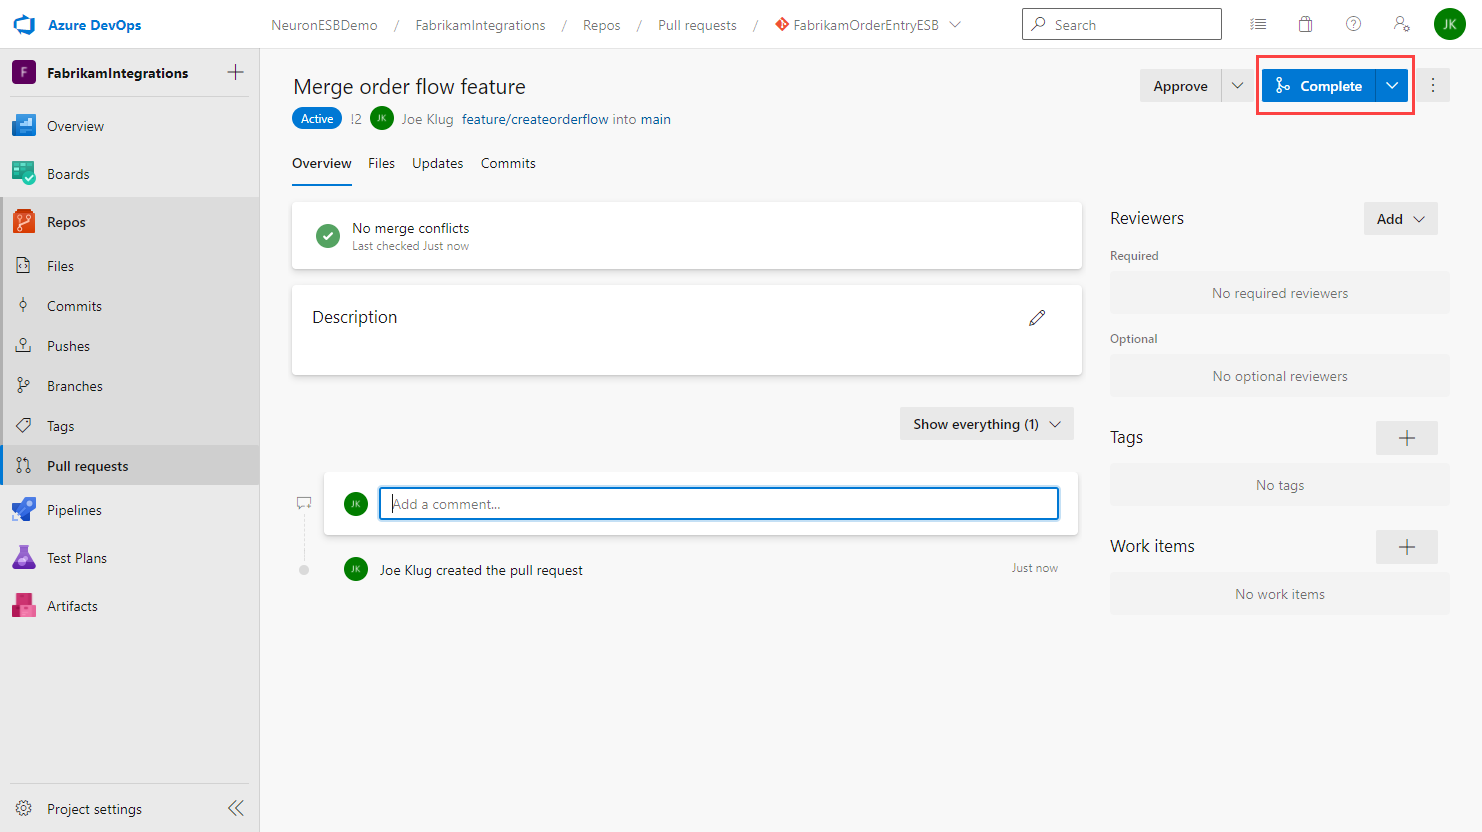
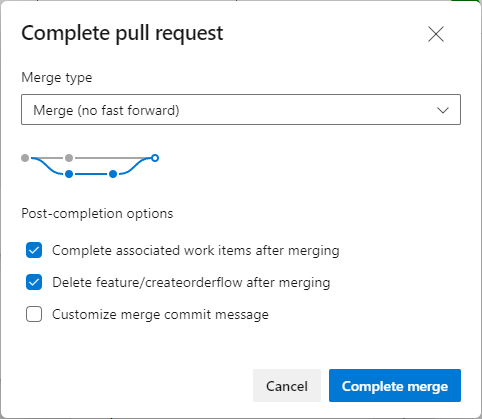
- Once all the policy requirements are satisfied, the pull request can be completed by clicking the Complete button.
- On the Complete pull request dialog, set the properties as needed and click Complete Merge.
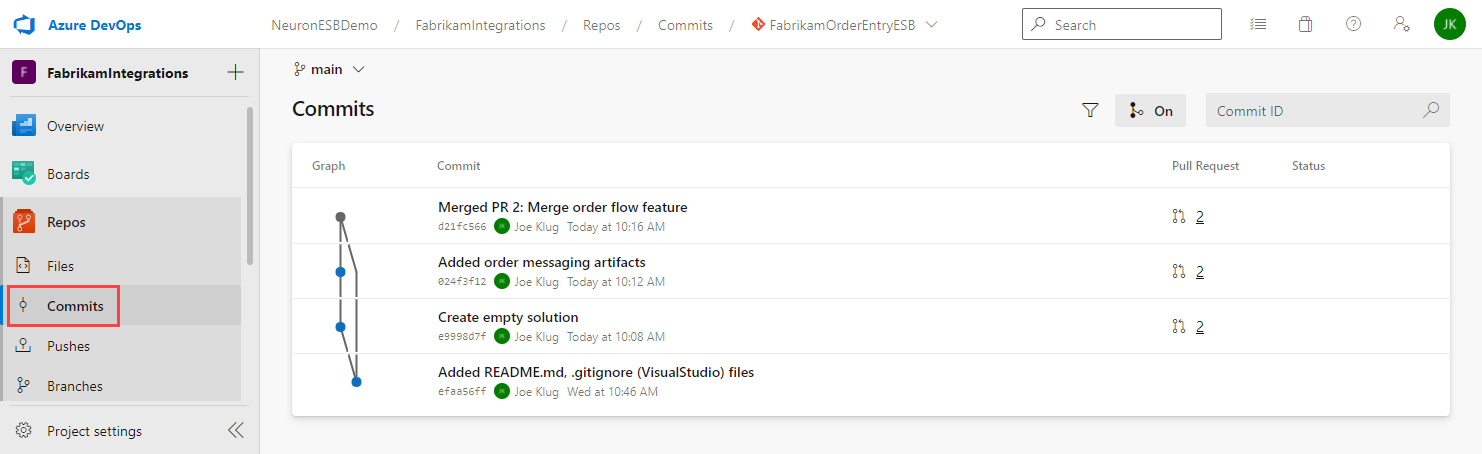
- If you navigate to Commits, you will see the repo history. This one shows two pushes and the merge:
Setting up Continuous Deployment Pipelines
Adding continuous deployment to your Neuron ESB source control require two Azure DevOps pipelines:
- Build Pipeline – Which will package the Neuron ESB solution into a Zip file
- Release Pipeline – Which will deploy the package to a Neuron ESB Server
Azure Pipelines are used to build, test and deploy code to one or more test or production environments.
More information on Azure Pipelines can be found here.
Setting up the Build Pipeline
The build pipeline will be used to package the Neuron solution into a Zip file and prepare it for deployment.
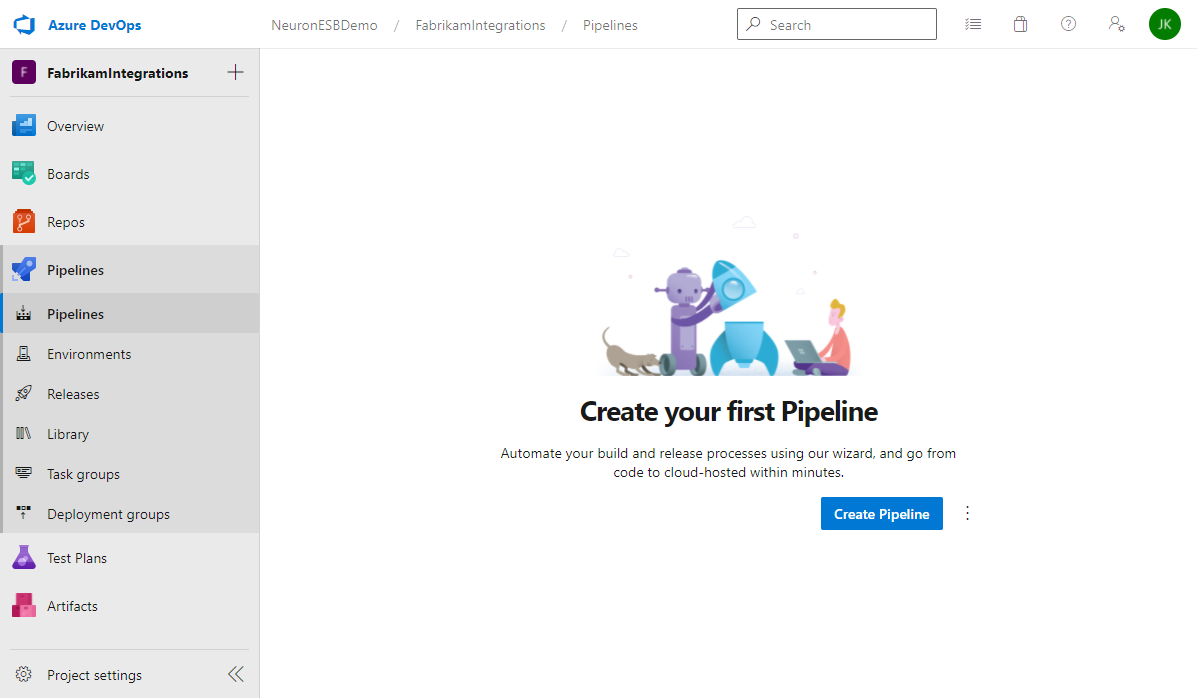
- In Azure DevOps, navigate to Pipelines and click Create Pipeline.
- Select which repo host contains your Neuron ESB solution. If you followed this guide, select Azure Repos Git.

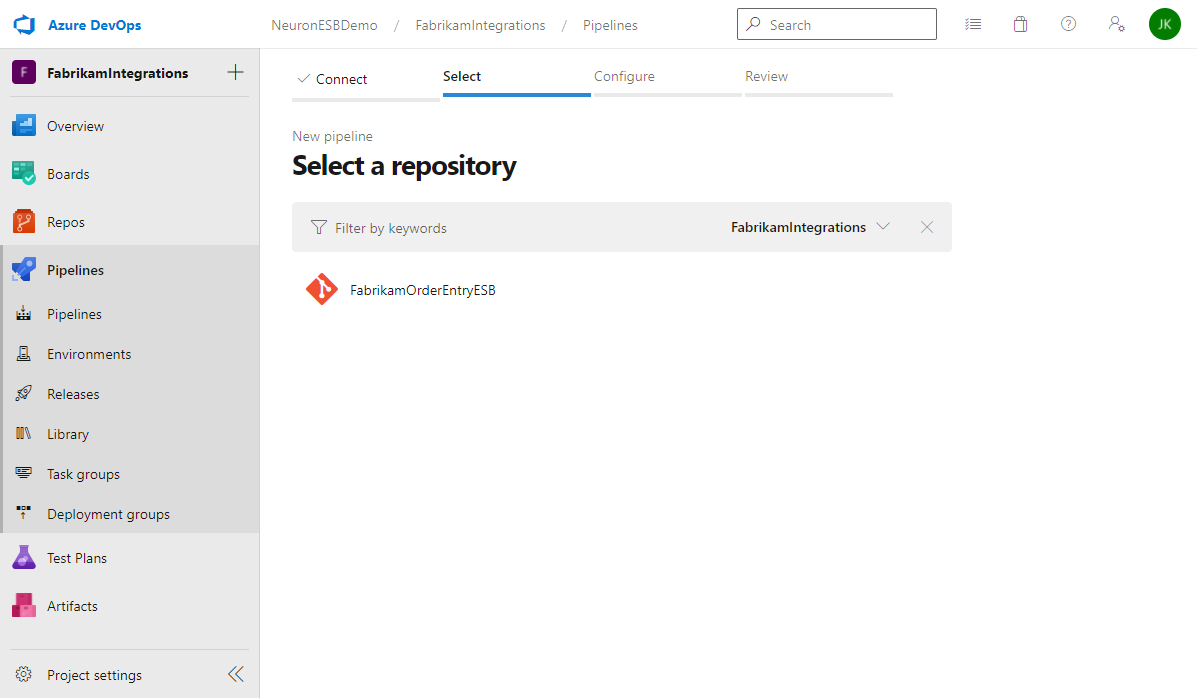
- Select the repository that contains the Neuron ESB solution.
- Select Starter pipeline.
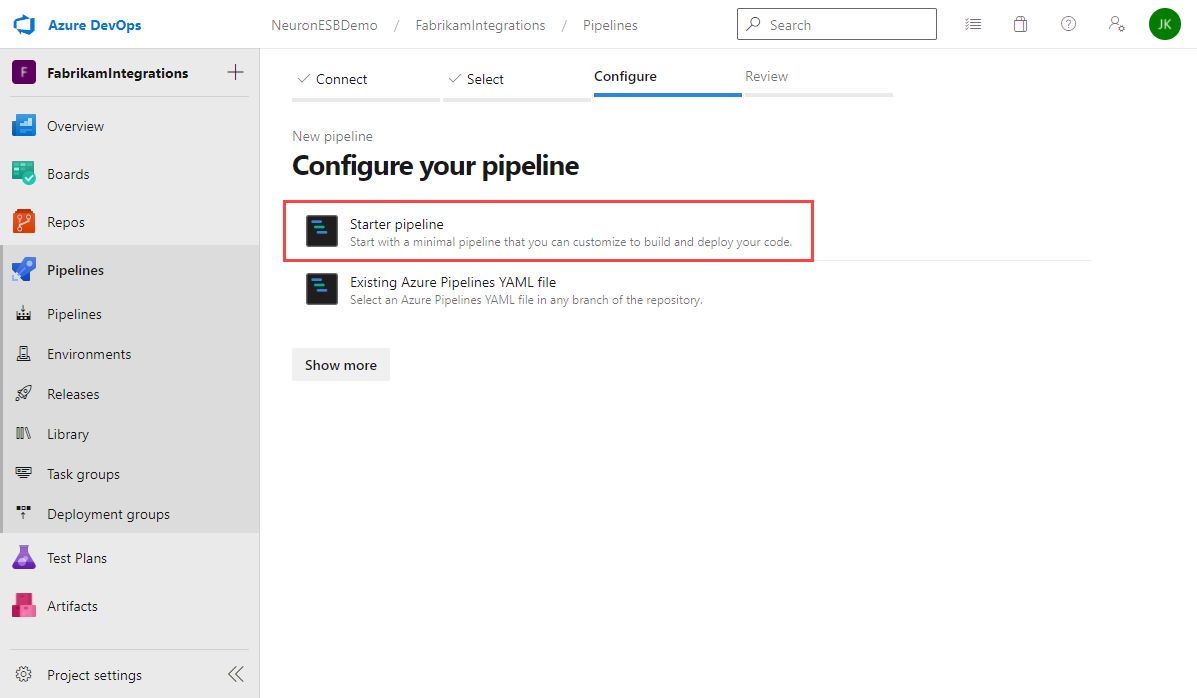
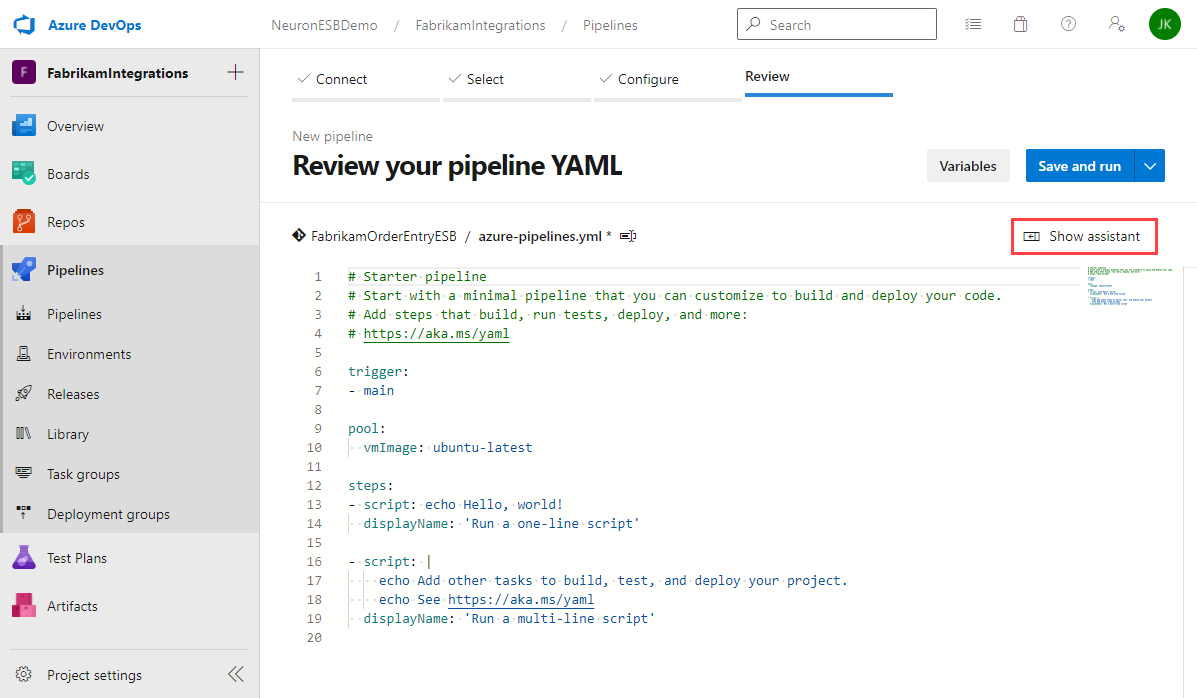
- The starter pipeline displays a sample YAML file. You can choose to write the pipeline using YAML, or click on the Show assistant button to get a list of tasks you can select from. For this guide you will use the task assistant.
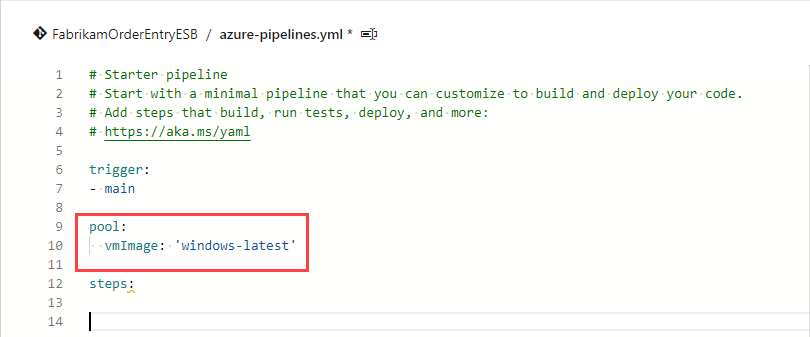
- Modify the sample YAML to remove the existing sample steps and set the “pool” property to use the windows latest VM image:
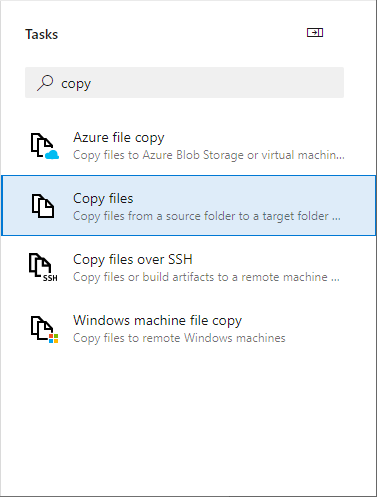
- The first step is to copy the source files to a different directory, using the build ID as the directory name. This step is not necessary if all you are building is a Neuron ESB solution. This step is useful when you also want to package together additional components such as custom adapter and process steps.
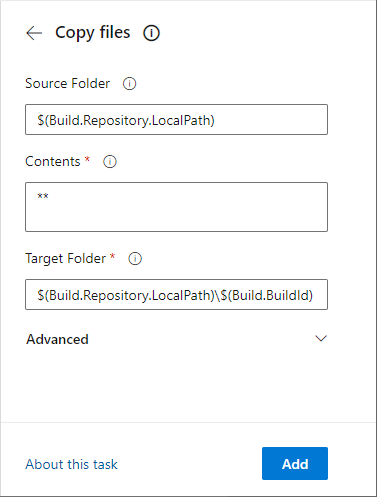
In the Task assistant, find and click the Copy files task.
- Set the properties of the Copy files task:
- Source Folder – $(Build.Repository.LocalPath). This is the local path on the build agent where the source files are downloaded to.
- Contents – **. This copies all files in the specified source folder and all files in all sub-folders.
- Target Folder – $(Build.Repository.LocalPath)\$(Build.BuildId). This is the folder the files will be copied to, using the build Id as the folder name.
Note – When using the Task Assistant to add steps to the YAML file, always verify the cursor is in the correct place in the YAML file where you want the task added. If any text is highlighted, it will be replaced by the new step you are adding. If the cursor is in the middle of a step, the new step will be added in that spot. Before each add, make sure the cursor is at the end of the YAML file!
Click the Add button to add the task to the YAML file.
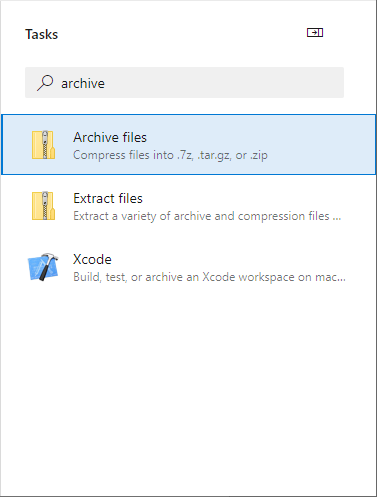
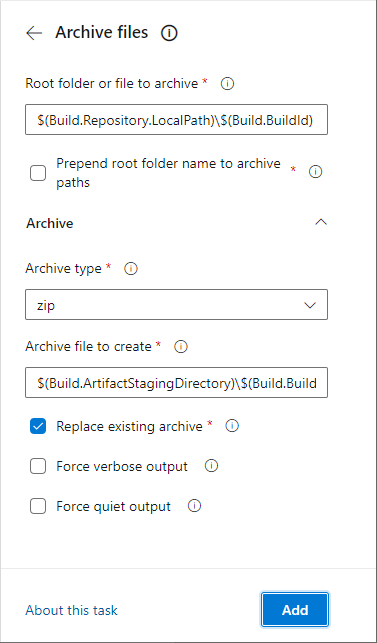
- In the Task assistant, find and click the Archive files task.
- Set the properties of the Archive files task:
- Root folder or file to archive – $(Build.Repository.LocalPath)\$(Build.BuildId). This is the where the files to archive were placed in the previous step.
- Prepend root folder name to archive paths – false (unchecked). We don’t need the root folder name.
- Archive type – zip
- Archive file to create – $(Build.ArtifactStagingDirectory)\$(Build.BuildId).zip. This will create a Zip file in the local path on the agent where artifacts are copied to before being pushed to their destination.
- Replace existing archive – true.
Verify the cursor is at the end of the YAML file and click the Add button to add the task.
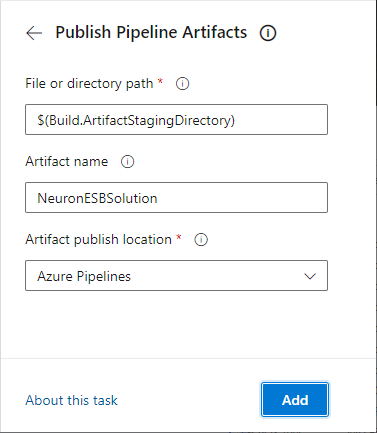
- In the Task assistant, find and click the Publish Pipeline Artifacts task.

- Set the properties of the Publish Pipeline Artifacts task:
- File or directory path – $( Build.ArtifactStagingDirectory). This is the where the files to archive were placed in the previous step.
- Artifact name – This can be anything you want. The sample below uses NeuronESBSolution.
- Artifact publish location – Azure Pipelines.
Verify the cursor is at the end of the YAML file and click the Add button to add the task.
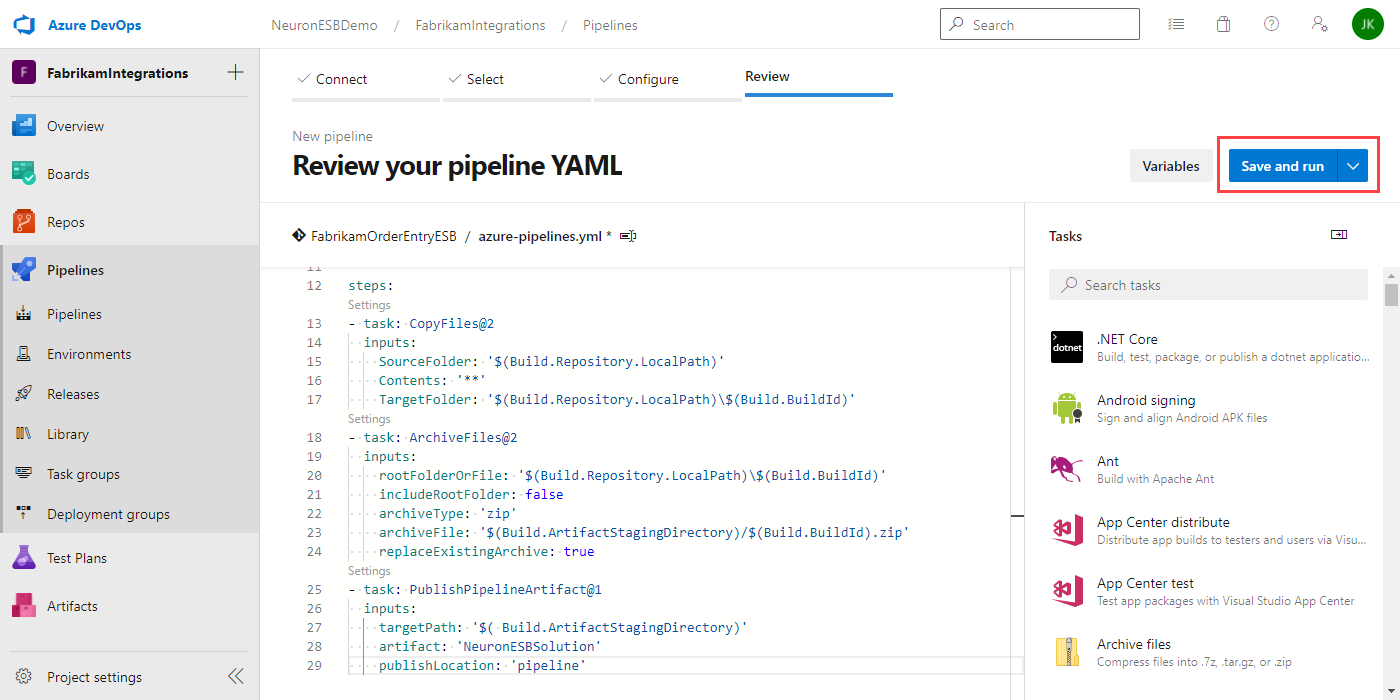
- The final YAML should look like this:
trigger:
– main
pool:
vmImage: ‘windows-latest’
steps:
– task: CopyFiles@2
inputs:
SourceFolder: ‘$(Build.Repository.LocalPath)’
Contents: ‘**’
TargetFolder: ‘$(Build.Repository.LocalPath)\$(Build.BuildId)’
– task: ArchiveFiles@2
inputs:
rootFolderOrFile: ‘$(Build.Repository.LocalPath)\$(Build.BuildId)’
includeRootFolder: false
archiveType: ‘zip’
archiveFile: ‘$(Build.ArtifactStagingDirectory)/$(Build.BuildId).zip’
replaceExistingArchive: true
– task: PublishPipelineArtifact@1
inputs:
targetPath: ‘$(Build.ArtifactStagingDirectory)’
artifact: ‘NeuronESBSolution’
publishLocation: ‘pipeline’
- Click the Save and Run button:
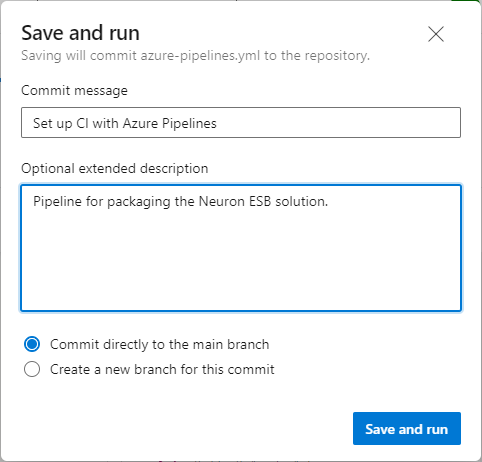
- Enter a commit message and optional description. You can either commit directly to the main branch or create a new branch for the pipeline. Click Save and run.
- After clicking the Save and run button, the status of the run is displayed. It will eventually move from Queued to Running, then to Success or Error. If there is an error, debug the issue and make any necessary changes to the pipeline’s YAML and try again.
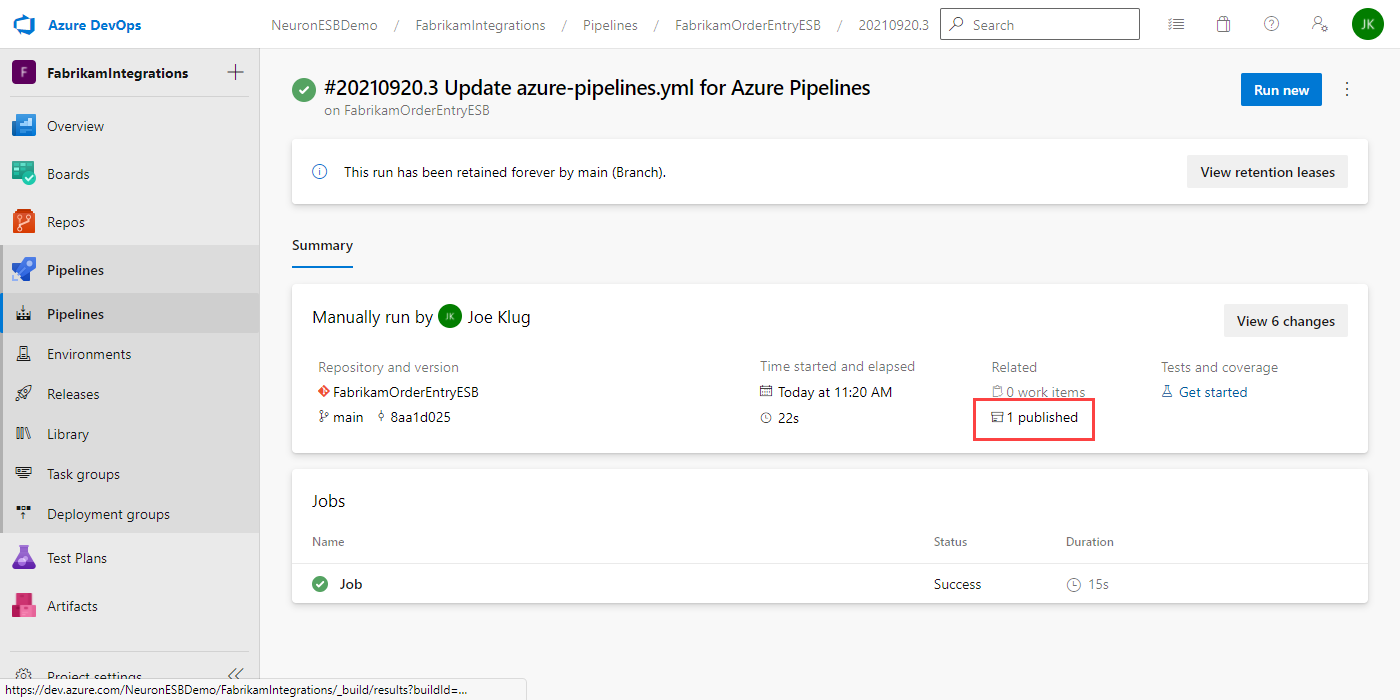
- To see the published artifacts, click on the “1 published” line outlined above.
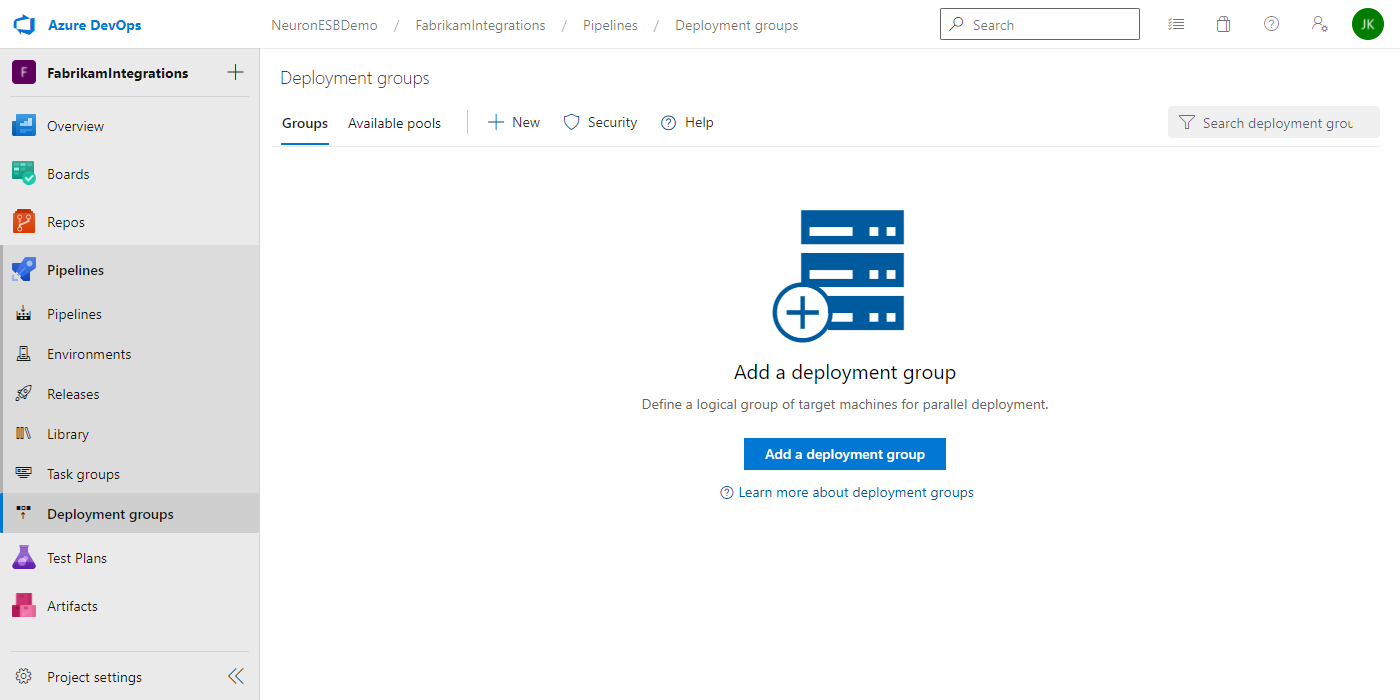
Create Deployment Groups
A Deployment Group is the logical name of your environment like Dev, QA, Prod, etc. After creating a Deployment Group, you can register the remote servers or VM’s that you want included in the deployment group by running a PowerShell script that is provided to you.
Then in order to register the VM you need to copy the scripts show in left hand side, also make sure you check the Personal access token checkbox, you take this scripts and run in Powershell on your remote VM, remote VM will install Azure agent, and Azure agent will register it against the deployment group.
More information on Deployment Groups can be found here.
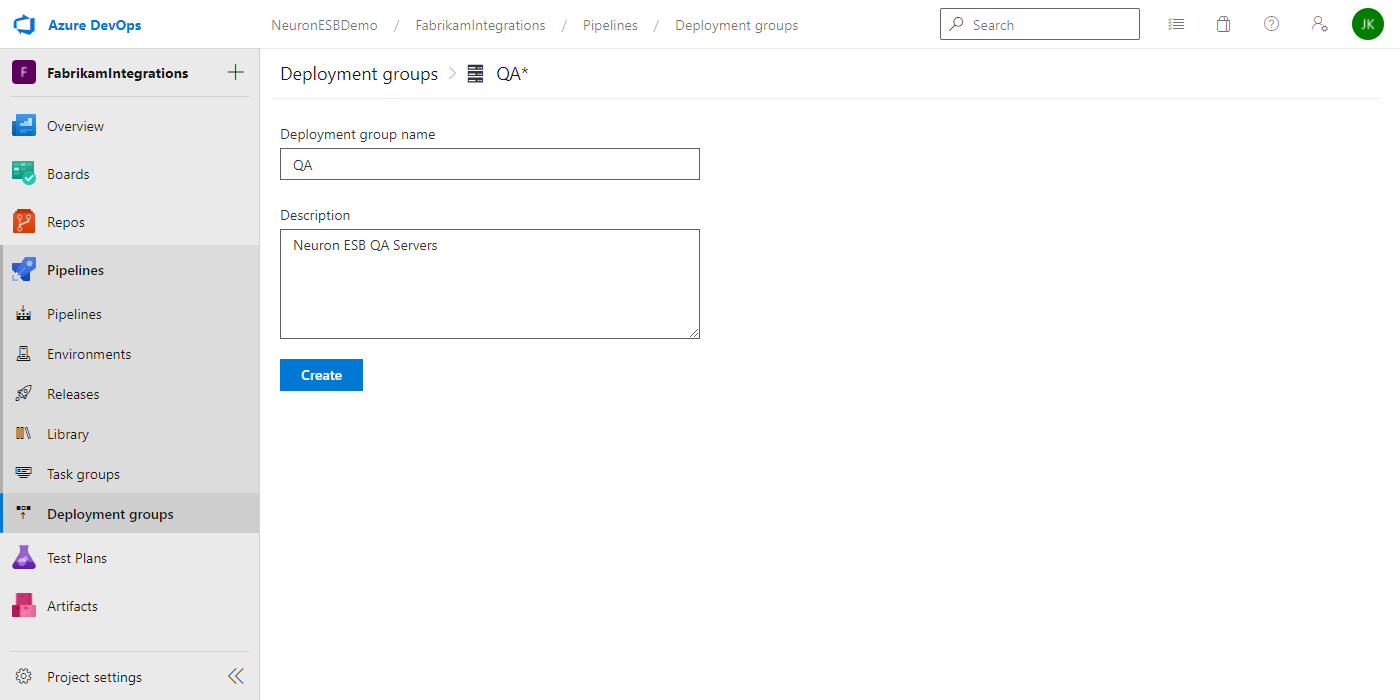
- In Azure DevOps, navigate to Deployment Groups and click on Add a deployment group.
- Enter the Name of the Deployment Group and an optional Description and click Create.
- On the Deployment Group page, verify the “Type of target to register” is set to Windows, check the box for “Use a personal access token in the script for authentication” and copy the PowerShell script to your clipboard. You will use this to register the agent on your Neuron ESB server.
- On your Neuron ESB Server, open PowerShell as an Administrator. Paste the registration script into PowerShell and execute it. Follow the prompts and enter the appropriate values.
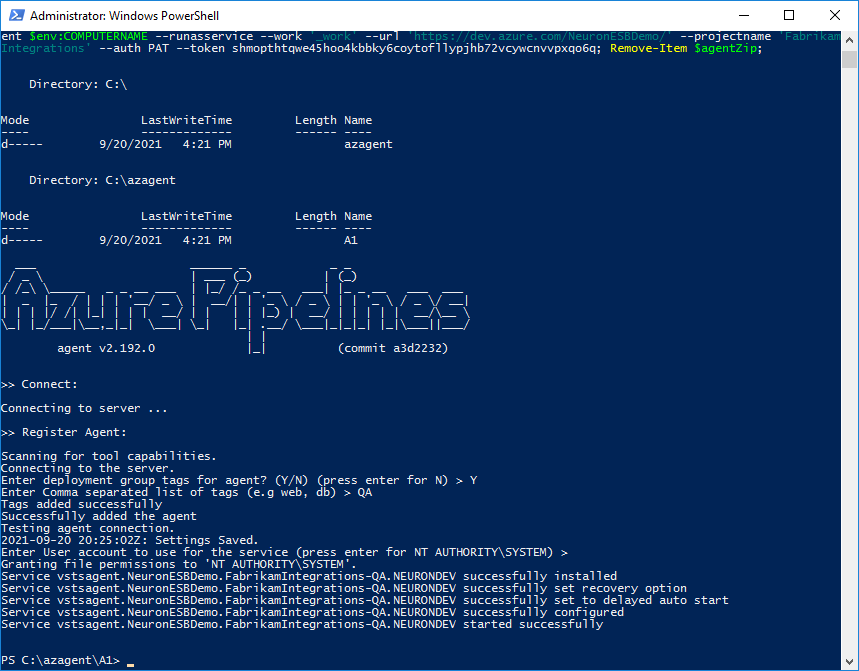
- If the agent started correctly, you continue with creating the release pipeline. If there were any errors, run the diagnostics command:
.\run –diagnostics
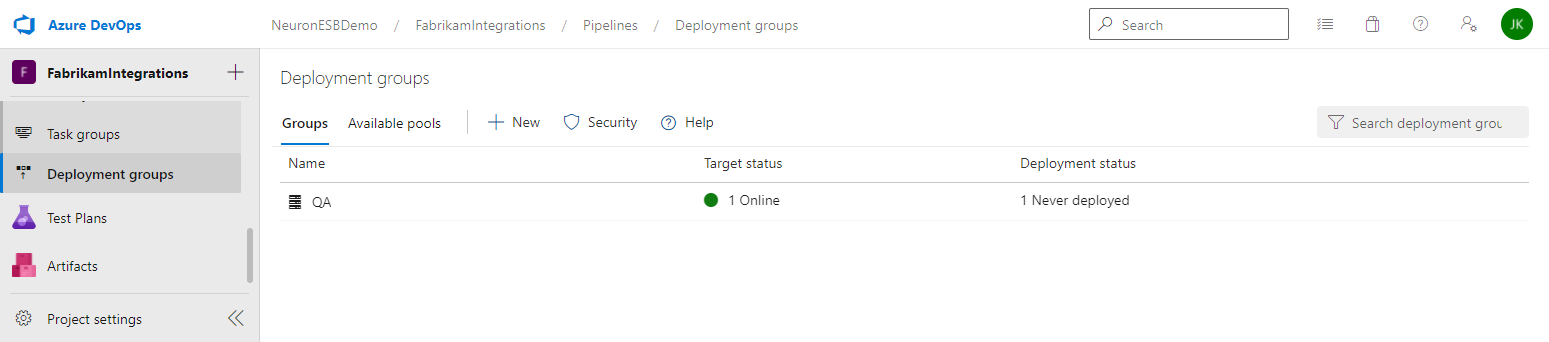
- You can check the status of your deployment group by navigating to Deployment Groups in Azure DevOps:
Setting up the Release Pipeline
The release pipeline is used to deploy the package created in the previous step to the remote Neuron ESB servers defined in the Deployment Group. You can create different release pipelines for each environment, i.e. DEV, QA, and Prod, or have a single release pipeline for multiple environments. For more information on release pipelines, click here.
This release pipeline assumes that the Neuron ESB solution has already been manually deployed to the Neuron ESB server(s), and that the Neuron ESB runtime has been configured to run the Neuron ESB solution that was created and added to Git in the previous steps.
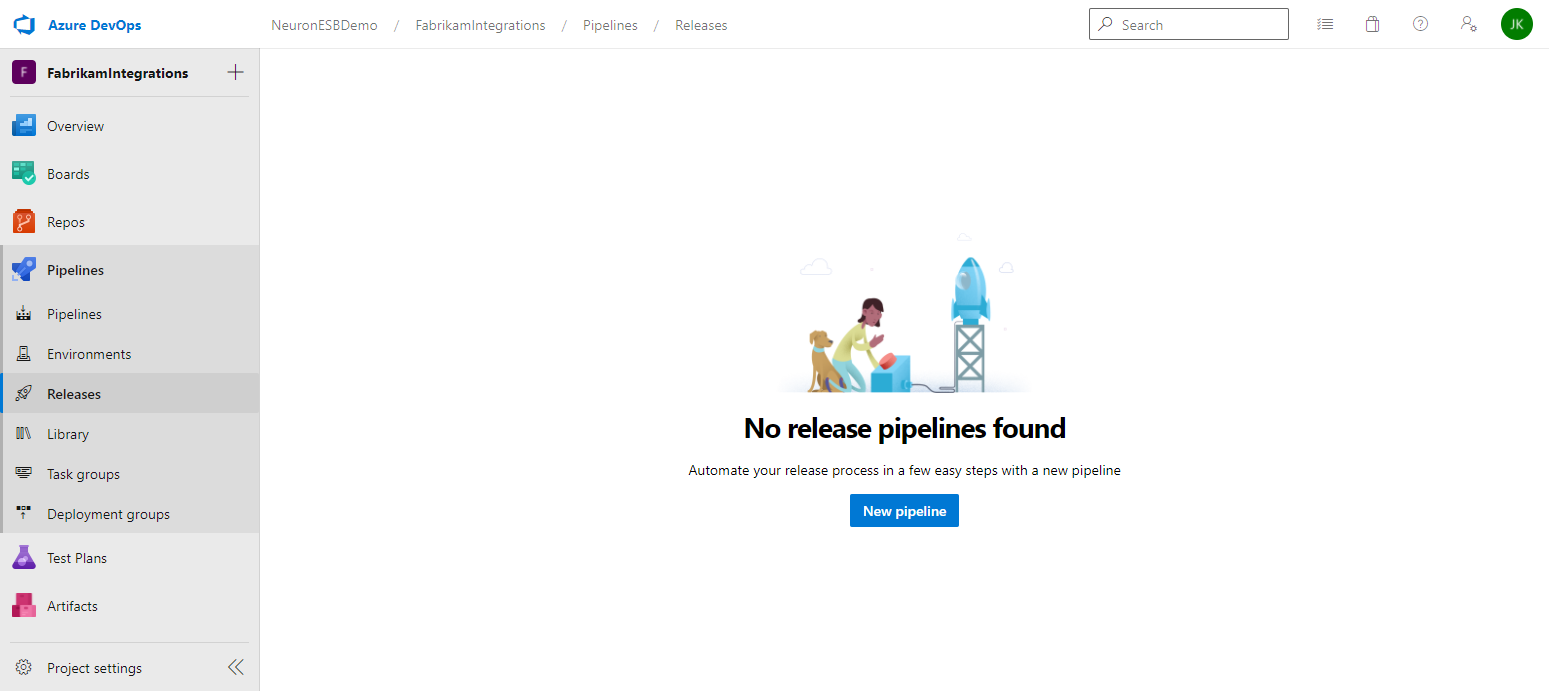
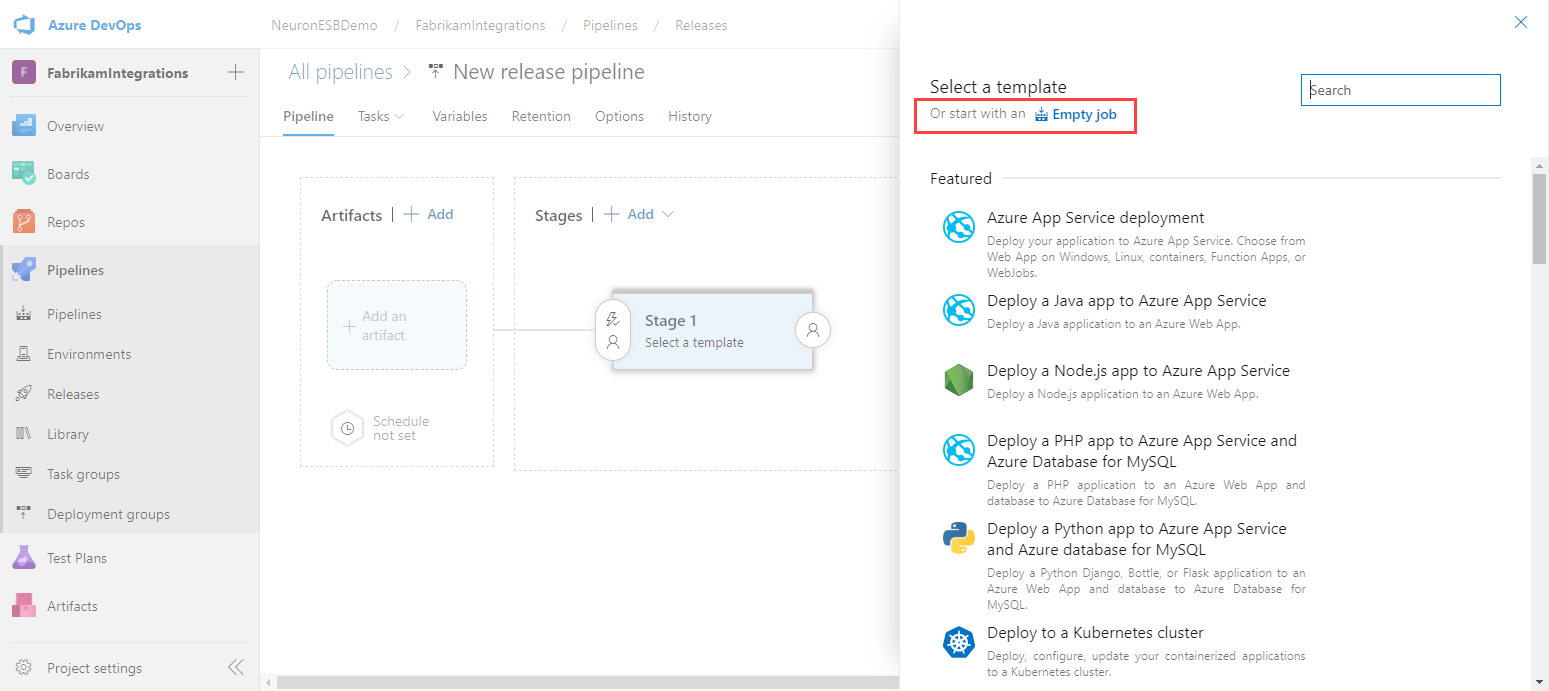
- In Azure DevOps, navigate to Releases and click on New pipeline.
- Click on Empty job.
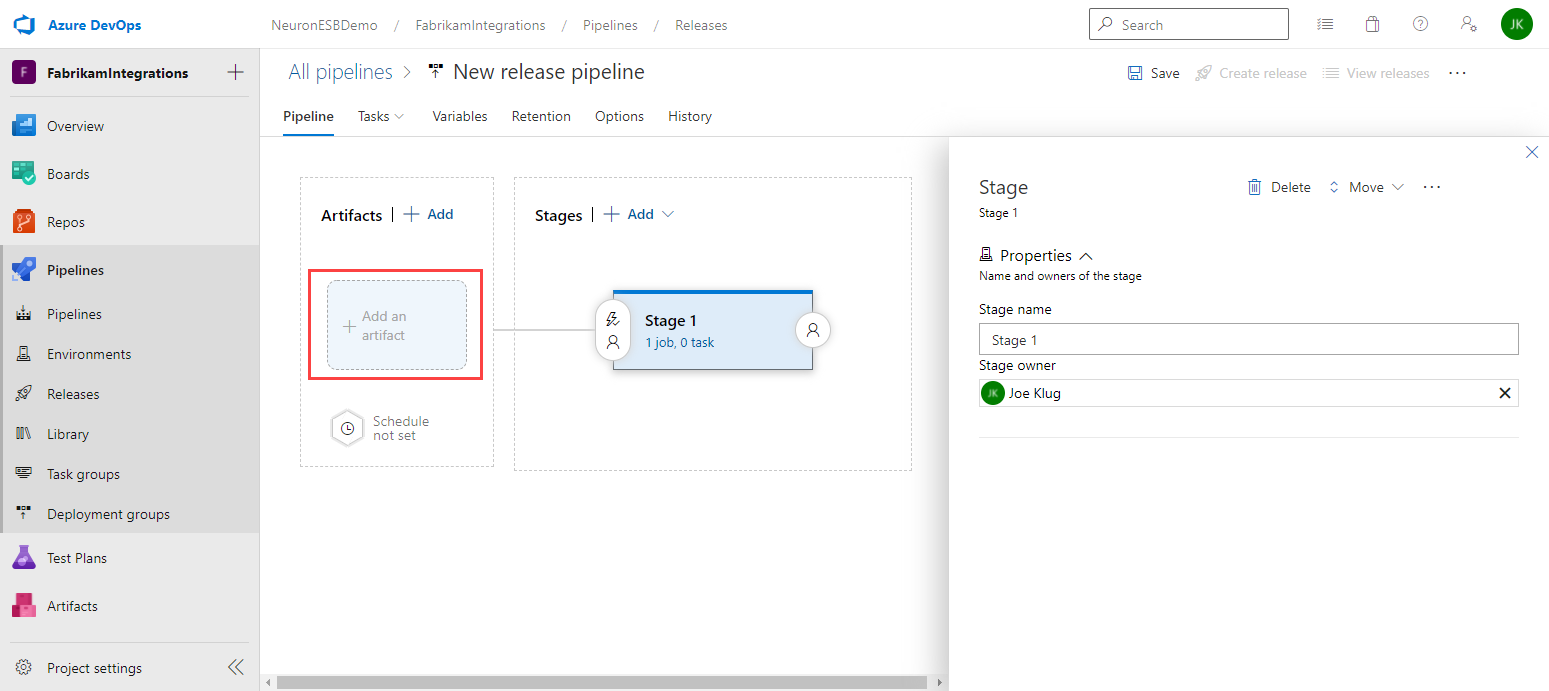
- Change the name of the Release Pipeline by hovering the cursor near the pipeline name and clicking the Edit pipeline name icon.

- Enter a Stage name and set the Stage owner. Click Add an artifact.
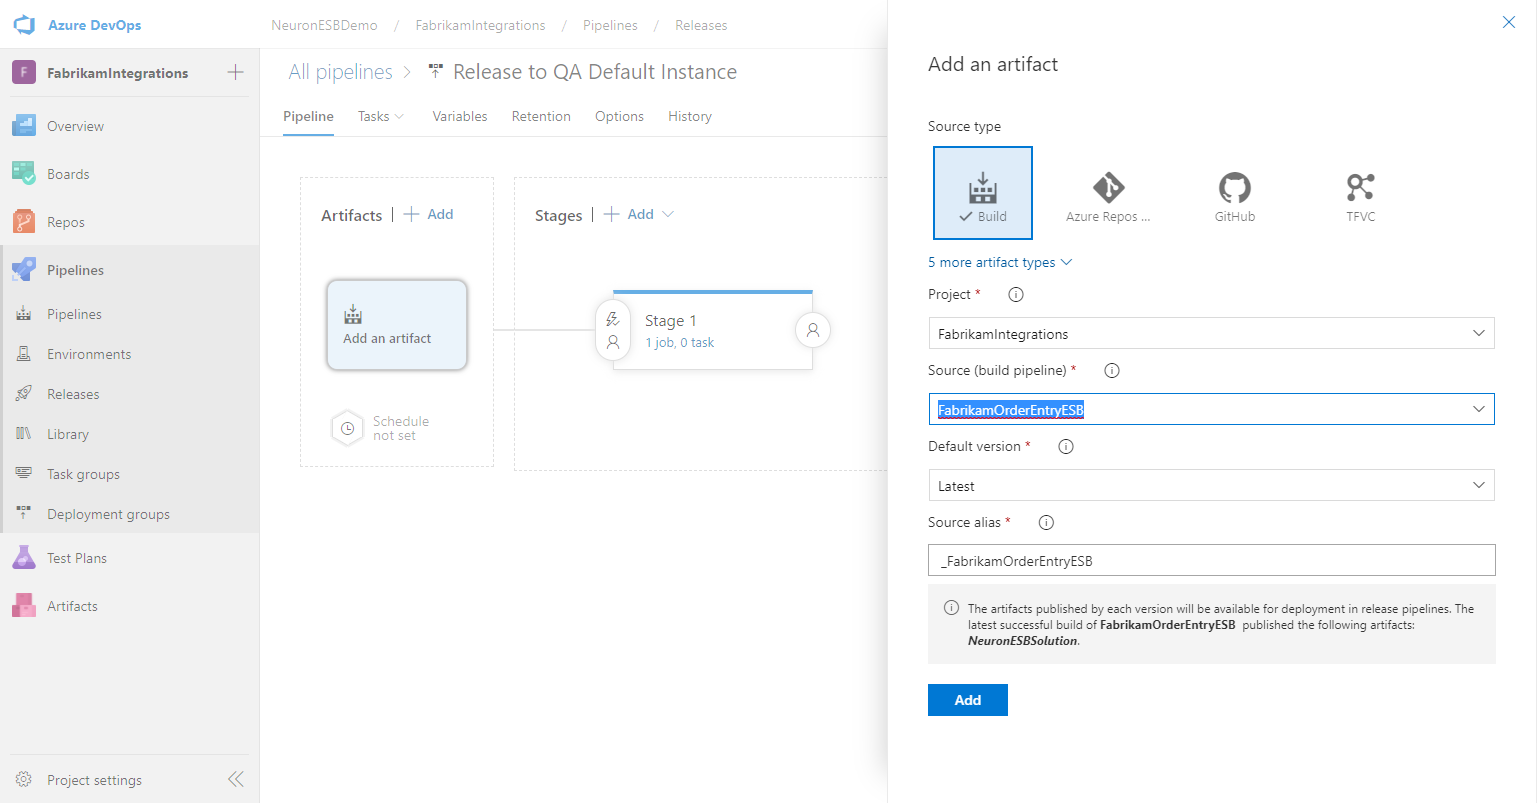
- Select the Source (build pipeline) that creates your Neuron ESB solution package. Keep the remaining default settings and click Add.
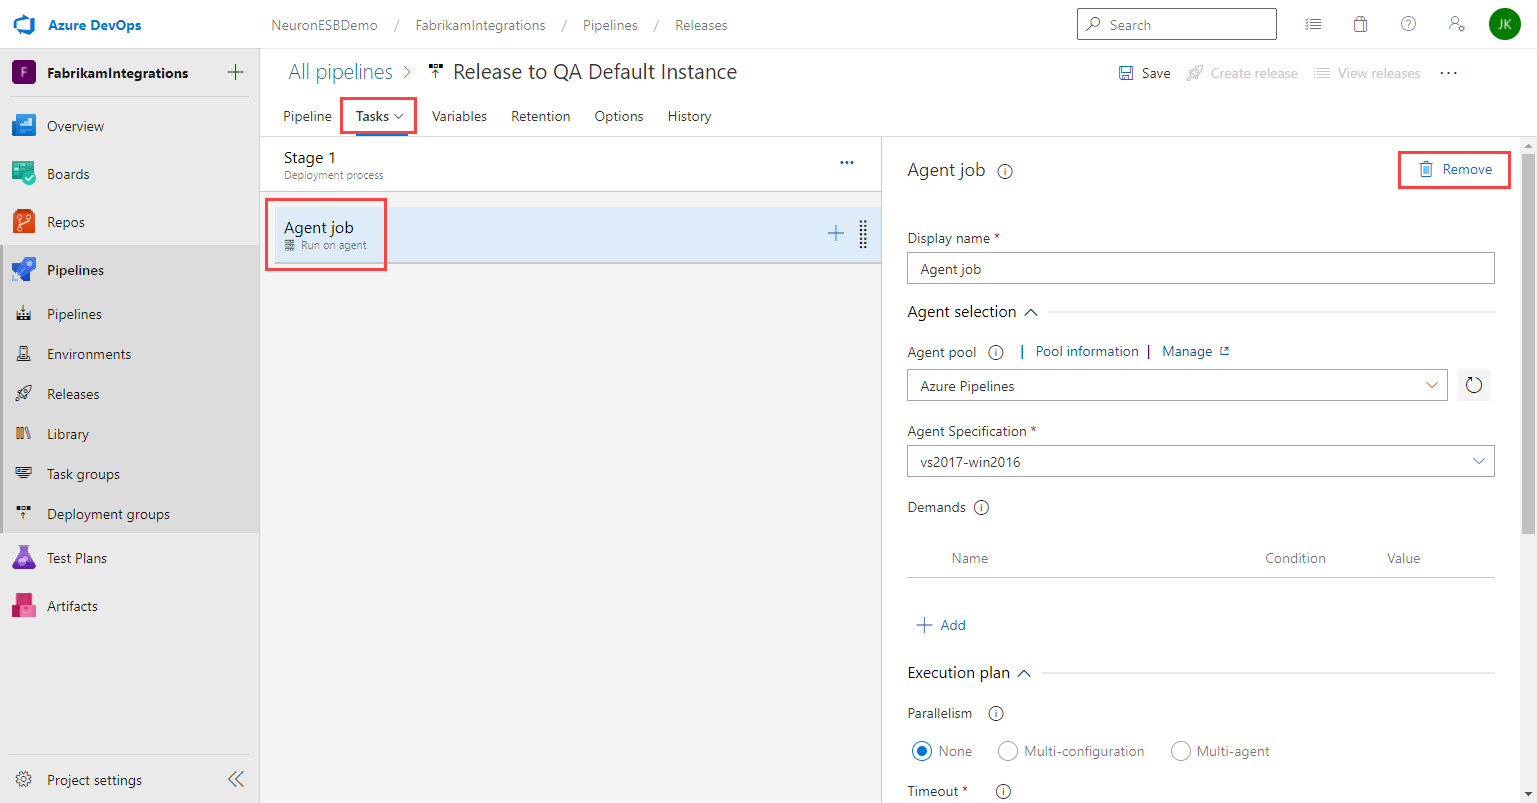
- Click on Tasks. Select the Agent job and click Remove. We will not perform a build as part of this release.
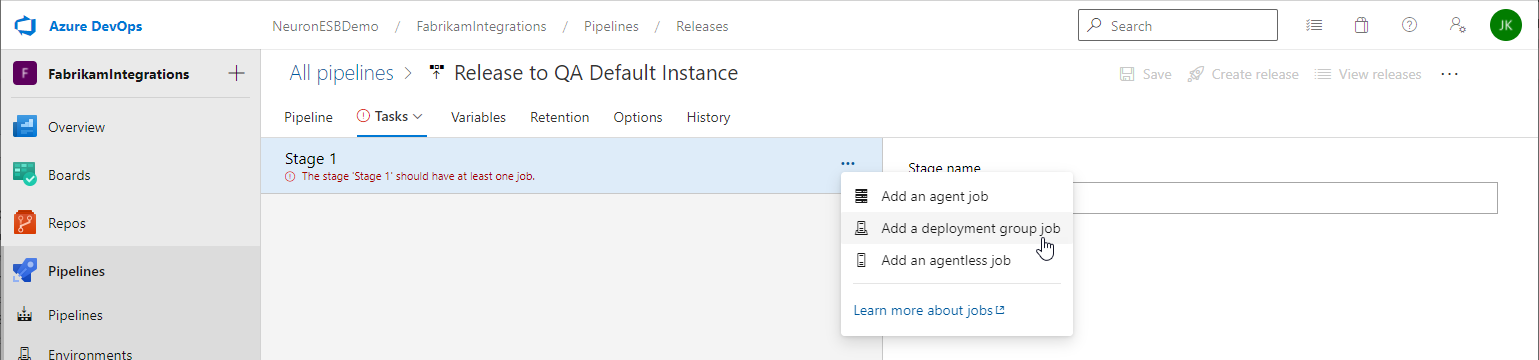
- Under Tasks, select the stage and click the ellipsis button. Click Add a deployment group job.
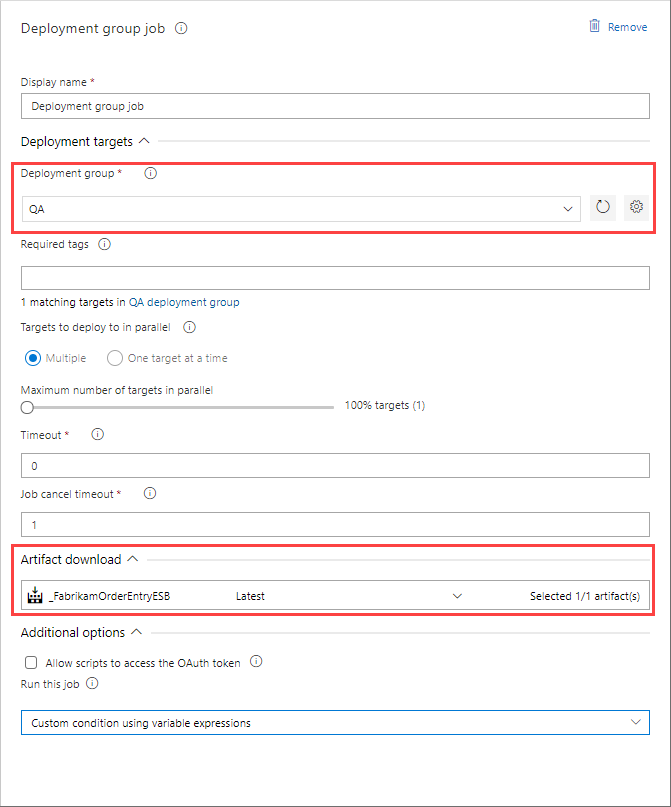
- In the Deployment group job settings, select the Deployment group you previously created and verify your Artifact download. You only need to enter tags if you have multiple targets in your deployment group and only want to deploy to a subset of the targets with the matching tag(s).
In the next several steps you will add tasks to the deployment group job to extract the Neuron ESB solution, stop the Neuron ESB Service for the instance you are deploying to, copy the new version of the solution to the location of the solution on the local server and start the Neuron ESB Service.
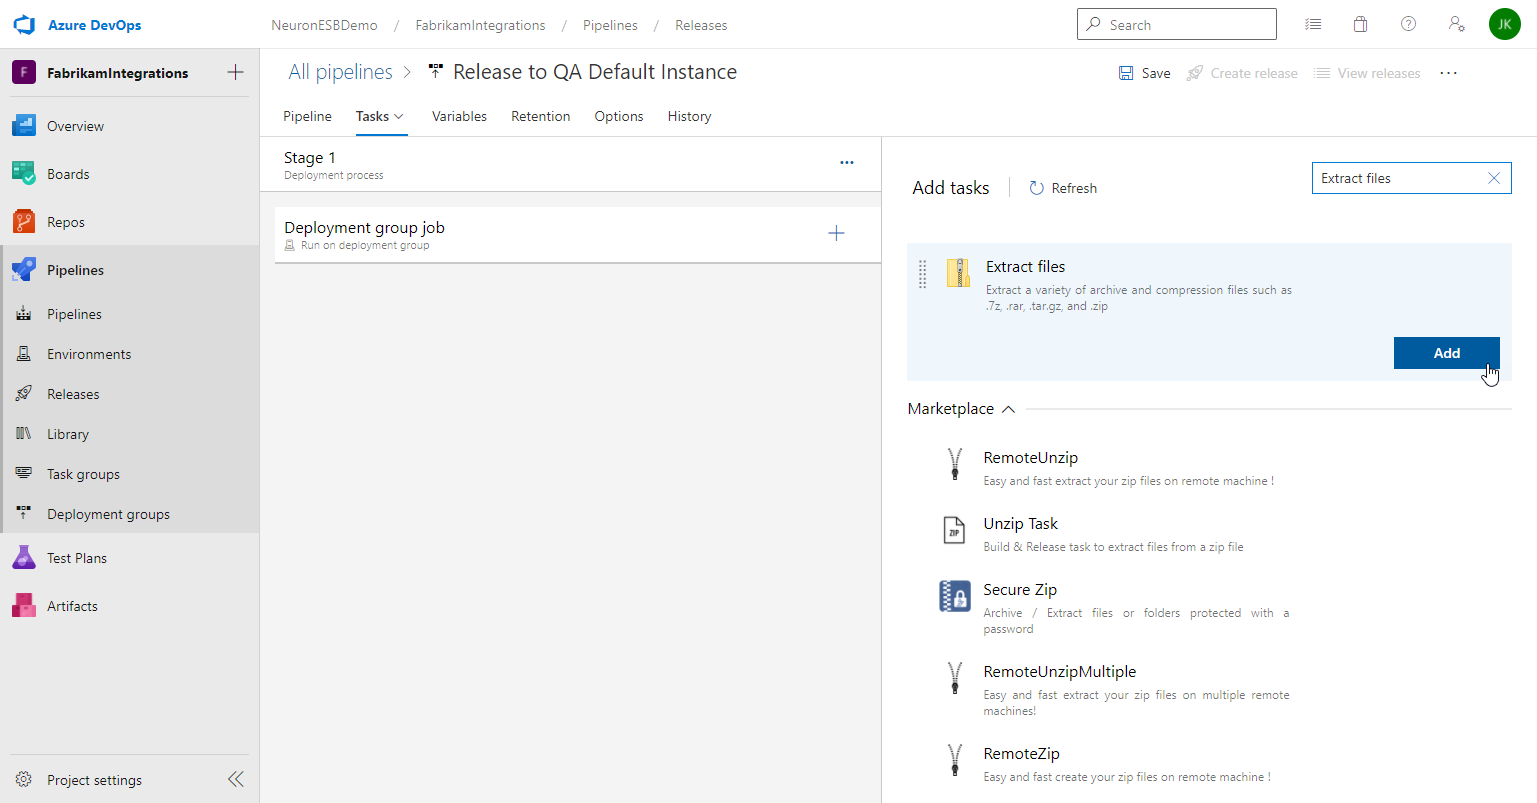
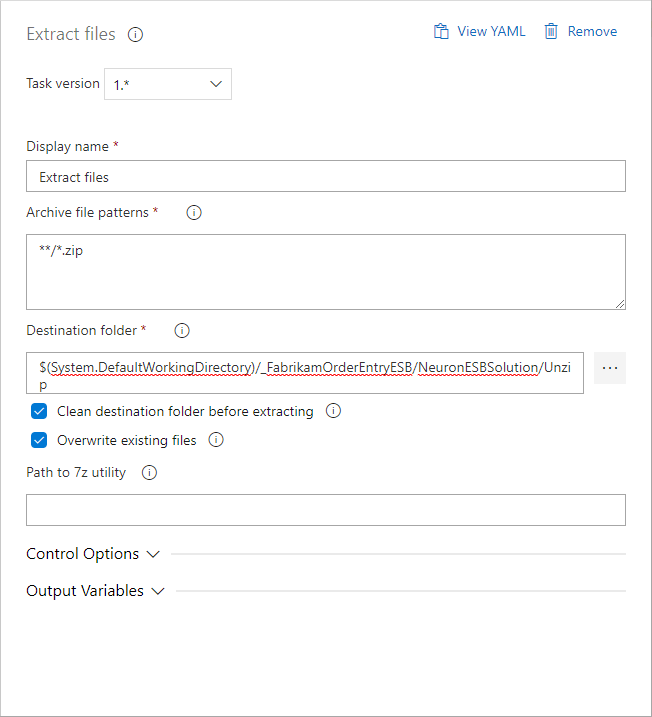
- Under Tasks, select the Deployment group job and click the plus “+” button. Search for and add Extract files.
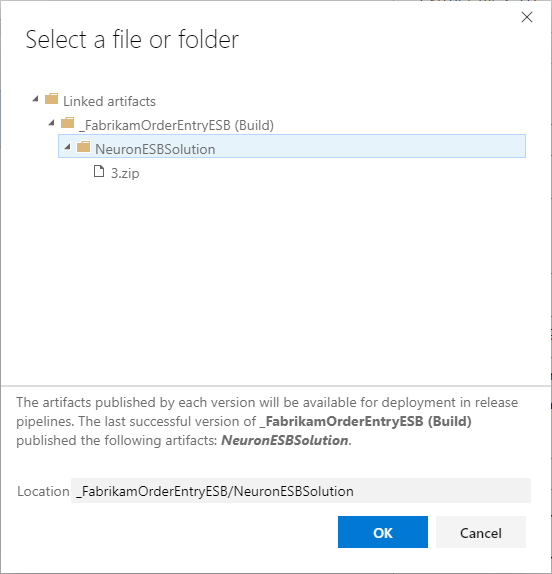
- Select the Extract files task set the Destination folder by clicking the ellipsis button to browse destination folder. Select the name of your downloaded artifact. Click OK.
Add a subfolder, i.e. Unzip, to the text displayed in the property text area. This is where the downloaded zip file will be extracted to. Also check the box to Overwrite existing files. Leave the remaining properties as their default values.
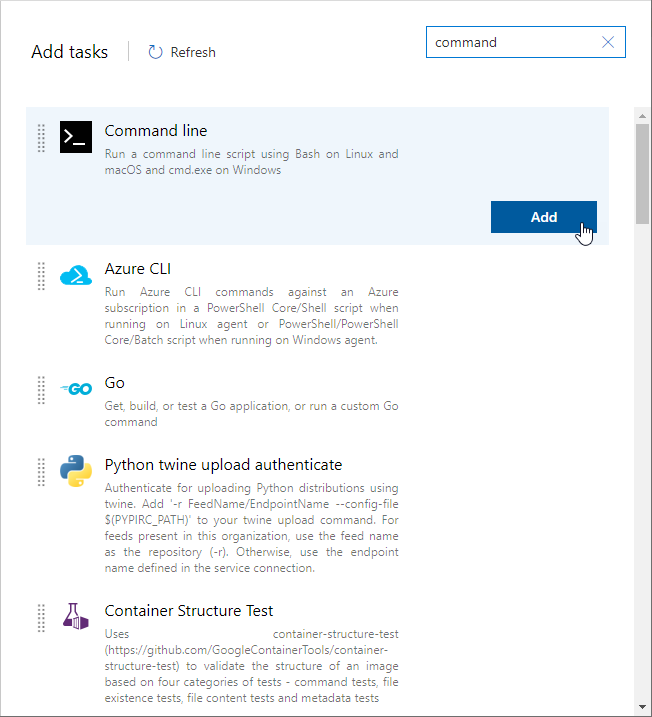
- Add another task called Command line.
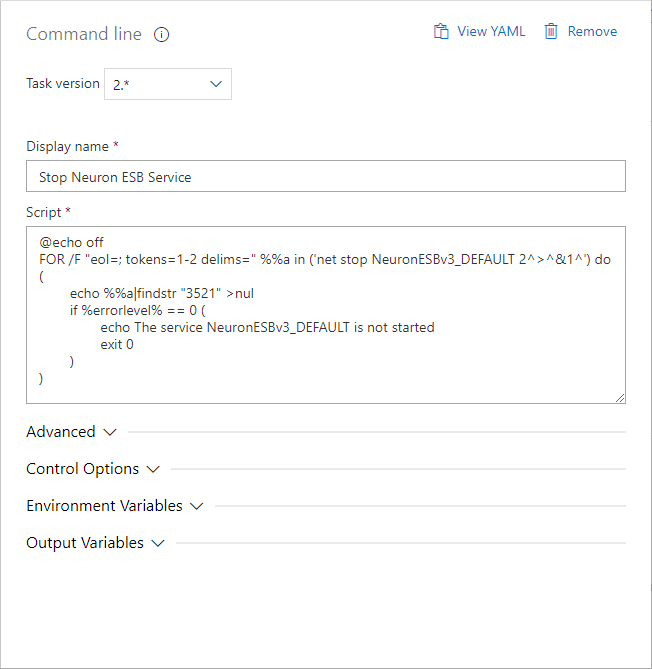
- Select the Command line task, change the Display name to “Stop Neuron ESB Service”, and set the Script to:
@echo off
FOR /F “eol=; tokens=1-2 delims=” %%a in (‘net stop NeuronESBv3_DEFAULT 2^>^&1^’) do (
echo %%a|findstr “3521” >nul
if %errorlevel% == 0 (
echo The service NeuronESBv3_DEFAULT is not started
exit 0
)
)
This script will stop the Neuron ESB instance that is running the solution your release pipeline will update. If your Neuron ESB instance has a different name than DEFAULT, you will have to update the instance name in the script accordingly.
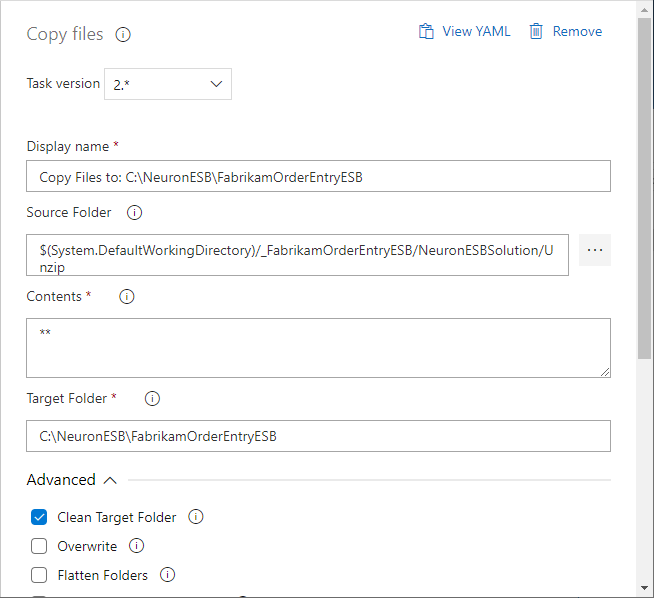
- Add another task called Copy files.
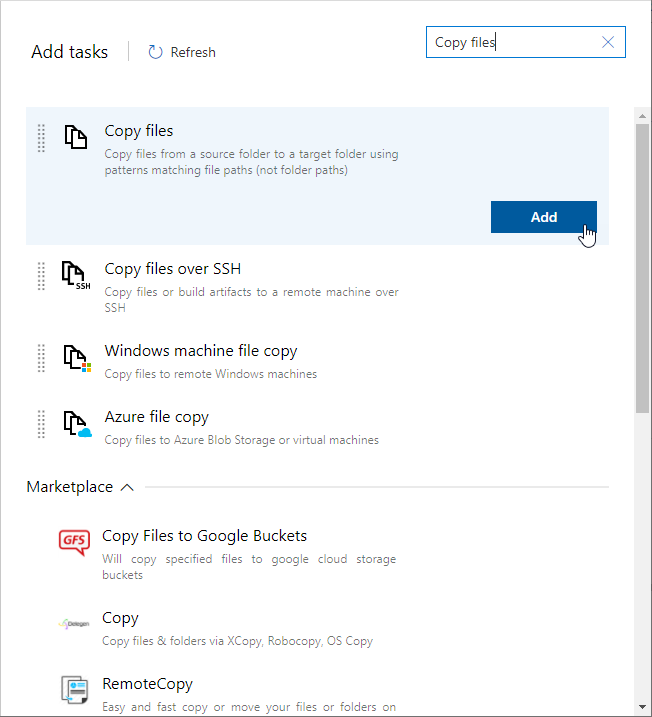
- Select the Copy files task and set the following properties (leave the remaining properties as their default values).
- Source Folder – this is the same folder as the destination folder in the Extract files step. For example:
$(System.DefaultWorkingDirectory)/_FabrikamOrderEntryESB/NeuronESBSolution/Unzip
-
- Target Folder – this is the location of the Neuron ESB solution that the Neuron ESB instance is configured to run. For example:
C:\NeuronESB\FabrikamOrderEntryESB
-
- Advanced->Clean Target Folder – since we are deploying the entire solution, you want to remove the old solution before copying over the new files.
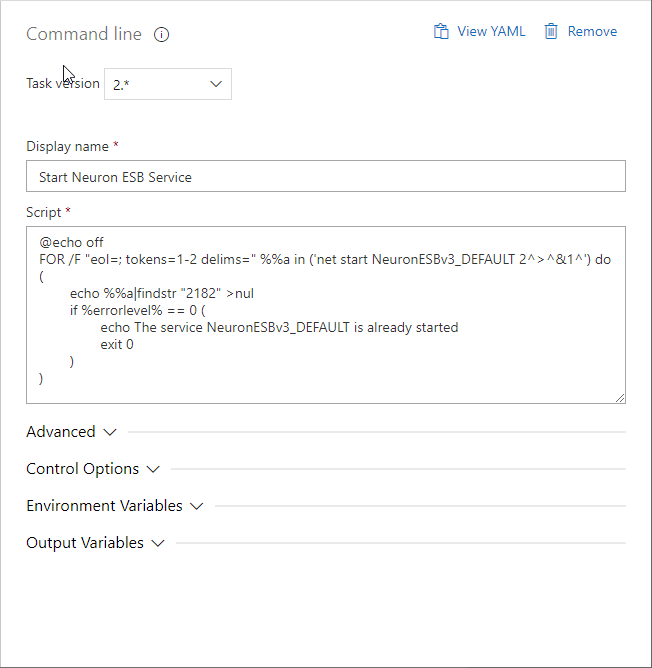
- Add another Command line task. Change the Display name to “Start Neuron ESB Service”, and set the Script to:
@echo off
FOR /F “eol=; tokens=1-2 delims=” %%a in (‘net start NeuronESBv3_DEFAULT 2^>^&1^’) do (
echo %%a|findstr “2182” >nul
if %errorlevel% == 0 (
echo The service NeuronESBv3_DEFAULT is already started
exit 0
)
)
This script will start the Neuron ESB instance that is configured to run the solution your release pipeline will update. If your Neuron ESB instance has a different name than DEFAULT, you will have to update the instance name in the script accordingly.
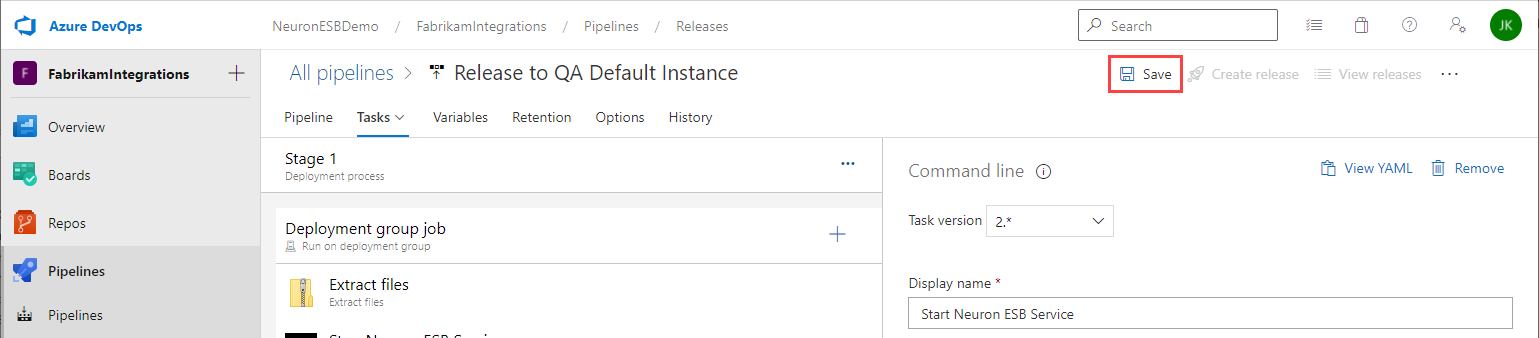
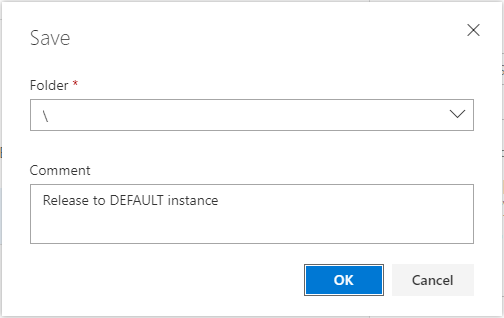
- Once you have finished adding the four tasks, Save the release pipeline. Either choose the root or enter a Folder name for the release pipeline, add a Comment and click OK.
Once you have created the release pipeline, you can choose to run it on a schedule, whenever there is a successful build or manually. First we will run the release pipeline manually.
- Click the Create release button.

- To create a manually trigger, select the release stage created previously, then click the Create button.
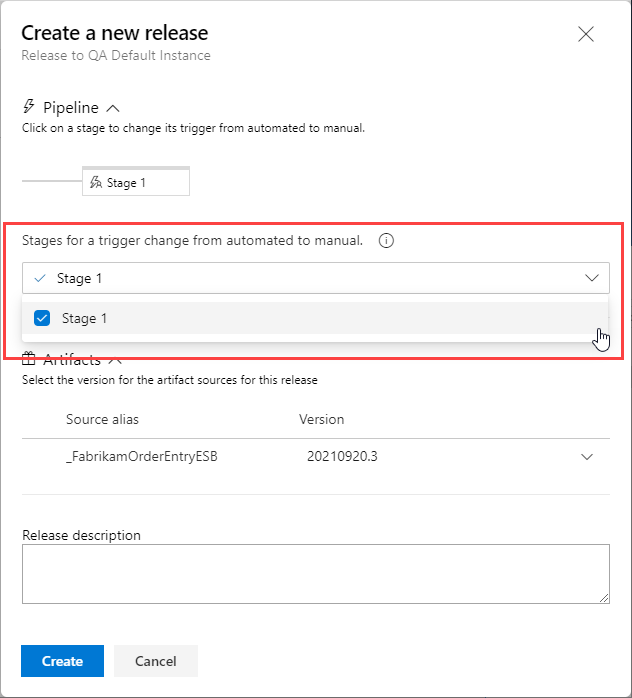
- You will be notified the release has been created. Click the release name (i.e. Release-1) in the notification to navigate to the release.

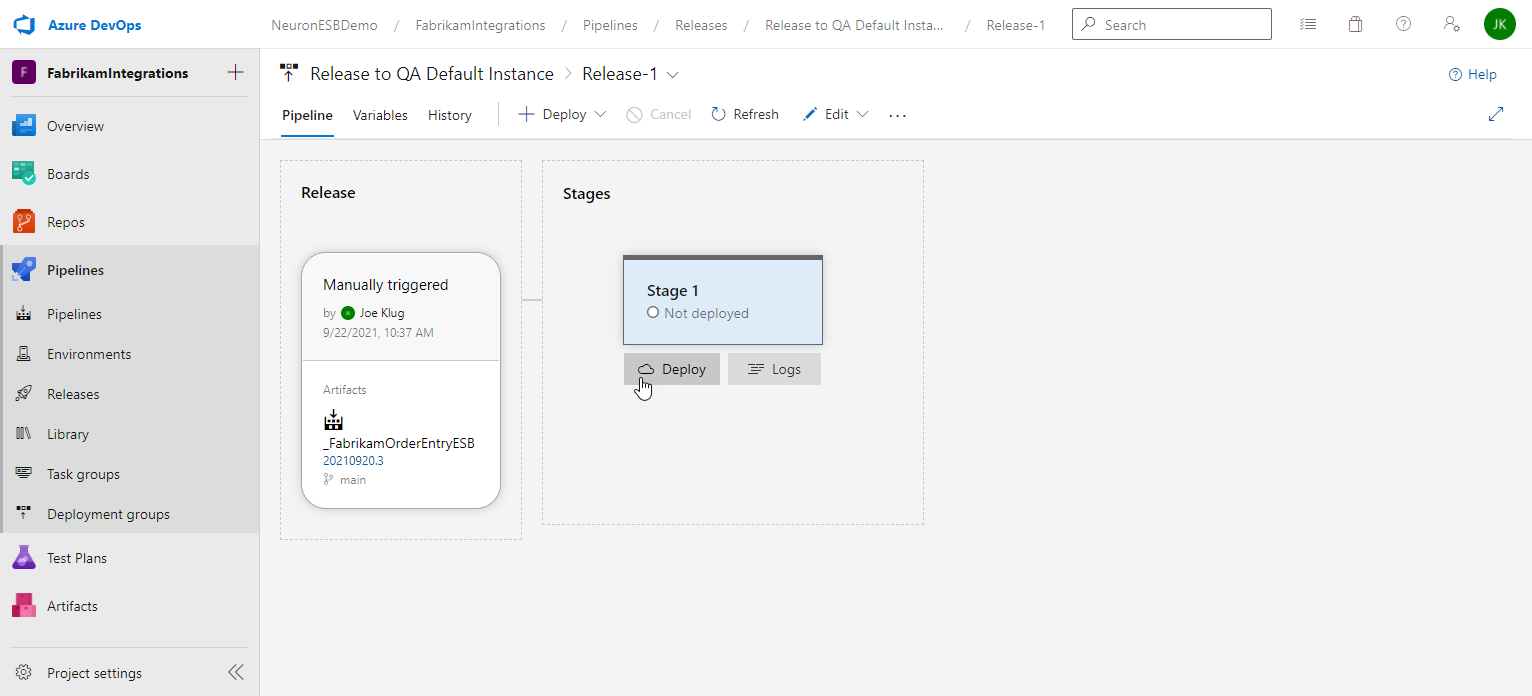
- On the release details page, hover the mouse over the stage and click Deploy.
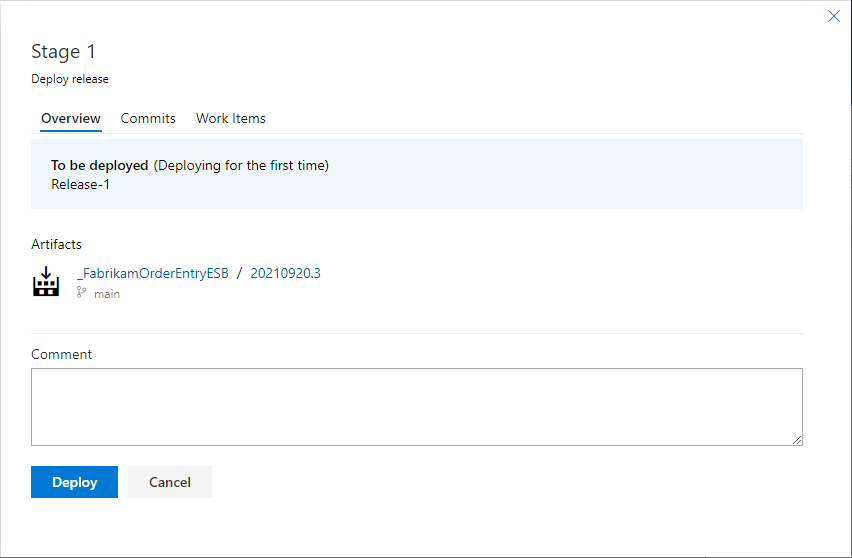
- Review the release details, enter an optional Comment and click the Deploy button.
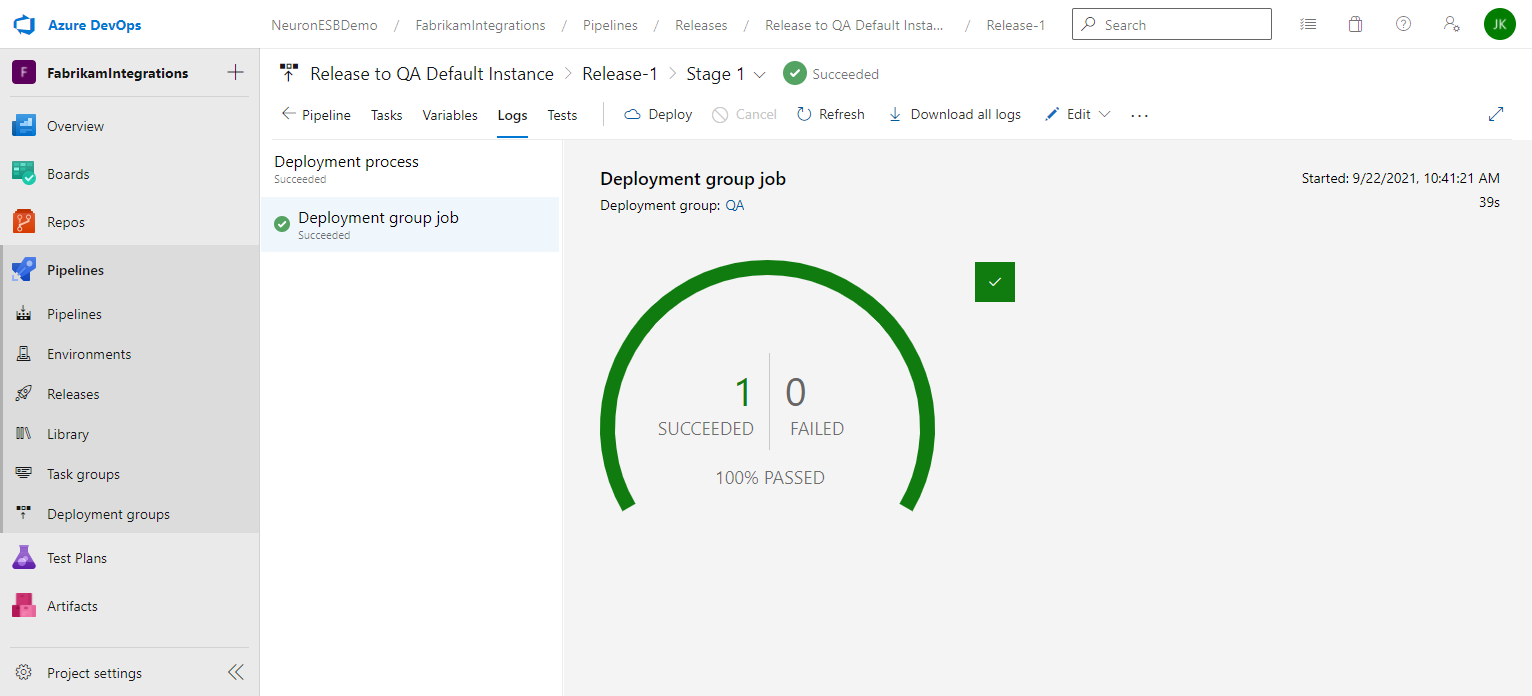
- You will be returned to the release details page and the progress of each stage will be displayed and updated as it progresses. When the release completes, you can hover the cursor over the stage to navigate to the logs.
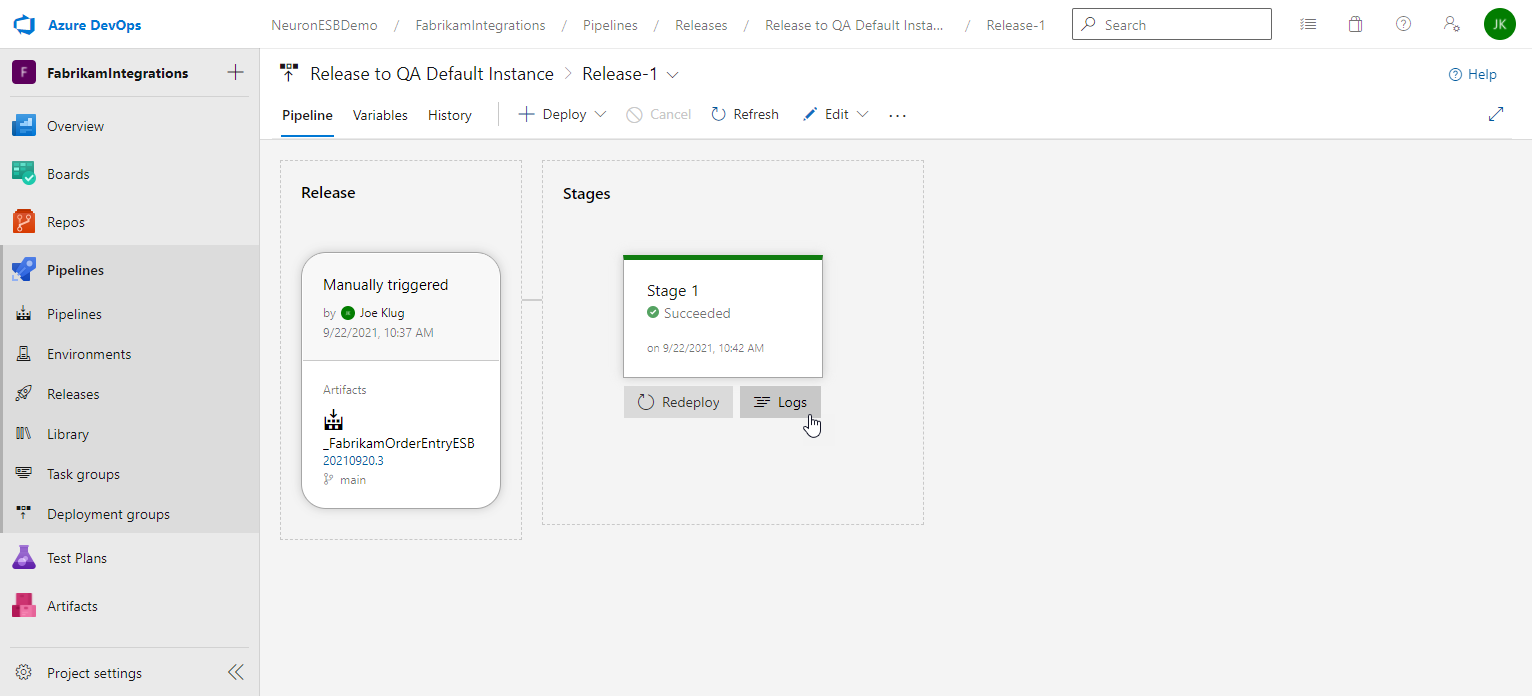
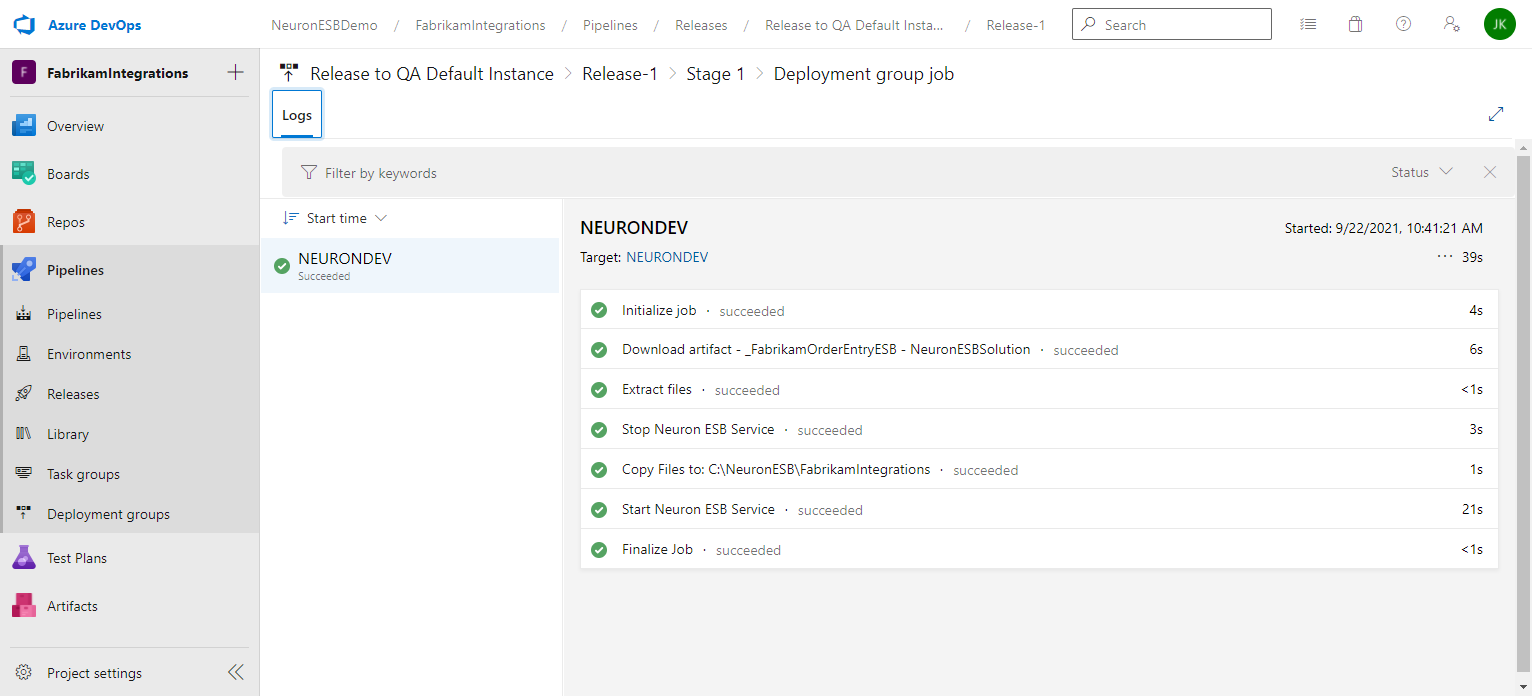
- After clicking the Logs button you will see the Deployment process page, and clicking on the Succeeded/Failed image will take you to the log entries.
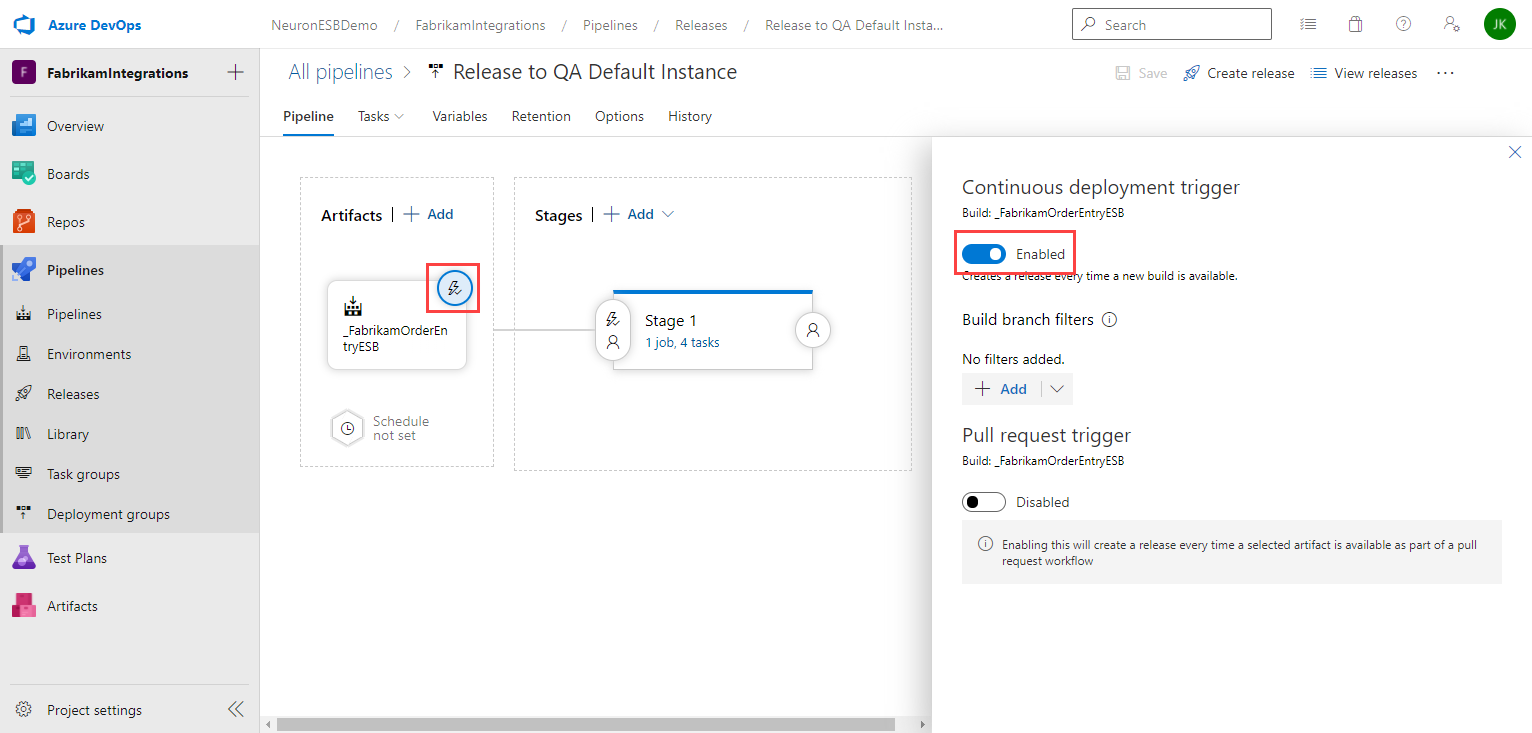
- A release pipeline can be configured for Continuous Deployment or to run on a schedule. This can be done by modifying the release pipeline (not the release you just created). Navigate back to the release pipeline definition and either select the Continuous deployment trigger or the Scheduled release trigger and make the appropriate changes. More information on Continuous deployment triggers can be found here, and scheduled release triggers here.
For example, to enable an automatic release each time a new build is available, first click on the Continuous deployment trigger for the Artifact and enable it:
Second, click on the Pre-deployment conditions and select After release:
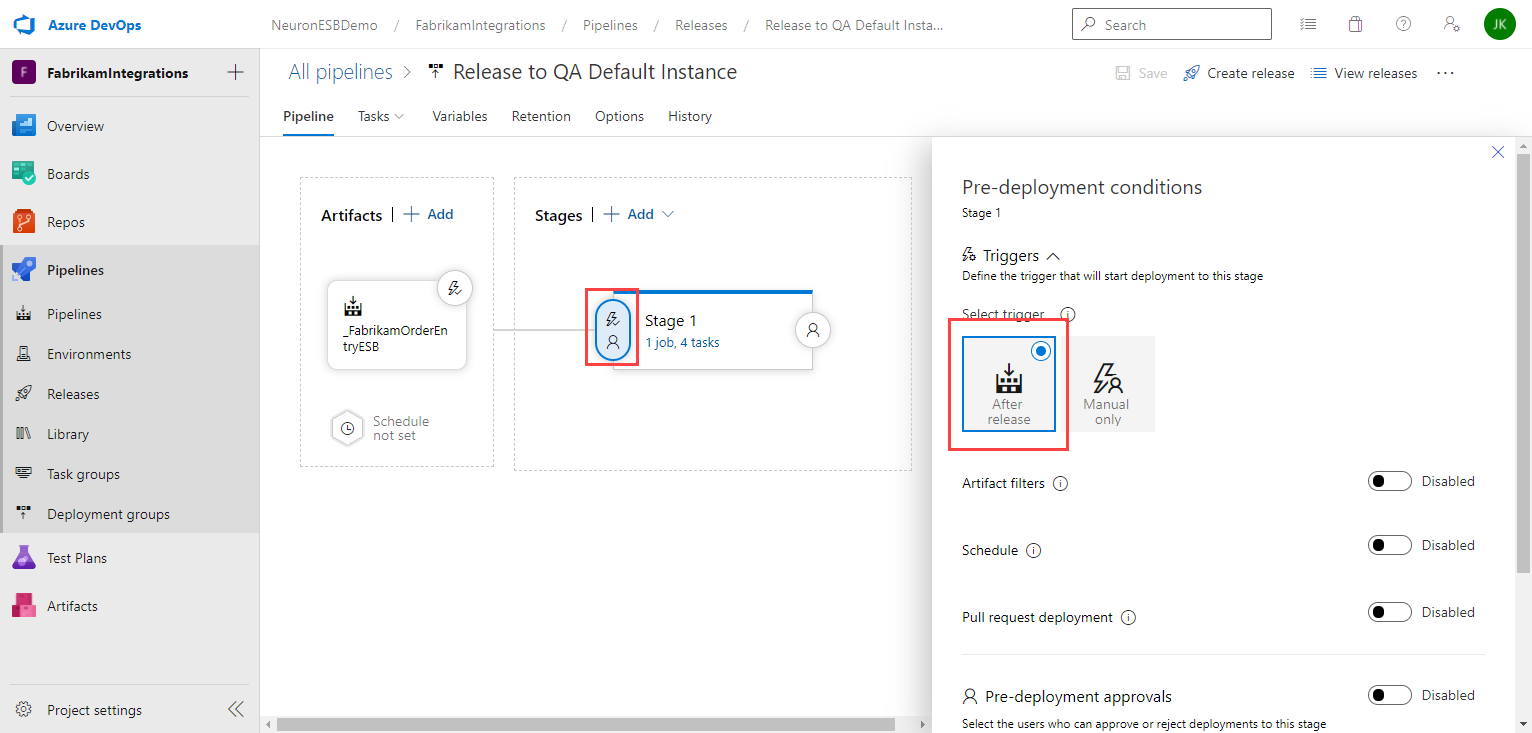
Now, whenever the build pipeline completes, a new release will be created for the newly generated artifact and deploy it to your Neuron ESB server(s).
About the Author
Joe Klug is a Solution Architect for Peregrine Connect, responsible for pre-sales engineering, post-sales support, training, architectural reviews, product development and consulting. Prior to joining the team, he spent a number of years at Microsoft.
Read more about Peregrine Connect

-
Rabbit MQ Topics
Introduction Due to the open-source nature of RabbitMQ and constant updates, it is...
-
Port Sharing
One of Neuron ESB’s scalability features is the ability to install multiple...

-
The Integration Journey to...
The Integration Journey to Digital Transformation with Peregrine Connect
-
Saving Time and Money by...
Neuron ESB Application Integration and Web Service Platform: A Real-World Example...

-
Neo PLM
-
Loomis Case Study
Loomis Chooses Peregrine Connect as Their No/Low-Code Integration Platform:...

-

Decision Test Data Mapping
- Use decisions to drive the execution of...
-
Map Testing
Learn how to utilize FlightPath's testing functions...