
Contents
- Executive Summary
- What is OAuth
- How OAuth works in Neuron Client Connectors
- Peregrine Management Suite
- Setup for using OAuth in a Neuron ESB Client Connector
- How to configure OAuth with PeregrineMS and Neuron ESB Explorer
- Obtaining a token before calling secure Neuron ESB Client Connector
- Using a token to call Neuron ESB Client Connector
- Validating scope and claims inside a Neuron ESB Business Process
- Validating a token outside Neuron ESB
- Bring your own OAuth Provider
- Using Neuron ESB Explorer to setup an OAuth Provider
- Associate OAuth provider with a Client Connector
Executive Summary
Using new features of Neuron ESB 3.7.5 and Peregrine Connect Management Suite (PeregrineMS), it is possible to secure Client Connectors with OpenId Connect and OAuth. The advantage of this identity and authorization mechanism is that it is an open standard and therefore Client Connectors secured using OAuth can be called securely across the internet and within the organization. This mechanism doesn’t rely on the organization’s Active Directory or any other internal LDAP directory. However, it is possible to use the cloud-based directory services also for OAuth if desired.
Therefore, it is easy to treat internal and external users with same security mechanisms. The entire process of setting up and configuring this security is made highly interactive and intuitive with PeregrineMS and therefore allowing you to use best security without needing a Ph.D. in cryptography and security.
What is OAuth
OAuth is an open-standard authorization protocol or framework that describes how unrelated servers and services can safely allow authenticated access to their assets without sharing the initial, related, single logon credential. In authentication parlance, this is known as secure, third-party, user-agent, delegated authorization. Please see the article below for a summary of OAuth:
How OAuth works in Neuron Client Connectors
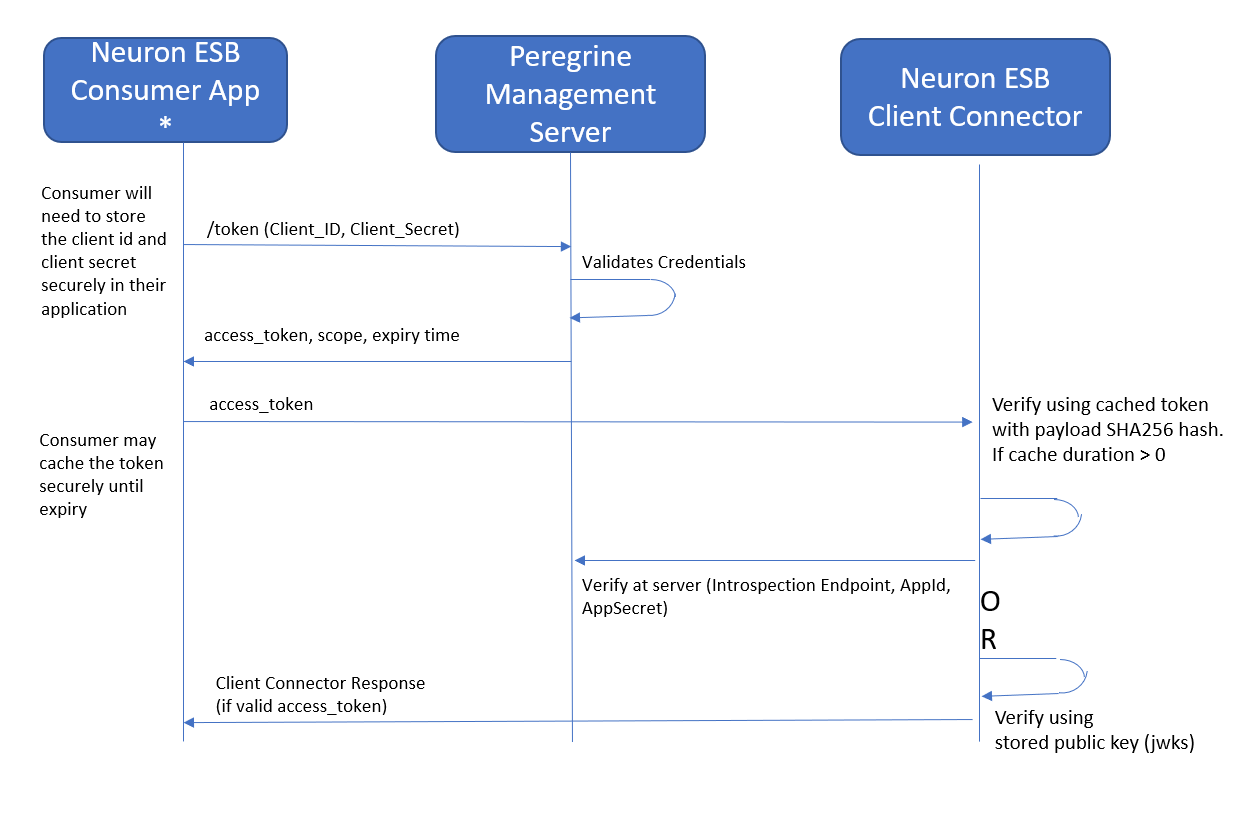
There are multiple different flows for using OAuth between web applications. In Neuron Client Connectors that use OAuth, the Client Credentials flow is generally implemented. In this paper we discuss the Client Credentials flow.
What is Client Credentials flow?
With machine-to-machine (M2M) applications, such as CLIs, daemons, or services running on your back-end, the system authenticates and authorizes the app rather than a user. For this scenario, typical authentication schemes like username + password or social logins don’t make sense. Instead, M2M apps use the Client Credentials Flow (defined in OAuth 2.0 RFC 6749, section 4.4), in which they pass along their Client ID and Client Secret to authenticate themselves and obtain a token. M2M apps then use that token to get access to the backend API resource.
The following diagram shows the sequence of events when accessing a Neuron Client Connector using OAuth:
https://auth0.com/docs/flows/concepts/client-credentials
It is the consumer application’s responsibility to properly code for getting and safeguarding the access token. For details refer to the Identity Server 4 documentation.
Peregrine Management Suite
Peregrine Management Suite (PeregrineMS) is a web-based portal with the sophisticated security management and health monitoring capabilities you need, all in one place. Built in and actionable from your own personalized dashboard, it provides critical alerting systems, security and historical reporting for your Neuron ESB runtime environments. Using OAuth with PeregrineMS makes it easy to use OAuth for securing APIs hosted by the Neuron runtime. The following sections detail the steps necessary for using PeregrineMS. For more details, see https://www.peregrineconnect.com/products/management-suite.
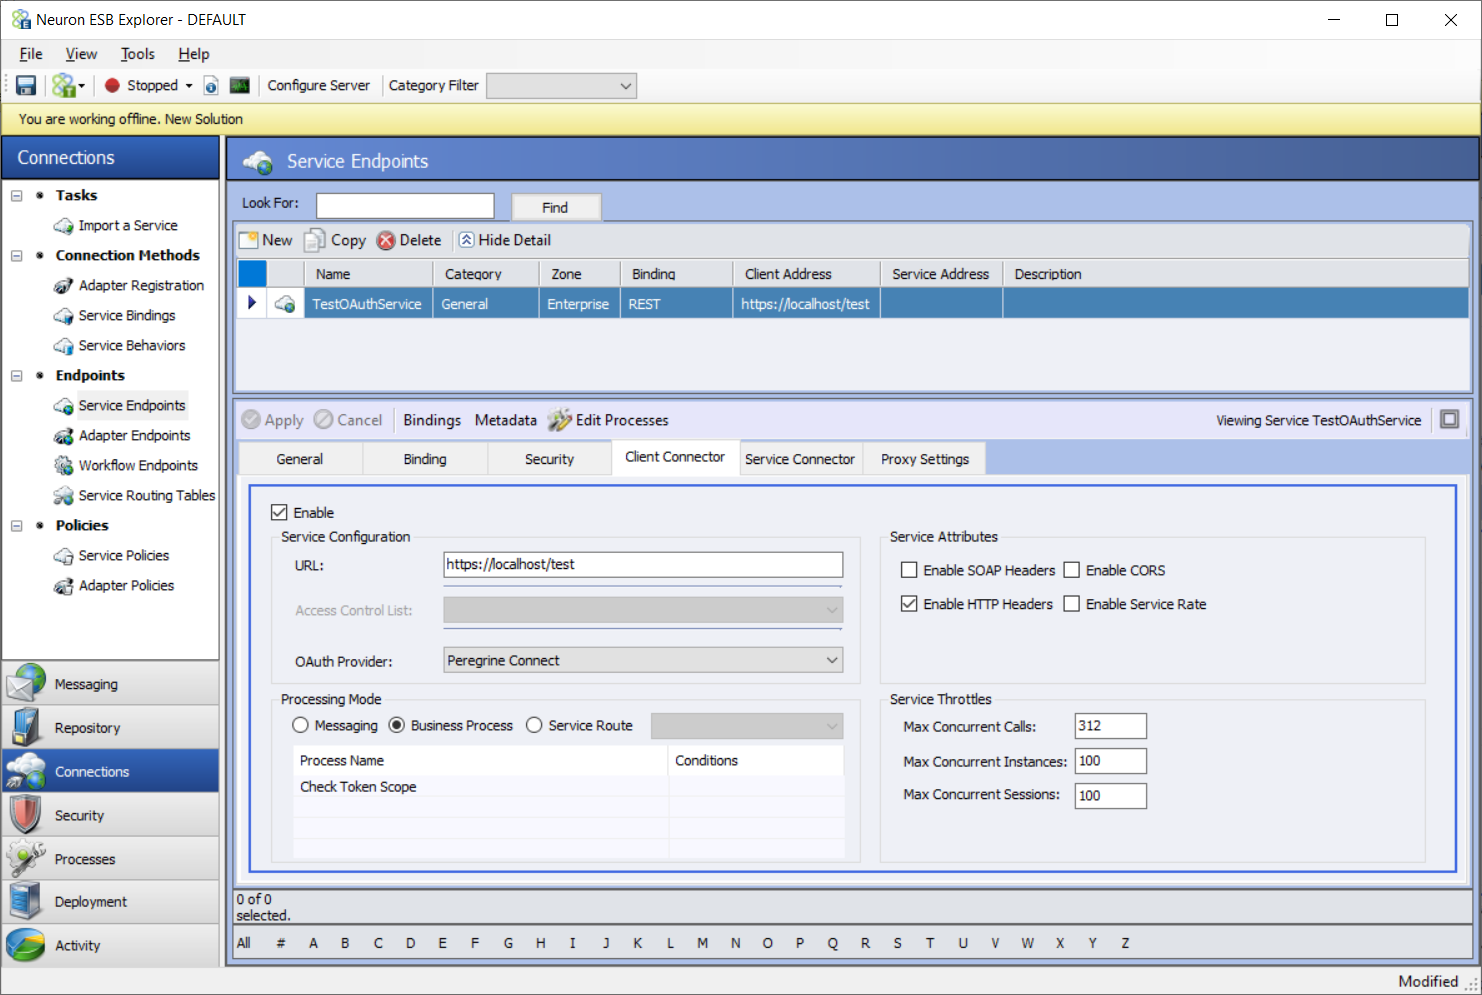
Setup for using OAuth in a Neuron ESB Client Connector
OAuth is supported for Client Connectors configured to use the REST binding and have their Security Model set to “None” or “Transport:None”.
Neuron ESB Consumer App can be native, mobile or web application that needs to communicate with Neuron Client Connector
There are several options for securing a Neuron ESB Client Connector. Besides using PeregrineMS, you can also use Azure, Amazon, Auth0, Okta or Thinktecture Identity Server as OAuth providers. Neuron ESB version 3.7.5 ships with three additional client-side OAuth providers: Azure, AWS and Thinktecture. The Thinktecture provider will work with an on-premises implementation of the Thinktecture Identity server as well as most other identity providers such as Auth0 and Okta.
See the last section, “Bring your own OAuth Provider” for details on using other OAuth providers.
Verification of the token consists of the following
- Integrity using Digital Signature with RSA 256 algorithm.
- Verify the token issuer matches PeregrineMS
- Verify the token’s not before and expiry dates
- Verify that the token’s audience matches the API resource name associated with the client connector. (Explanation of API Resource name in the next section)
The above steps are performed by PeregrineMS in the Introspection method. They are performed in the Neuron ESB Runtime for the Jwks method. For performance reasons, verified tokens may be cached by the runtime for the duration specified in the PeregrineMS setup (Shown in the next section).
Verification of Token Scope and its interpretation is left to the Business Process associated with the Client Connector. The unencrypted token is placed in the Http header property called “Token”. The http authorization header containing the unencrypted token is also available to Business Processes to pass it on for downstream service calls if needed. The samples that ship with Neuron version 3.7.5 include a sample Neuron Configuration showing how to access the Token property in a Business Process.
For more information on PKI, see https://www.csoonline.com/article/3400836/what-is-pki-and-how-it-secures-just-about-everything-online.html.
How to configure OAuth with PeregrineMS and Neuron ESB Explorer.
Utilizing PeregrineMS as your OAuth provider makes securing client connectors with OAuth very easy.
Neuron Explorer
- Create or open a solution in Neuron ESB Explorer.
- Navigate to Connections -> Service Endpoints. Select the service you want to secure using OAuth.
- Ensure that the service binding is REST and the Security Model is either “None” or “Transport:None”. See the section on securing Client Connectors with SSL for a description of Security Model – Transport None.
- Click on the Client Connector tab.
- Select Peregrine Connect from OAuth Provider drop down box.
- Click Apply and Save.
PeregrineMS
Setup the PeregrineMS environment and configure the Neuron Solution as the application in that environment. Refer to PeregrineMS documentation for this setup. Once you have completed the environment setup, you can continue setting up the OAuth part as per screens shown below.
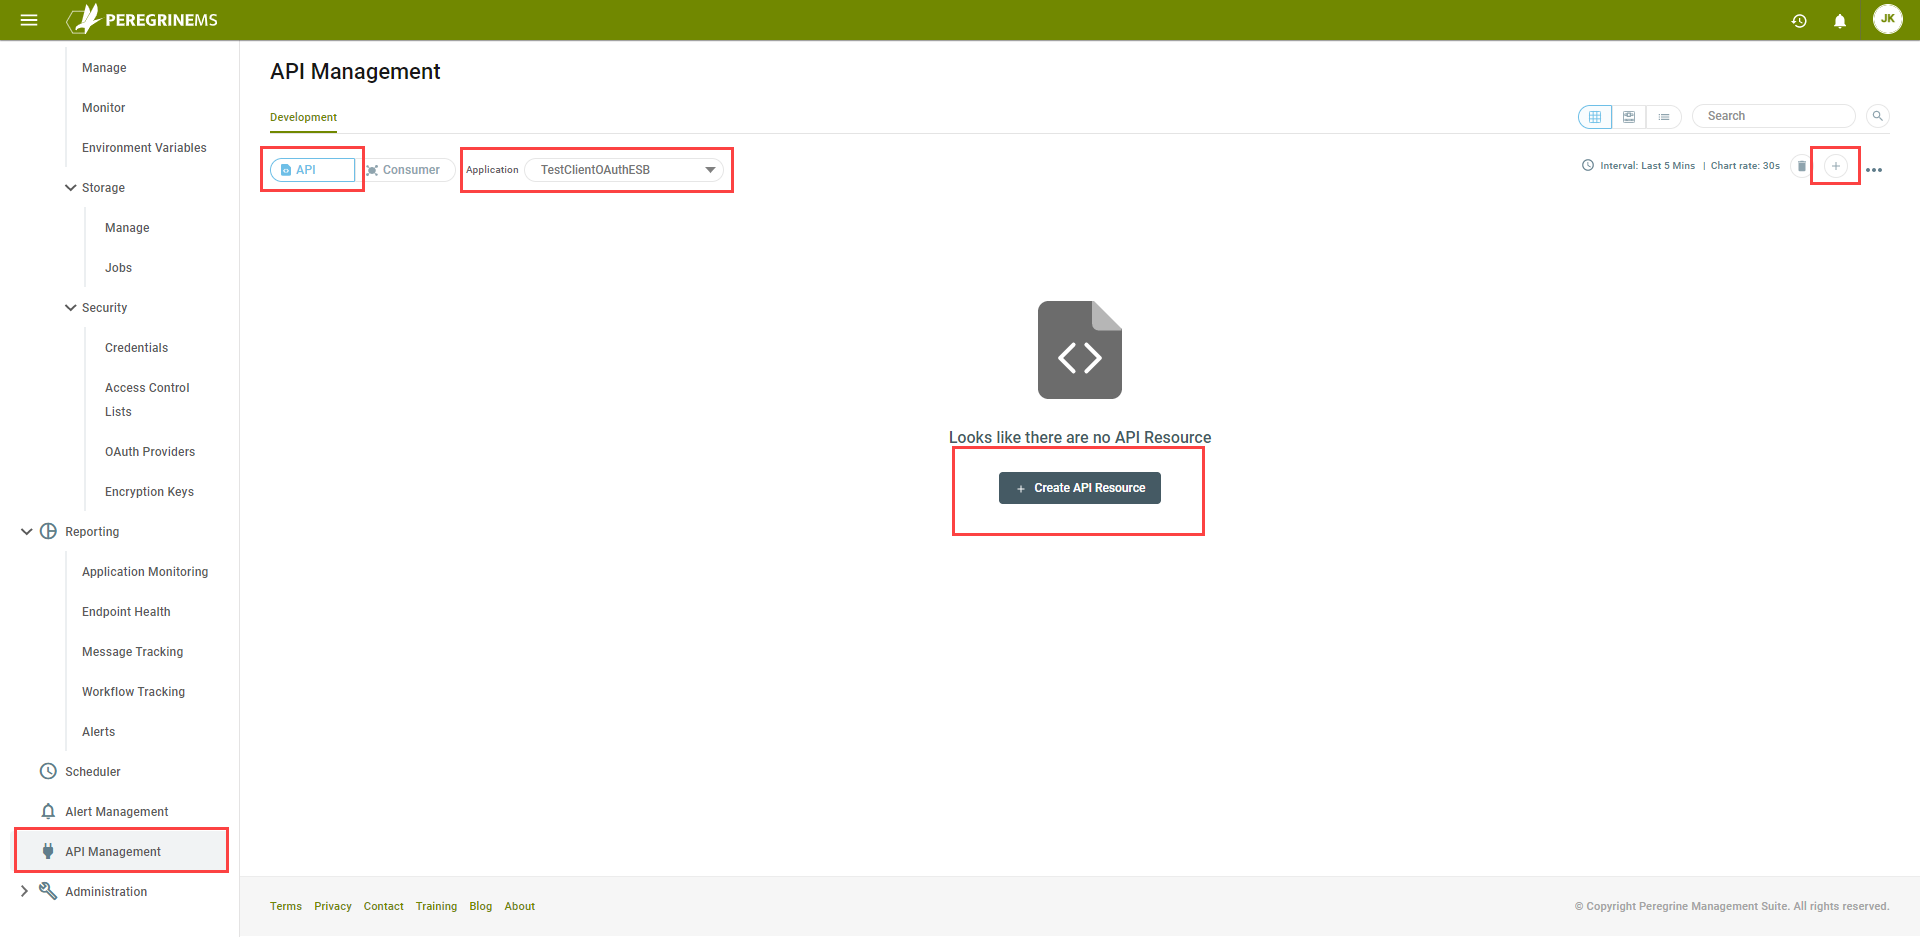
Setup API Resources
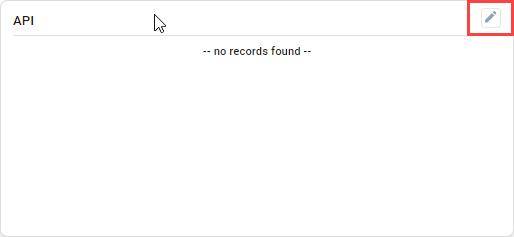
Click API Management in the left-hand navigation bar. Make sure the API tab is selected. Select the Neuron ESB application using the dropdown box. If there aren’t any existing API Resources, click the Create API Resource button. Otherwise click the plus symbol in the upper-right corner to create an API resource.
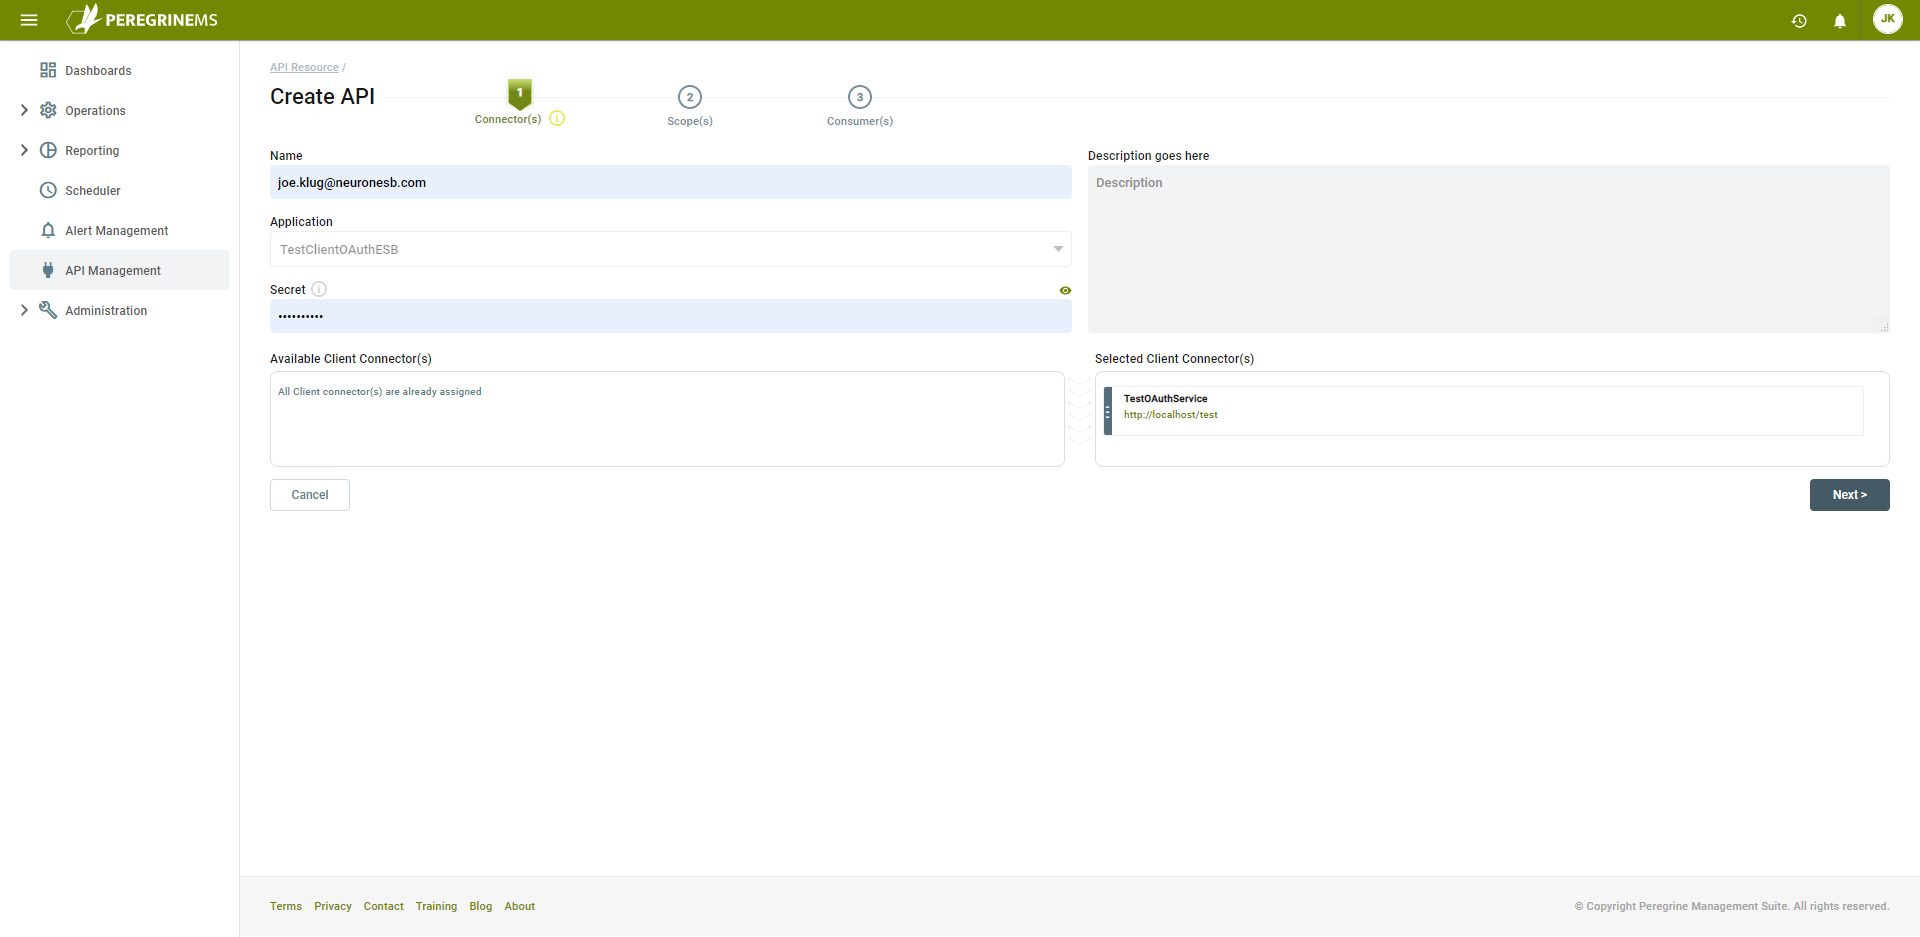
Enter a Name and Description of the API resource. Below that enter the application Secret. An application secret is a password used by Neuron to validate the access token. It ensures that no agent other than Neuron ESB can access the application token validation endpoint in PeregrineMS without having the application secret. You can select to show/hide the application secret for convenience. The application secret is used to access the introspection endpoint using the application name and application secret as basic authentication. This application secret is configurable because you may want to set up API resources for applications other than Neuron ESB.
The Bottom panel shows all the Client Connectors in the selected application that can be secured with a PeregrineMS OAuth provider. Note that the Neuron solution configured for the environment must have at-least one Client Connector with Peregrine Connect selected as the client OAuth Provider.
You can drag and drop the Client Connector endpoints from the Available Client Connectors list to the Selected Client Connectors list to include it in the API resource definition. Configure all the Client Connectors that you want to secure under that common API resource theme. Click Next to continue.
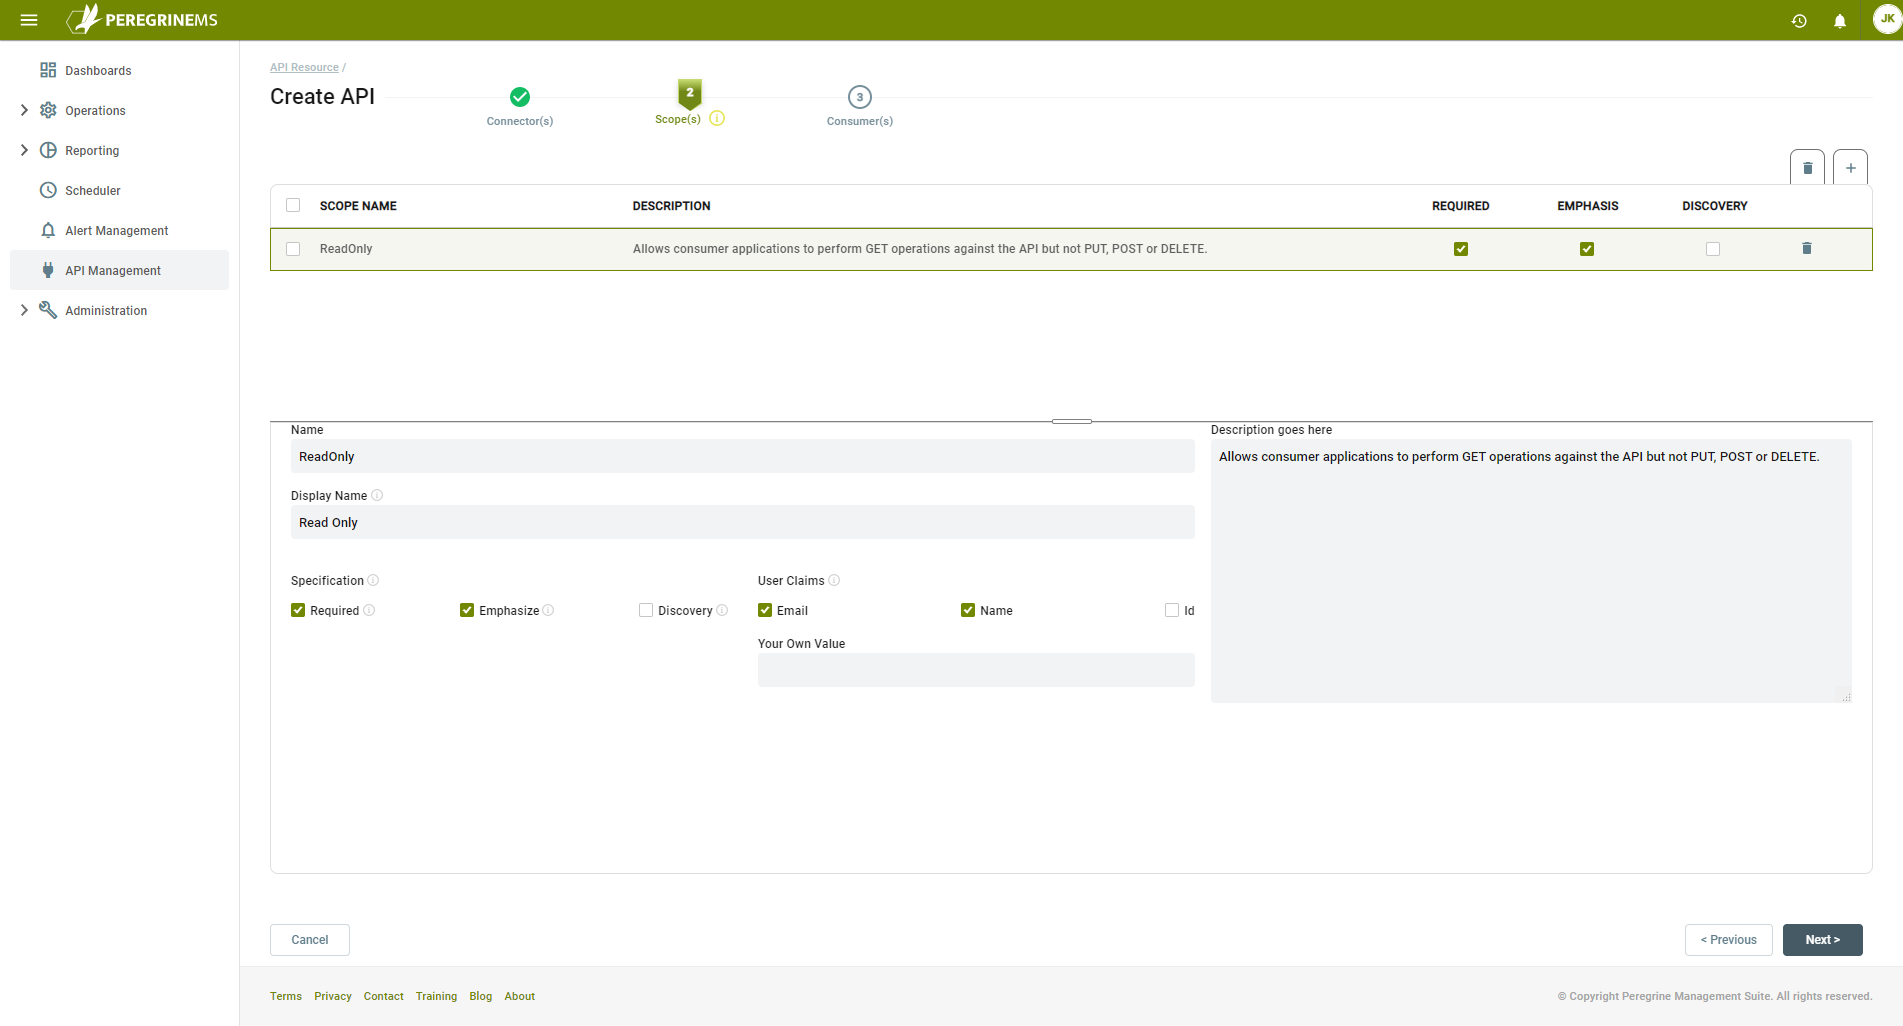
In the Scope(s) tab, add the desired scopes for the API resource. Scopes indicate the subject areas by which you want to control access. For example, if you want to control read/write access you may have a read-only scope, write-only scope and read-write scope. Choose a scope Name and Display Name that make sense in the context of the business use case. You can select whether to require, emphasize and include the scope names in discovery document. The consumer applications using these API resources will see the Scopes and Claims according to the way they are configured here.
Under each scope, you may further select User Claims that indicate which part of the user data will be shared with Neuron ESB when the consumer application sends its user token to Neuron. Note that claims are applicable only when the consumer application is a user-facing web or desktop application and users log-in to that application using PeregrineMS as the identity provider. In other words, for claims the grant type needs to be either PKCE or Hybrid. There can also be a custom defined user claim added here in the text area under Your Own Value. The Description is just a free form text to describe the intent of the scope being defined. Additional Scopes can be added by clicking plus sign. Click Next to continue.
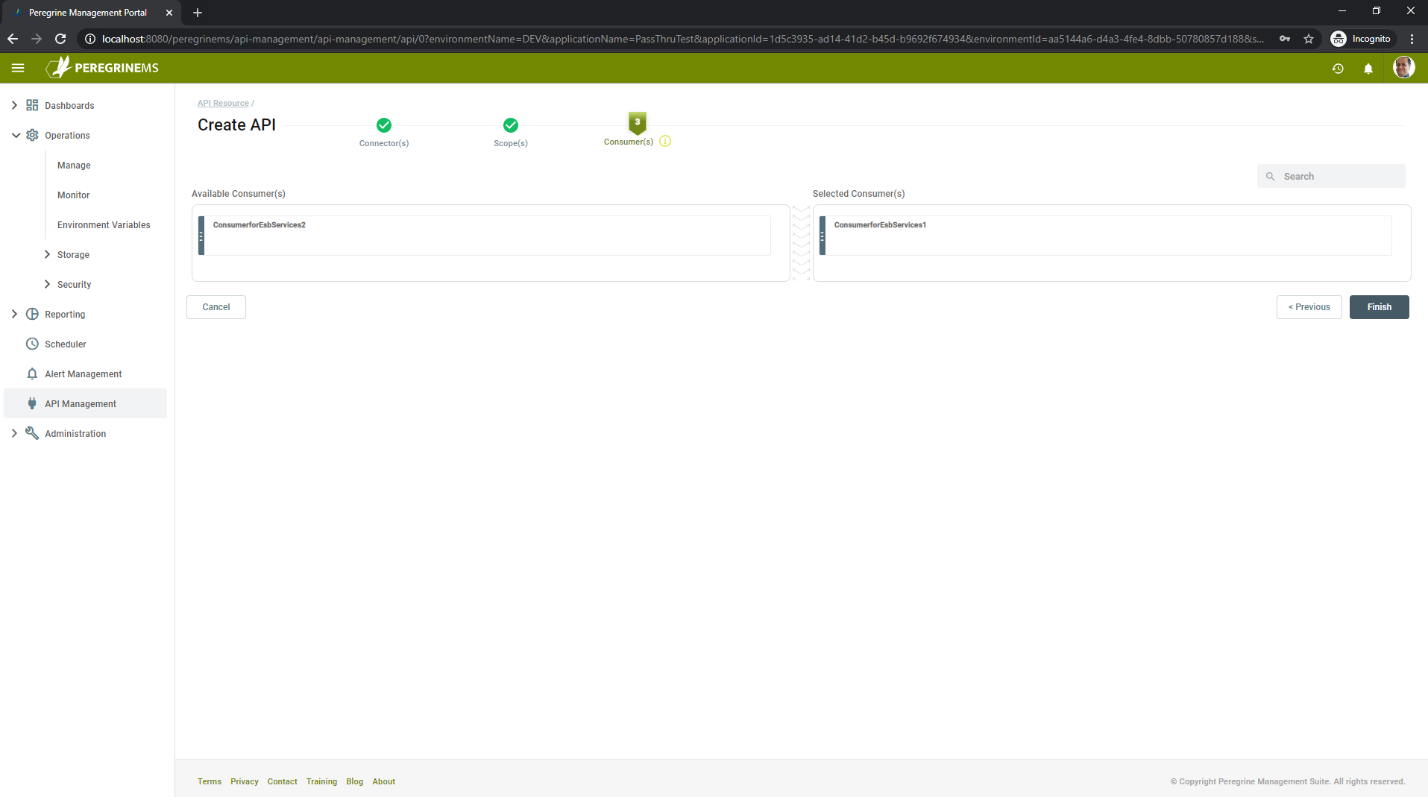
In the Consumer(s) tab, you can assign zero or more consumers to the API. Of course, you will want to assign at-least one consumer of the API resource. This consumer will get a token from Peregrine MS and send it when invoking the client connector that you selected in first step. Unassigned consumers will display on left-hand side from which you can drag and drop to the right-hand side to assign them. When you assign the consumers to API this way, by default the consumers will get all the scopes associated with the API. For a more advanced scenario where you need to restrict the consumer to specific scopes only, see the advanced scenario in the following section.
Generally, it is enough to create one API resource per Neuron Application and select all the client connectors in that application under the same API resource. If you want to logically partition your client connectors by some functionality aspect, you may create more than one API resource and place some client connectors under one and the other client connectors under the other API resource.
Setup for Issuing tokens to consumers of Neuron Client Connectors
Any application that needs to obtain a token from PeregrineMS needs to have a consumer record created with a name, description, client ID and client secret setup for them and same scope and claims (as defined under API Resource. Can also be subset of the scopes and claims defined for the API resource.) associated with that client id and client secret. A special property for Peregrine Connect called cache duration in minutes can be defined to reduce the overhead of token verification on every call.
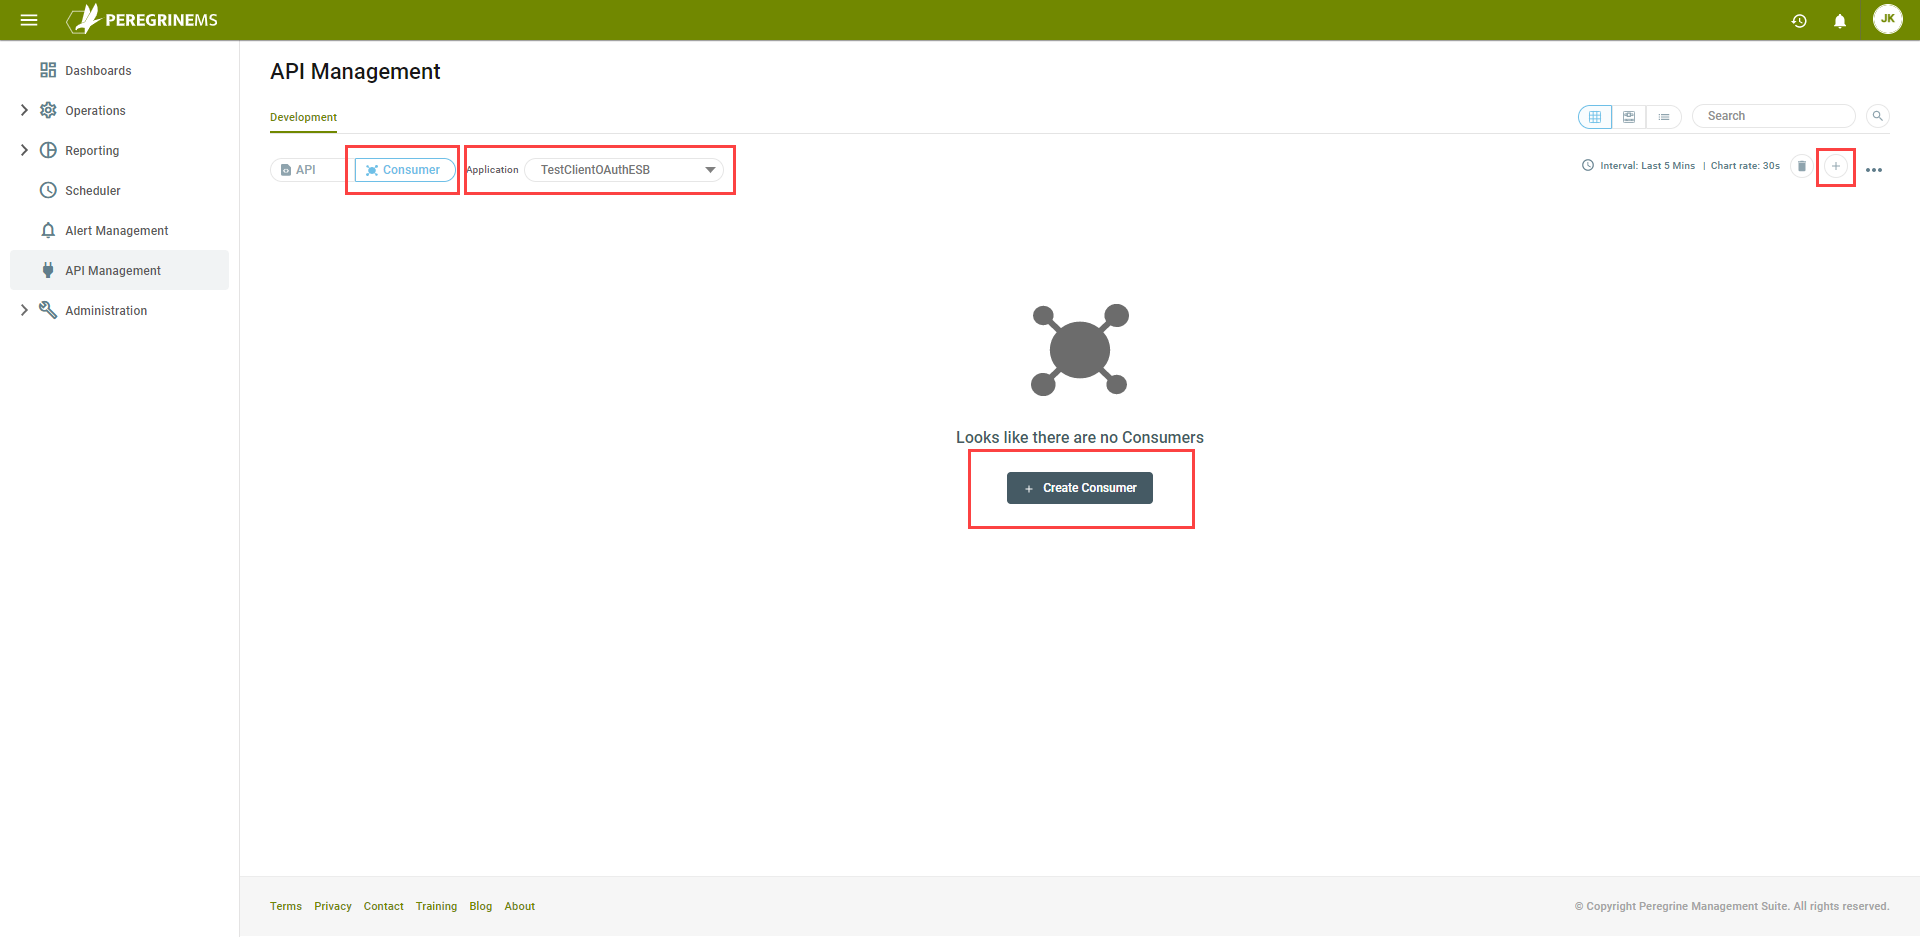
To create a consumer, select the Consumer Tab on the default view. If there aren’t any existing Consumers, click the Create Consumer button. Otherwise click the plus symbol in the upper-right corner to create a Consumer.
Enter the Name, Description and a unique ID for the consumer. Select the Grant Type the consumer will use when interacting with the token service.
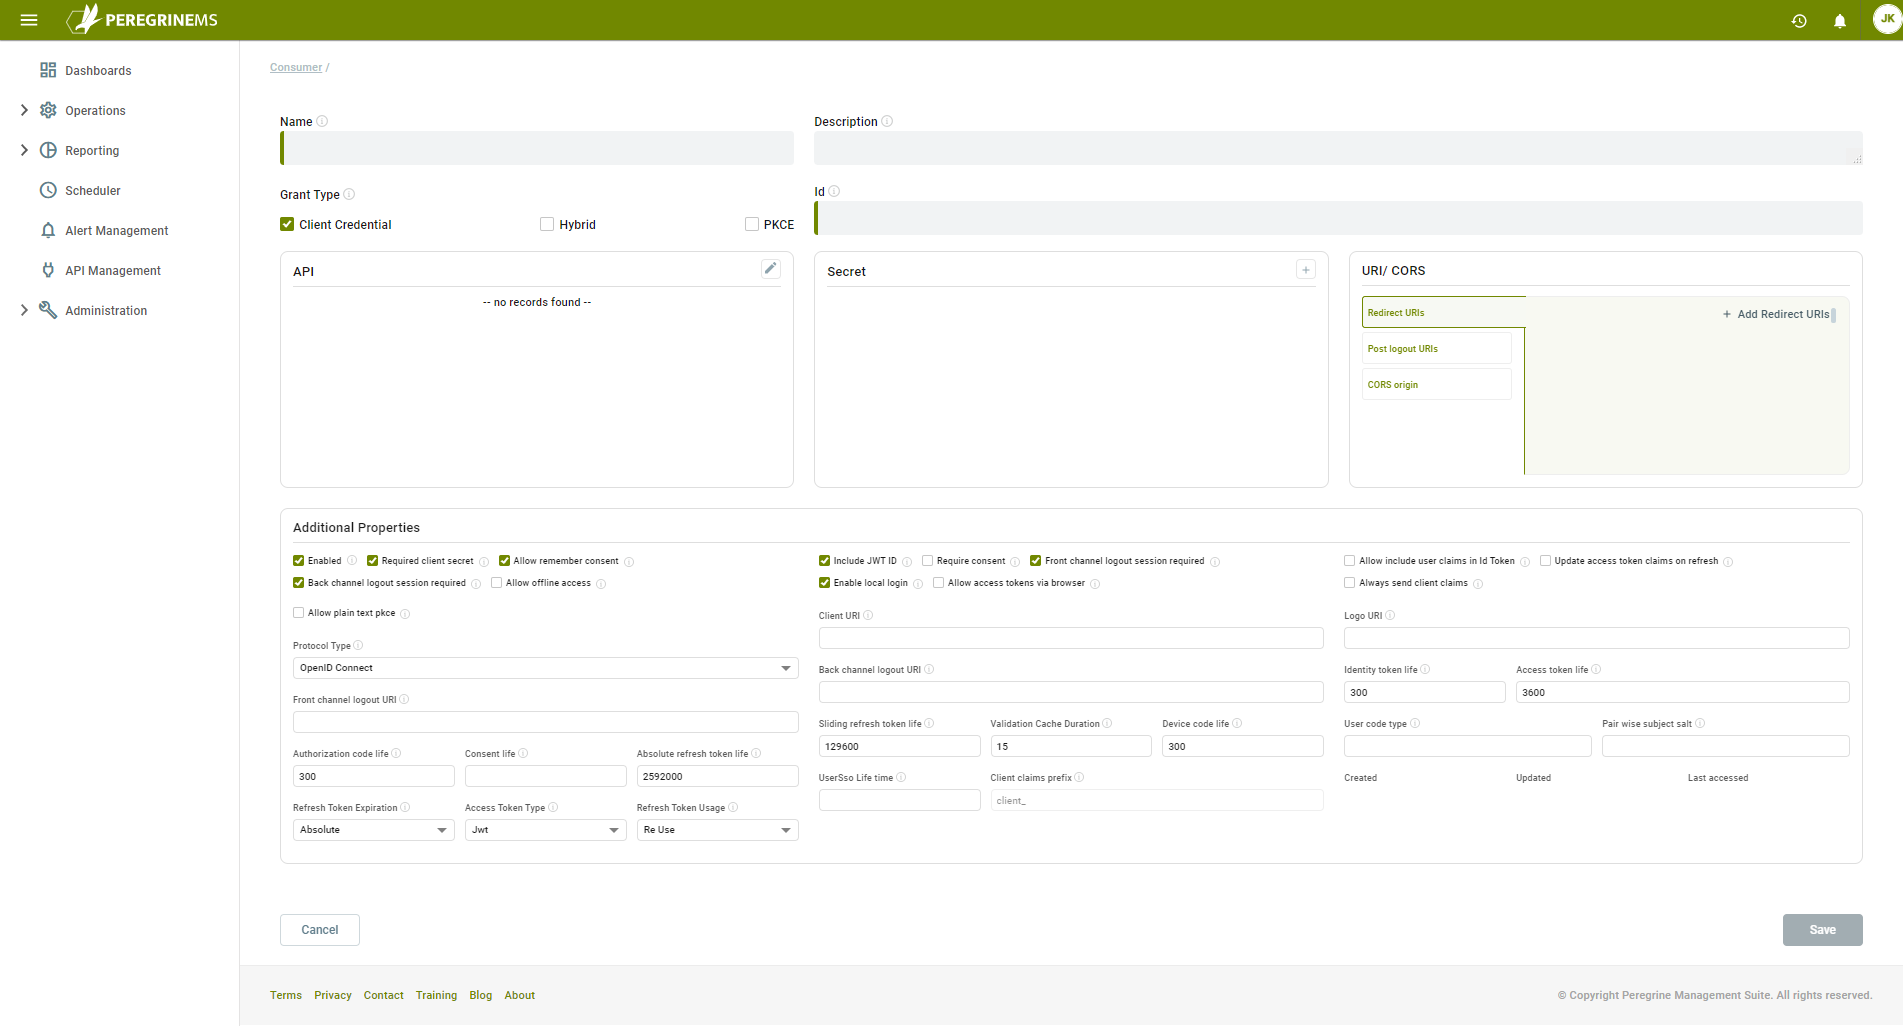
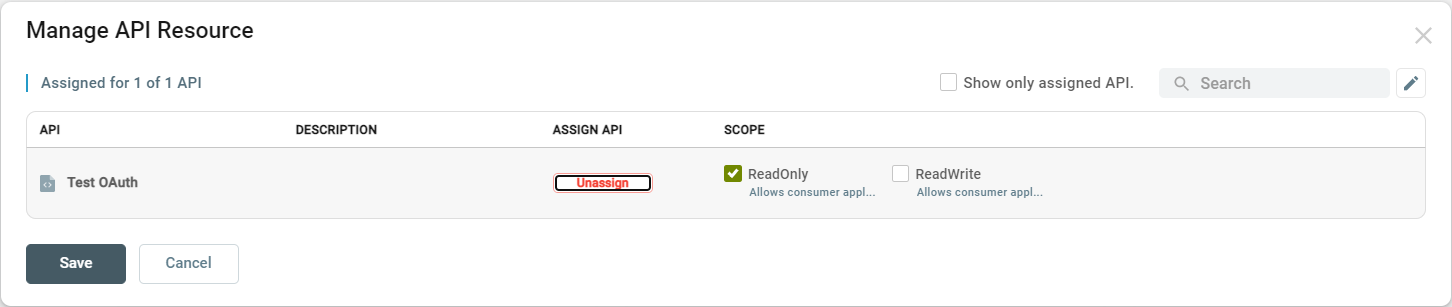
The APIs this consumer can access can either be selected in this configuration or assigned to the consumer in the API Resource configuration. To assign API(s) in this configuration, click the edit button in the API section:
The Manage API Resource dialog will display. Click the Assign button for the API(s) this consumer can access:

For each assigned API, the list of available scopes is displayed. Select the Scope(s) required for this consumer. You can select any number of the available scopes. Scopes are used to determine the level of authorization given to the consumer holding the token for various resources/functionality that the API allows. The scope(s) will be included in the token obtained by the consumer and sent to the Neuron ESB Client Connector. A Business Process associated with the Client Connector can evaluate the included scope(s) to control access to the functionality behind the API. Click the Save button:
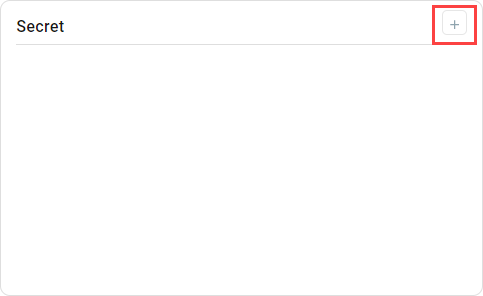
One or more Client Secrets can be setup for this consumer. To add a client secret, click the edit button in the Secret section:
The Create Secret dialog is displayed. Enter a Name, Value and optionally select an Expiration date. Even though it is optional, it is recommended that client secrets have an expiration.
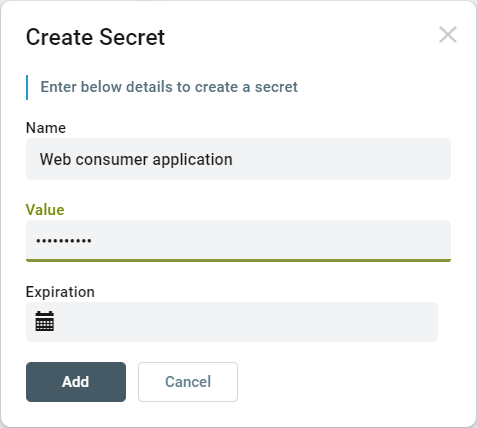
There can be more than one active client secret where two different applications need to have same other properties but different secrets. Generally, though an additional secret is added when the previous secret expires or is compromised.
Once a client secret is generated, it can’t be reproduced. This is by design. The client secret is the consumer application’s responsibility to securely store. Client secrets should have an expiration date.
Additional properties associated with the Client Connector are dictated by the consumer application’s need. The identity server’s token endpoint will respond with redirection to specified URLs and will honor requests from URLs coming from the CORS origins specified. These are in the URI/CORS tab and the bottom tab. These properties can generally be left to default values. If you would like to learn more about those properties, consult the PeregrineMS Identity Server documentation.
With the exception of the Include JWT ID and Validation Cache Duration properties, the properties listed in the Additional Properties section have no bearing on the Neuron ESB Runtime. They govern the interaction with Consumer Application and the PeregrineMS token and authorization endpoints. For a full understanding of the other flows and properties refer to the PeregrineMS Identity Server documentation.
Obtaining a token before calling secure Neuron ESB Client Connector
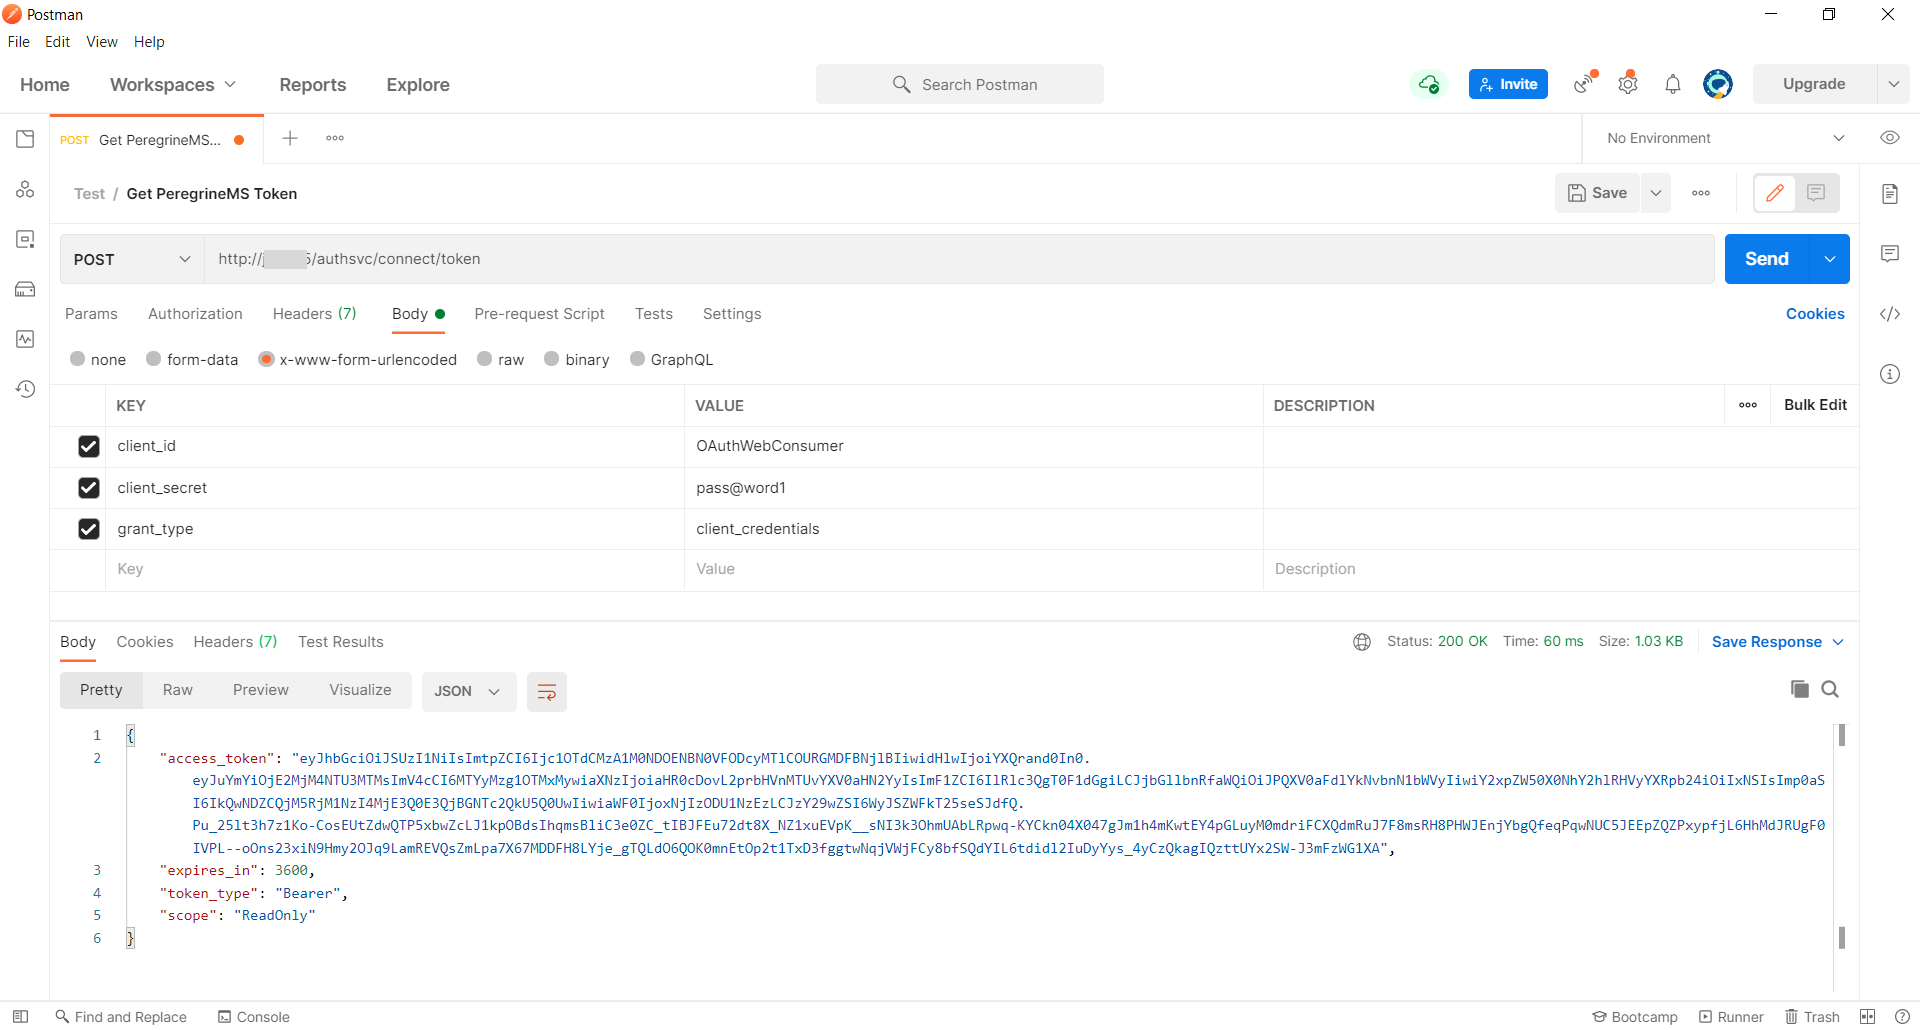
To obtain a token from the PeregrineMS Identity Server, use the token endpoint (https://hostname:port/authsvc/connect/token) to send a POST request containing the following form data. Host name and port are where the Peregrine management suite is installed.
- client_id
- client_secret
- grant_type – client_credentials
Following screen shows this endpoint setup in Postman.
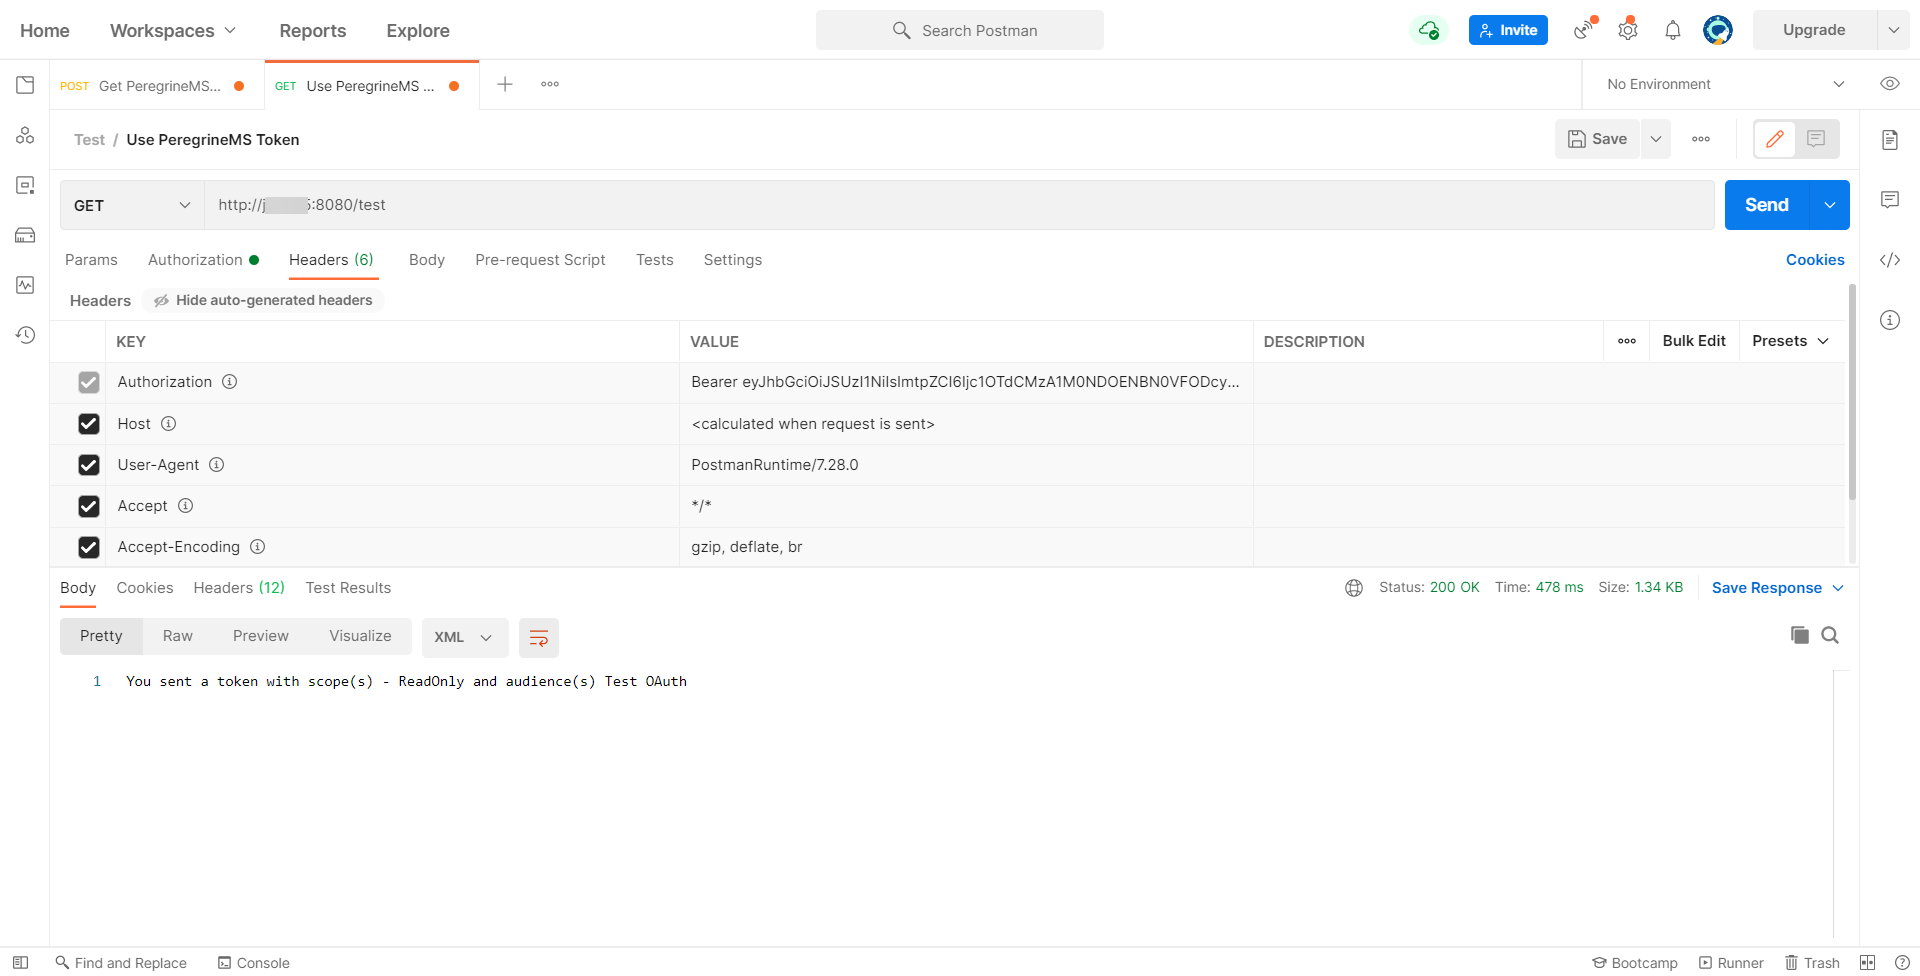
Using a token to call Neuron ESB Client Connector
To call the Neuron ESB Client Connector with an OAuth token, add an Authorization header with “Bearer” and the value of the access_token obtained in the previous to the Header of the Http Request to Neuron ESB Client Connector. Make sure you include a space between “Bearer” and the access token.
Following screen shows this endpoint setup in Postman:
Validating scope and claims inside a Neuron ESB Business Process
The unencrypted token is a json structure similar to that shown below. This can be parsed using a Neuron ESB Business Process code step to get the scopes and claims.
Business logic can then conditionally filter or redirect the flow to other Business Processes based on the scope values.
{
     "nbf": 1596078375,
     "exp": 1627182375,
     "iss": "https://localhost:8080/authsvc",
     "aud": "ClientConnectorAccess",
     "client_id": "consumerforesbclientservices",
     "client_CacheDuration": "15",
     "active": true,
     "scope": "Test Test2"
 }
Validating a token outside Neuron ESB
It is possible to use PeregrineMS for validating tokens in other applications hosted outside of Neuron ESB.
Online using Introspection Endpoint
To validate a token, POST a request to the introspection endpoint: https://hostname:port/authsvc/connect/introspect
The request is secured with Basic Authentication, using the PeregrineMS API Name and Secret as the username and password, respectively. The token being validated is added to the request as a parameter called “token”:

Offline using Jwks
Download the public JWKS keys from the PeregrineMS. Use the recipe below to validate using JWKS .
https://github.com/auth0-samples/auth0-dotnet-validate-jwt/tree/master/IdentityModel-RS256
Notes: When a Neuron ESB Client Connector receives a request containing an Authorization header with a Bearer token, the header will be passed-on to service connectors to use for authorization against downstream services. This will happen regardless of whether or not the Client Connector is configured for OAuth authorization. If the consuming application is sending a Bearer token that is not to be validated by the Client Connector, do not configure the client connector for OAuth authorization and the Bearer token will be ignored.
Bring your own OAuth Provider
It is possible to use Neuron ESB runtime’s OAuth verification with your own Identity Service Provider if you do not have PeregrineMS. Azure, AWS and Thinktecture Identity Server providers are supported. Many other directory services such as Auth0, Okta etc. can also be supported with the generic Thinktecture Identity Server provider.
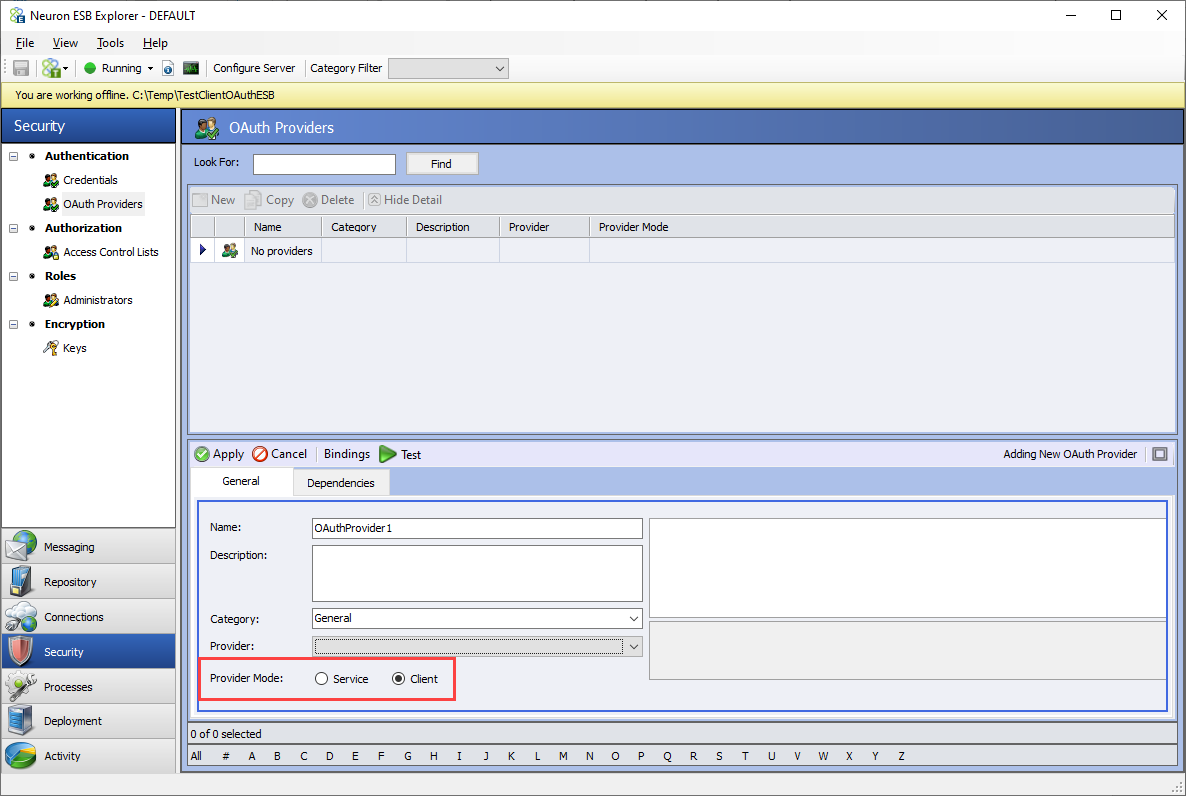
Using Neuron ESB Explorer to setup an OAuth Provider
In Neuron ESB Explorer, select the Security tab in the left-hand navigation bar. Select OAuth Providers and click New. Change the Provider Mode to Client:
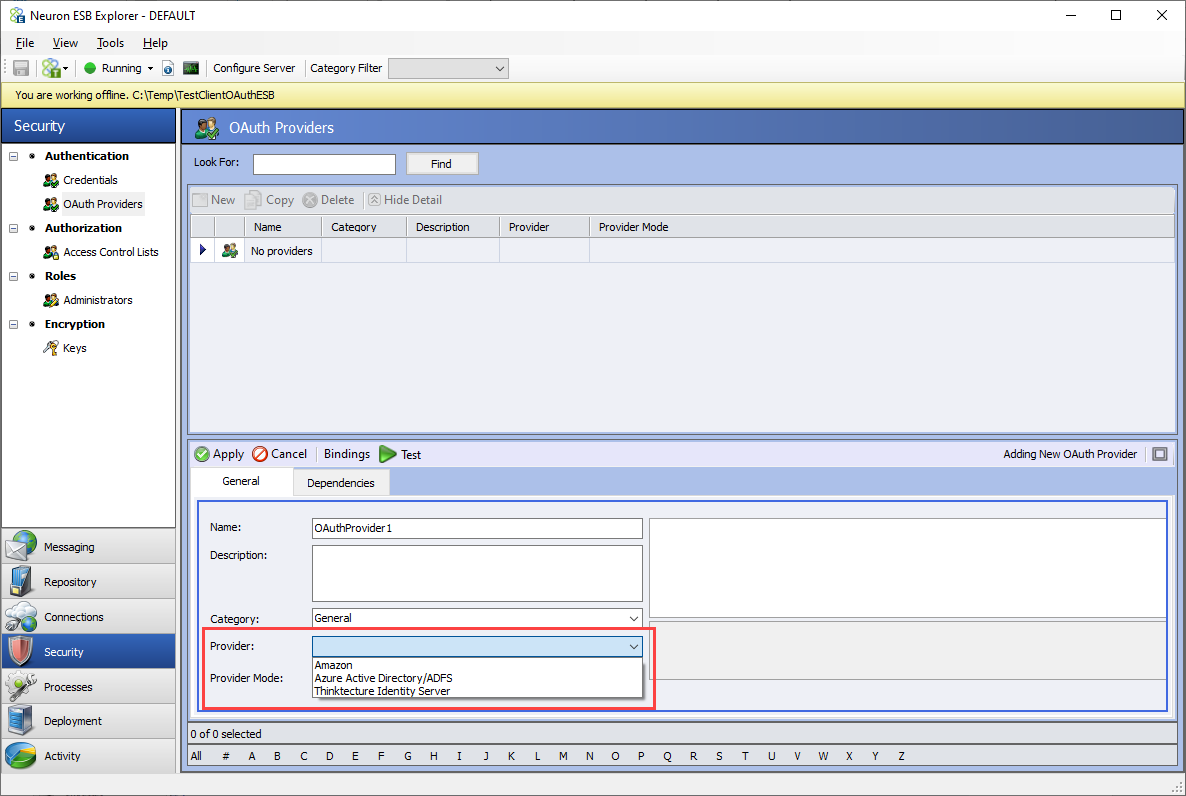
Select a Provider from the dropdown list:
Set the properties for the selected provider in the property grid:
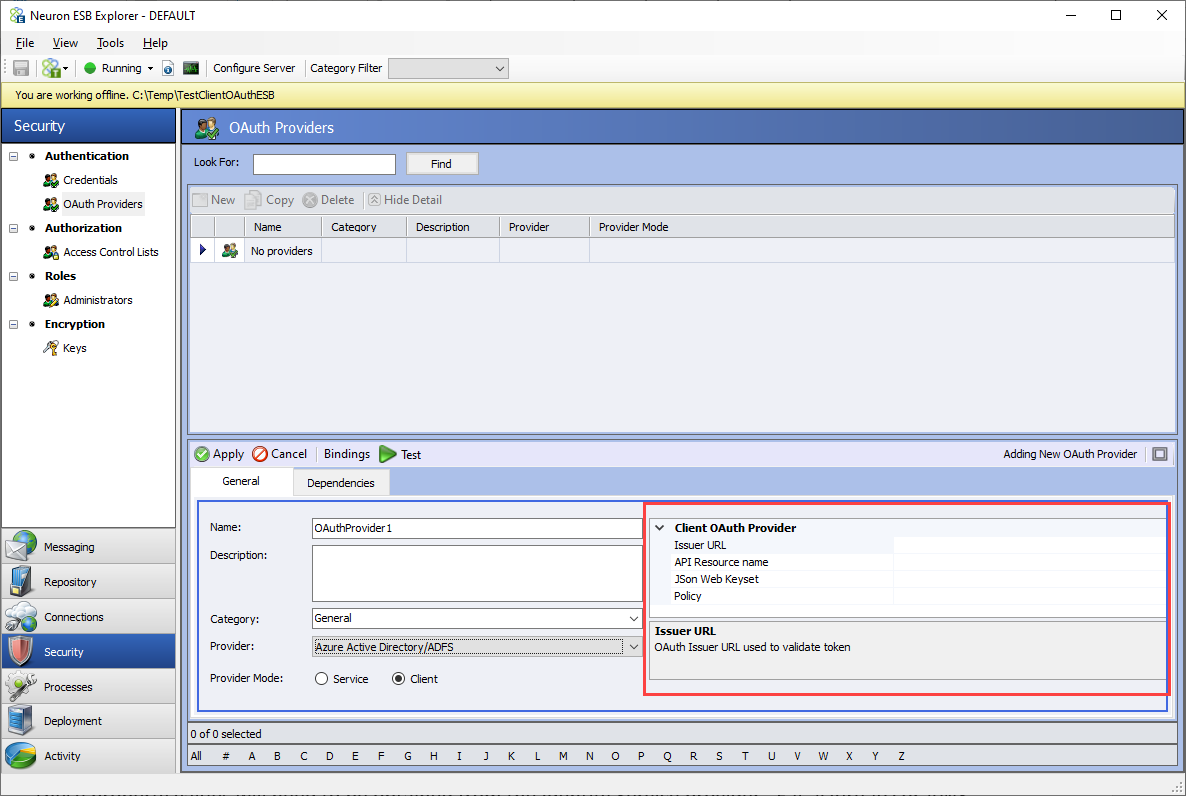
These property values will need to be obtained from the Identity Service provider. E.g. Azure AD, AWS, etc. Issuer URL will be of the format https://login.microsoftonline.com/{tenant}/oauth2/v2.0/token
API resource name is generally also known as application name.
Json Web Keyset can be downloaded from this tenant independent version for Microsoft: https://login.microsoftonline.com/common/.well-known/openid-configuration
Policy – A policy applies to Azure AD B2C configuration. Usually its default value is b2c_1_signupsignin1.
Associate OAuth provider with a Client Connector
Once you have completed the OAuth Provider setup, you will be able to select it in the Client Connector’s OAuth Provider dropdown:
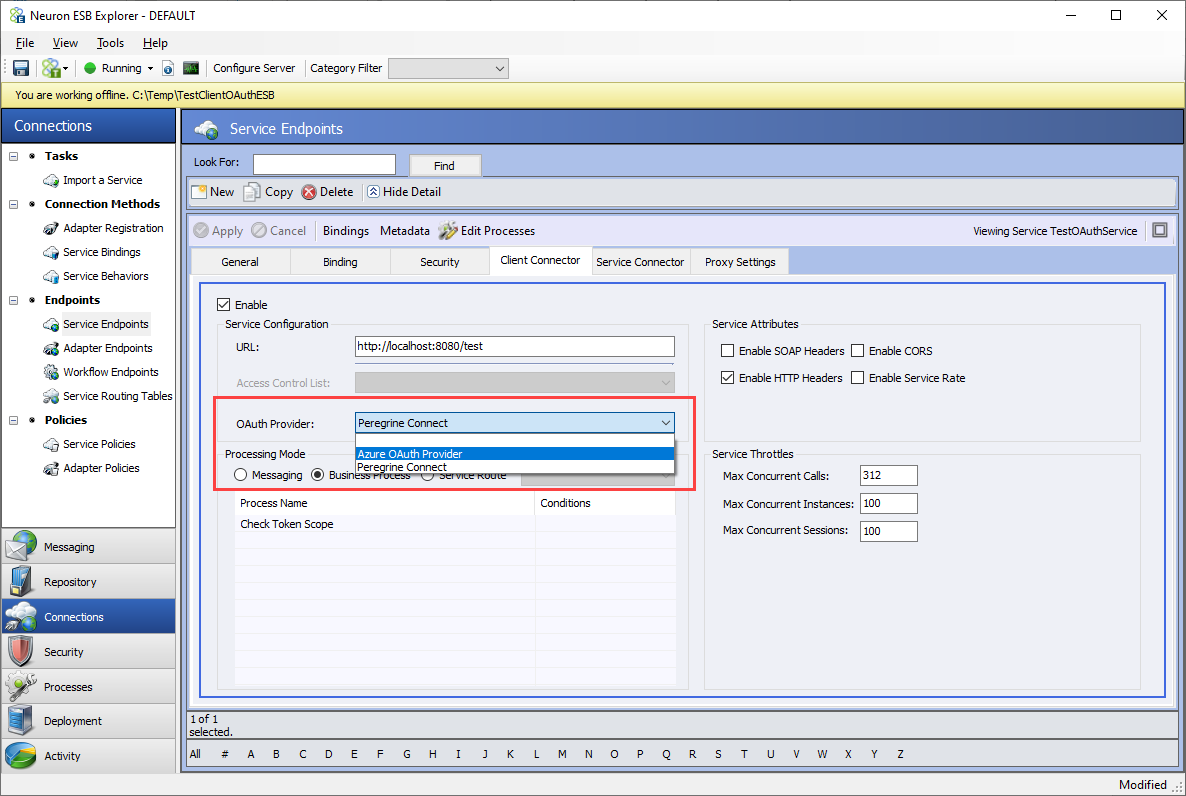
Select the provider to associate it with the Client Connector. Note that only Thinktecture Identity Server provider has online introspection mode. When using online mode, an application id and application secret are used to authenticate to the Identity Server’s introspection endpoint.
For Amazon and Azure Active Directory, the only option is to use JSON web key (offline mode).
About the Author
Himanshu is an experienced principal software engineer at Peregrine Connect. With several years of experience in the integration space with an extensive programming background. His numerous specialties include API management, security, cloud, and container technologies.
Read more about Peregrine Connect

-
Rabbit MQ Topics
Introduction Due to the open-source nature of RabbitMQ and constant updates, it is...
-
Port Sharing
One of Neuron ESB’s scalability features is the ability to install multiple...

-
The Integration Journey to...
The Integration Journey to Digital Transformation with Peregrine Connect
-
Saving Time and Money by...
Neuron ESB Application Integration and Web Service Platform: A Real-World Example...

-
Neo PLM
-
Loomis Case Study
Loomis Chooses Peregrine Connect as Their No/Low-Code Integration Platform:...

-

Decision Test Data Mapping
- Use decisions to drive the execution of...
-
Map Testing
Learn how to utilize FlightPath's testing functions...