Introduction
The Neuron ESB OneDrive Connector (Adapter) provides access to OneDrive using the Microsoft Graph API. Using this adapter, organizations can easily integrate their business content management requirements with OneDrive. This adapter provides three modes – Publish, Subscribe and Solicit/Response. Publish and subscribe modes provide similar functionality as the File and FTP adapters. In publish mode, a OneDrive folder is polled for documents. When a new document is found, it is published to a topic as the body of the Neuron ESB message. In subscribe mode, when the OneDrive adapter receives a new message, the body of the message is written to a OneDrive folder as a document. Solicit/Response performs the same functionality as subscribe mode with the added functionality of receiving information about the uploaded file as the response, including a link to the uploaded file.
Before reading this document
If you are not familiar with Neuron ESB Adapters, take a moment to consult our online help: https://www.peregrineconnect.com/documentation/doc-development-adapters. This document assumes you have the following knowledge:
- What adapters are and how they are leveraged in Neuron ESB
- Register a Neuron ESB Adapter within a Neuron ESB Solution
- Create an Adapter Endpoint in a Neuron ESB Solution
- Set a Neuron ESB Adapter Endpoint Properties
- Invoke a Neuron ESB Adapter Endpoint
Supported Modes
The OneDrive Adapter supports publish, subscribe and solicit/response modes. Publish and subscribe are both one-way calls. The solicit/response mode returns a response after uploading the document to OneDrive.
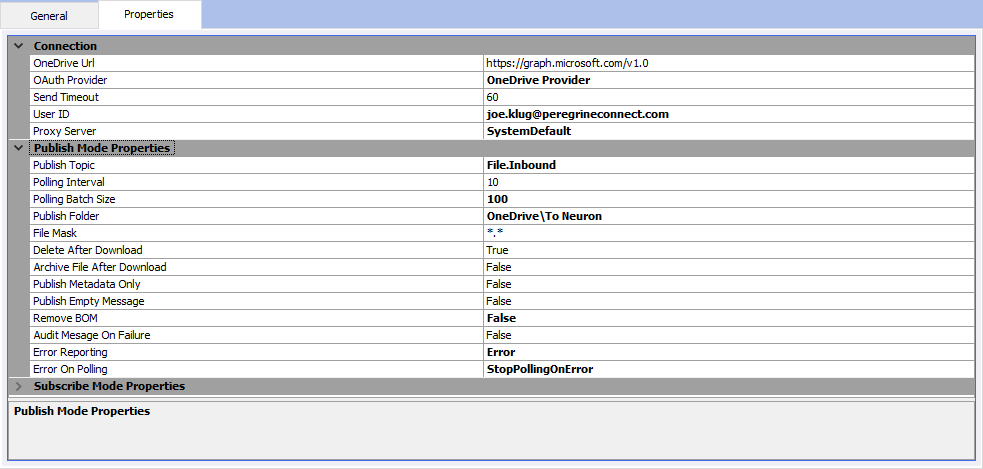
OneDrive Adapter Properties
Every Neuron ESB Adapter has design time properties that can configured within a standard Microsoft property grid (as shown below). These properties are used to determine the behavior of the adapter at runtime. The group of Connection properties is used to configure the base OneDrive URL and the OAuth Provider used for authorization.
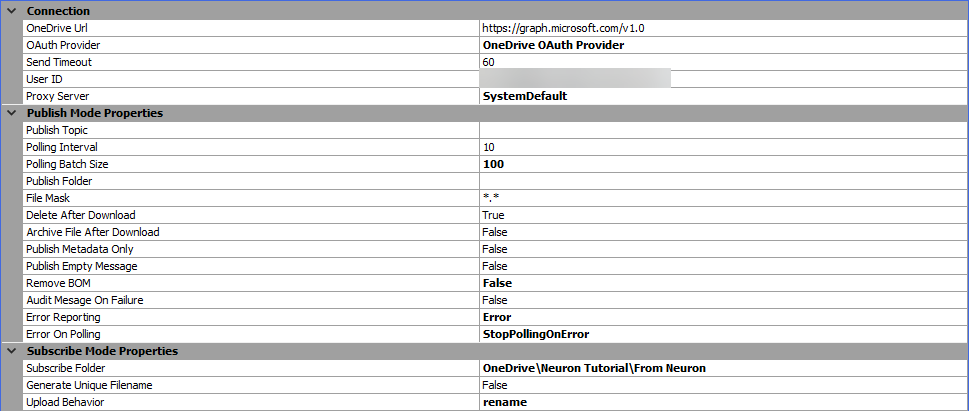
Connection Properties
The group of Connection properties is used to configure the OneDrive Endpoint URL, along with the security credentials used when sending requests to OneDrive.
OneDrive Url
The base Url used when making calls to OneDrive. This should always be https://graph.microsoft.com/v1.0.
OAuth Provider
This is the pre-configured OAuth Provider that will be used when making calls to OneDrive. See the section titled Azure Active Directory/ADFS OAuth Provider for details on how to create an OAuth connection.
Send Timeout
This is the amount of time in seconds the OneDrive adapter will wait to upload a file when in subscribe or solicit/response mode. The default value is 60 seconds and should be long enough for most calls. However, if you are uploading large documents you may want to extend the timeout.
User ID
OneDrive accounts are associated with a User ID. This is the User ID, which is usually an email address, for the OneDrive account.
Proxy Server
Allows you connect to OneDrive via a proxy server. By default, this value is set to System Default. Changing the value to custom will expose additional properties:
- Address – The URL address to the proxy server
- Port – The port for the proxy server address
- Use Custom Credentials – By default this is set to false and will use the credentials that the Neuron ESB instance is running under. Changing this value to True will allow you to select a stored credential from Neuron ESB.

Publish Mode Properties
In publish mode, the OneDrive adapter will poll a OneDrive folder and publish documents to a topic. The content of the document found in OneDrive will become the content of the Neuron ESB Message body.
Publish Topic
The Neuron ESB topic that messages will be published to.
Polling Interval
The amount of time between each polling attempt to see if there are any files to download from OneDrive.
Polling Batch Size
The maximum number of files to download during each polling attempt. Valid values are 1-1000. This property should be set based on the sizes of files being downloaded. The smaller the files, the higher you can set this number. For very large files you should set this value to a low value.
Publish Folder
The relative path of the OneDrive folder to poll for files. This can be a single folder, i.e. “OneDrive”, or a path, i.e. “OneDrive\Subfolder”. You cannot edit this property directly – you must click the ellipsis button and use the folder selector to navigate the OneDrive folder structure.
File Mask
File spec for retrieving files from OneDrive. Must be in the form of “*.*”. This also supports wild characters like “*” and “?”. Masks can be used for file name as well as extension i.e. “my?name.*”. Example: “*.log”. If all files should be returned use ‘*’ or “*.*”. Multiple search filters can be supplied if separated by a comma or semicolon i.e. “*.txt;*.doc”.
Delete After Download
Deletes the file on OneDrive after it is retrieved. Default value is True. Setting this to False will display the properties Enable Timestamp Comparison and Check Window.
Enable Timestamp Comparison
If True, compares the last write timestamp of the OneDrive file to retrieve, with the timestamp of the previously retrieved file of same name. If timestamps are the same, the file is not retrieved again unless the Check Window property has been exceeded. If False, the file will be downloaded with every polling interval. This property is only enabled when Delete After Download is set to False.
Check Window
The timespan range from the current date time which the file will be considered a duplicate and not be downloaded if Timestamp Comparison is enabled. Format is “d:hh:mm:ss”. For example, if the file is downloaded at 8:00 AM, and the check window is 12:00:00, then file will automatically be downloaded again at 8:00 PM even if the file has not changed. This property is only enabled when Delete After Download is set to False.
Archive File After Download
When set to True, the adapter will archive the file on OneDrive after it is retrieved. Default is False. This will override the ‘Delete After Download’ property. Setting this to True will display the property Archive Folder.
Archive Folder
The relative path of the Folder to archive the downloaded files to. Can be a single folder, or a path i.e. “OneDrive\Subfolder”. You cannot edit this property directly – you must click the ellipsis button and use the folder selector to navigate the OneDrive folder structure. This is only enabled when Archive File After Download is set to True.
Archive Behavior
Customize the archiving behavior when a file conflict occurs – Fail, Replace or Rename the file in the archive folder. Renaming the file will append a number to the end of the existing file name.
Publish Metadata Only
Publishes the metadata of the file, not the actual data. The file will be moved to the specified Archive Folder. This is useful when you only want to pass a pointer to the file to another system (i.e. a link to the file in a SharePoint site). When setting this to True, the Archive File After Download property will also be set to true and you will be required to set an archive folder.
Publish Empty Message
Publishes an empty message if a zero-byte file is returned from OneDrive.
Remove BOM
Provides the option for the adapter to remove the Byte Order Characters (BOM) preceding data in UTF8/UTF16 and other web formatted files.
Audit Message on Failure
When set to true, a message that has been received from OneDrive but fails publishing to a topic will be audited to the failed messages table.
Error Reporting
Determines how all errors are reported in Event Log and Neuron Logs. Either as Errors, Warnings or Informationals.
Error On Polling
Determines if polling of the folder will continue when an error occurs and if consecutive errors are reported. If StopPollingOnError is selected, when an error occurs the adapter endpoint will go into the Failed state. If SuppressConsecutiveErrors is selected, when an error occurs the adapter endpoint will continue to poll at the next polling interval. If the same error is encountered, it will not be logged. If ReportAllError is selected, when an error occurs the adapter endpoint will continue to poll at the next polling interval. All errors will be logged.
Subscribe Mode Properties
In subscribe mode, the OneDrive adapter will create or overwrite a document in a OneDrive folder. The content of the Neuron ESB Message body will be saved as the content of the document created in OneDrive.
Subscribe Folder
The relative path of the OneDrive folder to send files to. This can be a single folder, i.e. “OneDrive”, or a path, i.e. “OneDrive\Subfolder”. You cannot edit this property directly – you must click the ellipsis button and use the folder selector to navigate the OneDrive folder structure.
Generate Unique File Names
Setting this to true will automatically generate a unique file name based on a Guid on OneDrive for the uploaded file. When set to false, the filename will be determined in this order:
- The value of the Neuron ESB Message property onedrive.Filename (this would have to be set by a user in a process or workflow)
- If #1 does not return a file name, the value of the Neuron ESB Message property file_in.Filename (this would be set if the file was published to the bus by a file adapter)
- If #1 & #2 do not return a file name, the internal Neuron ESB Message ID + the numerical value of DateTime.UtcNow.Month + the numerical value of DateTime.UtcNow.Ticks + .txt
Upload Behavior
Customize the upload behavior when a file conflict occurs – Fail, Replace or Rename the file in the subscribe folder. Renaming the file will append a number to the end of the existing file name.
Using the OneDrive Adapter
The OneDrive Adapter has three modes:
- Publish
- Subscribe
- Solicit/Response
Publish and subscribe modes operate in the same manner as the file and FTP adapters. The Neuron ESB message body contains the file to be uploaded or downloaded from OneDrive. Solicit/Response mode will provide you with a file info response.
Security
As noted previously, the adapter supports OAuth 2.0 when integrating with OneDrive. The adapter handles all the security requirements at runtime. When you’re constructing a request message to send to OneDrive you do not need to worry about setting credentials.
Request and Response Message Formats
The OneDrive adapter can upload or download any file type that OneDrive supports. In request/response mode, the adapter will only return JSON for the response message.
Dynamic Message Properties
The OneDrive adapter supports several message properties that can be used to dynamically change the behavior of the adapter at runtime. All the message properties have the prefix “onedrive”. For example, if you want to set the filename that will be used when uploading a file to OneDrive on a per-message basis, you could use the following code in a C# step:
context.Data.SetProperty(“onedrive”, “Filename”, “test.xml”);
Subscribe Mode Message Properties
These message properties can control the behavior when uploading files to OneDrive:
|
Folder |
Name of the OneDrive folder that the file will be written to |
|
Filename |
The name that will be used when uploading |
Publish Mode Message Properties
These message properties are set when downloading files from OneDrive:
|
Folder |
Name of the OneDrive folder from which the file was retrieved |
|
Filename |
Name of the file received from OneDrive |
|
Length |
Lengeth of the file in bytes |
|
Timestamp |
The date time stamp of the file on OneDrive |
|
Mode |
Represents the configured Adapter Mode for the endpoint |
|
FileUrl |
The direct URL to download the file on OneDrive |
|
ArchiveFileInfo |
The full file infor of the downloaded file after it has been archived |
|
ArchiveFileName |
The name of the file in the archive folder |
|
ArchiveFolder |
The folder the downloaded file has been archived to after it has been archived |
|
ArchiveUrl |
The direct URL to download the archived file on OneDrive |
Create a OneDrive Account
If you don’t already have one, you will need to sign-up for a OneDrive developer account. You can get a free account from https://onedrive.com. Click the Create free account button to join. After completing the sign-up details and confirming your account, you will need to perform some setup in your account before you can use the adapter.
OneDrive Application Setup
The OneDrive adapter uses the Microsoft Graph API to upload and download files. Microsoft Graph uses OAuth 2 to authenticate users. With Neuron ESB, the client credentials grant flow (accessing without an interactive user) is the best option.
To configure OAuth 2.0, you will need to register an application with Azure Active Directory. This section will provide high-level steps of how to create an application. The details for each of these steps can be found here:
https://learn.microsoft.com/en-us/graph/auth-v2-service
- Register your app
- Create a client secret (this step is not included in the above link)
- Configure permissions for Microsoft Graph
- Get administrator consent*
- Get an access token*
- Use the access token to call Microsoft Graph*
* You don’t need to complete these last three steps in the above URL. See below.
Register your app
When adding a new app registration to Azure Active Directory, use these settings:
- Supported account type – Accounts in this organizational directory only
- Redirect URI – you do not need to select a platform or enter a redirect URI
- Save the Application (client) ID and Directory (tenant) ID. You’ll need these for the Neuron ESB OAuth Provider
Create a client secret
You will need a client secret for the client credentials grant flow.
- In your app registration click on “Certificates and secrets”. You can use either a certificate or a shared secret. For this demo, we will use a shared secret.
- Click on the “Client Secrets” tab.
- Click “New client secret”.
- Enter a description for the secret and an expires in value, then click add.
- Copy the generated Value for use in the Neuron OAuth Provider.
Configure Permissions for Microsoft Graph
When using the client credentials flow grant, you will need to add Application permissions to the Microsoft Graph API. The only permission you should need is Files.ReadWrite.All (Files.Read.All will also work if you are only reading files from OneDrive).
Get Administrator Consent
The easiest method to grant administrator consent is directly from the Azure Portal. On the API Permissions page, click the “Grant admin consent for…” button:
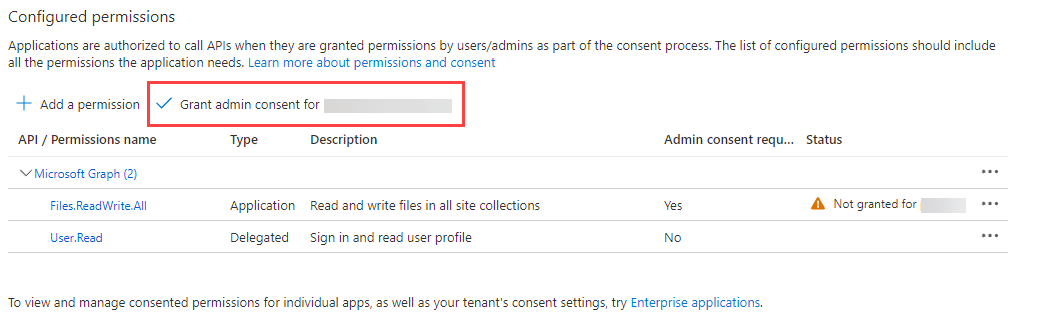
When prompted for confirmation, click Yes.
Get and use the access token
You don’t need to do anything here. Once you’ve created the Neuron OAuth Provider, all this will be handled for you.
Create Folders in OneDrive
Even though the OneDrive Adapter uses the Client Credentials Grant Flow for authorization to OneDrive, it still connects to a specific OneDrive account. You will need to create a few folders in the OneDrive account that will be used in this tutorial.
- Log into OneDrive for the user account you want to use with this tutorial.
- At the root (“My files”), click New->Folder:
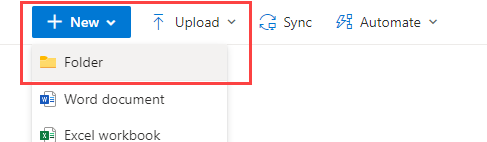
- Create a folder called From Neuron and click Create:
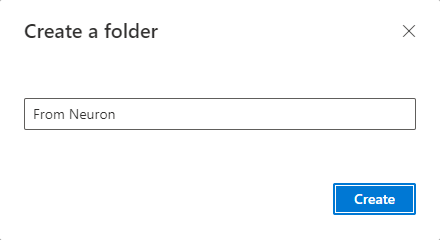
- Repeat the above steps and create a second folder called “To Neuron”. Both of these folders will be used in the tutorials.
Tutorial
This tutorial is broken down into three parts:
- Creating a Azure Active Directory OAuth Provider
- Uploading files to OneDrive
- Downloading files from OneDrive
Each section will describe the Neuron configuration that needs to be created to complete the that part of the tutorial. It is expected that the reader of this document is familiar with creating/configuring topics, publishers, subscribers and file adapter endpoints. The tutorials will describe in detail how to create Azure Active Directory OAuth providers and adapter endpoints.
Tutorial Requirements
The four tutorials all have the following requirements:
- A OneDrive account (see above)
- An Azure Active Directory app registration for use with OneDrive (see above)
- Folders created in OneDrive (see above)
- A new, blank Neuron Configuration that has been saved as OneDriveTutorialESB
- The Neuron ESB runtime is configured and started with the configuration OneDriveTutorialESB
Creating an Azure Active Directory OAuth Provider
When you created the Azure AD app registration, you saved some values that will be used to create the OAuth provider. The adapter utilizes the OAuth provider for authorization with OneDrive.
Please verify the tutorial requirements above have been completed prior to starting this tutorial.
We recommend using the Client Credentials grant type with the Active Directory OAuth Provider:
- When using the Password grant type, the adapter endpoint may have access to any Active Directory user’s OneDrive account that the credentials used in the OAuth provider can access.
- If you use the Authorization Code grant type, you will occasionally have to manually refresh the OAuth token.
To create an OAuth Provider:
- Open Neuron Explorer and the OneDriveTutorialESB configuration referred to in the above requirements.
- In Neuron Explorer, click on the Security->OAuth Providers and click New. Set the name of the OAuth Provider to OneDrive Provider and select Azure Active Directory/ADFS from the Provider drop-down list:
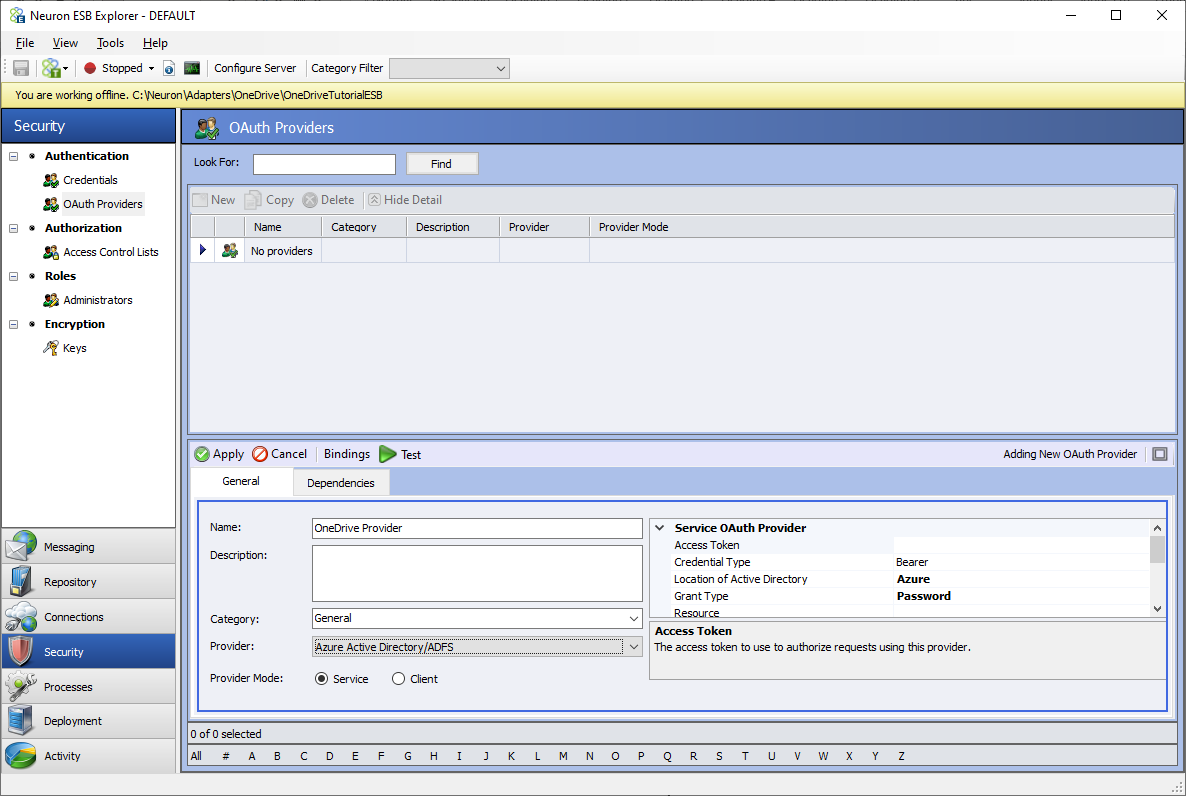
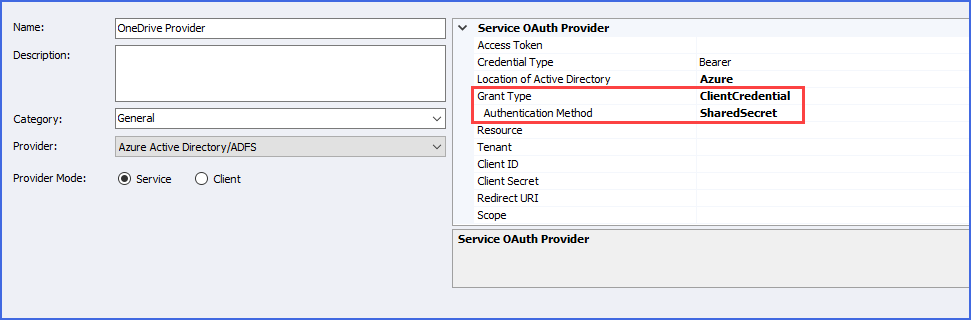
- In the properties for the Azure Active Directory/ADFS OAuth Provider, change the Grant Type property to ClientCredential and the Authentication Method to SharedSecret:
- Set the following values:
- Resource – https://graph.microsoft.com
- Tenant – This is the Directory (tenant) ID from the app registration
- Client ID – This is the Application (client) ID from the app registration
- Client Secret – This is the Client secret value you created in the app registration
- Redirect URI – Leave this empty
- Scope – https://graph.microsoft.com/.default
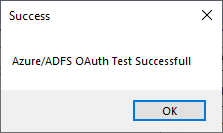
- To see if your OAuth Provider and the Azure AD app is registered correctly, click the Test button:
You should get a Success response:
If not, you will have to verify your app registration and that the values entered in the OAuth provider are correct.
- Click OK to close the dialog and then click the Apply button.
- You will see that an Access Token has been added to the OAuth Provider. This is a valid OAuth token, and the adapter will attempt to use it at runtime. If the access token expires the OAuth provider will automatically request a new one.
Uploading Files to OneDrive (Subscribe Mode)
This tutorial walks you through building an integration that will read files from a local folder using the file adapter and uploading those files to a OneDrive folder.
This tutorial requires:
- Verify the tutorial requirements above have been completed
- Complete the tutorial Creating a Azure Active Directory OAuth Provider
- Add the following items to the OneDriveTutorialESB configuration:
- Topic – File
- Subtopic – File.Outbound
- Publisher – FilePublisher with subscriptions to File.Outbound (Send)
- Subscriber – OneDriveSubscriber with a subscription to File.Outbound (Receive)
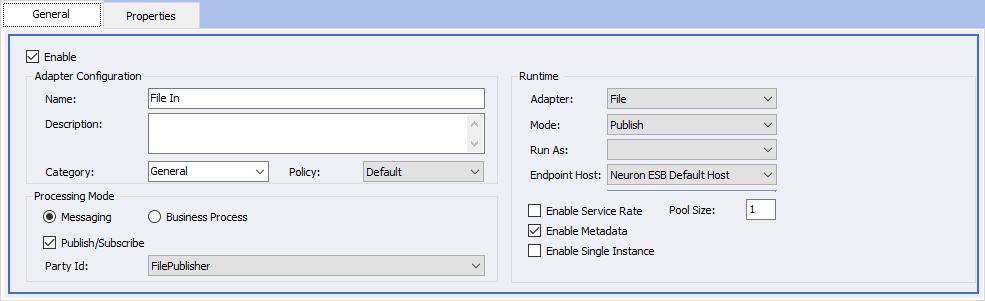
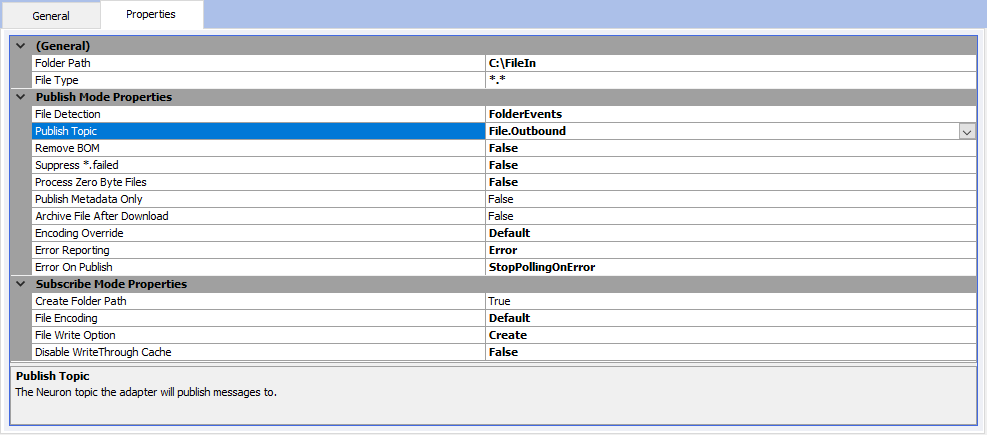
- Adapter Endpoint:
- Name – File In
- Adapter – File
- Mode – Publish
- Endpoint Host – Neuron ESB Default Host
- Processing Mode – Messaging
- Publish/Subscribe – Checked
- Party Id – FilePublisher
- Folder Path – C:\FileIn (or another folder that you choose)
- File Type – *.*
- Publish Topic – File.Outbound
- Topic – File
Save the Neuron configuration after applying the above changes.
*Note – Typically when performing one-way messaging with any adapter you should use a topic with a durable transport, either MSMQ or RabbitMQ. For this tutorial you can use TCP or Named Pipe for the topic transport for ease of setup.
Creating an Adapter Endpoint that Uploads Files to OneDrive
- Navigate to Connections->Adapter Endpoints and click New. Set the name of the adapter endpoint to OneDrive Upload, select OneDrive from the Adapter drop-down list, select Subscribe from the Mode drop-down list and select Neuron ESB Default Host from the Endpoint Host dropdown list. Select the Messaging radio button, check the Publish/Subscribe box and select OneDriveSubscriber from the Party Id drop-down list:
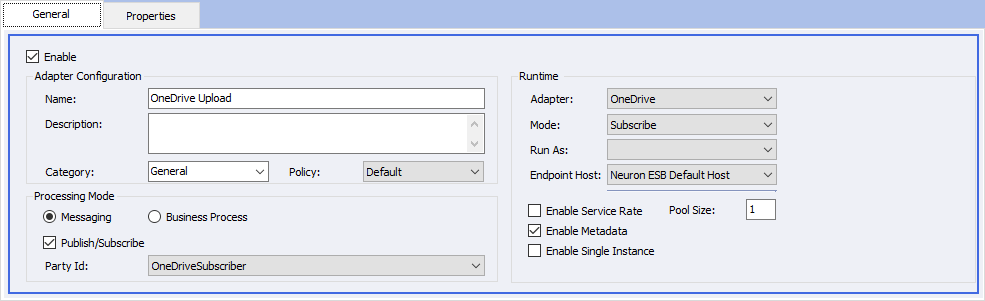
- Click on the Properties tab. Select the OneDrive Provider from the OAuth Provider drop-down list. In the User ID property, enter the email address or user ID of the OneDrive account you want to send files to. Click on the Subscribe Folder property, then the ellipsis button. A dialog with the folders accessible to the OneDrive adapter is displayed:
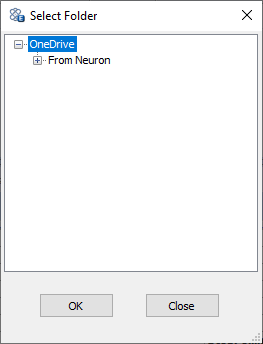
Select From Neuron and click OK (Publish Mode Properties group is collapsed):
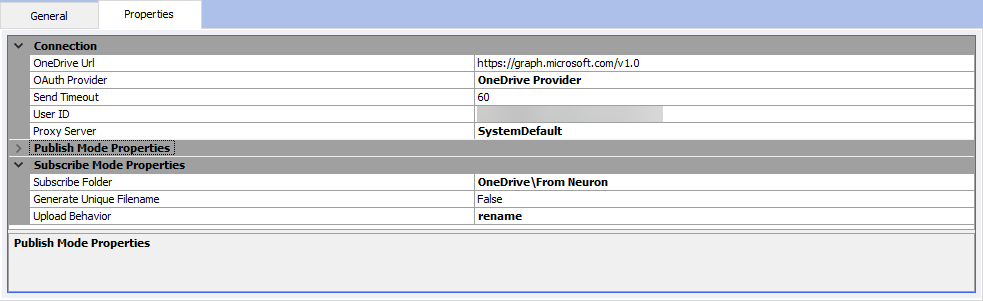
Don’t forget to click the Apply button!
- Save the Neuron ESB configuration.
At this point, you should have a file adapter endpoint that publishes messages to the topic File.Outbound, and a OneDrive adapter endpoint subscribing to messages from that same topic.
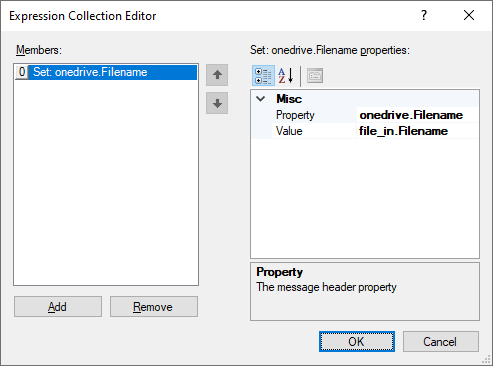
To test uploading files to OneDrive, all you need to do is copy a file into the folder that you configured the File In adapter endpoint to read messages from. Once the file adapter has read the message from the local folder, it should appear in the OneDrive folder From Neuron. The file will be created with a unique ID as the name. To have the filename in OneDrive match the filename from the file adapter, you would use a business process with a Set Property step:
This process could be attached to the publisher on the On Publish event or the subscriber on the On Receive event.
Uploading a File and Creating a Shared Link (Solicit/Response Mode)
This tutorial walks you through building a process that will upload a file to a OneDrive folder, create a shared link and return the uploaded file info as a response.
This tutorial requires:
- Verify the tutorial requirements above have been completed
- Complete the tutorial Creating a Azure Active Directory OAuth Provider
Creating an Adapter Endpoint that Uploads Files to OneDrive
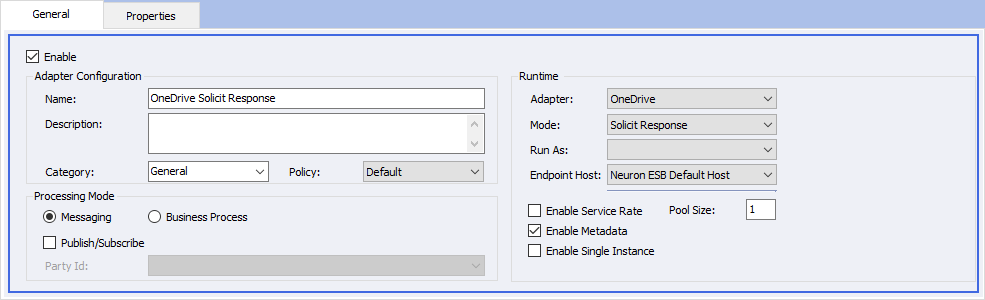
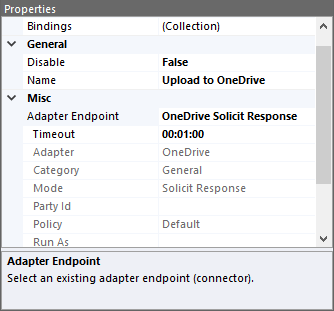
- Navigate to Connections->Adapter Endpoints and click New. Set the name of the adapter endpoint to OneDrive Solicit Response, select OneDrive from the Adapter drop-down list, select Solicit Response from the Mode drop-down list and select Neuron ESB Default Host from the Endpoint Host drop-down list. Select the Messaging radio button and uncheck the Publish/Subscribe box:
- Click on the Properties tab:
- Select the OneDrive Provider from the OAuth Provider drop-down list.
- In the User ID property, enter the email address or user ID of the OneDrive account you want to send files to.
- Click on the Subscribe Folder property, then the ellipsis button. A dialog with the folders accessible to the OneDrive adapter is displayed:

Select From Neuron and click OK.
- Set the following properties:
- Generate Unique Filename = False

Don’t forget to click the Apply button!
- Save the Neuron ESB configuration.
Create a Business Process that Uploads a File to OneDrive
This process will demonstrate uploading a file to OneDrive and receiving a file info response with a shared link.
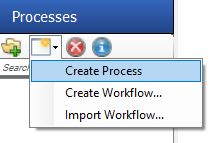
- Navigate to Processes in the Neuron ESB Explorer
- Click the New drop down and select Create Process
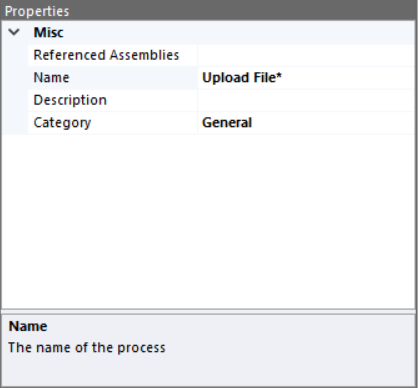
- Click on the UI element named New Process 1 and in the Property Grid on the right-hand side of the Neuron ESB Explorer enter “Upload File” in the Name text field.
- In the Search Steps text field of the Process Step Library enter “C#”
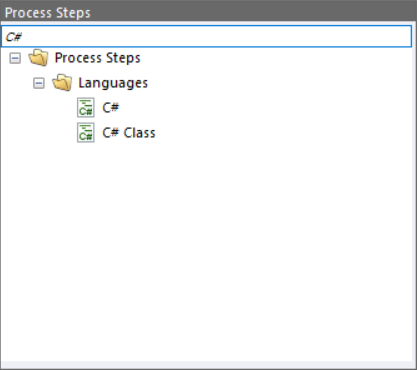
- Drag the C# process step on to the design canvas and drop it in the middle of the UI element labeled “Upload File”. Set the name of the process step to Set Filename.
- Double-click on the C# step to open the code designer. The following code can be used to set the filename of the file being uploaded and generate a password to assign to the shared link that will be created:
// Set the Filename message property to use for the uploaded file
context.Data.SetProperty("onedrive", "Filename", "test.xml");- Click the Apply button in the code editor and navigate back to the Upload File process.
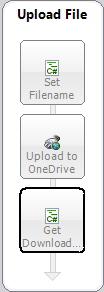
- In the Process Step Library, find the Adapter Endpoint step and drag it onto the designer directly under the C# step:
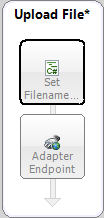
- Click on the Adapter Endpoint step, set the name to Upload to OneDrive and select OneDrive Solicit Response from the Adapter Endpoint drop-down list in the properties grid:
- In the Process Step Library, find the C# step and drag it onto the designer directly under the Adapter Endpoint step:

- Set the name of the C# process step to Get Download URL.
- Double-click on the C# step to open the code designer. The following code can be used to get the shared link download URL for the uploaded file:
var url = context.Data.GetProperty("onedrive", "FileUrl", "");
context.Instance.TraceInformation("Download URL: " + url);- Click the Apply button in the code editor and navigate back to the Upload File process.
- This entire process should look like this:
- Apply the changes to the process by clicking the Apply button in the process designer toolbar:

Congrats! You are now ready to fully test the Business Process.
Testing the OneDrive in Solicit/Response Mode
You can now test the above process using the Process Tester.
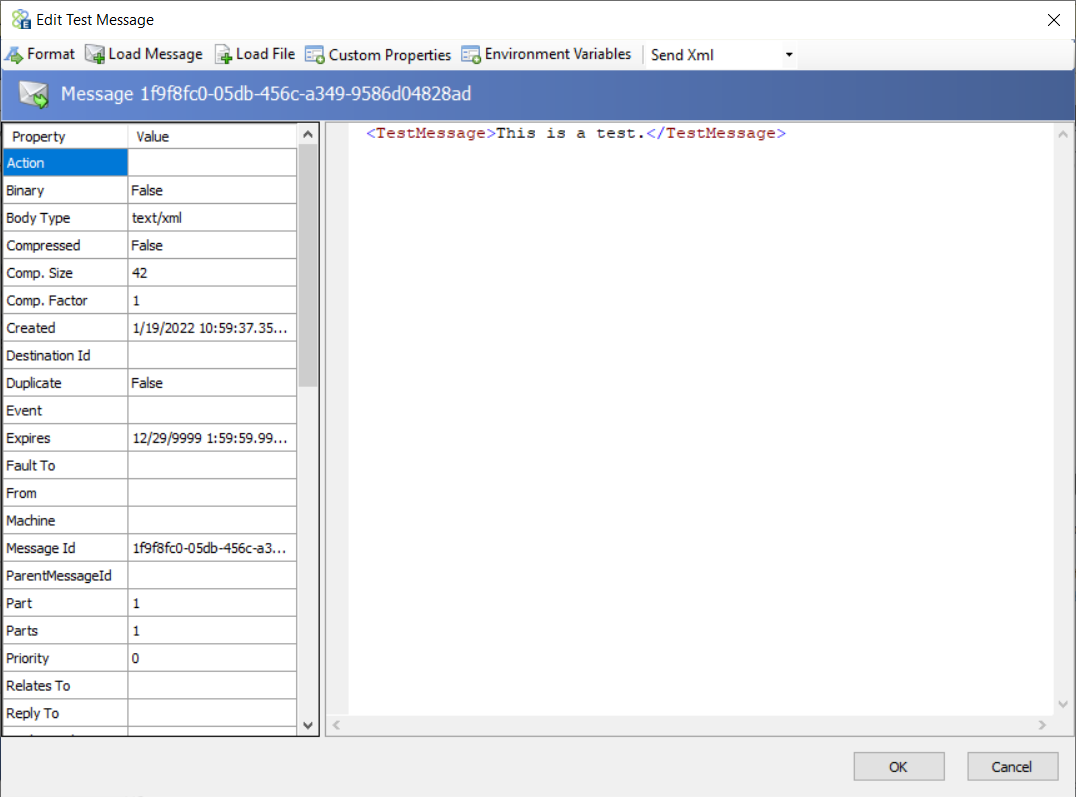
- Open the process tester by clicking the Test Process button in the process designer toolbar:

- The Edit Test Message dialog will appear. You do not need to enter or change the message body:
- Click the OK button, and you will see each step in the designer highlight as it is executed.
- Several entries will appear in the Output window at the bottom of the designer. Most of these are from the OneDrive Adapter displaying its debug output. There will be one entry from the code steps in the process. The last two lines in the Output window at the bottom of the designer will contain the download URL and the file info response body:
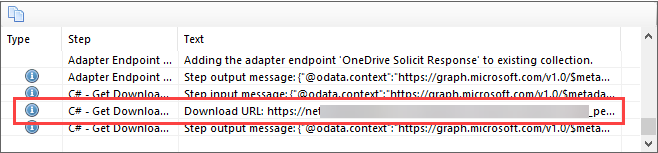
Double-click the output entry to see the entire text.
You can copy the Download URL value and paste it into a browser to download the file.
Downloading Files from OneDrive (Publish Mode)
This tutorial walks you through building an integration that will read files from a OneDrive folder and saving those files to a local folder using the file adapter.
This tutorial requires:
- Verify the tutorial requirements above have been completed
- Complete the tutorial Creating a OneDrive OAuth Provider
- Add the following items to the OneDriveTutorialESB configuration.
- Topic – File
- Add the subtopic – File.Inbound
- Publisher – BoxPublisher with subscriptions to File.Inbound (Send)
- Subscriber – FileSubscriber with a subscription to File.Inbound (Receive)
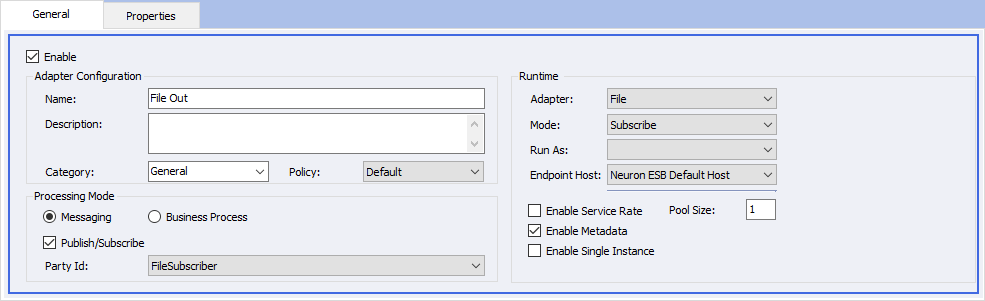
- Adapter Endpoint:
- Name – File Out
- Adapter – File
- Mode – Subscribe
- Endpoint Host – Neuron ESB Default Host
- Processing Mode – Messaging
- Publish/Subscribe – Checked
- Party Id – FileSubscriber
- Folder Path – C:\FileOut (or another folder that you choose)
- File Type – txt
- Topic – File
Save the Neuron configuration after applying the above changes.
*Note – Typically when performing one-way messaging with any adapter you should use a topic with a durable transport, either MSMQ or RabbitMQ. For this tutorial you can use TCP or Named Pipe for the topic transport for ease of setup.
Creating an Adapter Endpoint that Downloads Files from OneDrive
- Navigate to Connections->Adapter Endpoints and click New. Set the name of the adapter endpoint to OneDrive Download, select OneDrive from the Adapter drop-down list, select Publish from the Mode drop-down list and select Neuron ESB Default Host from the Endpoint Host drop-down list. Select the Messaging radio button, check the Publish/Subscribe box and select OneDrivePublisher from the Party Id drop-down list:
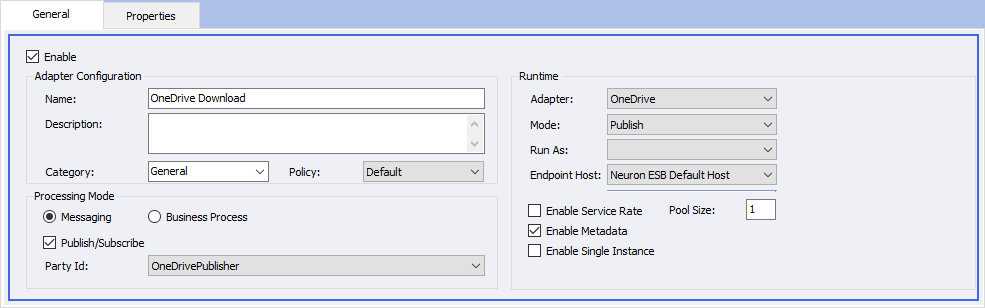
- Click on the Properties tab. Select the OneDrive Provider from the OAuth Provider drop-down list and set the Publish Topic to File.Inbound. In the User ID property, enter the email address or user ID of the OneDrive account you want to send files to. Click on the Publish Folder property, then the ellipsis button. A dialog with the folders accessible to the OneDrive adapter is displayed:
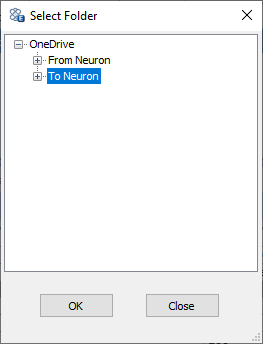
Select To Neuron and click OK:
Don’t forget to click the Apply button!
- Save the Neuron ESB configuration.
At this point, you should have a OneDrive adapter endpoint that publishes messages to the topic File.Inbound, and a file adapter endpoint subscribing to messages from that same topic.
To test downloading files from OneDrive, all you need to do is copy a file into the To Neuron folder that you created in OneDrive to read messages from. Once the file adapter has read the message from OneDrive, it should appear in the local folder you configured for the file adapter named File In.
About the Author
Joe Klug is a Solution Architect for Peregrine Connect, responsible for pre-sales engineering, post-sales support, training, architectural reviews, product development and consulting. Prior to joining the team, he spent a number of years at Microsoft.
Read more about Peregrine Connect

-
Rabbit MQ Topics
Introduction Due to the open-source nature of RabbitMQ and constant updates, it is...
-
Port Sharing
One of Neuron ESB’s scalability features is the ability to install multiple...

-
The Integration Journey to...
The Integration Journey to Digital Transformation with Peregrine Connect
-
Saving Time and Money by...
Neuron ESB Application Integration and Web Service Platform: A Real-World Example...

-
Neo PLM
-
Loomis Case Study
Loomis Chooses Peregrine Connect as Their No/Low-Code Integration Platform:...

-

Decision Test Data Mapping
- Use decisions to drive the execution of...
-
Map Testing
Learn how to utilize FlightPath's testing functions...