Introduction
The Neuron ESB Dynamics CRM Web API Connector (adapter) provides direct access to Microsoft Dynamics CRM 2016 Web API. Using this adapter, organizations can easily integrate their business applications such as SAP, NetSuite or Marketo with Dynamics CRM 2016, both on-premises and online. It utilizes the new Azure Active Directory/ADFS OAuth Provider to manage access to Dynamics CRM. This adapter operates in both subscribe as well as solicit/response (or query) mode. Organizations can use the adapter to query for data, create, update, retrieve and delete entities and execute CRM Functions and Actions.
The adapter can be used to access the entire Dynamics CRM Web API. When developing applications that utilize this adapter, developers will be able to use the Adapter Metadata Generation Wizard to provide JSON samples that describe the request and/or response documents that are exchanged with Dynamics CRM. Developers can also use the new Http Utility process step in our process designer to very easily define the calls to Dynamics CRM.
Before reading this document
If you are not familiar with Neuron ESB Adapters, take a moment to consult our online help: https://www.https://www.peregrineconnect.com/documentation/doc-development-external-systems. This document assumes you have the following knowledge:
- What adapters are and how they are leveraged in Neuron ESB
- Create an Adapter Endpoint in a Neuron ESB Solution
- Set a Neuron ESB Adapter Endpoint Properties
- Invoke a Neuron ESB Adapter Endpoint
This adapter exposes the functionality provided by the Dynamics CRM Web API that was introduced with Dynamics CRM 2016. All requests and replies are identical to those described in the Dynamics CRM Web API documentation. If you are not familiar with the Web API, review the online help:
Supported Modes
The Dynamics CRM Web API Adapter supports two modes:
- Subscribe: Used to send one-way calls to Dynamics CRM. Any calls to the Dynamics CRM Web API in this mode will not return a response. The best use cases for this mode are: create, update and delete of entity types.
- Solicit Response: Used to send request-reply calls to Dynamics CRM. All calls to the Dynamics CRM Web API will return a response. The response will match exactly what is returned by the Web API. If you are performing create entity, then the response will contain the ID of the created entity. If the request is a query, the response will contain the query results.
Dynamics CRM Web API Adapter Properties
Every Neuron ESB Adapter has design time properties that can be configured within a standard Microsoft property grid (as shown below). These properties are used to determine the behavior of the adapter at runtime. The Dynamics CRM Web API Adapter displays different adapter properties based on the type of Dynamics CRM deployment you are connecting to.
On-Premises Deployment
When connecting to an on-premises deployment there are two choices for which security model to use – the Neuron service account or a set of configured security credentials. To use the Neuron service account, just select ServiceAccount from the Security Method drop-down list:
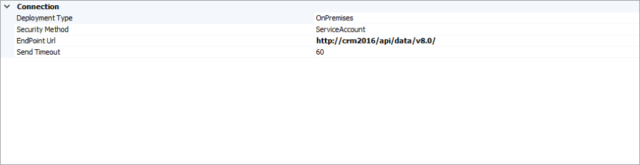
Figure 1: On-Premises with ServiceAccount
To use a different set of credentials for authentication to Dynamics CRM, select Windows from the Security Model dropdown list:
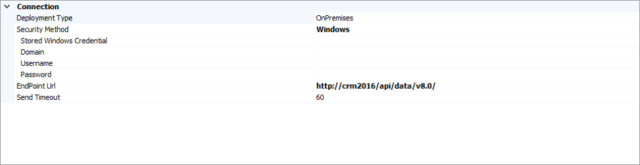
Figure 2: On-Premises with Windows Credentials
When you select Windows, four additional properties are displayed:
- Stored Windows Credentials – In Neuron ESB, you can create pre-configured credentials in the Neuron ESB Repository. The Store Windows Credentials drop-down list will display any Windows Credentials that have been added.
- Domain – The domain of the Windows credentials that should be used for authentication.
- Username – The user name of the Windows credentials that should be used for authentication.
- Password – The password of the Windows credentials that should be used for authentication.
Online or IFD (Internet-Facing) Deployment
When connecting to an online or Internet-Facing Deployment you must use the Azure Active Directory OAuth Provider for authentication. Directions on setting up the Azure AD OAuth Provider are provided later in this guide:
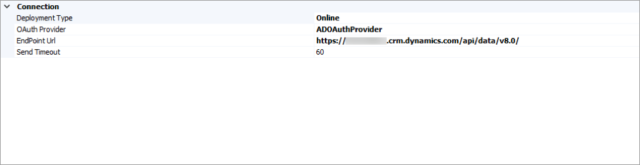
When you select Online for the Deployment Type, the only security property that’s displayed is OAuth Provider. Select the configure OAuth provider from the drop-down list.
EndPoint URL
This is the base URL that will be used for sending requests to Dynamics CRM. To obtain the URL for the CRM organization’s Web API, go to Settings->Customizations->Developer Resources. The Service Root URL is under “Instance Web API”:
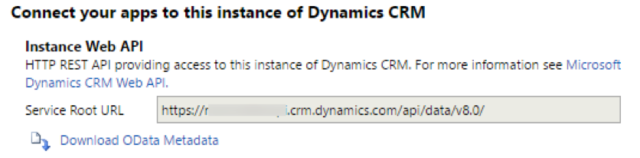
The URL will be in the following format:
https://[Organization URI]/api/data/v8.0
Send Timeout
This is the amount of time in seconds the Dynamics CRM Web API Adapter will wait for a reply from Dynamics CRM. The default value is 60 seconds and should be long enough for most calls. However, if you performing complex queries you may want to extend the timeout.
Using the Dynamics CRM Web API Adapter
The Dynamics CRM Web API Adapter can be used to make any call supported by the Dynamics Web API:
- Query data
- Retrieve and execute predefined queries
- Create an entity
- Retrieve an entity
- Update and delete an entity
- Associate and disassociate entities
- Web API Functions
- Web API Actions
The message formats for each of the above are the same as if you were executing the Web API directly. The Web API supports only JSON content. For more information on how to perform the above operations, see:
Perform Operations using the CRM Web API: https://msdn.microsoft.com/en-us/library/mt607901.aspx
When making calls to Dynamics CRM using the adapter, creating the request messages can be done in many different ways. You can use a C# or C# Class step in a process or workflow. You can use the new Http Client Utility process step. You can also pass-thru a REST request received by a client connector and route it to a Dynamics CRM Web API Adapter endpoint. This document focuses on creating the requests with a C# step in a process.
Security
As noted previously, the adapter supports different security models based on the CRM deployment type. Once the adapter endpoint is configured with either Windows credentials (for on-premises) or an OAuth Provider (for online and IFD), the adapter handles all the security requirements at runtime. When you’re constructing a request message to send to Dynamics CRM you do not need to worry about setting credentials or adding an authorization header.
Local Path
When you create an adapter endpoint for the Dynamics CRM Web API adapter, you set the “base URL” for all Web API calls:
https://[Organization URI]/api/data/v8.0
The local path is added to the base URL to complete the call. For example, if you want to add a contact, then the local path would be set like this:
context.Data.LocalPath = "/contacts";
Typically, the local path is the plural form of the entity name. You can find the local path for each entity type in the CRM Web API Reference.
Http Method
All calls to the CRM Web API require the Http Method to be set. You can set the method in a C# step with this code:
context.Data.Http.Method = "GET";
The CRM Web API Reference documents which method to use for each call. The following table can be used as a guideline:
| Operation | Http Method |
| Query Data | GET |
| Retrieve and Execute Predefined Queries | GET |
| Create an Entity | POST |
| Retrieve an Entity | GET |
| Update or Upsert an Entity | PATCH |
| Update a Single Property Value | PUT |
| Delete an Entity | DELETE |
| Delete a Single Property Value | DELETE |
| Add a Reference to an Entity | POST |
| Remove a Reference to an Entity | DELETE |
| Change the Reference to an Entity | PUT |
| Execute a Web API Function | GET |
| Execute a Web API Action | POST |
Http Headers
The CRM Web API requires certain Http headers for all calls. The Dynamics CRM Web API Adapter automatically adds these headers:
Accept: application/json

OData-MaxVersion: 4.0

OData-Version: 4.0

Content-Type: application/json
For online and Internet-Facing Deployments the adapter also adds the Authorization header.
Any additional Http Headers that are required need to be added manually. For example, When performing an Update or Upsert, you may want to make sure that the entity exists before performing the update. In this case, you would add the If-Match heading. To do that in a C# step inside a Neuron process:
context.Data.Http.Headers.IfMatch = "*";
The CRM Web API documentation describes all the different ways to use the Web API. The use of different Http Headers is described throughout the documentation.
Http Body
The CRM Web API only supports JSON content. All requests that contain a payload must be sent as valid JSON and any replies that include a payload will be delivered as JSON. The formats of the request and response JSON payloads are described in the CRM Web API Reference. A request body can be set in a C# step inside a Neuron process:
JObject json = new JObject();json.Add("name", "Neuron Industries");json.Add("primarycontactid@odata.bind", "/contacts(281cb661-d921-e611-80e3-5065f38a5ba1)");context.Data.Text = json.ToString();
Response Messages
When using Solicit Response mode, all successful calls to the CRM Web API will have a response message. The following Http Headers may be returned depending on the type of call:
- StatusCode
- StatusDescription
- Content-Type
- OData-Version
- OData-EntityId (returned as the ID of a created entity)
Using Http Utility
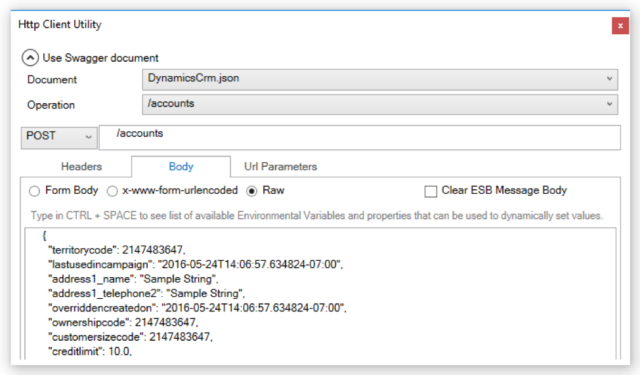
In the previous section we demonstrated how to create request messages using code in a C# step. Alternatively you can use the new “Http Client Utility” shape in the Process Designer. This HTTP Utility shape supports the selection of a Swagger document and then exposes a list of supported operations. Select the appropriate operation parameters from a dopr list to set up the ESBMessage as shown below:
Use Cases
What follows are some of the typical use cases and associated example messages that can be addressed with the Dynamics CRM Web API Adapter.
Creating Entities
To create an entity in Dynamics CRM, you set the Http Method to POST and set the body of the payload equal to the data used for creating the entity.
// Set the method to POST for Create Entitycontext.Data.Http.Method = "POST"; // Set the local path to contacts for creating a contactcontext.Data.LocalPath = "/contacts"; // Create the JSON payloadJObject json = new JObject();json.Add("firstname", "Joe");json.Add("lastname", "Klug");context.Data.Text = json.ToString();
The request JSON payload would look like this:
{

"firstname": "Joe",

"lastname": "Klug"

}
The response to this API call wouldn’t contain a payload, but the Http Header OData-EntityId would contain a reference to the newly created contact:
OData-EntityId: https://***.crm.dynamics.com/api/data/v8.0/contacts(1849eda7-c322-e611-80e5-c4346bdc0271)
This response header is important because it can be used to retrieve or reference this entity in the future.
Retrieving an Entity
You can retrieve an entity using the entity ID.
// Set the method to POST for Create Entitycontext.Data.Http.Method = "GET"; // Set the local path to contacts for creating a contactcontext.Data.LocalPath = "/contacts(1849eda7-c322-e611-80e5-c4346bdc0271)"; // Remove any message payloadcontext.Data.Text = String.Empty;
The response to this API call is the entity data:
{

"@odata.context":"https://neurondev.crm.dynamics.com/api/data/v8.0/$metadata#contacts/$entity",

"@odata.etag":"W/\"9425039\"",

"territorycode":1,

"_owningbusinessunit_value":"5aa37733-83a7-e411-80d9-fc15b428ddb0",

"address2_shippingmethodcode":1,

"address1_addressid":"c4ceff48-cad5-4b77-a55a-85a99c85e525",

"creditonhold":false,

"donotbulkemail":false,

"donotsendmm":false,

"createdon":"2016-05-25T21:57:28Z",

"educationcode":1,

"statecode":0,

"fullname":"Joe Klug",

"donotpostalmail":false,

"_ownerid_value":"8d5af5c6-2ac1-e411-80ea-c4346bac3974"

…
Creating an Entity that References an Associated Entity
Often times you need to create an entity that has a reference to another entity. For example, when you create an account you may want to reference a primary contact. Using the response from the Create an Entity example above, the following example creates an account with a reference.
// Set the method to POST for Create Entity
context.Data.Http.Method = "POST";

// Set the local path to contacts for creating a contact
context.Data.LocalPath = "/accounts";

// Create the JSON payload
JObject json = new JObject();json.Add("name", "Klug Industries");json.Add("primarycontactid@odata.bind", "/contacts(1849eda7-c322-e611-80e5-c4346bdc0271)");context.Data.Text = json.ToString();
Note the format of the primarycontactid property. You have to add the “@odata.bind” to the end of the property name when adding a reference, and you have to format the value as a reference including the entity type (/contacts) and the ID.
The response for this API call is:
OData-EntityId:
https://neurondev.crm.dynamics.com/api/data/v8.0/accounts(e3cf9056-c522-e611-80e5-c4346bdc0271)
Creating an Entity and Related Entities at the Same Time
In the previous example we created a new account and referenced a contact that had previously been created. But what if we want to create both at once?// Set the method to POST for Create Entity
// Set the method to POST for Create Entity
context.Data.Http.Method = "POST";

// Set the local path to contacts for creating a contactcontext.Data.LocalPath = "/accounts";

// Create the JSON payload
JObject contactJson = new JObject();
contactJson.Add("firstname", "Joe");
contactJson.Add("lastname", "Klug");
JObject accountJson = new JObject();
accountJson.Add("name", "Klug Industries");
accountJson.Add("primarycontactid", contactJson);
context.Data.Text = accountJson.ToString();
The request JSON payload would look like this:
{

"name": "Klug Industries",

"primarycontactid": {

"firstname": "Joe",

"lastname": "Klug"

}

}
Note – The response to this API call will only contain a reference to the newly created account entity. The newly created contact entity reference is not returned. This is due to the functionality of the Web API itself, not the adapter. The account reference is returned as part of the Http Headers:
OData-EntityId:
https://neurondev.crm.dynamics.com/api/data/v8.0/accounts(fcc2b136-c722-e611-80e5-c4346bdc0271)
Metadata Generation Wizard
The Metadata Generation Wizard is a tool that is used to generate sample messages and schema definitions for certain adapters and their operations. The Metadata Generation Wizard can be used to generate sample JSON request and response messages for the Dynamics CRM Web API Adapter. The following guide assumes the user has the Dynamics CRM Web API Adapter registered and an adapter endpoint already configured.
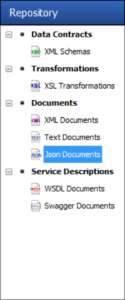
First, in Neuron ESB Explorer navigate to Repository->JSON Documents:
Next, click the Generate button:

The Generate button can be accessed from any of the following menus:
In the “Repository” tab in:
XML Schemas
XSL Transformations
XML Documents
Text Documents
Json Documents
Swagger Documents
In the Connections tab in:
Adapter Registration
Adapter Endpoints
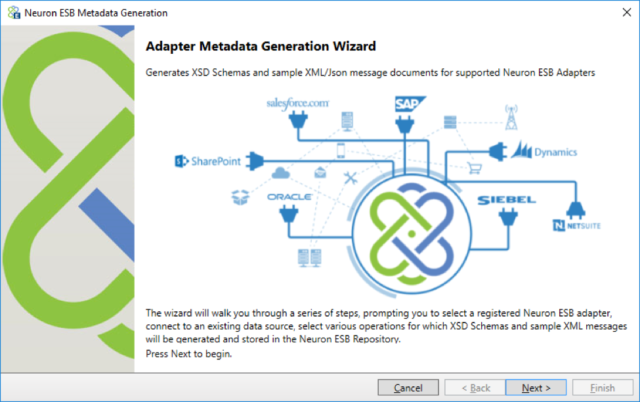
On the Welcome Page, click Next:
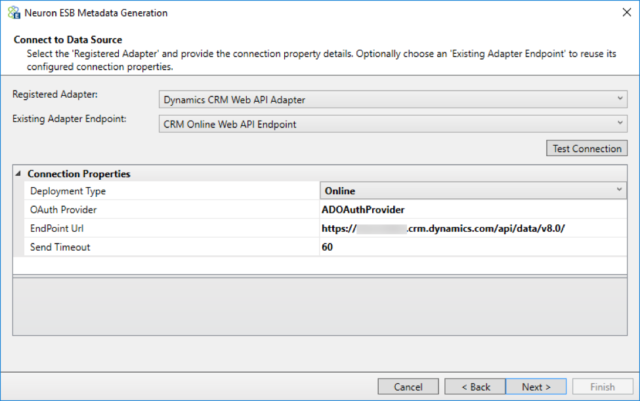
On the Connect to Data Source page choose an adapter and adapter endpoint. In this case, choose the Dynamics CRM Web API Adapter and the endpoint that has been configured for the adapter. Click Next:
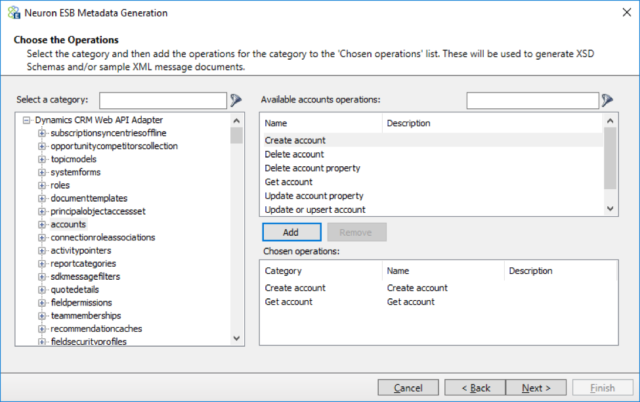
Select the Category (i.e. accounts) you want to see samples for and then select the Operation you want to perform and add them to the list of Chosen Operations by clicking the Add button. More than one operation can be added by choosing each operation and adding it to the list. Click Next:
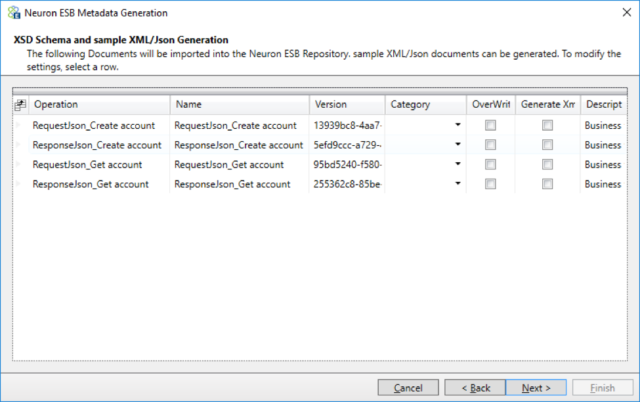
Choose whether to generate sample XML messages (chosen by default) and whether to overwrite the existing documents, if they have already been added, by clicking on the appropriate boxes. Click Next:
Finally, click Finish to generate the documents:
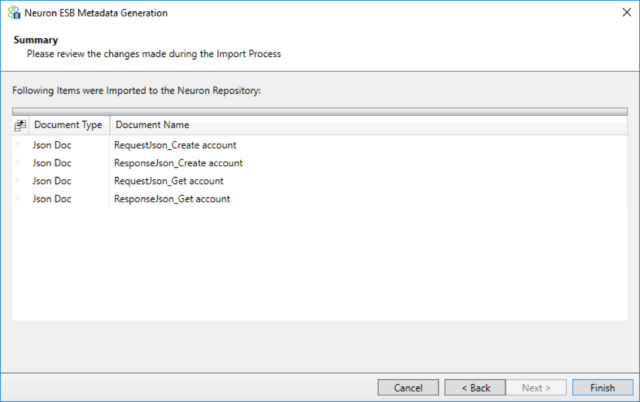
To see the sample request and response messages, navigate to the JSON Documents Repository and select one of the newly added documents. Not all of the request and/or responses will contain a JSON sample. Some requests, such as a Retrieve request, may just contain an example of the request URL:
GET [Organization URI]/api/data/v8.0/accounts(00000000-0000-0000-0000-000000000001)
An Update or Upsert request will also contain sample Http Headers you may want to set as well as a sample JSON request:
PATCH [Organization URI]/api/data/v8.0/accounts(00000000-0000-0000-0000-000000000001)
To prevent creating the entity if it doesn’t exist, add this Http header:
If-Match: "*"
To prevent an update the entity already exists, add this Http header:
If-None-Match: "*"

{

"territorycode": 2147483647,

"lastusedincampaign": "2016-05-24T14:06:57.6353242-07:00",

"address1_name": "Sample String",

...
A Create response sample will contain a sample of the response Http Headers. Note that the ID of the newly created entity is included in the headers:
HTTP/1.1 204 No Content

OData-Version: 4.0

OData-EntityId: [Organization URI]/api/data/v8.0/accounts(00000000-0000-0000-0000-000000000001)
You can use these samples to guide your development when creating integrations to Dynamics CRM.
Adding an Azure Active Directory OAuth Provider
If you want to use the Dynamics CRM Web API adapter with an online or Internet-Facing Deployment of Dynamics CRM you have to use the Azure Active Directory OAuth Provider for authentication.
First, you have to register your CRM instance with Azure Active Directory. It’s beyond the scope of this document to completely walk you through setting-up Azure Active Directory and registering Dynamics CRM Online with it. You can find more information on how to do that here:
Connect to Microsoft Dynamics CRM web services using OAuth
Walkthrough: Register a CRM app with Azure Active Directory
As you perform the steps outlined in the Walkthrough you will need to save these pieces of information for use when you create the OAuth provider in Neuron ESB:
- Redirect URI
- Client ID
Once you’ve registered CRM with Azure AD you have to add an OAuth provider to your Neuron solution. In Neuron ESB Explorer, navigate to Security->OAuth Providers and click the New button:
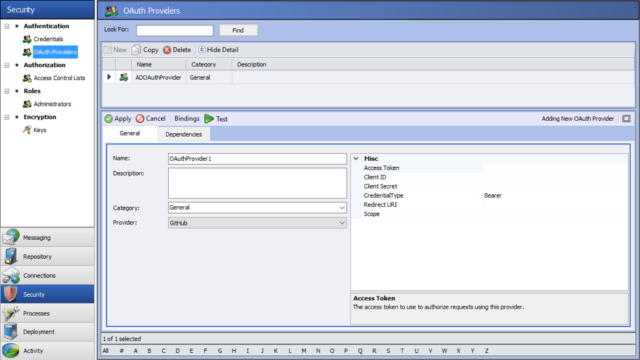
In the Provider drop-down list, select Azure Active Directory/ADFS:
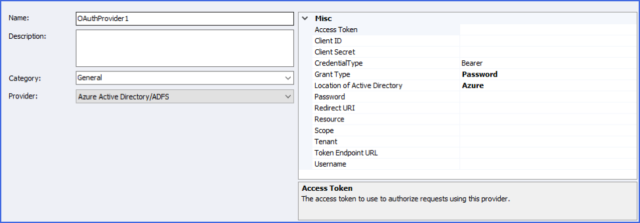
You need to set the following properties for using Azure Active Directory with the Dynamics CRM Web API Adapter:
- Client ID – This is the value saved when you registered CRM with Azure Active Directory
- CredentialType – Bearer
- Grant Type – Password
- Location of Active Directory – For online, select Azure. For IFD, select ADFS
- Password – The password of the username/password used for retrieving the OAuth token
- Redirect Uri – This is the value saved when you registered CRM with Azure Active Directory
- Resource – This is the CRM root service address, i.e. Organization URI
- Tenant – The Active Directory tenant that will issue access tokens, required only for an Azure AD deployment. The Tenant can be found by logging into the Azure Active Directory Portal as an administrator, then click on Active Directory, click the directory you registered your CRM application with, and the Tenant will be displayed as part of the URL. For example, in this URL: https://manage.windowsazure.com/shopit.onmicrosoft.com#Workspaces/ActiveDirectoryExtension/Directory/757f51c3-0e5d-6996-84f8-97d693a5b9d1/directoryQuickStart, the Tenant is 757f51c3-0e5d-6996-84f8-97d693a5b9d1.
- Username – The username of the username/password used for retrieving the OAuth token
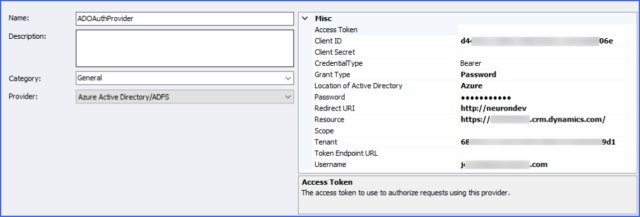
Save the OAuth provider and then select this provider in the Dynamics CRM Web API Adapter endpoint properties grid.d
About the Author
Joe Klug is a Solution Architect for Peregrine Connect, responsible for pre-sales engineering, post-sales support, training, architectural reviews, product development and consulting. Prior to joining the team, he spent a number of years at Microsoft.
Read more about Peregrine Connect

-
Rabbit MQ Topics
Introduction Due to the open-source nature of RabbitMQ and constant updates, it is...
-
Port Sharing
One of Neuron ESB’s scalability features is the ability to install multiple...

-
The Integration Journey to...
The Integration Journey to Digital Transformation with Peregrine Connect
-
Saving Time and Money by...
Neuron ESB Application Integration and Web Service Platform: A Real-World Example...

-
Neo PLM
-
Loomis Case Study
Loomis Chooses Peregrine Connect as Their No/Low-Code Integration Platform:...

-

Decision Test Data Mapping
- Use decisions to drive the execution of...
-
Map Testing
Learn how to utilize FlightPath's testing functions...