Introduction
The Neuron ESB NetSuite Connector (Adapter) provides direct access to the NetSuite SOAP API. Using this adapter, organizations can easily integrate their business applications such as Dynamics CRM, SAP or Salesforce.com with NetSuite. This adapter operates in subscribe mode. Organizations can use the adapter to perform operations on NetSuite Objects such as add, update, upsert or delete, as well as any other operations available in the SOAP API. When developing applications that utilize this adapter, developers will be able to use the Adapter Metadata Generation Wizard to provide Xml schemas and samples that describe the request and/or response documents that are exchanged with NetSuite.
Before reading this document
If you are not familiar with Neuron ESB Adapters, take a moment to consult our online help: https://www.peregrineconnect.com/documentation/doc-development-adapters/. This document assumes you have the following knowledge:
- What adapters are and how they are leveraged in Neuron ESB
- Register a Neuron ESB Adapter within a Neuron ESB Solution
- Create an Adapter Endpoint in a Neuron ESB Solution
- Set a Neuron ESB Adapter Endpoint Properties
- Invoke a Neuron ESB Adapter Endpoint
This adapter exposes the functionality provided by the NetSuite SOAP API. All requests and replies are identical to those described in the NetSuite documentation. If you are not familiar with the NetSuite SOAP API, review the online help:
https://docs.oracle.com/en/cloud/saas/netsuite/ns-online-help/chapter_N3412777.html
Supported Modes
The NetSuite Adapter supports 2 modes:
- Subscribe: Used to send calls to NetSuite without receiving a response back.
- Solicit Response: Used to send request-reply calls to NetSuite and will return a response. This mode can be used to call any operation exposed by the SOAP API.
NetSuite Adapter Properties
Every Neuron ESB Adapter has design time properties that can be configured within a standard Microsoft property grid (as shown below). These properties are used to determine the behavior of the adapter at runtime.
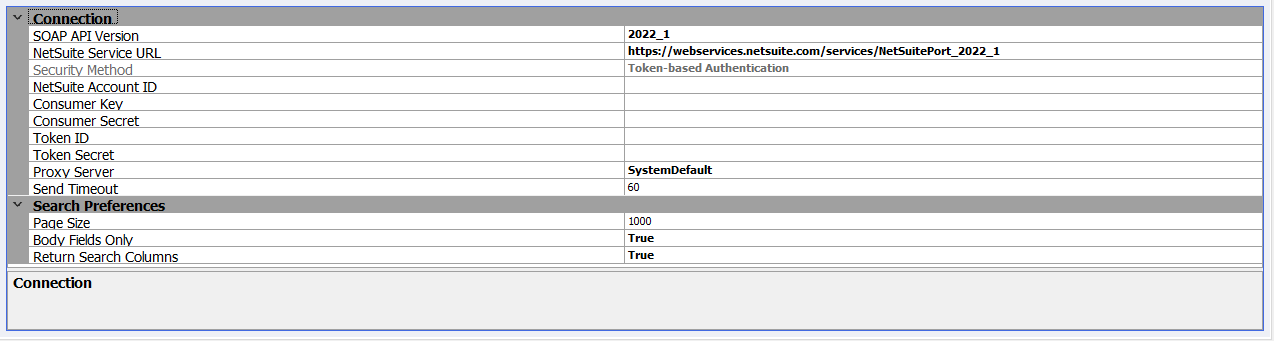
Connection Properties
The group of Connection properties is used to configure the connection to NetSuite, along with the security credentials used when sending requests to NetSuite.
SOAP API Version
This is the version of the SOAP API to call. NetSuite consistently releases new versions of the SOAP API. This setting will ensure that the version of the SOAP API you have developed your integration with is used even after newer versions are released. When creating a new adapter endpoint, you should always use the latest version available.
NetSuite Service URL
The login URL for the selected version of the SOAP API. This value should not be modified, as it needs to match the selected version. The adapter utilizes the NetSuite Data Center URLs API to retrieve the correct base URL to call at runtime. This will also account for account-specific URLs.
NetSuite Account ID
The Account ID for the NetSuite instance you want this adapter to connect to. The Account ID should adhere to the following format:
- All capital letters for test drive and sandbox accounts. i.e. TSTDVR1234567
- Use an underscore for sandbox accounts. i.e. 1234567_SB1
Security Method
The method of authentication to use when making calls to NetSuite – User Credentials or Token-Based Authentication. NOTE – As of release 2020_2, NetSuite no longer supports the use of User Credentials for SOAP Web Services. If you select SOAP Version 2020_2 or a later, you must use Token-based Authentication.
Username
The NetSuite username for logging-in. See the section “Security” in the appendix for more information regarding the required role permissions for this username. This property is only displayed when the security method “User Credentials” is selected.
Password
The NetSuite password for logging-in. This property is only displayed when the security method “User Credentials” is selected.
Role
A role is a set of permissions that allows customers, vendors, partners and employees access to specific aspects of your data. Optional. If you leave this blank, the users default role will be used. See the section “Security” in the appendix for more information regarding role settings. This property is only displayed when the security method “User Credentials” is selected.
Application ID
When using the SOAP API Version 2015_2 or later, an Application ID is required for all requests using user credentials. The Application ID is created when you define an integration record in NetSuite. You can create or obtain an existing Application ID in NetSuite by navigating to Setup > Integration > Integration Management > Manage Integrations. This property is only displayed when the security method “User Credentials” is selected.
Consumer Key
The consumer key that was generated when the integration record was created in NetSuite. This property is only displayed when the security method “Token-based Authentication” is selected.
Consumer Secret
The consumer secret that was generated when the integration record was created in NetSuite. This property is only displayed when the security method “Token-based Authentication” is selected.
Token ID
The token ID that was generated when creating an Access Token in NetSuite. The access token must be created using the same integration record that provided the consumer key and secret above. This property is only displayed when the security method “Token-based Authentication” is selected.
Token Secret
The token secret that was generated when creating an Access token in NetSuite. The access token must be created using the same integration record that provided the consumer key and secret above. This property is only displayed when the security method “Token-based Authentication” is selected.
Note – See the section “Security” in the appendix for more information on Integration Records and Access Tokens.
Proxy Server
Allows you connect to NetSuite via a proxy server. By default this value is set to System Default. Changing the value to custom will expose additional properties:
- Address – The URL address to the proxy server
- Port – The port for the proxy server address
- Use Custom Credentials – By default this is set to false and will use the credentials that the Neuron ESB instance is running under. Changing this value to True will allow you to select a stored credential from Neuron ESB.
Send Timeout
The period of time, in seconds, after which a call to NetSuite will time-out.
Search Preferences
A group of properties that are used to control how search results are returned.
Page Size
When performing a search, this preference indicates the number of records to return on a single page of search results. Valid values are 5 – 1000 records. If more results exist, you can subsequently use the searchMoreWithId operation to retrieve each additional page of results. The searchMoreWithId operation uses the same page-size preference that you originally set.
Body Fields Only
The search preference is used specify whether or not sublist values are returned in search results. In other words, if you set this value to true, only body fields are returned. If you set it to false, sublist values are also returned. Leaving this preference set to its default value, which is true, can significantly improve performance. If the preference is set to false, a basic search triggers user event scripts and workflows. Note that in an advanced search, this preference is ignored.
Return Search Columns
This preference is relevant when you are using an advanced search to execute an existing saved search. In these cases, you might want the search to return full records, as opposed to columns. To accomplish this, you would set the preference to false. The default value for the preference is true. Note that if you set this preference to true and you do not specify search return columns, the system returns an error. Similarly, if you are not executing a saved search and you set the preference to false, the system returns an error.
Using the NetSuite Adapter
The NetSuite Adapter can be used to call any operation exposed with the SOAP API. These are the operations supported by the SOAP API. Note that not all objects support all operations. add/addlist/asyncAddList
- attach/detach
- changeEmail*
- changePassword*
- delete/deleteList/asyncDeleteList
- get/getList/asyncGetList
- getAccountGovernanceInfo*
- getAll*
- getAsyncResult*
- getBudgetExchangeRate*
- getConsolidatedExchangeRate*
- getCurrencyRate*
- getCustomizationId*
- getDataCenterUrls*
- getDeleted
- getIntegrationGovernanceInfo*
- getItemAvailability*
- getPostingTransactionSummary*
- getSavedSearch
- getSelectValue
- getServerTime*
- initialize/initializeList/asyncInitializeList*
- mapSso*
- search/asyncSearch
- searchMoreWithId
- ssoLogin*
- update/updateList/asyncUpdateList
- updateInviteeStatus/updateInviteeStatusList*
- upsert/upsertList/asyncUpsertList
The message formats for the above commands without an asterisk can be retrieved using the Metadata Generation Wizard.
The operations denoted with an asterisk (*) indicate operations that are not available with the Metadata Generation Wizard. You will have to review the NetSuite documentation to find the request/response message formats:
https://docs.oracle.com/en/cloud/saas/netsuite/ns-online-help/chapter_N3477815.html
When making calls to NetSuite using the adapter, creating the request messages can be done in many ways. You can use a C# or C# Class step in a process or workflow. You can also use the Transform – XSLT process step for SOAP API calls. You can also pass-thru a SOAP request received by a client connector and route it to a NetSuite endpoint. This document will demonstrate how to:
- Use the Metadata Generation Wizard to create XML Schemas and sample documents
- Create a NetSuite Adapter endpoint and test it with an “add” customer operation
Security
As noted previously, the adapter requires either NetSuite user credentials or access token when making calls to NetSuite. These credentials are saved with the adapter endpoint, allowing the adapter to handle all the security requirements at runtime. When you’re constructing a request message to send to NetSuite you do not need to worry about setting credentials in your code.
Requirements
Each tutorial in this guide has the following requirements:
- A NetSuite account. This can be a production, sandbox or testdrive account. Generally you’d avoid using a production account. If you don’t have a NetSuite account, you may be able to get a free test drive account at https://www.netsuite.com.
- Neuron ESB 3.7.5 or later installed.
- Each of the following walk-throughs can be completed using the same Neuron solution. Create a new Neuron solution with the following items:
- 1 Topic – CRM
- One subtopic:
- Customer
- One subtopic:
- 1 Publisher:
- Customer Publisher, with a send subscription to the CRM.Customer topic
- 1 Subscriber:
- Customer Subscriber, with a receive subscription to CRM.Customer
- 1 Topic – CRM
- Save the Neuron solution in a folder called NetSuiteTutorialESB.
- Configure the Neuron ESB runtime to use the above solution.
- Start the Neuron ESB runtime.
Calling the SOAP API
This tutorial will walk you through using the NetSuite adapter to call the NetSuite SOAP API. You will learn how to create an adapter endpoint and all the options available when calling the SOAP API.
Creating an Adapter Endpoint
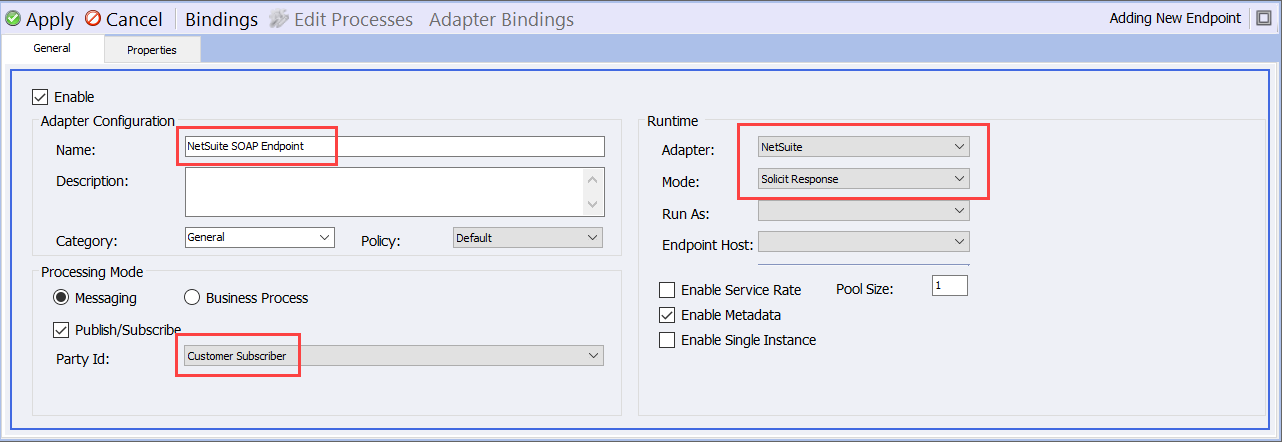
- In Neuron Explorer, navigate to Connections->Adapter Endpoints and click New. Set the name of the adapter endpoint to NetSuite SOAP Endpoint, select NetSuite from the Adapter drop-down list, Solicit Response from the Mode drop-down list and select Customer Subscriber from the Party Id drop-down list.
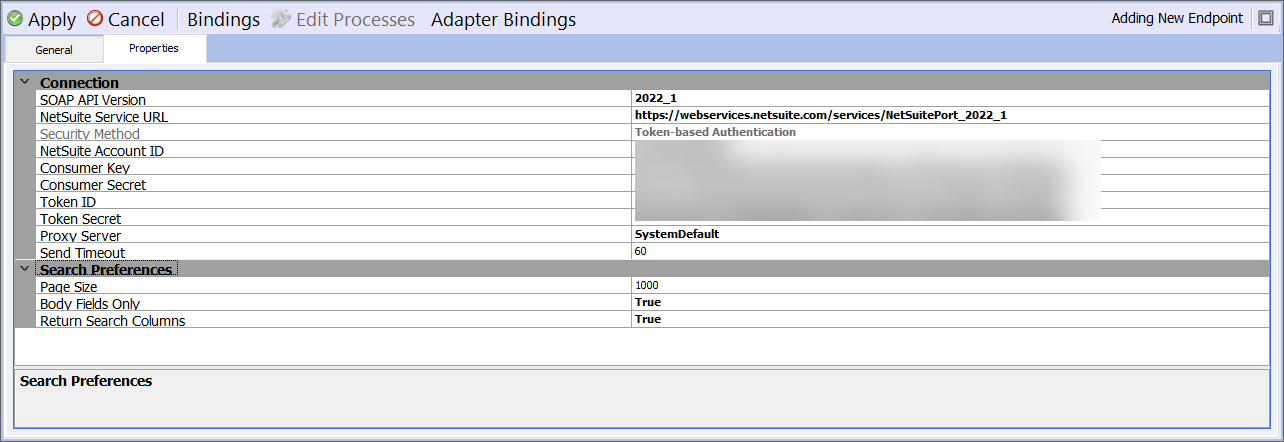
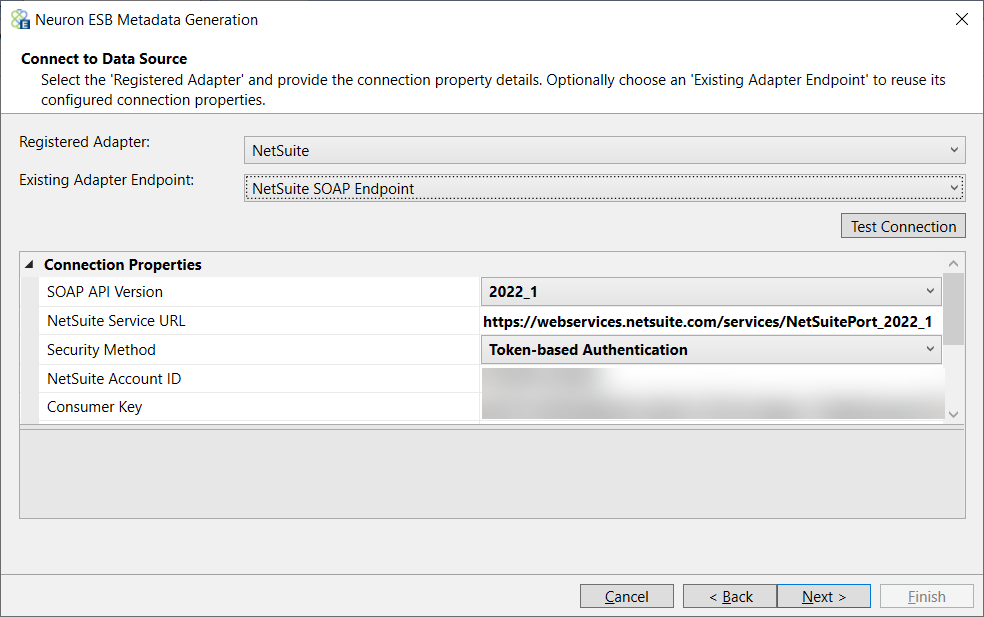
- Click on the Properties tab and set the properties as described below.
- SOAP API Version – 2022_1
- NetSuite Service URL – Leave as the default value: https://webservices.netsuite.com/services/NetSuitePort_2022_1
- NetSuite Account ID – The ID of the NetSuite Account you are integrating with. Remember – all caps and use underscores for sandbox/release preview accounts! (i.e. 1234567_SB1)
- Security Method – Token-based Authentication
- Consumer Key – The consumer key saved when the NetSuite Integration Record was created
- Consumer Secret – The consumer secret saved when the NetSuite Integration Record was created
- Token ID – The token ID saved when the access token was created in NetSuite
- Token Secret – The token secret saved when the access token was created in NetSuite
- Proxy Server – If needed, change this per your network policies
- Search Preferences – you do not need to set/modify any properties in this group
- Click the Apply button.
In the next walk-through, you will use this adapter endpoint in the Metadata Generation Wizard to create schemas and sample XML messages.
Request and Response Message Formats
When utilizing the SOAP API, the NetSuite adapter only supports XML content for request and response messages. The request and response message formats depend on the service operation being called. You can retrieve request and response message schemas, as well as XML samples, using the Metadata Generation Wizard described below.
Generating Metadata
The Metadata Generation Wizard is a tool that is used to generate sample messages and schema definitions for certain adapters and their operations. The Metadata Generation Wizard can be used to generate sample XML request and response messages for the NetSuite Adapter. The following guide assumes you have already completed the first part of this walk-though – Creating an Adapter Endpoint.
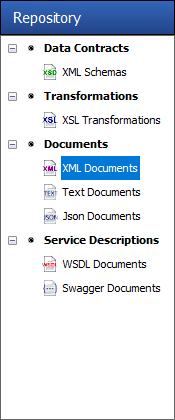
- First, in Neuron ESB Explorer navigate to Repository->Xml Documents:
- Next, click the Generate button:

The Generate button can be accessed from any of the following menus:
-
- In the “Repository” tab in:
- XML Schemas
- Json Schemas
- XSL Transformations
- XML Documents
- Text Documents
- Json Documents
- Swagger Documents
- In the Connections tab in:
- Adapter Registration
- Adapter Endpoints
- In the “Repository” tab in:
- On the Connect to Data Source page choose an adapter and adapter endpoint. In this case, choose the NetSuite adapter and the adapter endpoint created in the first part of this walk-through. Click Next:
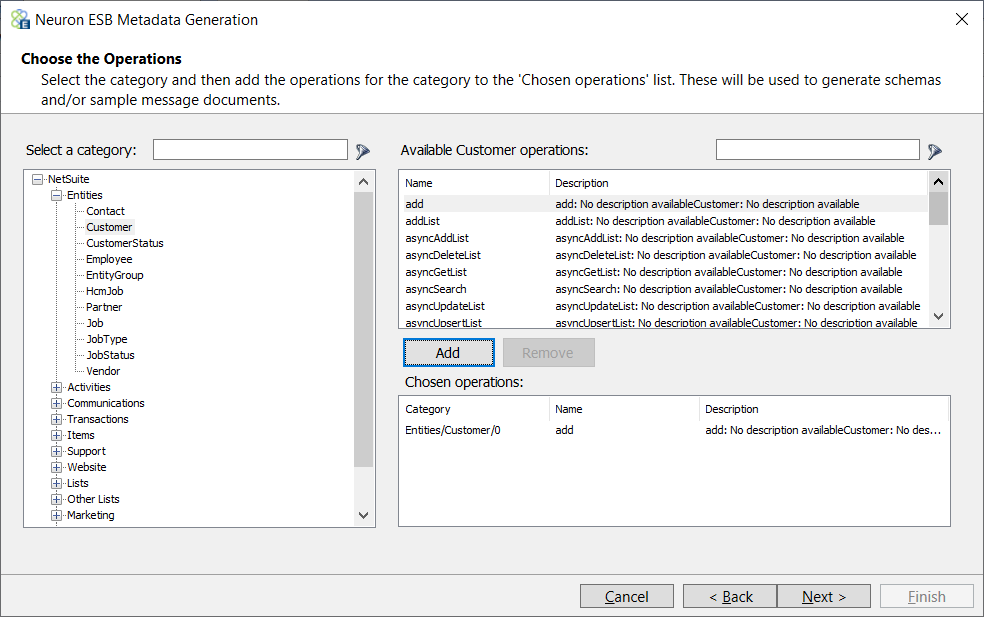
- For the NetSuite adapter, the Category will list all the entities supported by NetSuite’s SOAP API. Expand the Entities category and select the Customer object and then select the add operation from the list Available Customer operations. Add it to the list of Chosen Operations by clicking the Add button. More than one operation can be added by choosing each operation and adding it to the list. Click Next:
- Choose whether to generate sample messages (chosen by default) and whether to overwrite the existing documents, if they have already been added, by clicking on the appropriate boxes. Click Next:
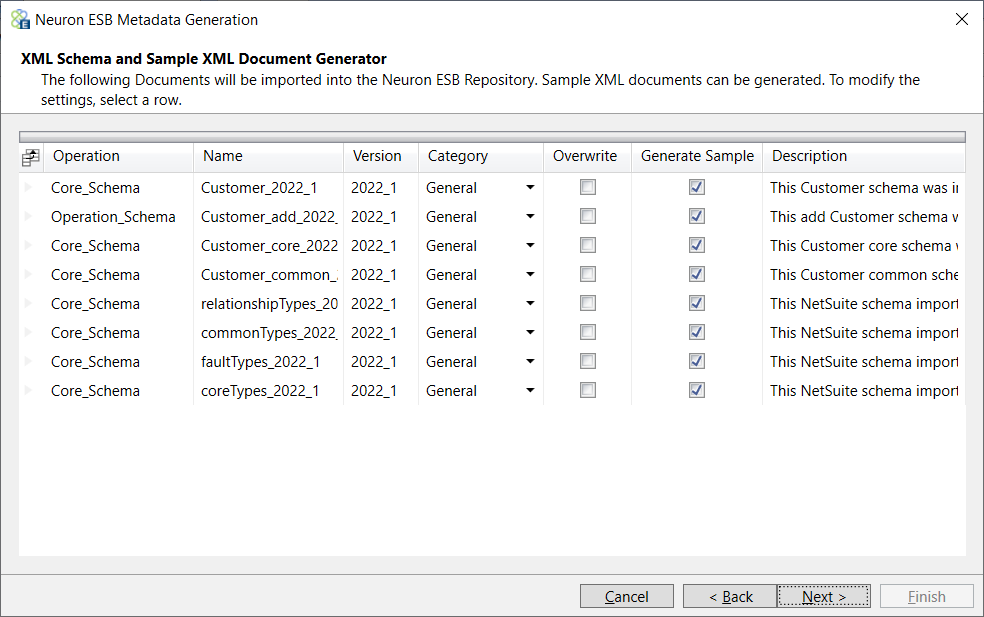
- Finally, click Finish to generate the documents:
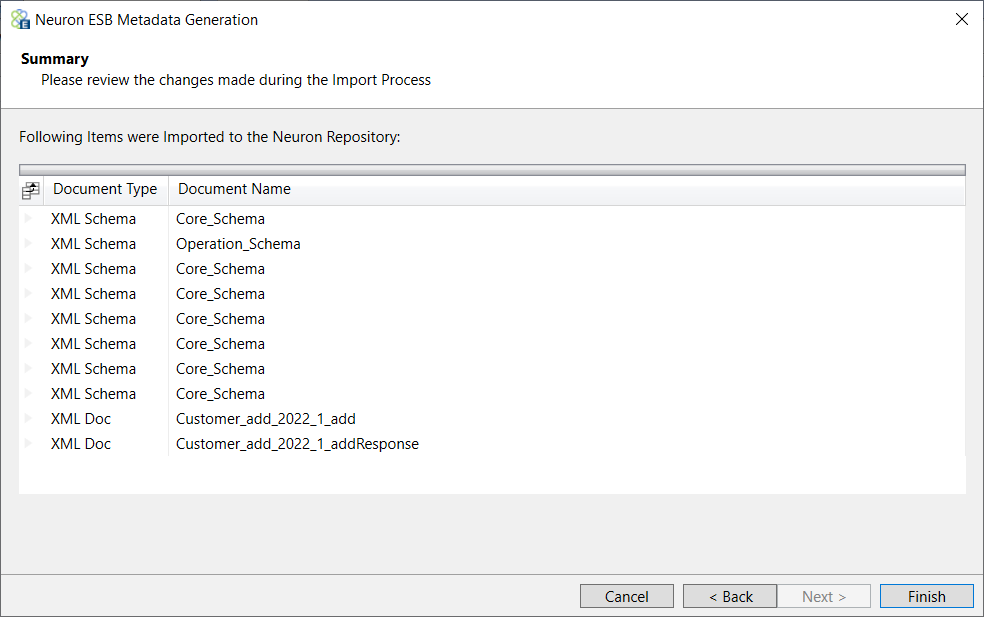
To see the sample request and response messages, navigate to the Xml Documents Repository and select the document Customer_add_2022_1_add or Customer_add_2022_1_addResponse. If you are already in the XML Documents Repository and do not see the documents, navigate to a different repository and then back. They should appear this time. This is a partial example of a Save or Update request:
<platformMsgs:add xmlns:xsi="https://www.w3.org/2001/XMLSchema-instance" ...>
  <platformMsgs:record internalId="internalId1" externalId="externalId1"
   xsi:type="listRel:Customer">
    <platformCore:nullFieldList>
      <platformCore:name>name1</platformCore:name>
    </platformCore:nullFieldList>
    <listRel:customForm internalId="internalId1" externalId="externalId1">
      <platformCore:name>name1</platformCore:name>
    </listRel:customForm>
    <listRel:entityId>entityId1</listRel:entityId>
    <listRel:altName>altName1</listRel:altName>
    <listRel:isPerson>true</listRel:isPerson>
    <listRel:phoneticName>phoneticName1</listRel:phoneticName>
    <listRel:salutation>salutation1</listRel:salutation>
    <listRel:firstName>firstName1</listRel:firstName>
    <listRel:middleName>middleName1</listRel:middleName>
    <listRel:lastName>lastName1</listRel:lastName>
    <listRel:companyName>companyName1</listRel:companyName>
You can use these XML samples to guide your development when creating integrations to NetSuite. The XML schemas and samples created by the Metadata Generation Wizard reflect the bodies of the SOAP request and response message types. The NetSuite adapter supports all the features of the SOAP API. To fully understand how to use a specific object and operation in the SOAP API, please refer to the NetSuite SOAP API documentation referenced at the beginning of this document.
Testing the NetSuite SOAP API Endpoint
This walk-through will show you how to use the NetSuite Adapter to call the SOAP API at runtime. This assumes you completed the previous steps in this section and the Neuron ESB Service is configured to host the Neuron configuration you’ve been working on.
- If you haven’t already done so, save your Neuron Configuration.
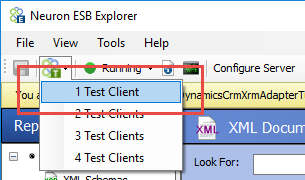
- Open a Neuron Test Client by clicking on the Test Client icon in the Neuron ESB Toolbar and select 1 Test Client:
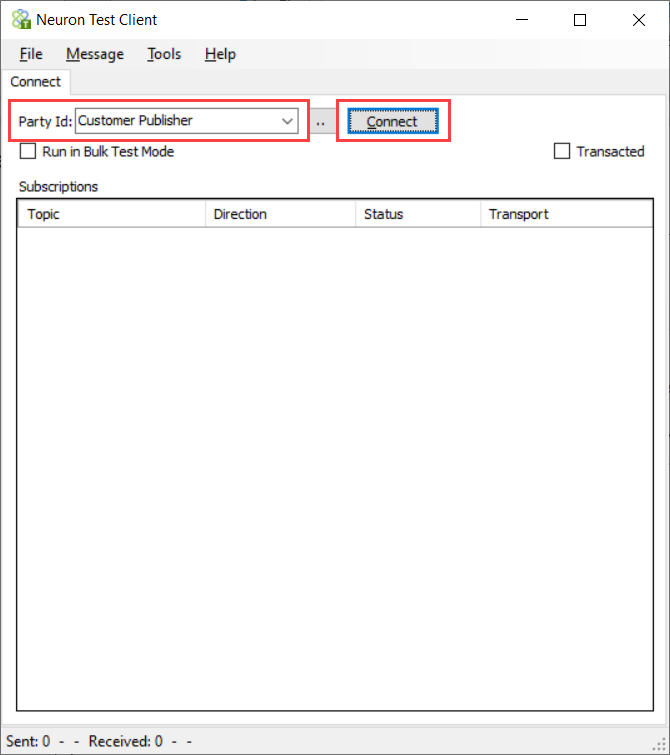
- When the Neuron Test Client open, select Customer Publisher form the Party Id drop-down list and click the Connect button:
- In the Neuron Test Client, click on the Send tab. Set the Semantic to Request and paste this XML to the Message text area:
<platformMsgs:add xmlns:xsi="https://www.w3.org/2001/XMLSchema-instance"
  xmlns:listRel="urn:relationships_2022_1.lists.webservices.netsuite.com"
  xmlns:platformMsgs="urn:messages_2022_1.platform.webservices.netsuite.com"
  xmlns:platformCommon="urn:common_2022_1.platform.webservices.netsuite.com">
  <platformMsgs:record xsi:type="listRel:Customer">
    <listRel:companyName>Peregrine Connect</listRel:companyName>
    <listRel:subsidiary internalId="1" type="account"/>
    <listRel:addressbookList replaceAll="true">
      <listRel:addressbook>
        <listRel:defaultShipping>true</listRel:defaultShipping>
        <listRel:defaultBilling>true</listRel:defaultBilling>
        <listRel:addressbookAddress>
          <platformCommon:country>_unitedStates</platformCommon:country>
          <platformCommon:addr1>200 Spectrum Center Dr</platformCommon:addr1>
          <platformCommon:addr2>Suite 300</platformCommon:addr2>
          <platformCommon:city>Irvine</platformCommon:city>
          <platformCommon:state>CA</platformCommon:state>
          <platformCommon:zip>92618</platformCommon:zip>
        </listRel:addressbookAddress>
      </listRel:addressbook>
    </listRel:addressbookList>
  </platformMsgs:record>
</platformMsgs:add>
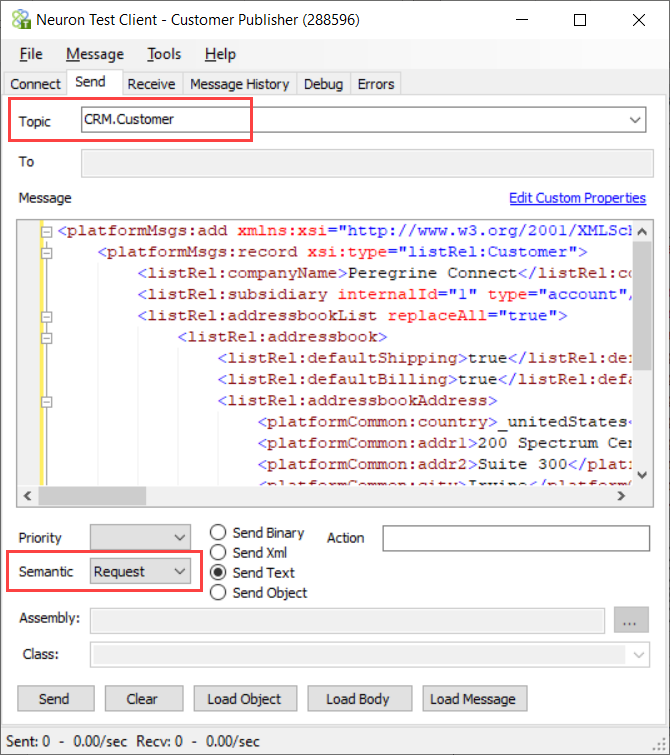
The XML above was created using the sample generated by the Metadata Generation Wizard. The sample values are replaced with real data for the elements we want to set in the new customer and the unneeded elements were removed.
- Click the Send button. If everything works correctly, you should see the Recv: counter at the bottom of the Test Client increase by one. Navigate to he Receive tab to see the response message (note – you might have to right-click in the response area and select “Format” to pretty-print the XML):
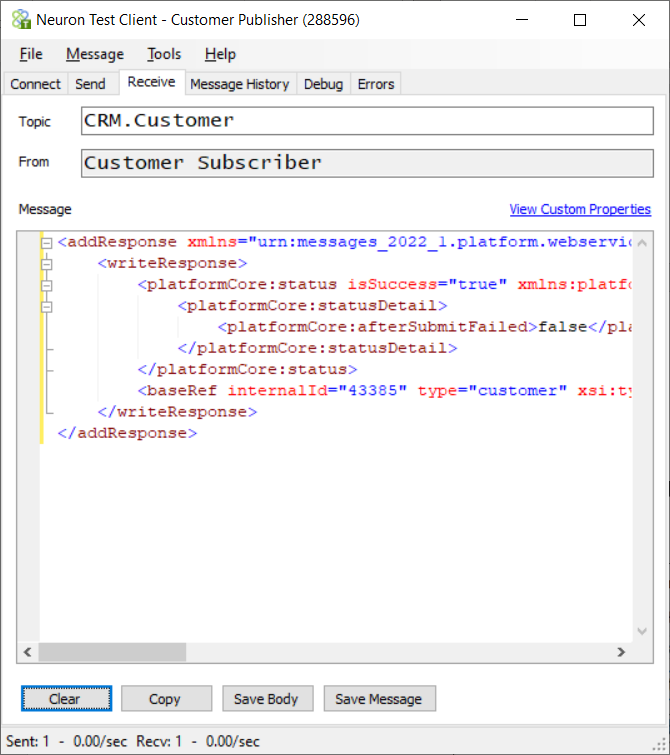
This operation returns a success flag and the internal NetSuite ID of the customer created.
- Open a web browser and log-into your NetSuite account. Navigate to Customers to see your newly added customer.
Appendix
Dynamic Message Properties
The NetSuite adapter supports several message properties that can be used to dynamically change the behavior of the adapter at runtime. All the message properties have the prefix “netsuite”. For example, if you want to set the username that will be used when making a call to NetSuite, you could use the following code in a C# step:
context.Data.SetProperty(“netsuite”, ” Email”, “netsuite.user@mycompany.com”);
Subscribe Mode Message Properties
These message properties can be set on request messages sent to NetSuite:
| AccountId | The NetSuite account ID that identifies which instance requests are sent to |
| The username to use when sending the request | |
| Password | The password to use when sending the request |
| Role | The NetSuite role ID to use when sending the request |
| ApplicationId | The NetSuite Integration Record ID to use when sending the request |
| ConsumerKey | The consumer key generated by the NetSuite Integration Record |
| ConsumerSecret | The consumer secret generated by the NetSuite Integration Record |
| Token | The token ID generated when the NetSuite Access Token was created |
| TokenSecret | The token secret generated when the NetSuite Access Token was created |
| disableMandatoryCustomFieldValidation | Affects the handling of custom fields that are configured in the UI to be mandatory. If you set this preference to true, the fields are not treated as required during SOAP web services requests. If the preference is set to false, the fields are required. |
| disableSystemNotesForCustomFields | This preference lets you disable the creation of system notes for changes to custom fields. |
| ignoreReadOnlyFields | This preference affects the way the system behaves when you mistakenly submit a value for a read-only field. If you set this preference to true, the system ignores these mistakes. |
| runServerSuiteScriptAndTriggerWorkflows | Using this preference you can control SuiteScript and trigger workflows per request. If you set this preference to false, you will disable server SuiteScripts and workflows that otherwise would have been triggered by SOAP web services requests. |
| warningAsError | When this preference is enabled, warning messages generated by NetSuite are treated as errors that cause an exception, resulting in rejection of the request. |
These message properties will be available on response messages received from NetSuite:
| ServiceUrl | The NetSuite Serivce URL from the WSDL |
| Username | Email used for the request credentials |
| AccountSpecificUrl | The base URL that can be used for accessing records via the NetSuite UI |
Security
The NetSuite adapter utilizes request-level security. This means that each request message sent to NetSuite will include either the user credential or Token-based Authentication (TBA) passport SOAP header. Starting with release 2020_2 NetSuite only supports TBA with the SOAP API. User credentials are still supported with version 2020_1 and older, but that support will eventually be removed as NetSuite stops supporting older versions of the SOAP API. It is recommended that all new integrations to NetSuite use the latest available version along with Token-based Authentication.
Role Permissions
All requests to the NetSuite SOAP API are subject to role permissions, whether you use user credentials or TBA as the security method. The only required role permission when using user credentials is “SOAP Web Services”. If you are using TBA, you also need the “Log in using Access Tokens” role permission.
Beyond these initial role permissions, you will need to add the necessary permissions to perform the actions requested by the SOAP API. For example, if you want to add customers to NetSuite, you will need to add the Customers permission with level = Create or Full.
If you don’t have the correct permissions, you will usually get an INSUFFICIENT_PERMISSION error returned.
Also note, there are several permissions that pertain to custom fields, lists and sublists. If you continue to get the INSUFFICIENT_PERMISSION error response, you should see what customizations have been done on the record you’re trying to add.
For a full review of Roles and Permissions in SOAP Web Services, see:
https://docs.oracle.com/en/cloud/saas/netsuite/ns-online-help/chapter_N3424144.html
For more information for setting-up Token-based Authentication, see:
https://docs.oracle.com/en/cloud/saas/netsuite/ns-online-help/chapter_4247329078.html
Integration Records
NetSuite requires an integration record to be defined and used with all SOAP requests. The integration record defines what type of authorization is allowed – TBA, OAuth 2.0 or User Credentials. You can select any combination of these. However, OAuth 2.0 is not supported with the SOAP API. When you create an integration record with TBA selected, a consumer key and secret are displayed when you first save it. You need to copy these values and save them, as they are used in the NetSuite adapter endpoint. Once you navigate away from the integration record they will not be displayed again and you will need to regenerate the values.
For more information on Integration Records, see:
https://docs.oracle.com/en/cloud/saas/netsuite/ns-online-help/chapter_4399047360.html
Access Tokens
When using Token-based Authentication, you will need to create at least one Access Token. When creating access tokens, you are mapping an application (Integration Record), role and user together for TBA access to NetSuite. Similar to creating Integration Records, when you first save the Access Token you will see the token ID and token secret. You will need to save these values for use in the NetSuite adapter endpoint as this is the only time you will see them.
Access tokens don’t expire, but they can be revoked. If you believe your token ID and secret have been compromised you should revoke the token and create a new one for the same application, role and user.
For more information on Token-based Authentication, see:
https://docs.oracle.com/en/cloud/saas/netsuite/ns-online-help/chapter_4247329078.html
About the Author
Joe Klug is a Solution Architect for Peregrine Connect, responsible for pre-sales engineering, post-sales support, training, architectural reviews, product development and consulting. Prior to joining the team, he spent a number of years at Microsoft.
Read more about Peregrine Connect

-
Rabbit MQ Topics
Introduction Due to the open-source nature of RabbitMQ and constant updates, it is...
-
Port Sharing
One of Neuron ESB’s scalability features is the ability to install multiple...

-
The Integration Journey to...
The Integration Journey to Digital Transformation with Peregrine Connect
-
Saving Time and Money by...
Neuron ESB Application Integration and Web Service Platform: A Real-World Example...

-
Neo PLM
-
Loomis Case Study
Loomis Chooses Peregrine Connect as Their No/Low-Code Integration Platform:...

-

Decision Test Data Mapping
- Use decisions to drive the execution of...
-
Map Testing
Learn how to utilize FlightPath's testing functions...