Abstract: The Dynamics CRM XRM Connector (Adapter) provides an interface between Dynamic CRM 2011 (and later) and Neuron ESB. The Dynamics CRM XRM Adapter can be used create, update or delete entities as well as execute FetchXml queries to retrieve data from Dynamics CRM.
Introduction
The Neuron ESB Dynamics CRM XRM Adapter provides direct access to Microsoft Dynamics CRM 2011 and later. Using this adapter, organizations can easily integrate their business applications such as SalesForce.com, NetSuite or Marketo with Dynamics CRM. This adapter operates in subscribe as well as solicit/response (or query) mode. Organizations can use the adapter to create, update or delete entities, as well as execute FetchXml queries to retrieve data from Dynamics CRM. When developing applications that utilize this adapter, developers will be able to use the Adapter Metadata Generation Wizard to provide XML schemas and samples that describe the request and/or response documents that are exchanged with Dynamics CRM.
Note – This adapter supports both on-premises and online versions of Dynamics CRM 2011 and later.
Before reading this document
If you are not familiar with Neuron ESB Adapters, take a moment to consult our online help section: Help Developing Neuron Applications, Connecting, & Adapters.
This document assumes you have the following knowledge:
- What adapters are and how they are leveraged in Neuron ESB
- Register a Neuron ESB Adapter within a Neuron ESB Solution
- Create an Adapter Endpoint in a Neuron ESB Solution
- Set a Neuron ESB Adapter Endpoint Properties
- Invoke a Neuron ESB Adapter Endpoint
The Dynamics CRM XRM Adapter provides a bridge between Neuron ESB and the service exposed by Dynamics CRM. This adapter utilizes the Dynamics 365 SDK for communications between Neuron ESB, but it does not expose all services and operations provided by the Dynamics 365 SDK. The adapter exposes three main operations that can be performed against any entity – Save (or Update), Delete and Set State, as well as a Get operation that can be used to execute a FetchXml command to retrieve data.
Supported Modes
The Dynamics CRM XRM Adapter supports 2 modes:
- Subscribe: Used to send one-way calls to Dynamics CRM and will not return a response. The best use cases for this mode are Create, Update and Delete of entity types.
- Solicit Response: Used to send request-reply calls to Dynamics CRM and will return a response. For the Save command, the response will contain the ID of the entity created (or updated). For the Delete and Set commands, the response will contain a success flag. For the Get command, the response will contain the result of the FetchXml statement sent to Dynamics CRM.
Dynamics CRM XRM Adapter Properties
Every Neuron ESB Adapter has design time properties that can be configured within a standard Microsoft property grid (as shown in Figure 1). These properties are used to determine the behavior of the adapter at runtime. The group of Connection properties is used to configure the connection to the Dynamics CRM Server, along with the security credentials used when sending requests to Dynamics CRM.
Deployment Type
The CRM instance deployment type. The options are OnPremises, Online and IFD (Internet-facing Deployment). The Deployment Type selected will determine which other properties are available for configuration.
Server Address
This is the name or IP address of the on-premises Dynamics CRM web front-end server. This property is only available for on-premises deployment types.
Discovery Service Address
The URL of the Dynamics CRM Discovery Service. When the deployment type is IFD, this URL is used by the adapter to discover the correct URL to use with the configured organization name. The Discovery Service URL can be found by logging into Dynamics CRM, then navigating to Settings->Customizations->Developer Resources.
Organization Name
This is the organization the Dynamics CRM Adapter endpoint will connect to. If the deployment type is Online, the organization name usually the first part of the DNS name used when logging into Dynamics CRM (i.e. OrganizationName.crm.dynamics.com).
Use Https
Indicates whether the connection to Dynamics CRM is encrypted with SSL. This property is only available for on-premises deployment types.
Online Region
The region where the online instance of Dynamics CRM is provisioned. This property is only available for online deployment types.
Send Timeout
This is the amount of time in seconds the Dynamics CRM XRM Adapter will wait for a reply from Dynamics CRM. The default value is 60 seconds and should be long enough for most calls. However, if you performing complex queries you may want to extend the timeout.
Security Method
There are several options for which security model to use. These options can be used with any deployment type:
- The Neuron ESB service account credentials can be used to login to Dynamics CRM. To use the Neuron service account, just select ServiceAccount from the Security Method dropdown list:
 Figure 1: ServiceAccount
 - To use a different set of Windows credentials for authentication to Dynamics CRM, select Windows from the Security Model dropdown list:
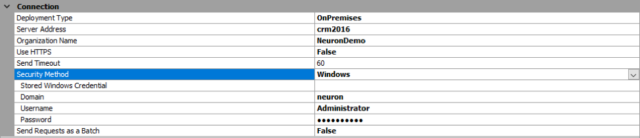 Figure 2: Windows Credentials
When you select Windows, four additional properties are displayed:
- Stored Windows Credentials – In Neuron ESB you can create pre-configured credentials in the Neuron ESB Repository. The Store Windows Credentials dropdown list will display any Windows Credentials that have been added.
- Domain – The domain of the Windows credentials that should be used for authentication.
- Username – The user name of the Windows credentials that should be used for authentication.
- Password – The password of the Windows credentials that should be used for authentication.
To connect with a Microsoft Live ID, select LiveID from the Security Model dropdown list:
Figure 3: Live ID
When you select LiveID, three additional properties are displayed:
- Stored Username Credentials – In Neuron ESB you can create pre-configured credentials in the Neuron ESB Repository. The Store Username Credentials dropdown list will display any username/password credentials that have been added.
- Username – The Microsoft Live ID that should be used for authentication.
- Password – The password of the Microsoft Live ID that should be used for authentication.
- To connect with ADFS, select Federated from the Security Model dropdown list:

Figure 4: Federated
When you select Federated, three additional properties are displayed:
- Stored Username Credentials – In Neuron ESB you can create pre-configured credentials in the Neuron ESB Repository. The Store Username Credentials dropdown list will display any username/password credentials that have been added.
- Username – The Microsoft Live ID that should be used for authentication.
- Password – The password of the Microsoft Live ID that should be used for authentication.
Send Requests as a Batch
The SaveCrmRecord requests can be sent individually or as a batch. Set this property to true if you want to send several requests in a single call to Dynamics CRM. Note – if you set this property to true, any external ID’s that are passed with each SaveCrmRecord request will not be preserved. Batch calls are effectively one-way calls. Also, if set to true, any forward references (Lookups) from one SaveCrmRecord to the next will not be honored.
Using the Dynamics CRM XRM Adapter
The Dynamics CRM XRM Adapter can be used to create, update, delete, or set the status of any Dynamics CRM entity. It can also be used to query Dynamics CRM for data. The adapter supports three generic commands:
- SaveCrmRecord – this command is used to create and updated any standard and custom entities
- SetCrmState – this command is used to set the state of an entity, i.e. setting the state of an Opportunity to “Won”
- DeleteCrmRecord – this command is used to delete any standard or custom entity
- GetCrmRecord – this command is used to execute a FetchXml query to retrieve data from Dynamics CRM
The message formats for the above commands can be retrieved using the Metadata Generation Wizard (https://www.neuronesb.com/article/introducing-new-neuron-esb-connector-metadata-generation-wizard).
When making calls to Dynamics CRM using the adapter, creating the request messages can be done in many different ways. You can use a C# or C# Class step in a process or workflow. You can also use the Transform – XSLT process step. You can also pass-thru a SOAP request received by a client connector and route it to a Dynamics AX Adapter endpoint. This document focuses on creating the requests with a C# step in a process.
Security
As noted previously, the adapter supports using Windows credentials, Microsoft LiveID or ADFS when calling Dynamics CRM. The adapter handles all the security requirements at runtime. When you’re constructing a request message to send to Dynamics CRM you do not need to worry about setting credentials.
Walk-through: Creating an Adapter Endpoint
This walkthrough has the following requirements:
- An on-premises instance of Dynamics CRM 2011 or later, or an online Dynamics CRM account
- The Dynamics CRM demo data loaded. For information on loading the demo data: https://www.microsoft.com/en-us/dynamics/crm-customer-center/add-or-remove-sample-data.aspx
- Neuron ESB 3.5.4 or later installed
- A new Neuron Configuration with the following items already created:
- 1 Topic – Account
- 1 Subscriber – Account Subscriber, with a receive subscription to the Account topic
- 1 Publisher – Account Publisher, with a send subscription to the Account topic
- The Neuron ESB runtime is configured and started with the above solution
Walk-through:
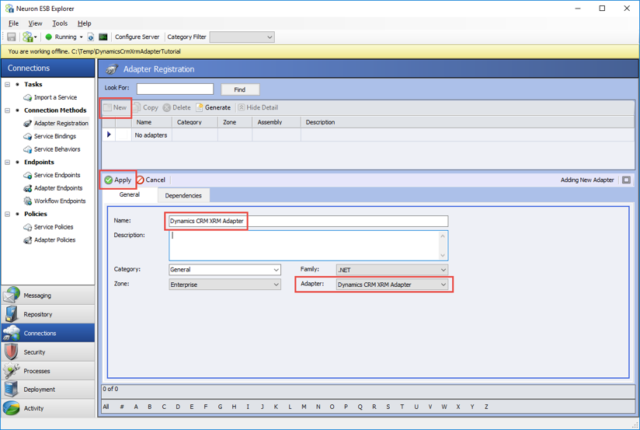
- In Neuron ESB Explorer, navigate to Connections->Adapter Registration and click New. Set the name of the adapter to Dynamics CRM XRM Adapter and select Dynamics CRM XRM Adapter from the Adapter drop-down list. Click Apply.
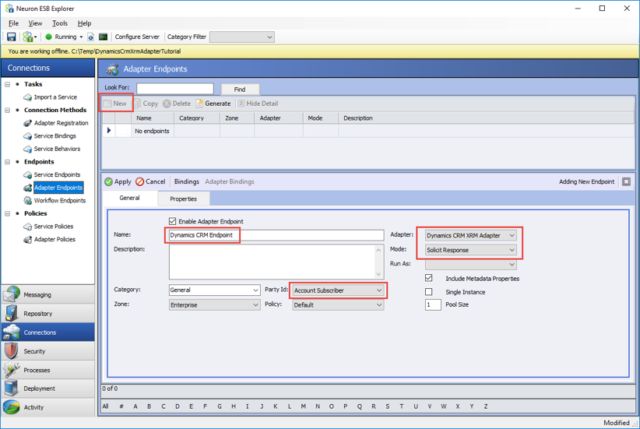
- Navigate to Connections->Adapter Endpoints and click New. Set the name of the adapter endpoint to Dynamics CRM Endpoint, select Dynamics CRM XRM Adapter from the Adapter drop-down list, Solicit Response from the Mode drop-down list and select Account Subscriber from the Party Id drop-down list.
- Click on the Properties tab. The values you enter here will depend on your CRM deployment type. Set the properties according to your deployment type as described below, then set the remaining properties per the section “All Deployment Types”. For simplicity, the instructions below only describe using Windows credentials for security.
Online Deployment Type:
- Deployment Type – Select Online
- Online Region – Select the region where your CRM instance has been provisioned
On-Premises Deployment Type:
- Deployment Type – Select OnPremises
- Server Address – Set the server name or IP address of the CRM Web Front-End Server
- Use HTTPS – Select true if your CRM instance is configured for SSL/TLS
Internet-Facing Deployment Type:
- Deployment Type – Select IFD
- Discovery Server Address – Set to the URL of the CRM Instance Discovery Service. This can be found by logging into CRM and navigating to Settings->Customizations->Developer Resources
All Deployment Types:
- Organization Name – Set to the organization you want to test with
- Security Method – Select Windows
- Domain – Set the CRM account’s domain
- Username – Set the CRM account’s username
- Password – Set the CRM account’s password
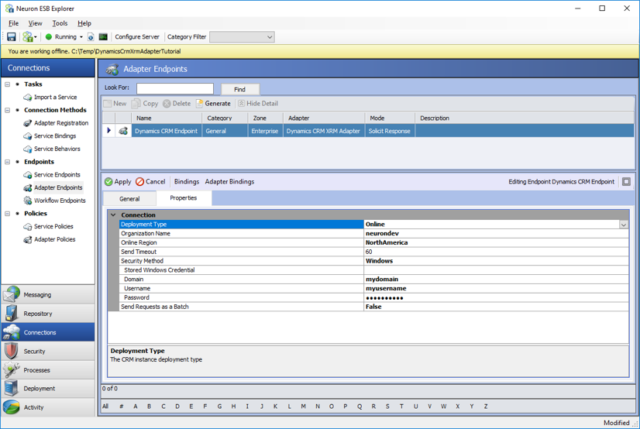
- Click the Apply
In the next walk-through, you will use this adapter endpoint in the Metadata Generation Wizard to retrieve schemas and sample XML messages.
Request and Response Message Formats
The Dynamics CRM XRM Adapter only supports XML content for request and response messages. The request and response message formats depends on the service operation being called. You can retrieve request and response message schemas, as well as XML samples, using the Metadata Generation Wizard described below.
Dynamic Message Properties
The Dynamics AX Adapter supports several message properties that can be used to dynamically change the behavior of the adapter at runtime. All the message properties have the prefix “dynamicsax”. For example, if you want to change which Company you are setting in the Call Context on a per-message basis, you could use the following code in a C# step:
context.Data.SetProperty("dynamicsax", "Company", "BRMF");These messages properties can control which Dynamics AX AOS Server service requests are sent to. If the message property ServiceUrl contains a value, then that value will be used and ServerName and PortNumber will be ignored. If the message property ServiceUrl is not set, then the ServerName and PortNumber properties will be used if they contain a value.
| ServiceUrl | This property overrides the Web Service URL to call |
| ServerName | This property overrides the Dynamics AX AOS Server Name set in the endpoint properties |
| PortNumber | This property overrides the Dynamics AX AOS Services Port Number set in the endpoint properties |
These message properties can be used if you want to dynamically control the credentials used to secure the request message sent to Dynamics AX:
| Domain | This property overrides the domain name of the Windows credentials used when calling the Dynamics AX Web service |
| Username | This property overrides the username of the Windows credentials used when calling the Dynamics AX Web service |
| Password | This property overrides the password of the Windows credentials used when calling the Dynamics AX Web service |
These message properties are used to dynamically control which values are set in the Call Context:
| Company | This property overrides the Company for the data on which the operation is performed |
| Language | This property overrides the LanguageID for the language used to display messages |
| LogonAsUser | This property overrides the user that is logged for having performed the service operation. Provide the user in the format “domain\user”. |
| MessageId | This property sets the MessageId that is used to uniquely identify the message. For end-to-end tracking, you can set this value to the Neuron ESB Message Id:context.Data.SetProperty(“dynamicsax”, “MessageId”, context.Data.Header.MessageId); |
| PartitionKey | This property overrides the partition key that contains the data that is referenced by this service operation |
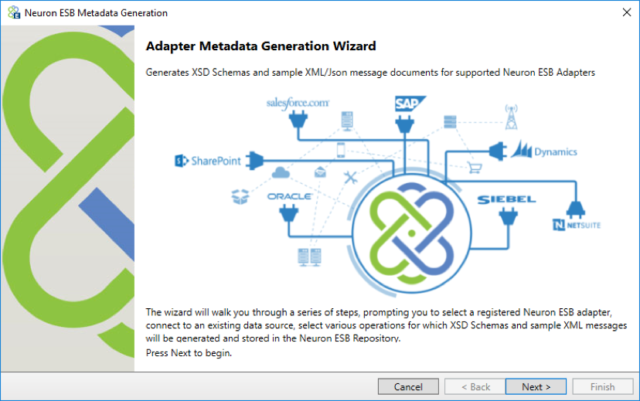
Walk-through: Using the Metadata Generation Wizard
The Metadata Generation Wizard is a tool that is used to generate sample messages and schema definitions for certain adapters and their operations. The Metadata Generation Wizard can be used to generate sample XML request and response messages for the Dynamics CRM XRM Adapter. The following guide assumes you have already completed the first walk-though – Creating an Adapter Endpoint.
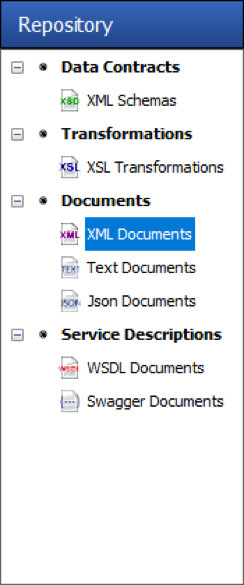
- First, in Neuron ESB Explorer navigate to Repository->Xml Documents:
- Next, click the Generate button:

The Generate button can be accessed from any of the following menus:
In the “Repository” tab in:
- XML Schemas
- XSL Transformations
- XML Documents
- Text Documents
- Json Documents
- Swagger Documents
In the Connections tab in:
- Adapter Registration
- Adapter Endpoints
- On the Welcome Page, click Next:
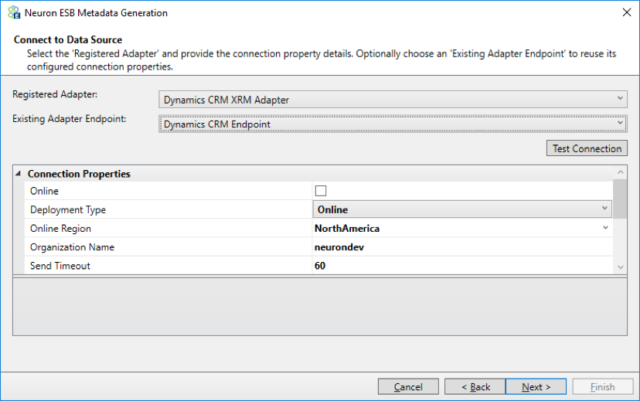
- On the Connect to Data Source page choose an adapter and adapter endpoint. In this case, choose the Dynamics CRM XRM Adapter and the adapter endpoint created in the first walk-through. Click Next:
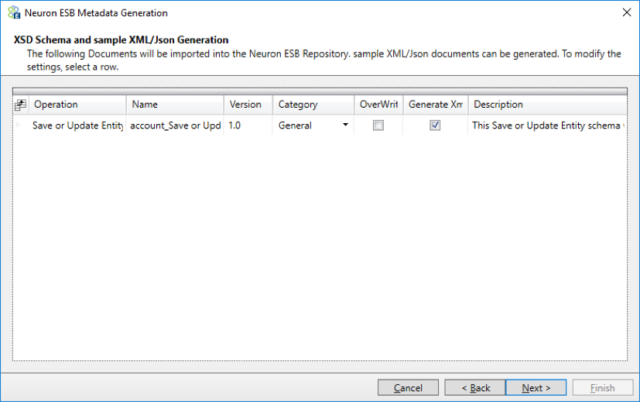
- For the Dynamics CRM XRM Adapter, the Category represents all the entities that are available for the CRM instance and organization that was set in the adapter endpoint. There is an additional category labeled CRM Operations which allows you to generate a schema and XML sample for the GetCrmRecord operation. Expand the CRM Entities category, select the Account entity, and then select the Save or Update Entity operation. Add it to the list of Chosen Operations by clicking the Add More than one operation can be added by choosing each operation and adding it to the list. Click Next:

- Choose whether to generate sample XML messages (chosen by default) and whether to overwrite the existing documents, if they have already been added, by clicking on the appropriate boxes. Click Next:
- Finally, click Finish to generate the documents:
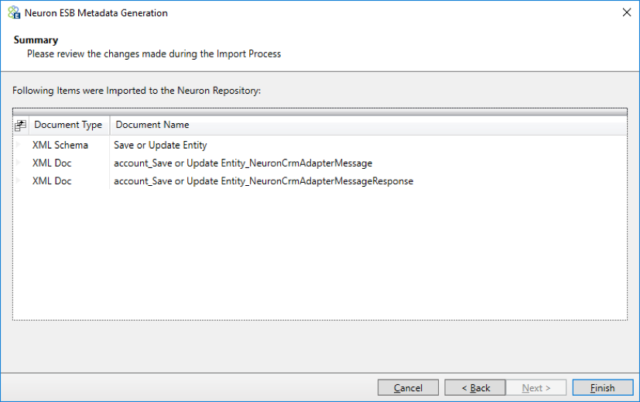
To see the sample request and response messages, navigate to the XML Documents Repository and select the document account_Save or Update Entity_NeuronCrmAdapterMessage. This is a partial example of a Save or Update request:
<?xml version="1.0" encoding="utf-16"?>
<NeuronCrmAdapterMessage xmlns:xsi="https://www.w3.org/2001/XMLSchema-instance" xmlns="https://neuronesb.adapters.dynamicscrm2013">
  <CrmCommands Transactional="true">
    <Lookups>
      <Lookup id="id1" entity="entity1" lookupfield="lookupfield1">
        <searchfield name="name1" value="value1" typename="typename1" operator="operator1" lookupid="lookupid1"/>
      </Lookup>
    </Lookups>
    <SaveCrmRecord allowCreate="true" id="account" entity="account" identityfield="accountid" lookup="lookup1">
         <properties>
           <entityimage_timestamp lookupid="lookupid1" typename="BigInt" reference="reference1">entityimage_timestamp1</entityimage_timestamp>
           <isprivate lookupid="lookupid1" typename="Boolean" reference="reference1">isprivate1</isprivate>
           <donotfax lookupid="lookupid1" typename="Boolean" reference="reference1">donotfax1</donotfax>
       <donotphone lookupid="lookupid1" typename="Boolean" reference="reference1">donotphone1</donotphone>
You can use these XML samples to guide your development when creating integrations to Dynamics CRM. The commands supported by the Dynamics CRM XRM Adapter contain a number of features that cannot easily be demonstrated in the generated XML samples. See the section “XML Command Syntax” in the appendix.
Walk-through: Testing the Dynamics CRM XRM Adapter
This walk-through will show you how to test the Dynamics CRM XRM Adapter at runtime. This assumes you completed the previous walk-throughs and the Neuron ESB Service is configured to host the Neuron configuration you’ve been working on.
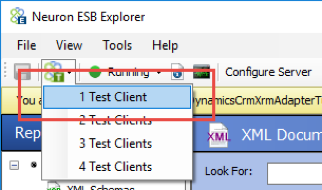
- If you haven’t already done so, save your Neuron Configuration.
- Open a Neuron Test Client by clicking on the Test Client icon in the Neuron ESB Toolbar and select 1 Test Client:
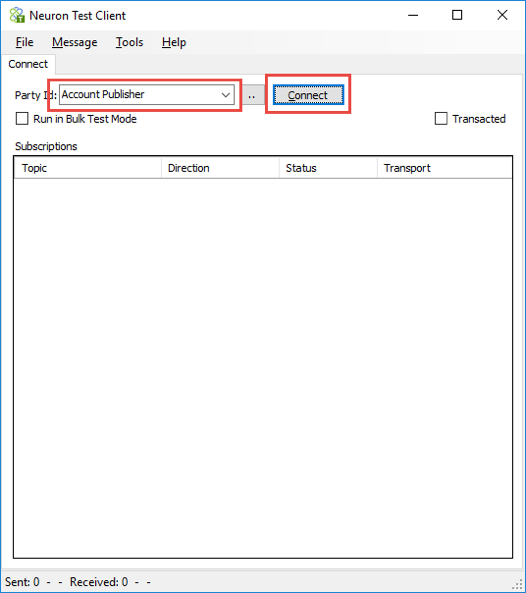
- When the Neuron Test Client open, select Account Publisher form the Party Id drop-down list and click the Connect button:
- In the Neuron Test Client, click on the Send tab. Set the Semantic to Request and paste this XML to the Message text area:
<NeuronCrmAdapterMessage> <CrmCommands Transactional="true"> <GetCrmRecord> <Query> <fetch mapping='logical'> <entity name='account'> <attribute name='accountid'/> <attribute name='name'/> </entity> </fetch> </Query> </GetCrmRecord> </CrmCommands> </NeuronCrmAdapterMessage>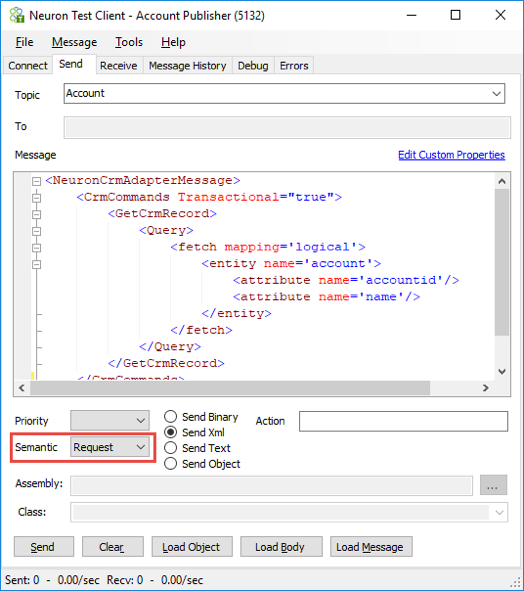
- Click the Send If everything works correctly, you should see the Recv: counter at the bottom of the Test Client increase by one. Navigate to the Receive tab to see the response message:
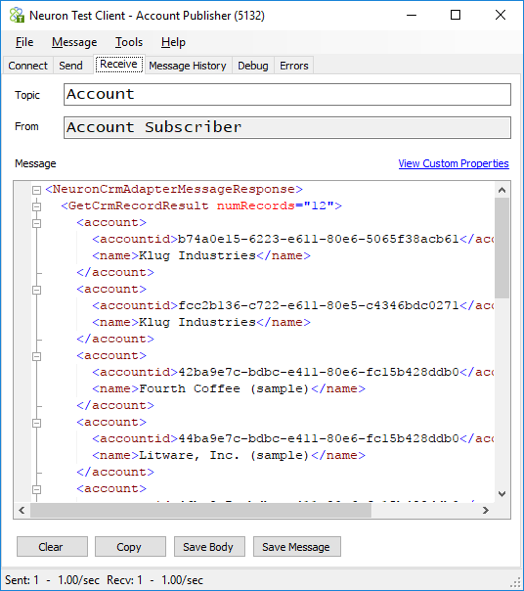
The XML in the request message uses the GetCrmRecord command to query CRM for a list of accounts, returning the AccountId and Name of the account.
Appendix
Message Samples
SaveCrmRecord
The SaveCrmRecord command allows you to create or update entities within CRM. It also supports “upsert”, where it will check for the existence of a record prior to updating or inserting.
Create
<NeuronCrmAdapterMessage>
<CrmCommands Transactional="false">
<SaveCrmRecord allowCreate="true" id="contact" entity="contact" identityfield="contactid">
<properties>
<emailaddress1 typename="String">John.Smith@domain.com</emailaddress1>
<birthdate typename="CrmDateTime">04/11/1982 12:00:00 AM</birthdate>
<firstname typename="String">John</firstname>
<lastname typename="String">Smith</lastname>
<donotemail typename="CrmBoolean">false</donotemail>
<creditlimit typename="CrmMoney">10000</creditlimit>
<department typename="String">Neudesic Sales</department>
</properties>
</SaveCrmRecord>
</CrmCommands>
</NeuronCrmAdapterMessage>
Update
This update assumes the entity ID is passed with the request. See the section SaveCrmRecord with Lookup to see how to update an entity when you don’t know the entity ID.
<NeuronCrmAdapterMessage>
<CrmCommands Transactional="false">
<SaveCrmRecord allowCreate="false" id="contact" entity="contact" identityfield="contactid">
<properties>
<contactid typename="key">{a3f02ac2-6783-e711-8134-e0071b66ae41}</contactid>
<emailaddress1 typename="String">John.Smith@domain.com</emailaddress1>
<birthdate typename="CrmDateTime">04/11/1982 12:00:00 AM</birthdate>
<firstname typename="String">John</firstname>
<lastname typename="String">Smith</lastname>
<donotemail typename="CrmBoolean">false</donotemail>
<creditlimit typename="CrmMoney">50000</creditlimit>
<department typename="String">Neudesic Sales</department>
</properties>
</SaveCrmRecord>
</CrmCommands>
</NeuronCrmAdapterMessage>
Upsert
Occasionally you don’t know if an entity exists or not. If it exists, you want to perform an update and if it doesn’t exist, you want to perform an insert (create). You can use the SaveCrmRecord command to perform the lookup and create the entity if the lookup fails or update the entity if the lookup succeeds. Note the use of the typename “uniqueidentifier” that’s used for the accounted. This is required whenever you use a lookup to set the value of the identity field. See Using Lookups below.
<NeuronCrmAdapterMessage>
<CrmCommands Transactional="false">
<Lookups>
<Lookup id="contactid" entity="contact" lookupfield="contactid" ignoreFailedLookup="true">
<searchfield name="fullname" value="John Smith" typename="String" operator="equal"/>
</Lookup>
</Lookups>
<SaveCrmRecord allowCreate="true" id="contact" entity="contact" identityfield="contactid">
<properties>
<contactid typename="uniqueidentifier" lookupid="contactid"/>
<creditlimit typename="CrmMoney">500000</creditlimit>
</properties>
</SaveCrmRecord>
</CrmCommands>
</NeuronCrmAdapterMessage>
SetCrmRecord
The SetCrmRecord command allows you to change the state of an entity within CRM. To perform this operation you need the ID of the entity to be changed. If you don’t know the ID, you can use a Lookup to retrieve it. See the section Using Lookups below. This sample changes the state of the contact to Active.
<NeuronCrmAdapterMessage>
<CrmCommands Transactional="false">
<SetCrmState entity="contact" value="e9f839d7-7e87-e711-8136-e0071b66ae41" statuscode="1" statecode="0"/>
</CrmCommands>
</NeuronCrmAdapterMessage>
DeleteCrmRecord
The DeleteCrmRecord command allows you delete an entity within CRM. To perform the delete operation, you need the ID of the entity to delete. If you don’t know the ID, you can use a Lookup to retrieve it. See the section Using Lookups below.
<NeuronCrmAdapterMessage>
<CrmCommands Transactional="true">
<DeleteCrmRecord entity="contact" value="3ef18c14-7e87-e711-811f-e0071b6af0d1" />
</CrmCommands>
</NeuronCrmAdapterMessage>
GetCrmRecord
The GetCrmRecord command can be used to retrieve data from CRM. With this command you can send any FetchXml statement to CRM and receive the result set. This example returns all of the contacts in CRM.
<NeuronCrmAdapterMessage>
<CrmCommands Transactional="true">
<GetCrmRecord>
<Query>
<fetch mapping='logical'>
<entity name='contact'>
<attribute name='contactid'/>
<attribute name='fullname'/>
</entity>
</fetch>
</Query>
</GetCrmRecord>
</CrmCommands>
</NeuronCrmAdapterMessage>
Using Lookups
Lookups can be combined with the commands SaveCrmRecord, SetCrmState and DeleteCrmRecord to retrieve information from another record to use in the command being executed. When using the SaveCrmRecord command, it is common to use a Lookup to retrieve the ID of another record that will be related to the entity. For example, you can use a Lookup to retrieve the ID of the primary contact that will be used when creating a new account. associate related records with an entity. When using the SetCrmState and DeleteCrmRecord commands, it is common to use a lookup to retrieve the ID of the entity that is to be modified or deleted.
To use a lookup, insert a Lookup node in the request and use typename “Lookup” and the attribute lookupid in the property XML to reference the lookup element.
SaveCrmRecord With Lookup
The following XML demonstrates the SaveCrmRecord command with two lookups – one that looks up the ID for the parent account and one that looks up the ID of the primary contact.
<NeuronCrmAdapterMessage>
<CrmCommands Transactional="true">
<Lookups>
<Lookup id="accountid" entity="account" lookupfield="accountid" ignoreFailedLookup="false">
<searchfield name="name" value="Adventure Works (sample)" typename="String" operator="equal"/>
</Lookup>
<Lookup id="contactid" entity="contact" lookupfield="contactid" ignoreFailedLookup="false">
<searchfield name="fullname" value="Patrick Sands (sample)" typename="String" operator="equal"/>
</Lookup>
</Lookups>
<SaveCrmRecord allowCreate="true" id="account" entity= "account" identityfield= "accountid">
<properties>
<accountnumber typename = "String">101010101010</accountnumber>
<address1_city typename = "String">Irvine</address1_city>
<address1_country typename = "String">USA</address1_country>
<name typename = "String">Kayaks R Us</name>
<creditlimit typename = "CrmMoney">10000</creditlimit>
<isprivate typename = "CrmBoolean">True</isprivate>
<industrycode typename = "Picklist">1</industrycode>
<territorycode typename = "Picklist">1</territorycode>
<description typename = "String">Adventure Works sub-account</description>
<telephone1 typename = "String">1-800-555-1212</telephone1>
<parentaccountid lookupid ="accountid" typename = "Lookup"/>
<primarycontactid lookupid ="contactid" typename = "Lookup"/>
</properties>
</SaveCrmRecord>
</CrmCommands>
</NeuronCrmAdapterMessage>
SetCrmRecord with Lookup
The following XML demonstrates the SetCrmState command with a lookup that looks up the ID for the account whose state is to be set.
<NeuronCrmAdapterMessage>
<CrmCommands Transactional="false">
<Lookups>
<Lookup id="accountid" entity="account" lookupfield="accountid" ignoreFailedLookup="false">
<searchfield name="name" value="Adventure Works (sample)" typename="String" operator="equal"/>
</Lookup>
</Lookups>
<SetCrmState entity="account" lookupid="accountid" statecode="0" statuscode="1"/>
</CrmCommands>
</NeuronCrmAdapterMessage>
DeleteCrmRecord with Lookup
The following XML demonstrates the DeleteCrmRecord command with a lookup that looks up the ID for the account that is to be deleted.
<NeuronCrmAdapterMessage>
<CrmCommands Transactionaltrue">
<Lookups>
<Lookup id="accountid" entity="account" lookupfield="accountid">
<searchfield name="name" value="Kayaks R Us" typename="String" operator="equal" />
</Lookup>
</Lookups>
<DeleteCrmRecord entity="account" lookupid="accountid" />
</CrmCommands>
</NeuronCrmAdapterMessage>
GetCrmRecord with Lookup
The GetCrmRecord command does not support lookups.
Multi-Valued Properties
Some entity properties can have multiple values. The CRM type for these properties is Party List. The CRM adapter supports setting multiple values for Party List properties. The following example demonstrates creating an email with multiple recipients. Lookups are used to retrieve the contact IDs of the sender and recipients.
<NeuronCrmAdapterMessage>
<CrmCommands Transactional="true">
<Lookups>
<Lookup id="fromlookup" entity="contact" lookupfield="contactid" ignoreFailedLookup="true">
<searchfield name="fullname" value="John Smith" typename="String" operator="equal"/>
</Lookup>
<Lookup id="tolookup1" entity="contact" lookupfield="contactid" ignoreFailedLookup="true">
<searchfield name="fullname" value="Maria Campbell (sample)" typename="String" operator="equal"/>
</Lookup>
<Lookup id="tolookup2" entity="contact" lookupfield="contactid" ignoreFailedLookup="true">
<searchfield name="fullname" value="Jim Glynn (sample)" typename="String" operator="equal"/>
</Lookup>
</Lookups>
<SaveCrmRecord allowCreate="true" id="email" entity="email" identityfield="activityid">
<properties>
<subject typename="String">Test message</subject>
<description typename="String">This is a test message</description>
</properties>
<multivalueproperties>
<to typename="PartyList">
<contactid lookupid="tolookup1" typename="Lookup" reference="contact"/>
<contactid lookupid="tolookup2" typename="Lookup" reference="contact"/>
</to>
<from typename="PartyList">
<contactid lookupid="fromlookup" typename="Lookup" reference="contact"/>
</from>
</multivalueproperties>
</SaveCrmRecord>
</CrmCommands>
</NeuronCrmAdapterMessage>
Dynamics CRM XRM Adapter Schema
Message Format
<NeuronCrmAdapterMessage>
<CrmCommands Transactional="">
<Lookups>
<Lookup id="" entity="" lookupfield="" ignoreFailedLookup="">
<searchfield name="" value="" typename="" operator="" lookupid="" />
</Lookup>
</Lookups>
<SaveCrmRecord allowCreate="" id="" entity="" identityfield="" lookup="">
<properties>
<any />
</properties>
<multivalueproperties>
<any />
</multivalueproperties>
</SaveCrmRecord>
<SetCrmState entity="" lookupid="" statuscode="" statecode="" value="" />
<DeleteCrmRecord entity="" value="" lookupid="" />
<GetCrmRecord>
<Query>
<any>anyContents0</any>
</Query>
</GetCrmRecord>
</CrmCommands>
</NeuronCrmAdapterMessage>
<CrmCommands>
Syntax
<CrmCommands Transactional="Boolean">
<Lookups />
<SaveCrmRecord />
<SetCrmState />
<DeleteCrmRecord />
<GetCrmRecord />
</CrmCommands>
Attributes and Elements
The following sections describe attributes and child elements.
Attributes
| Attribute | Description |
| Transactional | Deprecated. Setting this attribute has no effect. |
Child Elements
| Element | Description |
| Lookups | Lookups can be combined with the SaveCrmRecord, DeleteCrmRecord and SetCrmState commands to associate related records with an entity. Optional. |
| SaveCrmRecord | The SaveCrmRecord command allows data to be created and updated within CRM. Individual properties to be saved are passed as name value pairs within the command body. Optional. |
| SetCrmState | The SetCrmState command allows the state of specific entities in CRM to be updated. Optional. |
| DeleteCrmRecord | The DeleteCrmRecord command allows data to be deleted from CRM. Optional. |
| GetCrmRecord | The GetCrmRecord command allows data to be retrieved from CRM using a FetchXml statement. Optional. |
Note – Multiple SaveCrmRecord, SerCrmState and DeleteCrmRecord elements can be combined in a single request. Only one GetCrmRecord element per request is supported. You cannot combine the GetCrmRecord element with the other CRM commands.
<Lookups>
Syntax
<Lookups>
  <Lookup />
</Lookups>
Attributes and Elements
The following sections describe attributes and child elements.
Attributes
None
Child Elements
| Element | Description |
| Lookup | Specifies a lookup to be performed before any other CRM commands are executed. This element can be repeated an unlimited number of times. |
<Lookup>
Syntax
<Lookup id="String" entity="String" lookupfield="String" ignoreFailedLookup=”Boolean”>
  <searchfield />
</Lookup>
Attributes and Elements
The following sections describe attributes and child elements.
Attributes
| Element | Description |
| id | A unique identifier that will be referenced from the CRM commands utilizing this lookup field. This attribute value must be unique across all Lookup elements in a single request message. This can be any string value, for example “contactId1”. Required |
| entity | The entity that the lookup will be performed against, for example “contact”. Required |
| lookupfield | The field that will be returned from the lookup. This field is typically, but not always, an ID field of the entity, for example “contactid”. Required |
| ignoreFailedLookup | When set to false, if the lookup fails the command will not be executed. When set to true, if the lookup fails the command will still be executed. Optional, the default value is false. |
Child Elements
| Element | Description |
| searchfield | The search criteria to be used when performing the lookup. Multiple searchfield elements can be listed and the different search criteria will be aggregated using an “AND” operator. |
<searchfield>
Syntax
<searchfield name="String" value="String" typename="String" operator="String" lookupid="String" />Attributes and Elements
The following sections describe attributes and child elements.
Attributes
| Element | Description |
| name | The name of the entity field to use in the search query. Required. |
| value | The value of the entity field to use in the search query. Optional, see note below. |
| typename | The type of the entity field that is used in the search query. Required. |
| operator | The operator to use for the field comparison. Required.For details on supported operators, see https://msdn.microsoft.com/en-us/library/microsoft.xrm.sdk.query.conditionoperator.aspx |
| lookupid | A reference to another lookup whose value will be used in this search query. The lookup that is referenced must be executed prior to this lookup. Optional, see note below. |
Note – either one of the value attribute or the lookupid attribute must be present, but not both.
Child Elements
None
<SaveCrmRecord>
Syntax
<SaveCrmRecord allowCreate="Boolean" id="String" entity="String" identityfield="String" lookup="String">
  <properties />
  <multivalueproperties />
</SaveCrmRecord>
Attributes and Elements
The following sections describe attributes and child elements.
Attributes
| Element | Description |
| allowCreate | Set to true to create a new record, false to update an existing record. Required. |
| id | A unique name for this Save command. The unique identifier returned from the Save or Update command will be saved in the Lookups table and can be referenced by other CRM commands in the same request. This attribute value must be unique across all CRM commands and Lookup elements in a single request message. This can be any string value, for example, “contactId1”. When is Solicit Response mode, this ID will be returned with the response as the element “externalId”. Required. |
| entity | The type of the CRM entity that will be created or updated. Required. |
| identityfield | The name of the identity field used by the entity. Required. |
| lookup | Deprecated. Setting this attribute has no effect. |
Child Elements
| Element | Description |
| properties | The list of entity fields to create or update in the command. |
| multivalueproperties | Some CRM entity fields can contain multiple values, such as the “To” field in an email activity. The multivalueproperties element provides the capability to set multiple values on those entity fields. |
<properties>
Syntax
<properties>
<field1 />
<field2 />
<fieldn />
</properties>
Attributes and Elements
The following sections describe attributes and child elements.
Attributes
None
Child Elements
| Element | Description |
| field1 – field<n> | The entity fields to be included in the Create or Update command are listed here. The entity field names are used as the element names. |
<field<n>>
Syntax
<fieldn typename=”String” lookupid=”String” />Attributes and Elements
The following sections describe attributes and child elements.
Attributes
| Element | Description |
| typename | The type of the entity field. Required. |
| lookupid | A reference to the lookup whose value will be used in this field. Optional. |
Child Elements
None
<multivalueproperty>
Syntax
<multivalueproperty>
  <field1 />
  <field2 />
  <fieldn />
</multivalueproperty>
Attributes and Elements
The following sections describe attributes and child elements.
Attributes
None
Child Elements
| Element | Description |
| field1 – field<n> | The multi-value entity fields to be included in the Create or Update command are listed here. The entity field names are used as the element names. |
<field<n>>
Syntax
<field1 typename=”String”>
<entityidfield1 />
<entityidfield2 />
<entityidfieldn />
</field1>
Attributes and Elements
The following sections describe attributes and child elements.
Attributes
| Attribute | Description |
| typename | The type of the multi-valued entity field. Required. This is typically “PartyList” for multi-value properties. |
Child Elements
| Element | Description |
| entityidfield1-entityidfieldn | The entity id field that will be used for the multi-valued property. Required. Entity collections can contain different entity types, such as a contact or an account. The entity is added to the collection by the entity id. |
<entityidfield<n>>
Syntax
<entityidfield1 lookupid=”String” typename=”String” reference=”String”/>Attributes and Elements
The following sections describe attributes and child elements.
Attributes
| Attribute | Description |
| lookupid | A reference to the lookup whose value will be used in this Create or Update command. Optional, see note below. |
| typename | The type of the entity field. Required. If this is lookup, then a lookupid is required. If it is any other value, then a value must be provided for the entityfield element. |
| reference | The entity type of the multi-value element. |
Note – if a value is not provided for the entityfield element, then the lookupid attribute is required.
Child Elements
None
<SetCrmState>
Syntax
<SetCrmState entity="String" lookupid="String" statuscode="Integer" statecode="Integer" value="String" />Attributes and Elements
The following sections describe attributes and child elements.
Attributes
| Element | Description |
| entity | The entity type to set the state. Required. |
| lookupid | A reference to the lookup whose value will be used in this set state command. Optional, see note below. |
| statuscode | The status reason |
| statecode | The status of the record |
| value | The value to change the state to. Optional, see note below. |
Note – Only one of the entity or the value elements can be present.
For a list of statecode/statuscode combinations, see this blog – https://mostlymscrm.blogspot.com/2012/06/entity-statecodes-and-statuscodes.html
Child Elements
None
<DeleteCrmRecord>
Syntax
<DeleteCrmRecord entity=”String” lookupid=”String” value=”String” />
Attributes and Elements
The following sections describe attributes and child elements.
Attributes
| Element | Description |
| entity | The entity type of the record to delete. Required. |
| lookupid | A reference to the lookup who’s value will be used in this delete command. Optional, see note below. |
| value | The entity Id to delete. Optional, see note below. |
Note – Only one of the lookup or the value elements can be present.
Child Elements
None
<GetCrmRecord>
Syntax
<GetCrmRecord entity="String" lookupid="String" value="String" />Attributes and Elements
The following sections describe attributes and child elements.
Attributes
None
Child Elements
| Element | Description |
| Query | Child element of query is a valid FetchXML statement |
<Query>
Syntax
<Query>
  Valid FetchXML statement
</Query>
Example:
<Query>
  <fetch mapping='logical'>
    <entity name='account'>
      <attribute name='accountid'/>
      <attribute name='name'/>
    </entity>
  </fetch>
</Query>
About the Author
Joe Klug is a Solution Architect for Peregrine Connect, responsible for pre-sales engineering, post-sales support, training, architectural reviews, product development and consulting. Prior to joining the team, he spent a number of years at Microsoft.
Read more about Peregrine Connect

-
Rabbit MQ Topics
Introduction Due to the open-source nature of RabbitMQ and constant updates, it is...
-
Port Sharing
One of Neuron ESB’s scalability features is the ability to install multiple...

-
The Integration Journey to...
The Integration Journey to Digital Transformation with Peregrine Connect
-
Saving Time and Money by...
Neuron ESB Application Integration and Web Service Platform: A Real-World Example...

-
Neo PLM
-
Loomis Case Study
Loomis Chooses Peregrine Connect as Their No/Low-Code Integration Platform:...

-

Decision Test Data Mapping
- Use decisions to drive the execution of...
-
Map Testing
Learn how to utilize FlightPath's testing functions...