This How To will describe how you can create SSL endpoints in Neuron for clients to connect to and also how to create subscriptions that will result in a message being sent to an SSL endpoint.
Concepts
Working with SSL in Neuron involves three sections in Neuron Explorer:
· Credentials
The credentials section is where you configure the settings the Neuron ESB Windows Service will use to locate the certificate.
· Client Connectors- specifically the settings in the General, Security and Client Connector tabs
A Client Connector is used by Web Service Clients connecting to Neuron. The SSL credentials presented to the client will be those previously configured in the Credentials section of the Security tab.
· Service Connectors specifically the settings in the General, Security and Service Connector tabs
The following sections will detail an end to end SSL scenario in which a WCF client will connect to an SSL Client Connector using a custom certificate. The Client Connector will then use its configured Party to publish the request on a Topic. That message will then be received by the Party configured in a Service Connector which will then send the message to an IIS hosted service using a different SSL certificate than the Client connectors. Finally, the return message will be sent via the publishing system back to the Client Connector which will then forward the response to the original WCF client.
Step 1 Create the Certificates
This is usually the most problematic of all the steps. We’re going to use 2 certificates. The first will be created explicitly with makecert like a developer might do for a custom service running on a non standard port.
The second service is going to use a self signed cert issued by IIS7. This cert is closer to what you would use in production.
If you are only interested in using the same certificate used by IIS then you can skip to section entitled Step 2 Configure the Client Connector’s Certificate in Neuron and you may substitute the values from those instructions with values appropriate to your existing certificate.
Other cert types are Domain Certificates (which is the certificate type often used in production scenarios internally by companies who have configured a CA for their windows domain) and 3rd party certificates issued by a trusted authority (which are the certificates you typically use for public facing web servers).
The following steps assume a Windows 7, Vista or 2008 server operating system and assume Neuron is running on the local machine as Local System.
Steps for Custom Certificate to be used in the Client Connector
1) Open a command prompt as Administrator
2) Issue the command makecert -r -sy 12 -n CN=localhost -sky exchange -pe localhost.cer -ss My at the command prompt
3) Type mmc to launch the MMC snap in
4) Use the File/Add Remove Snap in to add the Certificate Snap In for My user account
5) Use the File/Add Remove Snap in to add the Certificate Snap In for Computer account and choose the local computer
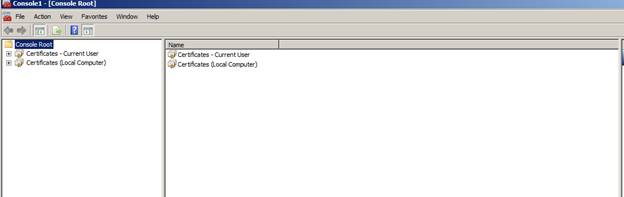
6) Open the Current User snap in and then open the Certificates folder under the Personal folder
7) Right click the localhost certificate and choose All tasks > Export
8) Follow the prompts ensuring to select to export the private key
9) Delete the localhost certificate
10) Open the Local Computer snap in navigate to the Personal folder
11) Right Click the Personal folder and select All tasks > Import and import the .pfx file you exported. Do not import the .cer.
12) Right Click the Trusted Root Certification Authorities folder Import the certificate as in step 11
13) Locate the localhost certificate in either the Personal store or the Trusted Root Certification Authorities folder
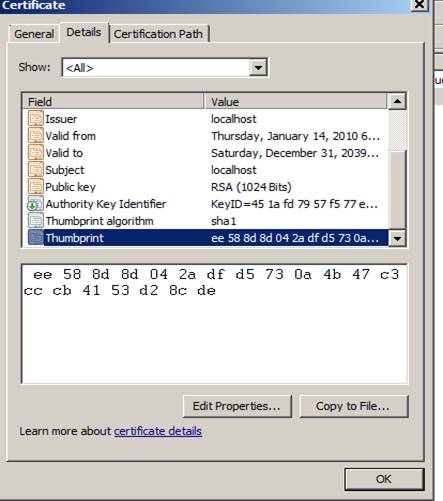
14) Double click the certificate and click the details tab
15) Highlight Thumbprint and copy the values
16) Return to the command prompt which should still be running as administrator. If it is not re-open a command prompt as Administrator.
17) Type in the following command:
netsh http add sslcert ipport=0.0.0.0:6900 certhash=[The Value of your certificates Thumbprint without spaces] appid=[A Guid in Registry format] certstore=MY
[Example follows. Type all on one line]
netsh http add sslcert ipport=0.0.0.0:6900 certhash=ee588d8d042adfd5730a4b47c3cccb4153d28cde appid={00FD80CE-BDE8-4aaa-ADC5-7D8BBC1F8D3A} certstore=MY
Whew! That’s a lot of steps. Aren’t custom certificates on custom ports fun and intuitive!
Let’s pause a moment to recap what we just did. First, we used makecert to create a self signed certificate. Then we used a method to export that certificate along with its private key so we could use it in the local machine’s store. Then we imported that certificate into the Local Machines Personal folder and its Trusted Root Certification Authorities folder. Finally we registered the certificate for port 6900.
We imported it into the Trusted Root Certification Authorities to avoid warnings about the certificate not being trusted.
Next, we will configure IIS7 to use a self signed cert. Thankfully, This is much easier. We are doing this because we are going to host our custom service in IIS.
If you already have configured a certificate for IIS you know works then you can skip these steps.
Steps for Self Signed Certificate to be used by IIS and the Service Connector
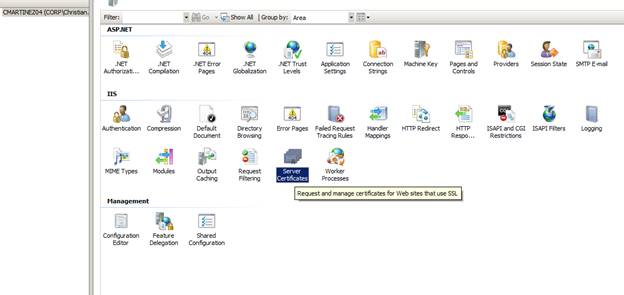
1) Open IIS Manager and at the Computer Level double click Server Certificates
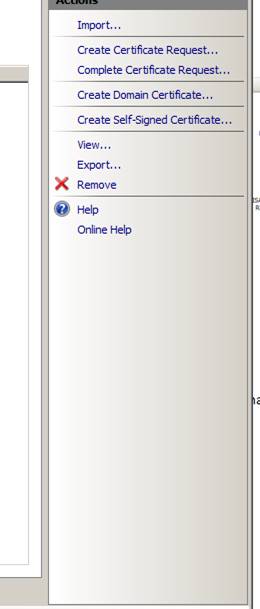
2) Choose the link to Create A Self-Signed Certificate in the Action Pane on the right hand side
3) After the certificate is created switch to the site and choose Bindings in the action menu
4) Add a binding for https and select the cert you created in the previous steps. Do not choose the localhost certificate
That’s obviously much easier. The even better news is you can also use the certificate you just created in Neuron as well. So if you want to skip all of the steps we did when using makecert you can. The only caveat is when using this technique Neuron will need to be running as Local System and you will need to use the Default Web Site’s SSL port.
The upside is you can run Neuron alongside IIS and clients will not see a difference. For example you host your service at https://[servername that matches self signed cert created by IIS]/myservice and your Neuron Client Connector can have a Client access url of https://[servername that matches self signed cert created by IIS]/esb and as far as the client is concerned they would be accessing the same host!
Step 2 Configure the Topics and Publishers
Create a Topic called SSLTopic and 2 Parties. Name one Party SSLPublisher and one Party SSL Subscriber. Subscribe both parties to SSLTopic.
Step 3 Configure the Client Connector’s Certificate in Neuron
Now we will create a Client Connector to listen to client requests.
Create a new Service Endpoint and in the General Tab change the name to SSLClientConnector
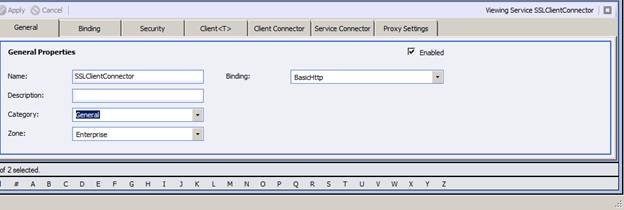
Switch to the Security tab and change the Security Model to Transport:None

Switch to Client Connector tab and enter the following values
Publisher Id: SSLPublisher
Topic: SSLTopic
URL : https://localhost:6900/ssl

Apply and Save all of you changes.
Step 4 Create a Service Connector
Create a new Service Endpoint and change the Name to SSLServiceConnector

Switch to the Security Tab and change the Security Model to Transport:None
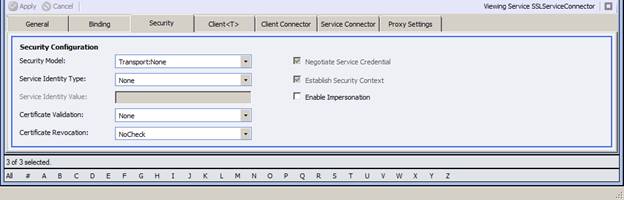
Switch to the Service Connector tab and enter the following settings
Subscriber Id: SSL Subscriber
Policy: <None>
URL: https://[NAME THAT MATCHES SUBJECT NAME OF IIS7 ISSUED CERTIFICATE] /EchoService/Service1.svc
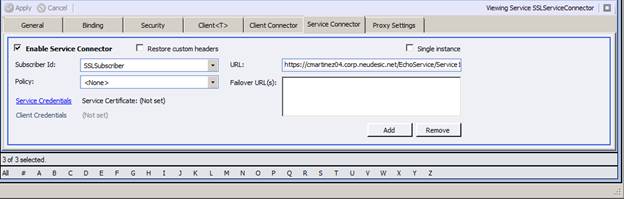
Apply your changes and save. You do not have to configure a certificate in the Service Connector for standard SSL.
Step 5 Create a Generic Echo Service and Host it in IIS
Start Visual Studio using Run as Administrator. Create a New Web Service Application named EchoService in Visual Studio. Configure the Project to use the IIS Web.
Follow the following steps.
1) Delete the generated IService1.cs file
2) Right Click Service1.svc, choose View Markup and change the text to:
<%@ ServiceHost Language="C#" Debug="true" Service="EchoService.Service" CodeBehind="Service1.svc.cs" %>
3) Edit the Service1.svc.cs file so it looks like the following
using System;
using System.Collections.Generic;
using System.Linq;
using System.Runtime.Serialization;
using System.ServiceModel;
using System.Text;
using System.ServiceModel.Channels;
namespace EchoService
{
[ServiceContract]
public interface IEcho
{
[OperationContract(Action="*",ReplyAction="*")]
Message Echo(Message msg);
}
[ServiceBehavior(AddressFilterMode=AddressFilterMode.Any)]
public class Service : IEcho
{
public Message Echo(Message msg)
{
return msg;
}
}
}
4) Edit the Web.Config System.ServiceModel section substituting the II7 issued SubjectName from the Self Signed IIS Certifcate. This should match the fully qualified name of your machine.
<system.serviceModel>
<bindings>
<basicHttpBinding>
<bindingname="BasicSSL">
<securitymode="Transport"/>
</binding>
</basicHttpBinding>
</bindings>
<services>
<servicename="EchoService.Service" behaviorConfiguration="EchoServiceBehavior">
<endpointaddress="https://[NAME THAT MATCHES SUBJECT NAME OF IIS7 ISSUED CERTIFICATE] /EchoService/Service1.svc" binding="basicHttpBinding"
name="BasicSSL" bindingConfiguration="BasicSSL"
contract="EchoService.IEcho"/>
</service>
</services>
<behaviors>
<serviceBehaviors>
<behaviorname="EchoServiceBehavior">
<serviceMetadatahttpsGetEnabled="true"/>
<serviceDebugincludeExceptionDetailInFaults="true"/>
</behavior>
</serviceBehaviors>
</behaviors>
</system.serviceModel>
</configuration>
5) Create a Test Project or a Console Application and add the appropriate references and usings
using System;
using System.Runtime.Serialization;
using System.ServiceModel;
using System.ServiceModel.Channels;
using System.Text;
using System.Web;
using System.Xml;
6) Add the following code to a test method or Main
var chan = new ChannelFactory<IRequestChannel>("SSL");
var proxy = chan.CreateChannel();
Console.WriteLine(proxy.Request(Message.CreateMessage(chan.Endpoint.Binding.MessageVersion,"http://neuronsslexample","Hello SSL")).ToString());
7) Add an App.Config file and a System.ServiceModel Section
<system.serviceModel>
<client>
<endpointaddress="https://localhost:6900/ssl"
binding="basicHttpBinding" bindingConfiguration="BasicSSL" contract="System.ServiceModel.Channels.IRequestChannel"
name="SSL" />
</client>
<bindings>
<basicHttpBinding>
<bindingname="BasicSSL">
<securitymode="Transport"/>
</binding>
</basicHttpBinding>
</bindings>
</system.serviceModel>
8) Run your project!
If you want to use the certificate issued by IIS in Neuron simply follow the procedure to add a Certifcate credential above for that certificate. The SubjectName should be the fully qualified name of your machine. The Client Access URL would be http://[SubjectName of from IIS certificate]/[anything not reserved by IIS]