Business Processes Reference
Overview
Business Processes and Workflow are two features within Neuron ESB used to design custom mediation or business logic to enhance integration scenarios or automate processes. Although both provide a graphical, drag and drop designers for composing complex business logic, they have very different runtime and management capabilities and target different scenarios. Where Workflow provides for state management, supports long running processes, compensated transactions, failover, restart capabilities, event correlation, tracking and fault tolerance; Business Processes do not. Business Processes on the other hand provide low latency execution and hence do not manage state. They are ideal for mediation and request/response type messaging scenarios (soap/rest services) where latency and scale are paramount. Business Processes are used to implement common integration patterns.
The Business Process designer and its respective runtime engine is used to achieve near real-time requirements where performance, agility and time to market are driving factors. Uses can develop custom business logic using the Business Process Designer for execution in low latency environments such as request/response type of messaging to provide either simple VETO or, more complex ScatterGather and Service Composition/Orchestration capabilities. Service Composition and Orchestration can be used to expose a discrete set of services within an organization as higher-level business services. A Business Process can be exposed as a SOAP or REST API within Neuron ESB.
The Neuron ESB Business Process Designer ships with over 40 configurable Process Steps; that do everything from calling a service and updating a database or queue, to parsing Flat files and Excel file (as depicted below within the Neuron ESB Explorer). Developers can extend its capabilities by building custom reusable Process Steps that can be registered in the Process Steps library and added to any custom Business Process. Process Steps can be graphically composed to build larger more complex Business Processes, significantly reduces the amount of custom code, as well as the time it takes to build and manage Business Processes.
For example, when a user or system submits a message to the bus, specific steps may first need to happen. These steps may include validating and transforming the message before it is published to other subscribers. VETO is a common integration pattern that stands for Validate, Enrich, Transform and Operate (see Figure 1). The VETO pattern and its variations can ensure that consistent, validated data will be routed throughout the ESB.

Figure 1: VETO pattern Validate, Enrich, Transform, Operate.
Neuron ESB provides a unique Business Process implementation that goes beyond the industry standard. Many patterns, like VETO, can be developed using the Neuron ESB Business Process designer. For example, Figure 2 displays a VETO pattern using the Neuron ESB Business Process Designer. When using Neuron ESB, this pattern can be implemented without any external custom code dependencies.
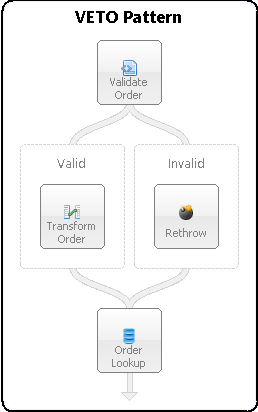
Figure 2: Neuron ESB Business Process implementing VETO pattern
The Neuron ESB Business Process Designer significantly extends the ability to develop more complex patterns and processes without introducing additional workflow technologies into a project. For example, a complex business process may involve the need for custom code execution, a decision based on external criteria, calling to a web service or data store, rerouting a message, but overall, being able to maintain transactions and deal with the exceptions as they occur. Figure 3 illustrates what such a process would look like when designed using the Neuron ESB Business Process Designer.
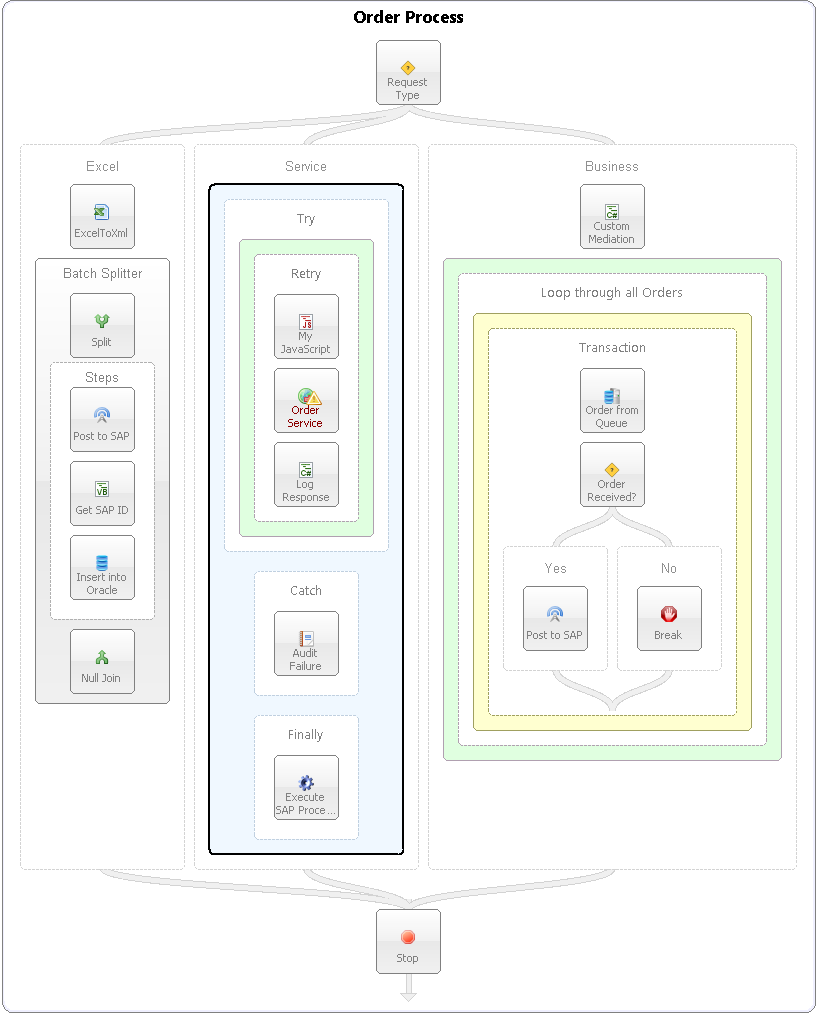
Figure 3: Neuron ESB Business Process implementing complex Order Process
Once designed, Business Processes can be directly tested and debugged within the Business Process Designer before being deployed. The Business Process designer allows developers to do an end-to-end test that supports output tracing, or more controlled debugging as shown in Figure 4. Business Process debugging support at design time allows developers to quickly test, diagnose and fix the Business Processes AS they are developing them. The Business Process debugging experience within Neuron ESB is synonymous to the experience provided by Microsoft Visual Studio for debugging .NET applications. For example, developers can set Breakpoints, disable Process Steps, use F5/F10/F11 keys, view exceptions and view the context of the Business Process and Process Steps.
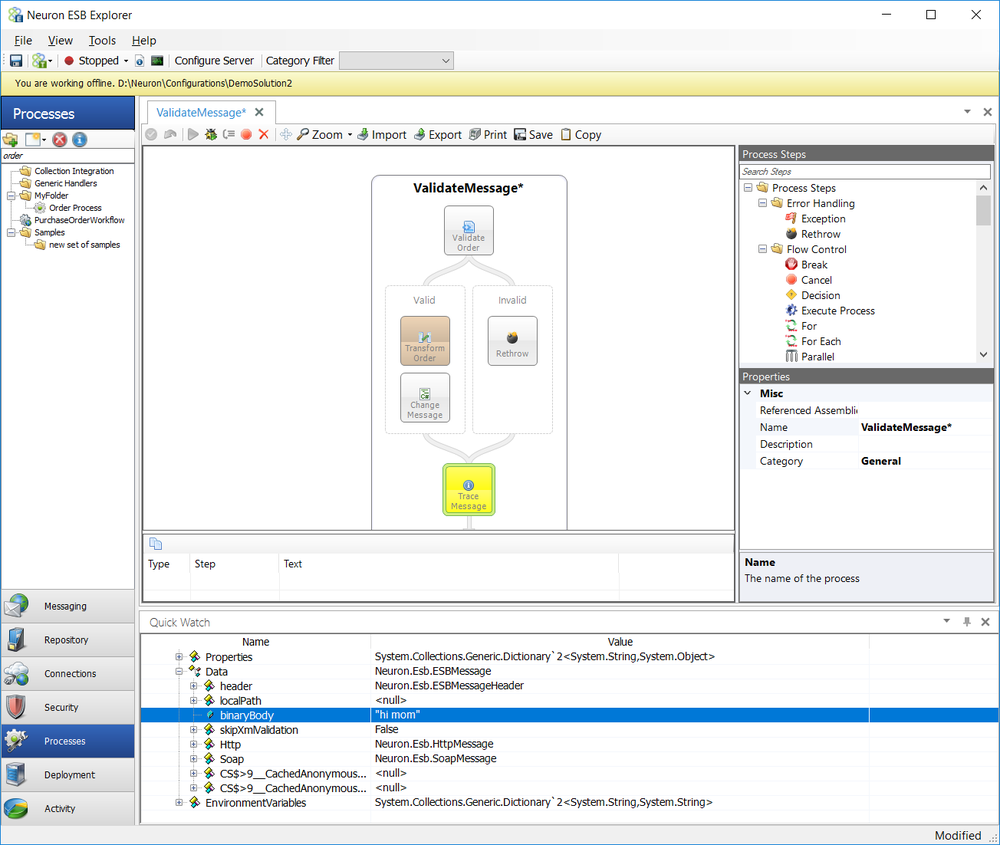
Figure 4: Neuron ESB Business Process Debugging Watch Window with Breakpoint
Once tested, Business Processes are executed at runtime either when a Party (Publisher/Subscriber) publishes or receives a message. When a Party is associated with Neuron ESB Endpoint (i.e. Workflow Endpoint, Adapter Endpoint or Service Endpoint), the Neuron ESB service or the Neuron ESB workflow host (depending on type of endpoint) provide the runtime execution environment. When the party is hosted in a third party .NET application using the Client API, that 3rd party .NET application serves as the runtime execution environment. Additionally, Business Processes support execution directly within a Workflow or a Business Process using the Execute Process Step or Workflow Activity.
The Neuron ESB Explorer can be used to associate one or more Business Processes to a Party as the final step required before deploying a Business Process to an active runtime environment. Business Processes can be effectively chained together, allowing developers to create more granular, componentized, reusable business logic. Figure 5 illustrates how multiple Business Processes can be added to a Party and, even given conditions to determine at runtime, when to execute.
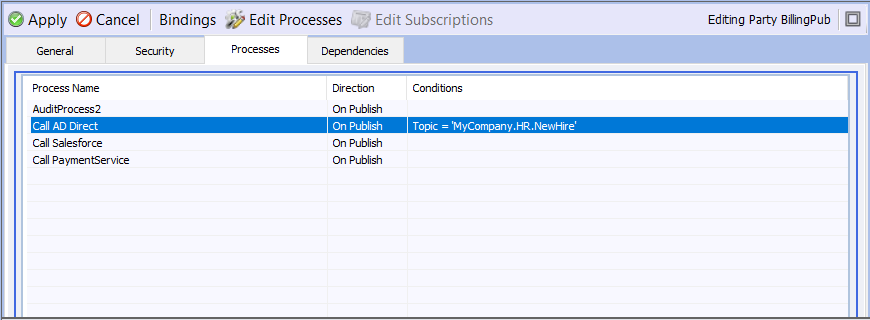
Figure 5: Attaching Business Processes to a Party
Working with Business Processes
The Neuron ESB Business Process Designer is essentially an MDI (multi document interface) hosted in the Neuron ESB Explorer. To work with Business Processes select Processes from the navigation bar located on the left hand side of the Neuron ESB Explorer. This will open the Business Process Designer as well as the Processes Library. The Processes Library appears on the left above the navigation bar and lists available Business Processes from the working Neuron ESB solution. The Business Process Designer fills the rest of the workspace and consists of the Design Canvas, a Process Steps Toolbox listing all the Process Steps used to create Business Processes and a property grid to specify the design time properties of the selected Process Step as shown in Figure 6.
Figure 6: Business Process Designer Business Processes can be designed and managed within the Neuron ESB Explorer.
Displaying Business Processes
A Business Process is opened and displayed on the Design Canvas by either double clicking on the Business Process within the Processes Library or selecting Open from the Business Process context menu when selected. Each Business Process is opened within their own Tab within the Neuron ESB Explorer. This allows multiple Processes to be opened at the same time, allowing a user to navigate between them all by simply selecting their respective tabs. Additionally, the tabs are dock-able and detachable, allowing several processes to be arranged within the same window as shown in Figure 7 and Figure 8 below.
Figure 7: Business Process Designer Business Processes can be opened in their own tabs and docked within the Neuron ESB Explorer.
Figure 8: Business Process Designer Business Processes can also be detached from the Neuron ESB Explorer.
Lastly, when a user navigates to another part of the Neuron ESB Explorer to work on any other part of the solution and later navigates back to the Business Process Designer, all previously opened Business Processes will still be opened in their respective tabs and locations. If there was a test message submitted for a specific process using the Edit Test Message dialog, that message will still be maintained and loaded in the Edit Test Message dialog when used with the specific Process.
Processes Library
The Processes Library displays a list of all saved Business Processes (and Workflows) within the currently opened Neuron ESB solution. The Process Library provides functions to create, manage and find Business Processes within a Neuron ESB Solution as displayed in the Figure 9.

Figure 9: Processes Library Business Processes are stored and listed within the Processes Library located within the Neuron ESB Explorer.
Processes can be added and deleted and their dependencies can be viewed by selecting the appropriate toolbar button.
Adding a Business Process
Business Processes can be created in the following ways:
- By selecting the Create Process sub menu from the Add toolbar menu located directly above the listing of Processes as shown in Figure 10
- By selecting the Create -> Process context menu depicted in Figure 9.
- By selecting an existing Business Process and selecting Copy context menu depicted in Figure 9
- By Importing an existing Business Process using the Import Toolbar button on the Design Canvas
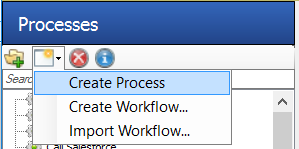
Figure 10: New Menu Add menu item displaying the Create Process sub menu.
Adding a Business Process will result in a blank, unnamed Business Process appearing on the Design Canvas surface as displayed in Figure 11.
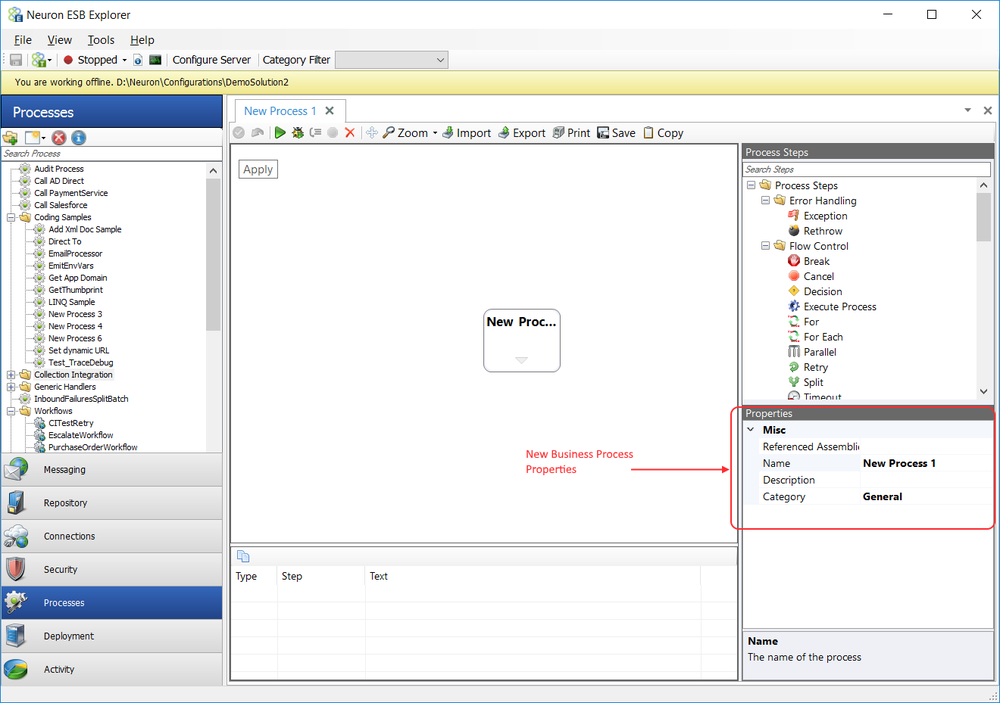
Figure 11: Design Canvas Displaying a New Business Process and the Property Page grid listing its properties.
Once a Business Process is added to the Design Canvas, several properties can be populated by using the Property Page grid (Figure 12) located at the bottom right corner of the Business Process Designer. The Property Page grid represents the configurable design time properties for the selected Business Process or Process step. The following properties are specific to a Business Process:
- Name Required.
- Description Optional. Cannot exceed 255 characters.
- Category Optional. Cannot exceed 50 characters. Used in the Neuron ESB Explorer Filter Toolbar to limit which Neuron ESB objects within the Neuron ESB Explorer to make visible.
- Referenced Assemblies Optional. Used to add references to 3rd party or existing .NET assemblies for later reference by C# Process Steps and all Steps that expose the Code Editor.
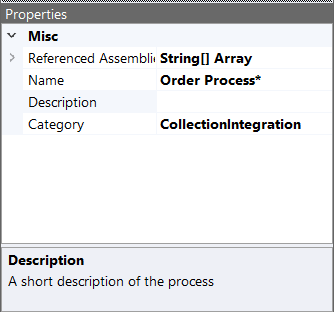
Figure 12: Neuron ESB Business Process Property Page grid
Saving a Business Process
To save a Business Process, the Apply button, located on the Design Canvas, must be clicked followed by the Neuron ESB Explorers Save Toolbar button or menu item. Once a Business Process has been saved, it can be renamed, copied, exported or deleted.
At least one Process Step is required to be placed onto the Business Process before it can be saved to the Neuron ESB solution.
Deleting a Business Process
Business Processes can be deleted by selecting a specific Business Process within the Processes Library, then selecting the Delete toolbar button located directly above the listing of Processes. Alternatively, Delete can be selected from the short-cut menu once a Business Process is selected within the Processes Library.
To finalize the delete action, the Neuron ESB Explorers Save Toolbar button or menu item must be selected. If there are Parties currently referencing the Process, a dialog (Figure 13) will be displayed warning the user before the delete action is committed.
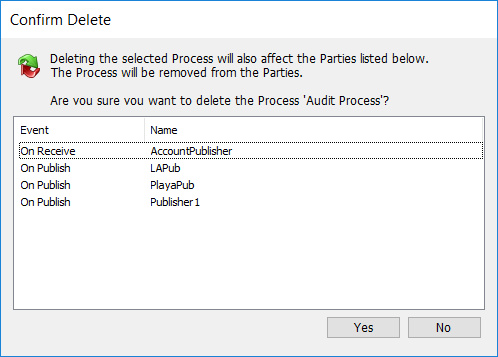
Figure 13: Confirm Delete Dialog Displayed if a Business Process is referencing a Party at time of deletion.
Runtime Execution
Business processes are stateless/in memory processes, which allow for a variety of actions to be used in the processing of messages.
Business processes can be attached to either the OnPublish or OnReceive events of a party
- In a request / reply scenario each party would have both OnPublish and OnReceive events available to them
- Multiple business processes can be used in conjunction with one another
- Messaging conditions can be used to control the execution of a business process
- The Execute Process process step can be used to componentize processes
Party Configuration
A Business Process must be attached to the OnPublish or OnReceive event of a Party (or both) to be configured for runtime execution (Figure 14). The exception case is when an existing Business Process is called from another Business Process using the Execute Process Step. In that case, the Business Process is essentially a child process called from a master process. Child processes do not need to be associated with a specific Party.
Message Conditions can be used to restrict the execution of a Business Process when it is added to a Party. Message Conditions can contain one or more conditions (predicates) which can be joined by AND/OR/XOR and supports parenthetic expressions. For example:
(BodyType = 'PurchaseOrder' OR BodyType = 'PurchaseOrderV2') ANDBody Matches XPath '//PurchaseOrder[@Status='Approved'])
Message Conditions can created ad hoc by selecting the Message Condition button (filter icon) located on the Processes dialog box (Figure 14).
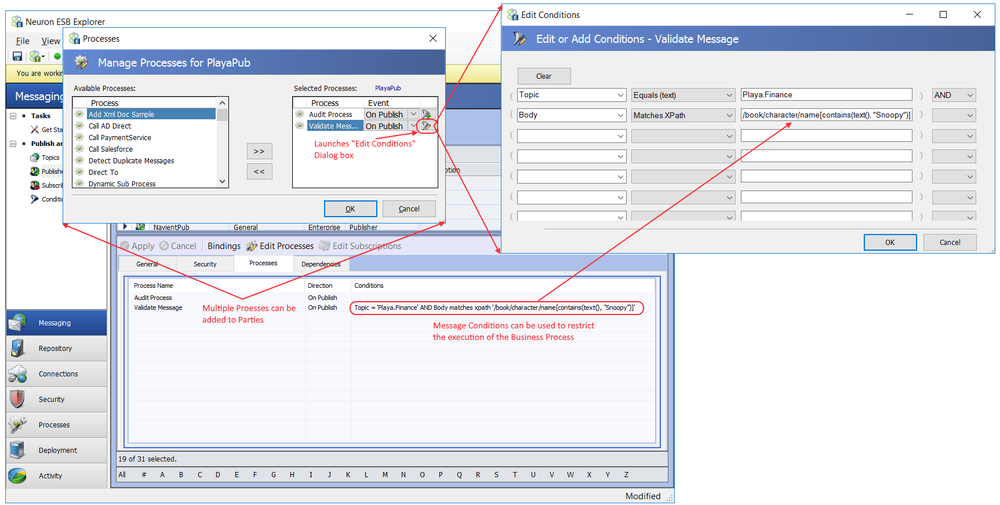
Figure 14: Adding Processes to Parties Any number of Processes can be added to a Party using the Processes dialog box launched from the Edit Processes tab of the Party. Processes can be assigned to either the OnPublish or OnReceive event or both. Additionally, the execution of the Process can be restricted by adding a Message Condition by launching the Edit Conditions dialog by clicking the filter icon button.
The Property on the left hand side of the predicate can be any Neuron ESB Header, custom ESB Message property (by manually adding it) or the body of the ESB Message. There is an extensive list of operators that can be used, including the following:
- "Contains"
- "Does Not Contain"
- "Does Not Match RegEx"
- "Does Not Match XPath"
- "Empty"
- "Equals (text)"
- "Equals Ignore Case (text)"
- "Equals (numeric)"
- "Less Than"
- "Less Than or Equal"
- "Greater Than"
- "Greater Than or Equal"
- "Matches RegEx"
- "Matches XPath"
- "Not Empty"
- "Not Equals (text)"
- "Not Equals Ignore Case (text)"
- "Not Equals (numeric)"
- "Not Greater Than"
- "Not Greater Than or Equal"
- "Not Less Than or Equal"
- "Not Less Than"
Once attached, the Business Process is executed when a message is received or sent, according to the event the Business Process is attached to and after any associated Message Condition evaluates to True. If attached to the OnPublish event, the Business Process is executed BEFORE the message is published to the destined Topic (determined by the value of the context.Data.Header.Topic value). If attached to the OnReceive event, the Business Process is executed AFTER the Party receives the message from the Topic, but BEFORE the Party passes on the message to any configured Service Connector, Workflow or Adapter Endpoint the Party may be attached to.
Every message sent or received will create a new instance of the Business Process to execute. Once completed, the instance is disposed.
View Dependencies
One of the advantages of the Processes Library is that one or more publishers and/or subscribers to the bus (Parties) can use Business Processes within it. The Dependencies toolbar button can be selected to view all the Parties currently using a selected Business Process. A dialog box displaying the dependencies will be presented as shown in Figure 15.
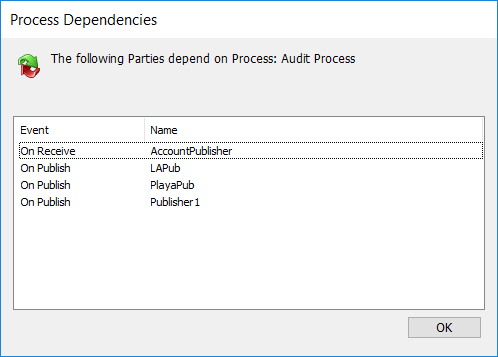
Figure 15: Business Process Dependency Dialog Box This displays all the Publishers and/or Subscribers that are currently using a selected Business Process within the Processes Library.
NOTE: If a Business Process is called from an Execute Process Step, it will not be listed in the Process Dependencies list
Referenced Assemblies
Neuron ESB is built on the Microsoft .NET Framework. As such, it can be customized and extended using Microsoft .NET languages. Specifically, the Neuron ESB Business Process designer ships a set of Language Editor based (Code) Process Steps that expose a Microsoft Visual Studio like editor for writing C# or VB.NET code that can be used to create highly customized and flexible Business Processes. All of these Code based Process Steps allow users to reference any 3rd party .NET assembly, any .NET assembly in the GAC (Global Assembly Cache) or any .NET assembly within the Probing Path of the Neuron ESB service runtime. You can find more information on the Neuron ESB Language Editors using the link below:
Using Language Editors in a Process
Rather than add individual references to every Code Process Step used within a Business Process, references to external assemblies can be added at the Business Process level as shown in Figure 16. If a .NET assembly is referenced at the Business Process level, it will automatically be added to each Code Process Step in the Business Process.
For example, if a general-purpose assembly library was required to be used throughout a Business Process and that Business Process used multiple Code Process Steps, adding references at the Business Process level would be an effective way of centralizing the management of those references. Otherwise, the developer would be required to add the assembly reference to each Code Process Step within the Business Process. Subsequently, if the reference had to be updated later for some reason, the developer would have to find all the Code Process Steps the assembly was referenced in and manually remove them, rather than just removing it once at the Business Process level.
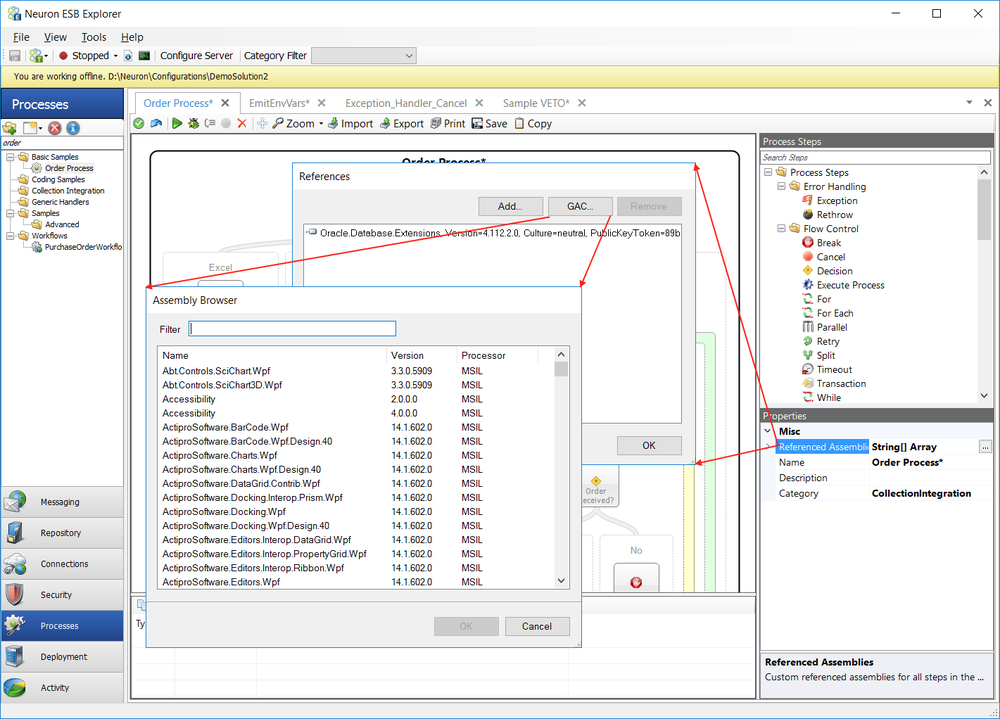
Figure 16: Business Process References Adding assembly references as the Business Process level.
Note:The GAC requires strong names and this can cause a traditional obstacle for developers who have turned on auto versioning for their assemblies. It is highly recommended that developersdo not use assembly versioningfor the dlls they plan to reference in the Code Editor.File versioning should be used in place of assembly versioning when versioning is desired.
Organize and Search
The Neuron ESB Process Library provides several ways that allow users to organize, categorize and find relevant Business Processes; Type ahead Search, Categorization and Folder hierarchies.
Type Ahead Search
The Process Library has an integrated type ahead Search bar that will automatically filter and display Business Process as characters are entered into the Search bar (Figure 17)
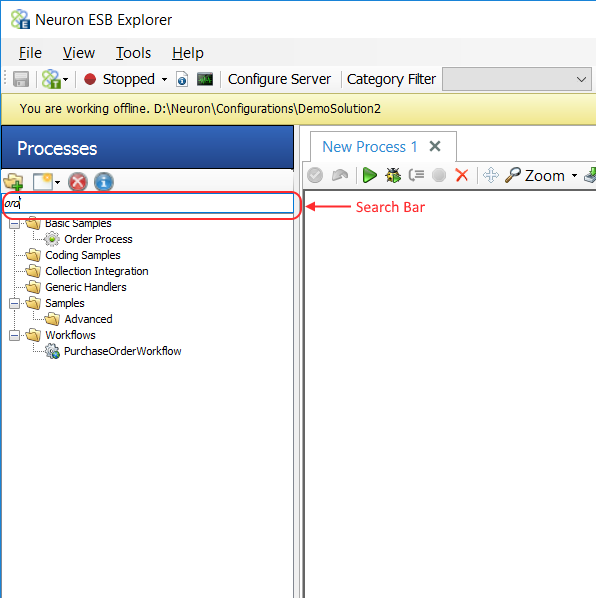
Figure 17: Type Ahead Search Displays all Business Processes that match the characters typed into the Search Bar.
Categorization
All Business Processes now have both a category and description property. If assigned a category, the category selected in the Category Filter toolbar dropdown of the Neuron ESB Explorer will automatically filter the view of Business Processes in the Process Library. This filter will also affect the visibility of all other Neuron ESB objects within the currently opened solution (Figure 18).
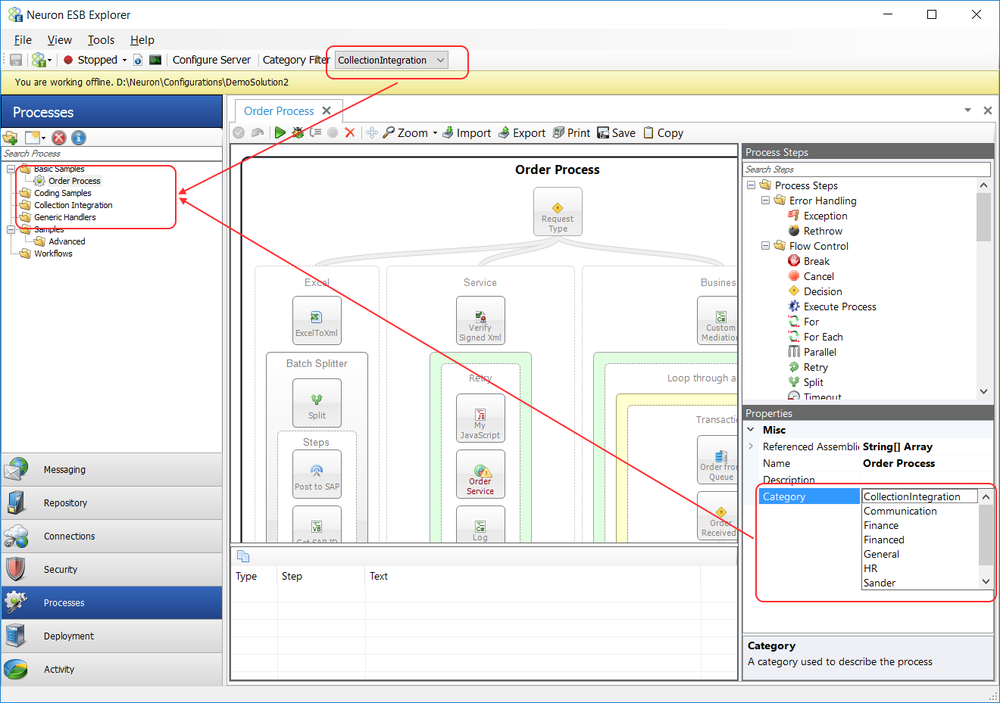
Figure 18: Category Filter Filters all Neuron Objects in the Neuron ESB Explorer based on the Category assigned to them.
Folder hierarchies
Users can create a folder hierarchy to organize and store Business Processes in. The Add Folder button can be used to create top-level folders within the Process Library. Sub folders can be created by right clicking on an existing folder and selecting Create Folder from the context menu. Users can also rename the folder by clicking on the name and in the Process Library for it to become editable.
Once folders are created, existing Business Processes can be dragged and dropped into the folders. Once the folder organization is complete, the solution must be saved for the folder hierarchy to be persisted with the solution.
Design Canvas
The Business Process Design Canvas contains a visual representation of the Business Process and each of its Process Steps. To create a Business Process, individual Process Steps are dragged onto the Business Process currently displayed on the Design Canvas Figure 19.
Note: Process Steps are dragged from the Process Step list located in the upper right hand corner of the Business Process Designer.
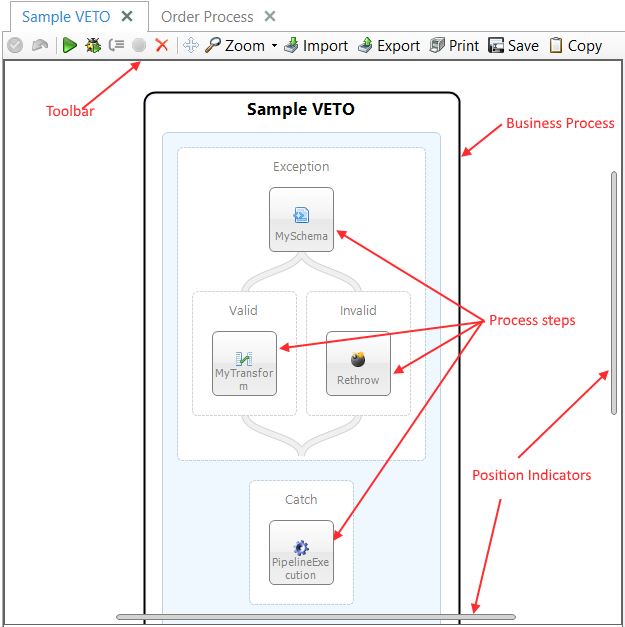
Figure 19: Design Canvas This is used to create and edit Business Processes within Neuron ESB.
Users interact with the Design Canvas, Process Steps Toolbox and Toolbar to build and test Business Processes.
Toolbar Functions
The Toolbar positioned directly above the Design Canvas provides functions that allow users to interact with the Business Process in a number of way including testing and debugging, importing/exporting, report generation and managing changes made to the Process Figure 20.
![]()
Figure 20: Process Toolbar Provides functions that allow users to interact with the Business Process
Apply
To persist changes to the Business Process to memory (not to disk), click the Apply Toolbar button. Once clicked, developers can navigate to other areas of the Neuron ESB Explorer. The user must, at some point, choose the Save option from the Neuron ESB Explorers menu or Toolbar to ensure the changes are persisted to the actual opened solution. If Save is not selected, all changes will be lost if the Neuron ESB Explorer is closed.
This is only enabled if a change has been detected, Figure 21.

Figure 21: Process Toolbar Apply button persists changes to memory
Undo
The Undo function will reverse all existing changes that have been made to the Business Process prior to Apply being executed. Undo will not work to rollback changes that have been committed to memory by the Apply function.
This is only enabled if a change has been detected, Figure 22.

Figure 22: Process Toolbar Undo button reverses recent changes to memory
Test
The Test function will start the testing process and launch the Edit Test Message dialog form, Figure 23. The Edit Test Message dialog form is used to prompt the user for information and the data (i.e. message) to use to conduct the test. The user can provide custom properties, choose Environment Variables associated with a particular deployment group, load a specific data payload and edit existing Neuron ESB header properties like Source ID and Topic.

Figure 23: Process Toolbar Test button initiates the testing process
Once a test is started, it can be stopped by selecting the Stop Toolbar button. Otherwise, the test will continue until an exception is thrown or the process completes.
To learn how to Test a Process click on the link below:
Debug
The Debug function will start the Neuron ESB .NET debugging engine and launch the Edit Test Message dialog form, Figure 24. The Edit Message Test dialog form is used to prompt the user for information and the data (i.e. message) to use to conduct the debugging session. The user can provide custom properties, choose Environment variables associated with a particular deployment group, load a specific data payload and edit existing Neuron ESB header properties like Source ID and Topic.
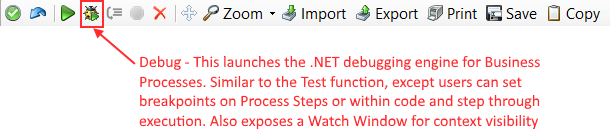
Figure 24: Process Toolbar Debug button initiates the debugging process
Once a debugging session is started, it can be stopped by selecting the Stop Toolbar button. Users can set breakpoints directly on Process Steps or within C# Process steps. The .NET debugger will stop at those points during the test where the context of the objects can be examined in the Watch Window. Users can then Step into, over or continue debugging using the Step Over Toolbar button or by pressing F5/F10/F11 on the keyboard.
To learn how to Debug a Process click on the link below:
.NET Debugging a Business Process
Step Over
Used in conjunction with the Debug Toolbar button, Figure 25. Once a .NET debugging session has started, the Step Over Toolbar button is enabled can be used to execute the next line of code but not follow execution through any function calls (Step Over). This is equivalent to pressing F10 in Microsoft Visual Studio. This requires that Breakpoints are set either within C# Process Steps or directly on Process Steps.

Figure 25: Process Toolbar Step Over button used during the debugging process
To learn how to Debug a Process click on the link below:
.NET Debugging a Business Process
Stop
Used in conjunction with the Debug and Test Toolbar buttons, Figure 26. Once a .NET debugging session or Test session has started, the Stop button can be selected to terminate session or exit out of a loop type of Process Step (i.e. For, For Each, While, Split).

Figure 26: Process Toolbar Stop button used to stop testing or debugging process
To learn how to Debug a Process click on the link below:
.NET Debugging a Business Process
To learn how to Test a Process click on the link below:
Clear All Breakpoints
Used in conjunction with the Debug Toolbar button, Figure 27. This is used to clear all breakpoints that may exist within a C# Process Steps or on any Process Steps.

Figure 27: Process Toolbar Clear All Breakpoints button removes all breakpoints used in debugging process
To learn how to Debug a Process click on the link below:
.NET Debugging a Business Process
Pan
Clicking the Pan Toolbar button toggles panning mode on and off, Figure 28. In panning mode the left mouse button can be used to move the Business Process around on the design surface by clicking anywhere on the canvas. Depressing the center mouse button if available can also be used for panning.

Figure 28: Process Toolbar Pan button used for moving a Business Process on the canvas
Conversely, the Business Process can be moved to any location on the Canvas by selecting it with the mouse cursor and dragging it to a different location on the canvas.
Zoom
Business Processes currently displayed on the Design Canvas can be resized to either 25%, 50%, 75% or 100% of their original size by selecting the Zoom drop down selector located on the bottom status bar of the Design Canvas, Figure 29. Anytime a Business Process is first opened on the Design Canvas, it will automatically be centered as well as resized to fit the current window.

Figure 29: Process Toolbar Zoom button used for resizing a Business Process on the canvas
By holding down the Control key (Ctrl); users can use their mouse wheel to zoom in and out of any Business Process, well beyond the static zoom ratios offered on the toolbar.
Import/Export
Right Clicking on a Business Process within the Design Canvas displays a short cut menu that not only allows you to add any step but also offers an Import and Export option, Figure 30. Selecting the Import short cut menu item will first prompt you that the current Business Process will be replaced. If you click Yes on the confirmation dialog, a file open dialog will be presented allowing you to select a previously exported Neuron Business Process. When selecting the Export short cut menu item you will be presented with a save file dialog.
Note: The default file extension is .npx for exported Neuron Business Processes.

Figure 30: Process Toolbar Import/Export buttons used to move proceses between solutions at design time
This Import/Export process can be used when active deployment of a process to be immediately picked up by the Neuron ESB service runtime is not desired, as in the case of active development scenarios.
Alternatively, the XML file located in the Solutions Processes folder can be directly copied to another Solutions Processes folder. It will then appear in the Process Library if the solution is opened within the Neuron ESB Explorer. However, if there is an active Neuron ESB service runtime configured with that solution and anything in the solution already configured to run the Business Process, it will be executed.
Print/Save
All processes within the Neuron ESB Process Designer can now be saved as a JPEG or Printed as a report through the new Process Designers toolbar, Figure 31

Figure 31: Process Toolbar Print/Save buttons used to genenrate reports and create process images
Clicking the Save button will prompt the user for a location to save the JPEG image of the process to.
Clicking the Print button will display a Print Preview form with an image of the process along with any custom code that any Process Step may contain. All custom code is formatted with Rich Text and separated in the report by the name of the Process step that contains it, Figure 32.
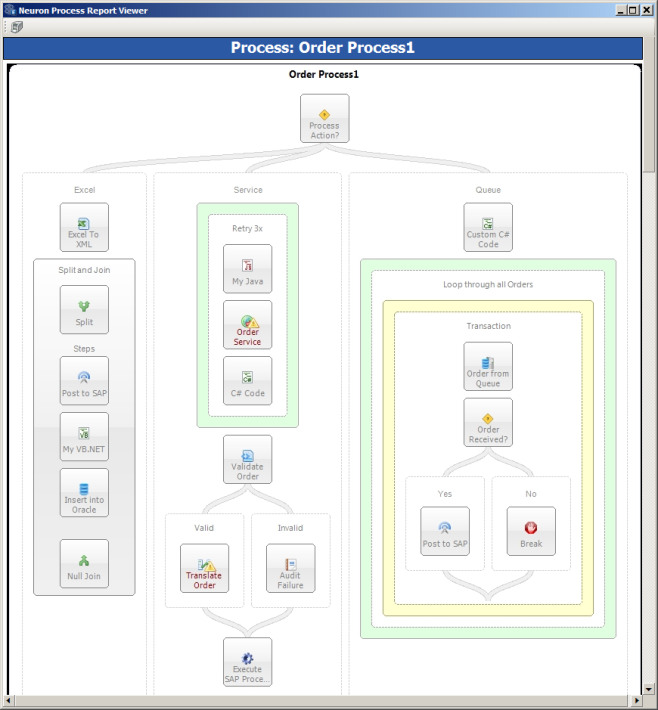
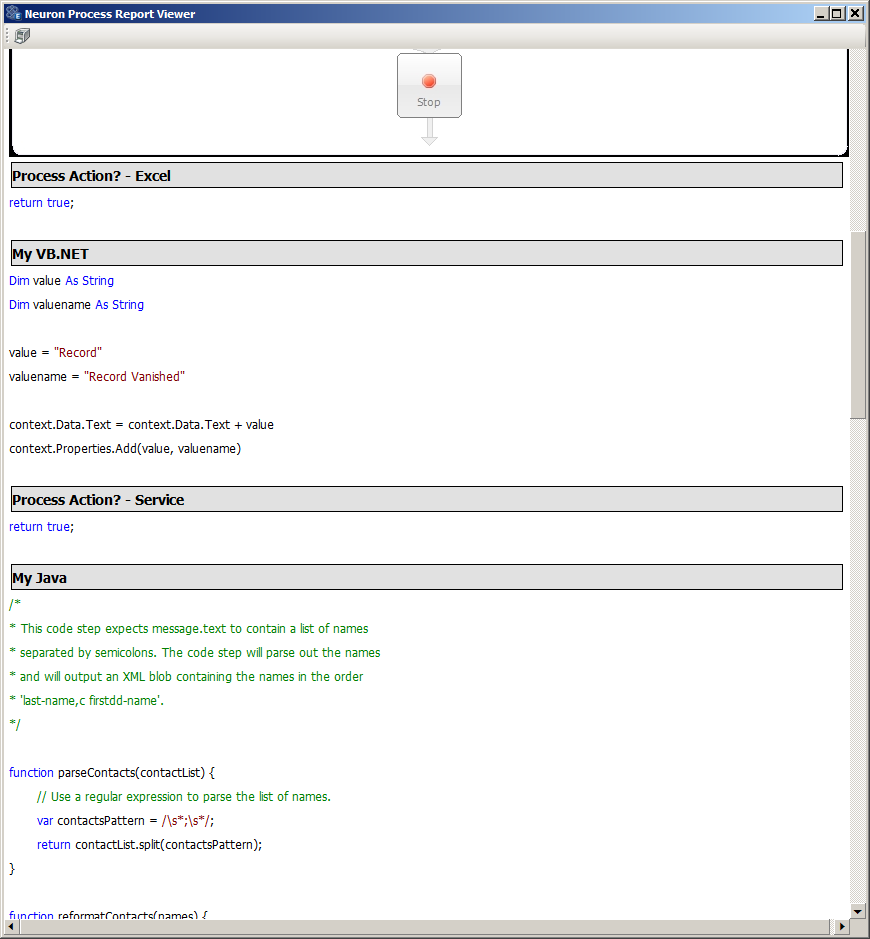
Figure 32: Process Toolbar Print/Save buttons used to genenrate reports and create process images
Copy
The Copy Toolbar button will copy the image of the currently selected Business Process to the operating systems Clipboard, Figure 33. This allows users to paste the image into third party programs like Microsoft Word.

Figure 33: Process Toolbar Copy button copies the image of the Process to clipboard
Navigation
Business Processes can be dragged to new positions located on the Design Canvas using the mouse pointer, or the Pan Toolbar function. If a Business Process is dragged beyond the Design Canvass borders, then both horizontal and vertical Position Indicators will appear at the bottom and right hand side of the Design Canvas. These provide a visual indicator of where the pipeline is located relative to the Design Canvas.
Reusable processes are an important development pattern. Neuron ESB Processes can be reused/called by other existing processes by using the Execute Process Process Step. If a user double clicks on this Process Step, the Process that it calls will be displayed along with a Back button on the toolbar, Figure 34. This provides the developer a way to navigate back and forth between parent and child processes.
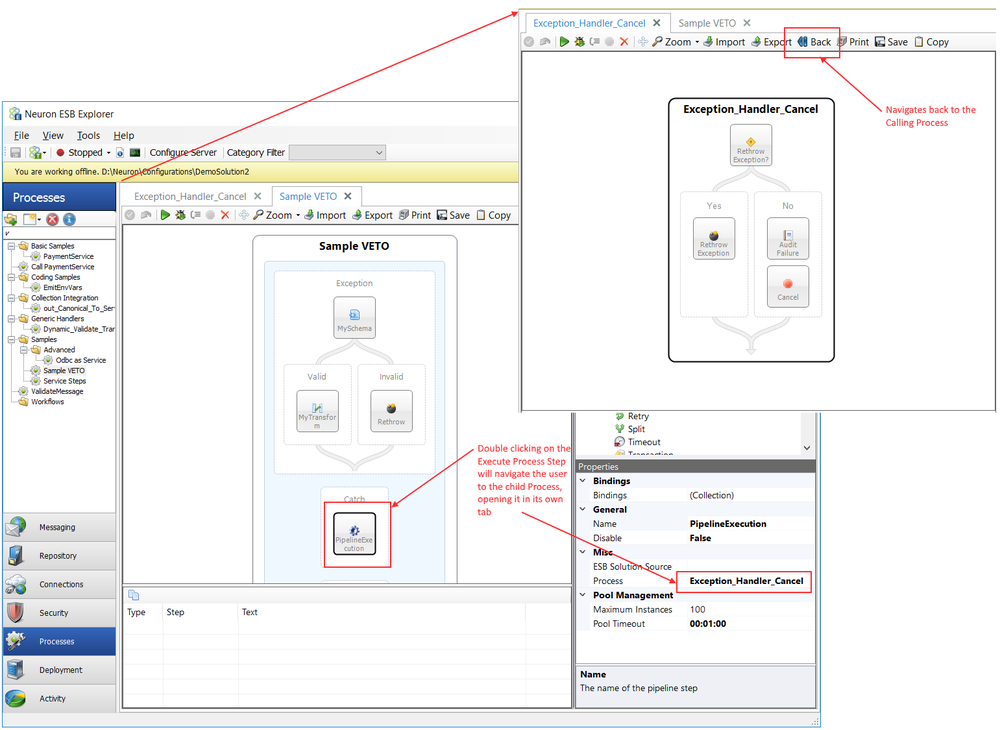
Figure 34: Process Toolbar Back button allows navigation from child process back to the parent process
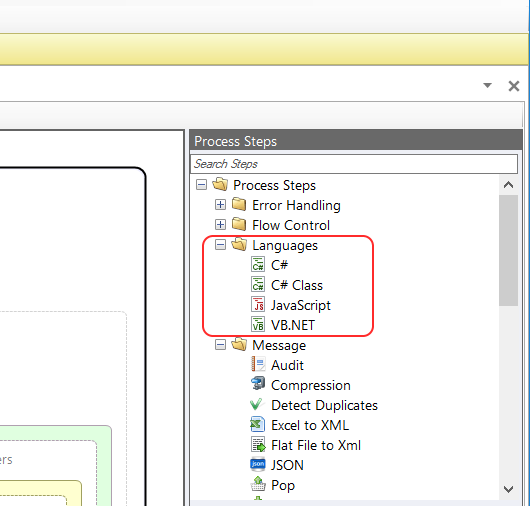
Process Steps Toolbox
Over 40 Process Steps are listed in the Process Step Toolbox located in the upper right hand corner of the Process Designer (Figure 35). An icon and a tooltip (which displays a brief description of the Process Step) represent each Process Step. Each Process Step can be dragged onto the currently displayed process on the Design Canvas. Each Process Step has design time properties, which can be modified through the Process Property Page grid.
Once added to a Process, a Process Step can be removed from a Process by right clicking on the edge of the Process Step and selecting Remove from the context menu or pressing the Delete key.
Overall, Process Steps (whether those shipped or custom developed) share a similar set of design time capabilities, behaviors and properties i.e. copy and paste, enabling/disabling, use of Environment Variables, etc.
Figure 35: Process Designer Displays all elements of the Process Designer
Organize and Search
Process Step Folders
Process Steps within the Toolbox are organized into several Folders:
Process Step Folder |
Process Step |
Error Handling |
Exception Rethrow |
Flow Control |
Break Cancel Decision Execute Process For For Each Parallel Retry Split Timeout Transaction While |
Languages |
C# C# Class VB.NET |
Message |
Audit Compression Detect Duplicates Excel to XML Flat File to XML JSON Pop Push Set Property Trace |
Security |
Decrypt XML Encrypt XML Sign XML Verify Signed XML |
Services |
Adapter Endpoint HTTP Client Utility Publish Rules WF Service Service Endpoint |
Storage |
MSMQ ODBC Store Table Query Xml Query |
XML |
Transform XSLT Validate - Schema |
When a Custom Process Step is registered, a folder hierarchy (that does not currently exist) can be defined as part of the registration. When the Custom Process Step is displayed within the Process Steps Toolbox in the Neuron ESB Explorer, the folder hierarchy that was registered with it will be created within the Toolbox.
Type Ahead Search
The Process Steps Library has an integrated type ahead Search bar that will automatically filter and display Business Process Steps as characters are entered into the Search bar (Figure 36)
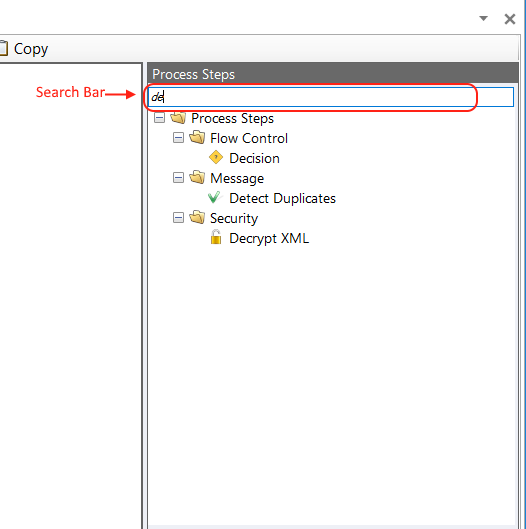
Figure 36: Type Ahead Search Displays all Business Process Steps that match the characters typed into the Search Bar.
Properties
Located at the bottom right of the Business Process Designer is the Property Page grid representing the configurable design time properties for the selected Business Process or Process Step. The Property Page grid becomes visible after a Process Step is added to a Business Process and selected, Figure 37. All Process Steps have the following default properties:
- Bindings Used to bind Neuron ESB Environment Variables to properties at runtime
- Name Not Required
- Disable False by default. If true, will not be executed
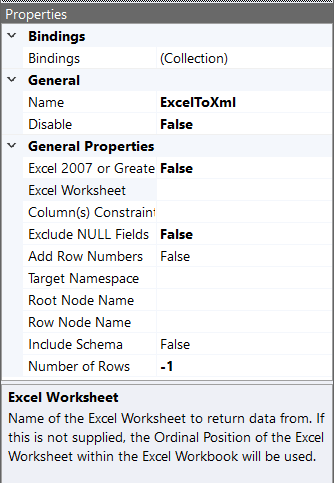
Figure 37: Property Page grid Used to configure design time properties of both Business Process and Process Steps.
Using Environment Variables
Neuron ESB the ability to use Environment Variables for configuration of any adapter or service endpoint, database connection string or process step. By using the Bindings Expression editor, users can bind Environment Variables directly to the properties exposed by those entities. Many developers access the values of Environment Variables directly in Code Process steps within processes. An Environment Variable is defined at the Deployment Group level and can contain a unique value for each Deployment Group. On startup, the Neuron ESB service runtime replaces the Environment Variable with the value associated with the Deployment Group the service is configured for.
All Process steps that have configurable properties have a Bindings property collection accessible on the Process Step Property Page grid. The Binding property launches the Bindings Expression editor, which is used to map Neuron ESB Environment Variables to a Process Steps properties at runtime and during design time testing. This is especially useful for properties such as connection strings and URLs. Clicking the ellipsis button next to the property opens the Binding Expressions Editor as shown in Figure 38.
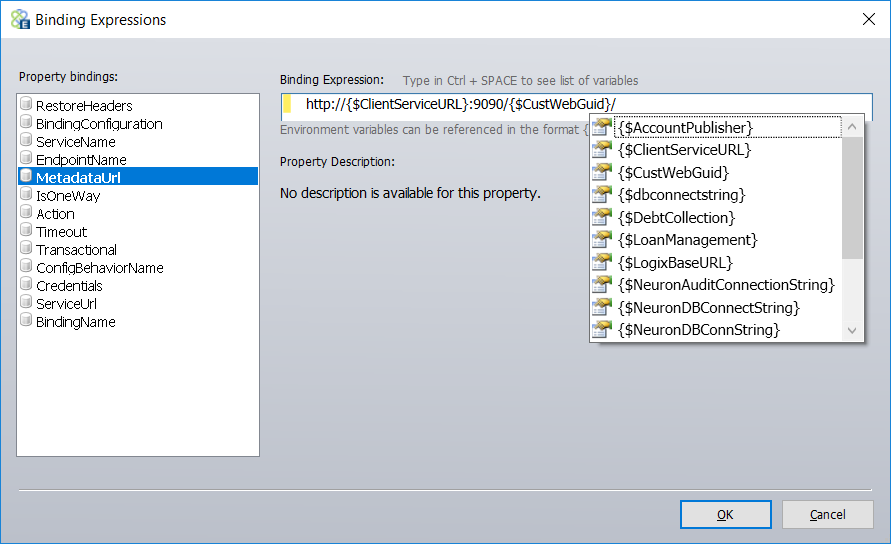
Figure 38: Binding Expressions Editor Used to define property values that use environment variables. Environment variable values will be replaced at runtime.
By pressing ctrl+space, a drop down list of all available Environment Variables (filtered by the category filter) will be displayed for selection. Environment Variables can be concatenated with text or other Environment Variables to create the final value for the property.
The editor allows you to define a Binding Expression for any scalar property. To add a Property Binding click a property from the property list located at the left of the dialog box. Enter the value in the Binding Expression text box. The property name in the list will appear in BOLD font if an expression has been entered.
Note: When the replacement of a value occurs, the same formatting rules apply as if they were entered into the property grid associated with the step. So for example, if the property is a type of Timeout then the value must be specified as hh:mm:ss or if the property is a true/false selection then the value must be specified as True or False.
Creating Environment Variables
Values that are used in the Binding Expression feature of Neuron ESB Process Steps are defined in theDeploymenttab ofNeuron Exploreras shown inFigure 39.
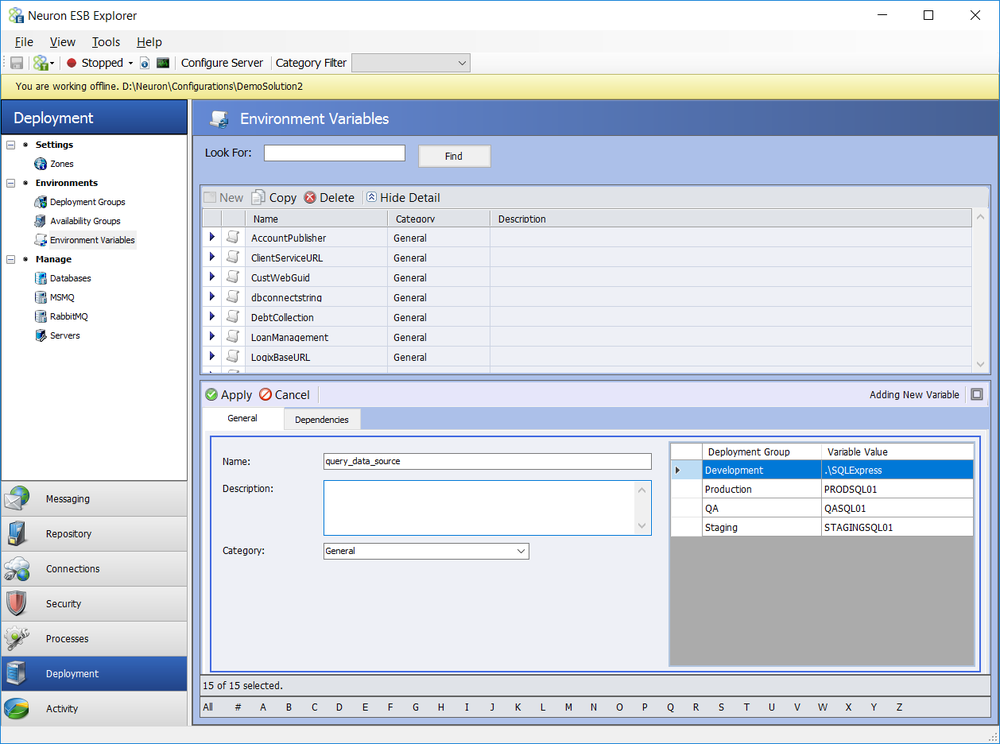
Figure 39: Deployment Tab Displays Environment Variables in the Neuron ESB Explorer
In the example displayed in Figure 39, an environment variable with the name of "query_data_source" is defined with the value ".\SQLExpress" for the deployment group "Development" and a value of "PRODSQL01" for the deployment group "Production".At runtime, if the active deployment group is "Production" and the following "Binding Expression" is used for a property value:
Initial Catalog=MessageData; Data Source={$query_data_source};
It will become "Initial Catalog=MessageData; Data Source=PRODSQL01;". This value will be used for the property when the process step is executed or tested.
Dynamic Configuration
In some scenarios, developers may need to set properties at runtime, rather than relying on design time configuration. For example, the URL or method of the REST API to call may only be known after the execution of custom business logic. The FTP server or folder to send information to may not be known until runtime. Many of the Neuron ESB Business Process Steps support having some of their properties set at runtime. This is called Dynamic Configuration.
The Process Steps that support this expose a set of custom ESB Message properties. These properties will be inspected at runtime and their values retrieved to overwrite any design time properties that they are mapped to. Either the developer would set the property value using either a .NET Language Code Editor (as shown below) or by using the Set Property Process Step, (these are case sensitive).
context.Data.SetProperty("neuron", "pipelineName","MyProcess");
Below is a listing of the Process Steps, their dynamic properties and what design time properties they are mapped to.
Process Step |
Custom Property (i.e. prefix.name) |
Design-time Property |
neuron.pipelineName |
Process |
|
neuron.FailureType |
Failure Type |
|
neuron.FailureDetail |
Failure Detail |
|
compression.Filename |
File name |
|
exceltoxml.Filename |
N/A |
|
flatfile.FirstRowHeaders |
First Row Contains Header Names |
|
flatfile.FirstLinesToIgnore |
First Rows to Ignore |
|
flatfile.LastLinesToIgnore |
Last Rows to Ignore |
|
ESBMessage.Header.Service |
Service Endpoint |
|
Addressing.To |
N/A |
|
msmq.CorrelationId |
CorrelationId |
|
msmq.AppSpecific |
AppSpecific |
|
msmq.Label |
Label |
|
msmq.Priority |
Priority |
|
msmq.AcknowledgeType |
N/A |
|
msmq.AttachSenderId |
N/A |
|
msmq.TimeToBeReceived |
N/A |
|
msmq.TimeToReachQueue |
N/A |
|
msmq.UseDeadLetterQueue |
N/A |
|
msmq.UseEncryption |
N/A |
|
msmq.UseJournalQueue |
N/A |
|
msmq.UseTracing |
N/A |
|
msmq.QueuePath |
Queue Path |
|
msmq.Recoverable |
Recoverable |
|
odbc.RowName |
Row Node Name |
|
odbc.RootName |
Root Node Name |
|
odbc.Namepace |
Target Namespace |
|
odbc.ConnectionString |
Connection String |
|
sql.ConnectionString |
ConnectionString |
|
sql.ConnectionString |
ConnectionString |
|
sql.ConnectionString |
ConnectionString |
|
neuron.schema |
N/A |
|
neuron.schemaNames |
Schema Names |
|
neuron.xslt |
N/A |
|
neuron.xsltName |
XSLT Names |
Features
Setting Breakpoints

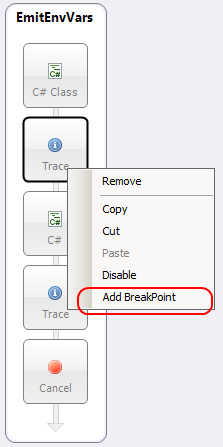
Breakpoints can be set on both Process Steps as well as within any code editor belonging to a C#, C# Class and VB.NET Process Step. Within a Business Process, Breakpoints can be set on any Process Step by selecting Add from the context menu. Once a breakpoint is added, the Process Step will change to a reddish brown color. To retain all Breakpoints between opening and closing of the Business Process, the Process must be saved.
Within a VB.NET, C# or C# Class Code Editor, Breakpoints are set by clicking to the left of the line of code that the debugger should stop at. A red dot will be displayed to the left of the line of code (Breakpoint Indicator Margin) and the line of code will be highlighted in red.
Once a Breakpoint is set and the debugging process has started (by selecting the Debug toolbar button), the green marker will move to the first Process Step that have a Breakpoint. Once the green marker moves to a Code Process Step (whether or not it has a Process Step level Breakpoint set on it) that has Breakpoints set within its Code Editor, the debugger will automatically open the Code Editor and stop on the line of code that has the Breakpoint. The line stopped on will be highlighted in yellow and the debug toolbar of the Code Editor will appear.
To learn how to Debug a Process click on the link below:
.NET Debugging a Business Process
Copy, Cut, Paste
A Process Step can be cut or copied from one Business Process and pasted into another location or within another Business Process. This eliminates the need to manually duplicate Process Step configuration. Cut, Copy, and Paste can be accessed by right clicking on any Process Step to display its context menu, Figure 40.
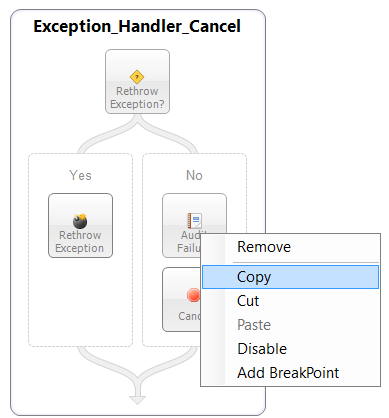
Figure 40: Copy Menu Right Click Context menu displaying Copy menu item used to copy selected Process Step
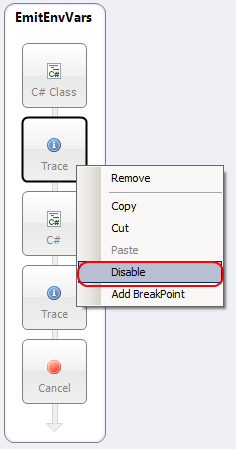
Disabling Process Steps
Process Steps can be disabled for both design time and runtime environments. If a Process Step is disabled, that Process Step will be stepped over and not executed, either when testing in the Process Designer or at runtime.
Within a Business Process, disabling a Process Step can be accomplished by selecting Disable from the context menu or setting the Disabled property located on the Property Page grid to true. Once a Process Step is disabled, the Process Step will change to a dark grey color. To retain the disabled condition at runtime, the Business Process must be saved.
Process Steps Summary
All Process Steps are listed in the table below.
Process Step |
Process Step Summary |
Audit |
Stores the current message into the Neuron ESB Audit Database. Optionally, store the message body, XPATH value and/or custom message properties. Supports object pooling for concurrency support. |
Adapter Endpoint |
Calls an Adapter Endpoint directly without the need to publish a message to a Topic. Supports object pooling for concurrency support. |
Break |
Causes a For, For Each or While loop to stop, and process execution to begin at the statement immediately following the loop. |
Cancel |
Purposefully ends/stops the execution of a process. No exception is reported. The Neuron ESB Runtime terminates the forwarding of the message to the Topic defined on the ESB Message Headers Topic property. |
Compression |
Used to Compress or decompress a message using common compression algorithms like GZip, Deflated, BZip2, LZMA, BWT, PPMd, etc. |
C# |
Full C# (.NET Framework version 4.5) code editor with full intellisense, design time compile errors; ability to reference assemblies. Functionally a method template. No external compilation or Visual Studio Development environment required. |
C# Class |
Full C# Class template (.NET Framework version 4.5) code editor with full intellisense, design time compile errors; ability to reference assemblies. No external compilation or Visual Studio Development environment required. Similar to C# Process Step, however using statements can be used and individual methods can be created. |
Decision |
Provides branching based on C# code. Branch logic is evaluated from Left to Right. |
Decrypt XML |
Will decrypt an XML message that was previously encrypted using an AES 256 encryption key. Allows for the use of an optional Initialization Vector value, a 32 bit hexadecimal number used to encrypt the original payload. |
Detect Duplicates |
Can be used to detect if a message was previously received within a user specified time window. User can define unique id for messages. |
Encrypt XML |
Will encrypt an XML message using an AES 256 encryption key. Allows for the use of an optional Initialization Vector value, a 32 bit hexadecimal number used with the encryption key to encrypt the payload. |
Excel to XML |
Converts a message containing an Excel file into an XML document. Where clauses for determining what rows are returned and specifics about how the XML should be constructed can be specified. This uses the Excel ODBC driver which is installed by default with Microsoft Office. This driver can also be downloaded from here: http://www.microsoft.com/download/en/details.aspx?id=13255 |
Exception |
Provides Try/Catch/Finally Execution Blocks within a Process. Process Steps can be dragged into each Execution Block. |
Execute Process |
Executes another process contained either in the same ESB solution or in an external ESB solution functioning as a library of processes. |
Flat File to XML |
Can convert flat files to XML. Wizard driven configuration. Optionally can generate XSD schema. |
For |
Provides a mechanism for repeating a set of steps within an Execution Block for a specified number of iterations. User must define the number of loops. The Break Process Step provides the ability to stop a loop in the middle of an iteration and continue with the next process step after the loop. |
For Each |
Provides a mechanism for repeating a set of steps within an Execution Block for an existing collection of objects. The Break Process Step provides the ability to stop a loop in the middle of an iteration and continue with the next process step after the loop. |
HTTP Client Utility |
The HTTP Client Utility is used for calling REST (HTTP) based Service Connectors (endpoints). It is similar to tools like Postman and the REST client of Chrome. It is not uncommon that various pieces of information need to be provided at runtime according to the REST specification. For example, the Method name (e.g. GET, POST, PUT, PATCH, etc.) must be provided. HTTP Headers usually need to be provided (e.g. Content Type, Authorization, Accept, etc.) as well as Query string or URL parameters. The information used to initialize these HTTP elements could come from the existing Neuron ESB Message or context properties or even from Neuron ESB Environment Variables that may have different values at runtime depending on the runtime environment they are deployed to. The HTTP Utility has built in intelligence and allows users to use Neuron ESB Environment Variables, Neuron ESB Message properties, Context properties and literal values to configure any HTTP element, including properties, message body or URL. |
JavaScript |
DISCONTINUED |
JSON |
Provide JSON encoding and decoding. Supports XML to JSON, JSON to XML, .NET Class to JSON, JSON to .NET Class. Uses the Newtonsoft library. |
Msmq |
Publish a message to or receive a message from an MSMQ queue. Supports the ability to peek at the next message in the queue. Supports MSMQ correlation. |
ODBC |
Supports all inserts, updates, deletes, queries and batch inserts into any data source using an ODBC driver. Supports dynamic SQL as well as stored procs. Optionally can generate XSD schema. |
Parallel |
Allows for parallel execution of process steps. Multiple Branches can be added. Each branch can have N number of Process Steps added to it. Each Branch can be configured to run on a dedicated thread. |
Pop |
Retrieves original ESB Message previously pushed by the Push Process Step. |
Publish |
Allows publication of the inbound ESB Message to another Topic authorized by the Publisher. Topic can be static or dynamically defined with the code editor. |
Push |
Places a reference of the original ESB Message onto an internal stack so that it can be retrieved with the Pop Process Step. |
Rethrow |
Re-throws the current exception. Can be used in the Catch Execution Block or the Execution Block of the Invalid branch of the Validate Schema Process Step. |
Retry |
Retries all Process Steps within its Execution Block. Number of retries, wait interval, trace errors and what type of exception to monitor are configurable. When configured exception is caught, a retry occurs. Once number of retries is exhausted, exception is thrown. |
Rules WF |
Allows design and execution of .NET WF rule set. Will launch the .NET WF Rules Designer where a rule set can be created. Ruleset can access and use Neuron ESB Messages and properties as part of the condition evaluation. |
Service |
DISCONTINUED |
Service Endpoint |
Calls a Service Endpoint (specifically a Service Connector) directly without the need to publish a message to a Topic. Preferred over using the Service process step. Supports object pooling for concurrency support. |
Set Property |
Provides the ability to set or modify any existing or custom ESB Message context property. This is useful to either modify the internal processing and routing behavior of a message, or add custom metadata to a message. |
Sign XML |
Uses the RSA algorithm to attach a cryptographic signature to an XML message. Specifically, the X.509v3 certificates stored in the Windows certificate store and configured in the ESB configuration are used to sign the XML message. This requires the presence of a private key attached to the certificate in the certificate store. Using the private key, the Sign XML process step will use the XML Signature standard to calculate the cryptographically-secure signature for the message and will add the signature to the XML body of the message. |
Split |
Will split a parent message into individual child messages by either using an XPATH expression or C#.Contains an Execution Block allowing for intermediate Process Step execution (synchronous or asynchronous) for each child message. Optionally aggregates (Join) all child messages after Execution Block. If aggregation is selected it can be either by enclosing the messages in an XML tag or can use C# code. |
Store |
Insert records into a Microsoft SQL database. Multiple records can be inserted based on the XPath property configured in the step |
Table Query |
Queries a Microsoft SQL Database for information. Response message data replaces current ESB Message data. |
Timeout |
The Timeout Process Step executes the contained Process Steps on a background thread. To succeed, the contained Process Steps needs to complete successfully before the timeout period expires, otherwise a timeout exception will be raised on the Business Process. |
Trace |
Writes the current ESB Message data to the Trace Window during test process execution. |
Transaction |
Can be used to enclose other process steps (that support transactions) inside a transaction scope by placing them within the Transaction Execution Block. This step uses System.Transactions from the .NET Framework. |
Transform - XSLT |
Applies an Xslt/Xsl transform to the ESB message body. Parameterized Xslt/Xsls are supported and the parameters can be dynamically set at runtime. Parameters can be useful when the same value must be repeated many times within the document. Supports providing the name of the Xsl/Xslt to execute at runtime. |
Validate Schema |
Validate the ESB message body against a set of XSD schemas. For the "schemaLocation" attribute that contain import or include references, both file based and Neuron ESB repository locations are supported. A schemaLocation attribute is used to direct the schema parser on the location of the XSD schema to use. Supports providing the name of the Xsd to execute at runtime. |
VB.NET |
Full VB.NET (.NET Framework version 4.5) code editor with full intellisense, design time compile errors; ability to reference assemblies. Functionally a method template. No external compilation or Visual Studio Development environment required. |
Verify Signed XML |
This will use the public key associated with a configured X.509v3 certificate to verify that the signature attached to an XML message is valid and was signed by the private key associated with the public key that is used to verify the messages signature. |
While |
The While Step provides a mechanism for repeating a set of steps within an Execution Block while a condition is met. The Break Process Step provides the ability to stop a loop in the middle of an iteration and continue with the next process step after the loop. |
Workflow |
DISCONTINUED |
XML Query |
Used to retrieve XML from a SQL database. The records retrieved become the body of the ESB message. This is designed to leverage the SQL FOR XML clause, which provides the ability to aggregate the relational rowset returned by the SELECT statement into XML. |
Extending Processes using .NET
Neuron ESB ships with over 40 Process Steps that provide a range of functionality and productivity when building complex Business Processes. However, it is impossible to anticipate all the capabilities and scenarios that may need support across industries and businesses. Neuron ESB provides several methods to extend Business Processes using the .NET-programming model. This provides the flexibility to accommodate the need for the inclusion of customized business rules, logic or the use of third party .NET based assemblies. These methods include:
- .NET Language Code Editors
- Referencing .NET Assembles
- Custom Process Steps
These methods are not mutually exclusive, all of which may be used in a Business Process.
.NET Language Code Editors
Neuron ESB provides .NET Language Code Editors that permit developers to write Microsoft C#/VB.NET .NET code within a Business Process to execute business logic, manipulate a message, or call out to externally developed code or resources. The .NET Language Code Editors are exposed in the following two ways within the Business Process Designer:
- Modal Code Editors - Process Steps that expose a Code Editor for message parsing or returning Boolean expressions.
- Modeless Code Editors - Language centric Process Steps that expose a Code Editor that provide a full .NET programming experience
Modal Code Editors (Process Steps):
- Publish
- Decision
- Parallel
- Split
- For
- While
Modeless Code Editors (Process Steps):
- C#
- C# Class
- VB.NET
The Neuron ESB .NET Language Code Editors allow developers to embed C#/VB.NET in Business Processes. They support all the .NET 4.x language enhancements and intellisense as well as the following features:
- Line numbering
- References to assemblies or inherit referenced assemblies applied at the Business Process level
- Zooming
- Indenting
- Formatting
- Compilation Errors
The .NET programming code entered into the editors is serialized into the XML file that represents the Business Process within the Neuron ESB solution. This code is dynamically compiled at runtime the first time it is used by the Partys instance or after it has been updated.
The Code Editors are preconfigured with the following DLL references.
- Neuron
- Neuron.Pipelines
- Neuron.Esb
- System, Version=4.0.0.0, Culture=neutral, PublicKeyToken=b77a5c561934e089
- System.Core, Version=4.0.0.0, Culture=neutral, PublicKeyToken=b77a5c561934e089
- System.Xml, Version=4.0.0.0, Culture=neutral, PublicKeyToken=b77a5c561934e089
- System.Xml.Linq, Version=4.0.0.0, Culture=neutral, PublicKeyToken=b77a5c561934e089
- System.Data, Version=4.0.0.0, Culture=neutral, PublicKeyToken=b77a5c561934e089
- System.Data.DataSetExtensions, Version=4.0.0.0, Culture=neutral, PublicKeyToken=b77a5c561934e089
- System.Runtime.Serialization, Version=4.0.0.0, Culture=neutral, PublicKeyToken=b77a5c561934e089
- System.ServiceModel, Version=4.0.0.0, Culture=neutral, PublicKeyToken=b77a5c561934e089
- **System.Activities, Version=4.0.0.0, Culture=neutral, PublicKeyToken=31bf3856ad364e35
- Newtonsoft.Json, Version=8.0.0.0, Culture=neutral, PublicKeyToken=30ad4fe6b2a6aeed
- Microsoft.CSharp, Version=4.0.0.0, Culture=neutral, PublicKeyToken=b03f5f7f11d50a3a
Note:**The System.Activities reference is only included in Modeless Code Editors
Developers may reference other .NET Assemblies from the Code Editor. .NET Assemblies that are referenced must be in the Global Assembly Cache (GAC) or, in the Neuron "instance" directory with the other Neuron Assemblies or in the Probing Path of the Neuron ESB runtime.
The Code Editors are preconfigured with .NET programming using statements for some of the referenced .NET Assembly namespaces, specifically:
- using System;
- using System.Collections;
- using System.Collections.Generic;
- using System.Collections.Specialized;
- using System.Data.DataSetExtensions;
- using System.Linq;
- using System.Xml.Linq;
- using System.Xml;
- using Neuron.ServiceModel;
- using Neuron.Pipelines;
- using Neuron.Esb;
- using Newtonsoft.Json;
- using Newtonsoft.Json.Linq;
Note:The C# Class Process Step allows developers to modify and add additional using statements.
Any time a class is used from a namespace that has not had its using statements preconfigured; the fully qualified name of the class must be used.
Modal Code Editors
These are used by some Process Steps to assist in parsing messages or setting properties required as part of their configuration. All Modal Code Editors expose a method signature that passes a pipeline context object, containing the ESB Message to the user:
PipelineContext<ESBMessage> context
The Pipeline Context object represents the Business Process instance and is used to access several things at design time and runtime including the existing Neuron ESB Configuration, Environment Variables, Properties, Party, as well as the current message being processed.
Note:The Publish Process Step only passes the Neuron.Esb.ESBMessage object rather than the entire pipeline context object.
The actual method signature may vary between the specific process steps.
In Figure 41 below, the Code Editor is opened by clicking on the ellipsis button of the Condition property of the While Process Step. The C# .NET code in Figure 41 returns a Boolean value at runtime to determine if the condition of the While loop has been met.
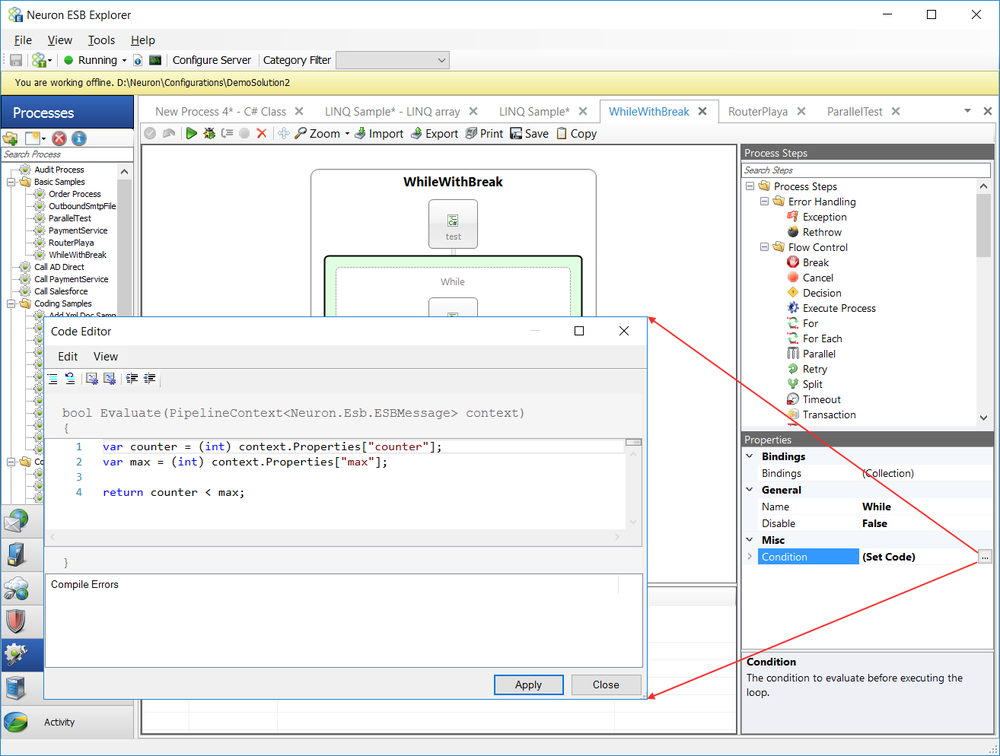
Figure 41: Modal Code Editor Used to populate value for Condition property of While loop
A more complex .NET programming code sample is displayed in Figure 42. This sample would be used within a Split Process Step to use C# code to split an inbound batch message into its individual constituent messages.
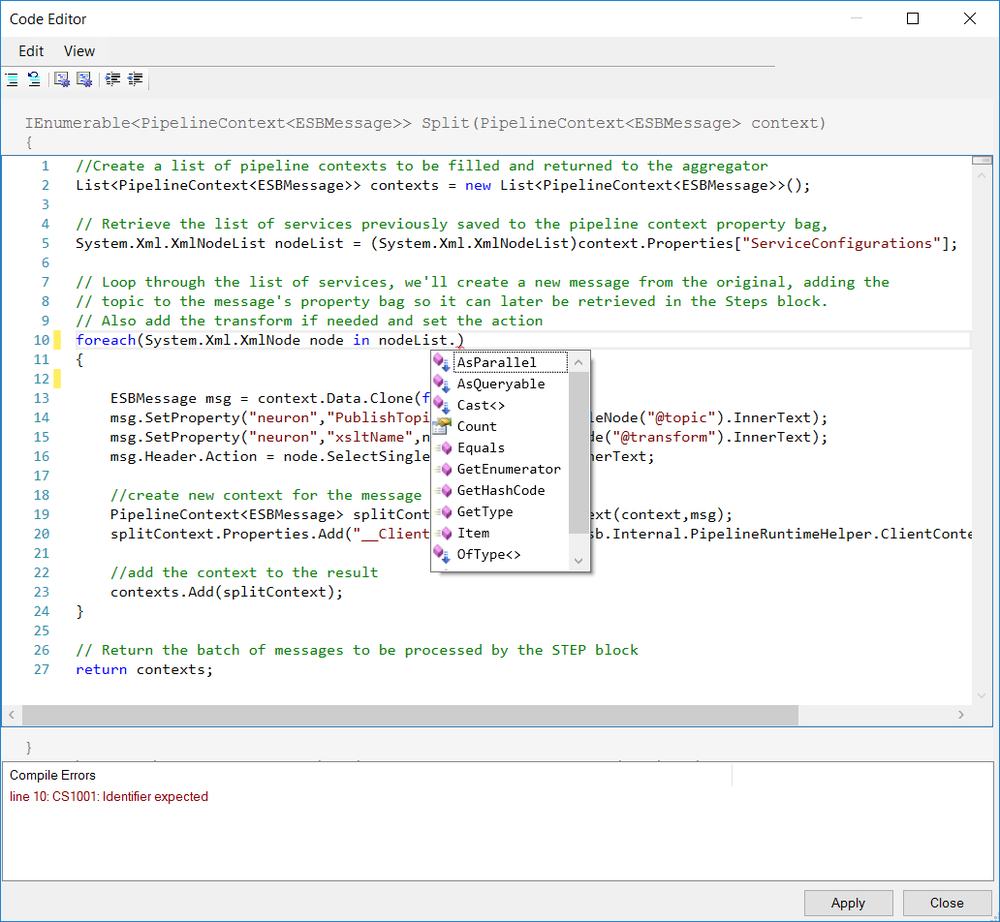
Figure 42: Modal Code Editor Scatter Gather sample shipped with Neuron ESB that shows how to parse a incoming batch message into its constituent parts for individual processing
Modeless Code Editors
Modeless Code Editors are used in the C#, C# Class and VB.NET Process Steps to expand the overall code writing experience. They have features that the Modal Code Editors lack such as:
- Expanded Toolbar
- .NET Debugging Support
- Tabbed Interfaces
To add/edit code, drag the Process Step onto the Business Process, right click on the Process Step and select Edit Code from the context menu as shown in Figure 43. This will open the Editor into a Tabbed Window alongside the Business Process.
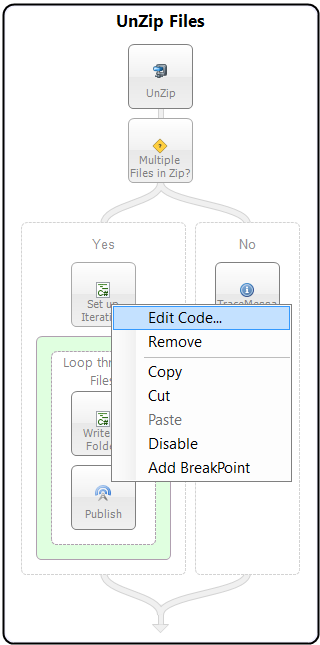
Figure 43: Edit Code Menu Right Click Context menu displaying Edit Code menu item that opens the Modeless Code Editor into a Tabbed window within the Process Designer
Expanded Toolbar
This provides developers access to common tasks such as undo, comment, format, indent, delete all breakpoints, add assembly references, display line numbers, etc., Figure 44.
![]()
Figure 44: Toolbar Modeless Code Editor Toolbar with buttons for common tasks
.NET Debugging Support
Breakpoints can be added on a specific line of C# (within the C# or C# Class Code Steps) and VB.NET Code Step. Breakpoints will cause the Neuron ESB debugger to stop on the specific line when it hits, similar to what developers experience within Microsoft Visual Studio. Once broken into the debugger, a modified Toolbar (Figure 45) will appear allowing the user to continue, step over or stop the debugging process. While in Debug mode, developers can view the state of context and process within the Watch Window.

Figure 45: Toolbar Modeless Code Editor Toolbar with displaying debugging functions
A Compile Window on all the Code Steps allow users to see the design time compile error, line number and column where the error is occurring as shown in the C# Code Editor Image below, Figure 46:
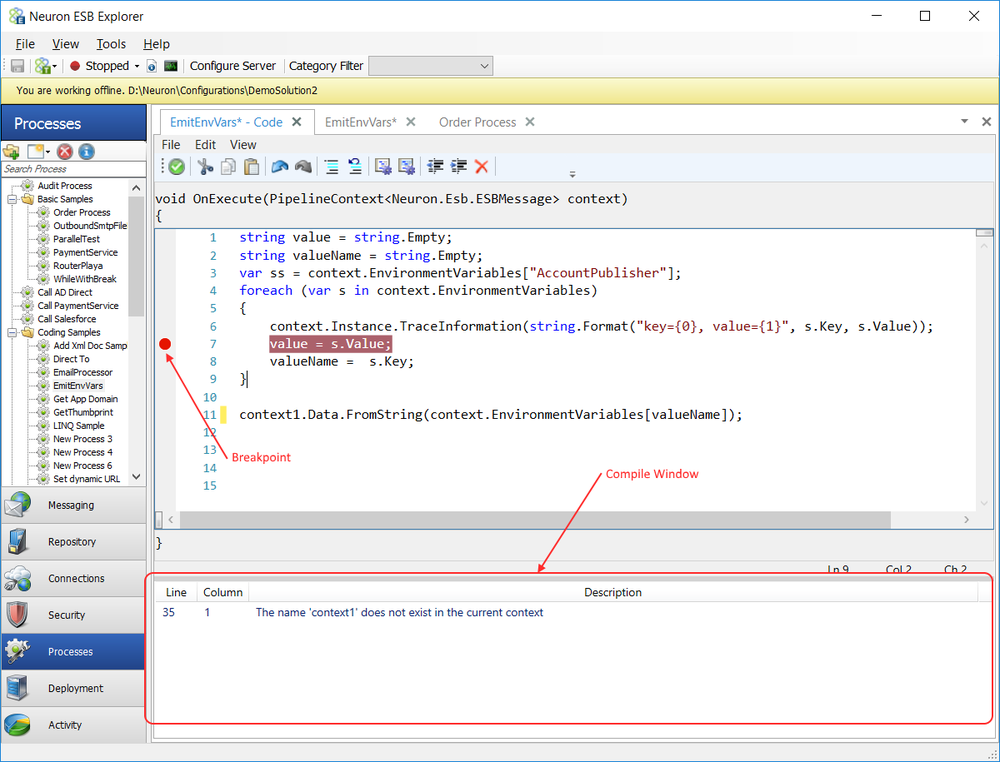
Figure 46: Compile Window Modeless Code Editor Compile Window that displays programming syntax error information
Tabbed Interfaces
The C#, C# Class and VB.NET Process Steps open into the same Modeless Tabbed Dialog view that Business Processes use (see Figure 46 above). Multiple Code editors (C#, C# Class and VB.NET) can be opened side by side in their own tabs, allowing users to navigate between Code Editors and Business Processes
Language.
.NET Language Process Steps
The .NET Language Process Steps are useful when one of the built-in Neuron Process Steps does not offer the functionality desired. They can be used to create custom processes without having to create custom externally developed and maintained code. Users can choose between the C#, VB.NET and C# Class Process Step.
C# Process Step
This is commonly used when there is no need to factor logic into multiple methods, share variables or add additional .NET using statements. The C# Process Step displays the following method signature that passes a pipeline context object, containing the ESB Message to the user:
void OnExecute(PipelineContext<Neuron.Esb.ESBMessage> context)
{
	// TODO: implement custom code here.
}
For more information go to the C# Process Step in the Process Step Reference Guide.
VB.NET Process Step
Writing VB.NET code within a Process is as simple as dragging the VB.NET Process Step onto the Process Designer, right click and selecting edit code from the context menu. Users will receive the same experience as provided by the C# Process Step. The VB.NET Process Step displays the following method signature that passes a pipeline context object, containing the ESB Message to the user:
Sub OnExecute(ByVal context As PipelineContext(Of ESBMessage))
{
	// TODO: implement custom code here.
}
For more information go to the VB.NET Process Step in the Process Step Reference Guide.
C# Class Process Step
The C# Class Process Step offers some advantages over the C# Process Step. The C# Class offers developers a way to refactor their code, reducing its complexity. It also allows developers to add using statements and define their own namespaces. The C# Class Process Step provides an existing template that developers can modify by changing the namespace and class names. Developers can add additional methods, static or non-static variables and new classes.
For more information go to the C# Class Process Step in the Process Step Reference Guide.
Code Editor API Samples
There are many cases where users either are required to, or will find a task easier to complete if the Neuron ESB .NET Language Process Steps are used. Following are samples of how to use specific APIs or complete certain actions in the Code Editors.
For example, within a Business Process users can check the direction of execution they are within. For example, users may want to do something specific if a Business Process is running on the On Publish event of a message versus the On Receive event. This can be accessed using the following C# within a Process Step:
if(context.EventSource == ExecuteEvent.OnReceive)
{
	// if receiving ...do something
}
The next example demonstrates retrieving the name of the current running process:
var processName = context.Pipeline.Name;
Working with messages
The data payload container within a Neuron ESB Business Process is the Neuron.Esb.ESBMessage class. The Code Editors are often used to manipulate the message payload. The Neuron.Esb.ESBMessage class has methods to set and retrieve data, encode data, set/get properties. Specifically:
- Neuron ESB Message Container
- Contains message body
- Contains header properties
- Contains methods
- Controls serialization of data
- Can contain custom properties
Common properties and methods to use for modifying the payload from a Neuron.Esb.ESBMessage are:
- FromString()
- FromXml()
- Bytes
- Text
While these properties and methods can be used to retrieve the payload from a Neuron.Esb.ESBMessage:
- ToXml
- ToXmlDocument
- ToXDocument
- Text
- Bytes
- Body
- GetBody<T>
- WriteMessage(stream)
The sample below demonstrates how to overwrite the data payload being processed by the Business Process with new data. It first shows how to access the data payload; convert it into its native .NET data type and then resets the current data payload with a new text message.
//retrieve the existing data payload as text
var data = context.Data.Text;
// If this is xml data, we can get an XmlDocument
var xmlDoc = context.Data.ToXmlDocument();
// or...get the XDocument reference
var xDoc = context.Data.ToXDocument();
// if this is JSON, get the dynamic JOBJECT
dynamic json = context.Data.ToJObject();
// alternatively, get the raw bytes
var bytes = context.Data.Bytes;
// Cast the data payload based on Body Type into its original .NET data type
if (context.Data.Header.BodyType != null)
{
	if (context.Data.Header.BodyType.Equals("text/xml"))
		context.Instance.TraceInformation( context.Data.GetBody<string>());
	if (context.Data.Header.BodyType.Equals("DateTime"))
		context.Instance.TraceInformation(context.Data.GetBody<DateTime>().ToString());
	if (context.Data.Header.BodyType.Equals("TestSerialization"))
		context.Instance.TraceInformation(context.Data.GetBody<TestSerialization>().Name);
	if (context.Data.Header.BodyType.Equals("Dictionary`2"))
		context.Instance.TraceInformation("Dictionary value: "
		+ context.Data.GetBody<Dictionary<string, string>>()["myKey"]);
}
// overwrite the existing data payload
context.Data.Text = "new message";
context.Data.Header.BodyType = "text/xml";
Alternatively, cloning the message before overwriting ensures a new message id is generated for the final message, creating a parent/child relationship between the messages.
// cloning the message ensures the message id is changed and
// the parent id of the new message is set to the original
// message id
context.Data = context.Data.Clone(false);
context.Data.Text = "new message";
context.Data.Header.BodyType = "text/xml";
Neuron ESB message properties is an important way to add and retrieve out-of-band data. A message property lives with the ESB message but is not part of the payload. If set within a Business Process, it can be retrieved anywhere within the system; another Business Process, an Adapter, Service or even a Workflow Endpoint. If a message is audited, all custom message properties are (by default) audited with the message. Using message properties is one of three ways to maintain state during message processing with a Business Process.
Note:Custom message properties must be specified in prefix.name pairs such as my.property. The GetProperty() and SetProperty() methods require the prefix and name of the property passed in as individual arguments.
Message properties are used when it is either not appropriate, practical or possible to modify the existing data payload. Facilities to provide out-of-band data is common in all protocols (i.e. HTTP and SOAP headers, TCP headers, MQSeries headers, etc.) to control custom business logic processing that is independent of the data payload.
// Set the customer purchase order number so that it
// can be accessed later in a Workflow or in
// follow up processes
context.Data.SetProperty("Org","PurchaseOrderNbr","P98098");
// Retrieve the purchase order number
var poNumber = context.Data.GetProperty("Org","PurchaseOrderNbr");
if(string.IsNullOrEmpty(poNumber))
	context.Instance.TraceError("The PO Nunber was not found");
The Neuron.Esb.ESBMessage and its custom properties can be used for dynamic routing scenarios. For example, the SOAP Headers can be retrieved from an inbound message received by a Neuron ESB Client Connector. Those values can be used to determine which Neuron ESB Topic to route a message to. The sample below shows how outbound SOAP Headers could be set:
// define the SOAP namespace and header name
var header = "http://www.neuronesb.com/samples/soapheaders"
	 + "/" + "Route";
var routingTopic = "<Topic>MyCompany.Finance.Orders</Topic>";
// Add the value to the Neuron ESB SOAP Headers collection
context.Data.Soap.Headers[header] = routingTopic;
The SOAP client would in turn receive the custom header as part of their SOAP Envelope:
<s:Envelope xmlns:s="http://schemas.xmlsoap.org/soap/envelope/">
	<s:Header>
		<Route xmlns="http://www.neuronesb.com/samples/soapheaders">MyCompany.Finance.Orders</Route>
	</s:Header>
	<s:Body></s:Body>
</s:Envelope>
The next sample shows how this same SOAP Header can be retrieved on an inbound SOAP based Client Connector and its value used to set the Topic property of the ESB Message.
// define the SOAP namespace and header name
var header = "http://www.neuronesb.com/samples/soapheaders"
	 + "/" + "Route";
// Get the SOAP header
var routingTopic = context.Data.Soap.Headers.ContainsKey(header)?context.Data.Soap.Headers[header]:"";
if(!String.IsNullOrEmpty(routingTopic))
{
	// Load the xml doc
	var xmlDoc = new System.Xml.XmlDocument();
	xmlDoc.LoadXml(routingTopic);
	// set the topic with the value of the SOAP Header
	// that represents the service to route to
	context.Data.Header.Topic = xmlDoc.InnerText;
}
State Management
There may be cases where it is preferable to initialize some state (i.e. variable mechanism) in one part of a process and later use that state in another part of the process, or in a different process. In other cases, it may be desirable to share state between consecutive or concurrent executions of a specific Business Process.
There are four built in ways to store state between Process Steps, Business Processes and consecutive or concurrent executions of a specific Business Process.
- Push and Pop Process Steps
- Properties collection available on the Process Instance (i.e. context.Properties)
- State collection available on the Process Instance (i.e. context.State)
- Get and Set Neuron.Esb.ESBMessage Properties
For example, using the Parallel Process Step, each branch can generate its own message and its state information. After all the branches have executed, there would be a common need to inspect, modify or aggregate the information in those messages and do the same for any out-of-band state generated in the branches. There may also be a need to identify which branch generated which message. Out of the box, Neuron ESB uses the Properties Collection to provide these capabilities to developers. In fact, many Process Steps leverage Neuron.Esb.ESBMessage properties or the Properties collection so developers can dynamically set the properties of a Process Step at runtime or retrieve out-of-band results from the execution of the Process Step.
Push and Pop Process Steps
The first is the Push Process Step. The Push Step stores a copy of the current ESB message. The corresponding Pop Process Step restores theoriginal copied ESB Message. This allows developers to freely modify the message in any Process Step and later restore the original ESB Message using the Pop step.
These are used to preserve the entire ESB Message (payload, custom properties, etc.) between Process Steps called within an instance of a Business Process.
For example, a Business Process may need to call out to many endpoints with each endpoint requiring that the message body be transformed before it is called. For Request/Response type endpoints, a response message is returned to the process, overwriting the existing message body of the ESB Message. If another call to a different endpoint must be made, that service may require information from the original message. In this scenario, a Push step can be used before the first transformation and then a Pop step restoring the original information could be used before the second service call.
Internally, Neuron ESB is storing the message in a Stack, which is in turn is stored in the context.Properties collection i.e.
context.Properties["PushedContext"] = new Stack<T>();
Where T is:
PipelineContext<ESBMessage>
Since the ESB Messages are stored in a stack, the Push and Pop Process Steps can be called many times within a Process.
You can read more about the Push and Pop Process Steps in the Process Step Reference Guide.
Context Properties
The Properties collection of the context object can be used when more granularity and flexibility is needed to maintain state within a Business Process Instance. The Properties collection lives for the execution lifetime of a Business Process instance. It will NOT maintain state between the executions of different Business Processes (unless the Business Process is called from the Execute Process Step i.e. sub process model). It also cannot be used to share state between consecutive or concurrent executions of a specific Business Process. Hence, state stored in the Properties collection is not visible to any other part of the system or Business Process instances and will not show up in Neuron ESB Auditing.
State stored in the Properties Collection can be used when it is not preferable to have the state associated with the message, or when state is later required drive custom business decisions within the Process. Many of the Flow Control type of Process Steps use the Properties Collection to maintain state or modify its own behavior at runtime. Neuron ESB also uses the Properties Collection to maintain the Exception information that may be encountered during the execution of a Process.
The Properties Collection is represented by the .NET type:
ConcurrentDictionary<string, object>
Anything can be added to the collection and, upon retrieval, must be cast back into its original data type. In the example below, a copy of the ESB Message and the current DateTime is stored in the collection at the beginning of a Process:
// When a process starts, In a C# Process step, store the
// original ESB Message and the start time
context.Properties.Add("originalMessage", context.Data.Clone());
context.Properties.Add("startTime", DateTime.Now);
At the end of the process, both values can be retrieved and processed:
// At the end of a Process, In a C# Process step, retrieve the
// original message and start time and calculate total time in milliseconds
var esbMessage = (ESBMessage)context.Properties["originalMessage"];
var topic = esbMessage.Header.Topic;
var startTime = (DateTime) context.Properties["startTime"];
var currentTime = DateTime.Now;
var totalTime = currentTime.Subtract(startTime).Milliseconds;
State Properties
The State collection of the context object is very similar to the Properties collection; however its primary use is to serve as a caching mechanism between the consecutive or concurrent executions of a specific Business Process for a specific endpoint. For example, the first instance of a specific Business Process that executes could initialize the State (i.e. Cache), whereas consecutive executions of the same Business Process could retrieve the state. This can be very useful way to increase the performance of a Business Process if the information cached is rarely updated but expensive to retrieve.
The State Collection functions as a cache at the endpoint level i.e. whatever is hosting the Party instance that executes the Business Process. In Neuron ESB, Adapter, Service and Workflow Endpoints all host a Party. For example, if a Party associated with a specific Adapter, Service or Workflow Endpoint executes a Business Process, the State Collection will function as a cache for all messages processed by the specific endpoint for that specific Business Process.
Similar to the Properties Collection, the State Collection is represented by the .NET type:
ConcurrentDictionary<string, object>
Anything can be added to the collection and, upon retrieval, must be cast back into its original data type. Since other threads could also be accessing the object, using a Lock is good practice as shown in the example below:
Random rand = null;
// check to see if the global state has been initialized
// with the random object
if (!context.State.ContainsKey("Random"))
{
	lock(context.State)
	{
		if (!context.State.ContainsKey("Random"))
		{
			// create Random object because it does not exist
			rand = new Random();
			context.State.Add("Random", rand);
		}
	}
}
// get random object
rand = (Random)context.State["Random"];
Accessing the Configuration
The Configuration API of the context object returns the Neuron ESB ESBConfiguration object, which can be used at design time or runtime to access any entity and its respective data and properties. The Neuron ESB solution (represented by the ESBConfiguration object) is loaded into memory at startup. This can be used to retrieve stored documents from the repository (i.e. JSON, XSD/XML/XSLT Documents, Swagger, WSDL, TEXT, etc.), Credentials, Encryption keys, etc.
In the first example, a JSON template is retrieved at runtime and used to map existing values from an incoming message to create a final outgoing message.
Below is the original JSON message received and retrieved from the context.Data object using the ToJObject() method:
{
	"message": "Success. Lead Created",
	"data": {
		"SalesOwnerAccountUserId": "118527",
		"accountUserID": "8908B"
	}
}
Following is the code sample that retrieves the original JSON message, writes out its properties to the Neuron ESB log files and Trace Window and sets the HTTP API properties of the ESB Message to make a REST call.
// Get message fields from registration with SalesForce...JSON format
dynamic sfResponse = context.Data.ToJObject();
if(context.Instance.IsInfoEnabled)
{
	// Log the information to the Trace Window and Neuron Log files
	context.Instance.TraceInformation("-JSON SF Registration message data");
	context.Instance.TraceInformation(" JSON: ");
	context.Instance.TraceInformation(" JSON: Message =" + sfResponse.message);
	context.Instance.TraceInformation(" JSON: SalesOwnerAccountUserIdL = " +
		sfResponse.data.SalesOwnerAccountUserId);
}
// to update the SF account, set the method and headers
context.Data.Http = new HttpMessage();
context.Data.Http.Headers.ContentType = "application/json";
context.Data.Http.Method = "PATCH";
context.Data.Http.Headers.Add("Authorization", "");
Here is JSON body of the OrgAccountUpdateRequest template stored in the Neuron ESB Document Repository.
{
	"salesRepAccountUserID":{0},
	"auditAccountUserID":{1}
}
Next, the JSON template is retrieved from the Neuron ESB Document Repository by accessing the JsonDocs collection of the Configuration object. It is then mapped with values from the previously retrieved JSON message to create a new message by setting the context.Data.Text property.
// to create the new Update message and do our mapping, we retrieve a saved
// request JSON 'template" from the Neuron ESB repository
// which has format specifiers which we'll then replace
var updateTemplate = context.Configuration.JsonDocs["OrgAccountUpdateRequest"].JsonFormatString;
// Here's where we create the account update doc, mapping elements into
// our template and replace the existing ESB Message payload
context.Data.Text = string.Format(updateTemplate,
(string)sfResponse.data.SalesOwnerAccountUserId??string.Empty,
(string)sfResponse.data.accountUserID??string.Empty);
In this next example, the Configuration object is used to find a specific Endpoint and then print out all of its relevant properties to the Trace Window and Neuron ESB Log files. This checks the Endpoints collection first, which contains all Adapter Endpoints. If nothing is found, the Services collection is checked. There is a collection for every type of Neuron ESB Entity within a solution.
// define the name of the endpoint that you want to
// retrieve properties from. Endpoints are always preceded by
// the 'Zone' name, which by default is 'Enterprise'
var zoneName = context.Configuration.ZoneName;
var endpointName = zoneName + "/PaymentService";
// Here, we're accessing the Neuron ESB Configuration
// stored in memory either at runtime or design time
// The 'Endpoints' collection contains adapter endpoints
// whereas the 'Services' collection contains service endpoints
if(context.Configuration.Endpoints.ContainsKey(endpointName))
{
	var adapterEndpoint = context.Configuration.Endpoints[endpointName];
	// this writes to the Trace Window during testing or the Neuron
	// Log file at runtime.
	if(context.Instance.IsInfoEnabled)
		context.Instance.TraceInformation("Adapter Name: " + adapterEndpoint.AdapterName);
	// Loop through all the properties and print them out
	foreach( var prop in adapterEndpoint.Properties)
	{
		if(context.Instance.IsInfoEnabled)
		context.Instance.TraceInformation(" Endpoint Property: " +
			prop.Name + " : " + prop.Value);
	}
}
else
{
	// Check to see if this is a Service Endpoint
	if(context.Configuration.Services.ContainsKey(endpointName))
	{
		var serviceEndpoint = context.Configuration.Services[endpointName];
		// this writes to the Trace Window during testing or the Neuron
		// Log file at runtime.
		if(context.Instance.IsInfoEnabled)
			context.Instance.TraceInformation("Service Name: " + endpointName);
		// if 'RouteClientTraffic' is enabled, this is
		// Client Connector, a service hosted by Neuron ESB
		if(serviceEndpoint.RouteClientTraffic)
		{
			var webHookUrl = serviceEndpoint.ClientUrl;
			// this writes to the Trace Window during testing or the Neuron
			// Log file at runtime.
			if(context.Instance.IsInfoEnabled)
				context.Instance.TraceInformation("Client Service Url: " +
					webHookUrl);
		}
		// if 'RouteServiceTraffic' is enabled, this is
		// Service Connector, a service Neuron ESB calls
		if(serviceEndpoint.RouteServiceTraffic)
		{
			var serviceUrl = serviceEndpoint.AccessUrl;
			// this writes to the Trace Window during testing or the Neuron
			// Log file at runtime.
			if(context.Instance.IsInfoEnabled)
				context.Instance.TraceInformation("Service Url: " +
					serviceUrl);
		}
	}
	else
		context.Instance.TraceInformation("Does Not Exist: " + endpointName);
}
Accessing Environment Variables
Neuron ESB Environment Variables can be used for configuration of any adapter or service endpoint, database connection string or process step. However, developers can access the values of Environment Variables directly in Code Process steps within processes using the EnvironmentVariables collection of the context object. This allows environment sensitive information to drive custom business logic in a Business Process. For example, the username and password needed to access a service in a QA environment may be different from the set of credentials required in the Production environment.
In the following example, Environment Variable values are used to set HTTP Query variables and retrieve the correct Environment based credential to use to call the SalesForce REST API.
// to authenticate with salesforce, set the query string parameters for URL
// encoded form submission. Use Environment variables so nothing is
// hard coded and this can work seamlessly in other Deployment Environments i.e.
// Production, QA, TEST, STAGE, etc.
var salesForceCredentialName = "SalesForceCredential";
var salesForceCredential = context.EnvironmentVariables[salesForceCredentialName];
context.Data.Http = new HttpMessage();
context.Data.Http.Headers.ContentType = "application/x-www-form-urlencoded";
context.Data.Http.Method = "POST";
context.Data.Text = string.Empty;
context.Data.Http.Query.Add("grant_type",
context.EnvironmentVariables["SalesForce-grant_type"]);
context.Data.Http.Query.Add("client_id",
context.EnvironmentVariables["SalesForce-client_id"]);
context.Data.Http.Query.Add("client_secret",
context.EnvironmentVariables["SalesForce-client_secret"]);
context.Data.Http.Query.Add("username",
context.Configuration.Credentials[salesForceCredential].Username);
context.Data.Http.Query.Add("password",
context.Configuration.Credentials[salesForceCredential].Password);
context.Data.LocalPath = "services/oauth2/token";
Heres another example of using Environment Variables to access the Credential store of the Configuration object and storing the resulting username/password values into the Properties Collection so that it can be used in another part of the Business Process.
// Set the name of the Environment Variable to Retrieve
var envVarName = "Neuron-X-Authentication";
// The Neuron ESB Credential name is stored in an Environment variable.
// well use it retrieve the Credential from the Neuron ESB Security
// repository and use to build the authentication header that will
// be used for a Web Service call.
var credName = context.EnvironmentVariables.ContainsKey(envVarName)?
context.EnvironmentVariables[envVarName]:
string.Empty;
if(string.IsNullOrEmpty(credName))
	throw new Exception(string.Format(
		"There was not a Credential name value for the NeuronX Authentication assigned
		to the '{0}' Neuron Environment Variable.", envVarName));
// Retrieve the Security Credential from the Neuron ESB Configuration
var credential = context.Configuration.Credentials.ContainsKey(credName) ?
	context.Configuration.Credentials[credName] : null;
if(credential == null)
	throw new Exception(string.Format(
		"the '{0}' Credential was not found for the NeuronX Authentication assigned
		to the '{0}' Neuron Environment Variable.", credName, envVarName));
// If we want to use the value in a different Business Process
// we can store in the property bag
context.Properties["NeuronX-AuthenticationHeader"] =
credential.Username + ":" + credential.Password;
// OR We can just Set the HTTP Authentication header directly that
// the REST API is expecting using the HTTP API of the ESBMessage
context.Data.Http.Headers["X-Authentication"]=
credential.Username + ":" + credential.Password;
Using the Client Context
The Neuron ESB Client Context is created when a Neuron ESB Party is instantiated by an externally hosted application, or when a Neuron ESB Adapter, Service or Workflow Endpoint is started. The Client Context can be accessed directly within any Code Process Step by using the following syntax:
var clientContext = Neuron.Esb.Internal.PipelineRuntimeHelper.ClientContext;
The Client Context encapsulates all of the capabilities of the Party and exposes properties and references to internal objects that it must communicate with and use, some of which are:
Property/Collection/Method |
Description |
Session |
Represents the Session ID (GUID) of the Party Instance. This is used for correlation purposes and uniquely identifies a Party instance connected to the runtime. |
SID |
Windows Security Identifier that represents the Windows Account the Party instance is running under. |
BootstrapHost |
The machine name hosting the Configuration service the Party communicates with. This is a Neuron ESB server. |
ClientCredentials |
The current Network Credentials the Party is running under |
ConfigurationAddress |
The URL address of the Neuron ESB Configuration service the Party is using to connect. |
FailMessage() |
A method for sending a message to the Neuron ESB Failed Message database |
Machine |
The name of the machine hosting the Party |
OwnerSubscriber |
The actual Party object. Can access all methods and properties like SendMessage(), etc. |
PartyId |
The name of the Party |
Pipelines |
The collection of Business Processes attached to the Party |
RequestReplyTimeout |
An integer representing the request/reply timeout in seconds that is used when calling through the Publish Process Step |
TopicContexts |
The collection of Topic connections that the Party is connected to. |
Username |
Windows Username represents the Windows Account the Party instance is running under. |
In the following example, the Client Context is used to publish a message directly to the Finance Topics Transport, rather than using the Publish Process Step.
var topicContext = clientContext.TopicContexts["Finance"];
if (topicContext != null)
topicContext.Publish(context.Data);
Referencing External Assemblies
All the Modeless and Modal based Code Process Steps support allow users to reference any third party .NET assembly, any .NET assembly in the GAC (Global Assembly Cache) or any .NET assembly within the Probing Path of the Neuron ESB service runtime. The existing probing path setting is displayed below:
<probing privatePath="Adapters;Pipelines"></probing>
To use an alternative location, modify the Probing Path configuration in the following Neuron ESB app.config files:
- esbservice.exe.config
- neuronexplorer.exe.config
- esbhost.exe.config
- neurontestclient.exe.config
More information regarding how to set the Probing Path can be found here:
https://msdn.microsoft.com/en-us/library/823z9h8w(v=vs.110).aspx
If assemblies are referenced at the Business Process level (i.e. link to this), they are automatically added as references to every Modeless and Modal based Code Process Step in the Business Process.
Modal Code Process Step (i.e. Publish, Decision, etc.) references can be accessed directly using the Edit -> References menu on the Code Editor, Figure 53.

Figure 53: References Menu Located on the Modal Code Editor launches the References dialog where assemblies can be added
Whereas Modeless Code Process Step (i.e. C#, C# Class, VB.NET) references can be accessed directly using the File -> Manage Assembly References menu on the Code Editor, Figure 54.
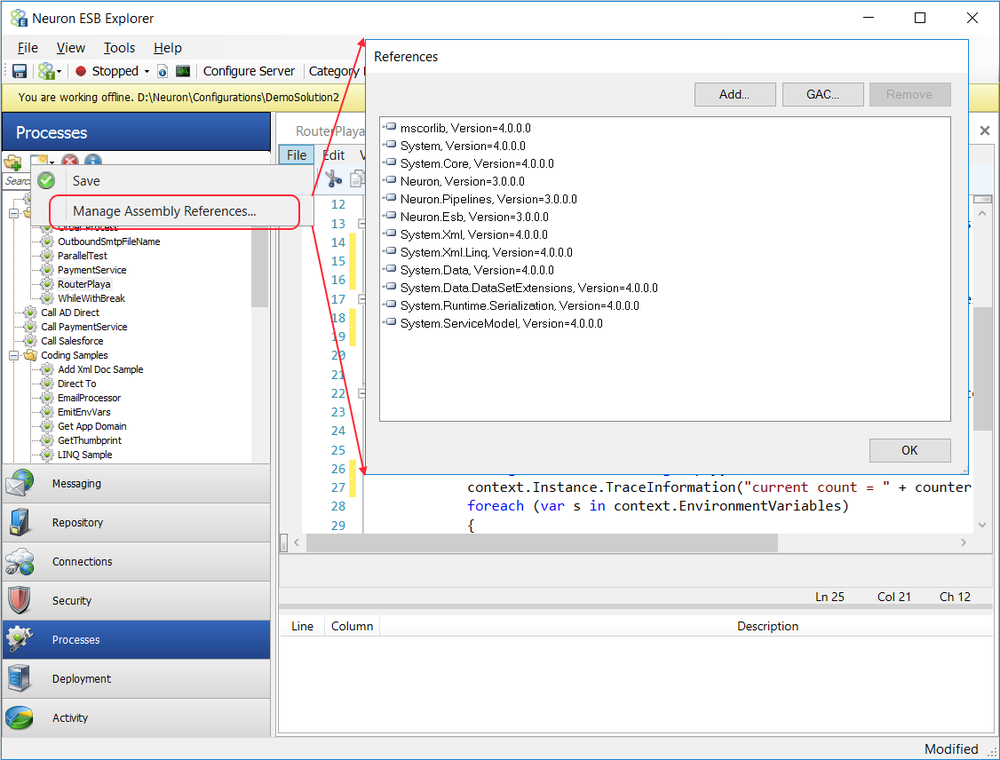
Figure 54: Manage Assembly References Menu Located on the Modeless Code Editor launches the References dialog where assemblies can be added
Adding references to Code Process Steps functions exactly the same as when references are added at the Business Process level. Using external assemblies is a common practice when developing or using an existing set of common framework libraries to provide specific capabilities to a Neuron ESB Business Process.
Note:The GAC requires strong names and this can cause a traditional obstacle for developers who have turned on auto versioning for their assemblies. It is highly recommended that developersdo not use assembly versioningfor the dlls they plan to reference in the Code Editor.File versioning should be used in place of assembly versioning when versioning is desired.
Custom Process Steps
Neuron ESB provides over 40 Process Steps that provide a range of functionality and productivity when building complex Business Processes. However, it also provides the ability for users to build their own reusable custom Process Steps that can be registered and added to the existing Process Step Toolbox, Figure 55. This allows users to build out custom Business Processes that incorporate reusable custom Process Steps.
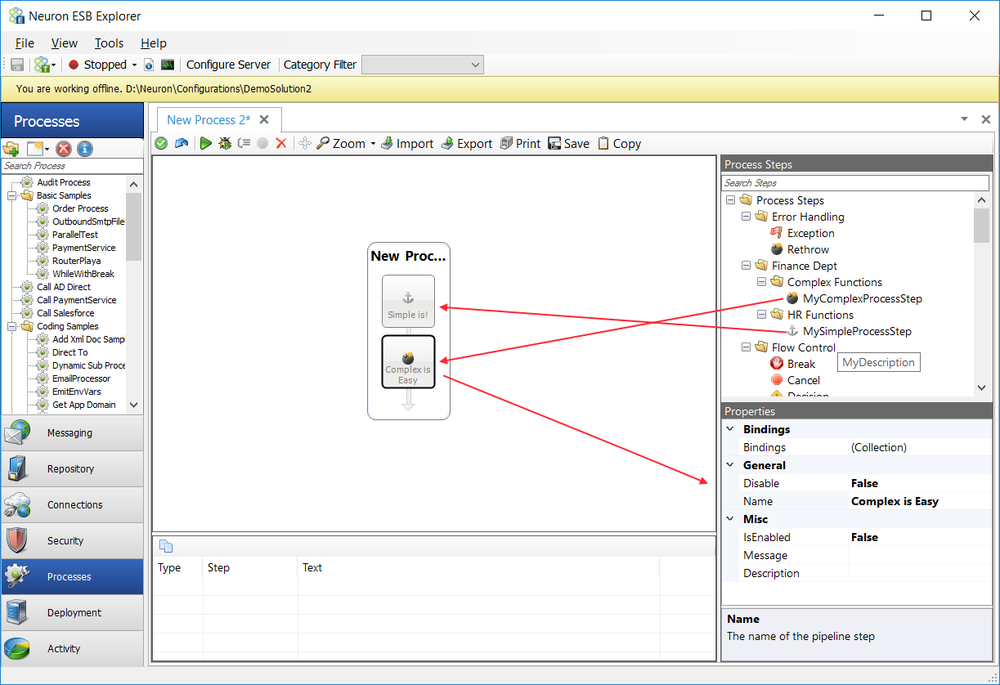
Figure 55: Custom Process Steps Located in the Process Steps Toolbox after registration. Custom Process Steps can be dragged onto the Canvas and its properties can be set in the Property Page grid. Custom Process Steps can also be stored in folders created as part of the registration process.
Besides using third party assemblies or writing code directly in the .NET Language Code Editors, custom Process Steps can also be used to extend the out of box functionality of the Business Process Designer. A Custom Process Step is a good candidate to use when there is a need to encapsulate proprietary code and business logic that can be driven externally by a custom set of exposed properties that direct its runtime/design time behavior. This may be a preferred approach where the designer of the custom Process Step needs to limit access or visibility of its source code and/or wants to ensure the business logic remains identical regardless of what user or Business Process uses it.
Custom Process Steps inherit all the base properties and features that all Neuron ESB Process Steps expose such as drag and drop, copy/paste, disable/enable, setting breakpoints, bindings, etc.
More information about Process Step properties can be found here: Process Step Properties
More information about Process Step features can be found here: Process Step Features
All custom Process Steps are developed using.NET 4.5 and by creating a Microsoft Visual Studio Class Library Project. They must be compiled into a .NET assembly to deploy. All custom Process Steps are .NET classes and must inherit from the CustomPipelineStep class and override the OnExecute() method as shown in the interface definitions below:
Class: CustomPipelineStep
Namespace:Neuron.Esb.Pipelines
Assembly:Neuron.Esb (in Neuron.Esb.dll)
Syntax:
[DataContract]
public abstract class CustomPipelineStep : PipelineStep<Neuron.Esb.ESBMessage>
{
protected CustomPipelineStep();
}
Class: PipelineStep<T>
Namespace:Neuron.Pipelines
Assembly:Neuron.Esb (in Neuron.Esb.dll)
Syntax:
[DataContract(Name = "{0}PipelineStep")]
[KnownType("GetKnownTypes")]
public abstract class PipelineStep<T> : IPipelineStep2, IPipelineStep,
IExpressionBindable, IDisposable
{
protected abstract void OnExecute(PipelineContext<T> context);
}
Depending on the User Experience required, Neuron ESB supports two types of custom Process Steps, Complex and Basic. The general difference between the two is that Complex custom Process Steps provide the developer more options for controlling the display of the Process Step within the Neuron ESB Explorer as well as its properties in the Property Page grid.
All custom Process Steps use the same method signature (i.e. OnExecute()) as used by the C# Process Step. Any object model, function or property that can be used in the C# Process Step can be accessed and used within a custom Process Step.
Process Step Types
Basic
The Basic model is the simplest way to build a custom Process Step. A Microsoft Visual Studio Class Library Project must be created and .NET Class must be added to it that will represent the custom Process Step Class. Additionally, a Resource File should be added if self-registration (decorating the class with the ProcessStepAtrribute) is used for deployment.
A Basic custom Process Step requires the following:
- A Class that inherits from CustomPipelineStep
- Must include the following assembly references
- System.ComponentModel.Composition.dll
- Neuron.dll
- Neuron.Esb.dll
- Neuron.Esb.XmlSerializers.dll
- System.Runtime.Serialization.dll
- The Class that inherits from CustomPipelineStep must be decorated
with
- System.Runtime.Serialization.DataContractAttribute (required)
- Neuron.Pipelines.ProcessStepAttribute (optional)
- Can optionally include a resource file (RESX)
- Access Modifier must be set to public
- Can have either 1 or 2 icons (16 x 16)
- RESX is needed to support multiple icons
Note:Neuron ESB ships a sample of the Basic model of a custom Process Step. http://www.neuronesb.com/neuron/Help3/Development/Samples_and_Walkthroughs/Process_Samples/Custom_Steps/Custom_Process_Step_with_the_Standard_Property_Grid.htm
Example
At minimum, a Basic model custom Process step will resemble the following sample:
using Neuron.Esb;
using Neuron.Esb.Pipelines;
using Neuron.Pipelines;
using System.ComponentModel;
using System.Runtime.Serialization;
namespace SimpleProcessStep
{
	[DisplayName("My Simple Process Step")]
	public class MySimpleProcessStep : CustomPipelineStep
	{
		protected override void OnExecute(PipelineContext<ESBMessage>
		 context)
		{
			if(context.Instance.IsInfoEnabled)
				context.Instance.TraceInformation("MyCustomProcessStep called.);
		}
	}
}
In the example above, the attribute, DisplayName attribute ("My Simple Process Step"), is used for manual registration deployment to define the name of the Process Step as it will appear in the Process Step Toolbox, as well as the default name of the Process Step after it is added to a Business Process. If self-registration is used, the DisplayName attribute is ignored.
Once the Microsoft Visual Studio custom Process Step project has been compiled and deployed, by default the custom Process Step will appear in the Process Step Toolbox using the default Neuron ESB Process Step icon as shown in Figure 56.
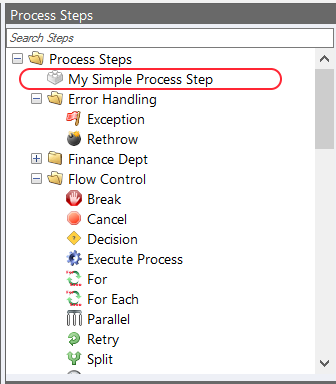
Figure 56: Basic Custom Process Step Located under the root folder using the default icon.
The Default Icon can be replaced and a custom folder can be created to locate the custom Process Step within the Process Steps Toolbox when using manual or self-registration.
Using manual registration the neuronpipelines.config configuration file can be modified and a 16x16 icon (PNG format) can be copied into the <Instance>/Pipelines directory.
Using self-registration, all the elements are added to the Process Step by decorating the class with the ProcessStep attribute.
The Deployment section covers both registration methods.
Complex
The Complex model of a custom Process Step provides developers more fine-grain control over the UI properties exposed by custom Process Steps. By referencing the new StepUIElement class, developers can control what icon and label will be displayed when a user drags the custom Process Step onto the Process Design Canvas as well as what appears on in the Process Steps Toolbox. In regards to exposing custom properties to be configured at design time, users can now control the order in which the properties will be displayed, as well as dynamically make properties visible/invisible depending on what the user selects within the property grid.
Similar to the Basic model of Process Step, a Microsoft Visual Studio Class Library Project must be created. However, two .NET Classes must be added. One to represent the custom Process Step Class, the other to represent the UIElement class required by the Design Canvas. Additionally, a Resource File needs to be added for icons and metadata.
A Complex custom Process Step requires the following:
- A Class that inherits from CustomPipelineStep
- A Class that inherits from StepUIElement<MyComplexProcessStep>
- Must include references
- System.ComponentModel.Composition.dll
- Neuron.dll
- Neuron.Esb.dll
- Neuron.Esb.XmlSerializers.dll
- Neuron.Pipelines.Design.dll
- Neuron.UI.dll
- System.Runtime.Serialization.dll
Using the Complex model, properties can be displayed in a custom defined order and visibility can be dynamically adjusted based on user input
Note:Neuron ESB ships a sample of the Complex model of a custom Process Step. http://www.neuronesb.com/neuron/Help3/Development/Samples_and_Walkthroughs/Process_Samples/Custom_Steps/Custom_Process_Step_with_the_Enhanced_Property_Grid.htm
Example
At minimum, a Complex model custom Process step will resemble the following sample:
using System.ComponentModel;
using System.Runtime.Serialization;
using Neuron.Esb;
using Neuron.Esb.Pipelines;
using Neuron.Pipelines;
namespace ComplexProcessStep
{
	[Description("Sample process step with a custom UI")]
	[DisplayName("My Complex Step")]
	public class MyComplexProcessStep : CustomPipelineStep
	{
		/// <summary>
		/// If these properties are required for design time configuration then
		/// they must be replicated in the Wrapper class of the UI Element class
		/// </summary>
		[DataMember]
		public bool IsEnabled { get; set; }
		[DataMember]
		public string ShowMe { get; set; }
		protected override void OnExecute(PipelineContext<ESBMessage> context)
		{
			if (context.Instance.IsInfoEnabled)
				context.Instance.TraceInformation("MyCustomProcessStep called.");
		}
	}
}
In the example above, the attribute, DisplayName attribute (i.e. "My Complex Step"), is used for manual registration deployment to define the name of the Process Step as it will appear in the Process Step Toolbox. The Description attribute (i.e. Sample process step with a custom UI), defines the tool tip that will appear when the mouse hovers over it in the Toolbox. If self-registration is used, the DisplayName and Description attribute are ignored. Generally, only self-registration should be used for Complex model custom Process Steps.
The IsEnabled and ShowMe properties are included as examples to show how to define properties; they are not required. Also notice that the properties for the process step are decorated only with the "DataMember" attribute. This is because the way the properties are displayed is defined in the MyComplexProcessStepUIElement class which means there is no need to define the attributes in the MyComplexProcessStep class.
The sample below shows the StepUIElement class that would accompany the sample class above.
using System.ComponentModel;
using Neuron.Esb;
using Neuron.Pipelines;
using Neuron.Pipelines.Design;
using System.Windows.Forms;
namespace ComplexProcessStep
{
	/// <summary>
	/// This is the UI Element class that determines how the custom Process step will be
	/// represented in both the property grid and Process Designer.
	/// </summary>
	public class MyComplexProcessStepUIElement : StepUIElement<MyComplexProcessStep>
	{
		public MyComplexProcessStepUIElement(Pipeline<ESBMessage> pipeline)
			: base(pipeline, Resource1.MyComplexProcessStep)
		{
		}
		protected override void OnPaint(PaintEventArgs e)
		{
			base.OnPaint(e);
			DrawLabel(e.Graphics, TypedData.Name);
		}
		public override string Label
		{
			get { return "Custom Label"; }
		}
		public override object BindTo
		{
			get
			{
				return new Wrapper(this.TypedData);
			}
		}
		/// <summary>
		/// This exposes the properties bound to the property grid
		/// These properties should map back to the ones in the custom Process
		/// Step class. This is where the Properties Type Converter can be used
		/// to control things like ordering of properties, as well as making
		/// properties dynamically visible/invisible at design time based on
		/// input of user
		/// </summary>
		[TypeConverter(typeof(PropertiesTypeConverter))]
		private class Wrapper : BaseWrapper
		{
			private readonly MyComplexProcessStep step;
			public Wrapper(MyComplexProcessStep step) : base(step)
			{
				this.step = step;
			}
			/// <summary>
			/// This is used to control the visibility of any property based on the
			/// value of the IsEnabled property
			/// </summary>
			/// <param name="attributes"></param>
			public void DynamicShowMeAttributesProvider(PropertyAttributes attributes)
			{
				attributes.IsBrowsable = (IsEnabled == true);
			}
			[PropertyOrder(1)]
			[Category("Default")]
			[DisplayName("IsEnabled")]
			[Description("To test the functionality of PropertyAttributesProvider.")]
			public bool IsEnabled
			{
				get { return this.step.IsEnabled; }
				set { this.step.IsEnabled = value; }
			}
			[Category("Default")]
			[DisplayName("ShowMe")]
			[PropertyOrder(0)]
			[Description("Should be visible only when IsEnabled is set to true.")]
			[PropertyAttributesProvider("DynamicShowMeAttributesProvider")]
			public string ShowMe
			{
				get { return this.step.ShowMe; }
				set { this.step.ShowMe = value; }
			}
		}
	}
}
In the example above, the Resource1.MyComplexProcessStep provides the image displayed on the Design Canvas after the Process Step has been added to it. This is passed to the base constructor of the MyComplexProcessStepUIElement class. The default name of the Process Step as it appears on the Design Canvas is controlled by the Label property.
The Wrapper class, which is decorated with the TypeConverter attribute taking a type of Neuron.Esb.PropertiesTypeConverter, allows the property grid to use the TypeConverter's functionality. This is accomplished essentially through "wrapping" an instance of the custom process step in a class, which exposes the properties of that custom process step and allows them to be manipulated. The PropertiesTypeConverter type converter provides developers with the PropertyAttributeProvider attribute to control visibility of properties. It also provides the PropertyOrder attribute to control the order in which properties will appear in the Property Page grid.
The following is a description of each of the PropertiesTypeConverter attributes:
- [PropertyOrder(0)]- Used to indicate the order that the property should be displayed in within each category. '0' would put that property at the top of the properties in the property's category, whereas a higher number will put it lower.
- [PropertyAttributesProvider("DynamicShowMeAttributesProvider")]- Used to indicate that there is a method that should be used to control the property's attributes. In this sample, the following method is used:
public void DynamicShowMeAttributesProvider(PropertyAttributes attributes)
{
	attributes.IsBrowsable = (IsEnabled == true);
}
The PropertyAttributes class contains the attributes for the property that is decorated with the PropertyAttributesProvider attribute (note that the PropertyAttributesProvider attribute uses the method/provider's name for its parameter). This allows attributes to be dynamically set at runtime. In this sample, the attribute "IsBrowsable" for the ShowMe property is set to whether the IsEnabled process step property is true or false.
The constructor for the Wrapper class uses one parameter which is the custom process step's class (the base class's constructor must also be called using the same class as the Wrapper class's constructor). In this sample, it is the class "MyComplexProcessStep", as this is the main class for the custom step.
For self-registration, the following ProcessStep attribute is added to the MyComplexProcessStep class:
[ProcessStep(typeof(MyComplexProcessStep), typeof(Resource1), "name",
"description", "ComplexProcessStep_MyComplexProcessStep",
typeof(MyComplexProcessStepUIElement), Path = "Finance Dept/Complex Functions")]
The typeof(MyComplexProcessStepUIElement) argument passed to the ProcessStep attribute directs the Business Process to use the included MyComplexProcessStepUIElement class to control the rendering of the Process Step on the Canvas.
Using the sample code above, once the Microsoft Visual Studio custom Process Step project has been compiled and deployed, the custom Process Step will appear in the Process Step Toolbox and Design Canvas as shown in Figure 57.
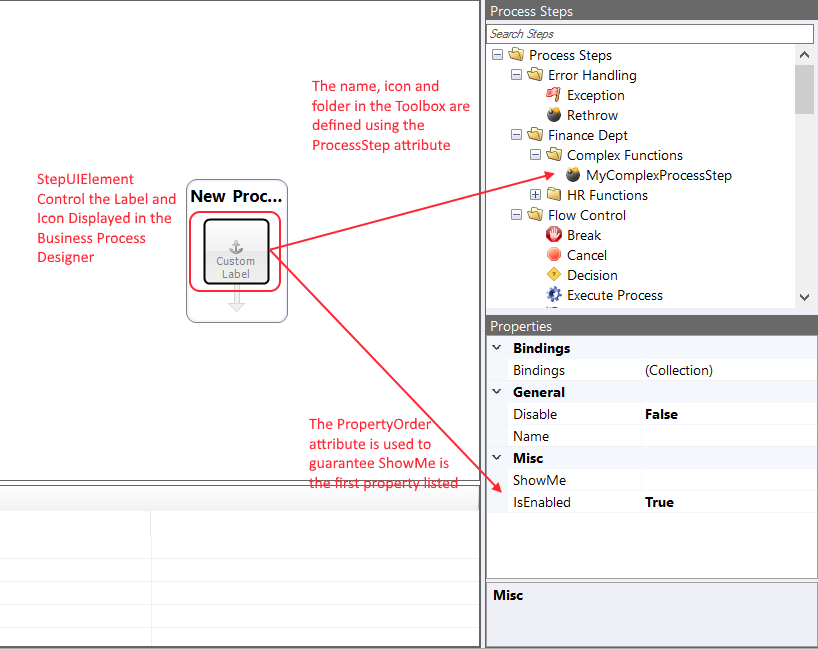
Figure 57: Complex Custom Process Step Located under in a custom folder in the Toolbox. Using one icon in the Toolbox, while a different icon and label are used on the Design Canvas.
Manual registration can be used in exactly the same way as when registering a Basic model Process Step. However, if manual registration is used, the custom StepUIElement class IS IGNORED, which negates the point of using the Complex model for building custom Process Steps. To leverage the benefits of the Complex model, only self-registration can be used.
The Deployment section covers both registration methods.
Deployment
.NET assemblies containing custom Process Steps do not need to be strongly signed.
All custom Process Steps must be copied to the Pipeline folder located under default Neuron installation directory (C:\Program Files\Neudesic euron ESB v3\DEFAULT\Pipelines).
All custom Process Steps must be registered using manual or self-registration.
Manual Registration
Manual registration requires that the custom Process Step class name, assembly name and folder information be entered within the neuronpipelines.config configuration file located in the Pipelines directory. Using the neuronpipelines.config, a stepTypes element must be added for each Custom Process Step registered. The stepTypes element has the following attributes:
Attribute |
Description |
name |
The name of the .NET Class representing the Custom Process Step |
value |
The full .NET Assembly name |
path |
The folder path (created under the Process Steps root folder) to display the Custom Process Step. If the folder does not exist, the Process Steps Toolbox will create automatically. |
A sample that shows an entry for the Basic Custom Process step example discussed in the previous section would appear as follows:
<neuron.pipelines>
	<stepTypes>
		<add name="MySimpleProcessStep" path="HR Dept/Simple Function" value="SimpleProcessStep, Version=3.0.0.0, Culture=neutral,  PublicKeyToken=null"></add>
	</stepTypes>
</neuron.pipelines>
To use a custom icon, a 16x16 PNG format file along with the .NET assembly must be copied to the Pipelines folder in the Neuron program files installation directory. The name of the PNG must match the fully qualified name of the .NET Class. In the example above, the namespace for the .NET Class is SimpleProcessStep (by coincidence the name of the assembly happens to be the same), while the name of the .NET Class is MySimpleProcessStep. Therefore the PNG file name would be, SimpleProcessStep.MySimpleProcessStep.png
Using the manual registration information above as well as the custom icon file, the Basic Custom Process Step will now appear in the Process Steps Toolbox as shown in Figure 58.
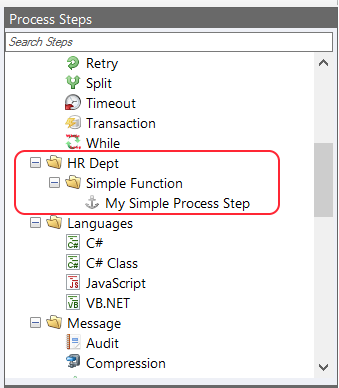
Figure 58: Basic Custom Process Step Located under the root folder using the custom icon and folder defined in the neuronpipelines.config file.
If deploying a Complex model custom Process Step, copying a PNG icon file to the Pipelines folder in the Neuron program files installation directory to use a custom icon will override the use of any icons that it may have compiled in its own resource file. The copied icon will be used for both Toolbox and Design Canvas.
Self-Registration
The neuronpipelines.config configuration is not needed when self-registration is used. Self-registration is accomplished by decorating the .NET Class representing the Process Step with the ProcessStep attribute. All elements needed for registration are embedded in the assembly and declared using the ProcessStep attribute, including which icons to use as shown in the interface definitions below:
Class: ProcessStepAttribute
Namespace:Neuron.Pipelines
Assembly:Neuron.Esb (in Neuron.Esb.dll)
Syntax:
[Serializable]
[AttributeUsage(AttributeTargets.Class)]
[MetadataAttribute]
public class ProcessStepAttribute : ExportAttribute
{
	public ProcessStepAttribute(string processStepTypeName, string name,
		string description, string uiElementTypeName);
	public ProcessStepAttribute(Type processStepType, string name,
		string description, string uiElementTypeName);
	public ProcessStepAttribute(Type processStepType, string name,
		string description, Type uiElementType);
	public ProcessStepAttribute(string processStepTypeName,
		string resourceTypeName,
		string nameResource, string descriptionResource,
		string imageResource, string uiElementTypeName);
	public ProcessStepAttribute(string processStepType, Type resourceType,
		string nameResource, string descriptionResource,
		string imageResource, string uiElementTypeName);
	public ProcessStepAttribute(Type processStepType, Type resourceType,
		string nameResource, string descriptionResource,
		string imageResource, string uiElementTypeName);
	public ProcessStepAttribute(Type processStepType, Type resourceType,
		string nameResource, string descriptionResource,
		string imageResource, Type uiElementType);
	public string Description { get; }
	public string Image { get; }
	public string Name { get; }
	public string Path { get; set; }
	public string ProcessStepTypeName { get; }
	public string ResourceTypeName { get; }
	public string UIElementTypeName { get; }
}
The ProcessStep attribute contains all the information that Neuron ESB Explorer needs to self-register the process step into its Business Process Designer and Process Steps Toolbox. The sample below displays the ProcessStep attribute for self-registration of the Basic Custom Process Step that was discussed earlier in this documentation.
[DisplayName("My Simple Process Step")]
[ProcessStep(typeof(MySimpleProcessStep), typeof(Resource1), "name",
"description","Image1","", Path = "Finance Dept/HR Functions")]
public class MySimpleProcessStep : CustomPipelineStep
{
- The first parameter of the attribute is the type of the class of the process step.
- The second parameter is the type of the resource class (*.resx file added to the Microsoft Visual Studio Project) that contains the name, description, and image that the process step uses.
- The third parameter is the name of the string in the resource class that contains the name of the process step. The name in the resource class will be the name displayed in the toolbox of the Process Designer.
- The fourth parameter is the name of the string in the resource class that contains the description that will be displayed when the mouse is hovering over the process step in the toolbox.
- The fifth parameter is the name of the image in the resource file that will be used as the icon for the process step.
- The sixth parameter is a fully qualified type name used to represent the process step in the Process Designer on the design surface. When the Basic Custom Process Step is used, it is an empty string, in which case Neuron will use a default generic UIElement.
- Lastly, the path of where the process step will sit in the Process Designer toolbox can be specified with the Path variable. If it is an empty string, the process step will be located at the root folder "Process Steps" in the toolbox.
Once the .NET Class is decorated with the ProcessStep attribute, the assembly must be compiled and then copied to the Pipelines folder. Nothing else is needed. When the Neuron ESB Explorer is opened, the Custom Process Step should display as shown in Figure 58.
Runtime Deployment
The Custom Process Step .NET assembly, along with any dependencies, must be present in the Pipelines Folder or in the Probing Path defined in the *.config files of the Neuron ESB runtime environments.
If hosting the Neuron ESB Party in a custom .NET application, then the Custom Process Step .NET assembly (along with its dependencies) must be deployed to the bin directory of that application. This is only necessary if the Party references any Business Processes that use the Custom Process Step.
Testing Business Processes
Design-time Testing
Test Message
Neuron ESB provides the ability to test a Business Process within the Business Process Designer. The Testing process is started by clicking the Test Toolbar button located on the Process Designer Toolbar. This will launch the Edit Test Message form, Figure 59.
The Edit Test Message dialog box allows users to enter any type of message (i.e. XML, JSON, Text, binary, etc.) to send to the Business Process for testing. Existing ESB Message context properties can be modified, custom ESB Message properties can be added and Environment Variables specific to Deployment Group can be selected to use during the test. This should be used to enter all the information required by the Business Process to test.
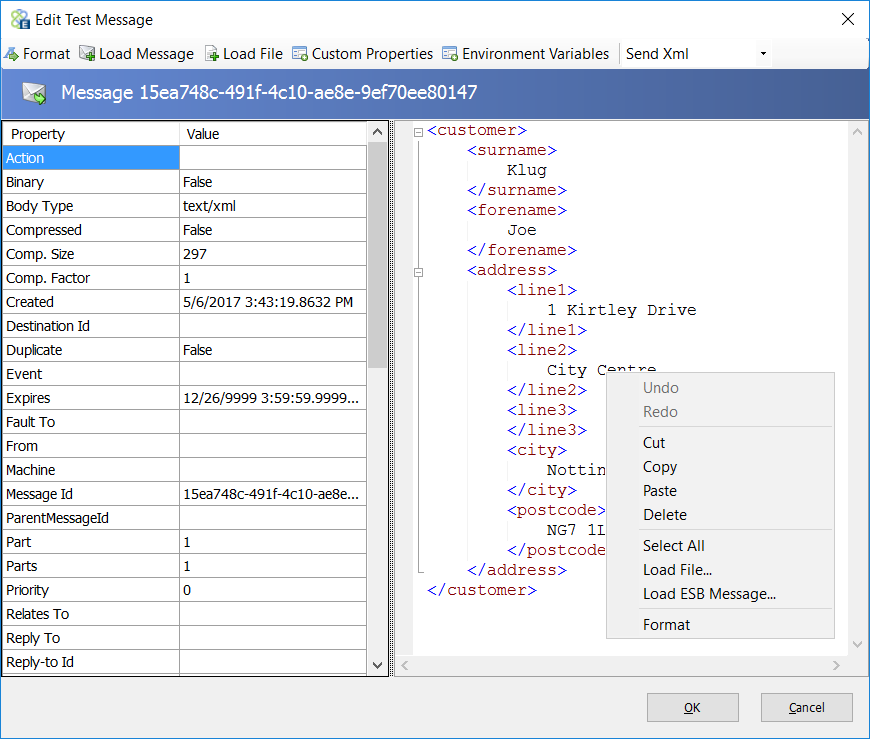
Figure 59: Edit Test Message dialog Used to start either the testing or debugging process. This is where all information needed by the Business Process for the test should be entered. The OK button is pressed to start the test.
The Edit Test Message developers provides the following features
Feature |
Description |
Format |
Formats the XML data displayed in the Edit Test Message dialog. |
Load File |
Clicking the Load File Toolbar button will prompt the user to select an external file to load as binary. |
Load Message |
Clicking the Load Message Toolbar button will prompt the user to select a previously saved ESB Message in the format of *.esbmsg. An ESB Message can be saved in the *.esbmsg format from the Failed Messages or the Message History report. This load the ESB Message properties as well as the data payload for the test. |
Custom Properties |
Clicking the Custom Properties Toolbar button will launch a dialog box allowing the user to add custom message properties. These will be added as part of ESB Message sent to the Business Process for the test. This means that any Process Step configured to use custom ESB Message properties, will work as expected during the test. |
Environment Variables |
Clicking the Environment Variables Toolbar button will launch a dialog box allowing the user select (and edit), the set of Environment Variables associated with a specific Deployment Group. This means that any Process Step configured to use Environment Variables, will work as expected during the test against the selected Deployment Groups Environment Variables. |
Modify ESB Message Header |
All ESB Message Header properties are displayed in the left hand pane of the Edit Test Message dialog. These can be edited before the message is submitted for testing. All properties except those beginning with HTTP. Can be edited and used during the test. |
Pressing the OK button on the Edit Test Message form will start the testing process, sending all the data entered into the Business Process for execution and closing the form. During testing, the execution of each Process Step in the Business Process is visible and highlighted within a green frame (Figure 60). Process Steps will output trace information (i.e. Verbose/Debug, Informational, Warnings or Errors) to the Trace Window (Figure 61) during execution.
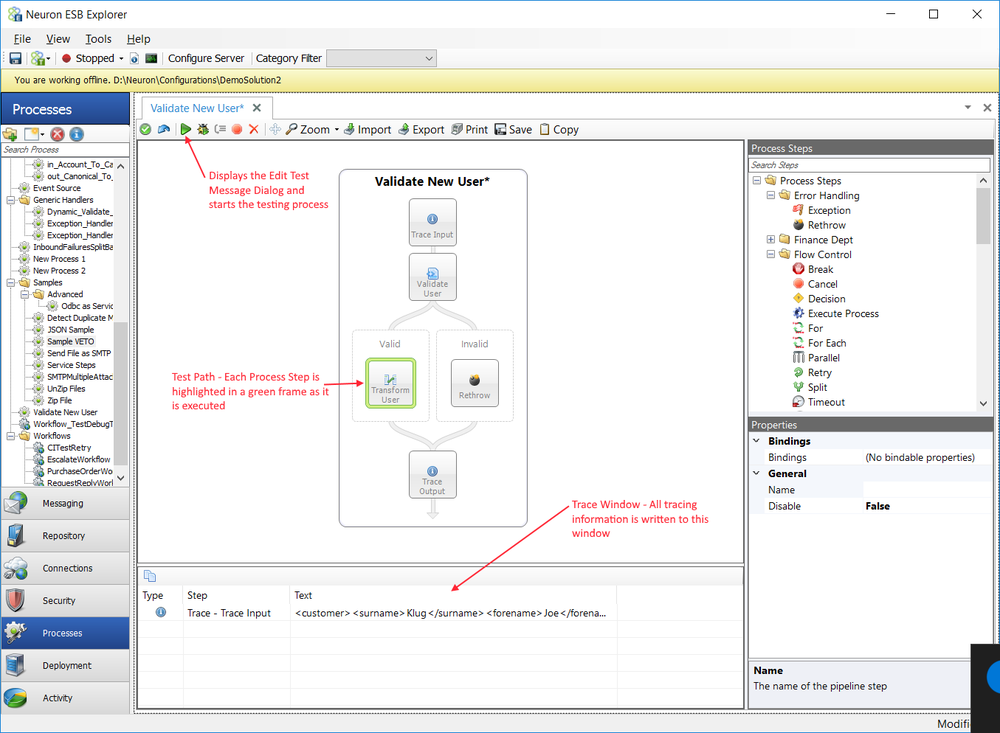
Figure 60: Testing on the Business Process Designer. Business Process testing can be started by selecting the Test toolbar button. Once a test message is submitted, execution of each Process Step will follow; each highlighted by a green frame as it is executed, representing the Test Path. Exception and custom information will be written to the Trace Window.
Once the testing process has started, it can be aborted by clicking the Stop Toolbar button. This will abort the test process. Developers cannot stop on a specific Process Step, inspect the context and then restart on the next. The .Net Debugging process provides that functionality.
A developer can use a Code Process Step to load custom information that the Edit Test Message does not support. For example, if the HTTP Method needed to be set for design time testing, this could be done in a C# Process Step using the following sample below:
if (context.Runtime.DesignMode)
context.Data.Http.Method = "GET";
In the sample above, the DesignMode returns True if the Business Process is being tested in the Business Process Designer. This ensure the code block setting the Method is not executed during normal runtime.
Trace Window
The Trace Window is always visible at the bottom of the Business Process Designer and can be resized (Figure 61). This will display all trace output generated by either the Trace Process Step, or by using Trace* methods from the IPipelineInstance interface exposed on the pipeline context object (i.e. context.Instance.Trace*). Additionally, all exception and abort information as well as any debug or informational messages generated by either the Business Process, its Process Steps, or the Rethrow process step will be displayed in this window. The Trace Window is only written to during test execution of the process. The contents of the Trace Window can be copied to the Windows clipboard by clicking the copy icon located directly above the Type column of the data grid or, it can be displayed in the Trace Result Windows by selecting the Display context menu (Figure 62).
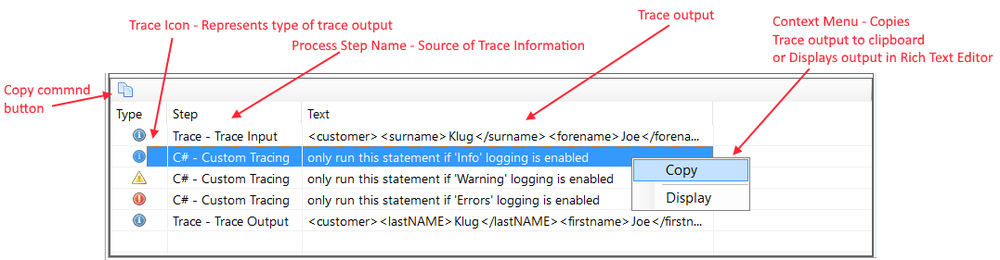
Figure 61: Trace Window Displays all trace output during testing. Trace output can be copied or displayed
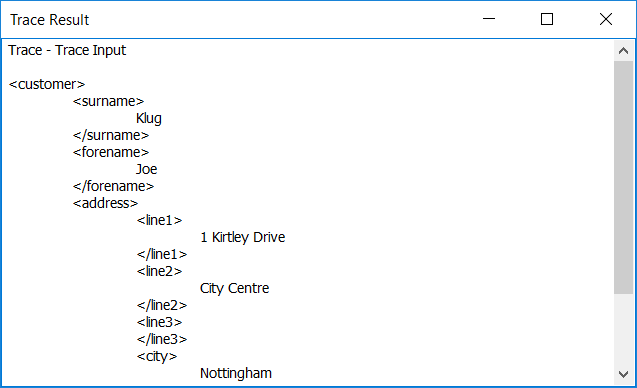
Figure 62: Trace Results Displays content of the Text column of the selected row within the Trace Window when either the row is double-clicked or the Display context menu is selected.
Tracing APIs
The Business Process Tracing APIs can be used during development to add custom trace information to Business Processes. These APIs will write to the Trace Window during testing. However, they will write to the appropriate Neuron ESB Log files at runtime. For example, if a Business Process ran during the receipt of a message from a Client Connector at runtime, the Trace APIs would write the trace output directly the Client Connectors respective log file.
The Trace APIs are defined on the IPipelineInstance interface exposed on the pipeline context object as shown below:
public interface IPipelineInstance
{
	void TraceError(string message);
	void TraceInformation(string message);
	void TraceWarning(string message);
	/// <summary>
	/// Boolean flag indicating whether Verbose level logging is enabled
	/// </summary>
	bool IsDebugEnabled { get; }
	/// <summary>
	/// Boolean flag indicating whether error level logging is enabled
	/// </summary>
	bool IsErrorEnabled { get;}
	/// <summary>
	/// Boolean flag indicating whether warning level logging is enabled
	/// </summary>
	bool IsWarningEnabled { get; }
	/// <summary>
	/// Boolean flag indicating whether info level logging is enabled
	/// </summary>
	bool IsInfoEnabled { get; }
}
Trace APIs can be used directly within any .NET Language Code Editor enabled Process Steps. Their output is controlled by current Trace Level set. The sample below demonstrates using the APIs in a C# Process Step:
if(context.Instance.IsDebugEnabled)
	context.Instance.TraceInformation(
		"only run this statement if 'Verbose' logging is enabled");
if(context.Instance.IsInfoEnabled)
	context.Instance.TraceInformation(
		"only run this statement if 'Info' logging is enabled");
if(context.Instance.IsWarningEnabled)
	context.Instance.TraceWarning(
		"only run this statement if 'Warning' logging is enabled");
if(context.Instance.IsErrorEnabled)
	context.Instance.TraceError(
		"only run this statement if 'Errors' logging is enabled");
Since the pipeline context as well as the current ESB Message is accessible, any header property, custom property or body of the ESB Message can be accessed either at run time or during design time testing by using the Trace APIs in any .NET Language Code Editor enabled Process Step.
The tracing level used during testing is located in the NeuronExplorer.exe.config file. The tracing level can be edited directly in the System.Diagnostics\switches section in the NeuronExplorer.exe.config file as shown below. The default Tracing level is Info.
<configuration>
<system.diagnostics>
<switches>
<!-- This switch controls ESB trace messages. -->
<!-- Value Meaning -->
<!-- ===== ======= -->
<!-- 0 No tracing -->
<!-- 1 Trace errors -->
<!-- 2 Trace errors + warnings -->
<!-- 3 Trace errors + warnings + info -->
<!-- 4 Trace errors + warnings + info + verbose -->
<add name="esbTraceSwitch" value="3"/>
</switches>
</system.diagnostics>
At runtime, the trace level settings will be located within the esbservice.exe.config and the esbhost.exe.config files. Either those trace levels are modified by using the Configure Server dialog launched from the Server management screen or Toolbar of the Neuron ESB Explorer as displayed in Figure 63.
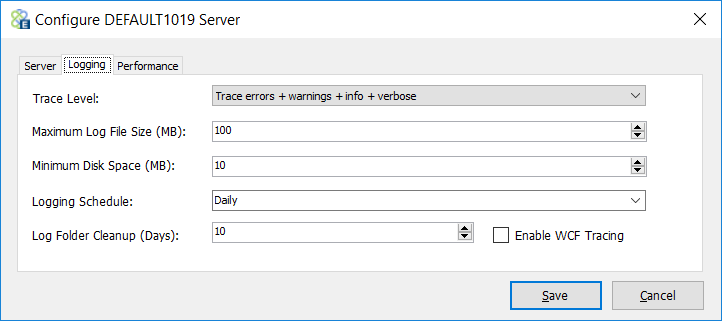
Figure 63: Configure Server dialog Displays current logging settings for the Neuron ESB runtime environments. These settings are used at runtime to determine what level of information to write to the Neuron ESB log files and Event Log.
Testing live Process Steps
There are two Process Steps that require that the Neuron ESB solution which contains the Business Process be actively running on the local machine. That is because they need to be able to communicate with internal Neuron ESB services to function. The Neuron ESB Explorer can be opened in offline mode for this to work. These Process steps are:
- Audit
- Publish
When submitting a message to test, a valid SourceId (i.e. the name of a Party) and Topic must be provided in the Edit Test Message dialog (Figure 64). These are used to create a connection to the live Neuron ESB runtime service hosting the solution:
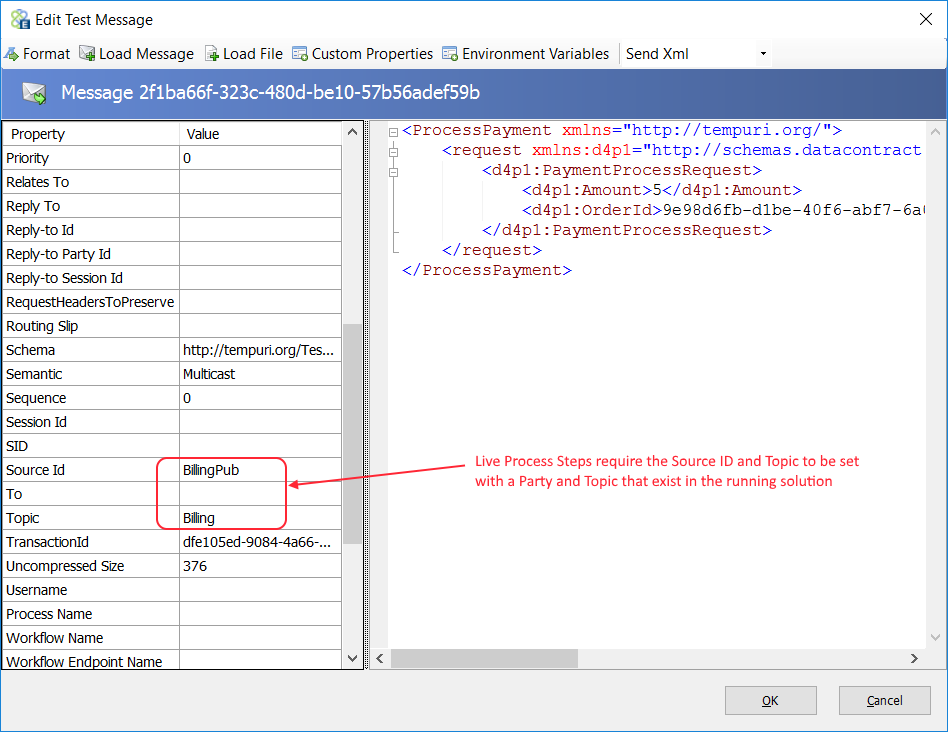
Figure 64: Edit Test Message dialog Source Id and Topic properties can be modified to use the names of the Party and Topic that exist in the running solution.
NOTE: For the Publish Step, the SourceId (i.e. Party) must have Send rights to the Topic configured for the Step.
NET Debugging
The .NET Debugging process is initiated almost exactly like the Testing Process, except that the Debug Toolbar button is pressed rather than the Test Toolbar button. Both will launch the Edit Test Message dialog. Everything that can be done during the Test Process (using Trace APIs, etc.), can be done during the debugging process. What the .NET Debugging process provides over the regular Testing process is the ability to set Breakpoints on Process Steps or within Code Process Steps. It provides a Watch Window and allows developers to view context and values during the debugging process.
Breakpoints
Breakpoints
can be set on Process Steps as well as within any code editor belonging
to a C#, C# Class and VB.NET Process Step. Within a Business Process,
Breakpoints can be set on any Process Step by selecting
Add BreakPoint from the context menu. Once a breakpoint is added, the Process Step will change to a reddish brown color. To retain all Breakpoints between opening and closing of the Business Process, the Process must be saved.
Breakpoints are set within a VB.NET, C# or C# Class Code Editor by clicking to the left of the line of code that the debugger should stop on. A red dot will appear to the left of the line of code (Breakpoint Indicator Margin) and the line of code will be highlighted in red.
To clear all breakpoints that may exist within a C# Process Steps or on any Process Steps, click the Clear All Breakpoints Toolbar button on the Business Process Toolbar
Step by Step Debugging
Once a Breakpoint is set and the debugging process has started (by clicking the Debug Toolbar button), the green frame will move to the first Process Step that have a Breakpoint. Users can continue to the next Breakpoint by clicking the Step Over Toolbar button. Once the green frame moves to a Code Process Step (whether or not it has a Process Step level Breakpoint set on it) that has Breakpoints set within its Code Editor, the debugger will automatically open the Code Editor and stop on the line of code that has the Breakpoint. The line stopped on will be highlighted in yellow and the debugging buttons on the toolbar of the Code Editor will appear (Figure 65).
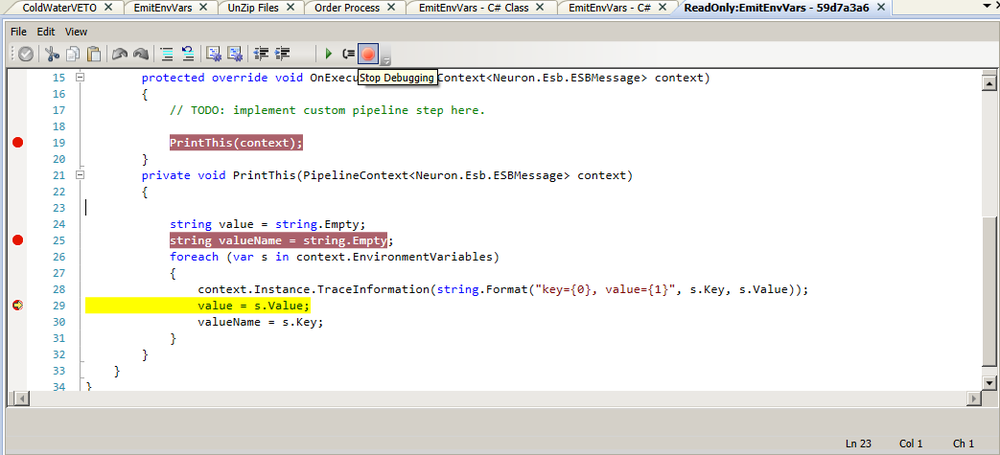
Figure 65: Code Editor Displays Breakpoints. Debugger currently stopped on line 29 with line highlighted.
Once on a Breakpoint, a developer can press F5 (continue), F10 (step over) or F11 (step into) keys to walk through each line of code in the Code Editor. The Continue and Step Over Toolbar buttons on the Code Editor Toolbar can be used in lieu of pressing F5 or F10. The debugger can also be stopped by clicking the Stop toolbar button (F1 key). When a developer is positioned on the last line and F5 (or the continue toolbar button) is pressed, the debugger will move to the next Process Step that has a Breakpoint set on it.
Exception Reporting
If an unhandled exception occurs, the line will immediately be highlighted in orange. By moving the mouse cursor over the Breakpoint Indicator Margin to the left of the line of code, a tooltip will appear with the error message. If an unhandled exception occurs on a Process Step, the debugger will stop on that Step and highlight it in red (Figure 66). The exception information will be written to the Trace Window.
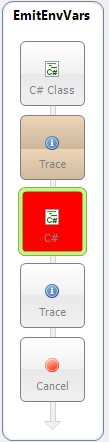
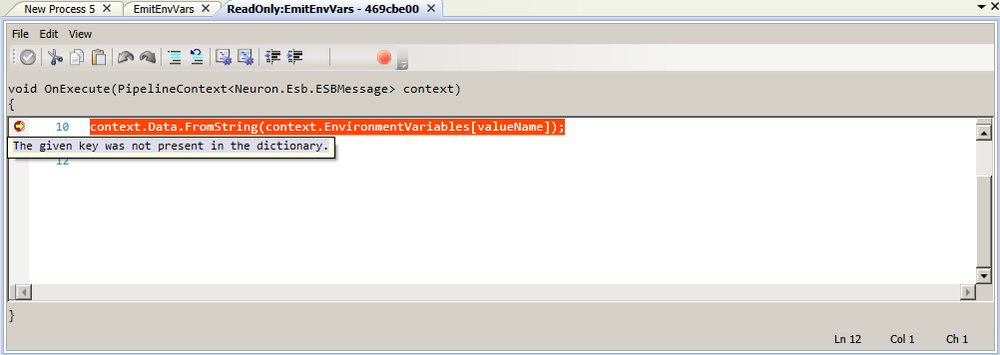
Figure 66: Code Editor Debug Error Highlights the line that caused the error in orange. Tooltip displays error message.
Quick Watch Window
The .NET Debugging Quick Watch window (Figure 67 and Figure 68) provides the ability for developers to view local variable information (much like Microsoft Visual Studio Auto window). If the .NET debugging process is stopped on a Breakpoint, the state of the ESB Message and its header properties, custom variables, Environment Variables and various context properties like context.Properties, context.State, etc. can be examined. The Quick Watch Window is read-only and becomes visible when the debugger stops on the first Breakpoint. When viewing the data payload, nothing larger than 99 characters will be viewable.
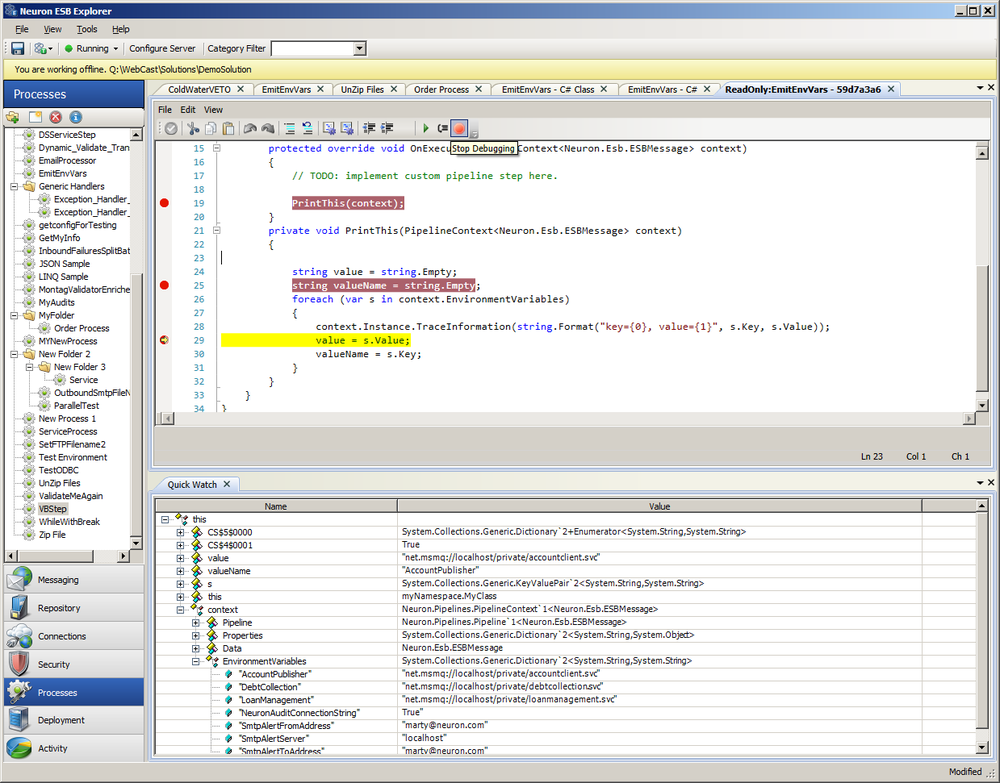
Figure 67: Quick Watch Window Displays the Quick Watch Window when the debugger is stopped on a Breakpoint within a Code Process Step.
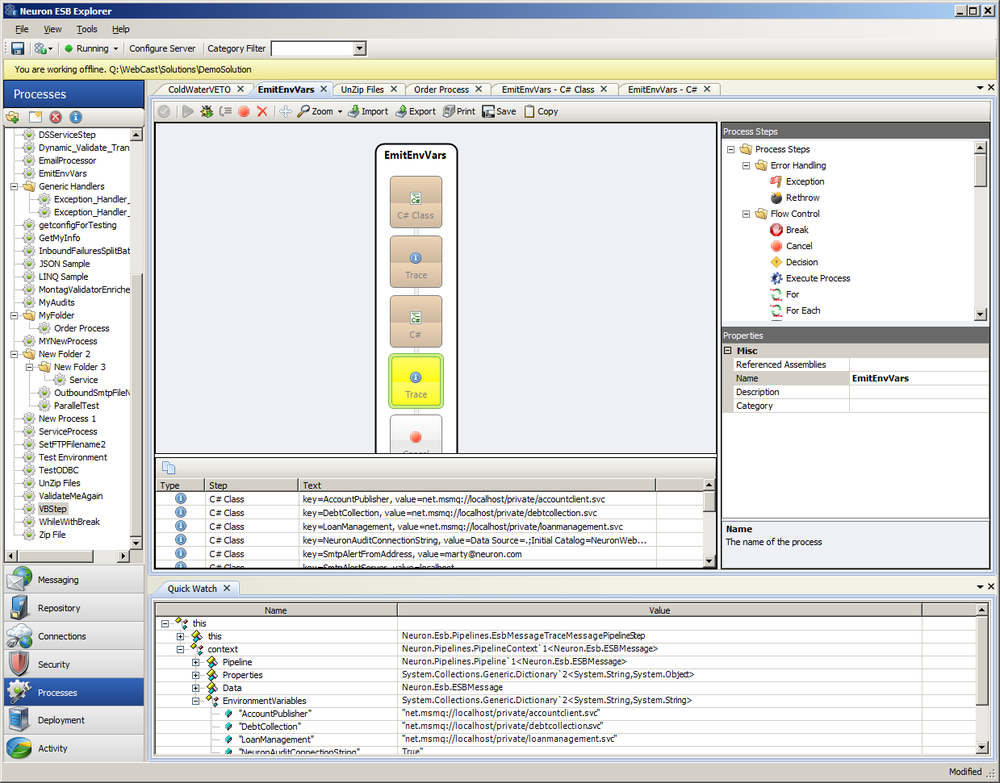
Figure 68: Quick Watch Window Displays the Quick Watch Window when the debugger is stopped on a Breakpoint set on a Trace Process Step.
Unit Testing
Testing custom process steps is relatively straight-forward. For this section on testing custom process steps, the NUnit Framework will be utilized. NUnit is easily integrated into Visual Studio using the Nuget.org package manager and is a popular testing framework for .NET C#.
Setting up Visual Studio
The most convenient place to put the Visual Studio test project is in the custom process step's solution.
Creating a new VS Project
- Create a new C# class library project from Visual Studio's File menu by clicking on File -> New -> Project.
- Choose "Visual C#" from the left-hand menu, then choose the "Class Library" template. Enter any information that is desired into the project's properties on the bottom of the new project screen. Click "Ok".
- Make sure the project's target framework is set to the same as the process step being tested (found in the project's properties).
Reference Required DLLs
- Required references, such as the custom process's dll, must be added to the project that was created. In the Solution Explorer pane, add a reference in the project to the desired custom process step dll to be tested.
- Install the NUnit Framework, NUnit Console Runner, and the Visual Studio Test Adapter to the project through the Nuget Package Manager by searching for "NUnit", "NUnit.console" and " NUnit 3 Test Adapter for Visual studio" or run the following from the Nuget Package Manager Console:
- Install-Package NUnit
- Install-Package NUnit.ConsoleRunner -Version 3.6.1
- Install-Package NUnit3TestAdapter -Version 3.7.0
- There are two ways to add the required Neuron ESB dlls to the project:
- Option 1: Users can download and install the Neuron ESB API from nuget.org by using the Nuget Package Manager in Visual Studio and searching for "Neuron ESB SDK", or by running "Install-Package NeuronEsb.ClientApi" from the Nuget Package Manager Console
- Option 2: If Neuron ESB is installed on the system, users can
reference the following DLLs from the installed instance's folder
(usually at "C:\Program Files\Neudesic\ Neuron ESB v3\DEFAULT"):
- Neuron.dll
- Neuron.Esb.dll
- Neuron.Esb.OAuth.dll
- Neuron.Pipelines.dll
- Neuron.Scripting.dll
- Newtonsoft.Json.dll
- RabbitMQ.Client.dll
Option 2 is recommended since that will ensure that the API version will match the version of Neuron ESB being tested against.
- Most likely, the only namespaces that will be used (i.e. "using"
statements to add) to test are:
- Neuron.Esb.Administration
- Neuron.Esb
- Neuron.Esb.Pipelines
- Neuron.Pipelines
- NUnit.Framework
Writing the Unit Test
The first step is to decorate the test class with the [TestFixture] attribute.
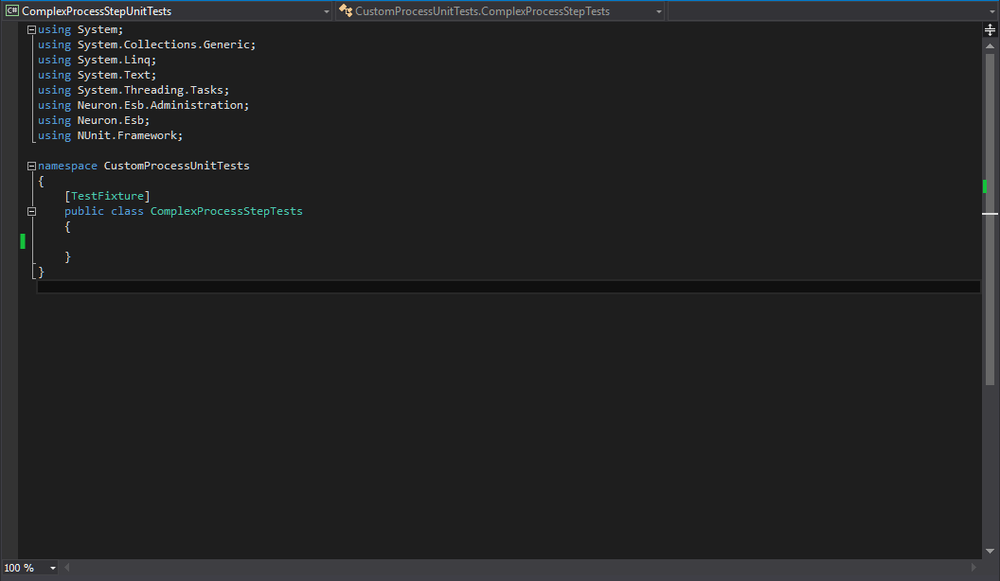
Next, create a method for each test case that needs to be validated against. Decorate each method with the [Test] attribute.

At this point, the solution can be built and the individual tests should appear in the "Test Explorer" window (accessed through Test -> Windows -> Test Explorer) if everything was installed correctly.
To execute a custom process step, the following objects are needed:
- PipelineContext<ESBMessage> contains the needed information for a pipeline (another name for a business process) to run.
- Pipeline<ESBMessage> - this is the object that contains the process step that will be tested. Multiple process steps can be added to this object.
- PipelineRuntime this will be the runtime for the pipeline from which the pipeline instance object will be created. The PipelineRuntime.DesignMode property should be set to "true" for unit testing.
- PipelineInstance<ESBMessage> - this will be an instance of the Pipeline. This is created through the PipelineRuntime.CreateInstance<ESBMessage>() method.
- ESBMessage this is the ESBMessage object that will be used to test the custom process step.
- ESBConfiguration this is needed if the custom process step needs something from a Neuron ESB Configuration, such as credentials, environment variables, etc.
- The Custom Process Step to be tested in this document, the "Complex Custom Process Step" sample from the Neuron Samples is being tested. This can be found in Neuron Explorer under View -> Samples The project from the VS solution can be copied, and then added to the unit test solution.
Since the same PipelineRuntime object and ESBConfiguration will be used for all the tests, they can be instantiated in the constructor. The test class should look something like the following:
Now to create the de-constructor, test setup and teardown, and test case logic. Consider the following code screenshot:
First, a method decorated with the [SetUp] attribute should be created. Since a new Pipeline<ESBMessage> object should be used for each test, the pipeline object should be "reset" here. The method with the [SetUp] attribute will be invoked before each test method is run. Similarly, there should be a method decorated with the [TearDown] attribute to clean up after each test is run. In the de-constructor, the pipeInstance and context objects are disposed, if not null. Notice that the attribute [TestCaseSource(typeof(TestData), "Messages")] has been added to the test method's attributes. This allows NUnit to run the test method with different parameters. The TestData class contains an object array called "Messages". For testing custom processes, different ESBMessage objects can be passed in along with the expected result. Here, since ESBMessage.Text is being tested against, the expected result will be a string.
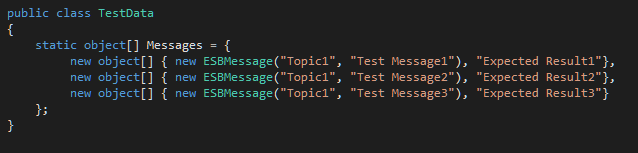
The TestData class referenced in the [TestCaseSource] attribute
The process step to be tested should be instantiated in the test method because different process configurations (i.e. different custom process step property values) would probably be used for each test case. The process step object should be added to the pipeline object's "Steps" collection. Using the pipeline runtime object, a pipeline and configuration can be passed into the runtime's "CreateInstance" method to create a pipeline instance object.
Now, the pipeline context object can be created by passing in the runtime, pipeline, pipeline instance, and ESBMessage objects to the PipelineContext<ESBMessage> constructor. From there, the process step can be executed on the context by calling the process steps "Execute" method with the context object as the parameter.
Using NUnit Framework's "Assert" class, the processed context.Data.Text (context.Data is the resulting ESBMessage) can be tested against the expected value. Of course, this example is a simple test, but the tests that can be created using the Neuron ESB Business API and NUnit are only limited to the capability of the two.
Neuron ESB Process Steps
Testing the built-in process steps provided with Neuron ESB is accomplished the same way as testing a custom process step. However, some of the provided steps need a configuration selector delegate. This can be determined by checking if the DesignModeEsbConfigSelector property exists in the process step's class. For example, the Audit process step uses the DesignModeEsbConfigSelector. To initialize it, the following code could be used:
EsbMessageAuditPipelineStep.DesignModeEsbConfigSelector = new EsbConfigSelectorDelegate(() => { return configuration; });
The "configuration" being returned by the delegate above is an ESBConfiguration object. A given Neuron ESB configuration can obtained by implementing the following code:
using (Administrator admin = new Administrator(@"C:\MyESBConfig"))
{
admin.OpenConfiguration();
configuration = admin.Configuration;
admin.CloseConfiguration();
}
Entire Business Process
Mostly, the construction of a test for an entire business process is the same as a process step. However, there are some differences. Consider the following code screenshot:
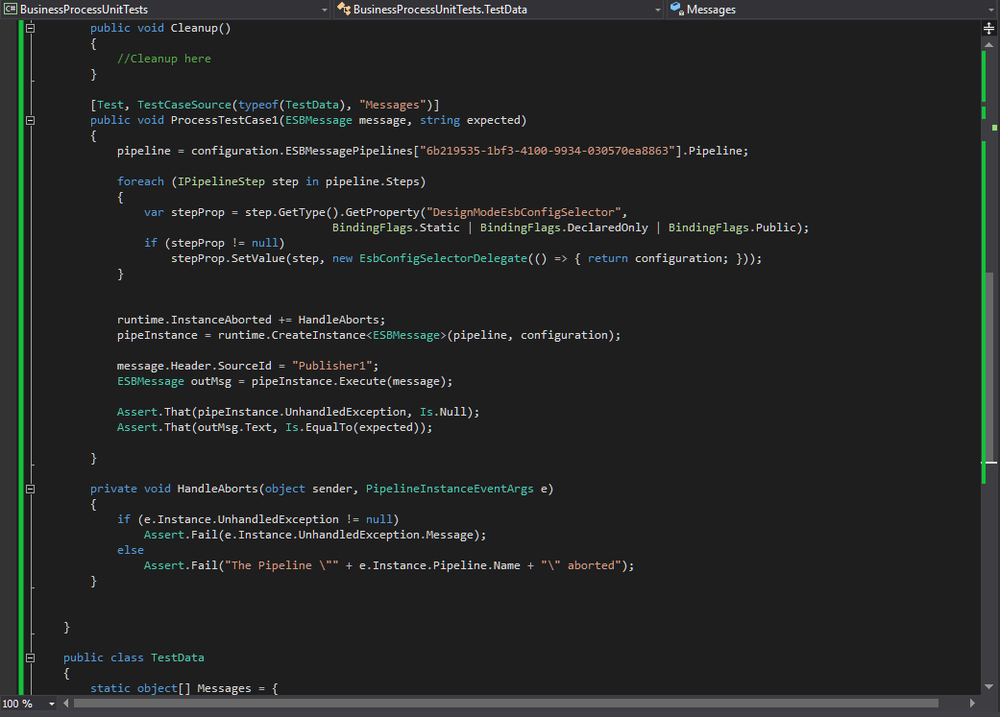
Notice that the pipeline object is being set by retrieving the pipeline definition from the configuration and getting its Pipeline property. In order to accomplish that, the GUID from the "Id" element in the process's definition xml file is needed. The process definition xml file is located in the Neuron configuration folder's "Processes" sub directory (e.g. "C:\MyESBConfig\Processes").
XML file for a process named "New Process 1"
Next, the "foreach" loop initializes the "DesignModeEsbConfigSelector" on any step in the process that uses it. Using reflection, the presence of the "DesignModeEsbConfigSelector" can be detected. Also note that the System.Reflection namespace has been added to the using statements. In order to handle if a pipeline aborts, a handler method should be added to the PipelineRuntime.InstanceAborted event handler. In addition, the ESBMessage's SourceId header property should be set to a valid Party from the configuration selected. This is for any "Audit" steps in the pipeline as a valid SourceId and Topic are needed (Topic is set in the TestData class's Messages object when instantiating the test ESBMessages). Furthermore, the Audit step requires that the ESB Service be running since it uses the Audit Service.
One more step is required for the Audit step to execute properly when testing. The ESBService.exe and ESBService.exe.config files must be copied to the directory where the tests will be run from (e.g. "<VS Project Path>\bin\Debug"). Now notice that instead of calling the pipeline step's "Execute" method, the pipeline instance's "Execute" method is called. This method returns the resulting ESBMessage. The PipelineInstance.UnhandledException should be checked for any non-null value as that means an exception occurred during the execution of the pipeline.
Running the Unit Tests
The unit tests can be run in Visual Studio in the Test Explorer window. This is convenient when developing/modifying the custom process step. The "NUnit 3 Test Adapter for Visual Studio" package installed earlier is what allows this capability. The tests can also be configured to run when the custom process step's project is built in Visual Studio. To do this, set the unit test project's build dependencies to depend on the custom process step project. This will make sure the custom process step is built before the unit test. Then add the following line to the post-build event (after modifying it to fit the test machine):
"<Path to VS Project>\packages Unit.ConsoleRunner.3.6.1\tools\nunit3-console.exe" "<Path to Unit Test dll>"
Using the preceding method of running the tests, in the Error List window of Visual Studio, if there are any failed tests, an error will be displayed with a POSITIVE exit code from NUnit. The positive number is the number of failed tests. The test summary can be viewed in the Output window of Visual Studio. When no tests fail, a test summary similar to the following will be displayed in the Output window:
For build server integration, please see the target build server's documentation. For example, the TeamCity build server from JetBrains is supported natively by NUnit and instructions can be found at: https://confluence.jetbrains.com/display/TCD10/NUnit+for+MSBuild
Source Code
Process Step Unit Test
using System;
using System.Collections.Generic;
using System.Linq;
using System.Text;
using System.Threading.Tasks;
using Neuron.Esb;
using Neuron.Pipelines;
using NUnit.Framework;
using Neuron.Esb.Pipelines;
using Neuron.Esb.Administration;
namespace CustomProcessUnitTests
{
	[TestFixture]
	public class ComplexProcessStepTests
	{
		private PipelineContext<ESBMessage> context;
		private PipelineRuntime runtime;
		private Pipeline<ESBMessage> pipeline;
		private PipelineInstance<ESBMessage> pipeInstance;
		private ESBConfiguration configuration;
		private ComplexProcessStep.MyComplexProcessStep processStep;
		public ComplexProcessStepTests()
		{
			runtime = new PipelineRuntime();
			runtime.DesignMode = true;
			using (Administrator admin = new Administrator(@"C:\MyESBConfig"))
			{
				admin.OpenConfiguration();
				configuration = admin.Configuration;
				admin.CloseConfiguration();
			}
		}
		~ComplexProcessStepTests()
		{
			if (pipeInstance != null)
				pipeInstance.Dispose();
			if (context != null)
				context.Dispose();
		}
		[SetUp]
		public void Init()
		{
			pipeline = new Pipeline<ESBMessage>();
		}
		[TearDown]
		public void Cleanup()
		{
			//Cleanup here
		}
		[Test, TestCaseSource(typeof(TestData), "Messages")]
		public void TestCase1(ESBMessage message, string expected)
		{
			processStep = new ComplexProcessStep.MyComplexProcessStep()
			{
				IsEnabled = true,
				CustomMessage = "My Custom Message"
			};
			pipeline.Steps.Add(processStep);
			pipeInstance = runtime.CreateInstance<ESBMessage>(pipeline,
				configuration);
			context = new PipelineContext<ESBMessage>(runtime, pipeInstance.Pipeline,
				pipeInstance, message);
			processStep.Execute(context);
			Assert.That(context.Data.Text, Is.EqualTo(expected));
		}
		[Test]
		public void TestCase2()
		{
		}
		[Test]
		public void TestCase3()
		{
		}
		}
		public class TestData
		{
		static object[] Messages = {
				new object[] { new ESBMessage("Topic1", "Test Message1"),
				 "Expected Result1"},
				new object[] { new ESBMessage("Topic1", "Test Message2"),
				 " Expected Result2"},
				new object[] { new ESBMessage("Topic1", "Test Message3"),
				 " Expected Result3"}
			};
		}
Complete Process Test
using System;
using System.Collections.Generic;
using System.Linq;
using System.Text;
using System.Threading.Tasks;
using Neuron.Esb;
using Neuron.Pipelines;
using NUnit.Framework;
using Neuron.Esb.Pipelines;
using Neuron.Esb.Administration;
using System.Reflection;
namespace BusinessProcessUnitTests
{
	[TestFixture]
	public class BusinessProcessTests
	{
		private PipelineContext<ESBMessage> context;
		private PipelineRuntime runtime;
		private Pipeline<ESBMessage> pipeline;
		private PipelineInstance<ESBMessage> pipeInstance;
		private ESBConfiguration configuration;
		public BusinessProcessTests()
		{
			runtime = new PipelineRuntime();
			runtime.DesignMode = true;
			using (Administrator admin = new Administrator(@"C:\MyESBConfig"))
			{
				admin.OpenConfiguration();
				configuration = admin.Configuration;
				admin.CloseConfiguration();
			}
		}
		~BusinessProcessTests()
		{
			if (pipeInstance != null)
				pipeInstance.Dispose();
			if (context != null)
				context.Dispose();
		}
		[SetUp]
		public void Init()
		{
			pipeline = new Pipeline<ESBMessage>();
		}
		[TearDown]
		public void Cleanup()
		{
			//Cleanup here
		}
		[Test, TestCaseSource(typeof(TestData), "Messages")]
		public void ProcessTestCase1(ESBMessage message, string expected)
		{
			pipeline = configuration.ESBMessagePipelines["6b219535-1bf3-4100-9934-030570ea8863"].Pipeline;
			foreach (IPipelineStep step in pipeline.Steps)
			{
				var stepProp = step.GetType().GetProperty("DesignModeEsbConfigSelector",
				BindingFlags.Static | BindingFlags.DeclaredOnly | BindingFlags.Public);
				if (stepProp != null)
					stepProp.SetValue(step, new EsbConfigSelectorDelegate(() => {
						return configuration; }));
			}
			runtime.InstanceAborted += HandleAborts;
			pipeInstance = runtime.CreateInstance<ESBMessage>(pipeline,
				configuration);
			message.Header.SourceId = "Publisher1";
			ESBMessage outMsg = pipeInstance.Execute(message);
			Assert.That(pipeInstance.UnhandledException, Is.Null);
			Assert.That(outMsg.Text, Is.EqualTo(expected));
		}
		private void HandleAborts(object sender, PipelineInstanceEventArgs e)
		{
			if (e.Instance.UnhandledException != null)
				Assert.Fail(e.Instance.UnhandledException.Message);
			else
				Assert.Fail("The Pipeline \"" + e.Instance.Pipeline.Name
				+ "\" aborted");
		}
		public class TestData
		{
			static object[] Messages = {
			new object[] { new ESBMessage("Topic1", "Test Message1"),
			 "Expected Result1"},
			new object[] { new ESBMessage("Topic1", "Test Message2"),
			 "Expected Result2"},
			new object[] { new ESBMessage("Topic1", "Test Message3"),
			 "Expected Result3"}
			};
		}
	}
}
Remote Deployment
If the Neuron ESB Client API (i.e. Party) is hosted in remote .NET applications, several Neuron ESB assemblies must be deployed. Generally, if hosting the Neuron ESB Client API in .NET applications, developers should ensure that all dependent assemblies are included in their respective BIN directories or in the search path of their application. The Neuron ESB Client API can be installed directly from the installer. Alternatively, Microsoft Visual Studio developers can use NuGet to download the latest Neuron ESB SDK (Client API):
- NeuronEsb.ClientApi: The Neuron ESB client assemblies This should contain all assemblies required for any Business Process.
If manually deploying dependent assemblies, the base Neuron ESB client assemblies are required:
- Neuron.Esb.dll
- Neuron.Esb.resources.dll
- Neuron.Esb.XmlSerializers.dll
- Neuron.dll
All Business Processes attached to a Party require the following assemblies:
- Neuron.Pipelines.dll
- Neuron.Scripting.dll
- Newtonsoft.Json.dll
If a Business Process is using a Publish Process Step to forward messages to a Rabbit MQ based Topic, the following is required:
- RabbitMQ.Client.dll
If a Business Process is using the Service Endpoint Process Step, the following are required:
- Microsoft.ServiceModel.Channels.dll
- Microsoft.ServiceBus.dll
If a Business Process is using the Compression Process Step, the following are required:
- Xceed.Compression.Formats.v5.8.dll
- Xceed.Compression.v5.8.dll
- Xceed.FileSystem.v5.8.dll
- Xceed.Zip.v5.8.dll
If custom Process Steps or third party assemblies are referenced within a Business Process, those assemblies must be deployed as well.
Tracing and Reporting
When using the Neuron ESB Client API hosted in custom .NET applications, all warnings and exceptions will be reported in the Windows Application Event Log. Additionally, the Neuron ESB TraceSwitch flag can be added to the custom .NET applications app.config file to control the level of logging for the Neuron ESB Client API. Following is an example of the configuration. Any Verbose, Informational, Warning or Error will be written to the default Trace Listener.
<configuration>
<system.diagnostics>
<switches>
<!-- This switch controls ESB trace messages. -->
<!-- Value Meaning -->
<!-- ===== ======= -->
<!-- 0 No tracing -->
<!-- 1 Trace errors -->
<!-- 2 Trace errors + warnings -->
<!-- 3 Trace errors + warnings + info -->
<!-- 4 Trace errors + warnings + info + verbose -->
<add name="esbTraceSwitch" value="3"/>
</switches>
</system.diagnostics>
Read more about tracing in the Tracing APIs section of this document.
Process Step Reference Guide
All Process Steps are in the Process Step Toolbox located in the upper right hand corner of the Business Process Designer. When Process Steps are initially placed onto a Business Process, or when they are mis-configured, they will display a yellow warning icon indicating that configuration of the Process Step is required or incorrect (see Figure 69). Once configured correctly, the icon will be automatically removed.
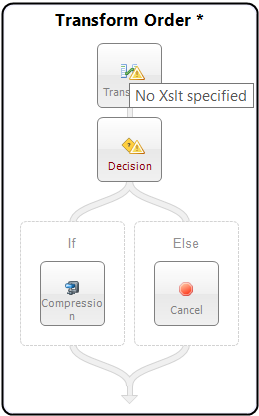
Figure 69: Warning Icon Transform Process Step with warning icon - Used to indicate that a Process Step is mis-configured or requires configuration.
NOTE: Process Steps that are dynamically configured at runtime will always show the yellow warning icon if their respective design time properties are left blank.
Process Steps can be added to any Execution Block within a Process Step by dragging them from the Process Step Toolbox and placing them onto the Execution Block or, by right clicking on the Execution Block and selecting the Process Step from the short cut menu displayed. Selecting any of the Process Steps in the short cut menu will insert the selected Process Step into the Execution Block.
Library
Error Handling
Exception
|
Category: |
Error Handling |
|||||||||||
Class: |
ExceptionPipelineStep |
||||||||||||
Namespace: |
Neuron.Pipelines |
||||||||||||
Assembly: |
Neuron.Pipelines.dll |
||||||||||||
Description: |
|||||||||||||
An Exception Process Step is comprised of three execution blocks: Try, Catch and Finally. Encapsulating process steps inside an Exception step allows for further processing in the event of any errors, similar to the .NET-programming model. For instance, several Process Steps could be placed within the Try Execution Block. If any exception occurs either during design time testing, or run time, control will immediately go to the Catch Execution Block, rather than fault the entire Business Process. Within the Catch Execution Block, the current exception could be examined and corrective action could be taken. Alternatively, the exception could be re-thrown by using the Rethrow Process Step, automatically faulting the entire Business Process, providing that the Exception Step is not contained within another Exception Step. Catch BlockIf a Process Step encounters an exception while processing a message it will throw the exception as the inner exception of a new PipelineException object. The PipelineException object will contain the name of the Business Process and Process Step that generated the exception. If the Process Step is located in the Try Block of the Exception Process Step, flow control will move to the Catch Block. Within the Catch Block, the exception information can be retrieved by accessing the Properties collection of the context object as shown below: var ex = (PipelineException)context.Properties["PipelineException"]; If an Audit Process Step is used and its Action property is set to Failure, its Failure Type and Failure Detail properties will be auto populated by the PipelineException objects inner exception property (i.e. the original exception thrown by the Process Step). Developers can use a .NET Language Code Process Step to implement custom tracing of the information as shown in the example below: var ex = (PipelineException)context.Properties["PipelineException"]; if(context.Instance.IsErrorEnabled) { context.Instance.TraceError("Business Process name = " + ex.Pipeline); context.Instance.TraceError("Process Step name = " + ex.PipelineStep); context.Instance.TraceError(ex.ToString()); } Finally BlockAll Process Steps placed within the Finally Execution Block will always run regardless of how the exception is handled or if an exception is encountered. The Finally execution block would normally be used if there was any necessary cleanup work to be done before the process exits. Any steps contained in the Finally execution block will be executed regardless of whether or not any previous step is executed. Note:Neuron ESB ships a sample demonstrating the Exception Process Step. http://www.neuronesb.com/neuron/Help3/Development/Samples_and_Walkthroughs/Process_Samples/exception_handling_using_neuron_pipelines.htm |
|||||||||||||
Design Time Properties |
|||||||||||||
|
|||||||||||||
Sample |
|||||||||||||
The sample below demonstrates a common reusable exception pattern. The Validate Customer Purchases Business Process has all its business logic encapsulated within the Exception Process Step (Try block). The Catch block has a single Execute Process Step. This calls the Business Process, Exception_Handler_ReThrow. This Business Process is used to enrich the current exception information, call the Audit Process Step with the Action set to Failed, and then re-throw the exception for the Neuron ESB to capture and process normally.
Developers can enrich the current exception information and reset the inner exception so that it will be reported by the Audit Process Step or other parts of the Neuron ESB system or processes. In the sample above, A Business Process named Validate Customer Purchases is constructed with a Validate Customer Process Step. When that process throws an exception, the current information about what process and step generated the information is retrieved within the Enrich Exception C# Process Step located in the Exception_Handler_ReThrow sub process. A new business friendly message (accessing the PipelineException is optional) and exception object is composed and created. The CurrentException property located in the Properties Collection of the context object is then set with this new object and message. The CurrentException property is used internally to reset the current PipelineException objects inner exception property.
var ex = (PipelineException)context.Properties["PipelineException"];
var errorMessage = String.Format(System.Globalization.CultureInfo.InvariantCulture,
	"The order process could not reconcile the customer id " +
	"with the customer name.{0}{1}" + "Error Message: {2}{3}Source Process: {4}{5}" +
	"Source Process Step: {6}",
	Environment.NewLine,
	ex.InnerException.Message,
	ex.Pipeline,
	ex.PipelineStep);
context.Properties["CurrentException"] = new System.Exception(errorMessage);
In the example above, the PipelineException property is retrieved so that the name of the Business Process and Process Step that generated the exception could be used as part of the new exception message. However, if that information was not needed, the CurrentException property could be retrieved instead. When an Audit Process Step that has its Action property set to Failure follows the sample above, the following message will be recorded in the Neuron ESB Failed Messages Report:
|
|||||||||||||

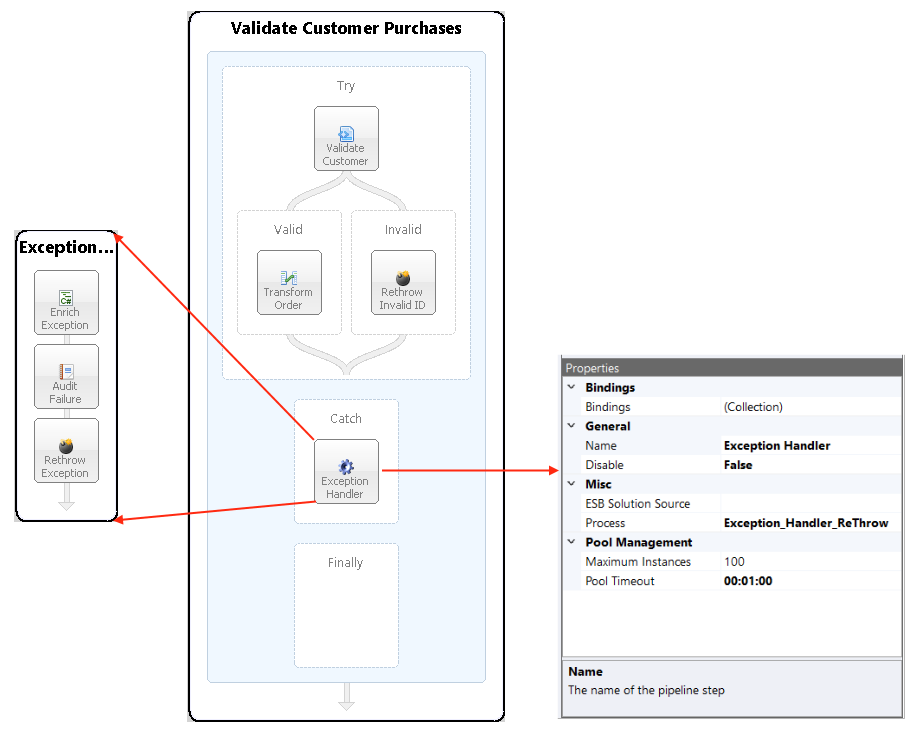
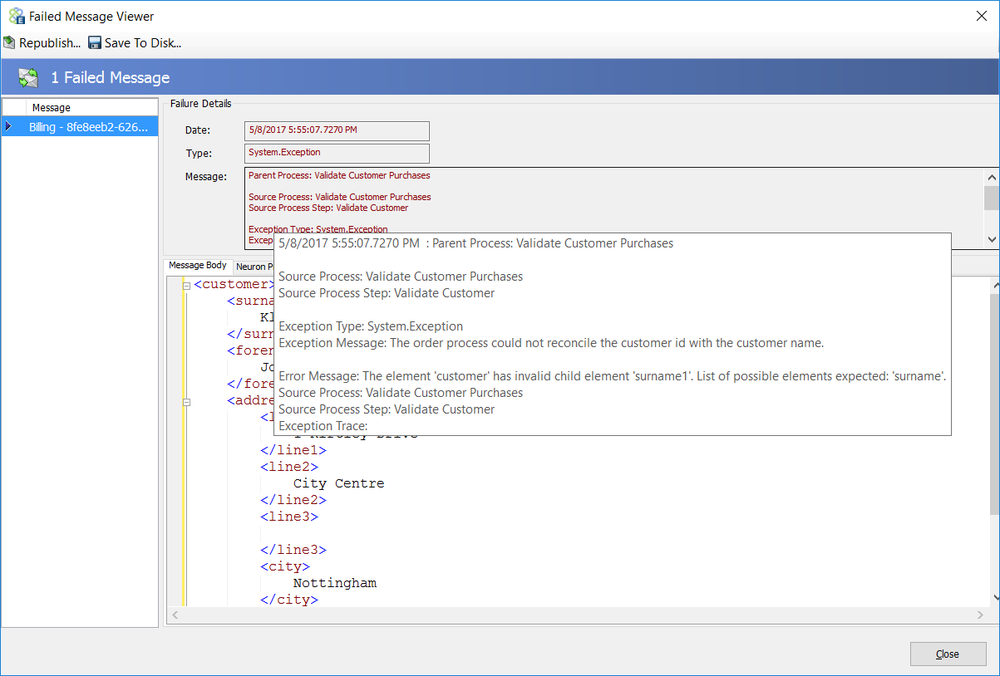
Rethrow
|
Category: |
Error Handling |
|||||||||||
Class: |
RethrowPipelineStep |
||||||||||||
Namespace: |
Neuron.Pipelines |
||||||||||||
Assembly: |
Neuron.Pipelines.dll |
||||||||||||
Description: |
|||||||||||||
The Rethrow Process Step can be placed within the Catch Execution Block of the Exception Process Step or the Invalid branch of the Validate Schema Pipeline Step. When added to a Business Process the current exception that is generated will be re-thrown and, if not caught in another Exception Process Step, will stop and fault the Business Process execution immediately. RemarksBusiness Processes can be used as the sole business logic for a Neuron ESB hosted service (i.e. Client Connector in Request/Reply mode). To configure this, the Business Process must be attached to the OnPublish event of the Party configured for the Neuron ESB Client Connector. By adding the Cancel Step as the last Process Step to an existing Business Process, Neuron ESB will forward the final processed ESB Message back to the calling client as the Reply message rather than to the Topic specified in the ESB Message Headers Topic property. This will only work if the Business Process is attached to the OnPublish event of the Party. For instance, if the same Business Process was attached to the OnReceive event of the Party, the Cancel Step would silently terminate the Reply message that it was processing and the Neuron ESB Client Connector would return a TimeoutException to the calling client. If an exception is thrown by this Business Process either because the exception was not caught or was re-thrown by the ReThrow Process Step, that exception will be converted to a message with the Semantic set to Reply. The exception details will become the body of the message and that message will be forwarded to the original caller. There are Process Steps that, by design, accept messages with the Semantic set to Request. In many cases, if an error is generated during processing, the error is converted to a Reply message and returned to the calling Business Process. Directly after the Process Step, developers can inspect the FaultType property of the ESB Message Header to determine if the message body of the returned Reply message contains the contents of an exception. FaultType can be set to the following enumeration from the Neuron.Esb namespace:
public enum FaultType
{
	None,
	Communication,
	Server,
	Exception
}
However, if the message processed has a Semantic of Mulitcast, the exception will not be converted to a Reply message. Instead the error will be thrown back to the Party (and any Endpoint hosting it) executing the Business Process. Note:Neuron ESB ships a sample demonstrating the Exception Process Step. http://www.neuronesb.com/neuron/Help3/Development/Samples_and_Walkthroughs/Process_Samples/exception_handling_using_neuron_pipelines.htm |
|||||||||||||
Design Time Properties |
|||||||||||||
|
|||||||||||||
Sample |
|||||||||||||
In the Sample below, an incoming message (Semantic == Multicast) is received by the Validate Customer Order Business Process via the OnPublish event of a Party. It uses the Validate Customer (Validate-Schema) Process Step to validate the customer information against an XSD Schema. If valid, control flows to the Valid branch. From there it is forwarded (by the Neuron ESB runtime) to the Topic specified in the ESB Message Headers Topic property. If the message fails validation, it flows to the Invalid branch.
The Invalid branch does not throw an exception. Instead, the Validate-Schema Process Step populates the CurrentException context property with a PipelineException object that contains the original exception generated by the Process Step so its available for developers and the ReThrow Process Step to access: context.Properties["CurrentException"] = new PipelineException(ex.Message, ex) { Pipeline = context.Pipeline.Name, PipelineStep = this.Name }; The ReThrow Process will see that the CurrentException property is populated, retrieve the inner exception object and throw that back to the calling party. If this Business Process is executed through the use of a Neuron ESB Test Client submitting an XML message other than the one received, an error message would appear similar to the one below:
|
|||||||||||||

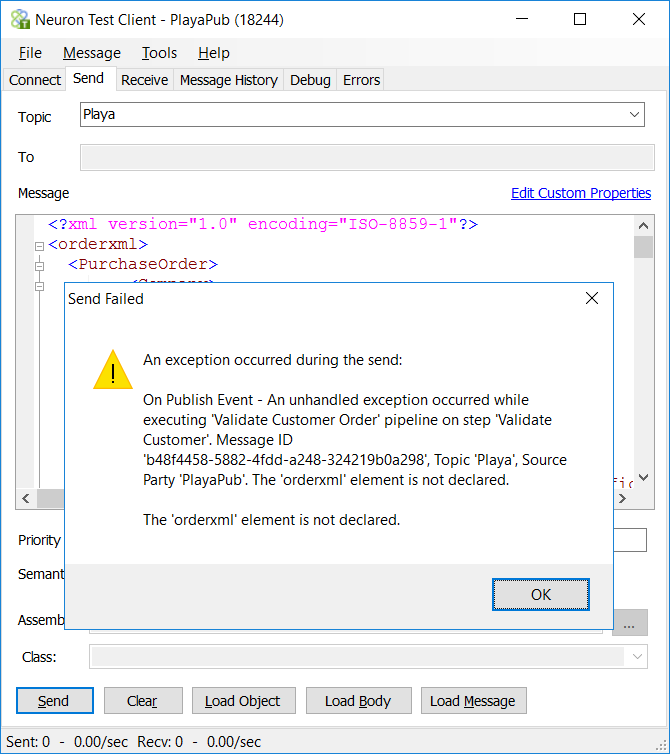
Flow Control
Break
|
Category: |
Flow Control |
|||||||||||
Class: |
BreakPipelineStep |
||||||||||||
Namespace: |
Neuron.Pipelines |
||||||||||||
Assembly: |
Neuron.Pipelines.dll |
||||||||||||
Description: |
|||||||||||||
The Break process step causes a For, For Each or While Process Step (i.e. Loop) to stop, breaking out of their respective execution blocks and, beginning execution at the Process Step immediately following the Loop. Internally, the Break Process Step throws the BreakLoopException exception, passing the name of the Business Process as well as the name assigned to the Loop Step. The exception does not cause an abnormal abort, nor will it be reported as an error within the system. It is caught internally by the Loop Steps. Rather than use the Break Process Step, a developer could throw a BreakLoopException in a .NET Language Code Editor enabled Process Step using the syntax below:
throw new BreakLoopException
{
	Pipeline = context.Pipeline.Name,
	PipelineStep = this.Name
};
The BreakLoopException class definition follows:
public class BreakLoopException : PipelineException
{
	public BreakLoopException() { }
	public BreakLoopException (string message) :
		base(message) { }
	public BreakLoopException (string message,
		Exception inner) : base(message, inner) { }
	protected BreakLoopException (
		SerializationInfo info,
		StreamingContext context)
			: base(info, context) { }
}
Note:Neuron ESB ships a sample demonstrating the Looping Process Steps. http://www.neuronesb.com/neuron/Help3/Development/Samples_and_Walkthroughs/Process_Samples/Using_For_and_While_Loops.htm |
|||||||||||||
Design Time Properties |
|||||||||||||
|
|||||||||||||
Sample |
|||||||||||||
In the Sample below, the steps in the process demonstrate the use of a For Process Step with a Decision Step to determine when the For Loop should break. The For Process Step initializes a counter to zero and increments by one for each iteration. The Decision Step checks the counter, and when it is equal to two the Break Step will execute, and process execution will move to the Audit Process Step.
|
|||||||||||||

Cancel
|
Category: |
Flow Control |
|||||||||||
Class: |
CancelPipelineStep |
||||||||||||
Namespace: |
Neuron.Pipelines |
||||||||||||
Assembly: |
Neuron.Pipelines.dll |
||||||||||||
Description: |
|||||||||||||
The Cancel Process Step explicitly ends the execution of a Business Process, terminating the publishing of the message to the Topic specified in the ESB Message Headers Topic property. This is most commonly used to end a branch in a Decision step or it is used to directly follow a Publish step. Internally, the Cancel Process Step throws the CancelPipelineException exception, passing the name of the Business Process as well as the name assigned to the Cancel step. The exception does not cause an abnormal abort, nor will it be reported as an error within the system. Rather than use the Cancel Process Step, a developer could throw a CancelPipelineException in a .NET Language Code Editor enabled Process Step using the syntax below:
throw new CancelPipelineException
{
	Pipeline = context.Pipeline.Name,
	PipelineStep = this.Name
};
The CancelPipelineException class definition follows:
public class CancelPipelineException : PipelineException
{
	public CancelPipelineException() { }
	public CancelPipelineException(string message) :
		base(message) { }
	public CancelPipelineException(string message,
		Exception inner) : base(message, inner) { }
	protected CancelPipelineException(
		SerializationInfo info,
		StreamingContext context)
			: base(info, context) { }
}
RemarksBusiness Processes can be used as the sole business logic for a Neuron ESB hosted service (i.e. Client Connector in Request/Reply mode). To configure this, the Business Process must be attached to the OnPublish event of the Party configured for the Neuron ESB Client Connector. By adding the Cancel Step as the last Process Step to an existing Business Process, Neuron ESB will forward the final processed ESB Message back to the calling client as the Reply message rather than to the Topic specified in the ESB Message Headers Topic property. This will only work if the Business Process is attached to the OnPublish event of the Party. For instance, if the same Business Process was attached to the OnReceive event of the Party, the Cancel Step would silently terminate the Reply message that it was processing and the Neuron ESB Client Connector would return a TimeoutException to the calling client. |
|||||||||||||
Design Time Properties |
|||||||||||||
|
|||||||||||||
Sample |
|||||||||||||
In the Sample below, an incoming message is received by the Detect Duplicate Messages Business Process via the OnPublish event of a Party. Once a unique ID is obtained, the Detect Duplicates Process Step is used to determine is the message was already received. If the message has not previously received, it flows to the Publish Message branch. From there it is forwarded (by the Neuron ESB runtime) to the Topic specified in the ESB Message Headers Topic property. If the message is a duplicate, it flows to the Yes branch. From here, the Business Process is silently terminated using the Cancel step. From this branch, the message is never forwarded to the Topic. This assumes the Business Process below is receiving an ESB Message with a Semantic of Multicast, rather than Request. This would usually be the case when using an Adapter Endpoint in Publish mode.
|
|||||||||||||

Decision
|
Category: |
Flow Control |
||||||||||||
Class: |
DecisionPipelineStep |
|||||||||||||
Namespace: |
Neuron.Pipelines |
|||||||||||||
Assembly: |
Neuron.Pipelines.dll |
|||||||||||||
Description: |
||||||||||||||
TheDecisionProcess Step allows users to define branching conditions within a Business Process.Conditions may be expressed in C# using the built inModal Code Editor.Conditions are evaluated from Left to Right. Once a condition evaluates to true, the execution block within that branch is executed and evaluation of the remaining branches ends. Additional branches can be added to the Decision Step by selecting the Step, right-clicking and select Add branch from the short cut menu. Branches (Execution Blocks) can be removed by right-clicking on the branch and selecting Remove branch from the short cut menu. Labels for each branch can be changed to a user-defined label by selecting the branchs execution block and changing the Name property within the Process Step Property Page. Each branch (excluding the default Else branch) has a Condition property that can be accessed within the Property page when the branch is selected. The Condition property exposes an ellipsis button that will launch the Modal Code Editor:
|
||||||||||||||
Design Time Properties |
||||||||||||||
|
||||||||||||||
Design Time Properties - Branch |
||||||||||||||
|
||||||||||||||
Sample |
||||||||||||||
In the Sample below, the steps in the process demonstrate the use of a For Process Step with a Decision Step to determine when the For Loop should break. The For Process Step initializes a counter to zero and increments by one for each iteration. The Decision Step checks the counter, and when it is equal to two the Break Step will execute, and process execution will move to the Audit Process Step.
|
||||||||||||||
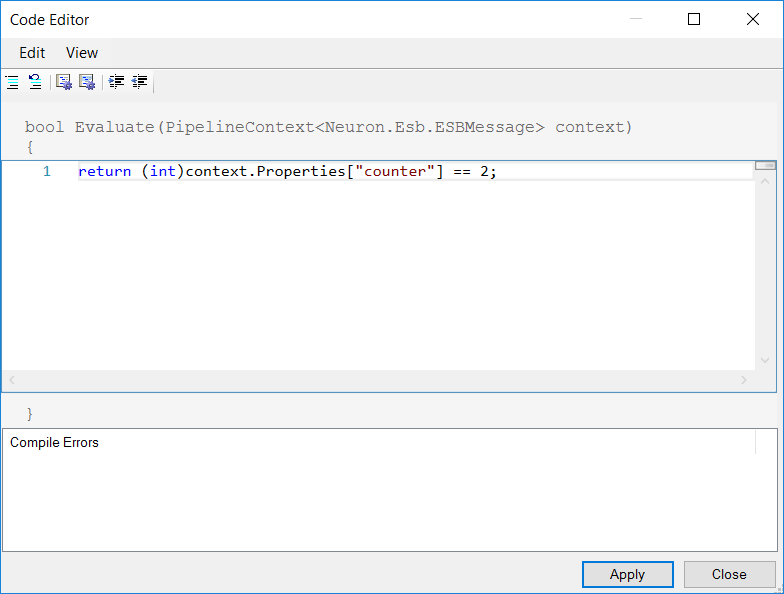
Execute Process
|
Category: |
Flow Control |
|||||||||||||||||||||||
Class: |
EsbMessagePipelineExecutionPipelineStep |
||||||||||||||||||||||||
Namespace: |
Neuron.Esb.Pipelines |
||||||||||||||||||||||||
Assembly: |
Neuron.Esb.dll |
||||||||||||||||||||||||
Description: |
|||||||||||||||||||||||||
The Execute Process Step executes another Business Process contained in the same Neuron ESB solution or in an external Neuron ESB Solution. This Step is used to provide the ability to componentize and reuse Business Processes. For example, a Business Process could be created that either standardizes on the way exceptions are processed (as shown in the Exception Process Step Sample) or that provides some other generic functionality or pattern that other Business Processes can encapsulate (dynamic router, validator or transformation). StateThe Execute Process Step has the ability to pass state and environment information back and forth between the calling Business Process (i.e. parent) and the Business Process being called (i.e. child). The Execute Process Step will pass the parents Pipeline context object to the Business Process that it is configured to execute. The Pipeline Context object represents the Business Process instance and is used to access several things at design time and runtime including the existing Neuron ESB Configuration, Environment Variables, Properties, Party, as well as the current message being processed. This means that any context.State, context.Properties information set in the parent Process will be accessible to the child Process. In addition, if information is added or modified to these collections in the child process, that information will be available in the parent process once control returns to the parent Process. LibrariesIn addition to being able to execute local Business Processes, the Execute Process Step can execute Business Processes residing in remote Neuron ESB Solutions. This is useful for creating and maintaining a library of common Business Processes that can be shared across Neuron ESB Solutions. The ESB Solution Source property must be populated with the folder location of the remote Neuron ESB Solution for this feature to be enabled. Once enabled, the Process property will be auto populated with a list of Business Processes located in the remote Neuron ESB Solution. At runtime, all the Business Processes contained within the remote configuration are retrieved and placed in a cache so that they can be executed if selected. Dynamic ConfigurationIn some scenarios, developers may need to declare which Business Process to execute at runtime, rather than relying on design time configuration. For example, during the course of execution, the logic in the Business Process could be used to determine the type of order to process. The type of order could then be used to determine which child process to execute. If relying on design time configuration, a Decision Process Step could be used, with each Branch configured to run an Execute Process Step, each configured with a different child process. This will work but would become impractical if it required more than half dozen or so branches. Alternatively, dynamically configuring the Process property at runtime, a Decision Process Step would not be needed. Only one Execute Process Step would be used. Directly preceding the Execute Process Step could be a Set Property Process Step or a Code Step. If a Code Step was used, the following ESB Message Property must be set:
context.Data.SetProperty("neuron", "pipelineName","MyProcess");
The Execute Process Step will look for the neuron.pipelineName ESB Message property (if it exists) and extract its value (i.e. MyProcess) which represents the name of the Business Process to execute. If the ESB Message property does not exist, it will default to the design time configuration of the Execute Process Step to determine the Business Process to load and execute. The prefix for all Execute Process custom message properties it neuron and they can be accessed directly from the Neuron ESB Message object using the GetProperty() or GetProperties() methods. All Neuron ESB Message properties can also be set using the Set Property Process Step.
Performance OptimizationsThe Execute Process Step uses a Blocking pool of processes to allow better scale out for concurrency and to eliminate all calls being serialized through one instance of a Business Process (child). There are 2 properties located in the Pool Management property category. Maximum Instances (defaults to 100) and Pool Timeout (defaults to 1 minute). Once the maximum number of Business Process instances have been created, the Pool Timeout determines the amount of time to wait for an existing Business Process instance to become available before throwing a timeout exception. Before a Business Process instance is created, the pool is always checked to see if one already exists. If it does, it retrieves is from the pool and uses it. When complete, the instance is returned to the pool. The Maximum Instances property does NOT define the number of Business Process instances that will always be created at runtime in all circumstances. It only defines the maximum number that could be created. For instance, Business Processes attached to most inbound Adapter Endpoint (Publish mode) will generally only create one pooled instance of a child process as many of the adapters only work with one inbound thread at a time (unless receiving messages from Topics). However, a Client Connector (Neuron ESB hosted service endpoint) could be dealing with many more threads representing concurrent users making service calls. Additionally, if configured with a remote ESB Solution Source, that source will be retrieved and cached (only the Business Processes it contains) at runtime to avoid unnecessary overhead.
|
|||||||||||||||||||||||||
Design Time Properties |
|||||||||||||||||||||||||
|
|||||||||||||||||||||||||
Sample |
|||||||||||||||||||||||||
The sample below demonstrates a common reusable exception pattern. The Validate Customer Purchases Business Process has all its business logic encapsulated within the Exception Process Step (Try block). The Catch block has a single Execute Process Step. This calls the Business Process, Exception_Handler_ReThrow. This Business Process is used to enrich the current exception information, call the Audit Process Step with the Action set to Failed, and then re-throw the exception for the Neuron ESB to capture and process normally.
|
|||||||||||||||||||||||||

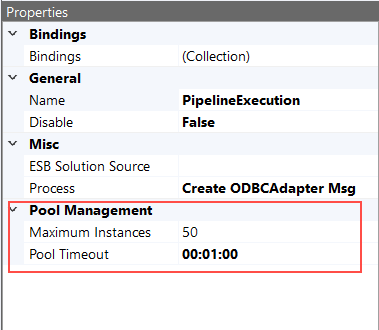
For
|
Category: |
Flow Control |
||||||||||||||||||||
Class: |
ForPipelineStep |
|||||||||||||||||||||
Namespace: |
Neuron.Pipelines |
|||||||||||||||||||||
Assembly: |
Neuron.Pipelines.dll |
|||||||||||||||||||||
Description: |
||||||||||||||||||||||
A loop is a Process Step, or set of Process Steps, that are repeated for a specified number of times or until some condition is met. Neuron ESB provides several types of loops. The type of loop chosen depends on the task and personal preference. The For Step provides a looping mechanism for repeating a set of Steps within an Execution Block for a specified number of iterations. It is useful when you know in advance how many times you want the loop to iterate. The For Step is similar to a C# For loop. It has three main properties that have to be set, the Initializer, Condition and Iterator. All three properties are set by using a C# expression entered in the Modal Code Editor.
InitializerThe Initializer property is executed first and only once before entering the execution block. The C# expression entered in this property is used to initialize a loop control variable stored in the Properties collection of the context instance. The name of the property is user defined and will be referenced in the Condition and Iterator properties. The expression to initialize a variable can be as simple as the following: context.Properties["counter"] = 0; The initializer declares and initializes a local loop variable, counter, that maintains a count of the iterations of the loop. ConditionNext, theConditionis evaluated. If it is true, the sequence of Process Steps in the execution block of the loop are executed. If it is false, the execution block of the loop does not execute and flow of control jumps to the next Process Step just after the For loop. Like the Initializer, the Condition property is set using a C# expression. For instance, if we wanted the sequence of Process Steps to execute four times, our C# Expression would look like this: return (int)context.Properties["counter"] < 4; IteratorAfter the execution block of the For loop executes, the flow of control jumps back up to theIteratorproperty. The Iterator property is used to update any loop control variables (i.e. counter). Like the Condition, the Iterator property is set using a C# expression. In the sample below, the Iterator is incremented by one: var counter = (int)context.Properties["counter"]; context.Properties["counter"] = counter ++; The Condition property is now evaluated again. If it is true, the loop executes and the process repeats itself (execution block of loop, then increment step, and then again testing for a condition). After the Condition becomes false, the For loop ends. Since the Initializer, Condition and Iterator properties are all configured by using the Modal Code Editor, anything can be used to initialize, set the value of, or compare against within the C# expression. For example, other context properties, ESB Message properties, Environment Variables, or content from the ESB Message. Note:Neuron ESB ships a sample demonstrating the Looping Process Steps. http://www.neuronesb.com/neuron/Help3/Development/Samples_and_Walkthroughs/Process_Samples/Using_For_and_While_Loops.htm |
||||||||||||||||||||||
Breaking the LoopThe Break Step provides the ability to stop a loop in the middle of an iteration and continue with the next process step after the loop. During Design Time testing, the Stop Toolbar button is used to stop in the middle of an iteration and abort the rest of the execution of the Business Process. |
||||||||||||||||||||||
Design Time Properties |
||||||||||||||||||||||
|
||||||||||||||||||||||
Sample |
||||||||||||||||||||||
In the Sample below, the steps in the process demonstrate the use of a For Process Step with a Decision Step to determine when the For Loop should break. The For Process Step initializes a counter to zero and increments by one for each iteration. The Decision Step checks the counter, and when it is equal to two the Break Step will execute, and process execution will move to the Audit Process Step.
|
||||||||||||||||||||||

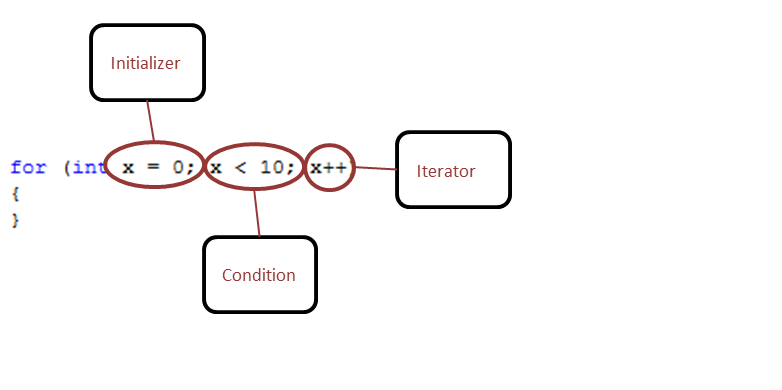
For Each
|
Category: |
Flow Control |
|||||||||||||||||
Class: |
ForEachPipelineStep |
||||||||||||||||||
Namespace: |
Neuron.Pipelines |
||||||||||||||||||
Assembly: |
Neuron.Pipelines.dll |
||||||||||||||||||
Description: |
|||||||||||||||||||
A loop is a Process Step, or set of Process Steps, that are repeated for a specified number of times or until some condition is met. Neuron ESB provides several types of loops. The type of loop chosen depends on the task and personal preference. The For Each Step provides a looping mechanism for repeating a set of Steps within an Execution Block for each element in an array or a collection of items. When working with collections, you are very likely to be using the For Each Process Step most of the time, mainly because it is simpler than any of the other loop for these kind of operations. The For Each Step is similar to a C# ForEach loop. It has two main properties that have to be set, the Collection Property Name and the Item Property Name.
Collection Property NameThe Collection Property Name is the name of the context property that contains the collection that the For Each loop will iterate through. This can be any collection that implements IEnumerable, such as XmlNodeList. This collection must be created in a Code Step preceding the For Each Process Step and saved in a context property of the name that is set in the For Each Process Steps Collection Property Name property. In the sample below, the Neuron ESB Mail API is used to retrieve an email message received by the Neuron ESB Microsoft Exchange Adapter. The email has several file attachments. The collection of attachments are stored in the Properties collection of the context instance using the name set in the property of the For Each Process Step. var email = Neuron.Esb.Mail.EmailMessage.Deserialize(context.Data.Bytes); context.Properties["EmailAttachments"] = email.Attachments; Item Property NameThe item Property Name is the name of the context property that the For Each Process Step will create and populate with an individual item from the collection. This property does not need to be created beforehand by the user. The item will be available to be processed by other Process Steps in the execution block of the For Each loop. This property can be accessed in a Code Step inside the execution block of the For Each Step. In the following C# sample, the Attachment property is retrieved, cast into the Neuron ESB Mail Attachment object. The existing ESB Message payload is set with the attachments content and custom message properties are added for future processing.
var att =
	(Neuron.Esb.Mail.Attachment)context.Properties["Attachment"];
context.Data = context.Data.Clone(false);
context.Data.Bytes = att.Content;
context.Data.SetProperty("email","ContentType",
	att.ContentType);
context.Data.SetProperty("email","Encoding",
	att.Encoding);
context.Data.SetProperty("email","Name",
	att.Name);
Note:Neuron ESB ships a sample demonstrating the Looping Process Steps. http://www.neuronesb.com/neuron/Help3/Development/Samples_and_Walkthroughs/Process_Samples/Using_For_and_While_Loops.htm |
|||||||||||||||||||
Breaking the LoopThe Break Step provides the ability to stop a loop in the middle of an iteration and continue with the next process step after the loop. During Design Time testing, the Stop Toolbar button is used to stop in the middle of an iteration and abort the rest of the execution of the Business Process. |
|||||||||||||||||||
Design Time Properties |
|||||||||||||||||||
|
|||||||||||||||||||
Sample |
|||||||||||||||||||
In the figure below, the steps in the process demonstrate the use of a For Each Process Step to publish the file attachments contained within an email message to a specified Topic. After all the attachments are published as individual messages, the original email message body is published to the Topic specified in the ESB Message Headers Topic property. The following describe the process in more detail:
|
|||||||||||||||||||

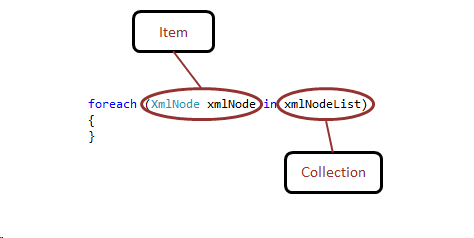

Parallel
|
Category: |
Flow Control |
||||||||||||||
Class: |
EsbMessageParallelStep |
|||||||||||||||
Namespace: |
Neuron.Esb.Pipelines |
|||||||||||||||
Assembly: |
Neuron.Esb.dll |
|||||||||||||||
Description: |
||||||||||||||||
TheParallelProcess Step allows Process Steps or a sequence of Process Steps to run concurrently within a Business Process. This can be used to control the logical flow of the business process, allowing multiple functionalities to run concurrently, reducing the overall processing time. Service composition/aggregation patterns are a good example where this is often applied. In those scenarios, an incoming request message is submitted to multiple services and the responses need to be aggregated and returned to the calling client. Process Steps (or a Sequence of Process Steps) are added to an Execution Block of a Parallel Steps Branch. Each Branch has a Condition property that is evaluated at runtime to determine if the Execution Block of the Branch will run. The Condition property can be accessed within the Property page when the branch is selected. The Condition property exposes an ellipsis button that will launch the Modal Code Editor. Conditions may be expressed in C# and must return either True or False.
Additional branches can be added to the Parallel Step by selecting the Step, right-clicking and select Add branch from the short cut menu. Branches (Execution Blocks) can be removed by right-clicking on the branch and selecting Remove branch from the short cut menu. Labels for each branch can be changed to a user-defined label by selecting the branchs execution block and changing the Name property within the Process Step Property Page. Branch Labels MUST BE UNIQUE. BranchesA different thread executes each Branch by default. This requires that each Branch receive not only a copy of the original message, but also a new context instance. This ensures that one Branchs processing does not affect another Branchs processing. In short:
Within a Branch, developers have access to all the state mechanisms that they would normally have access to in a Business Process (i.e. Properties Collection of the context instance, context.State and ESB Message properties). When working with the Properties Collection, the information added to the collection in Branch can be retrieved in a Code Process step following the Parallel Process Step by preceding the property name with the Branch name. For example, in a C# Process Step in a Branch named Branch1 may have the following code: context.Properties["myProp"] = "my custom data"; The value of the myProp property could later be retrieved after the Parallel Step completes by preceding the property name with the Branch name i.e. var propValue = context.Properties["Branch1.myProp"]; Within a Branch, the name of the current Branch can be retrieved by accessing the CurrentBranch property of the Properties Collection using the following syntax: var myBranchName = context.Properties["CurrentBranch"] as string; Post Parallel ProcessingControl only moves to the Process Step following the Parallel Step once ALL the Branches complete their execution. If an exception is thrown within a Branch, it will abort the execution of all Branches and the Business Process (unless contained within an Exception Process Step). It is recommended that all Process Steps in a Branchs Execution Block be contained within an Exception Process Step. After the execution of the Parallel Process Step, all of the ESB Messages and property values set within each Branch can be accessed within any Code Process Step
var messages = (Dictionary<string,
	ESBMessage>)context.Properties["Messages"];
foreach(var msg in messages)
{
	// print out the messages. Where "msg.Key" is
	the name
	// of the Branch and "msg.Value = context.Data(), the
	// Neuron ESB Message generated by the Branch
	context.Instance.TraceInformation(msg.Key + " - "
	+ msg.Value.Text);
}
Since all the ESB Messages are contained within a collection, optionally, each ESB Message can be accessed using a For Each Process Step. The following syntax could be used in a Code Process Step within a For Each Process Step: var message = (KeyValuePair<string,ESBMessage>)context.Properties["Message"]; // print out the messages. Where "message.Key" is the name of // the Branch and "message.Value = context.Data(), the // Neuron ESB Message generated by the Branch context.Instance.TraceInformation(message.Key + " - " + message.Value.Text); |
||||||||||||||||
Design Time Properties |
||||||||||||||||
|
||||||||||||||||
Sample |
||||||||||||||||
The figure below depicts the Call Provider Services Business Process that uses the Parallel Step to call two different SOAP based services in parallel. This Process essentially is a re-factorization of the existing Scatter Gather Sample, which is included in the Neuron ESB installation process. Note:Neuron ESB ships a sample demonstrating the Scatter Gather Pattern. http://www.neuronesb.com/neuron/Help3/Development/Samples_and_Walkthroughs/Patterns/web_service_scatter_gather_pattern_using_neuron_pipelines.htm The original Scatter Gather sample demonstrates retrieving the meta data of N number of services at runtime and using the Split Process Step to call all the services asynchronously, dynamically configuring all the Process Steps involved. It assumes that the information regarding which services to call is ONLY available through a runtime invocation.
The Call Provider Services Business Process demonstrates an alternative way to accomplish the asynchronous execution of each service, providing that the services to call are known at design time, rather than at runtime. Using the Split Process Step, every message MUST be processed by Steps included in the one Execution Block. Hence, it can be used for dynamic runtime configuration scenarios. In contrast, each Branch in a Parallel Step has its own Execution Block, allowing for a unique set of Process Steps to exist in each Branch. Each Branch in the Parallel Step represents a service to call (i.e. Kmart and Walmart). The following describes each Branch in more detail:
After the Parallel Step has finished, a For Each Process Step iterates through the collection of response messages received by the Branches. Within the For Each Step, several methods could be used to aggregate the response message including using the Transform XSLT Process Step. This sample uses the C# Class Process Step. Following is the contents of that class:
#define DEBUG
#define TRACE
using System;
using System.Collections;
using System.Collections.Generic;
using System.Collections.Specialized;
using System.Data.DataSetExtensions;
using System.Linq;
using System.Xml.Linq;
using System.Xml;
using Neuron.ServiceModel;
using Neuron.Pipelines;
using Neuron.Esb;
using Newtonsoft.Json;
using Newtonsoft.Json.Linq;
namespace Neuron.Esb.Sample.Services
{
	public class ResponseFactory :
		Neuron.Pipelines.PipelineStep<Neuron.Esb.ESBMessage>
	{
		// Declared variables
		System.Text.StringBuilder sb = new System.Text.StringBuilder();
		int totalMessageCount = 0;
		int totalMessagesProcessed = 0;
		protected override void OnExecute(
		PipelineContext<Neuron.Esb.ESBMessage> context)
		{
			// Get total number of messages in collection to process
			if(totalMessageCount == 0)
			totalMessageCount = ((Dictionary<string, ESBMessage>)
			context.Properties["Messages"]).Count;
			// Get a message from the collection
			var message = (KeyValuePair<string,ESBMessage>)context.Properties["Message"];
			// Write the XML Root element
			if(totalMessagesProcessed == 0) sb.AppendLine("<QuoteCollection>");
			// Append the current branch message to the new response
			message
			sb.AppendLine(message.Value.Text);
			// Increment the processed counter
			totalMessagesProcessed ++;
			// Close and finalize Response message. Set response message
			// as body of ESB Message. Clean up variables
			if(totalMessagesProcessed == totalMessageCount)
			{
				sb.Append("</QuoteCollection>");
				context.Data.Text = sb.ToString();
				sb.Clear();
				totalMessagesProcessed = 0;
				totalMessageCount = 0;
			}
		}
	}
}
The Cancel Process Step placed as the last Step in the process forces the final message to be returned as the Reply message to the original caller. |
||||||||||||||||
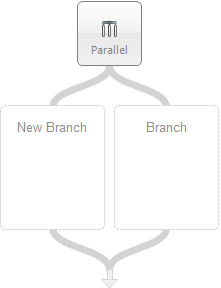
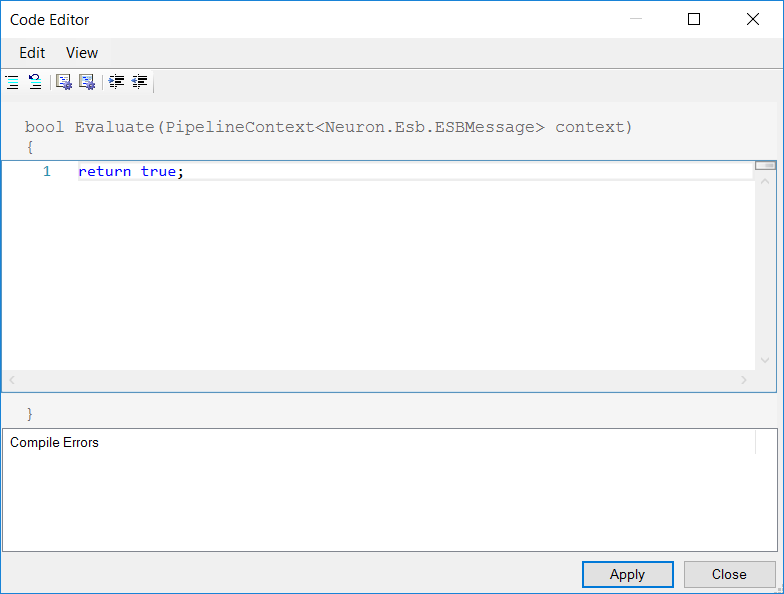
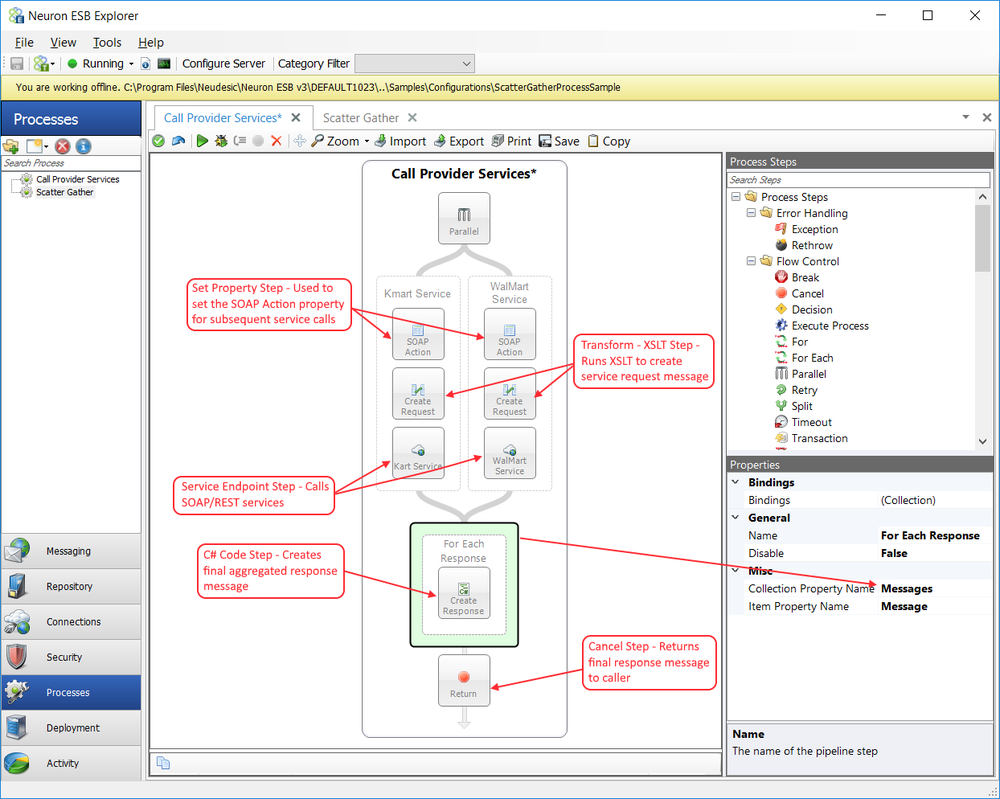
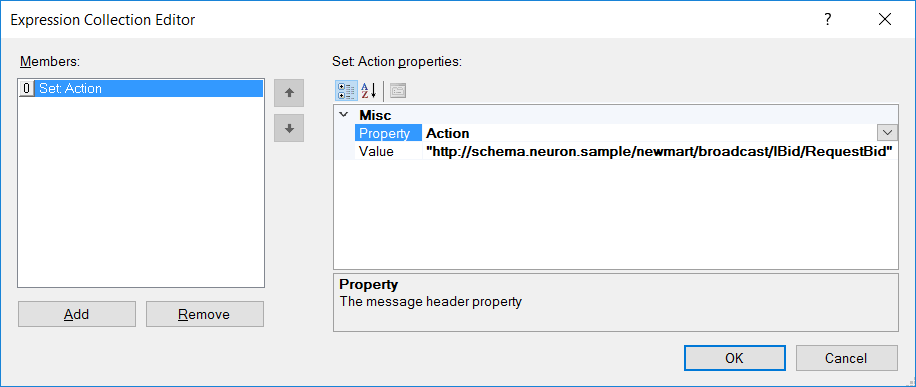
Retry
|
Category: |
Flow Control |
|||||||||||||||||||||||
Class: |
RetryPipelineStep |
||||||||||||||||||||||||
Namespace: |
Neuron.Pipelines |
||||||||||||||||||||||||
Assembly: |
Neuron.Pipelines.dll |
||||||||||||||||||||||||
Description: |
|||||||||||||||||||||||||
TheRetryProcess Step can be used to wrap any other Process Step or steps placed within the Execution Block in retry logic. It is most commonly used to help overcome problems such as timeouts and communication exceptions. It can also be used to retry on any exception. For example, Service and Adapter Policies have Retry semantics built into them to use when Service or Adapter Endpoints receive messages through Topic based subscriptions (i.e. via Messaging). However, these Policies do not apply when Service or Adapter Endpoints are called directly in a Business Process using a Service or Adapter Endpoint Process Step. In those cases, users could implement their own retry policy by using the Retry Process Step RemarksIf the ErrorType property is set to Communication, both Communication and Timeout exceptions will be caught. Note:Neuron ESB ships a sample demonstrating the Retry Step. http://www.neuronesb.com/neuron/Help3/Development/Samples_and_Walkthroughs/Process_Samples/retry_web_service_call_using_neuron_pipelines.htm |
|||||||||||||||||||||||||
Design Time Properties |
|||||||||||||||||||||||||
|
|||||||||||||||||||||||||
Sample |
|||||||||||||||||||||||||
In the Figure below, the Retry Service Call Business Process is used to process an incoming message containing new hire information. It first tries to call a Service Endpoint to retrieve updated information about the new hire. If found, the returned information is published to the HR.Employee Topic for further processing. The Service Endpoint is configured with the Retry Step to attempt 3 retries if the call throws an exception. If the Service Endpoint exhausts its retries, the exception is thrown, caught and audited. Then the original message is retrieved and published to the Topic, HR.Hires. If the updated information is NOT found, the original message is retrieved and published to the HR.Hires Topic as well. The following process in more detail:
|
|||||||||||||||||||||||||
Split
|
Category: |
Flow Control |
||||||||||||||||||||||||||
Class: |
XPathEsbMessageSplitter |
|||||||||||||||||||||||||||
Namespace: |
Neuron.Esb.Pipelines |
|||||||||||||||||||||||||||
Assembly: |
Neuron.Esb.dll |
|||||||||||||||||||||||||||
Description: |
||||||||||||||||||||||||||||
The Split Process Step (labeled Split and Join) is a composite Process Step that contains a Splitter, Execution Block (labeled Steps) and Aggregator sections. The Split Step can be used to control the flow of the business process by having a specific set of Steps operate on small portions of a larger message, either synchronously or asynchronously. For example, a purchase order published to the bus may contain several individual order line items that must be processed separately. Batch file processing is another common scenario, which requires the ability to split and process the individual parts of the original message as separate distinct messages. Often, these individual messages are sent for processing using a request-reply message exchange pattern. The responses can be collected and joined together for either further processing or as a return message to the original sender. The Splitter can use an XPath expression or C# code (using the Modal Code Editor) to split the incoming message (Batch) into individual message parts. Each message part is represented as an ESB Message and sent to the Execution Block for continued processing. The Steps within the Execution Block are executed for each individual message split from the Batch. The Aggregator section of the Step can be configured to re-join the individual messages back into a larger Batch message. The Aggregator can enclose the individual messages in an XML tag, use C# code to process them into a larger Batch message or be set to Null and not perform any aggregation, allowing the original incoming Batch message to be forwarded to the next Process Step following the Split Process Step. SplitterThe Splitter disassembles an incoming message into its constituent messages based on either an XPATH expression or custom C# code. The messages are returned to the Execution Block as a collection of Pipeline Context objects. Each Pipeline Context contains an individual message: PipelineContext<ESBMessage> Each individual message in the Pipeline Context is created by cloning the original incoming message and replacing the body with that of the individual message to ensure a Parent/Child relationship between the incoming message and each individual message. XPATHThe Splitter supports two types of methods for splitting incoming messages: XPATH or Code. Using an XPATH statement to disassemble the incoming message is the default. The split type can be changed through the right click context menu of the Split Step:
The XPath property becomes visible in the property grid when the XPath split type is selected. The value of the property is used internally to create a set of elements using the System.Xml.Linq.XDocument API, each of which will be converted to an ESB Message as shown in the following pseudo code. var document = context.Data.ToXDocument(); var nodes = document.XPathSelectElements(XPath); The XPath value can be standard notation XPATH 1.0. If namespaces exist in the incoming message, then the XPATH statement entered must be qualified. Once the set of elements has been created, they are looped through, each one creating a new Pipeline Context object with an ESB Message. The collection of Pipeline Context objects are passed to the Execution Block once all the elements have been iterated through. If the Synchronous property of the Split Step is set to False, then the Parallel.ForEach of the .NET Task Parallel Library will be used to loop through the set of elements, with the degree of Parallelism set to the number of CPU/Cores installed on the machine. CodeThe Code split type for splitting incoming messages is useful when receiving complex XML files where using a simple XPATH cannot be used. It is always used to disassemble NON XML incoming messages. When the Code split type is selected, the Edit Code context menu will become available on the Splitter Step of the Split Step. The Code property also becomes visible, exposing an ellipsis button, both of which will launch the Modal Code Editor:
The method template of the Code Editor must return a collection of Pipeline Context objects. The sample below demonstrates using C# to perform a similar batch split that the XPATH option of the Splitter does.
// Get the incoming message as an XmlDocument and run
// an XPATH against it to return the set of nodes
var document = context.Data.ToXmlDocument();
var nodes = document.SelectNodes("Orders/Order");
var list = new List<PipelineContext<ESBMessage>>();
// Loop through all nodes, creating a Pipeline Context
// for each node
foreach(var node in nodes)
{
	var clone = context.Data.Clone(false);
	clone.Text = node.ToString();
	list.Add(this.NewContext(context, clone));
}
// Return the collection to the Execution Block
return list;
Execution BlockProcess Steps (or a Sequence of Process Steps) are added to an Execution Block. At runtime, the Execution Block is executed for each message dissembled from the Batch by the Splitter. If the Synchronous property of the Split Step is False, a different thread executes the Steps enclosed within the Execution Block for each message. This means that each thread will execute its own instance of the Execution Block. The number of instances is determined by the value of the Maximum Thread Count property for the Split Step. This requires that the Execution Block receive not only the individual message, but also a new context instance along with it, similar to the Branches in the Parallel Step. This ensures that one messages processing does not affect another messages processing. In short:
Within the Execution Block, developers have access to all the state mechanisms that they would normally have access to in a Business Process (i.e. Properties Collection of the context instance, context.State and ESB Message properties). When working with the Properties Collection, the information added to the collection in an Execution Block cannot be retrieved later in Process Steps that follow the Split Step, or accessed by other messages processed by another instance of the Execution Block. If the Synchronous property of the Split Step is True, then the Execution Block will run as a For Each Loop on a single thread, only processing the next message once the first message has completed. However, everything else (i.e. each message has its own context instance) remains the same. After the first message completes processing, the next message with a new context instance is processed, and so on. Once all the messages have been processed by the Execution Block, the results are returned to Aggregator as a collection of context instances along with the original incoming message and its context instance i.e. IEnumerable<PipelineContext<ESBMessage>> AggregatorOnce ALL the messages are processed by their respective instance of the Execution Block and its associated process steps, control is passed to the Aggregator portion of the Split process step. Within the Aggregator, the process runtime can either reassemble all the individual Neuron ESB messages, which were processed by the Execution Block back, or discard them. How the Aggregator functions is determined by the value of the "join type" property.
NullIf the join type selected is Null, the Split Process Step will discard the individual messages that were processed and forward the original incoming message to the process step directly following the Split Step. WrapperIf the join type selected is Wrapper, the Split Process Step will reassemble each message output by the Execution Block. It will use the element tag and namespace specified in the WrapperElementName and WrapperElementNamespace (optional) to construct an XML root node to encapsulate all of the output messages. For example, if the following property values were used: WrapperElementName = Orders WrapperElementNamespace =urn:www-neuronesb-com:orders The result that the Join would produce from the original message follows, providing each output message had an OrderResult XML root node: <Orders xmlns="urn:www-neuronesb-com:orders"> <OrderResult></OrderResult> <OrderResult></OrderResult> </Orders> This message will be forwarded to the next Process Step that follows the Split Step. CodeWhen using the Code join type, the original context instance (which contains the original unaltered incoming message i.e. Neuron.Esb.ESBMessage) as well the collection of messages and context objects processed by the Execution Block, are passed into the Code Editor as arguments represented by the variables "context" and "splits".
As shown in the following code fragments, entirely custom xml can be created to aggregate the messages collected from the Execution Block by iterating through the splits collection using a For Each loop. Using StringBuilder:
var sb = new System.Text.StringBuilder();
// Add the Root element
sb.AppendLine("<Orders>");
// Add all child messages to root element
foreach (var ctx in splits)
	sb.AppendLine(ctx.Data.Text);
// Close the root
sb.Append("</Orders>");
//Replace original request message with new aggregated
//message. ensure new message retains a Parent/child
//relationship
context.Data = context.Data.Clone(false);
context.Data.FromXml(sb.ToString());
Using an XmlTextWriter:
using (System.IO.StringWriter sw = new
System.IO.StringWriter())
{
using(XmlTextWriter xw = new XmlTextWriter(sw))
{
	//writes <Orders> root element
	xw.WriteStartElement("Orders");
	foreach(var c in splits)
	{
		//adds <OrderResult>...</OrderResult>
		xw.WriteRaw(c.Data.ToXml());
	}
	//writes </Orders>
	xw.WriteEndElement();
	xw.Flush();
}
//Replace original request message with new aggregated
//message. ensure new message retains a Parent/child
//relationship
context.Data = context.Data.Clone(false);
context.Data.FromXml(sw.ToString());
}
As indicated in the code fragments above, to return the newly created aggregated message to the remaining steps of the process, the body of Neuron.Esb.ESBMessage assigned to the current context (represented by the context.Data variable) must be replaced with a new aggregated message body. RemarksIf the Synchronous property is set to True, the Split Step becomes ideal for scenarios where an XPATH statement is used to dissemble an incoming message. The Split Step provides a simple, no code solution for both disassembling the incoming message and aggregating the results. With Synchronous set to True, the disassembling and processing through the Execution Block are essentially two back-to-back For Each Loops. Therefore, if more complex criteria is required to disassemble an incoming message, requiring the split type to be set to Code, users should consider using the For Each Process Step instead, unless there is a requirement for each message to be processed with its own pipeline context object. That is because after the Splitter creates the raw collection of data items, it then has to loop through each data item, converting each into a Neuron.Esb.EsbMessage within a new context instance. In contrast, a For Each Process Step can iterate through the raw collection of data items, as long as there was not a need to have a unique context instance in each loop iteration. This would eliminate the second step of the Splitter i.e. creating the collection of context instances. However, if concurrent processing (Synchronous set to False) of the dissembled individual messages is required, then the Split Step should always be used. The more complex processing required in the Execution Block (i.e. more Process Steps), the more beneficial the concurrent processing becomes to enhance overall performance. Testing must be done to determine the ideal number of threads to assign to the Maximum Thread Count property. Users should start with the number of threads equaling the number of CPU/Cores installed and then gradually increase. Additionally, the larger the incoming batch message (number of rows in the message and size of rows), the more time it will take for the Splitter to compose the final collection of context instances to pass to the Execution Block. This needs to be weighed against the time for total execution. |
||||||||||||||||||||||||||||
Design Time Properties - Split |
||||||||||||||||||||||||||||
|
||||||||||||||||||||||||||||
Design Time Properties - Splitter - XPath |
||||||||||||||||||||||||||||
Design Time Properties - Splitter - Code
Design Time Properties - Aggregator - Wrapper
Design Time Properties - Aggregator - Code
|
||||||||||||||||||||||||||||
Sample |
||||||||||||||||||||||||||||
Note:Neuron ESB ships three samples demonstrating the Split Step. http://www.neuronesb.com/neuron/Help3/Development/Samples_and_Walkthroughs/Process_Samples/splitting_messages_with_join.htm |
||||||||||||||||||||||||||||
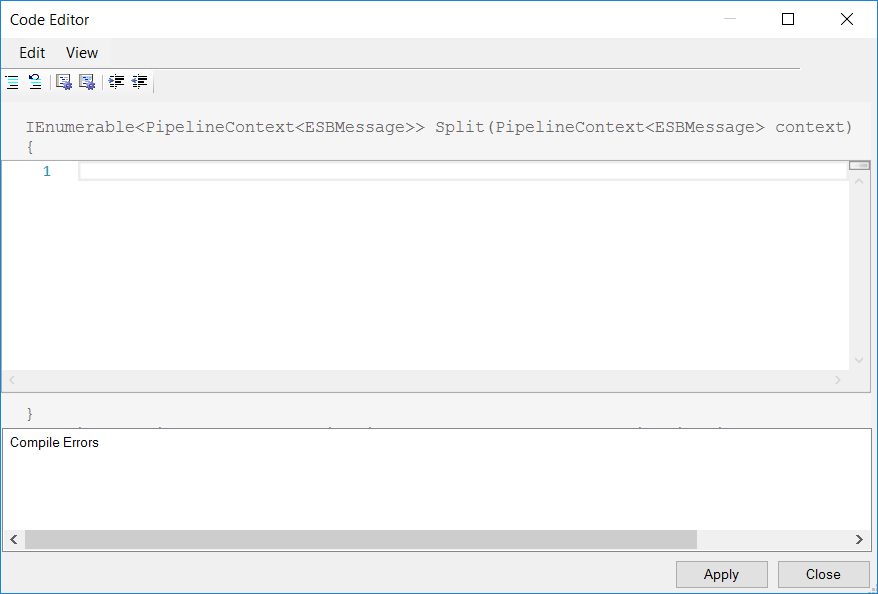
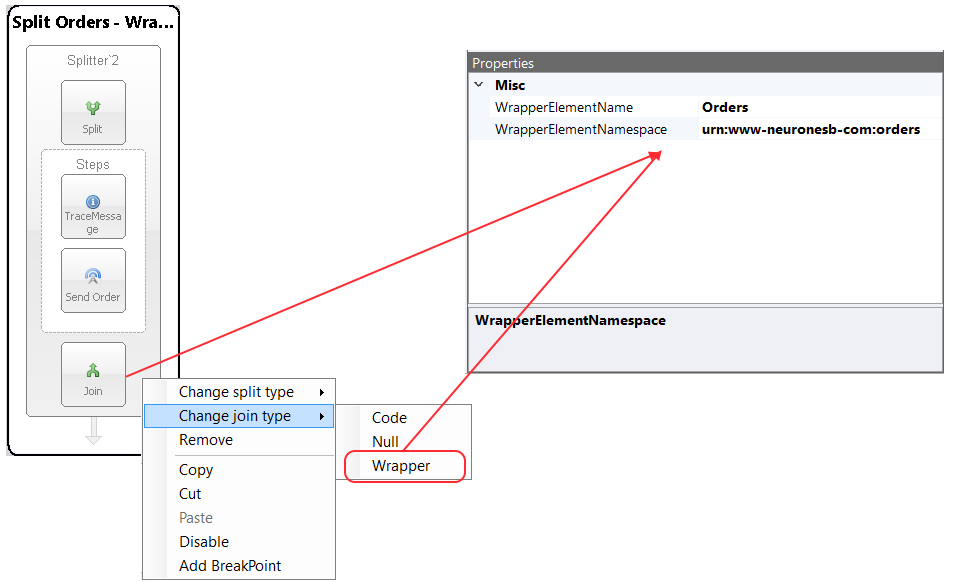
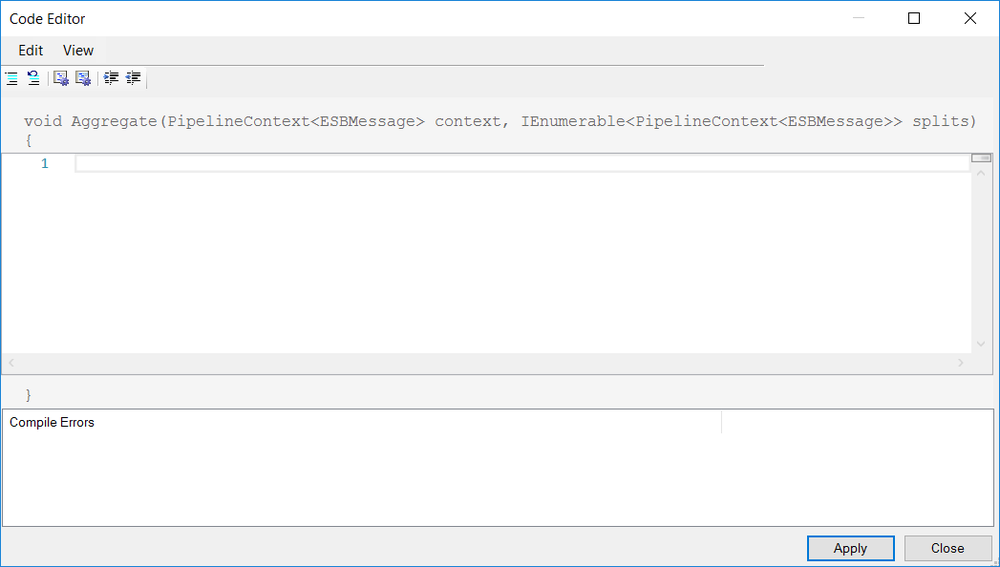
Timeout
|
Category: |
Flow Control |
||||||||||||||
Class: |
ContainerPipelineStep |
|||||||||||||||
Namespace: |
Neuron.Pipelines |
|||||||||||||||
Assembly: |
Neuron.Pipelines.dll |
|||||||||||||||
Description: |
||||||||||||||||
The Timeout Process Step executes the contained Process Steps on a background thread. To succeed, the contained Process Steps needs to complete successfully before the timeout period expires, otherwise a timeout exception will be raised to the Business Process. For example, if the Timeout Process Step is configured for 5 seconds, the contained steps must complete their execution before the 5 seconds expires, otherwise a timeout exception will be thrown to the underlying Business Process. Even though the contained Process Steps are executed on a background thread, the Timeout process step executes synchronously. The Business Process will not continue until either the contained Process Steps complete or a timeout occurs. The Timeout Process Step is compatible with the use of atomic transactions such as transactional MSMQ topics. If a transaction is active when the Business Process runs, the contained Process Steps will execute within the context of the transaction that the Business Process is participating. Failure of the contained Process Steps will cause the transaction to roll back and the message will be returned to the partys message queue. Although this cannot generally be used to abort a poorly constructed looping scenario, a cancellation token has been built into the context object, which can trigger the termination of the processing occurring in the background thread. This will only happen between Process Steps. For example, the Timeout Process Step would not terminate the following constructed loop if used in a C# Code Process Step:
while (true)
{
	// Do something here
	System.Threading.Thread.Sleep(1000);
}
However, if the loop were reconstructed to use the Cancellation Token, the loop (and the background processing thread) will be terminated directly by the Timeout Process Step by using the IsCancellationRequested property of the CancellationToken object of the context object.
while (!context.CancellationToken.IsCancellationRequested)
{
	// Do something here
	System.Threading.Thread.Sleep(1000);
}
NOTE: Inspecting the context.CancellationToken.IsCancellationRequested property to determine when to exit a custom loop will work during runtime execution. This will not work during design time testing within the Process Designer. The Timeout Step will throw an exception however, the statements within the while loop will continue to execute in the background until the Neuron ESB Explorer is closed. |
||||||||||||||||
Design Time Properties |
||||||||||||||||
|
||||||||||||||||
Sample |
||||||||||||||||
In the Sample below, the Timeout Process Steps Timeout value is set to five seconds. Within the Execution Block, there is a C# Code Step configured to write out to the Trace Window every second in a While loop. The While loop uses the IsCancellationRequested property of the context instance to determine if the Timeout has been exceeded and when to break out of the loop. Once the Timeout has exceeded, a TimeoutException is thrown and caught in the Exception Steps Catch block. The message is audited and the Business Process is terminated using the Cancel Step.
|
||||||||||||||||
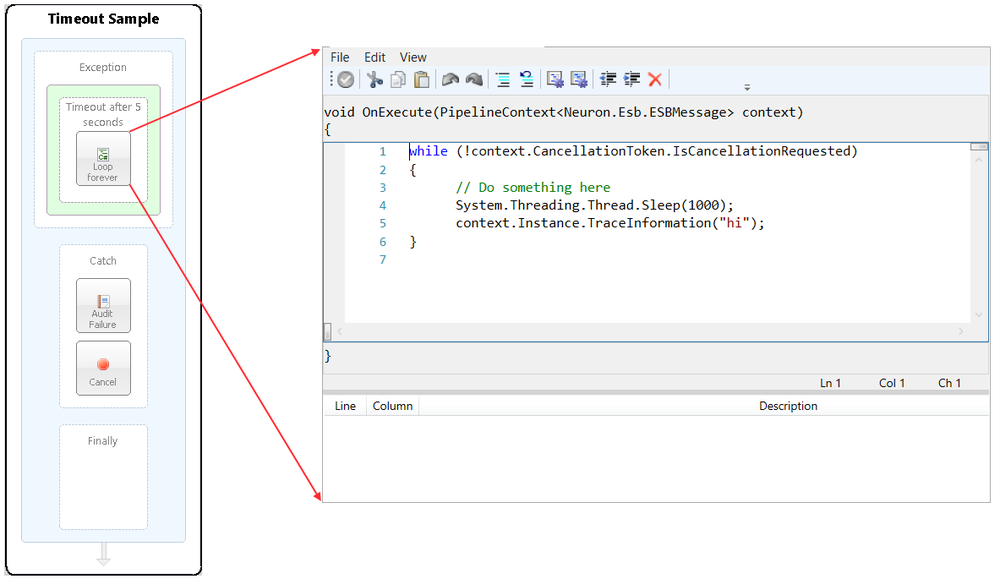
Transaction
|
Category: |
Flow Control |
|||||||||||||||||
Class: |
TransactionPipelineStep |
||||||||||||||||||
Namespace: |
Neuron.Pipelines |
||||||||||||||||||
Assembly: |
Neuron.Pipelines.dll |
||||||||||||||||||
Description: |
|||||||||||||||||||
TheTransactionProcess Step can be used to enclose other Process Steps (that support atomic Transactions or an XA resource compliant Transaction Manager) inside a transaction scope by placing them within the Transaction Execution Block. This step uses System.Transactions from the .NET namespace and will always create a new Transaction for the enclosed Process Steps. If the Transaction exceeds the configured Timeout property, an exception will be thrown to the underlying Business Process. Note:Neuron ESB ships a sample demonstrating the Transaction Process Step. http://www.neuronesb.com/neuron/Help3/Development/Samples_and_Walkthroughs/Process_Samples/transactional_step_execution_using_neuron_pipelines.htm |
|||||||||||||||||||
Design Time Properties |
|||||||||||||||||||
|
|||||||||||||||||||

While
|
Category: |
Flow Control |
||||||||||||||
Class: |
WhilePipelineStep |
|||||||||||||||
Namespace: |
Neuron.Pipelines |
|||||||||||||||
Assembly: |
Neuron.Pipelines.dll |
|||||||||||||||
Description: |
||||||||||||||||
A loop is a Process Step, or set of Process Steps, that are repeated for a specified number of times or until some condition is met. Neuron ESB provides several types of loops. The type of loop chosen depends on the task and personal preference. The While Step provides a looping mechanism for repeating a set of Steps within an Execution Block. The loop continues until its Condition property evaluates to False. The Condition property is evaluated each time the loop is encountered. If the evaluation result is true, the Process Steps within the Execution Block are executed. Here, the key point of thewhileloop is that the Execution Block may never run. When the Condition is tested and the result is False, the Execution Block is skipped and the first Process Step after the while loop is executed. An infinite while loop can be implemented by ensuring that the Condition property of the While Step always returns true, similar to the C# code fragment below: while (true){ // statements } In contrast to using the For Each or For Process Steps, it up to the developer to set the condition to exit the loop within the While Steps Execution Block. The While Process Step is similar to a C# While loop. It has one property that has to be set, the Condition. The property is set by using a C# expression entered in the Modal Code Editor.
ConditionTheConditionis evaluated before the execution of the Execution Block. If it is true, the sequence of Process Steps in the execution block of the loop are executed. If it is false, the execution block of the loop does not execute and flow of control jumps to the next Process Step just after the While loop. The Condition property is set using a C# expression that must return either True or False. For instance, if we wanted the sequence of Process Steps to execute four times, our C# Expression would look like this: return (int)context.Properties["counter"] < 4; However, unlike the For Process Step, there is no Iterator property to increment the counter. Using the While Step, the counter variable would have to be incremented by the user within the Execution Block: var counter = (int)context.Properties["counter"]; context.Properties["counter"] = counter ++; Since the Condition property is configured by using the Modal Code Editor, anything can be used to initialize, set the value of, or compare against within the C# expression. For example, other context properties, ESB Message properties, Environment Variables, or content from the ESB Message. Note:Neuron ESB ships a sample demonstrating the Looping Process Steps. http://www.neuronesb.com/neuron/Help3/Development/Samples_and_Walkthroughs/Process_Samples/Using_For_and_While_Loops.htm |
||||||||||||||||
Breaking the LoopThe Break Step provides the ability to stop a loop in the middle of an iteration and continue with the next process step after the loop. During Design Time testing, the Stop Toolbar button is used to stop in the middle of an iteration and abort the rest of the execution of the Business Process. |
||||||||||||||||
Design Time Properties |
||||||||||||||||
|
||||||||||||||||
Sample |
||||||||||||||||
In the Sample below, the steps in the process demonstrate the use of a While Process Step to continually query an external expense reporting system for current expenses of all users. The While Process Steps Condition is set to execute an infinite loop (i.e. return true). The query only returns for a specific user. Only when there are no longer expense records returned (Decision Process Step), will the While loop break and move control to the For Each Process Step. The For Each Process Step is used to aggregate the individual expense records that are returned within the While Step, creating a batch message, which eventually is submitted to a Payroll system. The following process in more detail:
context.Properties["Expenses"] = new List<string>();
|
||||||||||||||||
Initialize Expenses C# Code Step - pseudo code listing: context.Properties["Expenses"] = new List<string>(); Add Message C# Code Step - pseudo code listing:
//Retrieve the collection of expenses. Add the new expense
			//response from the expense system and update the collection
			var expenses = (List<string>)context.Properties["Expenses"];
			expenses.Add(context.Data.Text);
			context.Properties["Expenses"] = expenses;
			//Retrieve key to use to query next set of records
			var doc = context.Data.ToXmlDocument();
			var queryKey = doc.SelectSingleNode("/*/Expense/NextLineNo").InnerText;
			context.Properties["QueryKey"] = int.Parse(queryKey);
			Set Next Key C# Code Step - pseudo code listing:
			//Retrieve the previously saved query key
			var queryKey = (int)context.Properties["QueryKey"];
			//Update the original request message with the key
			var doc = context.Data.ToXmlDocument();
			var queryKeyNode = doc.SelectSingleNode("/Request/Expense/LineNo");
			queryKeyNode.InnerText = queryKey.ToString();
			context.Data.FromXml(doc.InnerXml);
Create Batch C# Class Code Step - pseudo code listing:
#define DEBUG
#define TRACE
using System;
using System.Collections;
using System.Collections.Generic;
using System.Collections.Specialized;
using System.Data.DataSetExtensions;
using System.Linq;
using System.Xml.Linq;
using System.Xml;
using Neuron.ServiceModel;
using Neuron.Pipelines;
using Neuron.Esb;
using Newtonsoft.Json;
using Newtonsoft.Json.Linq;
namespace Neuron.Esb.Sample.Services
{
	public class PayrollFactory
		:Neuron.Pipelines.PipelineStep<Neuron.Esb.ESBMessage>
	{
		// Declared variables
		System.Text.StringBuilder sb = new System.Text.StringBuilder();
		int totalMessageCount = 0;
		int totalMessagesProcessed = 0;
		protected override void OnExecute(
			PipelineContext<Neuron.Esb.ESBMessage> context)
		{
			// Get total number of expenses in collection to process
			if (totalMessageCount == 0)
				totalMessageCount = ((List<string>)
			context.Properties["Expenses"]).Count;
			// Get a expense from the collection
			var message = (string)context.Properties["Expense"];
			// Write the XML Root element
			if (totalMessagesProcessed == 0)
				sb.AppendLine("<ExpenseCollection>");
			// Append the current expense to the batch
			sb.AppendLine(message);
			// Increment the processed counter
			totalMessagesProcessed++;
			// Close and finalize Payroll batch message. Set it
			// as the body of ESB Message. Clean up variables
			if (totalMessagesProcessed == totalMessageCount)
			{
					sb.Append("</ExpenseCollection>");
				context.Data.Text = sb.ToString();
				sb.Clear();
				totalMessagesProcessed = 0;
				totalMessageCount = 0;
			}
		}
	}
} |
||||||||||||||||

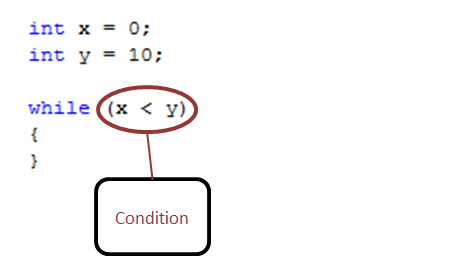
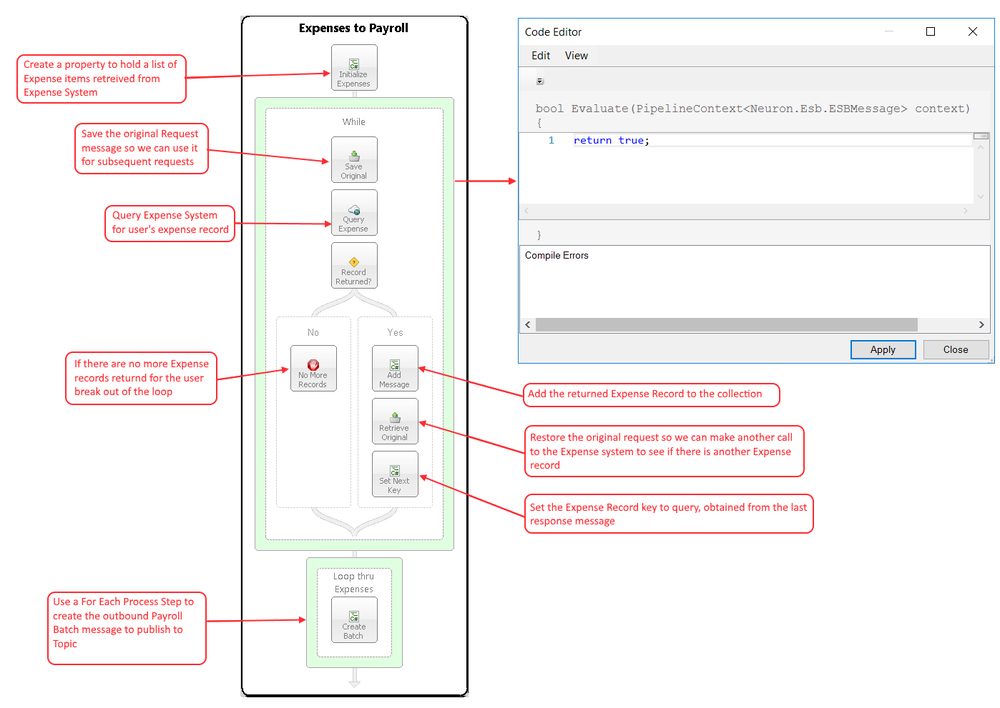
Languages
C#
|
Category: |
Languages |
|||||||||||
Class: |
EsbMessageCSharpCodePipelineStep |
||||||||||||
Namespace: |
Neuron.Esb.Pipelines |
||||||||||||
Assembly: |
Neuron.Esb.Pipelines.dll |
||||||||||||
Description: |
|||||||||||||
The.NET Language Process Steps are useful when one of the built-in Neuron Process Steps does not offer the functionality desired. They can be used to create custom processes without having to create custom externally developed and maintained code. Users can choose between the C#, VB.NET and C# Class Process Step. Read more about the .NET Language Code Editors. The C# Process Step is Modeless Code Editor and is commonly used when there is no need to factor logic into multiple methods, share variables or add additional .NET using statements. The C# Process Step displays the following method signature that passes a pipeline context object, containing the ESB Message to the user:
void OnExecute(PipelineContext<Neuron.Esb.ESBMessage> context)
{
	// TODO: implement custom code here.
}
The Pipeline Context object represents the Business Process instance and is used to access several things at design time and runtime including the existing Neuron ESB Configuration, Environment Variables, Properties, Party, as well as the current message being processed, as shown in the Figure below.
C# Code Editor Modeless Code Editor of the C# Process Step As can be seen from the figure above, calculating the correct Line is required when using the C# Process Step. The Process Step has a hidden part of the code template, which contains the using statements. For the C# Process Step, subtract 21 from the Line number displayed in the Compile Window. Using the example above, 35 21 = Line 11, which is the line number the error would be occurring on. Note:The C# Class Process Step correctly displays the line number To save changes made to the Code Editor the Save button, located on the Code Editor Toolbar, must be clicked; followed by the Neuron ESB Explorers Save Toolbar button or menu item, as shown in the figure below. The Save button will also save any pending changes to the underlying Business Process.
Save Toolbar Button Located on the Modeless Code Editor of the C# Process Step For more information on how to use Neuron ESB specific APIs within the Code Editor, review the Code Editor API Samples section of the documentation. |
|||||||||||||
Design Time Properties |
|||||||||||||
|
|||||||||||||

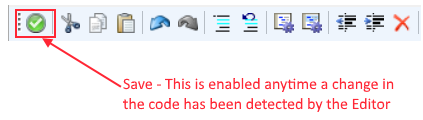
C# Class
|
Category: |
Languages |
|||||||||||
Class: |
EsbMessageCSharpCustomPipelineStep |
||||||||||||
Namespace: |
Neuron.Esb.Pipelines |
||||||||||||
Assembly: |
Neuron.Esb.Pipelines.dll |
||||||||||||
Description: |
|||||||||||||
The.NET Language Process Steps are useful when one of the built-in Neuron Process Steps does not offer the functionality desired. They can be used to create custom processes without having to create custom externally developed and maintained code. Users can choose between the C#, VB.NET and C# Class Process Step. Read more about the .NET Language Code Editors. The C# Class Process Step is Modeless Code Editor and offers some advantages over the C# Process Step. The C# Class offers developers a way to refactor their code, reducing its complexity. It also allows developers to add using statements and define their own namespaces. The C# Class Process Step provides an existing template that developers can modify by changing the namespace and class names. Developers can add additional methods, static or non-static variables and new classes as shown in the figure below.
C# Class Code Editor Modeless Code Editor of the C# Class Process Step Note:Unlike the C# and VB.NET Process Step, the C# Class Process Step correctly displays the line number The C# Class Process Step provides the following class template that passes a pipeline context object, containing the ESB Message to the user:
#define DEBUG
#define TRACE
using System;
using System.Collections;
using System.Collections.Generic;
using System.Collections.Specialized;
using System.Data.DataSetExtensions;
using System.Linq;
using System.Xml.Linq;
using System.Xml;
using Neuron.ServiceModel;
using Neuron.Pipelines;
using Neuron.Esb;
using Newtonsoft.Json;
using Newtonsoft.Json.Linq;
namespace __DynamicCode // Users can change the Namespace name.
{
	// Users can change the Class name
	public class __PipelineStep__ :
		Neuron.Pipelines.PipelineStep<Neuron.Esb.ESBMessage>
	{
		protected override void OnExecute(
			PipelineContext<Neuron.Esb.ESBMessage> context)
		{
		// TODO: implement custom logic here.
		}
		// Users can add additional methods
	}
		// Users can add additional classes
}
The Pipeline Context object represents the Business Process instance and is used to access several things at design time and runtime including the existing Neuron ESB Configuration, Environment Variables, Properties, Party, as well as the current message being processed. To save changes made to the Code Editor the Save button, located on the Code Editor Toolbar, must be clicked; followed by the Neuron ESB Explorers Save Toolbar button or menu item, as shown in the figure below. The Save button will also save any pending changes to the underlying Business Process.
Save Toolbar Button Located on the Modeless Code Editor of the C# Class Process Step For more information on how to use Neuron ESB specific APIs within the Code Editor, review the Code Editor API Samples section of the documentation. |
|||||||||||||
Design Time Properties |
|||||||||||||
|
|||||||||||||

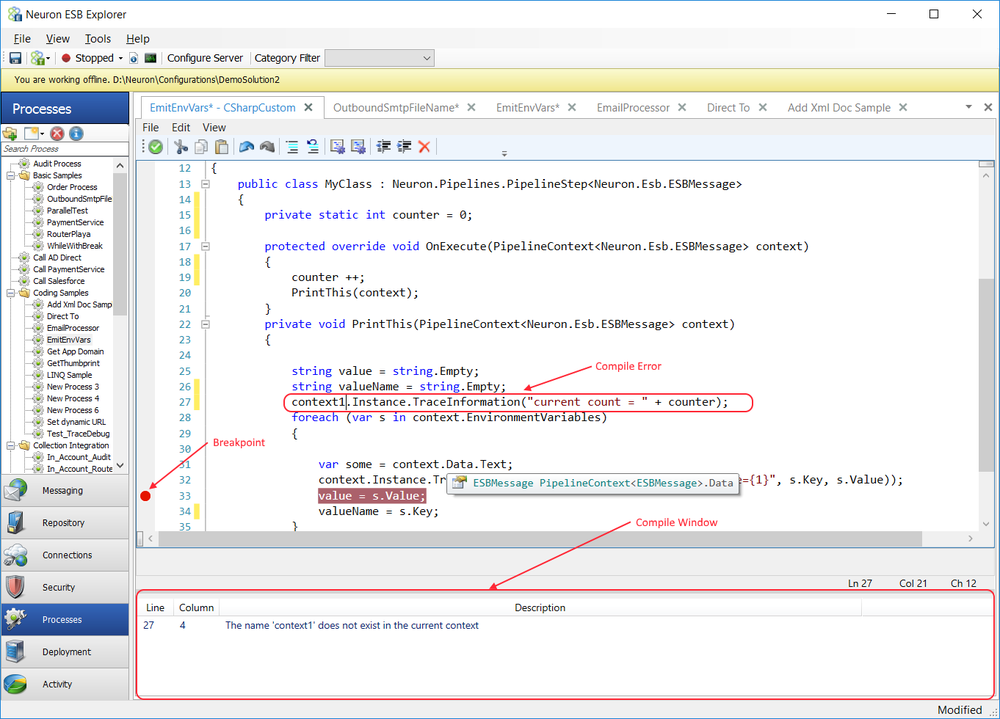
VB.NET
|
Category: |
Languages |
|||||||||||
Class: |
EsbMessageVBCodePipelineStep |
||||||||||||
Namespace: |
Neuron.Esb.Pipelines |
||||||||||||
Assembly: |
Neuron.Esb.Pipelines.dll |
||||||||||||
Description: |
|||||||||||||
The.NET Language Process Steps are useful when one of the built-in Neuron Process Steps does not offer the functionality desired. They can be used to create custom processes without having to create custom externally developed and maintained code. Users can choose between the C#, VB.NET and C# Class Process Step. Read more about the .NET Language Code Editors. The VB.NET Process Step is Modeless Code Editor. Writing VB.NET code within a Process is as simple as dragging the VB.NET Process Step onto the Process Designer, right click and selecting edit code from the context menu. Users will receive the same experience as provided by the C# Process Step. The VB.NET Process Step displays the following method signature that passes a pipeline context object, containing the ESB Message to the user:
Sub OnExecute(ByVal context As PipelineContext(Of ESBMessage))
{
// TODO: implement custom code here.
The Pipeline Context object represents the Business Process instance and is used to access several things at design time and runtime including the existing Neuron ESB Configuration, Environment Variables, Properties, Party, as well as the current message being processed, as shown in the Figure below.
VB.NET Code Editor Modeless Code Editor of the VB.NET Process Step As can be seen from the figure above, calculating the correct Line is required when using the VB.NET Process Step. The Process Step has a hidden part of the code template, which contains the using statements. For the VB.NET Process Step, subtract 18 from the Line number displayed in the Compile Window. Using the example above, 35 18 = Line 17, which is the line number the error would be occurring on. Note:The C# Class Process Step correctly displays the line number To save changes made to the Code Editor the Save button, located on the Code Editor Toolbar, must be clicked; followed by the Neuron ESB Explorers Save Toolbar button or menu item, as shown in the figure below. The Save button will also save any pending changes to the underlying Business Process.
Save Toolbar Button Located on the Modeless Code Editor of the VB.NET Process Step For more information on how to use Neuron ESB specific APIs within the Code Editor, review the Code Editor API Samples section of the documentation. |
|||||||||||||
Design Time Properties |
|||||||||||||
|
|||||||||||||

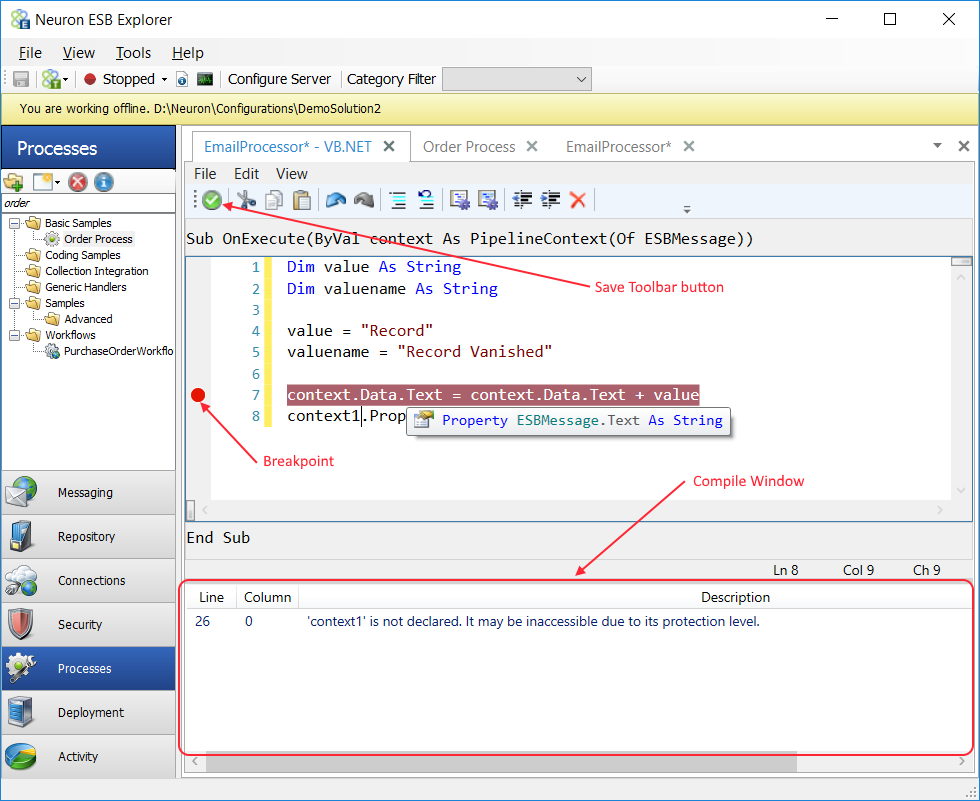
Message
Audit
|
Category: |
Message |
|||||||||||||||||||||||||||||||||||
Class: |
EsbMessageAuditPipelineStep |
||||||||||||||||||||||||||||||||||||
Namespace: |
Neuron.Esb.Pipelines |
||||||||||||||||||||||||||||||||||||
Assembly: |
Neuron.Esb.Pipelines.dll |
||||||||||||||||||||||||||||||||||||
Description: |
|||||||||||||||||||||||||||||||||||||
The Audit Process Step is an extension of the Neuron ESB Audit Service. The Neuron ESB Audit Service is an internal Neuron ESB runtime service used to archive Neuron ESB Messages to the Neuron ESB database. There are two ways to Audit messages:
Auditing can be configured either directly through a Topics Auditing option, an Adapter or Service Policys Failure Action option (i.e. Failures) or using the Audit Process Step. Additionally, some Topic Network Transport properties can be configured to direct messages to be Audited as Failures in the case where no subscribers exist for the incoming message (i.e. TCP/Named Pipes/MSMQ). Lastly, exceptions raised within the system that are not caught by a configured Policy, but where the message is available, will automatically be archived as a Failure. Configuring Auditing at the Topic level ensures that all messages received and sent over Topics are archived. Although this can work for Messaging scenarios, it lacks the flexibility to use in more complex Business scenarios. Topic level Auditing tends to cast a wide net, archiving information that may not be necessary or even desirable. In contrast, the Audit Process Step gives the user granular control of exactly what to archive (the whole message or just part of it) and where the archive should take place in a business process (i.e. before or after some sequence of events). In addition, the Audit Process Step provides the user the ability to customize exception handing and Audit Failures any place within a Business Process, capturing the error information as well as the context (i.e. Parent Process, Process that threw exception, Process Step generating the original error, custom exception messages, etc.) so that action can be taken (i.e. resubmitting the message for processing). The Audit Process step has a number of configurable properties. However, there are two properties located on the Auditing Tab of the Topic that directly affect the execution of the Audit Process Step. Both properties are checkboxes, enabled by default. These are:
The first property, Audit messages Asynchronously, determines if the Audit Process Step will archive the message using a blocking or non-blocking call to the Neuron ESB Audit Service. For example, if the property was disabled (unchecked), control will not pass to the next Process Step until the call to the Neuron ESB Audit Service returns successfully. If an exception is encountered, it will be thrown to the underlying Business Process. In contrast, if the property was enabled/checked (the default), the call will be made as a datagram, only waiting to see if the call was successful to the network, not necessarily all the way to the Neuron ESB Service. If there is an exception, it will be recorded in the Neuron ESB Log files and the Windows Event log but the exception will NOT be thrown to the underlying Business Process. This will allow control to continue to the next Process Step in the process without waiting for the actual Neuron ESB Auditing Service to respond. The second property only applies to the Audit Process Step when its Action property is set to Failure. The Use verbose detail when auditing message failures determines whether the full exception stack (i.e. verbose detail) or just the exception message will be logged with the ESB Message if an exception is thrown within a Business Process and recorded by the Audit Process Step. Action PropertyThe Action property determines if, how and where the Audited Message will appear in either Message History and Failed Messages reports within the Neuron ESB Explorer. There are four Action property values including None, Receive, Send and Failure. NoneIf the Action is set to None, the Neuron ESB Message will NOT be audited at runtime. The call to the Neuron ESB Audit Service is essentially ignored. Send/ReceiveIf the Action is set to either Receive or Send, the Neuron ESB Message will be archived to the Message History table where it will be viewable in the Message History Report as shown below. The Action property will be displayed in the Direction column:
Providing that the following message was Audited: <ProcessPayment xmlns="http://tempuri.org/" xmlns:xsd="http://www.w3.org/2001/XMLSchema"> <request xmlns:a="http://schemas.datacontract.org/2004/07/PaymentService" xmlns:i="http://www.w3.org/2001/XMLSchema-instance"> <a:PaymentProcessRequest> <a:Amount>6666</a:Amount> <a:OrderId>efab608f-f70f-4d27-8e78-c430b28004ac</a:OrderId> </a:PaymentProcessRequest> </request> </ProcessPayment> It would be viewable in the Message Viewer dialog by double clicking on the row in the Message History report:
Along with the message body, all of the Neuron ESB Message Header properties (Neuron Properties tab) and custom properties (Custom Properties tab) are viewable in the Message Viewer dialog. NOTE: By default, all audited messages will have a custom Neuron ESB Message property (i.e. neuron.EndpointName) populated with the name of the adapter or service endpoint that is hosting it. This visible in the Message Viewer under the Custom Properties tab. FailureIf the Action is set to Failure, the Audit Process Step will attempt to retrieve the PipelineException context property. Its Failure Type and Failure Detail properties will be auto populated by the PipelineException objects inner exception property (i.e. the original exception thrown by the Process Step). It will also use that exception information and ambient properties such as the name of the process and step that generated the exception as well as the name of the parent process, if there is one. The PipelineException context property is populated by the process runtime anytime a Process Step throws an Exception. Because of this, the Audit Process Step is commonly used in the Catch Execution Block of the Exception Process Step. NOTE: Any exception recorded by the Audit Process Step will be recorded in both the Windows Neuron ESB Event log and the Neuron ESB log files as well as the Failed Messages database table. The Use verbose detail when auditing message failures directly affects the error messages format and detail that is recorded in the Failed Messages table and viewable in the Failed History Report. For example, if this property was unchecked/disabled the following exception would be recorded as the Failure Detail property value: Parent Process: Unknown Process Name Source Process: call payment service Source Process Step: Msmq The queue does not exist or you do not have sufficient permissions to perform the operation. In contrast, if the verbose detail property is enabled/checked (default) the error message along with the full exception stack and any inner exceptions will be recorded as the Failure Detail property value: Parent Process: Unknown Process Name Source Process: call payment service Source Process Step: Msmq Exception Type: System.Messaging.MessageQueueException Exception Message: The queue does not exist or you do not have sufficient permissions to perform the operation. Exception Trace: at System.Messaging.MessageQueue.ResolveFormatNameFromQueuePath(String queuePath, Boolean throwException) at System.Messaging.MessageQueue.get_FormatName() at System.Messaging.MessageQueue.get_Transactional() at Neuron.Esb.Pipelines.EsbMessageMsmqPipelineStep.ValidateLocalQueueForTransactions(MessageQueue queue, String pipelineName) in d: euron\Dev\3.5.4\sdk\core\latest euronEsbSdk\Esb.Pipelines\EsbMessageMsmqPipelineStep.cs:line 796 at Neuron.Esb.Pipelines.EsbMessageMsmqPipelineStep.SendToQueue(MessageQueue queue, PipelineContext`1 state) in d: euron\Dev\3.5.4\sdk\core\latest euronEsbSdk\Esb.Pipelines\EsbMessageMsmqPipelineStep.cs:line 708 The latter can be very useful for debugging application solutions. Design Time TestingWhen testing the Audit Process Step in the Process Designer, the user must supply the Source ID (name of the Party) and Topic in the Edit Test Message dialog. Both Party and Topic must exist in the opened solution and the open solution MUST be running in the local Neuron ESB Service runtime. More information can be found in the Testing Live Process Steps section of this documentation. Additionally, if the Action property is set to None, the Audit Process Step will throw an AuditStepException to the user. Whereas at runtime, if the Action property is set to None, no Neuron ESB Message will be audited. Dynamic ConfigurationIn some scenarios, developers may need to declare values for the Failure Type and Failure Detail properties at runtime, rather than relying on design time configuration. For example, there may be a business logic where, depending on the condition, it may be desirable to record the condition as an actual exception (Failure) so that monitoring tools and operations could be alerted to the condition, even though an actual exception was not thrown within the Business Process. The logic path may determine what the Failure Type and Failure Detail should be. Moreover, there may be information at runtime that needs to be incorporated into the Failure Detail message recorded. Setting the Failure Detail and Failure Type properties could be done using the Set Property Process Step or a Code Step. If a Code Step was used, the following ESB Message Property must be set:
context.Data.SetProperty("neuron", " FailureDetail",
	"My custom details");
context.Data.SetProperty("neuron", " FailureType",
	"System.Exception");
The Audit Step will look for the ESB Message properties (if it exists) and extract their values. If the ESB Message properties do not exist, it will default to the design time configuration of the Audit Process Step. The prefix for all Audit custom message properties it neuron and they can be accessed directly from the Neuron ESB Message object using the GetProperty() or GetProperties() methods. All Neuron ESB Message properties can also be set using the Set Property Process Step.
Performance OptimizationsThe Audit Process Step uses a Blocking pool of Service Proxies (connections to the Neuron ESB Audit Service) to allow better scale out for concurrency and to eliminate all calls being serialized through one instance of the Service Proxy. There are 2 properties located in the Pool Management property category. Maximum Instances (defaults to 1) and Pool Timeout (defaults to 1 minute). Once the maximum number of Service Proxies have been created, the Pool Timeout determines the amount of time to wait for an existing Service Proxy to become available before throwing a timeout exception. Before a Service Proxy is created, the pool is always checked to see if one already exists. If it does, it retrieves is from the pool and uses it. When complete, the Service Proxy is returned to the pool. The Maximum Instances property does NOT define the number of Service Proxies that will always be created at runtime in all circumstances. It only defines the maximum number that could be created. For instance, Business Processes attached to most inbound Adapter Endpoint will generally only create one pooled Service Proxy as many of the adapters only work with one inbound thread at a time (unless receiving messages from Topics). However, a Client Connector (Neuron ESB hosted service endpoint) could be dealing with many more threads representing concurrent users making service calls. Unlike the pooling properties for other Process Steps, the Maximum Instances for the Audit Step defaults to 1. Since the Neuron ESB Audit Service is a configured as a Per Instance service, general guidance is to test any increase in the Maximum Instance setting against the business scenario. This number should not exceed the Maximum Concurrent Instances property located in the Internal Service Binding Settings section of the Server tab of the Zone for the solution. More than likely, any setting above 50 will likely bring diminished returns.
|
|||||||||||||||||||||||||||||||||||||
Design Time Properties |
|||||||||||||||||||||||||||||||||||||
|
|||||||||||||||||||||||||||||||||||||

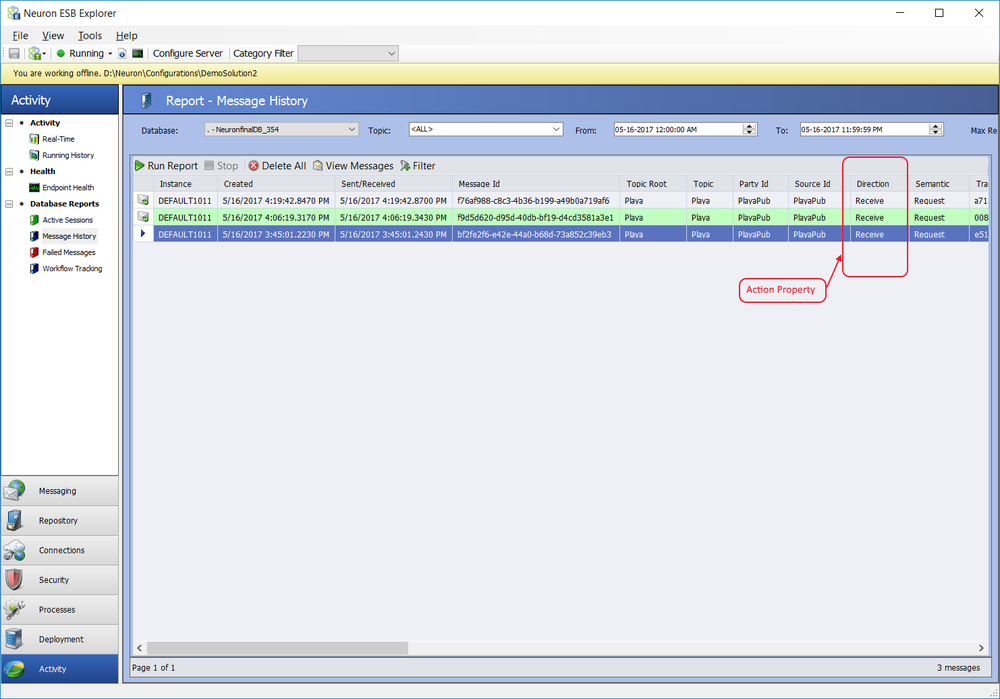
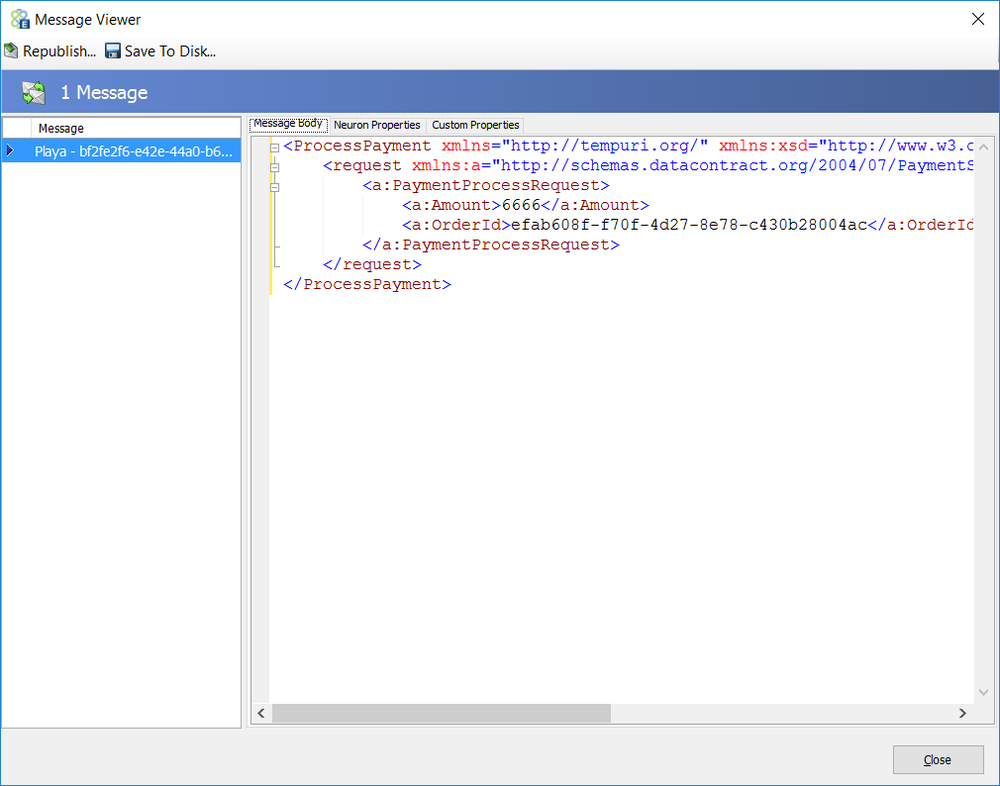
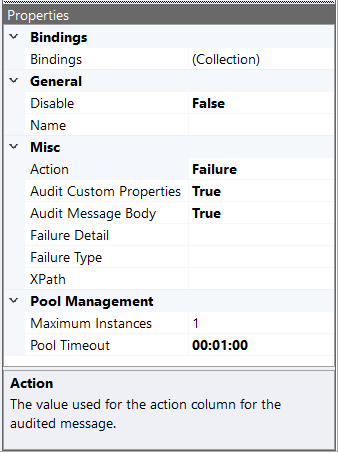
Sample |
|
In the Sample below, the steps in the process demonstrate the use of an Audit Process Step to archive a fragment of the incoming the message as well as capture the exception information (and message that generated it) generated by the mis-configured MSMQ Process Step.
The Incoming ProcessPayment XML message submitted to the Business Process is represented below: <ProcessPayment xmlns="http://tempuri.org/" xmlns:xsd="http://www.w3.org/2001/XMLSchema"> <request xmlns:a="http://schemas.datacontract.org/2004/07/PaymentService" xmlns:i="http://www.w3.org/2001/XMLSchema-instance"> <a:PaymentProcessRequest> <a:Amount>6666</a:Amount> <a:OrderId>efab608f-f70f-4d27-8e78-c430b28004ac</a:OrderId> </a:PaymentProcessRequest> </request> </ProcessPayment> The first Audit Step is configured to use the following XPATH 1.0 statement to archive only the request node of the ProcessPayment XML message above: //*[local-name()='request'] The archived message fragment is viewable in the Message History report using the Message Viewer dialog as shown below:
After the Audit Step archives the fragment of the message, control moves to the MSMQ Process step, which is configured to send to a queue that does not exist. This throws an exception, which is caught by the Audit Step, located in the Catch Execution Block. This in turn generates the following message in the Failed Messages report:
|
|
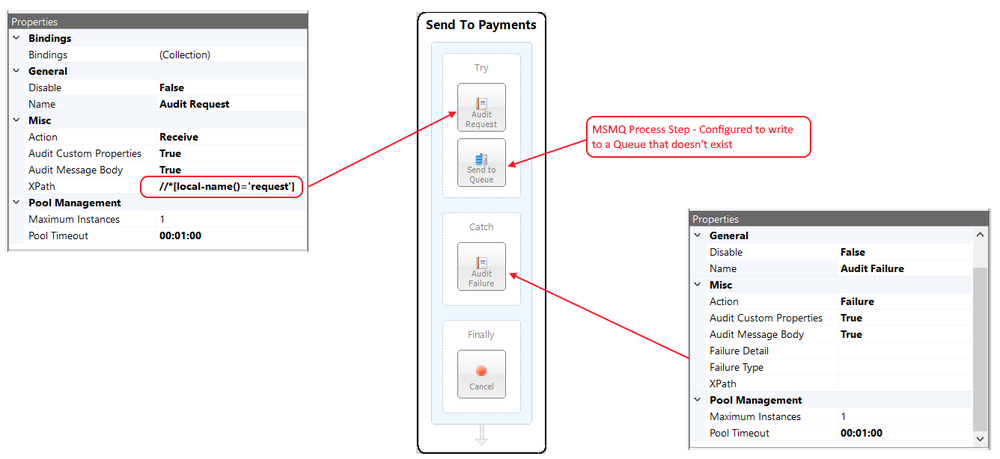
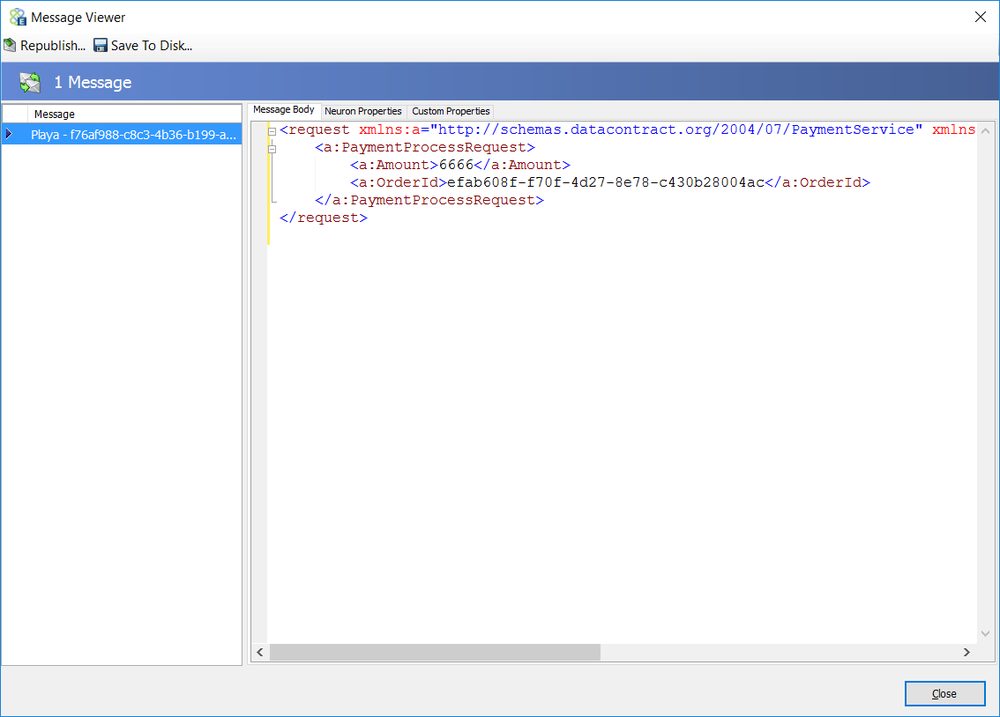
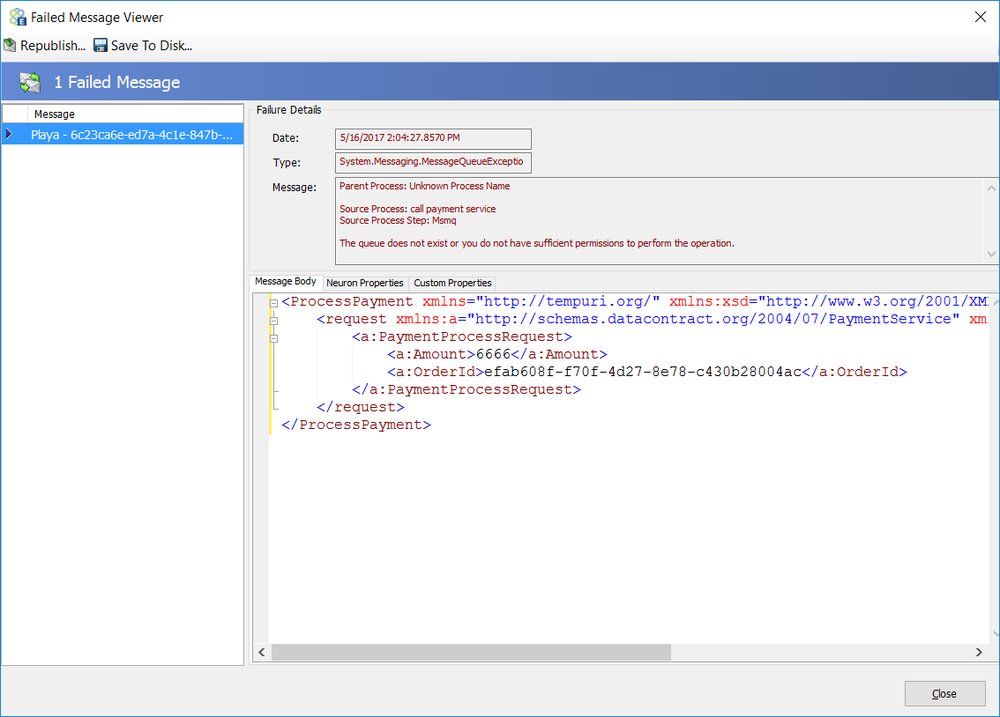
Compression
|
Category: |
Message |
|||||||||||||||||||||||||||||||||||||||||||||||
Class: |
ZipUnzipStep |
||||||||||||||||||||||||||||||||||||||||||||||||
Namespace: |
Neuron.Esb.Pipelines |
||||||||||||||||||||||||||||||||||||||||||||||||
Assembly: |
Neuron.Esb.Pipelines.dll |
||||||||||||||||||||||||||||||||||||||||||||||||
Description: The Compression Process Step can be used to Compress or Decompress incoming messages. This step is commonly used in the following scenarios:
The Compression Process Step uses Xceed API internally for all operations. The Step supports most compression algorithms, multiple files within a compressed incoming message (i.e. file) and recursive decompression of an incoming message (i.e. a compressed file within a compressed file or Folder within a compressed file). RAW Deflate (which can be used with MSFTs library or PHPs zlib), GZip and Winzip 12 compatible compression methods are also supported. The Compression Step populates a number of Neuron ESB Message properties that contains meta data about the compression or decompression process that can be inspected directly after the Compression Step executes. These properties are listed in the table included with this documentation. The Compression/Decompression methods supported are:
CompressionWhen compressing incoming messages, the File Name property must be provided for all Compression Methods except GZip and DeflatedRaw. This can be provided at either design time or runtime. If a File name property is not provided, the Compression step will create one composed of the following pseudo code: var fileName = System.Guid.NewGuid().ToString() + ".bin"; The final output of the Compression Step is a binary payload stored in the Neuron ESB Messages Bytes property and the following happens:
DecompressionWhen decompressing incoming messages, Neuron ESB provides the following API specifically to access decompressed messages. This is helpful if there was more than one message (i.e. file) included in the incoming compressed message as it includes an Attachments collection. Class: ZipMessage Namespace:Neuron.Esb.Zip Syntax:
[Serializable]
public sealed class ZipMessage
{
	public static byte[] Serialize<T>(T message);
	public static ZipMessage Deserialize(byte[] bytes);
	private Collection<Attachment> attachments;
	public Collection<Attachment> Attachments { get; set;}
}
Class: Attachment Namespace:Neuron.Esb.Zip Syntax:
[Serializable]
public sealed class Attachment
	{
	public Byte[] Content { get; set; }
	public string Filename { get; set; }
	public int Length { get; set; }
	public string CompressionLevel { get; set; }
	public string CompressionMethod { get; set; }
	public string EncryptionMethod { get; set; }
	public bool IsFolder { get; set; }
	public bool ContentEncoding { get; set; }
	public bool ContentType { get; set; }
}
The Neuron ESB Message property, compression.count is always populated when decompressing incoming messages. The value can be retrieved to determine whether the Neuron ESB API should be used to process the individual messages. The following C# fragment sample can be used in a C# Code Step to output each individual file to the file system. Alternatively, a For Each Process Step can be used, allowing greater flexibility on what to do with each individual attachment (i.e. call a service, publish to Topic, etc.):
// Determine how many files were decompressed from incoming message
var count = int.Parse(context.Data.GetProperty("compression",
	"Count","0"));
if(count > 0 )
{
	// Get the uncompressed message payload. Each
	// uncompressed message be represented as an Attachment
	var zipMessage = Neuron.Esb.Zip.ZipMessage.Deserialize(
	context.Data.InternalBytes);
	//Loop through the attachments, and write each to the file
	//system.
	foreach(var att in zipMessage.Attachments)
	{
		context.Instance.TraceInformation(att.Filename);
		context.Instance.TraceInformation(att.CompressionLevel);
		context.Instance.TraceInformation(att.CompressionLevel);
		context.Instance.TraceInformation(att.EncryptionMethod);
		context.Instance.TraceInformation(att.IsFolder.ToString());
		System.IO.File.WriteAllBytes(@"E:\Assets\ziptest\Out\"
		+ file.Filename, file.Content);
	}
}
If the incoming message only consists of one compressed file, the API is not needed for retrieving the message or inspecting the compression properties as the following happens:
This ensures the content of the decompressed message becomes the current Neuron ESB Message and is forwarded to the next Process Step in the Business Process. The prefix for all Compression custom message properties it compression and they can be accessed directly from the Neuron ESB Message object using the GetProperty() or GetProperties() methods. All Neuron ESB Message properties can also be set using the Set Property Process Step. Neuron ESB Message Properties
|
|||||||||||||||||||||||||||||||||||||||||||||||||
Dynamic ConfigurationIn some scenarios, developers may need to declare values for the File name property at runtime, rather than relying on design time configuration. When compressing incoming messages, the File Name property must be provided for all Compression Methods except GZip and DeflatedRaw. If provided at runtime, the following Neuron ESB Message property can be set in a Code Process Step immediately before the Compression Step:
context.Data.SetProperty("compression", "Filename",
	"mycompressedFile.pdf");
|
|||||||||||||||||||||||||||||||||||||||||||||||||
Design Time Properties |
|||||||||||||||||||||||||||||||||||||||||||||||||
|
|||||||||||||||||||||||||||||||||||||||||||||||||

Sample |
|
In the Sample below, the steps in the process demonstrate the use of the Compression Step to unzip an incoming message that contains several files of different types (i.e. text file, PDF file, Excel, etc.). After the Compression Step executes, a Decision step examines one of the message properties generated by the Step to determine if more than one file was decompressed from the incoming message. If there was more than one, then a For Each Process Step is used to iterate through the files, trace out their properties and publish each one individually to a Topic.
The Unzip and Publish Files Business Process is tested in the Business Process Designer. Once the Edit Test Message dialog is displayed, the *.zip file containing several files is selected by clicking the Load File command button as shown below:
This will read the binary file into the dialog (see figure below) and pass its contents as the Neuron ESB Message body to the Business Process.
The UnZip Compression Process Step will decompress the incoming binary message into a new Neuron.Esb.Zip.ZipMessage object, serializing it as the new body for the Neuron ESB Message. Next, the Decision Process Step will execute the following logic to determine if multiple files were decompressed from the original binary message:
return int.Parse(context.Data.GetProperty("compression","Count","0"))
			 > 1;
If True, control moves to the Set up Iteration C# Code Step, where the collection for the For Each Process Step is initialized:
var zipMessage = Neuron.Esb.Zip.ZipMessage.Deserialize(context.Data.Bytes);
context.Properties.Add("UnZippedFiles", zipMessage.Attachments);
The For Each Process Step uses the enclosed Set Message C# Code Step to retrieve each individual decompressed file and convert it into a new Neuron ESB Message. Each one is later published to a Topic, independent of the original incoming message or other decompressed files. The Set Message Step accesses all of the Neuron.Esb.Zip.Attachment properties to set the Neuron ESB Message body and header properties as well as trace out to the Neuron ESB Log and Trace Window the values of Attachment properties as shown in the C# sample below:
// Retrieve the decompressed file and create a new
// child message retaining parent/child relationship
var file = (Neuron.Esb.Zip.Attachment)context.Properties["File"];
context.Data = context.Data.Clone(false);
// Set the current Neuron ESB Message with the file bytes
context.Data.Bytes = file.Content;
// set the Neuron ESB Message binary properties
// in case other steps will content
if(!string.IsNullOrEmpty(file.ContentEncoding))
{
	context.Data.Header.Binary = false;
	context.Data.Header.BodyType = string.IsNullOrEmpty(file.Filename)?
	file.ContentEncoding:file.ContentType;
}
else
{
	context.Data.Header.Binary = true;
	context.Data.Header.BodyType = file.ContentType;
}
// Trace out meta data and contents of file to
// Neuron ESB Log file and Trace Window
if(context.Instance.IsInfoEnabled)
{
	context.Instance.TraceInformation("CompressionLevel
		: " + file.CompressionLevel);
	context.Instance.TraceInformation("CompressionMethod
		: " + file.CompressionMethod);
	context.Instance.TraceInformation("ContentEncoding
		: " + file.ContentEncoding);
	context.Instance.TraceInformation("EncryptionMethod
		: " + file.EncryptionMethod);
	context.Instance.TraceInformation("ContentType : "
		+ file.ContentType);
	context.Instance.TraceInformation("Filename : "
		+ file.Filename);
	context.Instance.TraceInformation("IsFolder : "
		+ file.IsFolder);
	context.Instance.TraceInformation("BodyType : "
		+ context.Data.Header.BodyType);
	context.Instance.TraceInformation("IsBinary : "
		+ context.Data.Header.Binary);
	context.Instance.TraceInformation("Actual Message :
		" + context.Data.Text);
}
The output of the Trace statements that appear in the C# Code Step will appear in the Business Process Designer Trace Window as displayed below:
|
|
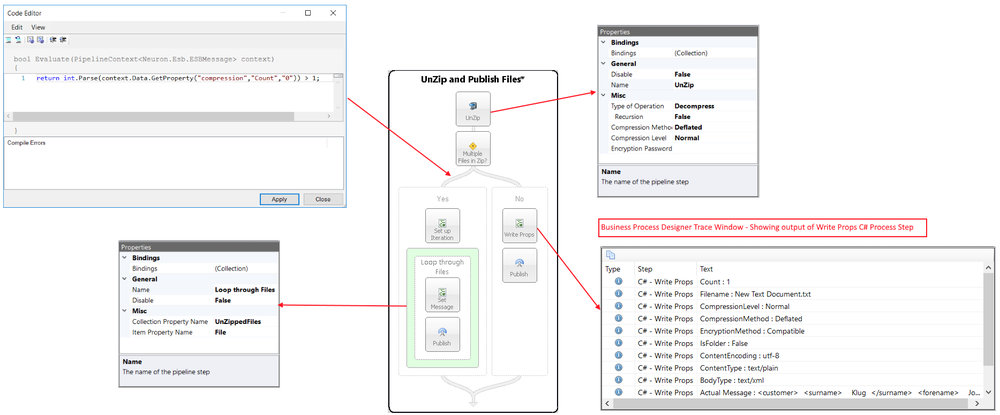
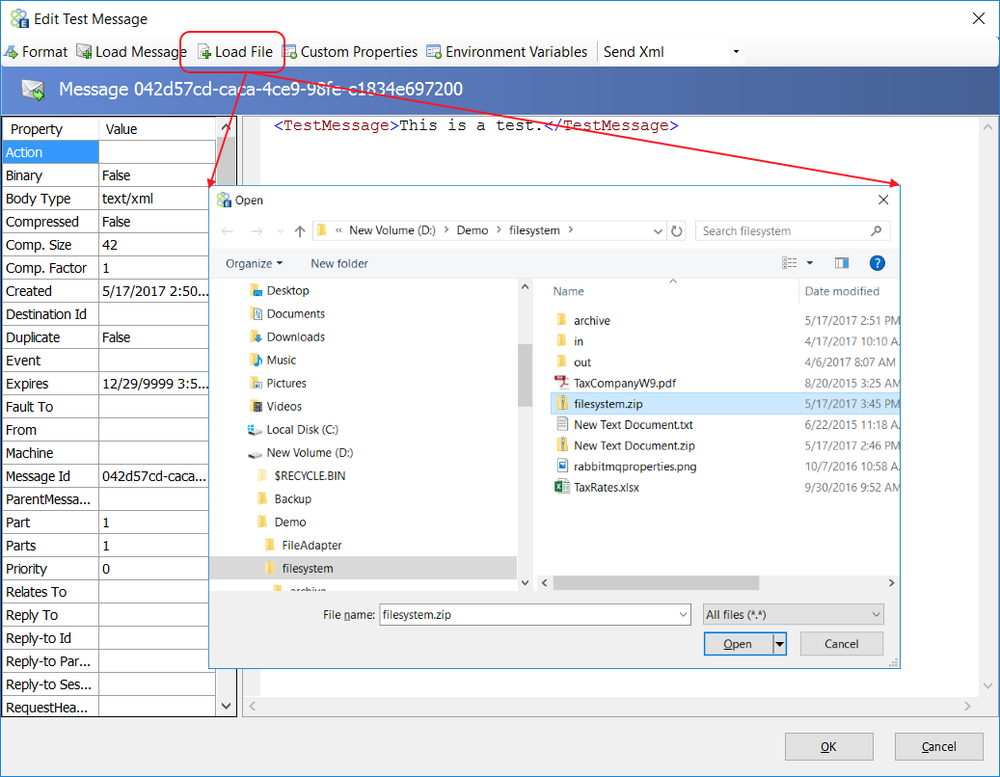
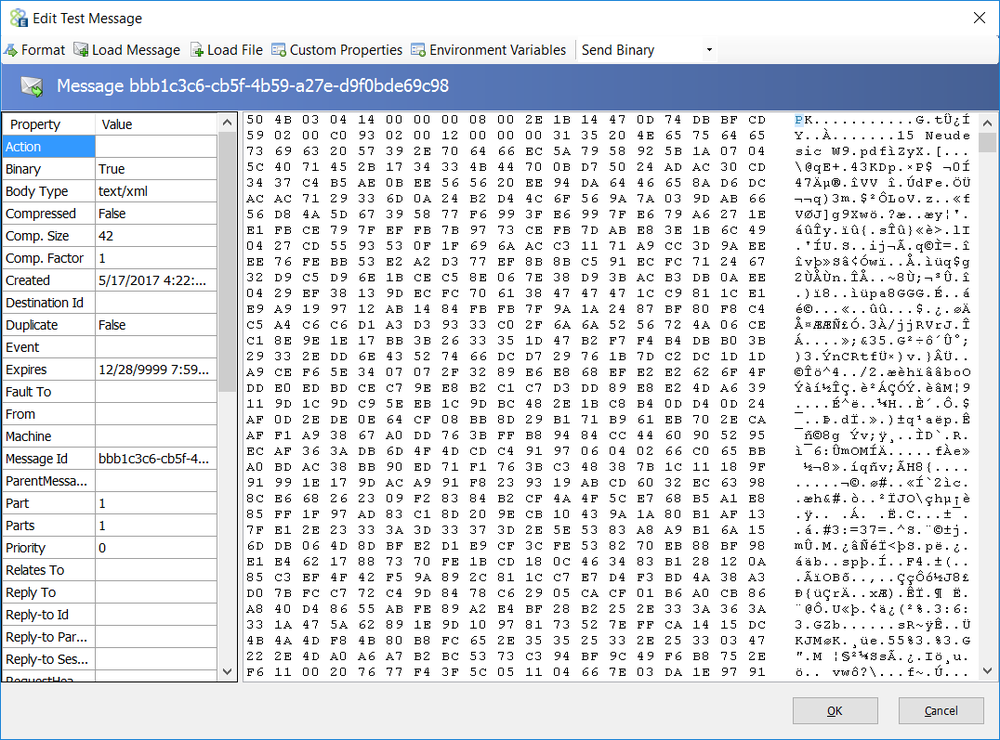

Detect Duplicates
|
Category: |
Message |
||||||||||||||||||||
Class: |
DetectDuplicatesStep |
|||||||||||||||||||||
Namespace: |
Neuron.Esb.Pipelines |
|||||||||||||||||||||
Assembly: |
Neuron.Esb.Pipelines.dll |
|||||||||||||||||||||
Description: The Detect Duplicates Process Step can identify messages previously received by a Business Process so that decisions can be made whether to receive the message again or do some other action. For example, many 3rd party applications and transports (i.e. FTP, FILE, Azure Service Bus, etc.) do not support guaranteed once only delivery of messages. However, users may need to integrate with these technologies (or similar ones) as publication sources to Neuron ESB. In those cases, the Detect Duplicates Process Step can ensure consistency and eliminate the chance of a duplicate message being processed. The Detect Duplicates Process Step uses the Neuron ESB database to store metadata of received messages. Specifically, the Unique ID, Application Name and the time range which the message will be considered a duplicate. To use the Process Step, the unique identifier for the message (Unique ID), the Check Window (Timespan) property and Application Name must be provided. The Unique ID can be determined at design time by providing an XPATH 1.0 statement, or developers can determine what the Unique ID should be at runtime by setting a custom Neuron ESB Message Property. The Unique ID can be any string value no longer than 200 characters. The Check Window is a DateTime Timespan range from the current date time that the message is considered a duplicate. Usually this is set for short durations in the order of minutes. The Check Window property determines in what window of time an incoming message that matches the unique id will be considered a duplicate. For example, if the Check Window were set to 1 minute, the first incoming message would log its unique ID into the Neuron ESB database. If a second message comes in within the next minute where its unique ID matched what was in the database, it is considered a duplicate. However, if the second message came in 5 minutes after the first message, it would not. If a third message though came in within 1 minute of the second message, that message would be considered a duplicate because it came in within the 1 minute Check Window. Post ProcessingAfter a message is processed by the Detect Duplicates Process Step, the dupcheck.MessageFound Neuron ESB Message Property must be inspected to determine if the message is considered a duplicate. This property is populated by the Process Step and is usually used in the condition property of a Decision Process Steps Branch as shown below: return bool.Parse(context.Data.GetProperty("dupcheck","MessageFound")); The prefix for all Detect Duplicates custom message properties it dupcheck and they can be accessed directly from the Neuron ESB Message object using the GetProperty() or GetProperties() methods. All Neuron ESB Message properties can also be set using the Set Property Process Step. Neuron ESB Message Properties
|
||||||||||||||||||||||
Dynamic ConfigurationThe Detect Duplicates Step provides the Location of Unique ID (Unique ID) design time property that can be set with an XPATH 1.0 statement. This can be used if the message is embedded with its own unique identifier. However, it is more often the case where there will be multiple elements (i.e. data) within the message that must be used in combination to determine the uniqueness of a message. Alternatively, elements of the message in combination with the context or ambient properties of the endpoint receiving the message may have to be used. In those scenarios, the Unique ID can be composed within a C# Code Step and then its value set using the dupcheck.UniqueId Neuron ESB Message Property. context.Data.SetProperty("dupcheck", "UniqueId", "some unique id");
|
||||||||||||||||||||||
Design Time Properties |
||||||||||||||||||||||
|
||||||||||||||||||||||

Sample |
|
In the Sample below, the steps in the process demonstrate the use of the Detect Duplicates Process Step to determine if an incoming file received by the FTP adapter has previously been processed during the Check Window parameter. The FTP properties of the incoming message is used to determine the uniqueness of the file, including the original file name.
|
|
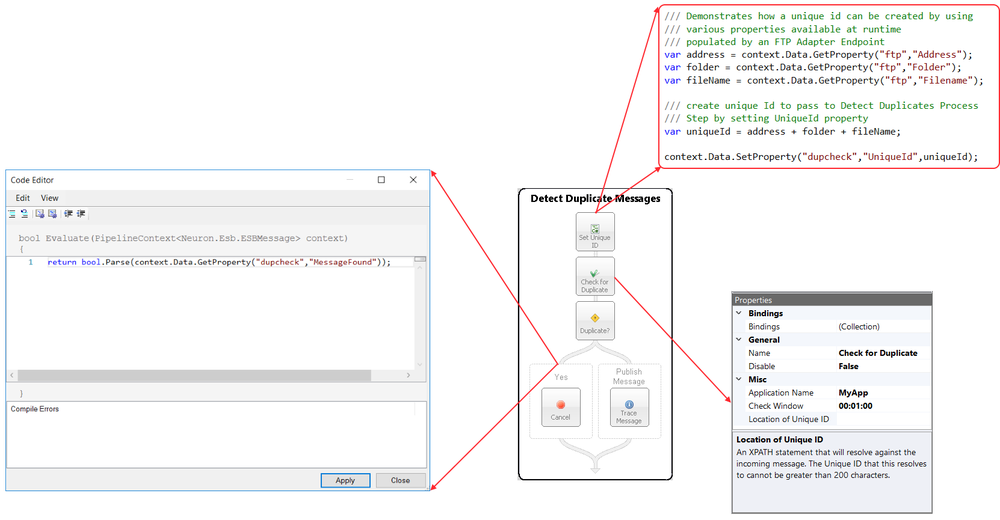
Excel to XML
|
Category: |
Message |
|||||||||||||||||||||||||||||||||||||||||
Class: |
ExcelToXmlPipelineStep |
||||||||||||||||||||||||||||||||||||||||||
Namespace: |
Neuron.Esb.Pipelines |
||||||||||||||||||||||||||||||||||||||||||
Assembly: |
Neuron.Esb.Pipelines.dll |
||||||||||||||||||||||||||||||||||||||||||
Description: The Excel to XML Process Step is used to convert an Excel Worksheet within an Excel Workbook file into an XML formatted message. This can be done for Worksheets/Workbook files created with pre 2007 and post 2007 editions of Microsoft Excel. Once converted to XML, the file can be processed using any Process Step or C# Code. The Excel to XML Process Step uses a combination of design time properties as well as the structure of the Excel Worksheet to determine the final XML format (i.e. Root node name, Row node name, XML element names, namespace etc.), allowing the user granular control over the output structure of the XML. For example, the following Spreadsheet has a worksheet named DATA. This worksheet has defined column headers (first row):
Within the design properties of the Excel to XML Process Step, the Root Node Name property is set to Payments and the Row Node Name property is set to Record. If an Adapter Endpoint consumes the file, executing the Process Step, the following XML Message (only displaying a fragment below) will be created and set as the Body of the Neuron ESB Message: <Payments> <Record> <STUDY_NO>D6898</STUDY_NO> <COUNTRY_CODE>USA</COUNTRY_CODE> <RANK_NO>1</RANK_NO> <CREDIT>3880</CREDIT> <LAST_NAME>Medlock</LAST_NAME> <FIRST_NAME>John</FIRST_NAME> <REFERENCE_NO>001</REFERENCE_NO> <ORG_NAME>PPD Development, LP</ORG_NAME> <ORG_ADDRESS>7551 Metro Center Drive Cuite 200</ORG_ADDRESS> <CITY>Bustin</CITY> <STATE>TX</STATE> <ZIP>78744</ZIP> <PAYEE>PPD Development, LP</PAYEE> <PAYMENT>815200.05</PAYMENT> <PAYMENT_DATE>2017-07-15T00:00:00-07:00</PAYMENT_DATE> <CORRECTION>No</CORRECTION> <PAYMENT_TYPE>CC</PAYMENT_TYPE> </Record> <Record> <STUDY_NO>D6898</STUDY_NO> <COUNTRY_CODE>USA</COUNTRY_CODE> Each row in the original spreadsheet will be represented as a repeating Record element within the Payments root. Each original column header name is converted to an XML element containing the value of the cell. Once the Excel Worksheet is converted to XML, the Split Process Step can be used to split the XML file into its constituent records (rows), allowing them to be processed individually. The Excel to XML Process Step has a number of features to allow customization of the XML output, making post processing of the output less troublesome. Some of these features include:
FeaturesSQL WHERE clausesWhen the Excel to XML Process Step translates an incoming Excel Worksheet to XML it can use an ANSI compliant SQL WHERE clause (including AND/OR) to restrict how many and exactly what rows in the Worksheet will be included in the XML output. To include a restriction, the Column(s) Constraint design time property must be configured with the body of a WHERE clause and must NOT be enclosed in quotes. The body of the WHERE clause must refer to the Excel Worksheet column header names as field names. For example, in the screen shot of the Excel Workbook earlier in this document, the second column header is labeled COUNTRY_CODE. If a user needs to ensure that ONLY rows that have the value of USA or US in this column are included in the XML output, the following WHERE clause could be entered into the design time property: Country_Code = 'US' OR Country_Code = 'USA' The labels representing the field names in the body of the WHERE clause are not case sensitive. All text comparisons must be enclosed single quotes. This provides users the ability to selectively choose which rows, based on their cell values in a Worksheet should be translated to an XML output. Excluding NULL field valuesThe Exclude NULL Fields design time property is used to allow users the flexibility to either include or exclude the XML element representing a field within a row included in the final XML output document. This can make further document operations such as mapping and schema validation less problematic and more predictable. For instance, in the screen shot of the Excel Workbook earlier in this document, the third column header is labeled RANK_NO. If a value is missing for this cell in a row and the Exclude NULL Fields property is set to false, the XML output for the row would appear as follows. <Payments> <Record> <STUDY_NO>D6898</STUDY_NO> <COUNTRY_CODE>USA</COUNTRY_CODE> <strong style="font-weight: bold;"> <em style="font-style: italic;"> <RANK_NO></RANK_NO> </em> </strong> <CREDIT>6894</CREDIT> <LAST_NAME>Jones</LAST_NAME> <FIRST_NAME>Mark</FIRST_NAME> <REFERENCE_NO>001</REFERENCE_NO> <ORG_NAME>CNBL Clinical Pharmacology Center</ORG_NAME> <ORG_ADDRESS>800 East Baltimore Ave., 4th Floor</ORG_ADDRESS> <CITY>Baltimore</CITY> <STATE>MD</STATE> <ZIP>21201</ZIP> <PAYEE>CNBL Clinical Pharmacology Center</PAYEE> <PAYMENT>368489.92</PAYMENT> <PAYMENT_DATE>2017-07-15T00:00:00-07:00</PAYMENT_DATE> <CORRECTION>No</CORRECTION> <PAYMENT_TYPE>CC</PAYMENT_TYPE> </Record> </Payments> However, if the value of the Exclude NULL Fields property is set to true, the same document would appear without the RANK_NO element as shown below: <Payments> <Record> <STUDY_NO>D6898</STUDY_NO> <COUNTRY_CODE>USA</COUNTRY_CODE> <CREDIT>6894</CREDIT> <LAST_NAME>Jones</LAST_NAME> <FIRST_NAME>Mark</FIRST_NAME> <REFERENCE_NO>001</REFERENCE_NO> <ORG_NAME>CNBL Clinical Pharmacology Center</ORG_NAME> <ORG_ADDRESS>800 East Baltimore Ave., 4th Floor</ORG_ADDRESS> <CITY>Baltimore</CITY> <STATE>MD</STATE> <ZIP>21201</ZIP> <PAYEE>CNBL Clinical Pharmacology Center</PAYEE> <PAYMENT>368489.92</PAYMENT> <PAYMENT_DATE>2017-07-15T00:00:00-07:00</PAYMENT_DATE> <CORRECTION>No</CORRECTION> <PAYMENT_TYPE>CC</PAYMENT_TYPE> </Record> </Payments> Adding Row NumbersThe Excel to XML Process Step will convert an Excel Worksheet, which may contain hundreds, thousands, tens of thousands, or more rows into an XML document. Consequently, the Process Step is usually used in concert with the Split Process Step to decompose the output XML document into its constituent records so that each row can be processed as an individual message. The Split Process Step allows processing to occur either synchronously (i.e. ForEach) or asynchronously. In all cases, errors may arise when processing the individual rows. If an error occurs, the user can handle the error while allowing other rows to continue processing. In many cases, it may be preferable to report which row in the originating Excel Worksheet generated the error. The Add Row Numbers design time property, if set to True, auto generates row numbers during the internal conversion process. An XML element named, _RowNumber, will be appended as a column to each row within the XML document, its value will represent the row number within the original Excel Worksheet as shown below: <Payments> <Record> <STUDY_NO>D6898</STUDY_NO> <COUNTRY_CODE>USA</COUNTRY_CODE> <RANK_NO>1</RANK_NO> <CREDIT>3880</CREDIT> <LAST_NAME>Henry</LAST_NAME> <FIRST_NAME>John</FIRST_NAME> <REFERENCE_NO>001</REFERENCE_NO> <ORG_NAME>RD Development, LP</ORG_NAME> <ORG_ADDRESS>8551 Center Drive Floor 200</ORG_ADDRESS> <CITY>Bustin</CITY> <STATE>TX</STATE> <ZIP>78994</ZIP> <PAYEE>RD Development, LP</PAYEE> <PAYMENT>815200.05</PAYMENT> <PAYMENT_DATE>2017-07-15T00:00:00-07:00</PAYMENT_DATE> <CORRECTION>No</CORRECTION> <PAYMENT_TYPE>CC</PAYMENT_TYPE> <strong style="font-weight: bold;"> <em style="font-style: italic;"> <_RowNumber>1</_RowNumber> </em> </strong> </Record> <Record> <STUDY_NO>D6898</STUDY_NO> <COUNTRY_CODE>USA</COUNTRY_CODE> <RANK_NO>1</RANK_NO> <CREDIT>6894</CREDIT> <LAST_NAME>Jones</LAST_NAME> <FIRST_NAME>Mark</FIRST_NAME> <REFERENCE_NO>001</REFERENCE_NO> <ORG_NAME>NBC Clinical Pharmacology Center</ORG_NAME> <ORG_ADDRESS>700 East Baltimore Street 4th Floor</ORG_ADDRESS> <CITY>Baltimore</CITY> <STATE>MD</STATE> <ZIP>23201</ZIP> <PAYEE>NBC Clinical Pharmacology Center </PAYEE> <PAYMENT>368489.92</PAYMENT> <PAYMENT_DATE>2017-07-15T00:00:00-07:00</PAYMENT_DATE> <CORRECTION>No</CORRECTION> <PAYMENT_TYPE>CC</PAYMENT_TYPE><_RowNumber>2</_RowNumber> </Record> </Payments> The row number in concert with the Neuron ESB custom message property, exceltoxml.RowsReturned can be used to enhance exception messages when any particular row within the document generates an error during processing as the sample below demonstrates:
// Retrieve the row number from within the XML document
var rowNumber = 0;
var node =
context.Data.ToXmlDocument().SelectSingleNode("//_RowNumber");
if(node != null)
	rowNumber = int.Parse(node.InnerText);
// Retrieve the properties populated by the Excel to XML Step
var rowCount = int.Parse(context.Data.GetProperty("exceltoxml",
	"RowsReturned","0"));
var workSheet = context.Data.GetProperty("exceltoxml",
	"WorkSheet","");
var filename = context.Data.GetProperty("exceltoxml",
	"Filename","");
// Get current exception
var ex = (System.Exception)context.Properties["CurrentException"];
// Create a new error message that tells the user what exact
// row in the original spreadsheet caused the error
var errorMessage = String.Format(
	System.Globalization.CultureInfo.InvariantCulture,
	"The Payment Process failed processing row {0} of a
	{1} " +
	"in the '{2}' Worksheet from the Excel Workbook, "
	+ "'{3}'.{4}{4}Error Message: {5}",
	rowNumber,
	rowCount,
	workSheet,
	filename,
	Environment.NewLine,
	ex.Message);
// Reset the exception object
context.Properties["CurrentException"] = new
	System.Exception(errorMessage);
Generating an XSD SchemaThe Include Schema design time property can be used to generate an XSD Schema that represents the XML output of the Excel to XML Process Step. This can be useful validating the output within the Business Process at runtime or in other parts of the system using the Validate Schema Process Step. When the Include Schema design time property is set to True, an XSD Schema will be pre pended to the output XML as shown below: <?xml version="1.0" encoding="utf-16"?> <xs:schema id="Payments" xmlns="" xmlns:xs="http://www.w3.org/2001/XMLSchema" xmlns:msdata="urn:schemas-microsoft-com:xml-msdata"> <xs:element name="Payments"> <xs:complexType> <xs:choice minOccurs="0" maxOccurs="unbounded"> <xs:element name="Record"> <xs:complexType> <xs:sequence> <xs:element name="STUDY_NO" minOccurs="0"> <xs:simpleType> <xs:restriction base="xs:string"> <xs:maxLength value="510"/> </xs:restriction> </xs:simpleType> </xs:element> <xs:element name="COUNTRY_CODE" minOccurs="0"> <xs:simpleType> <xs:restriction base="xs:string"> <xs:maxLength value="510"/> </xs:restriction> </xs:simpleType> </xs:element> <xs:element name="RANK_NO" type="xs:double" minOccurs="0"/> <xs:element name="CREDIT" type="xs:double" minOccurs="0"/> <xs:element name="LAST_NAME" minOccurs="0"> <xs:simpleType> <xs:restriction base="xs:string"> <xs:maxLength value="510"/> </xs:restriction> </xs:simpleType> </xs:element> <xs:element name="FIRST_NAME" minOccurs="0"> <xs:simpleType> <xs:restriction base="xs:string"> <xs:maxLength value="510"/> </xs:restriction> </xs:simpleType> </xs:element> <xs:element name="REFERENCE_NO" minOccurs="0"> <xs:simpleType> <xs:restriction base="xs:string"> <xs:maxLength value="510"/> </xs:restriction> </xs:simpleType> </xs:element> <xs:element name="ORG_NAME" minOccurs="0"> <xs:simpleType> <xs:restriction base="xs:string"> <xs:maxLength value="510"/> </xs:restriction> </xs:simpleType> </xs:element> <xs:element name="ORG_ADDRESS" minOccurs="0"> <xs:simpleType> <xs:restriction base="xs:string"> <xs:maxLength value="510"/> </xs:restriction> </xs:simpleType> </xs:element> <xs:element name="CITY" minOccurs="0"> <xs:simpleType> <xs:restriction base="xs:string"> <xs:maxLength value="510"/> </xs:restriction> </xs:simpleType> </xs:element> <xs:element name="STATE" minOccurs="0"> <xs:simpleType> <xs:restriction base="xs:string"> <xs:maxLength value="510"/> </xs:restriction> </xs:simpleType> </xs:element> <xs:element name="ZIP" minOccurs="0"> <xs:simpleType> <xs:restriction base="xs:string"> <xs:maxLength value="510"/> </xs:restriction> </xs:simpleType> </xs:element> <xs:element name="PAYEE" minOccurs="0"> <xs:simpleType> <xs:restriction base="xs:string"> <xs:maxLength value="510"/> </xs:restriction> </xs:simpleType> </xs:element> <xs:element name="PAYMENT" type="xs:double" minOccurs="0"/> <xs:element name="PAYMENT_DATE" type="xs:dateTime" minOccurs="0"/> <xs:element name="CORRECTION" minOccurs="0"> <xs:simpleType> <xs:restriction base="xs:string"> <xs:maxLength value="510"/> </xs:restriction> </xs:simpleType> </xs:element> <xs:element name="PAYMENT_TYPE" minOccurs="0"> <xs:simpleType> <xs:restriction base="xs:string"> <xs:maxLength value="510"/> </xs:restriction> </xs:simpleType> </xs:element> <xs:element name="_RowNumber" type="xs:int" minOccurs="0"/> </xs:sequence> </xs:complexType> </xs:element> </xs:choice> </xs:complexType> </xs:element> </xs:schema> <Payments> <Record> <STUDY_NO>D6898</STUDY_NO> <COUNTRY_CODE>USA</COUNTRY_CODE> <RANK_NO>1</RANK_NO> <CREDIT>3880</CREDIT> <LAST_NAME>Jones</LAST_NAME> <FIRST_NAME>John</FIRST_NAME> <REFERENCE_NO>001</REFERENCE_NO> <ORG_NAME>RD Development, LP</ORG_NAME> <ORG_ADDRESS>878 Turner Center Drive</ORG_ADDRESS> <CITY>Bustin</CITY> <STATE>TX</STATE> <ZIP>79744</ZIP> <PAYEE>RD Development, LP </PAYEE> <PAYMENT>815200.05</PAYMENT> <PAYMENT_DATE>2017-07-15T00:00:00-07:00</PAYMENT_DATE> <CORRECTION>No</CORRECTION> <PAYMENT_TYPE>CC</PAYMENT_TYPE> <_RowNumber>1</_RowNumber> </Record> <Record> <STUDY_NO>D6898</STUDY_NO> <COUNTRY_CODE>USA</COUNTRY_CODE> <RANK_NO/> <CREDIT>6894</CREDIT> <LAST_NAME>Jones</LAST_NAME> <FIRST_NAME>Mark</FIRST_NAME> <REFERENCE_NO>001</REFERENCE_NO> <ORG_NAME>NBC Clinical Pharmacology Center</ORG_NAME> <ORG_ADDRESS>900 East Baltimore Street</ORG_ADDRESS> <CITY>Baltimore</CITY> <STATE>MD</STATE> <ZIP>21301</ZIP> <PAYEE>NBC Clinical Pharmacology Center </PAYEE> <PAYMENT>368489.92</PAYMENT> <PAYMENT_DATE>2017-07-15T00:00:00-07:00</PAYMENT_DATE> <CORRECTION>No</CORRECTION> <PAYMENT_TYPE>CC</PAYMENT_TYPE> <_RowNumber>2</_RowNumber> </Record> </Payments> This property should only be set to True during development to retrieve the XSD Schema, if one is needed. Usually this would be done by running a test within the Business Process Designer, capturing the output using a Trace Process Step or Audit Process Step, and then copying the XSD portion into the Neuron ESB Schema Repository. For batch processing scenarios, it is usually desirable to validate the individual records separately from the original XML message (batch message). In those cases, the XSD Schema can be broken into two schemas, one designed to Validate the batch envelope, the other to validate the individual records. For example, the XSD Schema to validate the batch envelope would look like the following, using the ANY XSD Schema element to handle the records (highlighted in bold): <?xml version="1.0" encoding="UTF-8"?> <xs:schema id="Payments" xmlns:msdata="urn:schemas-microsoft-com:xml-msdata" xmlns:xs="http://www.w3.org/2001/XMLSchema"> <xs:element name="Payments"> <xs:complexType> <xs:choice maxOccurs="unbounded" minOccurs="1"> <xs:element name="Record"> <strong style="font-weight: bold;"> <em style="font-style: italic;"> <xs:complexType> <xs:sequence maxOccurs="unbounded" minOccurs="0"> <xs:any processContents="skip"></xs:any> </xs:sequence> </xs:complexType> </em> </strong> </xs:element> </xs:choice> </xs:complexType> </xs:element> </xs:schema> Whereas the XSD Schema for validating individual records would appear as: <?xml version="1.0" encoding="UTF-8"?> <xs:schema id="Payments" xmlns:msdata="urn:schemas-microsoft-com:xml-msdata" xmlns:xs="http://www.w3.org/2001/XMLSchema"> <xs:element name="Record"> <xs:complexType> <xs:choice maxOccurs="unbounded" minOccurs="0"> <xs:sequence> <xs:element minOccurs="0" name="STUDY_NO"> <xs:simpleType> <xs:restriction base="xs:string"> <xs:maxLength value="510"></xs:maxLength> </xs:restriction> </xs:simpleType> </xs:element> <xs:element minOccurs="0" name="COUNTRY_CODE"> <xs:simpleType> <xs:restriction base="xs:string"> <xs:maxLength value="510"></xs:maxLength> </xs:restriction> </xs:simpleType> </xs:element> <xs:element minOccurs="0" name="RANK_NO" type="xs:double"></xs:element> <xs:element minOccurs="0" name="CREDIT" type="xs:double"></xs:element> <xs:element minOccurs="0" name="LAST_NAME"> <xs:simpleType> <xs:restriction base="xs:string"> <xs:maxLength value="510"></xs:maxLength> </xs:restriction> </xs:simpleType> </xs:element> <xs:element minOccurs="0" name="FIRST_NAME"> <xs:simpleType> <xs:restriction base="xs:string"> <xs:maxLength value="510"></xs:maxLength> </xs:restriction> </xs:simpleType> </xs:element> <xs:element minOccurs="0" name="REFERENCE_NO"> <xs:simpleType> <xs:restriction base="xs:string"> <xs:maxLength value="510"></xs:maxLength> </xs:restriction> </xs:simpleType> </xs:element> <xs:element minOccurs="0" name="ORG_NAME"> <xs:simpleType> <xs:restriction base="xs:string"> <xs:maxLength value="510"></xs:maxLength> </xs:restriction> </xs:simpleType> </xs:element> <xs:element minOccurs="0" name="ORG_ADDRESS"> <xs:simpleType> <xs:restriction base="xs:string"> <xs:maxLength value="510"></xs:maxLength> </xs:restriction> </xs:simpleType> </xs:element> <xs:element minOccurs="0" name="CITY"> <xs:simpleType> <xs:restriction base="xs:string"> <xs:maxLength value="510"></xs:maxLength> </xs:restriction> </xs:simpleType> </xs:element> <xs:element minOccurs="0" name="STATE"> <xs:simpleType> <xs:restriction base="xs:string"> <xs:maxLength value="510"></xs:maxLength> </xs:restriction> </xs:simpleType> </xs:element> <xs:element minOccurs="0" name="ZIP"> <xs:simpleType> <xs:restriction base="xs:string"> <xs:maxLength value="510"></xs:maxLength> </xs:restriction> </xs:simpleType> </xs:element> <xs:element minOccurs="0" name="PAYEE"> <xs:simpleType> <xs:restriction base="xs:string"> <xs:maxLength value="510"></xs:maxLength> </xs:restriction> </xs:simpleType> </xs:element> <xs:element minOccurs="0" name="PAYMENT" type="xs:double"></xs:element> <xs:element minOccurs="0" name="PAYMENT_DATE" type="xs:dateTime"></xs:element> <xs:element minOccurs="0" name="CORRECTION"> <xs:simpleType> <xs:restriction base="xs:string"> <xs:maxLength value="510"></xs:maxLength> </xs:restriction> </xs:simpleType> </xs:element> <xs:element minOccurs="0" name="PAYMENT_TYPE"> <xs:simpleType> <xs:restriction base="xs:string"> <xs:maxLength value="510"></xs:maxLength> </xs:restriction> </xs:simpleType> </xs:element> <xs:element minOccurs="0" name="_RowNumber" type="xs:int"></xs:element> </xs:sequence> </xs:choice> </xs:complexType> </xs:element> </xs:schema> Number of rows returnedThe Number of Rows design time property controls the number of records/rows that will be returned in the XML output retrieved from the original Excel Worksheet after the WHERE clause (if provided) is evaluated. By default, the value of the property is -1, which would return all the rows after the WHERE clause is evaluated. NOTE: The Neuron ESB Message body will contain the output of the Process Step. The MessageId will be unchanged. However, the ParentMessageID property will be set to the current MessageID property. Post ProcessingThe Excel to XML will produce the output XML, setting it as the body of the existing Neuron ESB Message. With that, it will also set a number of custom message properties (listed in the table below) that can be used at runtime, providing meta data to the operations that may be performed on the XML. This includes the name of the Excel Worksheet, the file name of the Excel Workbook, the number of rows actually included in the XML from the Worksheet as well as information about the data structure of the XML (i.e. namespace, root node name, row record name). Note:Neuron ESB ships a sample demonstrating the Excel to Xml Process Step. http://www.neuronesb.com/neuron/Help3/Development/Samples_and_Walkthroughs/Process_Samples/Converting_Excel_To_XML.htm The prefix for all Excel to XML custom message properties it exceltoxml and they can be accessed directly from the Neuron ESB Message object using the GetProperty() or GetProperties() methods. All Neuron ESB Message properties can also be set using the Set Property Process Step. Neuron ESB Message Properties
|
|||||||||||||||||||||||||||||||||||||||||||
Dynamic ConfigurationThe Excel to XML Step provides the Filename property that can be set at runtime to provide a user with the name of the Excel Workbook that sourced the final output XML. This is strictly informational and is not used by the Process Step. If this is not provided, the Process Step will auto populate this property with the Filename custom message property populated by either the File, FTP, FTPS or SFTP adapter endpoint (assuming that the Excel file was originally consumed through one of them). If these properties do not exist on the existing Neuron ESB Message, than the temporary file name used to process the Excel Worksheet will be used. The Filename property can be set within a C# Code Step. context.Data.SetProperty("exceltoxml", "Filename", "Payments.xls");
|
|||||||||||||||||||||||||||||||||||||||||||
Installation RequirementsThe Excel to XML Process Step uses ODBC to translate Microsoft Excel documents into XML. To use this Process Step, the Microsoft Access Database Engine Redistributable must be installed. This in turn will install the necessary Microsoft Excel ODBC drivers that the Process Step uses. The Microsoft Access Database Engine Redistributable is available in 64 and 32 bit installations and can be downloaded using the following link: https://www.microsoft.com/en-us/download/details.aspx?id=13255 NOTE: 32 and 64 editions of Microsoft Office cannot be installed side by side. Once installed, open the ODBC Data Source Administrator utility to validate that the drivers have been installed. The ODBC Data Source Administrator comes in both a 32 and 64-bit version. Displayed below is the 32 bit version:
There are no other dependencies. Design Time Properties |
|||||||||||||||||||||||||||||||||||||||||||
|
|||||||||||||||||||||||||||||||||||||||||||
Sample |
|||||||||||||||||||||||||||||||||||||||||||
In the Sample below, the process demonstrates the use of the Excel to XML Process Step to receive an incoming binary Excel Spreadsheet, convert it to XML, validate and then batch split it so that each individual record can be processed on its own thread, increasing concurrency and throughput. The Split Process Step is configured to perform an Asynchronous Split using 20 threads. If an exception occurs processing any record, it is caught and the information regarding the exception as well as the Worksheet and row number that caused the error is reported in Neuron ESB Failed Messages Report. The parent Process, Payment Batch Processing, is responsible for converting the Excel Worksheet into XML. The XML batch message is validated against an XSD Schema generated by the Process Step. The Execute Process Step is then used to call a child Process, Payment Processor, which captures some meta data and then uses the Split Process Step, allowing each individual record to be processed on a dedicated thread and validated by an XSD Schema. It is in this Process where individual record exceptions can be caught and reported.
|
|||||||||||||||||||||||||||||||||||||||||||
The Payment Batch Processing Process can be tested in the Business Process Designer by clicking the Test button on the toolbar, launching the Edit Test Message form (displayed below). The Load File toolbar button can be used to select the Excel Worksheet to load into the dialog. Additionally, the exceltoxml.Filename custom Neuron ESB Message property is populated with the name of the Excel Workbook, so its value can be used later in the Process. |
|||||||||||||||||||||||||||||||||||||||||||

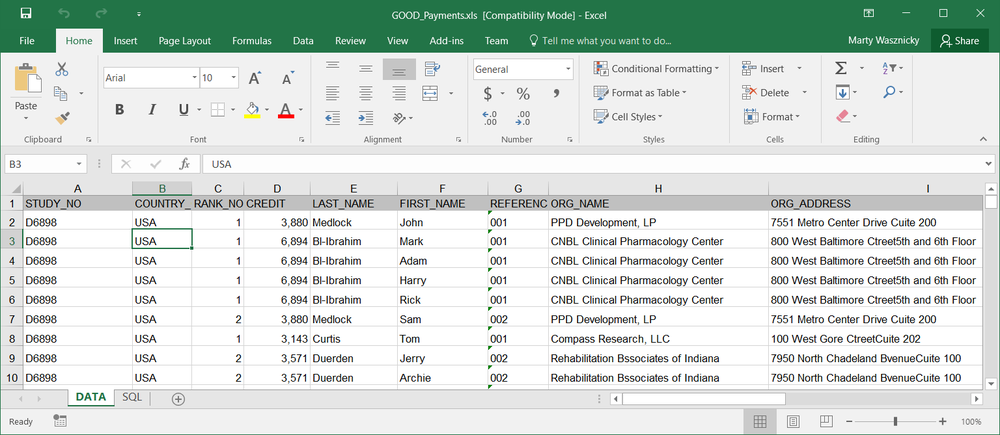
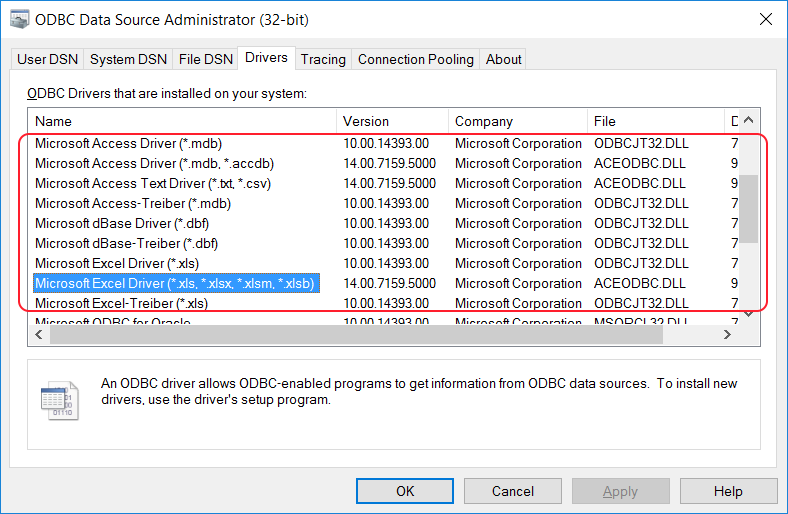
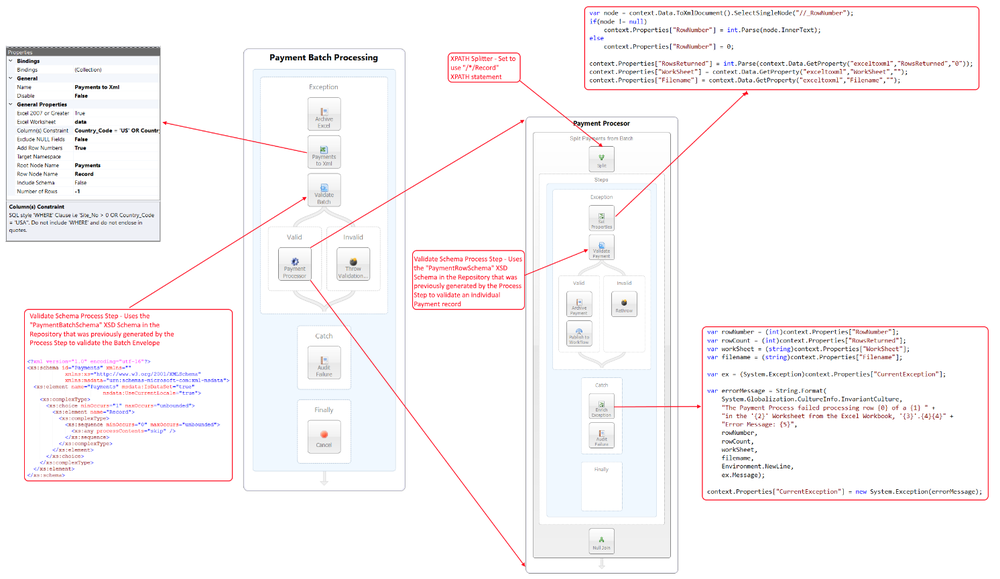
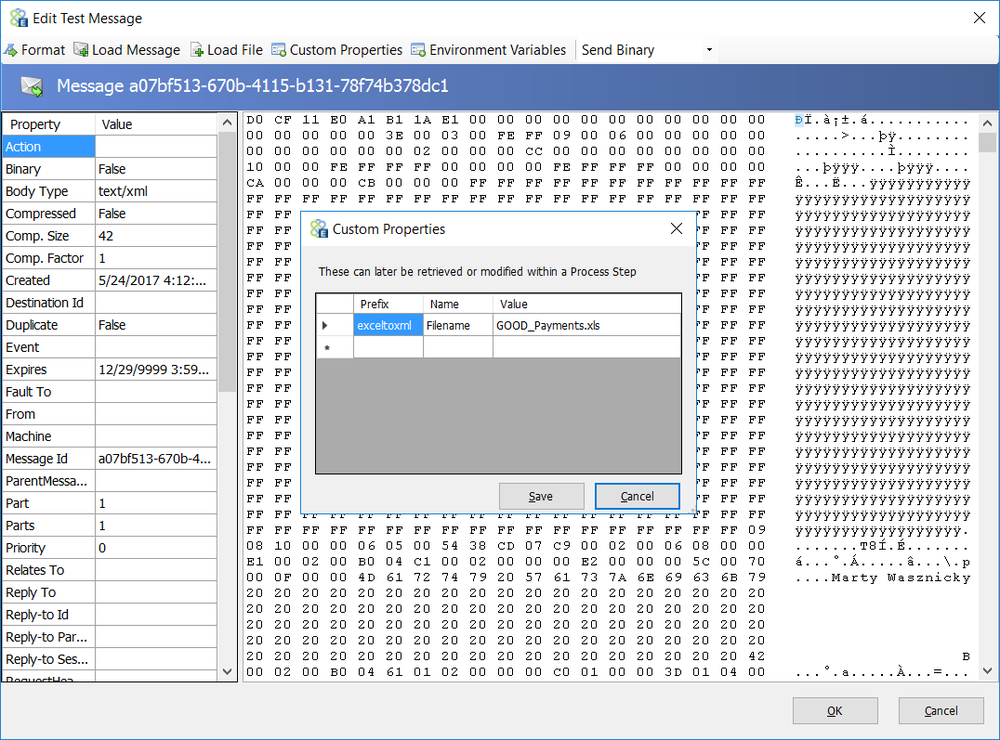
If an error occurs during the processing of a record, it would be captured and reported to the Failed Messages report by using the Audit Step. By enriching the exception with the existing metadata populated by the Excel to XML Process Step, a more valuable error message will be captured and displayed to the user as indicted in the screen shot of the Failed Message Viewer below:
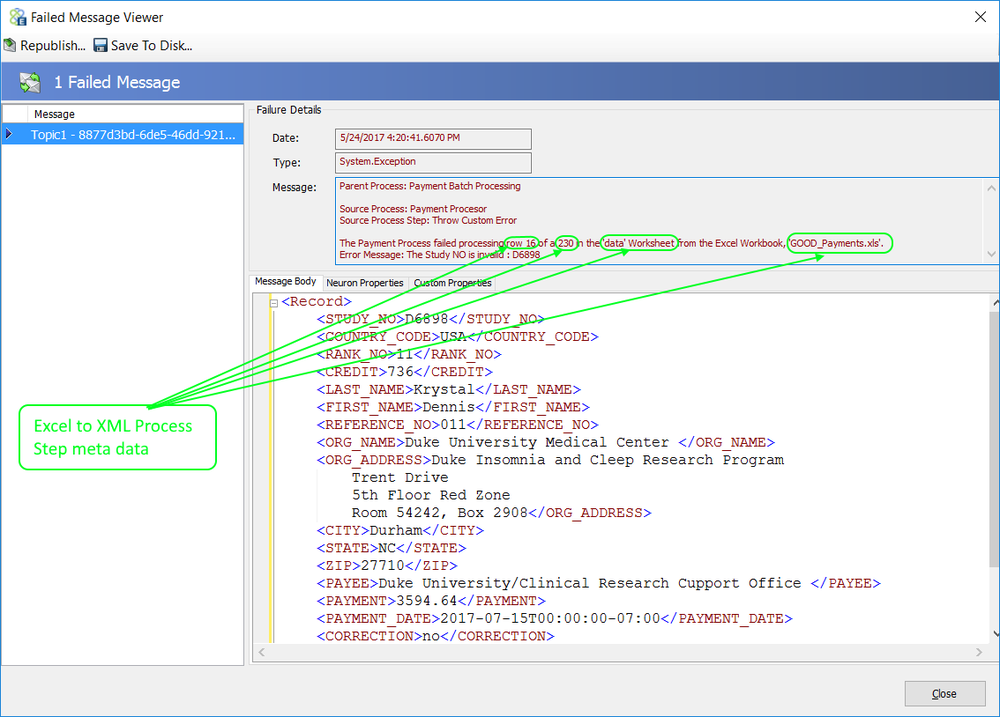
Flat File to Xml
|
Category: |
Message |
|||||||||||||||||||||||||||||||||||||||||||
Class: |
FlatFileParserStep |
||||||||||||||||||||||||||||||||||||||||||||
Namespace: |
Neuron.Esb.Pipelines |
||||||||||||||||||||||||||||||||||||||||||||
Assembly: |
Neuron.Esb.Pipelines.dll |
||||||||||||||||||||||||||||||||||||||||||||
Description: The Flat File to Xml Process Step is a flat file parser that is used to convert single record format flat files into XML or JSON. The supported flat files must have the following attributes:
Fixed width and delimited files are commonly received through File, FTP, FTPS, SFTP interfaces or Queuing technologies like IBM MQSeries when integrating external business partners or legacy systems. Once received, this information often needs to be processed and de-composed to update other systems or participate in various business-processing scenarios. The Flat File to Xml Process Step is used to translate and normalize this information into an XML structure that can be easily consumed by participating systems. The Flat File to Xml Step launches a Wizard that walks a user through creating a Flat File Definition. The Definition contains all the instructions and properties that are used by the Flat File Parser (runtime engine) to translate incoming files to XML structures (i.e. type of delimiter, field names, lines to process, width size, data types, etc.). Although XML is the default document output type, JSON can be produced instead by modifying the Output Document Type property in the Steps property grid. The following is an example of a comma delimited file where the column names are included as the first row: COMPANY,VENDOR,INVOICE,DIST-SEQ-NBR,ORIG-TRAN-AMT 0060, 1012091,614581478 ,0,000000005062.07 0060, 1012091,614581478 ,0,000000000363.11 0060, 1012091,614581478 ,0,000000000174.41 0060, 1012091,614581478 ,0,000000000262.07 0060, 1012091,614581478 ,0,000000000031.34 0001, 1001137,139364 ,0,000000000255.58 0001, 1001137,139364 ,0,000000000016.46 Using the Flat File Wizard, a Definition can be created that will convert the data above into the normalized XML Structure shown below: <Payments xmlns="http://www.ordersrus.com/payments"> <Invoice> <COMPANY>0060</COMPANY> <VENDOR>1012091</VENDOR> <INVOICE>614581478</INVOICE> <DIST_SEQ_NBR>0</DIST_SEQ_NBR> <ORIG_TRAN_AMT>5062.07</ORIG_TRAN_AMT> </Invoice> <Invoice> <COMPANY>0060</COMPANY> <VENDOR>1012091</VENDOR> <INVOICE>614581478</INVOICE> <DIST_SEQ_NBR>0</DIST_SEQ_NBR> <ORIG_TRAN_AMT>363.11</ORIG_TRAN_AMT> </Invoice> </Payments> If JSON is selected for the Output Document Type, the following will be produced:
{
	"Payments": {
		"@xmlns": "http://payments.org/invoices",
		"Invoice": [
			{
				"COMPANY": "60",
				"VENDOR": "1012091",
				"INVOICE": "614581478",
				"DIST_SEQ_NBR": "0",
				"ORIG_TRAN_AMT": "5062.07"
			},
			{
				"COMPANY": "60",
				"VENDOR": "1012091",
				"INVOICE": "614581478",
				"DIST_SEQ_NBR": "0",
				"ORIG_TRAN_AMT": "363.11"
			}
		]
	}
}
Optionally, based on user selected options the following XSD Schema can be generated for the XML Structure in case XSD Schema validation is required in the Business Process: <xs:schema attributeFormDefault="qualified" elementFormDefault="qualified" id="Payments" targetNamespace="http://www.ordersrus.com/payments" xmlns="http://www.ordersrus.com/payments" xmlns:msdata="urn:schemas-microsoft-com:xml-msdata" xmlns:mstns="http://www.ordersrus.com/payments" xmlns:xs="http://www.w3.org/2001/XMLSchema"> <xs:element name="Payments"> <xs:complexType> <xs:choice maxOccurs="unbounded" minOccurs="0"> <xs:element name="Invoice"> <xs:complexType> <xs:sequence> <xs:element minOccurs="0" name="COMPANY" type="xs:string"></xs:element> <xs:element minOccurs="0" name="VENDOR" type="xs:int"></xs:element> <xs:element minOccurs="0" name="INVOICE" type="xs:int"></xs:element> <xs:element minOccurs="0" name="DIST_SEQ_NBR" type="xs:int"></xs:element> <xs:element minOccurs="0" name="ORIG_TRAN_AMT" type="xs:double"></xs:element> </xs:sequence> </xs:complexType> </xs:element> </xs:choice> </xs:complexType> </xs:element> </xs:schema> Creating a Flat File DefinitionThe Flat File to Xml Step includes a wizard that assists users in creating the Flat File Definition. The Definition cannot be created without using the wizard. Definitions can be created either from scratch or by using a sample Flat File. Sample Flat Files can be imported into the Neuron ESB Text Document Repository located by navigating to Repository->Documents->Text Documents within the Neuron ESB Explorer or, can be retrieved directly from the file system. Once created, the definition is stored as a set of hidden properties of the Flat File to Xml Process Step. Launching the Flat File WizardTo start the wizard, right-click on the Flat File to Xml Process Step in the Business Process Designer and select Flat File Wizard right click context menu as shown below:
The wizard can also be started by double clicking on the icon with the computers mouse. This will display the following Welcome page of the wizard:
Clicking the Next button will navigate the user to the Flat File Type page of the wizard:
Flat File TypesThe Flat File Wizard is designed to work with Fixed Width or Delimited (including CSV) flat files. The primary difference between working with both is that the user must define exactly where the column breaks are located with Fixed Width formatted files. Fixed WidthFixed Width Flat Files are different from Delimited Flat Files in so far that a set number of spaces or tabs separates each column, limiting each field in length. There is no requirement that the distance between each column in a Flat File be the same. Below are some examples of Fixed Width Flat Files that can be parsed by the wizard, the first without column names, the second that includes column names as the first row: Jim Glynn someone_j@example.com Coho Winery 555-0109 Maria Campbell someone_d@example.com Fabrikam Inc. 555-0103 Nancy Anderson someone_c@example.com Adventure Works 555-0102 Patrick Sands someone_k@example.com Alpine Ski House 555-0110 Paul Cannon someone_h@example.com Alpine Ski House 555-0107 With column names: Name Address City StZip PhoneNumber Joe Hare 21515 NE Alder Crest Dr. Redmond WA98053425-941-0457 Josh Hare 11317 165th Ct. NE Redmond WA98052425-869-1050 On the Flat File Type page, select the Fixed Width option and click the Next button to display the Fixed Width Flat File page of the wizard as displayed below:
The Fixed Width Flat File page displays options for creating a user defined Flat File Definition or, creating a Flat File Definition by using a sample document loaded directly from the file system or from the Neuron ESB Explorers Text Documents Repository. In the following example, well load the sample document directly from the repository:
As seen in the previous screen shot, the sample file is loaded from the repository by, selecting the Repository radio button and selecting a document from the list. The selected document is used to populate the lower preview pane with the first 10 rows. Some flat files include column header names in the first line/row. If the flat file includes column headers, check the box for First Row Contains Column Names. Also, if the Flat File Parser needs to ignore any of the leading or trailing rows, indicate how many of each row to ignore. This would generally be used if the flat file contained headers or footers. When parsing a fixed width file column break locations must be provided. To set a column break, click anywhere in the preview pane and a vertical line will appear. Click the line again and it will disappear. Note you dont have to click on the ruler above the preview pane, just click inside the preview pane:
Once the columns are set, clicking the Next button will navigate the user to the Column Details page of the wizard. This page can be used to either create column names or rename existing default column names. If column names were not already provided in the sample and the First Row Contains Names option was not checked, column names will be auto created for the sample in the format of Field1, Field2, Field3, and so on. This page also allows users to define Trim options, Optional Fields and Data Types. As entries are made, the changes will be visible in the preview pane. When parsing Fixed Width files, this page can be used to adjust the Start Index and Width of each column. In the image below, Field1 is renamed to Name, Field2 to EmailAddress, Field3 to CompanyName and Field4 to Phone:
When creating a Flat File Definition using sample documents, the Start Index and Width properties of each column is automatically calculated when column breaks are set on the preceding Fixed Width Flat File page of the wizard. Users should only have to set these properties if the User Defined option is selected. NOTE: Whether column names are provided within a sample flat file, renamed or user defined, they must use valid XML characters. Spaces, periods and other invalid characters (i.e. \~#%&*{}/:<>?|\"-.), will be replaced with an underscore character. NOTE: Duplicate column names are not allowed. If they are included within a sample flat file, each duplicate will be appended with an underscore followed by an index number ensuring that all column names are unique. After finishing the wizard (clicking the Finish button), the Flat File Definition is stored as a Process Step property. The wizard can be launched and rerun again to view or edit the existing Flat File Definition. To finalize the structure of the xml that the Flat File Parser will produce when processing the flat file, the Root Element Name, Row Element Name and Namespace can be modified in the Process Steps property page as shown below:
The Flat File Definition can be tested using the Business Process Designer, which will produce the following output in the Trace window:
DelimitedThe Flat File to XML Wizard can process CSV and Delimited files by choosing the Delimited option on the Flat File Type page of the wizard. The difference between CSV and Delimited files are:
Compared to Fixed Width Flat Filesthat use spaces to force every field to the same width, aDelimited/CSV filehas the advantage of allowing field values of any length. The Flat File Type page allows users to either Comma, Tab, Semicolon, Vertical Bar (Pipe) or a custom defined set of characters as field delimiters. Below are some examples of Delimited Flat Files that can be parsed by the wizard: Using Vertical Bar as delimiter: Joe Hare|24415 NW Alder Crest Dr.|Redmond|WA|98053|425-789-0457 Josh Hare|14417 145th Ct. NE|Redmond|WA|98052|425-456-1050 Using Semicolon as delimiter: Joe Hare;24415 NW Alder Crest Dr.;Redmond;;98053;425-789-0457 Josh Hare;14417 145th Ct. NE;Redmond;;98052;425-456-1050 With Quote Character: 20080,1014631,Heritage Electrical Services,07/19/2016,1607182,830.00,USD,200800001,800054,07/19/2016 01053,1003276,Massglass & Door Facilities Ma,08/01/2016,221286,436.25,USD,010530006,800070,08/22/2016 20102,1013681,"FIVE STAR REFRIGERATION, INC",07/29/2016,2910, "1,786.86",USD,201020002,800062,07/29/2016 With column names and Quote Character: COMPANY,VENDOR,INVOICE,DIST-SEQ-NBR,ORIG-TRAN-AMT 0060, 1012091,614581478 ,0,"000000005,062.07" 0060, 1012091,614581478 ,0,"000000000363.11" 0060, 1012091,614581478 ,0,"000000000174.41" 0060, 1012091,614581478 ,0,"000000067,262.07" 0060, 1012091,614581478 ,0,"000000000031.34" 0001, 1001137,139364 ,0,"000000002,255.58" 0001, 1001137,139364 ,0,"000000000016.46" On the Flat File Type page, select the Delimiter option and click the Next button to display the Delimiter Flat File page of the wizard as displayed below:
The Delimited Flat File page displays options for creating a user defined Flat File Definition or, creating a Flat File Definition by using a sample document loaded directly from the file system or from the Neuron ESB Explorers Text Documents Repository. In the following example, well load a sample document directly from the repository which includes column names and quoted fields:
Unlike working with Fixed Width Flat Files, column break lines do need to be set. Using the sample above, column names are included, requiring that the First Row Contains Column Names to be checked. What is also visible is that the ORIG-TRAN-AMT column values are enclosed in double quotes (Quote Character). After all the options have been selected, clicking on the Next button would display the following warning:
This indicates that the wizard has detected more delimiters in a row than there are column names. To resolve this, the wizard has to be directed to use a Quoted Character for the fifth column, ORIG-TRAN-AMT. This can be accomplished by temporarily selecting the User Defined option, followed by clicking the Next button. Depending on what was selected, either the column names listed in the sample file will be listed or generic field names (i.e. Field1, Field2, etc.):
Once the Column Details page appears, click on either Field5 or the ORIG_TRAN_AMT column (depending on what is visible) and enter a double quote in the Quote Character text box and hit enter, followed by clicking the Back button. This will display the Delimited Flat File page of the Wizard. The sample file and options previously selected should be visible. Lastly, navigate back to the Column Details page by hitting Next. The Column Details preview should be displayed correctly, without generating the warning message previously encountered as shown below:
NOTE: Whether column names are provided within a sample flat file, renamed or user defined, they must use valid XML characters. Spaces, periods, hyphens and other invalid characters (i.e. \~#%&*{}/:<>?|\"-.), will be replaced with an underscore character. Similar to the Fixed Width process, If column names were not provided in the sample or this was a user defined Flat File Definition, column names can be created or renamed. This page allows users to define Trim options, Optional Fields and Data Types. As entries are made, the changes will be visible in the preview pane. Unlike Fixed Width flat files, the Start Index and Width properties are disabled when processing Delimited files. Delimited Flat File Definitions can be tested in the Business Process Designer just like Fixed Width Flat File Definitions. To finalize the structure of the xml that the Flat File Parser will produce when processing the flat file, the Root Element Name, Row Element Name and Namespace can be modified in the Process Steps property page as shown below:
The Flat File Definition can be tested using the Business Process Designer, which will produce the following XML output: <Payments xmlns="http://payments.org/invoices"> <Invoice> <COMPANY>0060</COMPANY> <VENDOR>1012091</VENDOR> <INVOICE>614581478</INVOICE> <DIST_SEQ_NBR>0</DIST_SEQ_NBR> <ORIG_TRAN_AMT>000000005,062.07</ORIG_TRAN_AMT> </Invoice> <Invoice> <COMPANY>0060</COMPANY> <VENDOR>1012091</VENDOR> <INVOICE>614581478</INVOICE> <DIST_SEQ_NBR>0</DIST_SEQ_NBR> <ORIG_TRAN_AMT>000000000363.11</ORIG_TRAN_AMT> </Invoice> </Payments> User Defined DefinitionsThe User Defined option can be selected on the Flat File (Delimiter or Fixed Width) wizard page when a sample document is not available to use to create or validate a Flat File Definition. This option can also be useful when creating Flat File Definitions for flat files with optional fields or for delimited flat files with quoted fields and the quoted field will contain the delimiter. For example, using a flat comma-separated file with these three fields: 1234,Neuron,Neudesic, LLC. If a sample file with this data is used, the Flat File Parser will read that as four fields. To create a Flat File Definition that can parse the data correct, select the User Defined option as shown below:
Clicking on the Next button will display the Column Details page where column names can be manually entered using the right-click context menu of the Columns list box. Select Add to manually add the fields as shown below:
After adding the first column, the right-click context menu provides the following options:
Once all the columns and their properties have been defined, clicking the Finish button will save the Flat File Definition. This can be tested normally like the previous samples within this document. Schema GenerationThe Include Schema design time property can be used to generate an XSD Schema that represents the XML output of the Flat File to Xml Process Step. This can be useful validating the output within the Business Process at runtime or in other parts of the system using the Validate Schema Process Step. This property should only be set to True during development to retrieve the XSD Schema, if one is needed. Usually this would be done by running a test within the Business Process Designer, capturing the output using a Trace Process Step or Audit Process Step, and then copying the XSD portion into the Neuron ESB Schema Repository. There are several elements of the Flat File Definition that control the output of the XSD Schema and XML. The remainder of this section will based on the flat file sample used in the Fixed Width section above: COMPANY,VENDOR,INVOICE,DIST-SEQ-NBR,ORIG-TRAN-AMT 0060, 1012091,614581478 ,0,"000000005,062.07" 0060, 1012091,614581478 ,0,"000000000363.11" 0060, 1012091,614581478 ,0,"000000000174.41" 0060, 1012091,614581478 ,0,"000000067,262.07" 0060, 1012091,614581478 ,0,"000000000031.34" 0001, 1001137,139364 ,0,"000000002,255.58" 0001, 1001137,139364 ,0,"000000000016.46" In an earlier section of the document, the sample above was used to generate a Flat File Definition. To finalize the structure of the xml that the Flat File Parser would produce when processing the flat file, the Root Element Name, Row Element Name and Namespace can be modified in the Process Steps property page as shown below:
Using the modified properties, the Flat File Definition produced the following XML output:
However, by default all the columns were set to use the string datatype, even though some were integers and doubles. Additionally, some fields had an extra trailing space. In the following example, the columns are modified changing some to integers and doubles, while trimming the spaces off others. The Data Type drop down list located on the Column Details page of the Wizard is populated with the basic data types defined in the .NET Framework. As shown below the columns have been reset to specifically to the following:
This will result in the following output XML:
When the Include Schema design time property is set to True, an XSD Schema will be pre-pended to the output XML. The XSD Schema representing the xml will look like this. <xs:schema attributeFormDefault="qualified" elementFormDefault="qualified" id="Payments" targetNamespace="http://payments.org/invoices" xmlns="http://payments.org/invoices" xmlns:msdata="urn:schemas-microsoft-com:xml-msdata" xmlns:mstns="http://payments.org/invoices" xmlns:xs="http://www.w3.org/2001/XMLSchema"> <xs:element name="Payments"> <xs:complexType> <xs:choice maxOccurs="unbounded" minOccurs="0"> <xs:element name="Invoice"> <xs:complexType> <xs:sequence> <xs:element minOccurs="0" name="COMPANY" type="xs:int"></xs:element> <xs:element minOccurs="0" name="VENDOR" type="xs:int"></xs:element> <xs:element minOccurs="0" name="INVOICE" type="xs:string"></xs:element> <xs:element minOccurs="0" name="DIST_SEQ_NBR" type="xs:int"></xs:element> <xs:element minOccurs="0" name="ORIG_TRAN_AMT" type="xs:double"></xs:element> </xs:sequence> </xs:complexType> </xs:element> </xs:choice> </xs:complexType> </xs:element> </xs:schema> At runtime, the Flat File Parser will use the data types represented in the XSD Schema above to validate the incoming data during the parsing process. NOTE: The Neuron ESB Message body will contain the output of the Process Step. The MessageId will be unchanged. However, the ParentMessageID property will be set to the current MessageID property. Optional FieldsThe Column Details page of the wizard provides an Optional Field check box. This is used to indicate that a column may not be present in the data being parsed. If a column is marked as an Optional Field in a Flat File Definition, all columns that follow it must also be marked as Optional Fields. For instance, in the previous sample there are a COMPANY, VENDOR, INVOICE, DIST_SEQ_NBR and ORIG_TRAN_AMT columns. Below is a modified source file for that sample: COMPANY,VENDOR,INVOICE,DIST-SEQ-NBR,ORIG-TRAN-AMT 0060, 1012091,614581478 ,0 0060, 1012091,614581478 ,6 0060, 1012091,614581478 , 0060, 1012091,614581478 ,0 0060, 1012091,614581478 ,0 0001, 1001137,139364 ,0 0001, 1001137,139364 ,0 As indicated in the sample above, the delimiter (,) for the ORIG_TRAN_AMT column is missing. If the ORIG_TRAN_AMT column is not marked as an Optional Field, the following error will be reported by the Flat File Parser: Delimiter ',' not found after field 'DIST_SEQ_NBR' (the record has less fields, the delimiter is wrong or the next field must be marked as optional). However, if the column is marked as an Optional Field, the following xml output will be generated with a default value used for the ORIG_TRAN_AMT column: <Payments xmlns="http://www.ordersrus.com/payments"> <Invoice> <COMPANY>0060</COMPANY> <VENDOR>1012091</VENDOR> <INVOICE>614581478</INVOICE> <DIST_SEQ_NBR>0</DIST_SEQ_NBR> <ORIG_TRAN_AMT>0</ORIG_TRAN_AMT> </Invoice> <Invoice> <COMPANY>0060</COMPANY> <VENDOR>1012091</VENDOR> <INVOICE>614581478</INVOICE> <DIST_SEQ_NBR>6</DIST_SEQ_NBR> <ORIG_TRAN_AMT>0</ORIG_TRAN_AMT> </Invoice> </Payments> Alternatively, if a delimiter for the ORIG_TRAN_AMT column is in place as shown below, then the field does not need to be marked as optional as the default value for its assigned data type will be used to populate the field in the XML output. In the case of a string data type and empty field element will be used. Lastly, missing field values in preceding columns will be replaced with their default data type values in the output xml. COMPANY,VENDOR,INVOICE,DIST-SEQ-NBR,ORIG-TRAN-AMT 0060, 1012091,614581478 ,0, 0060, 1012091,614581478 ,6, 0060, 1012091,614581478 ,, 0060, 1012091,614581478 ,0, 0060, 1012091,614581478 ,0, 0001, 1001137,139364 ,0, 0001, 1001137,139364 ,0, NOTE: Columns set to use either a Char or GUID data type cannot be marked as Optional Fields. Additionally, missing values for columns using the Char or GUID data type will generate a parsing error. Engine CachingThe Flat File to Xml Process Step uses a cache of parsing engines based on the Name property of the Process Step. Therefore, the Name property of the Process Step must always be set if there is more than one Flat File to Xml Process Step being used in the same Business Process. If a Name is not provided, the following warning will be written to the Neuron ESB Log files The current Flat File Parser Process Step does not have a value for its name property. If there is only one Flat File Parser process Step on the 'New Process 1*' Business Process then the correct parsing engine will be used. If there are more than one, and they are configured to use different Flat File Parsing definitions, the wrong engine will be used to parse incoming files. Please ensure that each Flat File Parser Process Step is assigned a unique name The prefix for all Flat File to Xml custom message properties it flatfile and they can be accessed directly from the Neuron ESB Message object using the GetProperty() or GetProperties() methods. All Neuron ESB Message properties can also be set using the Set Property Process Step. Neuron ESB Message Properties
|
|||||||||||||||||||||||||||||||||||||||||||||
Dynamic ConfigurationThe Flat File to Xml Step allows for dynamically setting the First Row Contains Header Names, First Rows to Ignore and Last Rows to Ignore properties within a C# Process Step or by using the Set Property Process Step. context.Data.SetProperty("flatfile", "FirstLinesToIgnore", "2");
|
|||||||||||||||||||||||||||||||||||||||||||||
Design Time Properties |
|||||||||||||||||||||||||||||||||||||||||||||
|
|||||||||||||||||||||||||||||||||||||||||||||

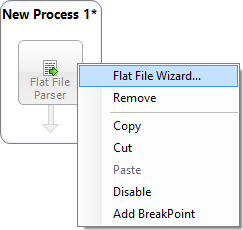
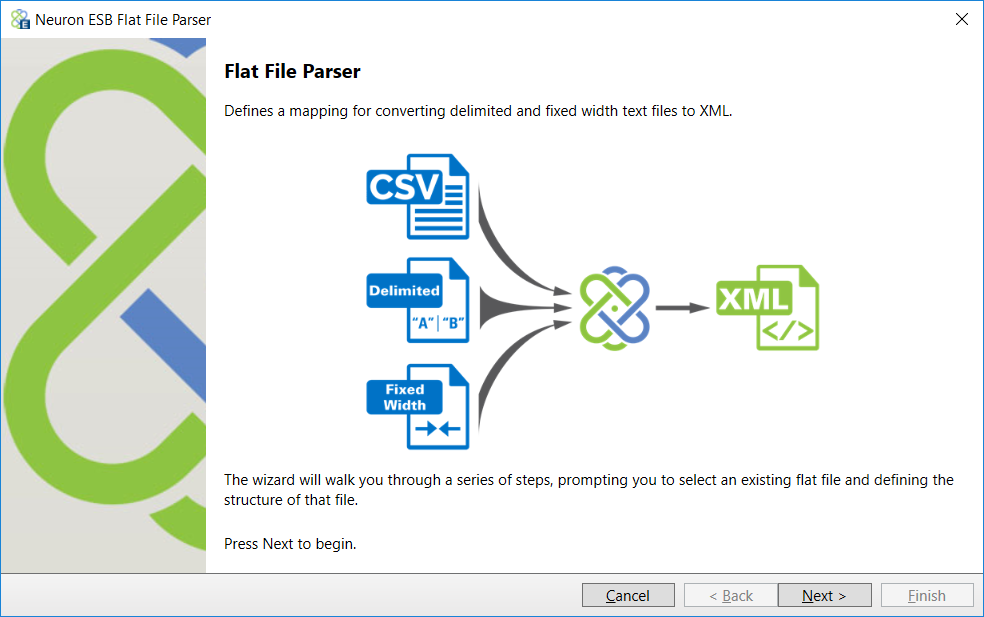
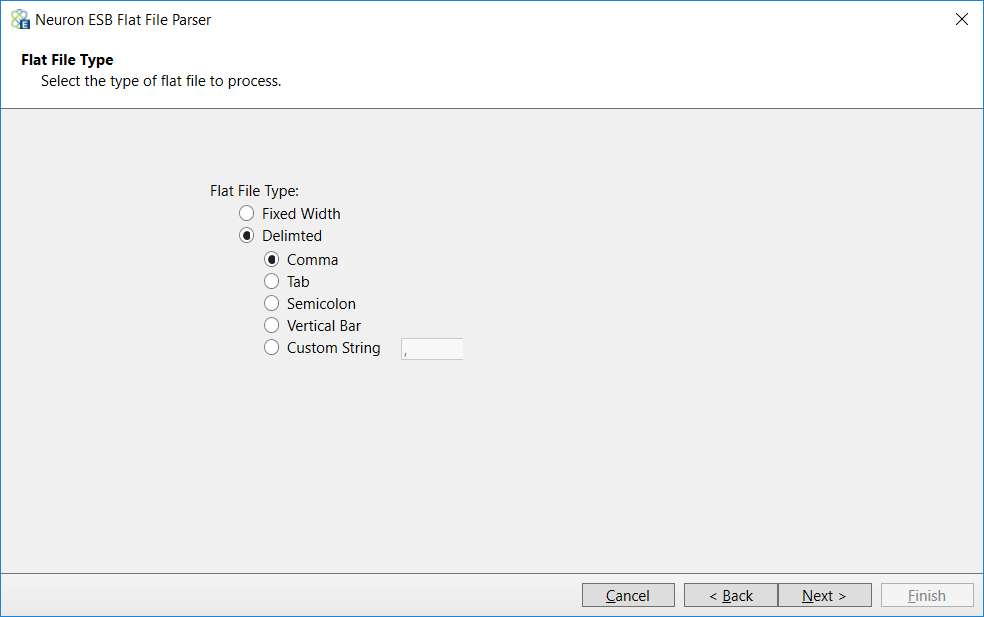
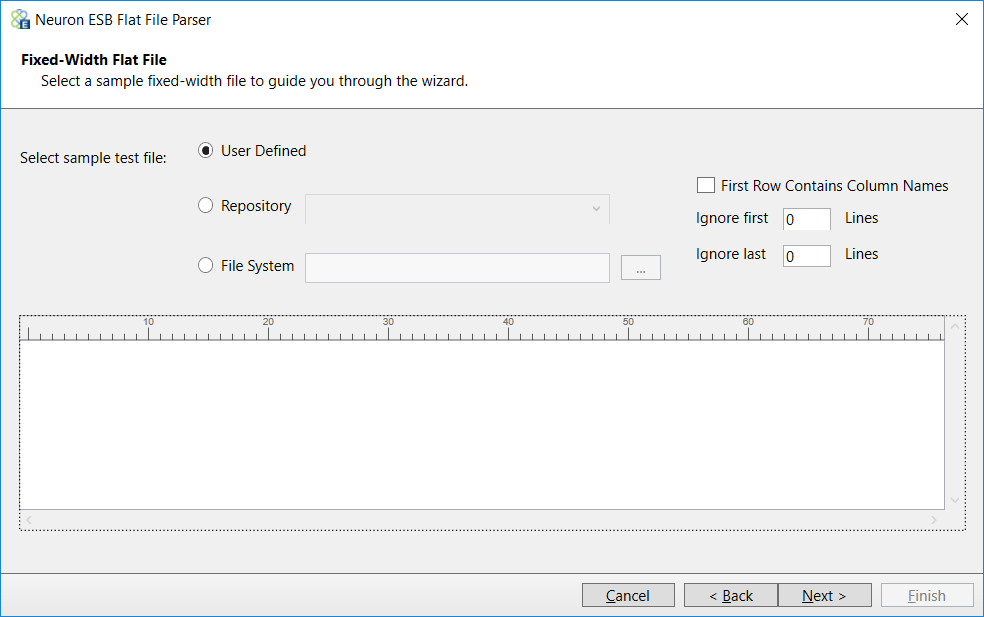
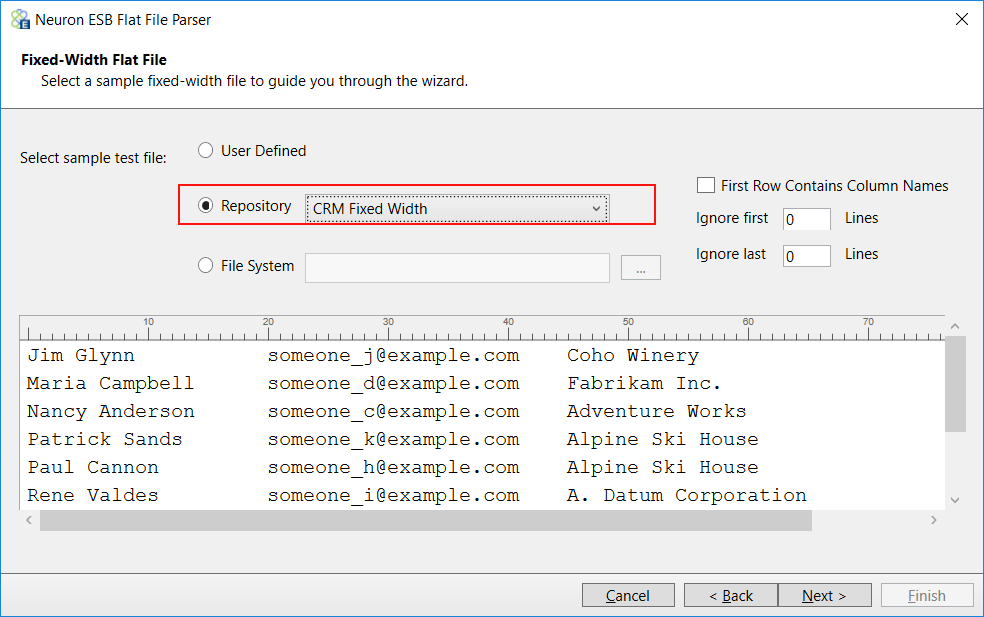
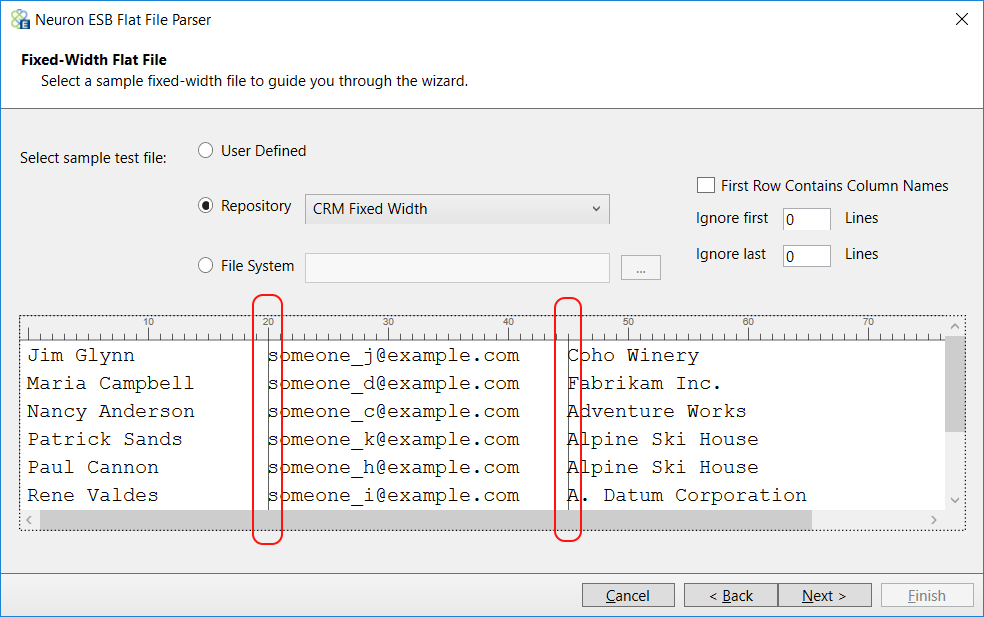
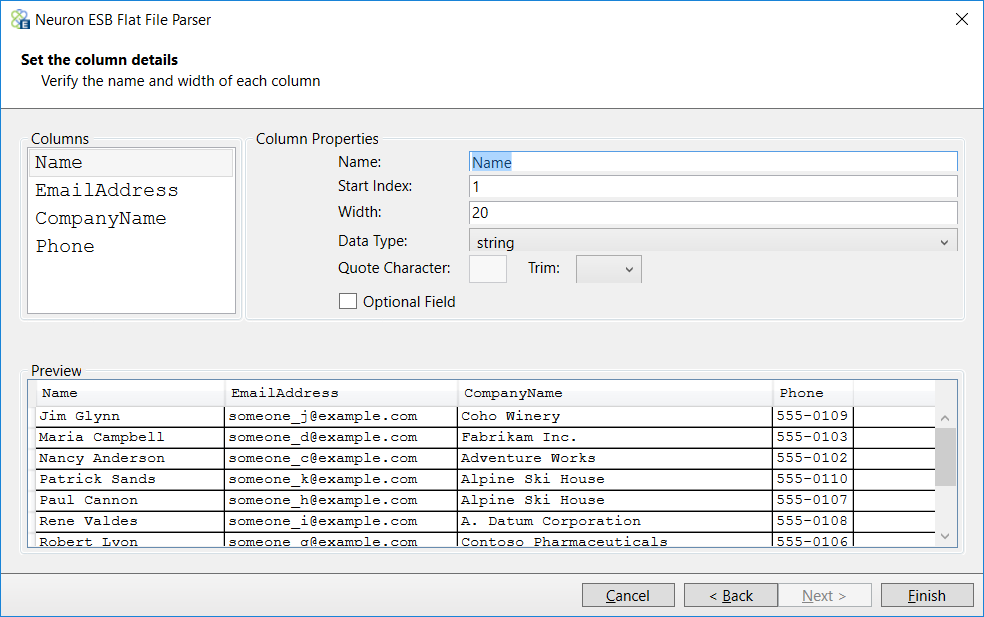
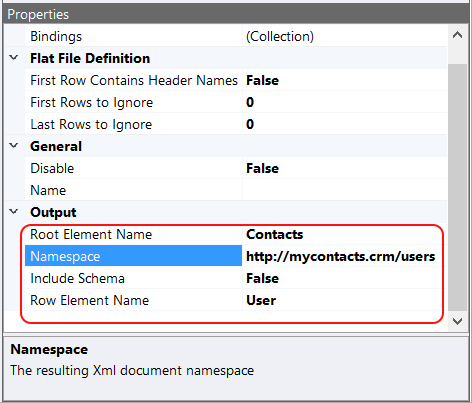
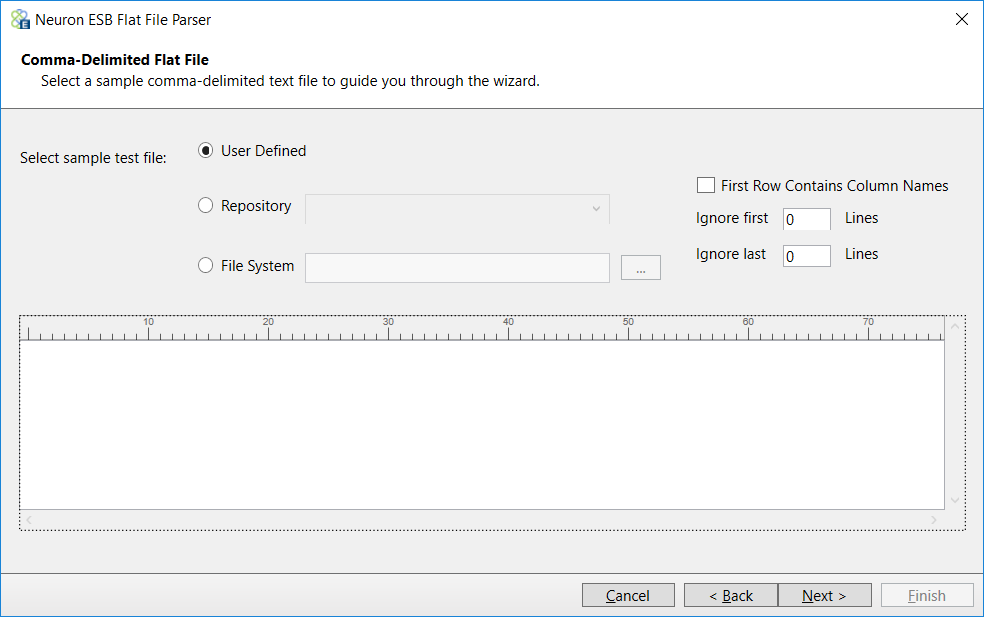
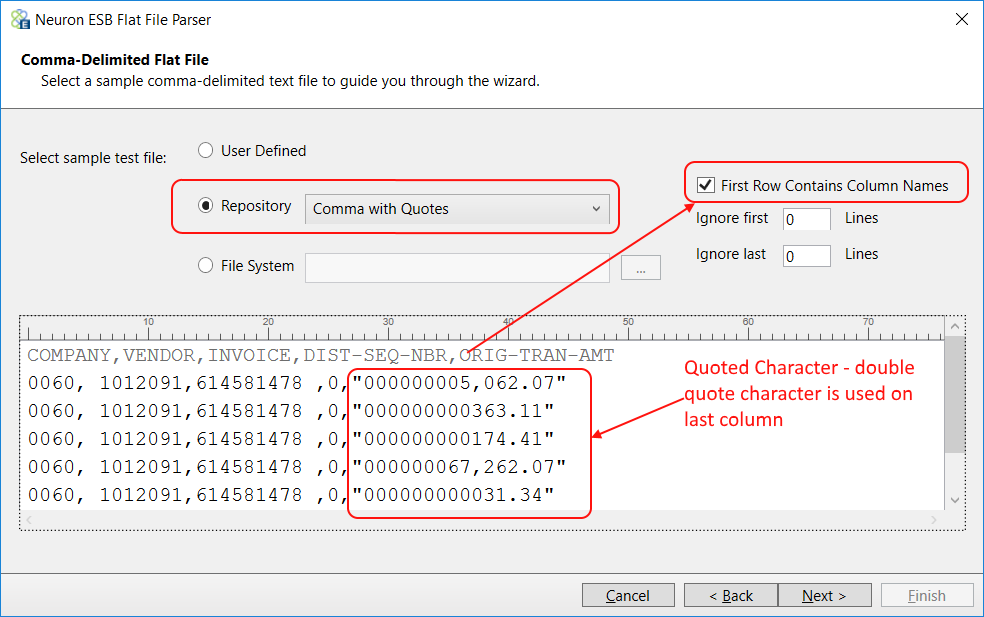
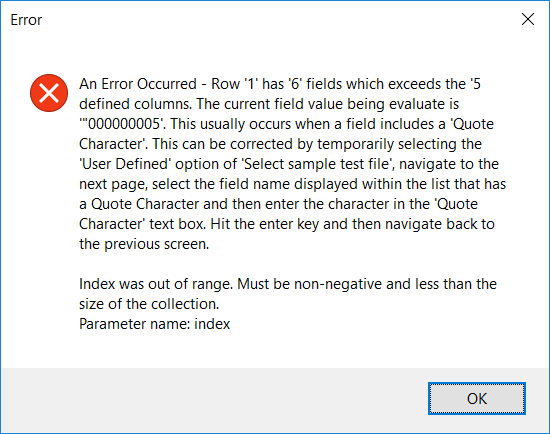


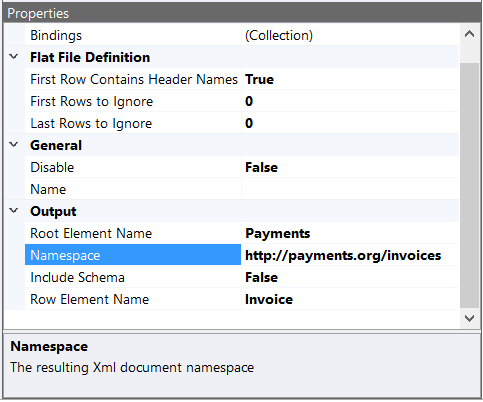
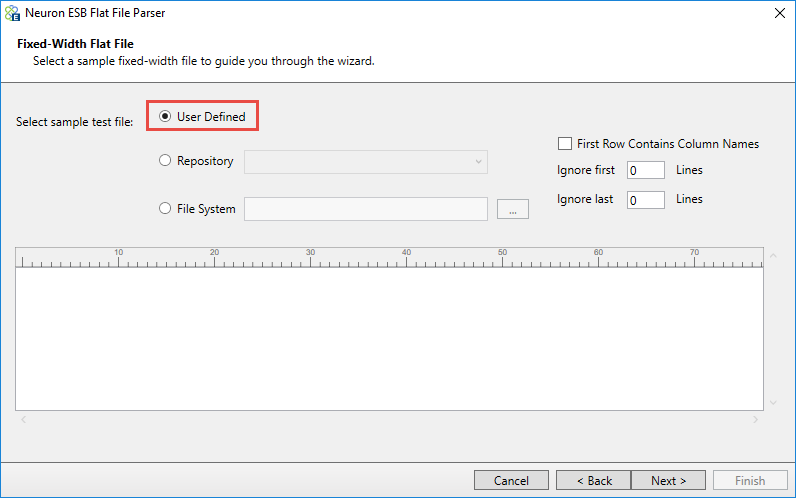

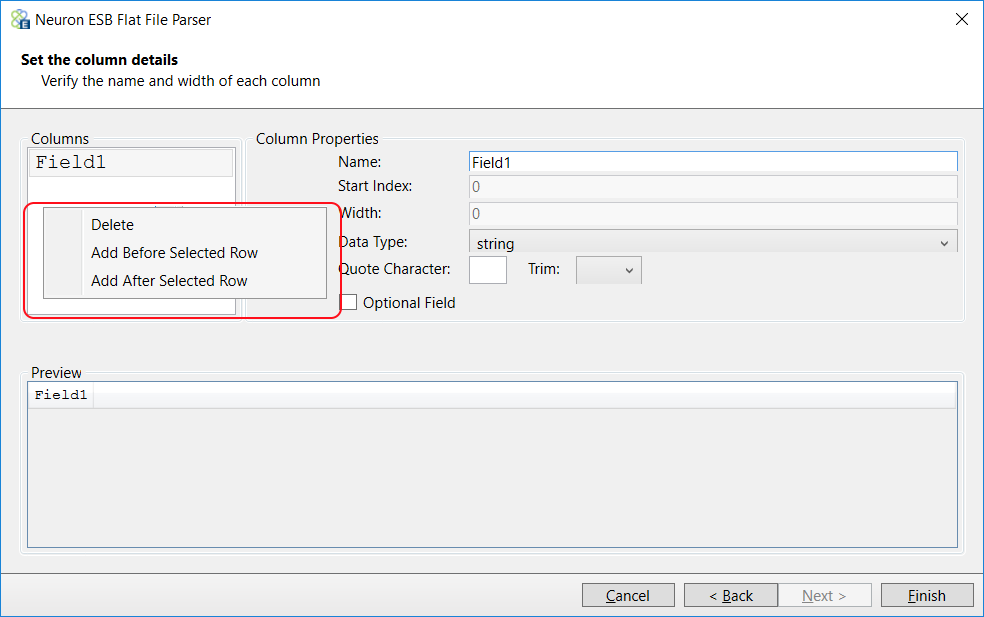
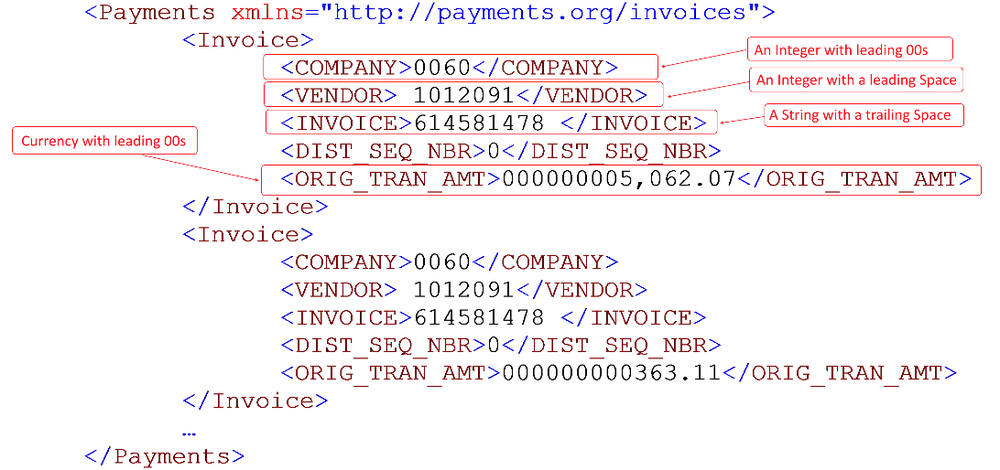
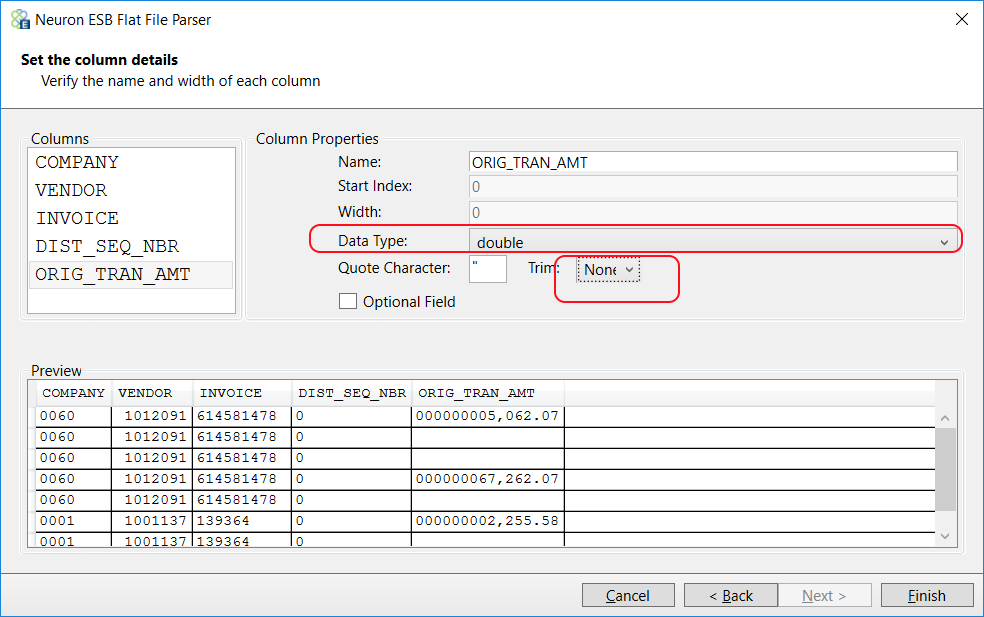
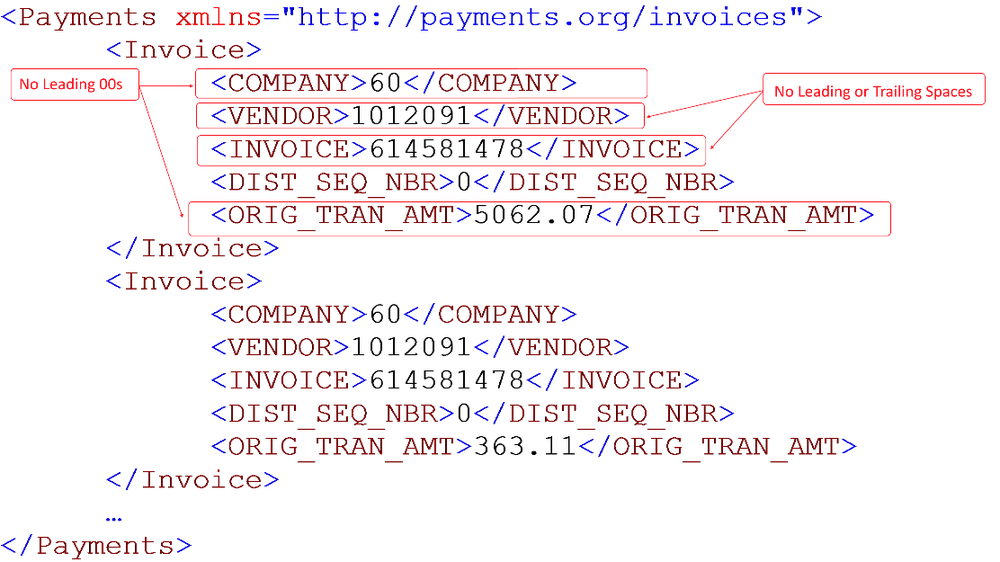
JSON
|
Category: |
Message |
|||||||||||||||||||||||||||||||||||
Class: |
JsonXmlProcessStep |
||||||||||||||||||||||||||||||||||||
Namespace: |
Neuron.Esb.Pipelines |
||||||||||||||||||||||||||||||||||||
Assembly: |
Neuron.Esb.Pipelines.dll |
||||||||||||||||||||||||||||||||||||
Description: The JSON Process Step is used to translate .NET Class instances and XML documents to JSON and back again. The Process Step uses the Newtonsoft JSON library (JSON.NET) to handle serialization to JSON and deserialization from JSON. The Convert To design time property determines the translation mode of the Process Step. There are three options available to users:
The Process Step provides a number of features that controls the format of the JSON, including:
Convert to JSONThe primary use of the JSON Process Step is to convert either .NET Serializable Class instances or XML documents to properly formatted JSON documents. In either case, the JSON Process Step provides a number of features that can be used to determine the format of the JSON produced. Once the JSON message has been serialized into the Neuron ESB Message, the HTTP.ContentType of the Neuron ESB Message object will be set to "application/json". Using Newtonsoft Directives:For example, the following incoming XML document uses the json:Array attribute from JSON.NET to direct the Process Step to produce JSON in the expected Array format: <contractLines json:Array="true" xmlns:json="http://james.newtonking.com/projects/json"> <lineId>38939e01-cb69-4d0d-8747-164e33a35aec</lineId> <lineId>37839d01-rt56-4d0d-8747-164e33a15aec</lineId> <lineId>34639f01-kj98-4d0d-8747-164e33a25aec</lineId> </contractLines> The output of the Process Step with the Array attribute is shown below:
{
	"contractLines": [
		{
		"lineId": [
			"38939e01-cb69-4d0d-8747-164e33a35aec",
			"37839d01-rt56-4d0d-8747-164e33a15aec",
			"34639f01-kj98-4d0d-8747-164e33a25aec"
		]
		}
	]
}
However, if the Array attribute is removed from the incoming XML document, the output is no longer serialized into a JSON array structure:
{
	"contractLines": {
		"lineId": [
			"38939e01-cb69-4d0d-8747-164e33a35aec",
			"37839d01-rt56-4d0d-8747-164e33a15aec",
			"34639f01-kj98-4d0d-8747-164e33a25aec"
		]
	}
}
Excluding Xml Root:Another feature is the handling of root nodes in XML documents. In almost all cases, XML documents require an enclosing root node, whereas JSON documents do not. In fact, many web frameworks using JSON do not use a root node, just the core object. Hence, an XML document like the following: <company> <name>ABC TEST LTD</name> <extref>10050023871</extref> </company> Will translate to the following JSON:
{
	"company": {
		"name": "ABC TEST LTD",
		"extref": "10050023871"
	}
}
However, if the Exclude Xml Root property is set to True, the following JSON would be produced:
{
	"name": "ABC TEST LTD",
	"extref": "10050023871"
}
Removing Xml Namespaces:In addition to root node removal, either most web frameworks cannot work with XML Namespaces or the inclusion can cause processing issues. Namespaces can appear anywhere within an XML Document. In most cases, developers will usually manually remove them. The sample below depicts a typical XML document with Namespaces <ProcessPayment xmlns="http://tempuri.org/"> <request xmlns:d4p1="http://schemas.datacontract.org/2004/07/PaymentService" xmlns:i="http://www.w3.org/2001/XMLSchema-instance"> <d4p1:PaymentProcessRequest> <d4p1:Amount>5</d4p1:Amount> <d4p1:OrderId>9e98d6fb-d1be-40f6-abf7-6a0417d7e449</d4p1:OrderId> </d4p1:PaymentProcessRequest> </request> </ProcessPayment> The default translation settings of the JSON Process Step would produce the following JSON output.
{
	"ProcessPayment": {
		"@xmlns": "http://tempuri.org/",
		"request": {
			"@xmlns:d4p1":
			"http://schemas.datacontract.org/2004/07/PaymentService",
			"@xmlns:i": "http://www.w3.org/2001/XMLSchema-instance",
			"d4p1:PaymentProcessRequest": {
				"d4p1:Amount": "5",
				"d4p1:OrderId": "9e98d6fb-d1be-40f6-abf7-6a0417d7e449"
			}
		}
	}
}
However, using the Exclude Xml Root and Remove Xml Namespaces properties, the following JSON would be produced instead:
{
	"request": {
		"PaymentProcessRequest": {
			"Amount": "5",
			"OrderId": "9e98d6fb-d1be-40f6-abf7-6a0417d7e449"
		}
	}
}
Null Value Handling:In addition, how empty or null values are translated can also be problematic for web developers. For example, the following XML Document has an empty element, as well as an element that is defined as null (i.e. xsi:nil=true):
Default settings of the JSON Process Step would in turn produce the following JSON:
However, users can choose to serialize empty or null values with either an empty string or a NULL value by selecting the option using the Null Value Handling property. For example, choosing the EmptyString option of the property, the following JSON would be produced instead:
Strongly Typing JSON:As can be seen in all of the JSON previous sample outputs in this section, all JSON values are enclosed with double quotes, denoting a string data type, even though some of the values within the XML document may be numbers or Booleans values. This is because JSON and XML are different serialization formats. For instance, XML does not have a way to differentiate primitive types. Whereas JSON can differentiate between string, number, and boolean Therefore, when converting from JSON to XML and back, the type information gets lost. One way to handle this is to use a strongly typed intermediate .NET Class when converting back and forth. In other words, instead of converting directly from XML to JSON, deserialize the XML to the .NET Class then serialize the .NET Class to JSON. The .NET Class will force the data to be the correct types. The JSON Process Step provides the Class Type property to do exactly that. By referencing a .NET Class that represents the XML, the JSON Process Step can produce JSON with the intended data types. For example, the XML sample below can be submitted without a .NET Class instance selected: <?xml version="1.0" encoding="UTF-8"?> <Customer xmlns:xsd="http://www.w3.org/2001/XMLSchema" xmlns:xsi="http://www.w3.org/2001/XMLSchema-instance"> <ID>5</ID> <Name>Marty</Name> <Email>marty.wasz@neudesic.com</Email> <ConfirmDate>2017-06-02T08:11:21.2618385-07:00</ConfirmDate> </Customer> The JSON Process Step would produce the following JSON. Even though the ID node value is a number, it is still enclosed with double quotes:
{
	"ID": "5",
	"Name": "Marty",
	"Email": "marty.wasz@neudesic.com",
	"ConfirmDate": "2017-06-02T08:11:21.2618385-07:00"
}
However, clicking on the ellipsis button of the Class Type property will display the following .NET Assembly picker dialog. Like all .NET Assemblies used by Neuron ESB at runtime, the assembly must be either in the Neuron ESB instance directory, GAC or the Probe Path defined in the esbservice.exe.config file.
Below is the .NET C# Class that was selected in the dialog:
using System;
namespace Neuron.Samples.JSON
{
	public class Customer
	{
		public int ID;
		public string Name;
		public string Email;
		public DateTime ConfirmDate;
	}
}
Once the .NET Class has been selected as the Class Type property, the following JSON will be produced with the ID value properly represented as a number (without double quotes): { "ID": 5, "Name": "Marty", "Email": "marty.wasz@neudesic.com", "ConfirmDate": "2017-06-02T08:11:21.2618385-07:00" } Custom DateTime formatting:Lastly, when using an intermediate .NET Class instance to serialize XML to JSON, all date time formats are ISO 8601 formatted (i.e. yy-M-ddTHH:mm:ss.fffffffzzz). However, this can be changed by editing the DateTime Format property. To work though, the incoming DateTime value in the XML document must be formatted using standard date time formats and not custom formats (i.e. https://msdn.microsoft.com/en-us/library/az4se3k1.aspx ). If a custom formatted DateTime string is received in the XML, it will throw a serialization exception. The DateTime Format property is ONLY used when a Class Type is provided. Converting .NET Class Instances to JSON:Sometimes it is easier for developers to work directly with .NET Class Instances than with XML. Neuron ESB accommodates this by allowing a Neuron ESB Message body to be set with a .NET Class Instance. This allows it to be used within any C# Code Step as shown below. The Body property can be set with the class, and the GetBody<T>() method of the Neuron ESB Message can be used to retrieve the .NET Class Instance.
When using the JSON Process Step to translate a .NET Class Instance to JSON, the Null Value Handling property is ignored. Additionally, the type information of the class is serialized with the JSON as shown below:
{
	"$type": "Neuron.Samples.JSON.Customer,
	Neuron.Samples.JSON.Customer",
	"ID": 5,
	"Name": "Marty",
	"Email": "marty.wasz@neudesic.com",
	"ConfirmDate": "2017-06-02T10:03:45.2973412-07:00"
}
However, the type information can be suppressed by setting the Include Object Types property to false. This property is ONLY visible when a Class Type has been selected. Additionally, the datetime format can be modified to any custom datetime format (i.e. https://msdn.microsoft.com/en-us/library/8kb3ddd4.aspx ). In the sample below, the type information has been suppressed, but additionally, the Datetime Format property has been changed from its default of yyyy-MM-ddTHH:mm:ss.fffffffzzz to yy-M-dd HH:mm:ss tt:
{
	"ID": 5,
	"Name": "Marty",
	"Email": "marty.wasz@neudesic.com",
	"ConfirmDate": "17-6-02 10:05:49 AM"
}
Convert to XMLUse the JSON Process Step to translate JSON documents to XML formatted documents. Once the XML message has been serialized into the Neuron ESB Message, the HTTP.ContentType of the Neuron ESB Message object will be set to "application/xml". For Instance, the following JSON document includes an enclosing root node, Customer:
{
	"Customer": {
		"ID": 5,
		"Name": "Marty",
		"Email": "marty.wasz@neudesic.com",
		"ConfirmDate": "2017-06-02T08:11:21.2618385-07:00"
	}
}
Using the default Process Step settings, the following XML would be produced: <?xml version="1.0" encoding="UTF-8"?> <Customer> <ID>5</ID> <Name>Marty</Name> <Email>marty.wasz@neudesic.com</Email> <ConfirmDate>2017-06-02T08:11:21.2618385-07:00</ConfirmDate> </Customer> However, if the JSON document did not include an enclosing root (as would be more typical) as shown below:
{
	"ID": 5,
	"Name": "Marty",
	"Email": "marty.wasz@neudesic.com",
	"ConfirmDate": "2017-06-02T08:11:21.2618385-07:00"
}
The following error would be generated: Aborted: JSON root object has multiple properties. The root object must have a single property in order to create a valid XML document. This can be successfully translated though by providing a value for the XML Root Name property. By setting the property to Root, the following XML documents will be produced: <?xml version="1.0" encoding="UTF-8"?> <Root> <ID>5</ID> <Name>Marty</Name> <Email>marty.wasz@neudesic.com</Email> <ConfirmDate>2017-06-02T08:11:21.2618385-07:00</ConfirmDate> </Root> Convert to ClassThis will work to serialize either a JSON or XML message into a .NET Class Instance which can later be accessed in a C# Code Step using the GetBody<T> method of the Neuron ESB Message object. The Class Type property is the only value required. Given the following JSON message:
{
	"Customer": {
		"ID": 5,
		"Name": "Marty",
		"Email": "marty.wasz@neudesic.com",
		"ConfirmDate": "2017-06-02T08:11:21.2618385-07:00"
	}
}
Its .NET Class instance representation can be retrieved using the following C# in any Code Step enabled Process Step:
// Retrieve the class from the body and print out
// properties
var Customer =
context.Data.GetBody<Neuron.Samples.JSON.Customer>();
if(context.Instance.IsInfoEnabled)
{
	context.Instance.TraceInformation(Customer.Email);
	context.Instance.TraceInformation(Customer.ID.ToString());
	context.Instance.TraceInformation(Customer.Name);
}
NOTE: The Neuron ESB Message body will contain the output of the Process Step. The MessageId will be unchanged. However, the ParentMessageID property will be set to the current MessageID property. |
|||||||||||||||||||||||||||||||||||||
Design Time Properties |
|||||||||||||||||||||||||||||||||||||
|
|||||||||||||||||||||||||||||||||||||


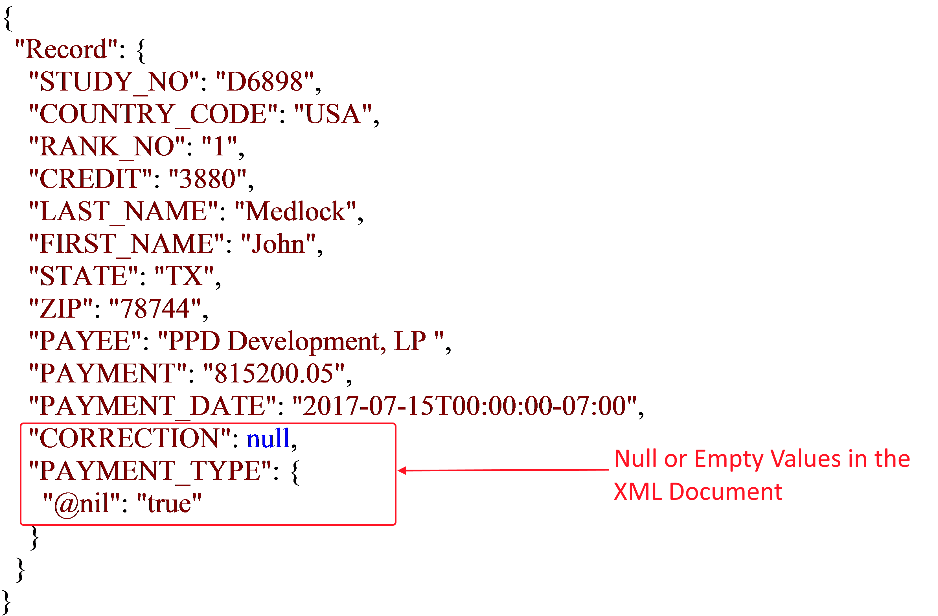
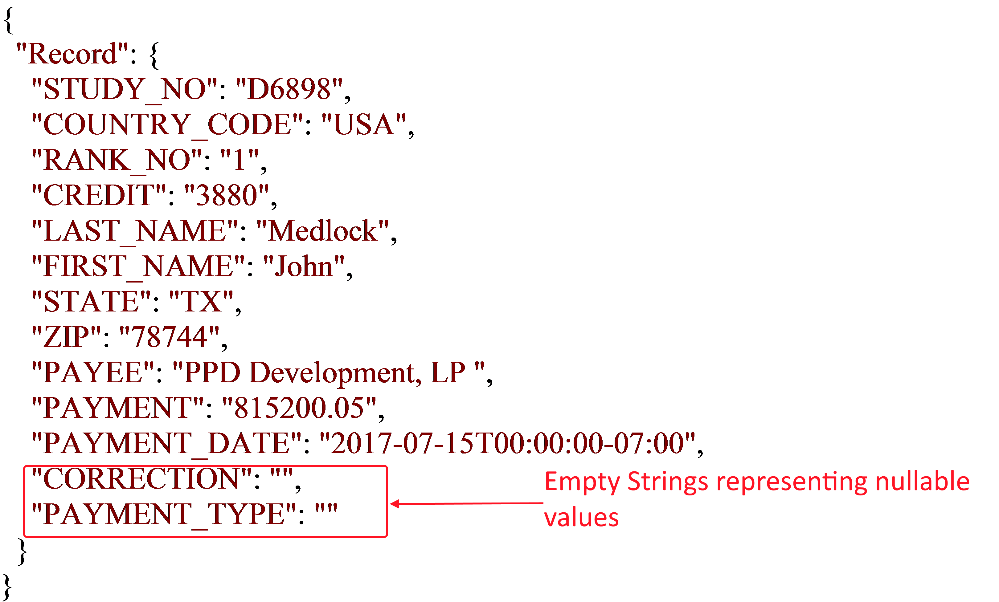
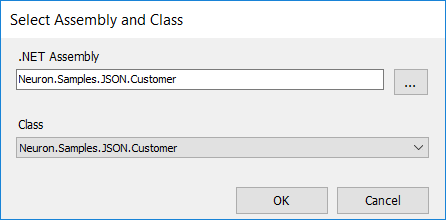
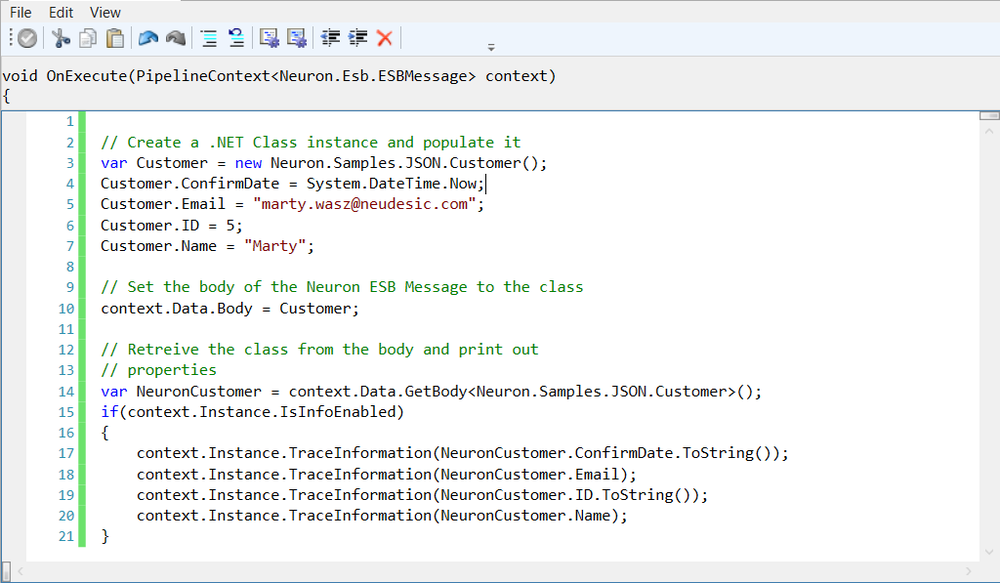
Push
|
Category: |
Message |
|||||||||||
Class: |
PushContextPipelineStep |
||||||||||||
Namespace: |
Neuron.Pipelines |
||||||||||||
Assembly: |
Neuron.Pipelines.dll |
||||||||||||
Description: The Push Process Step stores a Neuron ESB Message to an internal stack, which can later be retrieved by the Pop Process Step. The Push Process Step MUST precede the Pop Process Step. When used in conjunction with one another, it provides a convenient way to preserve a message between transformation and data manipulation. For example, a Business Process may receive a message. Within the Process, the message may be transformed, enriched or changed completely. However, at any point after message processing has taken place, it may become necessary to access the original state of the message. If the Push Process Step is the first step within the Process, then the Pop Process Step can be used to retrieve the original unprocessed message. Internally, the storage for the saved message is a .NET Stack, persisted to the context.Properties collection using the PushedContext key. Hence, the Push Step can be used any number of times in a Process. Each Pop Process Step will take the last message placed on the Stack and restore it as the current Neuron ESB Message in the context of the Process. |
|||||||||||||
Design Time Properties |
|||||||||||||
|
|||||||||||||

Pop
|
Category: |
Message |
|||||||||||
Class: |
PopContextPipelineStep |
||||||||||||
Namespace: |
Neuron.Pipelines |
||||||||||||
Assembly: |
Neuron.Pipelines.dll |
||||||||||||
Description: The Pop Process Step retrieves the last stored Neuron ESB Message from an internal stack, which was previously placed there by the Push Process Step. The Push Process Step MUST precede the Pop Process Step. When used in conjunction with one another, it provides a convenient way to preserve a message between transformation and data manipulation. For example, a Business Process may receive a message. Within the Process, the message may be transformed, enriched or changed completely. However, at any point after message processing has taken place, it may become necessary to access the original state of the message. If the Push Process Step is the first step within the Process, then the Pop Process Step can be used to retrieve the original unprocessed message. Internally, the storage for the saved message is a .NET Stack, persisted to the context.Properties collection using the PushedContext key. Hence, the Pop Step can be used any number of times in a Process. Each Pop Process Step will take the last message placed on the Stack and restore it as the current Neuron ESB Message in the context of the Process. |
|||||||||||||
Design Time Properties |
|||||||||||||
|
|||||||||||||

Set Property
|
Category: |
Message |
||||||||||||||
Class: |
EsbMessageTraceMessagePipelineStep |
|||||||||||||||
Namespace: |
Neuron.Esb.Pipelines |
|||||||||||||||
Assembly: |
Neuron.Esb.Pipelines.dll |
|||||||||||||||
Description: The Set Property Process Step can be used to set the value of any ESB Message header property or custom Neuron ESB Message property. This is useful to either modify the internal processing and routing behavior of a message, or add custom metadata to a message. Most of the sub systems within Neuron ESB expose defined custom Neuron ESB Message properties that can be used to set properties at runtime, rather than relying on design time configuration. For example, the URL or method of the REST API to call may only be known after the execution of custom business logic. The FTP server or folder to send information to may not be known until runtime. Many of the Neuron ESB Business Process Steps support having some of their properties set at runtime. This is called Dynamic Configuration. Other examples include Neuron ESB Adapters, which register their properties in form of prefix.property. Neuron ESB Service Endpoints can have their URL dynamically set at runtime by modifying custom Neuron ESB Message Properties. Lastly, all the Neuron ESB Message Header properties, like Topic, Action, etc. (with the exception of SOAP/HTTP) can be set using the Set Property Process Step. Developers can also set the property value of Neuron ESB Message properties using either a .NET Language Code Editor (as shown below). The prefix and property names are always case sensitive. context.Data.SetProperty("neuron", "pipelineName","MyProcess"); However, the Set Property Step does not require code, supports the use of built in variables and exposes all Neuron ESB Header properties and Adapter properties as a drop down list. For example, the picture below displays the Expression Collection Editor, showing all the available custom Neuron ESB Message properties that the Active Directory Adapter exposes (represented by the AD prefix) as well as some of the properties of the Active MQ Adapter (i.e. the activemq_in prefix):
Launching the Expression Collection EditorTo launch the Expression Collection Editor, right-click on the Set Property Process Step in the Business Process Designer and select Set Properties right click context menu as shown below:
The Expression Collection Editor can also be started by double clicking on the icon with the computers mouse. The Expression Collection Editor allows users to enter one or more property entries. Each property entry has a Property and corresponding Value property that must be populated. Either the Property property can be selected by choosing an entry in the drop down box or, if a custom Neuron ESB Message needs to be set, the name of the property can be entered. Once the Property is set, the Value property must be entered. For this, users can again either select from the drop down list of available values or enter in a custom value. However, all custom string values MUST BE ENCLOSED in double quotes. In the example below, the custom property myPrefix.MyProperty is being set with the value of hi mom:
Confirmation of the property being set can be accomplished by testing within the Business Process Designer and using a C# Code Process Step to write out the value as shown below: var myProp = context.Data.GetProperty("myPrefix","MyProperty"); context.Instance.TraceInformation(myProp); The Set Property Process Step Value dropdown list contains the following constants which can be used and modified:
In the Example below, custom properties have been set using the constants and custom format specifiers:
In a C# Code Process Step, the values of the properties are retrieved:
var localDate = context.Data.GetProperty("myPrefix",
	"MyLocalDateCustom");
var guid = context.Data.GetProperty("myPrefix","MyGUID");
var IMFdate = context.Data.GetProperty("myPrefix","MyIMFDate");
var utcDate = context.Data.GetProperty("myPrefix",
	"MyUtcDateDefault");
context.Instance.TraceInformation(localDate);
context.Instance.TraceInformation(guid);
context.Instance.TraceInformation(IMFdate);
context.Instance.TraceInformation(utcDate);
Producing the following output in the Trace Window:
|
||||||||||||||||
Design Time Properties |
||||||||||||||||
|
||||||||||||||||

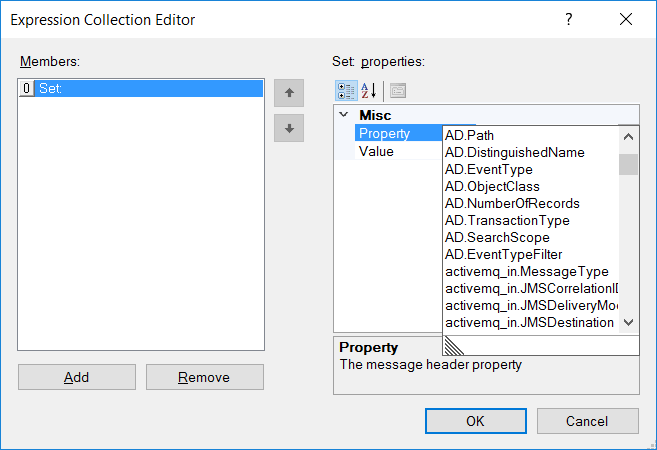
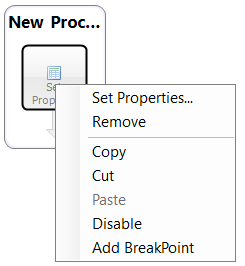
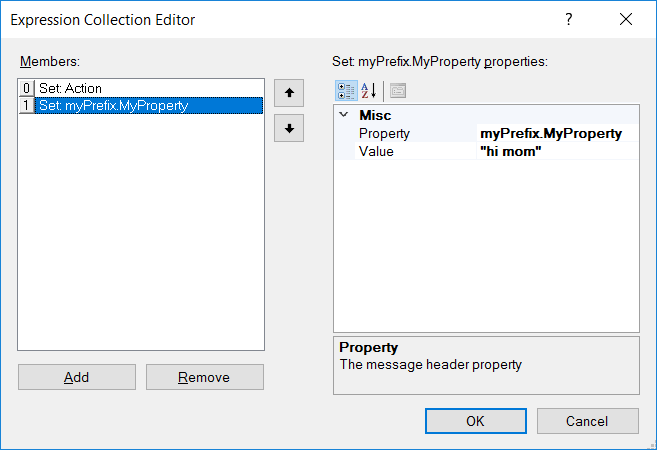
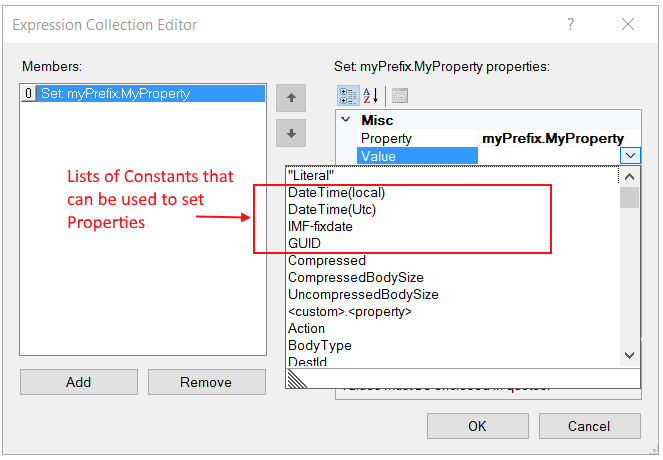
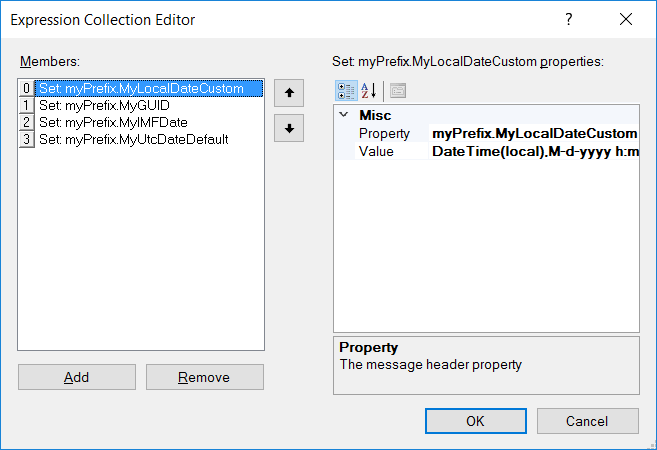
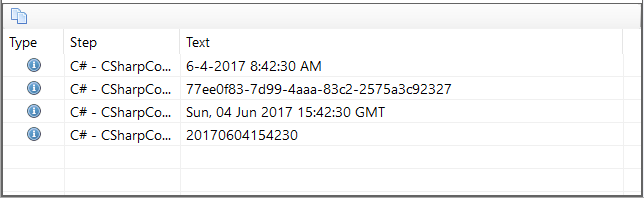
Trace
|
Category: |
Message |
|||||||||||
Class: |
EsbMessageTraceMessagePipelineStep |
||||||||||||
Namespace: |
Neuron.Esb.Pipelines |
||||||||||||
Assembly: |
Neuron.Esb.Pipelines.dll |
||||||||||||
Description: The Trace Process Step is used to write the body of the Neuron ESB Message to the Business Process Designers Trace Window during testing of a Business Process. It will also write the body of the Neuron ESB Message to the Neuron ESB Log file of the endpoint in which it is hosted in at runtime. The Trace Process Step is dependent on the Tracing level set within the Neuron ESB Explorers .config file as well as the runtime services .config file (set using the Configure Server toolbar button of the Neuron ESB Explorer. It requires that the Trace Level be set to Informational. Internally, the context.Instance.TraceInformation() API is used to write the message. Neuron ESB Message Body Format:The .NET UTF8 Encoder is used to translate the body of the Neuron ESB Message to text. |
|||||||||||||
Design Time Properties |
|||||||||||||
|
|||||||||||||

Security
Decrypt XML
|
Category: |
Security |
|||||||||||||||||
Class: |
EsbMessageDecryptXmlPipelineStep |
||||||||||||||||||
Namespace: |
Neuron.Esb.Pipelines |
||||||||||||||||||
Assembly: |
Neuron.Esb.Pipelines.dll |
||||||||||||||||||
Description: The Decrypt XML Process Step uses the Microsoft .NET Framework standards-based, interoperable way to decrypt all or part of an XML document. The Microsoft .NET Framework implements the World Wide Web Consortium (W3C) specification for XML encryption located at http://www.w3.org/TR/xmlenc-core/. The Decrypt XML Process Step employs the AES 256 encryption standard based on the Rijndael encryption algorithm to protect sensitive data from being exposed to unauthorized parties. Use the Process Step whenever you need to share encrypted XML data between Parties, applications or organizations in a standard way. Any Neuron ESB Message body encrypted using Encrypt XML Process Step can be decrypted by any implementation of the W3C specification for XML encryption or the Decrypt XML Process Step. The Decrypt XML Process Step will look up the encryption key from the Neuron ESB solution. Developers may also specify a custom initialization vector that was used to enhance the security of the encrypted data. The Decrypt Xml Step will decrypt the entire XML message, or whatever fragment of the message that previously encrypted. The encryption Key and Initialization Vector property values MUST be identical to the ones used to encrypt the original data. For example, the Neuron ESB Message body can be set with the following encrypted data: <EncryptedData Type="http://www.w3.org/2001/04/xmlenc#Element" xmlns="http://www.w3.org/2001/04/xmlenc#"> <EncryptionMethod Algorithm="http://www.w3.org/2001/04/xmlenc#aes256-cbc"></EncryptionMethod> <CipherData> <CipherValue>AAAAAAAAAAAAAAAAAAAAAFFKI/HgrMyMXQeXc+sYDkAJKDD69Vczbnmbp0J7uXohz+v/vfKnZwGHye1GMNtCfWYO6fZgHu1PynnmrTJ2eH6laLN7Gh04GouSP6N1EZt1Iux7Sm27NzEoGKvFcomI6xw60aNWXwy7x6mFz297f9lu3PrdThsO6DYygFBJjojMoqqBSF+s3HdmNYkFIu+7Si/BzUzHYirriRUNtmt/yhDi+l3FYcWUFRcdcy9on0foZ25hdbqQJknhrW1PdVJaN6EHzNneOibeS/EJcQ1HhfAesoCEyyBYmke4AxqoYrsHMHm49gsm/M+SCQpUF1nEEuXgqCgTOyb1TSu44vFGW9HT3PfxB/8rLogrQ1RBDqh9HewXpKCa02d91mhmPg7np+h9a/4HbAcoNjUXq63CrIoS1MQg0yqWrD4wrP3xU61hF2k1sj9xLBYhClqgkX4DPkm3OnQBmyNH83/2Qo5w/wtKl9l5PMhslWxNvBZfXLJD4+KVSYuh4KvnA8VUifDHlg==</CipherValue> </CipherData> </EncryptedData> By setting the encryption Key and Initialization Vector properties to those used to encrypt the data, the Decrypt XML Process Step will produce the output below: <ProcessPayment xmlns="http://tempuri.org/"> <request xmlns:d4p1="http://schemas.datacontract.org/2004/07/PaymentService" xmlns:i="http://www.w3.org/2001/XMLSchema-instance"> <d4p1:PaymentProcessRequest> <d4p1:Amount>5</d4p1:Amount> <d4p1:OrderId>9e98d6fb-d1be-40f6-abf7-6a0417d7e449</d4p1:OrderId> </d4p1:PaymentProcessRequest> </request> </ProcessPayment> NOTE: The Neuron ESB Message body will contain the output of the Process Step. The MessageId will be unchanged. However, the ParentMessageID property will be set to the current MessageID property. |
|||||||||||||||||||
Design Time Properties |
|||||||||||||||||||
|
|||||||||||||||||||

Encrypt XML
|
Category: |
Security |
|||||||||||||||||||||||
Class: |
EsbMessageEncryptXmlPipelineStep |
||||||||||||||||||||||||
Namespace: |
Neuron.Esb.Pipelines |
||||||||||||||||||||||||
Assembly: |
Neuron.Esb.Pipelines.dll |
||||||||||||||||||||||||
Description: The Encrypt XML Process Step uses the Microsoft .NET Framework standards-based, interoperable way to encrypt all or part of an XML document. The Microsoft .NET Framework implements the World Wide Web Consortium (W3C) specification for XML encryption located at http://www.w3.org/TR/xmlenc-core/. The Encrypt XML Process Step employs the AES 256 encryption standard based on the Rijndael encryption algorithm to protect sensitive data from being exposed to unauthorized parties. Use the Process Step whenever you need to share encrypted XML data between Parties, applications or organizations in a standard way. Any Neuron ESB Message body encrypted using this Process Step can be decrypted by any implementation of the W3C specification for XML encryption or by the Decrypt XML Process Step. XML encryption replaces any plain text XML element or document with the <EncryptedData> element, which contains an encrypted (or cipher text) representation of plain text XML or any arbitrary data. The <EncryptedData> element also contains information about which cryptographic algorithm was used to encrypt the plain text. The Encrypt Xml Process Step will look up the encryption key from the Neuron ESB solution. Developers may also specify a custom initialization vector that will be used to enhance the security of the encrypted data. Using the Encrypt Xml Step, it is possible either to encrypt the entire XML message, or to encrypt a fragment of the message specifying using an XPATH 1.0 expression. For example, the Neuron ESB Message body can be set with the following XML Sample document: <ProcessPayment xmlns="http://tempuri.org/"> <request xmlns:d4p1="http://schemas.datacontract.org/2004/07/PaymentService" xmlns:i="http://www.w3.org/2001/XMLSchema-instance"> <d4p1:PaymentProcessRequest> <d4p1:Amount>5</d4p1:Amount> <d4p1:OrderId>9e98d6fb-d1be-40f6-abf7-6a0417d7e449</d4p1:OrderId> </d4p1:PaymentProcessRequest> </request> </ProcessPayment> Using the /* XPATH 1.0 statement to populate the Element To Encrypt property, the body of the Neuron ESB Message will be replaced with the following: <EncryptedData Type="http://www.w3.org/2001/04/xmlenc#Element" xmlns="http://www.w3.org/2001/04/xmlenc#"> <EncryptionMethod Algorithm="http://www.w3.org/2001/04/xmlenc#aes256-cbc"></EncryptionMethod> <CipherData> <CipherValue>AAAAAAAAAAAAAAAAAAAAAFFKI/HgrMyMXQeXc+sYDkAJKDD69Vczbnmbp0J7uXohz+v/vfKnZwGHye1GMNtCfWYO6fZgHu1PynnmrTJ2eH6laLN7Gh04GouSP6N1EZt1Iux7Sm27NzEoGKvFcomI6xw60aNWXwy7x6mFz297f9lu3PrdThsO6DYygFBJjojMoqqBSF+s3HdmNYkFIu+7Si/BzUzHYirriRUNtmt/yhDi+l3FYcWUFRcdcy9on0foZ25hdbqQJknhrW1PdVJaN6EHzNneOibeS/EJcQ1HhfAesoCEyyBYmke4AxqoYrsHMHm49gsm/M+SCQpUF1nEEuXgqCgTOyb1TSu44vFGW9HT3PfxB/8rLogrQ1RBDqh9HewXpKCa02d91mhmPg7np+h9a/4HbAcoNjUXq63CrIoS1MQg0yqWrD4wrP3xU61hF2k1sj9xLBYhClqgkX4DPkm3OnQBmyNH83/2Qo5w/wtKl9l5PMhslWxNvBZfXLJD4+KVSYuh4KvnA8VUifDHlg==</CipherValue> </CipherData> </EncryptedData> In contrast, the /*/*/*[local-name(.) = 'PaymentProcessRequest'] XPATH 1.0 statement can be used to ensure only the PaymentProcessRequest node of the XML document is encrypted rather than the entire document as shown below: <ProcessPayment xmlns="http://tempuri.org/"> <request xmlns:d4p1="http://schemas.datacontract.org/2004/07/PaymentService" xmlns:i="http://www.w3.org/2001/XMLSchema-instance"> <EncryptedData Type="http://www.w3.org/2001/04/xmlenc#Element" xmlns="http://www.w3.org/2001/04/xmlenc#"> <EncryptionMethod Algorithm="http://www.w3.org/2001/04/xmlenc#aes256-cbc"></EncryptionMethod> <CipherData> <CipherValue>AAAAAAAAAAAAAAAAAAAAAFO12CzK0fDAAY/CNC8Hlfwt+msp2o1ux9f7hqsgGxQ6IMBeYjWUzaPi6jnh3A+m2jInMUA+01xj69QdCK4mERIOaA7Q/wGOIlKyNjW8d6Jn/tflhquV0ouy/FiuPVf2iZWoEEzj8yycAsQlfeSeaZqrJZUOr1wgWTEYpE62b3stSW3u53jsp1U3tu/xRpjhH0adWcfaAiGs9t+lPOjk5wdKxkGe5I5Ou1il9T4WU+jgSD1Su+tXk1Vb0gFoplVzKqhRfmpwf/g1MFf8lNRh95hbVRpvsjm2Z8ob2jc/FJ87NeT1K5hgSpSF7xkkrED31w==</CipherValue> </CipherData> </EncryptedData> </request> </ProcessPayment> NOTE: The Neuron ESB Message body will contain the output of the Process Step. The MessageId will be unchanged. However, the ParentMessageID property will be set to the current MessageID property. |
|||||||||||||||||||||||||
Design Time Properties |
|||||||||||||||||||||||||
|
|||||||||||||||||||||||||

Sign XML
|
Category: |
Security |
||||||||||||||
Class: |
EsbMessageSignXmlPipelineStep |
|||||||||||||||
Namespace: |
Neuron.Esb.Pipelines |
|||||||||||||||
Assembly: |
Neuron.Esb.Pipelines.dll |
|||||||||||||||
Description: The Sign XML Process Step uses the .NET Framework implementation of the World Wide Web Consortium (W3C) XML Signature Syntax and Processing Specification, also known as XMLDSIG (XML Digital Signature). XMLDSIG is a standards-based, interoperable way to sign and verify all or part of an XML document. Use the Sign XML Process Step whenever you need to share signed XML data between Parties, applications or organizations in a standard way. Any Neuron ESB Message body signed using this Process Step can be verified by any conforming implementation of the W3C specification for XMLDSIG or by using the Verify Signed XML Process Step. The Sign XML Process Step uses X.509v3 certificates stored in the Windows certificate store and configured in the Security section of the Neuron ESB configuration to sign the XML message. The Sign XML Process Step requires the presence of a private key attached to the certificate in the certificate store. Using the private key, the Sign XML Process Step will use the XML Signature standard to calculate the cryptographically secure signature for the message and will add the signature to the XML body of the message. XMLDSIG creates a <Signature> element, which contains a digital signature of an XML document. The <Signature> element contains information about which cryptographic algorithm was used for signing. For example, the Neuron ESB Message body can be set with the following XML Sample document: <ProcessPayment xmlns="http://tempuri.org/"> <request xmlns:d4p1="http://schemas.datacontract.org/2004/07/PaymentService" xmlns:i="http://www.w3.org/2001/XMLSchema-instance"> <d4p1:PaymentProcessRequest> <d4p1:Amount>5</d4p1:Amount> <d4p1:OrderId>9e98d6fb-d1be-40f6-abf7-6a0417d7e449</d4p1:OrderId> </d4p1:PaymentProcessRequest> </request> </ProcessPayment> Once an appropriate Certificate is selected, the Sign XML Process Step will output the following: <ProcessPayment xmlns="http://tempuri.org/"> <request xmlns:d4p1="http://schemas.datacontract.org/2004/07/PaymentService" xmlns:i="http://www.w3.org/2001/XMLSchema-instance"> <d4p1:PaymentProcessRequest> <d4p1:Amount>5</d4p1:Amount> <d4p1:OrderId>9e98d6fb-d1be-40f6-abf7-6a0417d7e449</d4p1:OrderId> </d4p1:PaymentProcessRequest> </request> <Signature xmlns="http://www.w3.org/2000/09/xmldsig#"> <SignedInfo> <CanonicalizationMethod Algorithm="http://www.w3.org/TR/2001/REC-xml-c14n-20010315"></CanonicalizationMethod> <SignatureMethod Algorithm="http://www.w3.org/2000/09/xmldsig#rsa-sha1"></SignatureMethod> <Reference> <Transforms> <Transform Algorithm="http://www.w3.org/2000/09/xmldsig#enveloped-signature"></Transform> </Transforms> <DigestMethod Algorithm="http://www.w3.org/2000/09/xmldsig#sha1"></DigestMethod> <DigestValue>i/IcSANTRaTtG87rUppQOZG/nqU=</DigestValue> </Reference> </SignedInfo> <SignatureValue>y5S4Oyfk3GmKr7EKgcSg82iDUukXkCdGn1nt+NN5w8HR3CIqhjIi4AI3qSG80gcWWusmz3tfW69U38AxSip54Ff1CLNwWCVlrmKjv+knozFBQlE/d6ND0ilfpqy9qQQ5Fc2LduscA9JkSjNsmsdpBXtyysTzH9Prl479kCen52ODmXe+/jFocVKrg3ckvQ87Mv1uCQFplwAhbPF0sxooj2r0hmDfmQ1nn/AA1jE1FXdXpaYq62Zawd6Wfgyc87TfpavrWQ9Zo6bcpvUsB07VkmvWjo2M7NRoHSbaumLvQ+RBb/Lziuorn7O96dWCwiJuuWSR+/A/KXWXSfMVEPW9ZQ==</SignatureValue> </Signature> </ProcessPayment> NOTE: The Neuron ESB Message body will contain the output of the Process Step. The MessageId will be unchanged. However, the ParentMessageID property will be set to the current MessageID property. |
||||||||||||||||
Design Time Properties |
||||||||||||||||
|
||||||||||||||||

Verify Signed XML
|
Category: |
Security |
||||||||||||||
Class: |
EsbMessageVerifySignedXmlPipelineStep |
|||||||||||||||
Namespace: |
Neuron.Esb.Pipelines |
|||||||||||||||
Assembly: |
Neuron.Esb.Pipelines.dll |
|||||||||||||||
Description: The Verify Signed XML Process Step uses the .NET Framework implementation of the World Wide Web Consortium (W3C) XML Signature Syntax and Processing Specification, also known as XMLDSIG (XML Digital Signature). XMLDSIG is a standards-based, interoperable way to sign and verify all or part of an XML document. Use the Verify Signed XML Process Step whenever you need to share signed XML data between Parties, applications or organizations in a standard way. Any Neuron ESB Message body signed using the Sign XML Process Step can be verified by any conforming implementation of the W3C specification for XMLDSIG or by using this Process Step The Verify Signed XML Process Step uses the public key associated with a configured X.509v3 certificate to verify that the signature attached to an XML message is valid and was signed by the private key associated with the public key that is used to verify the messages signature. The Verify Signed XML Process Step uses X.509v3 certificates stored in the Windows certificate store and configured in the Security section of the Neuron ESB configuration to verify the XML message. For example, if the Neuron ESB Message body is set with the following signed XML Message: <ProcessPayment xmlns="http://tempuri.org/"> <request xmlns:d4p1="http://schemas.datacontract.org/2004/07/PaymentService" xmlns:i="http://www.w3.org/2001/XMLSchema-instance"> <d4p1:PaymentProcessRequest> <d4p1:Amount>5</d4p1:Amount> <d4p1:OrderId>9e98d6fb-d1be-40f6-abf7-6a0417d7e449</d4p1:OrderId> </d4p1:PaymentProcessRequest> </request> <Signature xmlns="http://www.w3.org/2000/09/xmldsig#"> <SignedInfo> <CanonicalizationMethod Algorithm="http://www.w3.org/TR/2001/REC-xml-c14n-20010315"></CanonicalizationMethod> <SignatureMethod Algorithm="http://www.w3.org/2000/09/xmldsig#rsa-sha1"></SignatureMethod> <Reference> <Transforms> <Transform Algorithm="http://www.w3.org/2000/09/xmldsig#enveloped-signature"></Transform> </Transforms> <DigestMethod Algorithm="http://www.w3.org/2000/09/xmldsig#sha1"></DigestMethod> <DigestValue>i/IcSANTRaTtG87rUppQOZG/nqU=</DigestValue> </Reference> </SignedInfo> <SignatureValue>y5S4Oyfk3GmKr7EKgcSg82iDUukXkCdGn1nt+NN5w8HR3CIqhjIi4AI3qSG80gcWWusmz3tfW69U38AxSip54Ff1CLNwWCVlrmKjv+knozFBQlE/d6ND0ilfpqy9qQQ5Fc2LduscA9JkSjNsmsdpBXtyysTzH9Prl479kCen52ODmXe+/jFocVKrg3ckvQ87Mv1uCQFplwAhbPF0sxooj2r0hmDfmQ1nn/AA1jE1FXdXpaYq62Zawd6Wfgyc87TfpavrWQ9Zo6bcpvUsB07VkmvWjo2M7NRoHSbaumLvQ+RBb/Lziuorn7O96dWCwiJuuWSR+/A/KXWXSfMVEPW9ZQ==</SignatureValue> </Signature> </ProcessPayment> If an appropriate Certificate is selected (the same used to sign the message), the Verify Signed XML Process Step will output the exact same message. However, if the message fails validation, the following exception will be thrown: Neuron.Pipelines.PipelineException: The XML signature could not be verified. |
||||||||||||||||
Design Time Properties |
||||||||||||||||
|
||||||||||||||||

Services
Adapter Endpoint
|
Category: |
Services |
|||||||||||||||||||||||
Class: |
ExecuteAdapterPipelineStep |
||||||||||||||||||||||||
Namespace: |
Neuron.Esb.Pipelines |
||||||||||||||||||||||||
Assembly: |
Neuron.Esb.Pipelines.dll |
||||||||||||||||||||||||
Description: A core feature of Application and Data Integration servers is their ability to bridge and abstract third party applications, databases, technologies, protocols or transports. Neuron ESB provides this through either its library of built in adapters and by allowing users to build their own adapters using the Neuron ESB Adapter Framework. In many ways, Adapters provide capabilities similar to those found in Neuron ESBs Service Broker specifically:
Just as with Service Connectors, Adapter Endpoints would normally need to be invoked through the Neuron ESB Messaging system where a message is published to a Topic and then routed to eligible subscribers, one of which could be an Adapter Endpoint as shown below:
However, the Adapter Endpoint Process Step can be used with the Business Process Designer to circumvent the Messaging system. The Process Step allows a user to directly call any Adapter Endpoint that exists in the Neuron ESB Configuration (e.g. Connections -> Endpoints -> Adapter Endpoints within the Neuron ESB Explorer), without the need to publish a Neuron ESB Message to a Topic, eliminating all pub/sub overhead:
This allows users to create Business Processes that define an end-to-end solution without the pub/sub abstraction in the middle. The immediate advantage is:
The cost of correlating messaging traffic over a Topic is eliminated.
For request/reply type calls, intermediate pub/sub is eliminated.
The Adapter Endpoint does NOT have to be Enabled to be use. Which means a new app domain with dedicated resources will not be created by the Neuron ESB service runtime. When to Use:Generally, the process step should always be used with any request/response type of request against the Adapter Endpoint since there will never be more than one subscribing endpoint fulfilling the request and essentially, it would be always be a blocking call within the Business Process. For fire-and-forget messaging (i.e. multicast/datagram), unless there is a need to decouple using the topic-based pub/sub engine as in the case where the publishing process should not know who the subscribing endpoints/parties are, then using the process step would be a preferred approach. However, the Business Process would incur more increased latency since it would now inherit the amount of time it takes an Adapter Endpoint to complete its execution. Only Subscribe side Adapters can be executed by the Adapter Endpoint Process Step. For example, the Adapter Endpoint Process Step can be used in the Neuron ESB Business Process designer to create real-time service composition solutions by aggregating existing services and application endpoints into more innovative business capabilities that can be accessed throughout an organization (displayed below). The advantage of the Adapter Endpoint Process Step is that it can eliminate much of the overhead traditionally seen when a bus or other messaging architectures are incorporated in service composition solutions where request/response type of message patterns are predominately employed.
Performance OptimizationsThe Adapter Endpoint Process Step uses a Blocking pool of Adapter Endpoints to allow better scale out for concurrency and to eliminate all calls being serialized through one instance of an Adapter Endpoint. There are two properties located in the Pool Management property category. Maximum Instances (defaults to 100) and Pool Timeout (defaults to 1 minute). Once the maximum number of Adapter Endpoint instances have been created, the Pool Timeout determines the amount of time to wait for an existing Adapter Endpoint instance to become available before throwing a timeout exception. Before an Adapter Endpoint instance is created, the pool is always checked to see if one already exists. If it does, it retrieves is from the pool and uses it. When complete, the instance is returned to the pool. The Maximum Instances property does NOT define the number of Adapter Endpoint instances that will always be created at runtime in all circumstances. It only defines the maximum number that could be created. For instance, Business Processes attached to most inbound Adapter Endpoints (Publish mode) will generally only create one pooled instance of an Adapter Endpoint as many of the adapters only work with one inbound thread at a time (unless receiving messages from Topics). However, a Client Connector (Neuron ESB hosted service endpoint) could be dealing with many more threads representing concurrent users making service calls.
|
|||||||||||||||||||||||||
Design Time Properties |
|||||||||||||||||||||||||
|
|||||||||||||||||||||||||


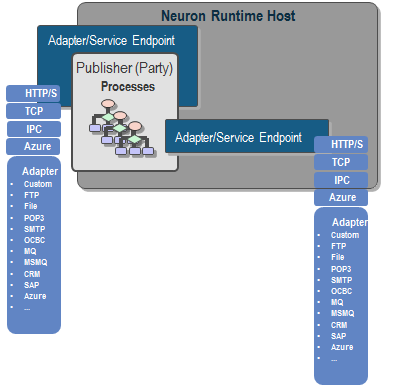

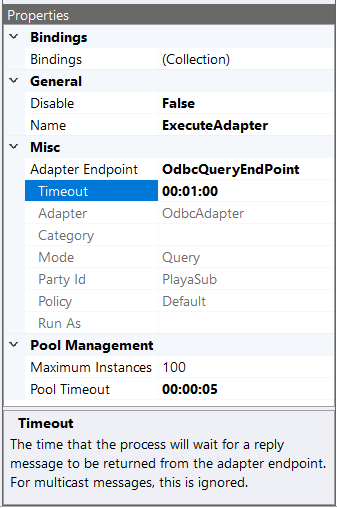
Http Client Utility
|
Category: |
Services |
||||||||||||||
Class: |
RestPipelineStep |
|||||||||||||||
Namespace: |
Neuron.Pipelines |
|||||||||||||||
Assembly: |
Neuron.Pipelines.dll |
|||||||||||||||
Description: Neuron ESB includes a Service Broker that enables organizations to deploy Neuron ESB as a Service Gateway, providing mediation, security, hosting and a number of other services. Service Connectors are essentially registrations within Neuron ESB that point to existing services hosted within an organization, by a partner or in a cloud domain. These services, which can be either SOAP or REST (HTTP) based, can be called either through the Neuron ESB messaging system via a Topic subscription or by using a Service Endpoint Process Step. The latter can be used with the existing Business Process Designer and allows a user to directly call any Service Connector without the need to publish a request to a Topic, eliminating all pub/sub overhead. These are commonly used to create service aggregation and composition solutions. For calling REST (HTTP) based Service Connectors (endpoints), it is common that various pieces of information need to be provided at runtime according to the REST specification. For example, the Method name (e.g. GET, POST, PUT, PATCH, etc.) must be provided. HTTP Headers usually need to be provided (e.g. Content Type, Authorization, Accept, etc.) as well as Query string or URL parameters. This information can be provided by using a C# Code Editor within the Business Process Designer directly preceding the Service Endpoint activity as depicted below:
Opening the C# Code Editor allows developers to provide the information they need to initialize the service call at runtime by primarily using the HTTP API of the Neuron ESB Message as shown below.
The information used to initialize these HTTP elements can come from the Neuron ESB Message or context properties or even Neuron ESB Environmental Variables that may have different values at runtime depending on the runtime environment they are deployed to. The example below shows how Query string parameters could be set in a Code Editor in the Neuron ESB Workflow Designer.
Launching the Http Client UtilityAlternatively, rather than using C# to set HTTP properties, the Http Client Utility Editor can be used within a Business Process to do advanced levels of HTTP configuration. To launch the Http Client Utility Editor, right-click on the Http Client Utility Process Step in the Business Process Designer and select Configure right click context menu as shown below:
The Http Client Utility Editor can also be started by double clicking on the icon with the computers mouse as displayed below:
For users familiar with tools like Postman and the REST client of Chrome, the Http Client Utility Editor will look very similar and they will find it just as easy to configure. The Http Client Utility Editor has built in intelligence and allows the use of Neuron ESB Environmental Variables, Neuron ESB Message properties, Context properties and literal values to configure any Value, Message body or URL as shown below:
Valid HTTP Header options and methods are displayed as drop down boxes, while possible values for the selected HTTP Header key also appear as context sensitive drop downs.
Alternatively, Neuron ESB Environmental Variables, properties (context, message, etc.), message body and literals can be used by selecting from the available list. Environmental variables are preceded by the $, whereas all others are preceded by # as shown below. The literal values that appear in the list (i.e. by pressing CTRL + SPACE) that can be used are:
Values that can be used to access either some part of the body or a custom message property of the ESB Message are:
Besides the Method drop down box and the URL text box, the Http Client Utility Editor has three primary tabs: Headers, Body and URL Parameters. The Headers tab allows users to specify any HTTP or custom key/value pairs that will appear as HTTP Headers in the final REST service call. A good example of an HTTP Header could be either the Content Type or the Authorization header. The Body tab allows users to specify how the body should be encoded and sent to the service as shown below:
Using the settings, Neuron ESB will ensure the proper HTTP Content Type and data are appropriately set and encoded if necessary. Users have additional options like clearing out the underlying Neuron ESB Message body if either Form Body or Form Url Encoded options are chosen. The URL Parameters tab allows users to enter key/value pairs that will be serialized as URL parameters for the service call. The Http Client Utility Editor eliminates the need for developers to use C# to set the required HTTP properties for any service call. In the example below, a Salesforce authentication call is made where all the values are using Neuron ESB Environmental Variables, allowing the values to be specific to the actual runtime environment the solution is deployed to:
Swagger IntegrationThe Http Client Utility Editor can be auto configured by selecting Swagger, a common documentation format for REST (HTTP) based services, from the drop down list. For example, Neuron ESB ships a Marketo adapter, which is accompanied by its respective Swagger documentation. The Marketo Swagger documentation, as well as any Swagger document registered within the new Neuron ESB Swagger Repository, can be accessed directly within the Use Swagger document section of the Http Client Utility Editor.
Swagger documents can be imported in the Neuron ESB Swagger Repository by navigating to Repository->Service Descriptions->Swagger Documents within the Neuron Explorer. By expanding the Use Swagger document section, the Document and Operations dropdown fields will be visible and populated using existing Swagger documents in the Repository. These can be selected to auto configure the Http Client Utility Editor. If a Swagger document does not exist, one can be imported directly within the UI by selecting the Import Swagger option from the Document dropdown and providing the URL of the Swagger document. |
||||||||||||||||
Design Time Properties |
||||||||||||||||
|
||||||||||||||||

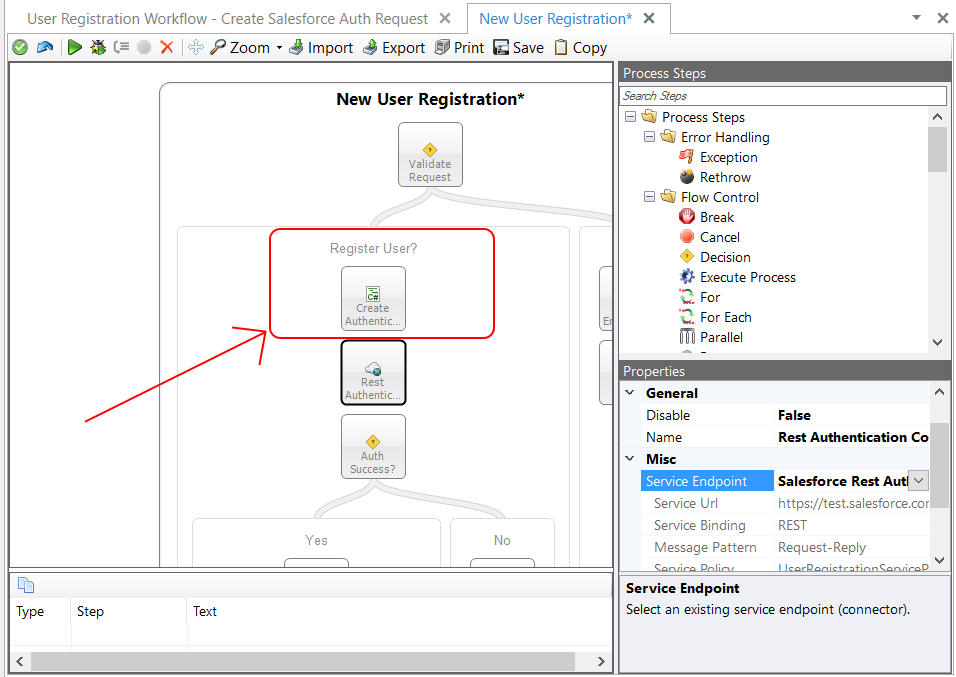
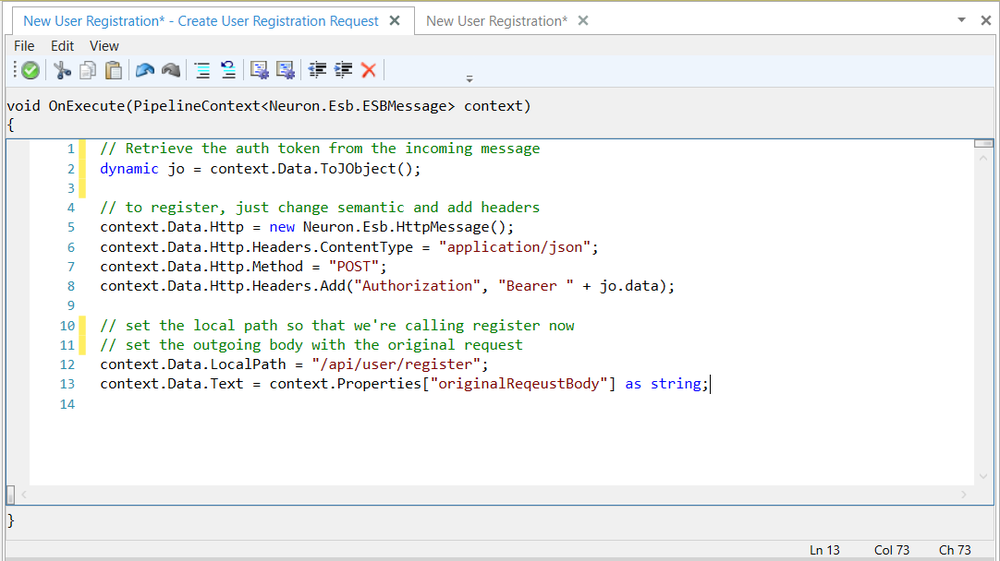
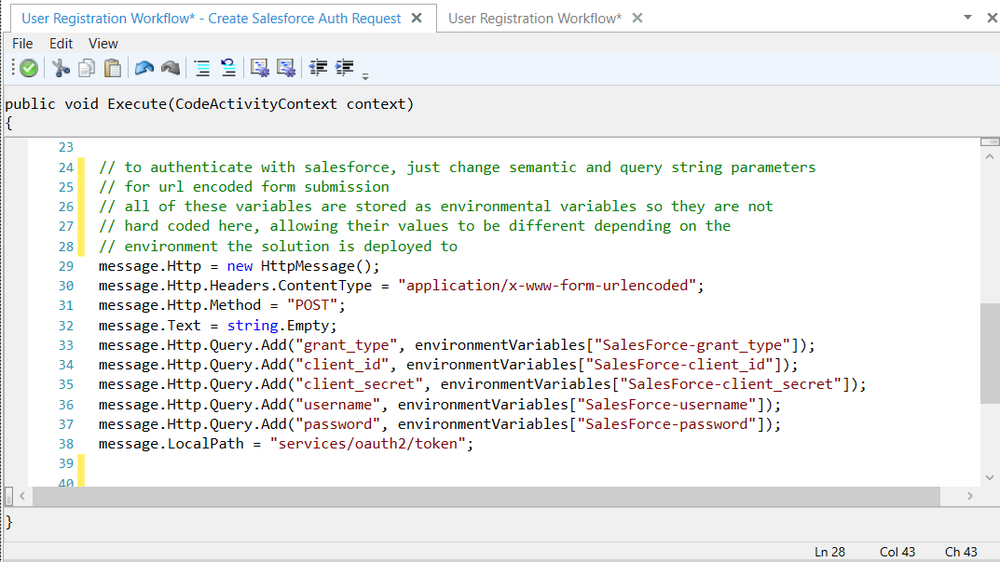
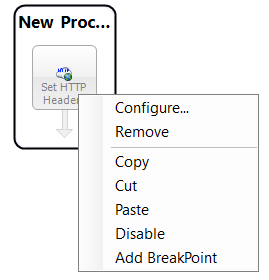
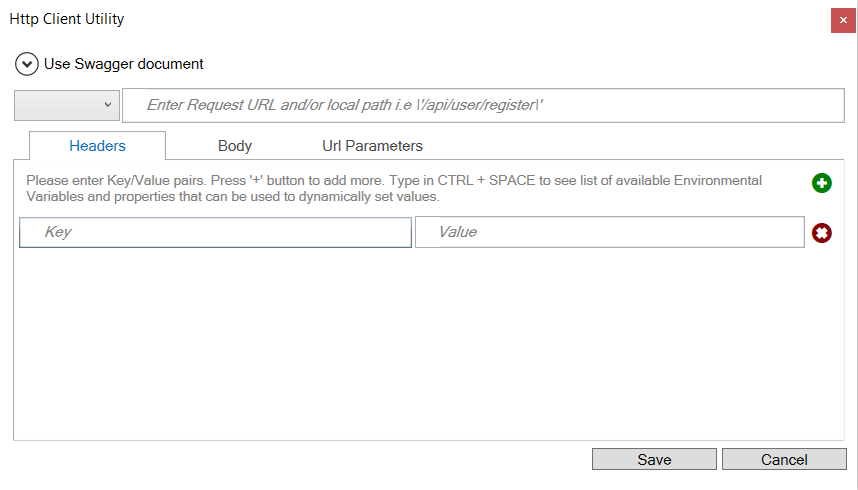
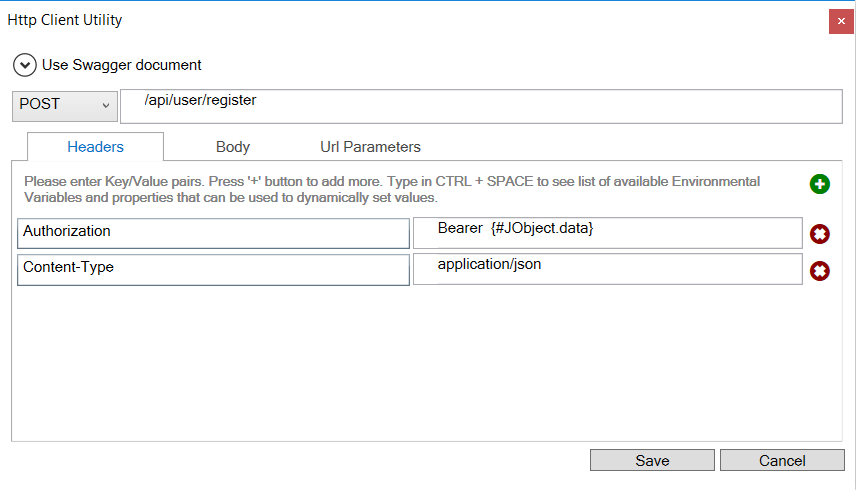
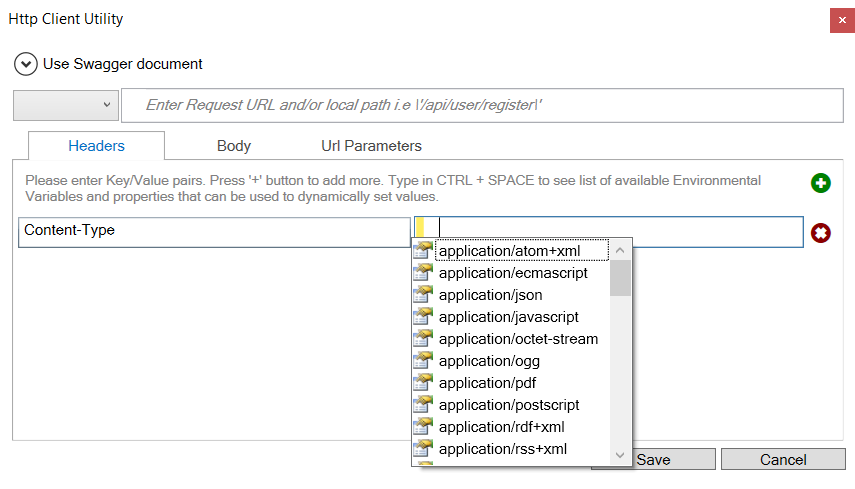
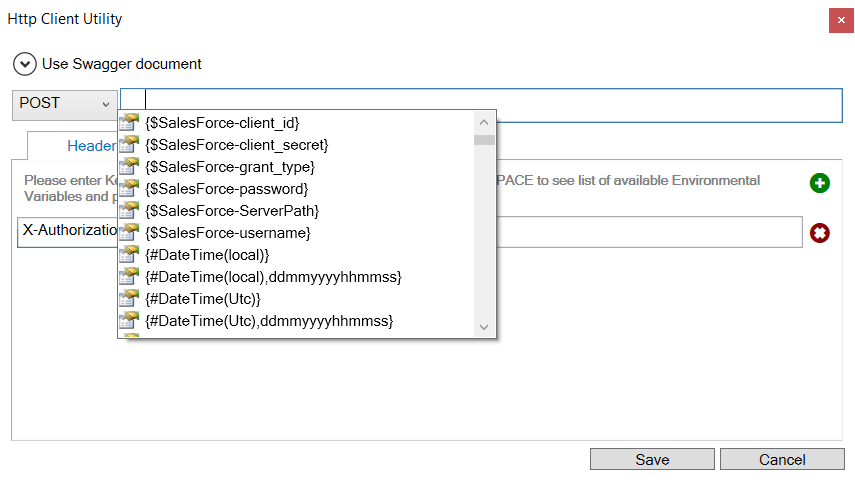
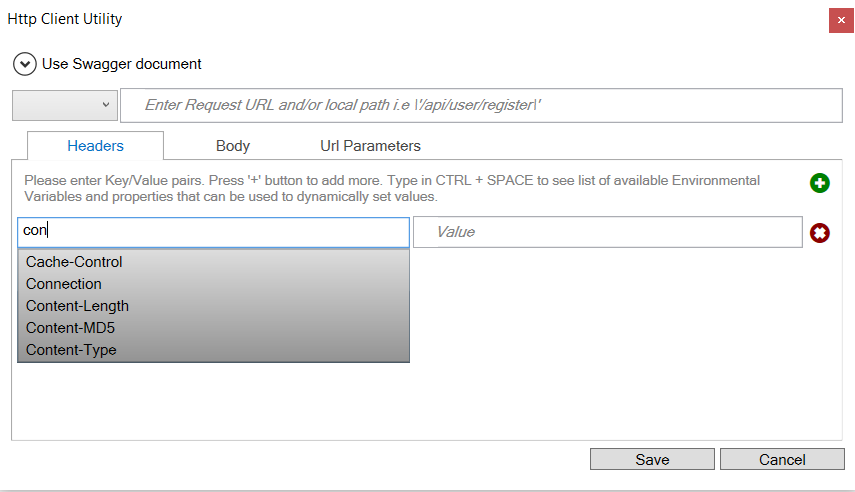
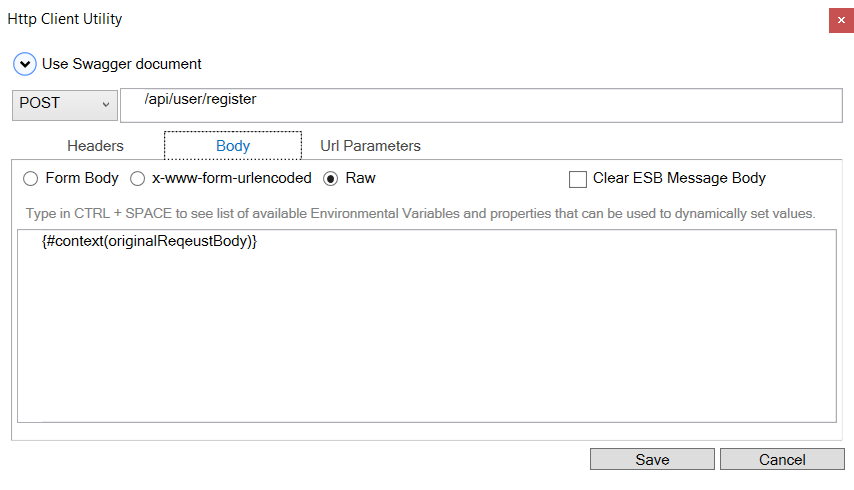
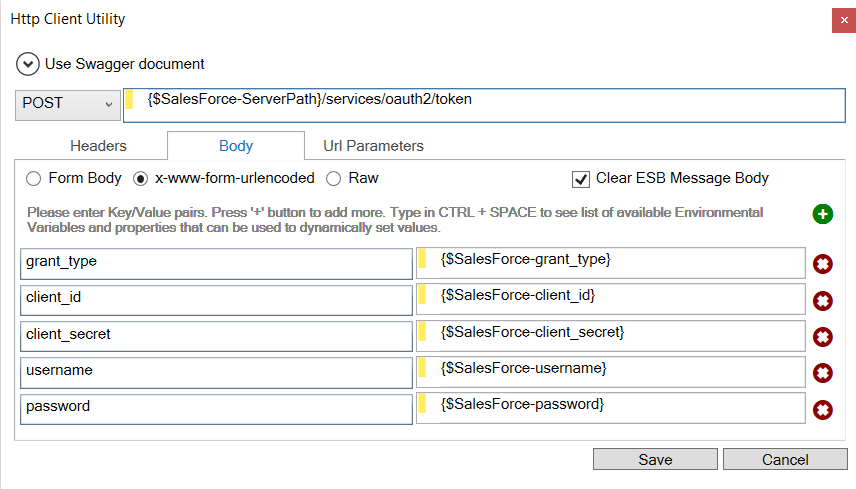
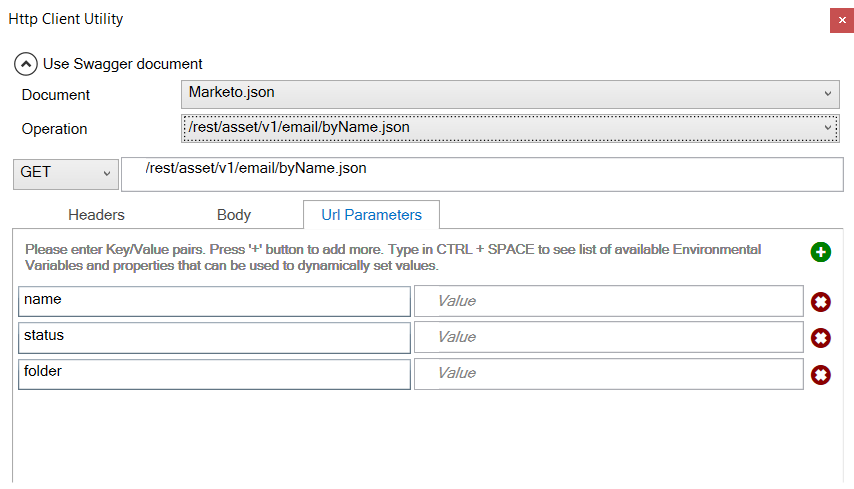
Publish
|
Category: |
Services |
|||||||||||||||||||||||
Class: |
EsbMessagePublishPipelineStep |
||||||||||||||||||||||||
Namespace: |
Neuron.Esb.Pipelines |
||||||||||||||||||||||||
Assembly: |
Neuron.Esb.Pipelines.dll |
||||||||||||||||||||||||
Description: The Publish Process Step uses the context of the Neuron ESB Party that the Business Process is associated with to publish the incoming message to a specified Topic. The Publish Process Step provides direct integration to the Neuron ESB Messaging system. When the Publish Step runs in the context of Parties, (attached to a Party configured in an Endpoint) it uses the Party it is attached to and that Partys subscriptions and authorizations will be applied. Topics can also be set dynamically by using the built in C# Code Editor within the Publish Process Step. For instance, it may be necessary to inspect the content of the message to determine which Topic to publish the message. Using the C# Code Editor, C# can be used to inspect the message, or call external services, code or logic to return the correct Topic. Design Time TestingWhen testing the Publish Process Step in the Process Designer, the user must supply the Source ID (name of the Party) in the Edit Test Message dialog. Both Party and Topic to route to must exist in the opened solution and the open solution MUST be running in the local Neuron ESB Service runtime. More information can be found in the Testing Live Process Steps section of this documentation. |
|||||||||||||||||||||||||
Design Time Properties |
|||||||||||||||||||||||||
|
|||||||||||||||||||||||||

Rules Engine
|
Category: |
Services |
||||||||||||||
Class: |
EsbMessageRulesPipelineStep |
|||||||||||||||
Namespace: |
Neuron.Esb.Pipelines |
|||||||||||||||
Assembly: |
Neuron.Esb.Pipelines.dll |
|||||||||||||||
Description: The Rules Engine Process Step uses the Microsoft .NET Workflow Rules Engine. Rules can be defined based on any Neuron ESB Message property, body content or the Business Process context. The .NET Workflow Rules Engine can be used to modify the Neuron ESB Message body and its properties as well as the Business Process Context. The current Neuron ESB Business Process Context and Neuron ESB Message can be accessed within the Rule Set Editor by referencing this. in the Rule Set editing text boxes for Conditions and Actions. Launching the Rules Set EditorTo launch the Rule Set Editor, right-click on the Rules Engine Process Step in the Business Process Designer and select Rule Set Editor right click context menu as shown below:
The Rule Set Editor can also be started by double clicking on the icon with the computers mouse, displayed below:
All objects from the Business Process Context are available to be referenced within the Rule Set Editor text boxes. Shown below is an example of setting Neuron ESB Message Properties to values retrieved from the current Neuron ESB Message Body (e.g. SelectSingleNode()) and Environment Variables collection:
Once a Rule Set has been created, it is saved and serialized as part of the Business Process. More information regarding the .NET Windows Workflow Rules Engine can be found here: https://msdn.microsoft.com/en-us/library/dd554919.aspx |
||||||||||||||||
Design Time Properties |
||||||||||||||||
|
||||||||||||||||


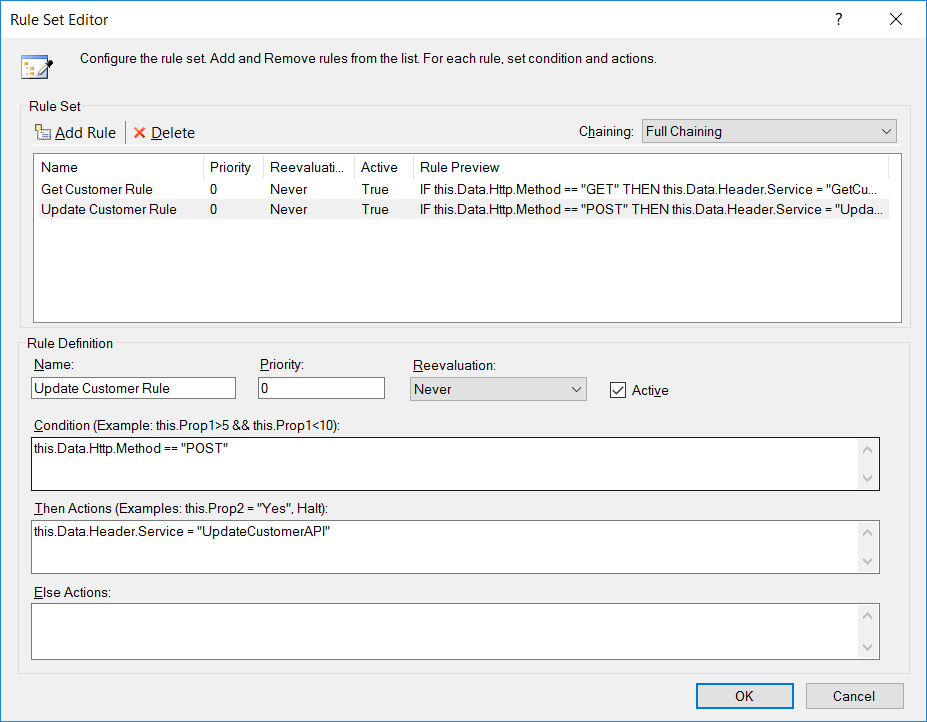
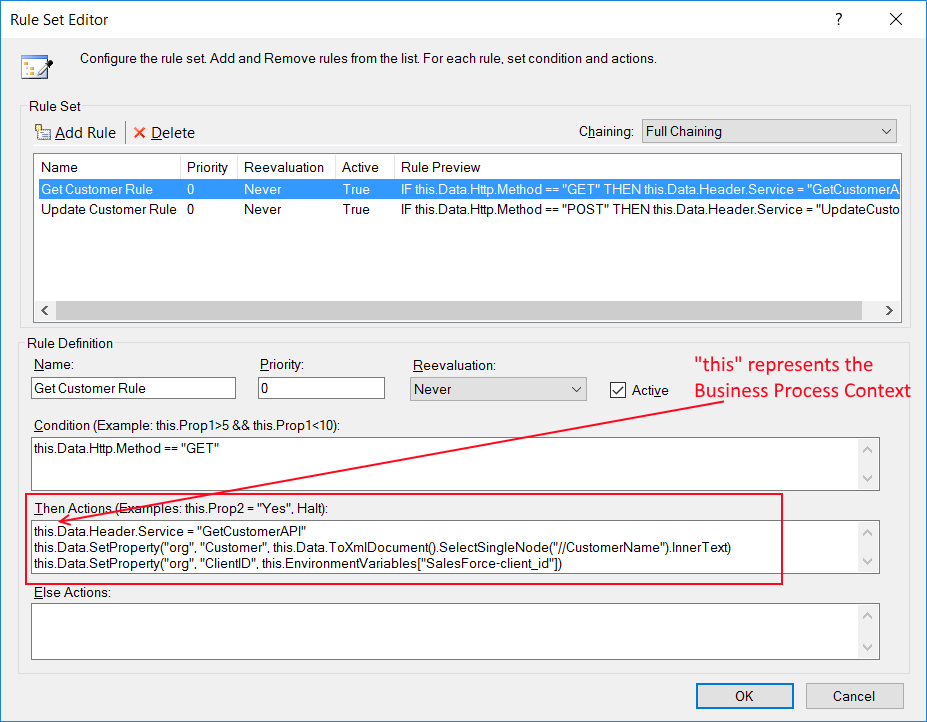
Service
|
Category: |
Services |
|||||||||||||||||||||||||||||||||||||||||||||||||||||
Class: |
EsbMessageCallWebServicePipelineStep |
||||||||||||||||||||||||||||||||||||||||||||||||||||||
Namespace: |
Neuron.Esb.Pipelines |
||||||||||||||||||||||||||||||||||||||||||||||||||||||
Assembly: |
Neuron.Esb.Pipelines.dll |
||||||||||||||||||||||||||||||||||||||||||||||||||||||
THIS PROCESS STEP IS OBSOLETE AND SHOULD NOT BE USED. THE DOCUMENTATION FOR THIS PROCESS STEP IS NOT MAINTAINED. THE SERVICE ENDPOINT PROCESS STEP FUNCTIONALLY REPLACES THE SERVICE PROCESS STEP. The Service Process Step can be used to call a Web Service. To configure, drag the Service Process Step onto a Business Process, right click the step to display the short cut menu, and select Select Endpoint from the menu. This will display the Select Endpoint Dialog box in the figure below.
In the Select Endpoint dialog, enter the URL to the WSDL of the service in the URL text box, then click the Load button. This will populate the Services and Operations list boxes. Once populated, select the services endpoint and associated operation, and click the OK button. This will populate the following Service Pipeline Step properties:
If metadata (WSDL) is not available, the Service Process step can be configured manually by entering values for the following properties:
The first three properties must be configured within the *.config file of whatever application will be hosting and executing the process.This is determined by where the Business Process associated Party is running.For example, if the Business Process is configured for a Party, which in turn is associated with a Service Connector, Client Connector or Neuron ESB Adapter, then the configuration file for the Neuron ESB Service must be edited to include the properties.The name of the configuration file is esbService.exe.config and can be found in the root of the Neuron ESB installation directory. Metadata Exchange EndpointsThe Service Process Steps supports WSDL extensions as well as WCF Metadata Exchange Endpoints. If using the Select Endpoint wizard (displayed above), if an endpoint is entered without either a WSDL or Metadata Exchange Endpoint (e.g. mex), WSDL will be assumed and that extension will be automatically entered for the user. If a WSDL or Metadata Exchange Endpoint is not found, an error will be displayed to the user. Lastly, the Service Process Step can still be manually configured to call any WCF or non-WCF service endpoint using its associated property grid. This allows service calls to be made without have to retrieve and parse the Metadata for each call. |
|||||||||||||||||||||||||||||||||||||||||||||||||||||||
Design Time Properties |
|||||||||||||||||||||||||||||||||||||||||||||||||||||||
|
|||||||||||||||||||||||||||||||||||||||||||||||||||||||

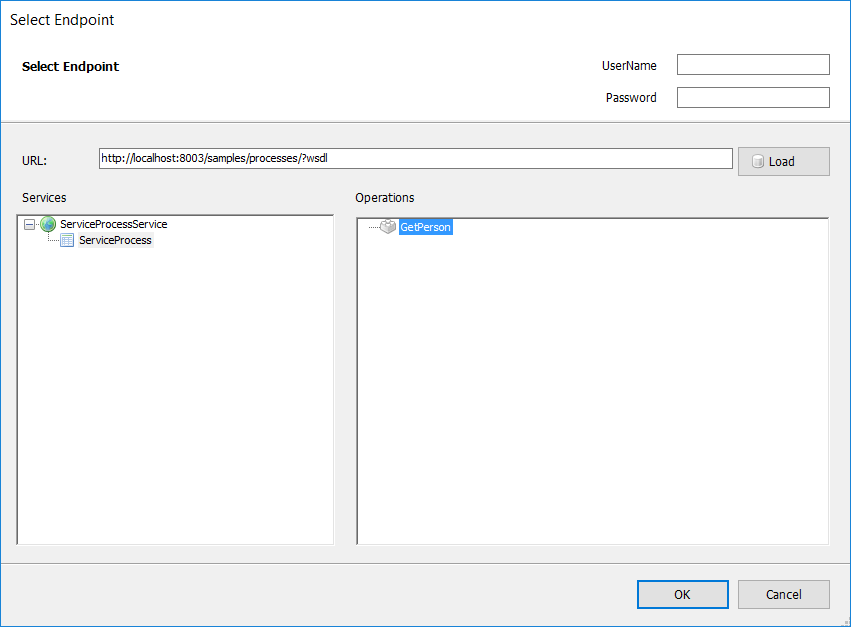
Service Endpoint
|
Category: |
Services |
|||||||||||||||||||||||
Class: |
EsbMessageServiceEndpointPipelineStep |
||||||||||||||||||||||||
Namespace: |
Neuron.Esb.Pipelines |
||||||||||||||||||||||||
Assembly: |
Neuron.Esb.Pipelines.dll |
||||||||||||||||||||||||
Description: Neuron ESB includes a Service Broker that enables organizations to deploy Neuron ESB as a Service Gateway, providing mediation, security, hosting and a number of other services. Service Connectors are essentially registrations within Neuron ESB that point to existing services hosted within an organization, partner or cloud domain. Some of Neuron ESBs Service Broker capabilities include:
Normally a Service Connector (externally hosted service registered with Neuron ESB) receives request messages through the Neuron ESB Messaging system. Request messages are published to a Topic and then routed to eligible subscribers, one of which could be a Service Endpoint (e.g. Service Connector) as shown below:
However, the Service Endpoint Process Step can be used with the Business Process Designer to circumvent the Messaging system. The Process Step allows a user to directly call any Service Connector that exists in the Neuron ESB Configuration (e.g. Connections -> Endpoints -> Service Endpoints within the Neuron ESB Explorer), without the need to publish a Neuron ESB Message to a Topic, eliminating all pub/sub overhead:
This allows users to create Business Processes that define an end-to-end solution without the pub/sub abstraction in the middle. The immediate advantage is:
The cost of correlating messaging traffic over a Topic is eliminated.
For request/reply type calls, intermediate pub/sub is eliminated.
The Service Endpoint does NOT have to be Enabled to be use (the Service Connector must be enabled though). Which means a new app domain with dedicated resources will not be created by the Neuron ESB service runtime. When to Use:Generally, the process step should always be used with any request/response type of request against the Service Endpoint (e.g. Service Connector) since there will never be more than one subscribing endpoint fulfilling the request and essentially, it would be always be a blocking call within the Business Process. For fire-and-forget messaging (i.e. multicast/datagram), unless there is a need to decouple using the topic-based pub/sub engine as in the case where the publishing process should not know who the subscribing endpoints/parties are, then using the process step would be a preferred approach. However, the Business Process would incur more increased latency since it would now inherit the amount of time it takes a Service Endpoint to complete its execution. Only Service Connectors can be executed by the Service Endpoint Process Step. NOTE: this should be used instead of the Service Process Step (which has been marked as deprecated). Service Connectors are generally easier to configure than the Service Process Step; can be dynamically configured at runtime and support more features. For example, the Service Endpoint Process Step can be used in the Neuron ESB Business Process designer to create real-time service composition solutions by aggregating existing services and application endpoints into more innovative business capabilities that can be accessed throughout an organization (displayed below). The advantage of the Service Endpoint Process Step is that it can eliminate much of the overhead traditionally seen when a bus or other messaging architectures are incorporated in service composition solutions where request/response type of message patterns are predominately employed.
Dynamic ConfigurationIn some scenarios, developers may need to declare which Service Connector or URL to use at runtime, rather than relying on design time configuration. For example, during the course of execution, the logic in the Business Process could be used to determine the Service Connector to call, or the URL. If relying on design time configuration, a Decision Process Step could be used, with each Branch configured to run a Service Endpoint Step, each configured with a different Service Connector. This will work but would become impractical if it required more than half dozen or so branches. Alternatively, dynamically configuring the Service Endpoint property or the URL of the Service Connector at runtime, a Decision Process Step would not be needed. Only one Service Endpoint Process Step would be used. Directly preceding the Execute Process Step could be a Set Property Process Step or a Code Step. If a Code Step was used, the following custom properties and/or header property could be used:
context.Data.SetProperty("Addressing",
	"To","http://www.mysite/customer");
context.Data.Header.Service = "MyServiceConnector";
The Addressing.To property can be used to dynamically configure the URL of the existing configured Service Connector at runtime. This is useful if more than one service can use the exact same options as configured in the Service Connector being called. In contrast, the Service property of the Neuron ESB Message Header is used to direct the Service Endpoint Process Step, which Service Connector should be called at runtime, effectively making the Service Endpoint name property dynamic. The Addressing.To property can be accessed directly from the Neuron ESB Message object using the GetProperty() or GetProperties() methods. All Neuron ESB Message properties can also be set using the Set Property Process Step.
Performance OptimizationsThe Service Endpoint Process Step uses a Blocking pool of Service Endpoints to allow better scale out for concurrency and to eliminate all calls being serialized through one instance of a Service Endpoint. There are two properties located in the Pool Management property category. Maximum Instances (defaults to 100) and Pool Timeout (defaults to 1 minute). Once the maximum number of Service Endpoints instances have been created, the Pool Timeout determines the amount of time to wait for an existing Service Endpoint instance to become available before throwing a timeout exception. Before a Service Endpoint instance is created, the pool is always checked to see if one already exists. If it does, it retrieves is from the pool and uses it. When complete, the instance is returned to the pool. The Maximum Instances property does NOT define the number of Service Endpoint instances that will always be created at runtime in all circumstances. It only defines the maximum number that could be created. For instance, Business Processes attached to most inbound Adapter Endpoints (Publish mode) will generally only create one pooled instance of an Service Endpoint as many of the adapters only work with one inbound thread at a time (unless receiving messages from Topics). However, a Client Connector (Neuron ESB hosted service endpoint) could be dealing with many more threads representing concurrent users making service calls.
|
|||||||||||||||||||||||||
Design Time Properties |
|||||||||||||||||||||||||
|
|||||||||||||||||||||||||

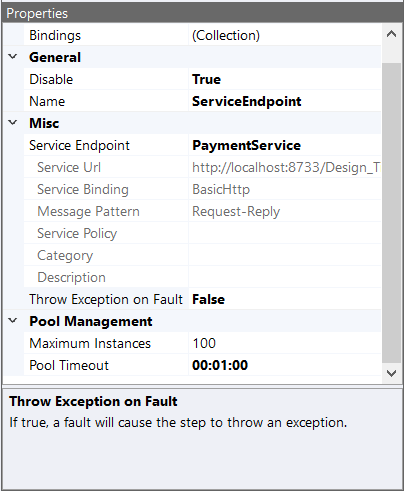
Storage
MSMQ
|
Category: |
Storage |
|||||||||||||||||||||||||||||||||||||||||||||||||||||||||||||||||||||||||||||||||||||||||||||||||||||||||||||||||||||||||||||||||||||||||||||||||||||||||||||||||||||||||||||||||||||||||||||||||||||||||||||||||
Class: |
EsbMessageMsmqPipelineStep |
||||||||||||||||||||||||||||||||||||||||||||||||||||||||||||||||||||||||||||||||||||||||||||||||||||||||||||||||||||||||||||||||||||||||||||||||||||||||||||||||||||||||||||||||||||||||||||||||||||||||||||||||||
Namespace: |
Neuron.Esb.Pipelines |
||||||||||||||||||||||||||||||||||||||||||||||||||||||||||||||||||||||||||||||||||||||||||||||||||||||||||||||||||||||||||||||||||||||||||||||||||||||||||||||||||||||||||||||||||||||||||||||||||||||||||||||||||
Assembly: |
Neuron.Esb.Pipelines.dll |
||||||||||||||||||||||||||||||||||||||||||||||||||||||||||||||||||||||||||||||||||||||||||||||||||||||||||||||||||||||||||||||||||||||||||||||||||||||||||||||||||||||||||||||||||||||||||||||||||||||||||||||||||
Description: The MSMQ Process is used to send messages to or receive messages from an MSMQ Queue. The MSMQ Process step has similar capabilities as the Neuron ESB MSMQ Adapter except that the MSMQ Process Step supports correlated Sends and Receives. At minimum the following three properties need to be configured to use the step:
Queue PathThe Queue Path property represents the location and name of the Queue (i.e. path name or FormatName) to send or receive messages from. NOTE: For more about MSMQ queue path formats: https://msdn.microsoft.com/en-us/library/ms700996(v=vs.85).aspx For example, to send to the OrderQueue located on the local machine with a NETBIOS name of Martywaz01, acceptable queue paths are:
TransactionalFor transactional messaging, the Microsoft Distributed Transaction Coordinator (MSDTC) service must be configured and running when reading from and writing to transactional queues.
When the Transactional property is set to Requires or RequiresNew, the message is read from the queue in a transaction. This requires that the MSMQ queue be a transactional queue.
If the Transactional property is set and the queue is not a transactional queue, then the Process Step will not be able to retrieve messages from the queue or send messages to the queue. Remote transactional reads are only supported on MSMQ4.0 and above which is shipped with Windows 2008, Vista and later operating systems. A remote transactional read is one where the queue is not on the same machine as the Neuron ESB server. When sending and receiving to remote transactional queues, the MSDTC must be configured for secure network access on all machines involved in the transaction. NOTE: For more about configuring the MSDTC: https://technet.microsoft.com/en-us/library/cc753510(v=ws.10).aspx https://technet.microsoft.com/en-us/library/cc731461(v=ws.11).aspx https://technet.microsoft.com/en-us/library/cc731495(v=ws.11).aspx If RequiresNew is selected, a new Transaction will be created for the Process Step operation. However, if Requires is selected, an attempt will be made to enlist in the underlying ambient transaction (e.g. System.Transactions.Transaction.Current != null). For local transactional queues, the Process Step will check the transactional property of the queue before sending messages to the queue. If the queue is not transactional, and the Transactional property is set to Requires or RequiresNew, an exception will be thrown. However, there is no ability to check the transactional property of a remote queue. If the Process Step sends a message to a non-transactional queue with the Transactional property set, the send will silently fails. The developer must ensure the type of queue the message is being sent to matches the properties set. OperationThe Operation property is used to indicate what operation the Process Step should execute:
Sending MessagesThe Send operation indicates that the body of the Neuron ESB message will be sent to the queue specified in the Queue Path Property. The BodyStream property of MSMQ message will be set to the byte array of the Neuron ESB Message. If any custom Neuron ESB Message properties exist (prefix of msmq listed in the table below), their values will be copied to the respective properties of the MSMQ message. The exact Neuron ESB Message properties copied are determined by the value of the Extended Properties property value. If set to true, all MSMQ Message properties are copied to the new MSMQ message. If false, only Correlation Id (if Correlate property is set to true), AppSpecific, Label and Priority are copied. After the message body has been sent to the MSMQ queue, the MSMQ Message ID as well as the Correlation Id (provided the Correlate property was set to true) are copied to the existing Neuron ESB Message as custom message properties (with prefix of msmq). Reading MessagesThe Read operation will attempt to read a message from the MSMQ Queue, for the duration of the timespan value set for the Timeout property. This is essentially a WAIT operation. If Correlate is set to true and a Correlation ID is provided, the ReceiveByCorrelationId() method of the MSMQ queue will be used to ensure that only messages with the given Correlation Id will be retrieved. If a message is found, its retrieved and the following happens:
If no message is found after the Timeout period, the msmq.ReceivedMessage custom Neuron ESB Message property is added to the existing Neuron ESB Message and is set to false. Peek a MessageThe Peek Operation is similar to the Read except that it does NOT remove the message from the Queue. It only determines if a message exists on the queue or if Correlate is set to true, determines if a message with a specific Correlation Id exists on the queue. If a message is found on a queue, the following happens:
If no message is found after the Timeout period, the msmq.ReceivedMessage custom Neuron ESB Message property is added to the existing Neuron ESB Message and is set to false. CorrelationCorrelation can be used to ensure that random messages are not read from a Queue. Using a Correlation ID, the Process Step can be directed to only read those MSMQ messages whose Correlation Id properties are set with the Correlation Id value provided either at design time (property grid) or runtime (e.g. msmq.CorrelationId). To enable correlation, the Correlate property of the Process Step must be set to true. If true, the Correlation Id property will be visible and can be set in the property grid. The Correlation Id must conform to the format specified by MSMQ, which is essentially a GUID and 7-digit number separated by a backslash (e.g. \). More about Correlation Ids can be found here: https://msdn.microsoft.com/en-us/library/ms703979(v=vs.85).aspx RequirementsThis MSMQ Process requires that the Microsoft Message Queue (MSMQ) server Windows feature be installed. The MSMQ Active Directory Domain Services Integration sub feature is required only if sending or receiving to Public queues.
Post ProcessingAfter either a Read or Peek operation, the msmq.ReceivedMessage Neuron ESB Message Property can be inspected to determine if the Process Step either retrieved or found a message on the Queue. This property is populated by the Process Step and is usually used in the condition property of a Decision Process Steps Branch as shown below:
return bool.Parse(context.Data.GetProperty("msmq",
	"ReceivedMessage"));
The prefix for all MSMQ custom message properties it msmq and they can be accessed directly from the Neuron ESB Message object using the GetProperty() or GetProperties() methods. All Neuron ESB Message properties can also be set using the Set Property Process Step. NOTE: Learn more about MSMQ Message properties: https://msdn.microsoft.com/en-us/library/ms705286(v=vs.85).aspx Neuron ESB Message Properties
Dynamic ConfigurationDirectly preceding the MSMQ Process Step could be a Set Property Process Step or a Code Step. If a Code Step was used, the following custom properties could be used:
context.Data.SetProperty("msmq","CorrelationId",
	" 220b1f11-23b6-460c-a83b-70907e9dff45\3940494");
context.Data.SetProperty("msmq","QueuePath",
	".\Private$\msgsfromneuron");
The msmq.CorrelationId property can be used to dynamically set the Correlation Id at runtime. This is useful if business logic within the process is required to compose the uniqueness of the Correlation Id. In other cases, the actual Queue to send the message to or attempt to read from may only be able to be determined at runtime. For instance, perhaps an MSMQ is mapped to a user or customer, and the name of that user or customer can only be known at runtime. The msmq properties can be accessed directly from the Neuron ESB Message object using the GetProperty() or GetProperties() methods. All Neuron ESB Message properties can also be set using the Set Property Process Step.
NOTE: Sample of using the MSMQ Process Step can be found here: |
|||||||||||||||||||||||||||||||||||||||||||||||||||||||||||||||||||||||||||||||||||||||||||||||||||||||||||||||||||||||||||||||||||||||||||||||||||||||||||||||||||||||||||||||||||||||||||||||||||||||||||||||||||
Design Time Properties |
|||||||||||||||||||||||||||||||||||||||||||||||||||||||||||||||||||||||||||||||||||||||||||||||||||||||||||||||||||||||||||||||||||||||||||||||||||||||||||||||||||||||||||||||||||||||||||||||||||||||||||||||||||
|
|||||||||||||||||||||||||||||||||||||||||||||||||||||||||||||||||||||||||||||||||||||||||||||||||||||||||||||||||||||||||||||||||||||||||||||||||||||||||||||||||||||||||||||||||||||||||||||||||||||||||||||||||||

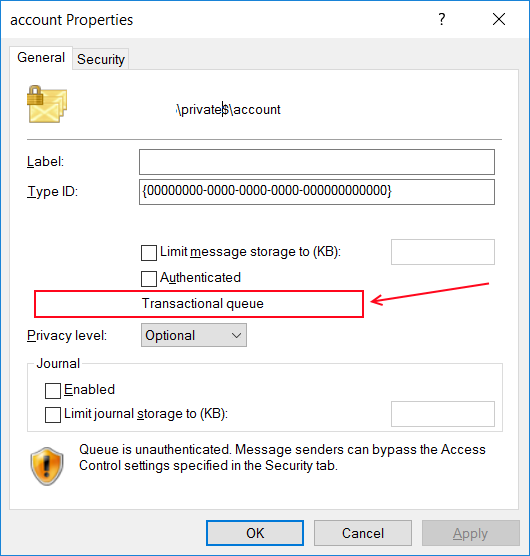
ODBC
|
Category: |
Storage |
||||||||||||||||||||||||||||||||||||||||||||||||||||||||||||||||||||
Class: |
OdbcStep |
|||||||||||||||||||||||||||||||||||||||||||||||||||||||||||||||||||||
Namespace: |
Neuron.Esb.Pipelines |
|||||||||||||||||||||||||||||||||||||||||||||||||||||||||||||||||||||
Assembly: |
Neuron.Esb.Pipelines.dll |
|||||||||||||||||||||||||||||||||||||||||||||||||||||||||||||||||||||
Description: The ODBC Process Step provides powerful capabilities for users building Business Processes that need to integrate directly with ODBC based data sources (i.e. Excel, SQL Server, Oracle, DB2, MySQL, and Lotus Notes, among others). The ODBC Process Step supports one-way inserts and updates, as well as query (i.e. Request/Response) types of message patterns. Generally, it supports all the capabilities of the Neuron ESB ODBC Adapter except Publish and Batch mode operations. Optionally, the ODBC Process Step can also generate XML Schemas that represent the result sets returned. This Step uses the same ODBC Connection String Builder that the Neuron ESB ODBC Adapter uses. NOTE: Neuron ESB ODBC Adapter documentation: The ODBC Process Step supports both Message based and Parameter Mapped configuration models. When using the Message based model, a specifically formatted XML message must be sent to the Process Step. The XML message contains all the necessary meta-data and information to direct the Process Step on how and what to execute against the datasource. The following is an example of an XML message that he ODBC Process step understands. It contains the type of call to make, the format of the call, and the meta-data for the parameters of the call including their respective values:
<Statement sql="{Call      StoreOrderItem(?,?,?)}" type="StoredProcedure">
	<Parameters>
		<Parameter name="@OrderID" type="int" value="1237"></Parameter>
		<Parameter name="@OrderDate" type="datetime" value="4/22/09"></Parameter>
		<Parameter name="@OrderAmount" type="money" value="100.00"></Parameter>
	</Parameters>
</Statement>
In contrast, the Parameter Mapped based model allows users to work directly with existing XML messages, Neuron ESB Message headers and custom properties to map values within them directly to parameters for the call as shown below:
The Parameter Mapped based model allows developers to work with any existing message or meta-data without the need for creating specially formatted documents or template mapping. Besides the different configuration models, the ODBC Process Step supports a number of features including:
Developers can use the ODBC Process Step to make one-way calls (i.e. insert, update, upsert, etc.) or queries (i.e. Select * From, etc.) against any ODBC data source that a registered ODBC driver exists for. For one-way calls, the Semantic property of the Step must be set to Multicast. For queries, the Semantic property must be set to Request. Either ODBC Drivers or ODBC Data Source Names (DSN) can be used when constructing a connection string for the ODBC Process Step. NOTE: For more information on ODBC DataSource Names refer here: https://docs.microsoft.com/en-us/sql/odbc/admin/odbc-data-source-administrator The ODBC Process Step provides the Connection String Builder user interface (UI) to assist users in constructing connection strings. This can be launched by clicking the ellipsis button located on the Connection String property in the Process Steps property grid:
All connection strings built using the Connection String Builder UI are stored as encrypted name/value pairs as shown in the lower half of the screen (grid). One column contains ODBC Keywords, while the other contains their respective values. NOTE: More about how to create Connection Strings can be found here; https://www.connectionstrings.com/ The Connection String Builder UI supports several ways to assist users in creating connection strings:
If the Data Source Name radio button option is selected, users can launch the Microsoft Windows ODBC Data Source Administrator by clicking the Create button as displayed below:
If ODBC Data Source Names (DSN) already exist, clicking the Load button will populate the list of DSNs (User and System) in the top part (grid) of the ODBC Connection String Builder UI. Clicking on any entry will automatically populate the correct Name/Value pairs in the lower grid with the DSN keyword and value as well as the Driver keyword and value Alternatively, users can directly query an ODBC driver for the list of available keywords that it supports by choosing the ODBC Driver radio button option. When selected, the dropdown will be populated by all the available registered ODBC Drivers on the machine. Select one, and then click the Load button.
Not every Keyword/Value pair is required to make a successful connection. They can be used to fine-tune the connection though. Usually only four common keywords are required when not using a DSN: Driver, Database, Server and Trusted_Connection (indicating Windows integrated security). Clicking the Test Connection button will use the selected Keyword/Value pairs to connect to the data source as shown below:
Message FormatsOnce a connection has been established, the Process Step can execute statements. The configuration of the statements can be either Message or Parameter Mapped based. For Message based statements, the body of the Neuron ESBMessage must be the Neuron ESB ODBC XML format (this is not required for Parameter Mapped configuration). The XML describes the stored procedure or SQL Statement called and parameters that are passed. Multicast MessagesThe sample XML documents below represents an incoming Neuron ESB Message where the Semantic is Multicast. Neither one is expected to return a result set back to the Business Process. In the<Statement>element, the type attribute specifies whether a stored procedure or SQL statement is executed. If a SQL statement is used, the Sql Enabled design time property must be set to true. The sql attribute specifies the stored procedure or SQL statement to be executed. The sql attribute must be in the format using the ODBC call syntax. NOTE: More about ODBC Call Syntax formats: https://msdn.microsoft.com/en-us/library/system.data.odbc.odbccommand.commandtext.aspx If there are any parameters, a<Parameters>element must be used and defines each parameter. The type attribute is optional, but most ODBC data sources need them. If the type attribute is not used, the data source will attempt to cast the value into the data type required by the statement. However, the cast could fail depending on the target data source and the data type that is being cast. When the type attribute is used, it must be an ODBC data type defined in the Microsoft .NET Framework. When executing a Stored Procedure:
<Statement sql="{Call      uspUpdatePhoneNumber(?,?)}" type="StoredProcedure">
	<Parameters>
		<Parameter name="@Id" type="int" value="3"></Parameter>
		<Parameter name="@PhoneNumber" type="varchar" value="11111"></Parameter>
	</Parameters>
</Statement>
When executing a SQL Statement (i.e. INSERT): <Statement sql="INSERT INTO phonebook(LastName, FirstName,PhoneNumber) VALUES(?,?,?)" type="Text"> <Parameters> <Parameter name="@LastName" type="varchar" value="Wasznicky"></Parameter> <Parameter name="@FirstName" type="varchar" value="Todd"></Parameter> <Parameter name="@PhoneNumber" type="varchar" value="3109890000"></Parameter> </Parameters> </Statement> NOTE: When creating the Parameters collection of the message, the parameters MUST BE IN THE ORDER in which the parameter placeholders (e.g. ?) appear in the ODBC Call Syntax, from left to right. Null ParametersAdditionally, NULL values can be passed to the datasource by adding the nillable attribute to the Parameter element and setting the value attribute to null as shown below:
Binary ParametersLastly, if the type attribute is set to binary, image or varbinary, the ODBC Process Step will use the text of the value attribute within the Parameter element. It will assume the text is base64 encoded and attempt to convert it to a byte array, which will be passed to the datasource. If the text contains a file:// url as the content, it will use the url to read in the content as a byte array and pass that to the datasource. The specific type used depends on the type used for the table or stored procedure. For example, if a column is defined as varbinary(max), then the image odbc data type should be used instead of the binary or larger files may fail. For example, the following SQL Script will create a table and stored procedure in Microsoft SQL Server. The stored procedure includes a parameter (@FileContent) of varbinary(max): SET ANSI_NULLS ON GO SET QUOTED_IDENTIFIER ON GO CREATE TABLE [dbo].[FilePrint]( [Id] [int] IDENTITY(1,1) NOT NULL, [FileName] [nvarchar](150) NOT NULL, [FileContent] [varbinary](max) NULL, [FieldOffice] [nvarchar](5) NULL, CONSTRAINT [PK_FilePrint] PRIMARY KEY CLUSTERED ( [Id] ASC )WITH (PAD_INDEX = OFF, STATISTICS_NORECOMPUTE = OFF, IGNORE_DUP_KEY = OFF, ALLOW_ROW_LOCKS = ON, ALLOW_PAGE_LOCKS = ON) ON [PRIMARY] ) ON [PRIMARY] TEXTIMAGE_ON [PRIMARY] GO SET ANSI_NULLS ON GO SET QUOTED_IDENTIFIER ON GO CREATE PROCEDURE [dbo].[InsertFilePrint] @FileName nvarchar(150), @FileContent varbinary(max), @FieldOffice nvarchar(5) AS BEGIN SET NOCOUNT ON; Insert into FilePrint (FileName, FileContent, FieldOffice) Values (@FileName, @FileContent, @FieldOffice) END GO If the script above is executed, creating both the table and stored procedure, then the ODBC XML messages below can be used to insert binary data directly into the table. The first message contains a base64 encoded string as the text for the value attribute, representing the contents of a PDF file:
<Statement sql="{Call      InsertFilePrint (?,?,?)} " type="StoredProcedure">
	<Parameters>
		<Parameter name="@FileName" type="String" value="Test"></Parameter>
		<Parameter name="@FileContent" type="Image" value="JVBERi0xLjMKJaqrrK0KNCAwIG9iago8PCAvVHlwZSAvSW5mbwovUHJvZHVjZXIgKG51bGwpID4+ CmVuZG9iago1IDAgb2JqCjw8IC9MZW5ndGggMjY5 NiAvRmlsdGVyIC9GbGF0ZURlY29kZSAKID4+ CnN0cmVhbQp4nLVabVPjyBH+zq9QPqSyt7UW8 z6jrUrVebHN+XJ0eHJlZgo2NTg4CiUlRU9GCg=="></Parameter>
		<Parameter name="@FieldOffice" type="String" value="BO"></Parameter>
	</Parameters>
</Statement>
The second message below uses the file:\\ moniker to represent the contents of the PDF file. At runtime, the ODBC Process Step will read the file into a byte array and pass it as the parameter to the data source:
<Statement sql="{Call      InsertFilePrint (?,?,?)} " type="StoredProcedure">
	<Parameters>
		<Parameter name="@FileName" type="String" value="Test"></Parameter>
		<Parameter name="@FileContent" type="Image" value="file://C:\temp\License_2.0.pdf"></Parameter>
		<Parameter name="@FieldOffice" type="String" value="BO"></Parameter>
	</Parameters>
</Statement>
Creating MessagesEither creating the message formats can be done through C#, XSLT or using XML Templates. For example, if receiving information via an HTTP POST Query String, the values could be retrieved and mapped within a C# Code Step as shown below: // Retrieve the template var insertContact = context.Configuration.XmlDocs["InsertContactTemplate"].Xml; // Set the ODBC Statement Parameters based on HTTP POST Query String context.Data.Text = string.Format(insertContact, context.Data.Http.Query["LastName"], context.Data.Http.Query["FirstName"], context.Data.Http.Query["Phone"]); This would create the following Neuron ESB ODBC XML statement: <Statement sql="INSERT INTO phonebook(LastName, FirstName,PhoneNumber) VALUES(?,?,?)" type="Text"> <Parameters> <Parameter name="@LastName" type="varchar" value="wasznicky"></Parameter> <Parameter name="@FirstName" type="varchar" value="marty"></Parameter> <Parameter name="@PhoneNumber" type="varchar" value="435-908-9999"></Parameter> </Parameters> </Statement> Request MessagesExecuting statements when the Semantic is a Request functions the same as a message with a Multicast Semantic, except that a result set from the stored procedure or SQL statement is returned as a new Neuron ESB Reply message. The following Neuron ESB ODBC XML formats are examples of SQL statements and Stored Procedures that return a result set. <Statement sql="select * from PhoneBook where Id = ?" type="Text"> <Parameters> <Parameter name="@Id" type="int" value="2"></Parameter> </Parameters> </Statement> Executing the statement above would return the following XML back to the Business Process as a Neuron ESB Reply Message: <NewDataSet> <Table1> <Id>2</Id> <FirstName>Joe</FirstName> <LastName>King</LastName> <PhoneNumber>425-909-8787</PhoneNumber> </Table1> </NewDataSet> However, developers can control the output and structure of returned result sets by modifying the design time properties like Root Node Name, Row Node Name and Namespace as shown below: <Employees> <Contact xmlns="http://www.neuronesb.com/contacts"> <Id>2</Id> <FirstName>Joe</FirstName> <LastName>King</LastName> <PhoneNumber>425-909-8787</PhoneNumber> </Contact> </Employees> SQL statements and Stored Procedures can return a result set or they can use ReturnValue or OutPut parameters to return a value from the Request call. If ReturnValue or OutPut parameters are used, the following format MUST be used. Notice the new direction attribute and the position of the ? = notation in the ODBC Call Syntax. The value of this attribute can be either ReturnValue or OutPut. This attribute is ONLY REQUIRED when making a Request call AND when a value is returned using a ReturnValue or OutPut parameter:
<Statement sql="{? = Call CLOB_InsertPaymentRecord (?,?)}" type="Text">
	<Parameters>
		<Parameter direction="ReturnValue" name="@RETURN_VALUE" size="1" type="varchar"></Parameter>
		<Parameter name="RECORD_NO" type="varchar" value="C9722/2051"></Parameter>
		<Parameter name="DATA" type="varchar" value="19.99"></Parameter>
	</Parameters>
</Statement>
NOTE: If an Output or ReturnValue parameter is a binary, image or varBinary data type, the value will be encoded within the returned XML message as a base64 encoded string. Parameter MappingThe ODBC process step has a property called "Use Parameter Mapper". When set to true, the incoming message will be passed through to the Parameter Mapper, which allows the message to deviate from the format previously described in this document. The Parameter Mapper model offers a unique value over the Message format model. It offers users the ability to decouple the ODBC operation from the incoming Neuron ESB Message body format. When the Use Parameter Mapper is set to true, the following four properties become visible in the property grid:
Each Parameter entry can have the following properties:
Note: The number and order of parameters in theOdbcCallParamter Collection Editormust match the number and order of parameters in theCommandproperty of theParameter Mapper. The SelectionType property provides the capability to decouple the ODBC operation from using the ODBC XML Message format previously documented. This property allows users to hard code parameter values, use any part of an incoming message as well as use any Neuron ESB Message or Header property as the value for a parameter. This property in concert with the SelectionValue property provides the mapping between the parameter and value. For Example:
In the following example, the Property Mapper is used to map a custom Neuron ESB Message property to an ODBC Parameter. The custom Property can be set either using the Set Property Process Step:
Or by using the following C# code within a C# Code Process Step: context.Data.SetProperty("mw","FileContent",@"file://C:\License_2.0.pdf"); Within the OdbcCallParameter Collection Editor, the SelectionType property is set to MessageProperty and the SelectionValue property is set to mw.FileContent as displayed below. This will insert a binary payload into a table:
In the next example, the following message is set as the Neuron ESB Message body: <GetOrder> <OrderID>1235</OrderID> </GetOrder> The Xpath property in the Property Mapper section of the property grid contains the XPATH 1.0 statement GetOrder, which returns the following child element to the Property Mapper for the OdbcCallParameters Collection Editor to process: <OrderID>1235</OrderID> Within the OdbcCallParameter Collection Editor, the SelectionType property is set to Element and the SelectionValue property is set to the XPATH 1.0 statement OrderID as displayed below. This ensures that the innertext property of the OrderID element is used as the Parameter value:
Passing Null and Empty StringsThe SelectionValue and DefaultValue properties within the OdbcCallParameters Collection Editor support passing in null values and empty strings as values for parameters. For a value to be evaluated as null, DBNull must be entered (remove double quotes). To pass an empty string, String.Empty must be entered (remove double quotes). NOTE: When creating the Parameters collection within the Collection Editor, the parameters MUST BE IN THE ORDER in which the parameter placeholders (e.g. ?) appear in the ODBC Call Syntax, from left to right. Schema GenerationThe Include Schema design time property can be used to generate an XSD Schema that represents the XML output of the ODBC Process Step. This can be useful validating the output within the Business Process at runtime or in other parts of the system using the Validate Schema Process Step. This property should only be set to True during development to retrieve the XSD Schema, if one is needed. Usually this would be done by running a test within the Business Process Designer, capturing the output using a Trace Process Step or Audit Process Step, and then copying the XSD portion into the Neuron ESB Schema Repository. To finalize the structure of the xml that the ODBC Process Step would return when querying a data source, the Root Node Name, Row Node Name and Target Namespace can be modified in the Process Steps property page as shown below:
Using the modified properties, the ODBC Process Step produced the following XML output: <Employees> <Contact xmlns="http://www.neuronesb.com/contacts"> <Id>2</Id> <FirstName>Joe</FirstName> <LastName>King</LastName> <PhoneNumber>425-909-8787</PhoneNumber> </Contact> </Employees> When the Include Schema design time property is set to True, an XSD Schema will be pre-pended to the output XML. The XSD Schema representing the xml will look like this. <xs:schema id="Employees" xmlns="" xmlns:xs="http://www.w3.org/2001/XMLSchema" xmlns:msdata="urn:schemas-microsoft-com:xml-msdata" xmlns:app1="http://www.neuronesb.com/contacts" msdata:schemafragmentcount="2"> <xs:import namespace="http://www.neuronesb.com/contacts"/> <xs:element name="Employees" msdata:IsDataSet="true" msdata:UseCurrentLocale="true"> <xs:complexType> <xs:choice minOccurs="0" maxOccurs="unbounded"> <xs:element ref="app1:Contact"/> </xs:choice> </xs:complexType> </xs:element> </xs:schema> <xs:schema targetNamespace="http://www.neuronesb.com/contacts" xmlns:mstns="http://www.neuronesb.com/contacts" xmlns="http://www.neuronesb.com/contacts" xmlns:xs="http://www.w3.org/2001/XMLSchema" xmlns:msdata="urn:schemas-microsoft-com:xml-msdata" attributeFormDefault="qualified" elementFormDefault="qualified" xmlns:app1="http://www.neuronesb.com/contacts"> <xs:element name="Contact"> <xs:complexType> <xs:sequence> <xs:element name="Id" msdata:ReadOnly="true" msdata:AutoIncrement="true" type="xs:int"/> <xs:element name="FirstName" minOccurs="0"> <xs:simpleType> <xs:restriction base="xs:string"> <xs:maxLength value="50"/> </xs:restriction> </xs:simpleType> </xs:element> <xs:element name="LastName" minOccurs="0"> <xs:simpleType> <xs:restriction base="xs:string"> <xs:maxLength value="50"/> </xs:restriction> </xs:simpleType> </xs:element> <xs:element name="PhoneNumber" minOccurs="0"> <xs:simpleType> <xs:restriction base="xs:string"> <xs:maxLength value="50"/> </xs:restriction> </xs:simpleType> </xs:element> </xs:sequence> </xs:complexType> </xs:element> </xs:schema> Post ProcessingAfter the execution of a Request statement, the odbc.Rows Neuron ESB Message Property can be inspected to determine how many rows were returned in the result set. This property is populated by the Process Step and is usually used in the condition property of a Decision Process Steps Branch as shown below: return bool.Parse(context.Data.GetProperty("odbc","Rows")); The prefix for all ODBC custom message properties it odbc and they can be accessed directly from the Neuron ESB Message object using the GetProperty() or GetProperties() methods. All Neuron ESB Message properties can also be set using the Set Property Process Step. Neuron ESB Message Properties
Dynamic ConfigurationDirectly preceding the ODBC Process Step could be a Set Property Process Step or a Code Step. If a Code Step was used, the following custom properties could be used: context.Data.SetProperty("odbc","RowName"," Customer"); The odbc properties can be accessed directly from the Neuron ESB Message object using the GetProperty() or GetProperties() methods. All Neuron ESB Message properties can also be set using the Set Property Process Step.
NOTE: Sample of using the ODBC Process Step can be found here: |
||||||||||||||||||||||||||||||||||||||||||||||||||||||||||||||||||||||
Design Time Properties |
||||||||||||||||||||||||||||||||||||||||||||||||||||||||||||||||||||||
|
||||||||||||||||||||||||||||||||||||||||||||||||||||||||||||||||||||||


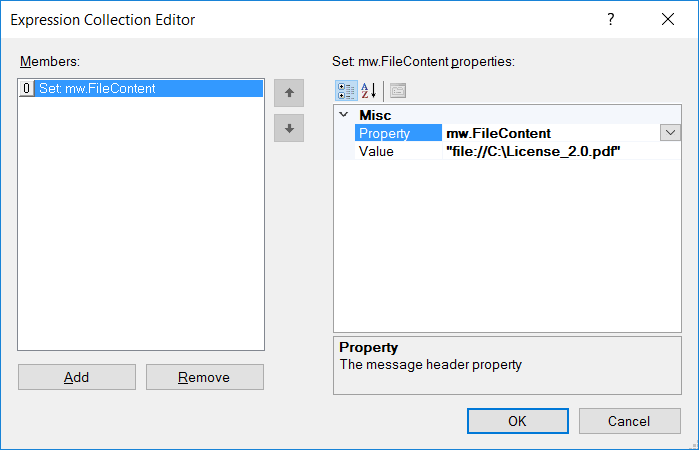
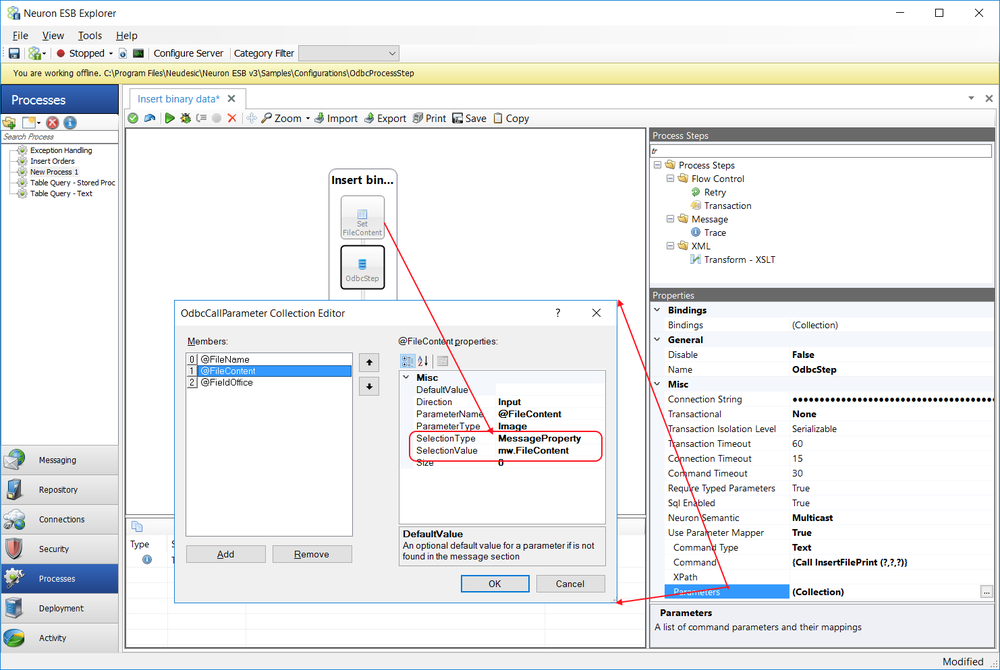
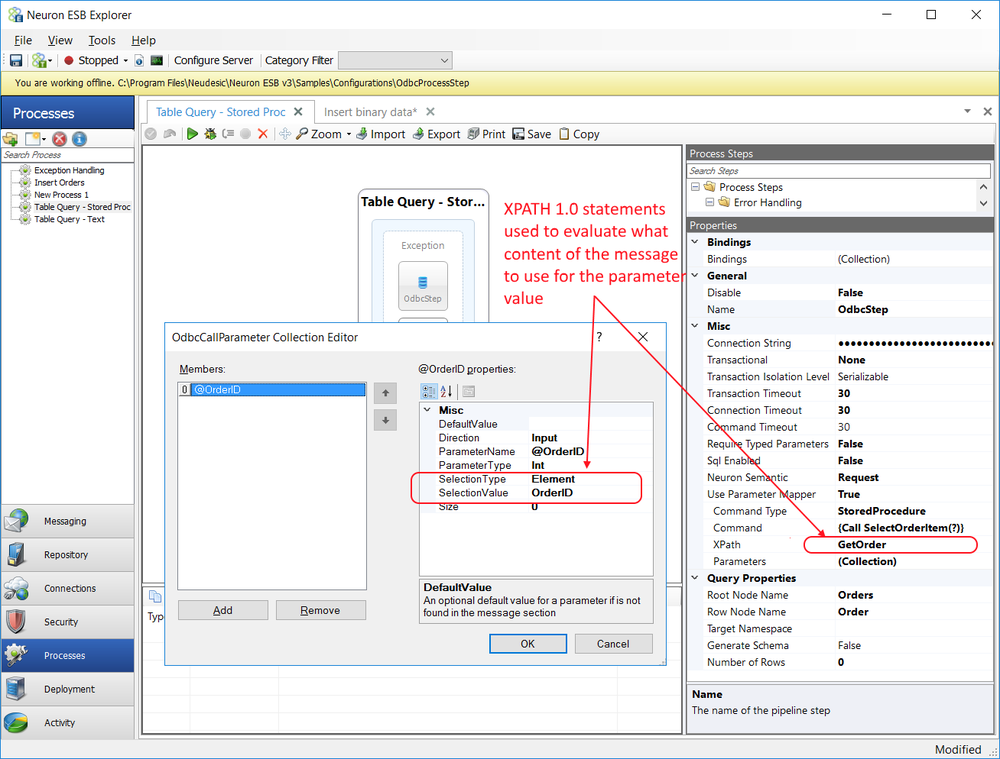
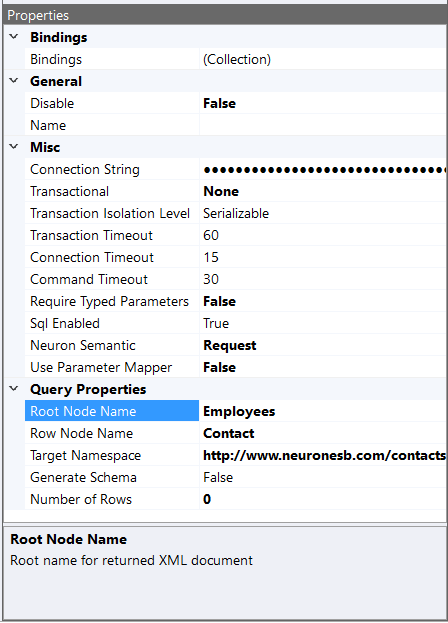
Store
|
Category: |
Storage |
||||||||||||||||||||||||||||||||
Class: |
EsbMessageStorePipelineStep |
|||||||||||||||||||||||||||||||||
Namespace: |
Neuron.Esb.Pipelines |
|||||||||||||||||||||||||||||||||
Assembly: |
Neuron.Esb.Pipelines.dll |
|||||||||||||||||||||||||||||||||
Description: The Store Process Step supports one-way inserts and updates into any Microsoft SQL Server database. The Store Process Step provides a Parameter Mapped configuration model. The Parameter Mapped based model allows users to work directly with existing XML messages, Neuron ESB Message headers and custom properties to map values within them directly to SQL parameters for the call as shown below:
The Parameter Mapped based model allows developers to work with any existing message or meta-data without the need for creating specially formatted documents or template mapping. Besides the different configuration models, the Store Process Step supports calling either Microsoft SQL Server Stored Procedures or Dynamic SQL. The Store Process Step provides the Connection Properties user interface (UI) to assist users in constructing SQL connection strings. This can be launched by clicking the ellipsis button located on the Connection String property in the Process Steps property grid:
All connection strings built using the Connection Properties UI are stored as encrypted strings. Clicking the Test Connection button will use the settings to connect to the Microsoft SQL Server database as shown below:
Parameter MappingThe Store process step uses a Parameter Mapper, which offers users the ability to decouple the SQL operation from the incoming Neuron ESB Message body format. The following four properties control how the parameter mapping is executed:
Each Parameter entry can have the following properties:
Note: The number of parameters in theStoreParameters Collection Editormust match the number of parameters in theCommandproperty. The SelectionType property provides the capability to decouple the SQL operation from the incoming Neuron ESB Message body. This property allows users to hard code parameter values, use any part of an incoming message as well as use any Neuron ESB Message or Header property as the value for a parameter. This property in concert with the SelectionValue property provides the mapping between the parameter and value. For Example:
In the following example, the Property Mapper is used to map a custom Neuron ESB Message property to three SQL Parameters. The custom Property can be set either using the Set Property Process Step:
Or by using the following C# code within a C# Code Process Step:
context.Data.SetProperty("mw","OrderID","2345");
context.Data.SetProperty("mw","OrderDate","4/8/2017");
context.Data.SetProperty("mw","OrderAmount","3000");
Within the StoreParameter Collection Editor, the SelectionType property of each Parameter is set to MessageProperty and the SelectionValue property is set to the name of the custom property as displayed below:
Data TypesThe Store Process Step passes all parameters to the Microsoft SQL Server as strings, which are interpreted as varchar data types. If the Dynamic SQL or Stored Procedure being called requires parameters of a different type (i.e. int, bool, etc.) Microsoft SQL Server will automatically attempt to do an implicit conversion between the parameter values and the target data types. Currently there is no support for passing Null values and working with Binary data types. Dynamic ConfigurationDirectly preceding the Store Process Step could be a Set Property Process Step or a Code Step. If a Code Step was used, the following custom properties could be used:
context.Data.SetProperty("sql","ConnectionString",
	" ");
The sql.ConnectionString property can be used to dynamically set the ConnectionString design-time property at runtime, effectively changing the target database and server to execute against. The sql property can be accessed directly from the Neuron ESB Message object using the GetProperty() or GetProperties() methods. All Neuron ESB Message properties can also be set using the Set Property Process Step.
NOTE: Sample of using the Store Process Step can be found here: http://www.neuronesb.com/neuron/Help3/Development/Samples_and_Walkthroughs/Process_Samples/Accessing_SQL_Data_From_Processes.htm |
||||||||||||||||||||||||||||||||||
Design Time Properties |
||||||||||||||||||||||||||||||||||
|
||||||||||||||||||||||||||||||||||

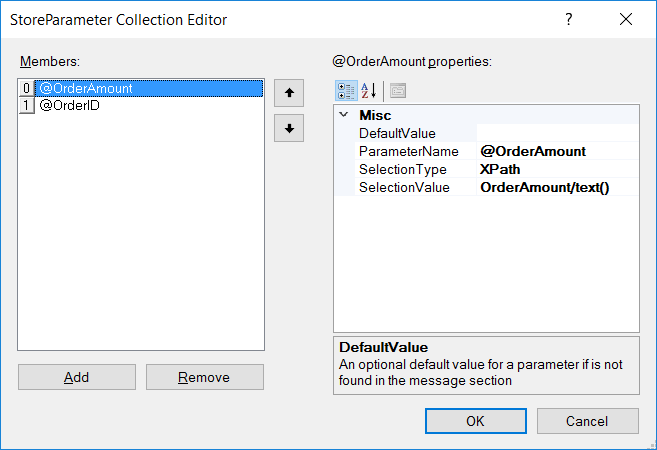
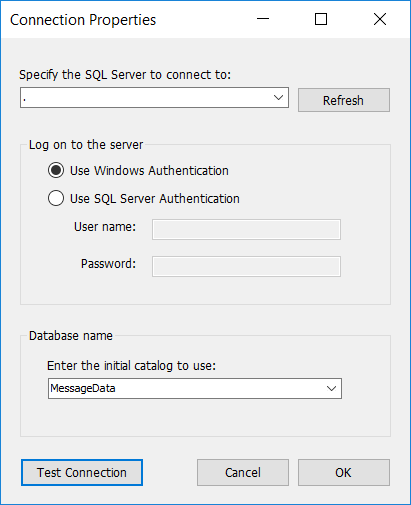
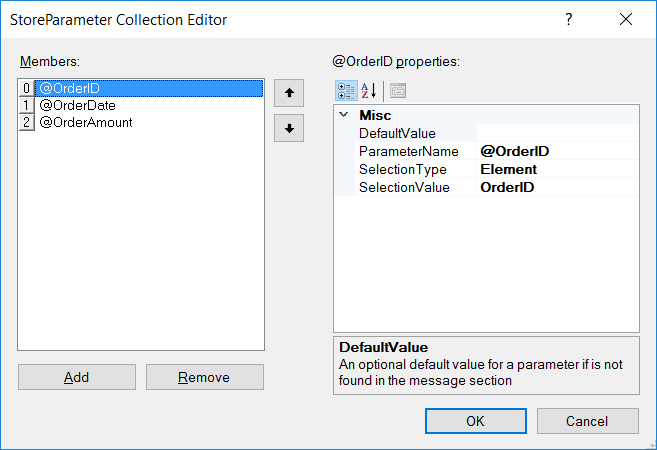
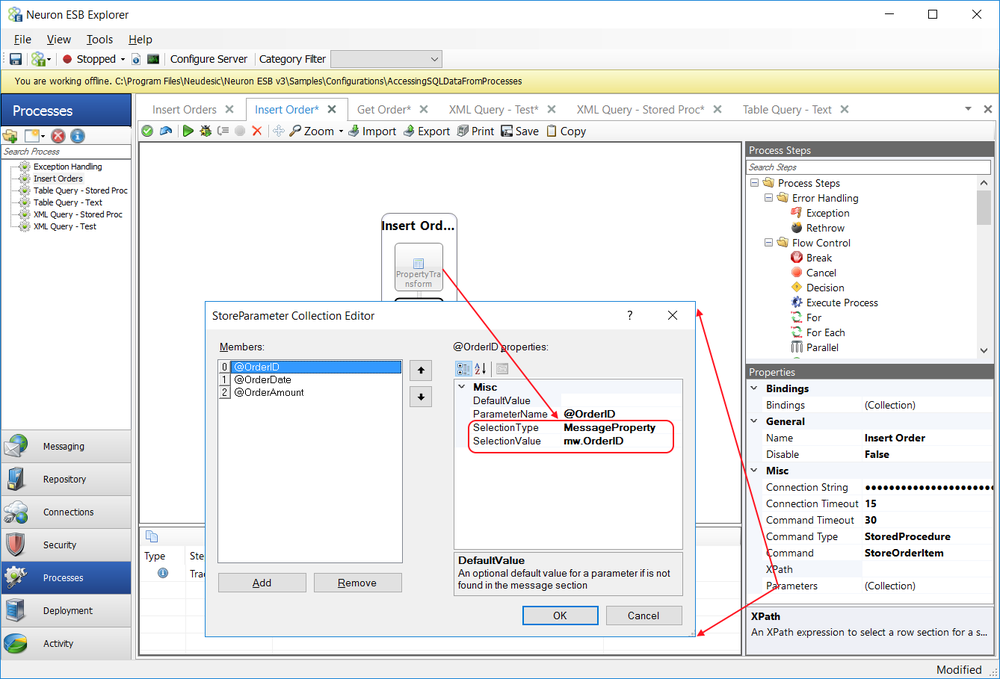
Table Query
|
Category: |
Storage |
|||||||||||||||||||||||||||||||||||||||||
Class: |
EsbMessageQueryPipelineStep |
||||||||||||||||||||||||||||||||||||||||||
Namespace: |
Neuron.Esb.Pipelines |
||||||||||||||||||||||||||||||||||||||||||
Assembly: |
Neuron.Esb.Pipelines.dll |
||||||||||||||||||||||||||||||||||||||||||
Description: The Table Query Process Step supports as query (i.e. Request/Response) type of message pattern against any Microsoft SQL Server database. The Table Query Process Step provides a Parameter Mapped configuration model. The Parameter Mapped based model allows users to work directly with existing XML messages, Neuron ESB Message headers and custom properties to map values within them directly to SQL parameters for the call as shown below:
The Parameter Mapped based model allows developers to work with any existing message or meta-data without the need for creating specially formatted documents or template mapping. Besides the different configuration models, the Table Query Process Step supports calling either Microsoft SQL Server Stored Procedures or Dynamic SQL. The Table Query Process Step provides the Connection Properties user interface (UI) to assist users in constructing SQL connection strings. This can be launched by clicking the ellipsis button located on the Connection String property in the Process Steps property grid:
All connection strings built using the Connection Properties UI are stored as encrypted strings. Clicking the Test Connection button will use the settings to connect to the Microsoft SQL Server database as shown below:
Parameter MappingThe Table Query process step uses a Parameter Mapper, which offers users the ability to decouple the SQL operation from the incoming Neuron ESB Message body format. The following four properties control how the parameter mapping is executed:
Each Parameter entry can have the following properties:
Note: The number of parameters in theQueryParameters Collection Editormust match the number of parameters in theCommandproperty. The SelectionType property provides the capability to decouple the SQL operation from the incoming Neuron ESB Message body. This property allows users to hard code parameter values, use any part of an incoming message as well as use any Neuron ESB Message or Header property as the value for a parameter. This property in concert with the SelectionValue property provides the mapping between the parameter and value. For Example:
In the following example, the Property Mapper is used to map a custom Neuron ESB Message property to a SQL Parameter. The custom Property can be set either using the Set Property Process Step:
Or by using the following C# code within a C# Code Process Step:
context.Data.SetProperty("mw","OrderID","1234");
Within the QueryParameter Collection Editor, the SelectionType property of each Parameter is set to MessageProperty and the SelectionValue property is set to the name of the custom property as displayed below:
In the next example, the following message is set as the Neuron ESB Message body: <GetOrder> <OrderID>1235</OrderID> </GetOrder> The Xpath property in the Property Mapper section of the property grid contains the XPATH 1.0 statement GetOrder, which returns the following child element to the Property Mapper for the QueryParameters Collection Editor to process: <OrderID>1235</OrderID> Within the QueryParameters Collection Editor, the SelectionType property is set to Element and the SelectionValue property is set to the XPATH 1.0 statement OrderID as displayed below. This ensures that the innertext property of the OrderID element is used as the Parameter value:
When executed, the Table Query Process Step returns the following default XML message: <QueryResult> <Row> <OrderID>1235</OrderID> <OrderDate>2009-04-22T00:00:00</OrderDate> <OrderAmount>110.0000</OrderAmount> </Row> </QueryResult> Data TypesThe Table Query Process Step passes all parameters to the Microsoft SQL Server as strings, which are interpreted as varchar data types. If the Dynamic SQL or Stored Procedure being called requires parameters of a different type (i.e. int, bool, etc.) Microsoft SQL Server will automatically attempt to do an implicit conversion between the parameter values and the target data types. Currently there is no support for passing Null values and working with Binary data types. Dynamic ConfigurationDirectly preceding the Table Process Step could be a Set Property Process Step or a Code Step. If a Code Step was used, the following custom properties could be used:
context.Data.SetProperty("sql","ConnectionString",
	" ")
The sql.ConnectionString property can be used to dynamically set the ConnectionString design-time property at runtime, effectively changing the target database and server to execute against. The sql property can be accessed directly from the Neuron ESB Message object using the GetProperty() or GetProperties() methods. All Neuron ESB Message properties can also be set using the Set Property Process Step.
NOTE: Sample of using the Table Process Step can be found here: http://www.neuronesb.com/neuron/Help3/Development/Samples_and_Walkthroughs/Process_Samples/Accessing_SQL_Data_From_Processes.htm |
|||||||||||||||||||||||||||||||||||||||||||
Design Time Properties |
|||||||||||||||||||||||||||||||||||||||||||
|
|||||||||||||||||||||||||||||||||||||||||||

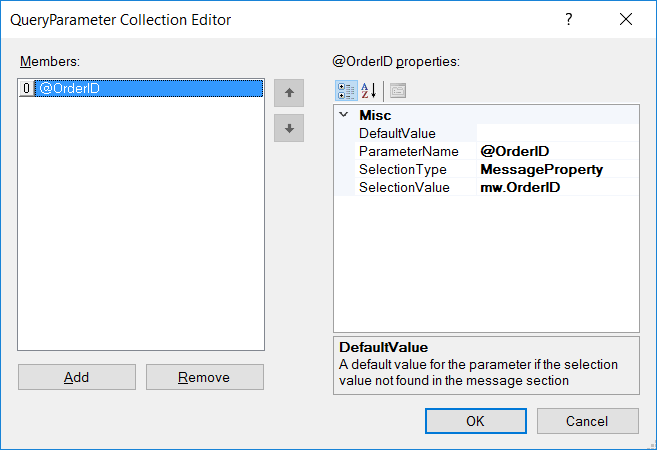
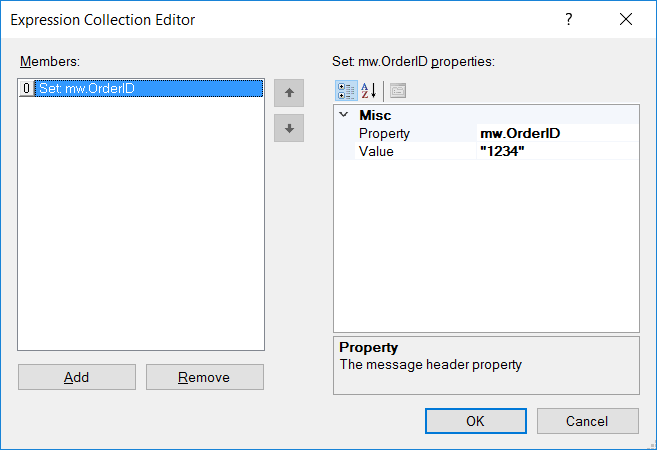
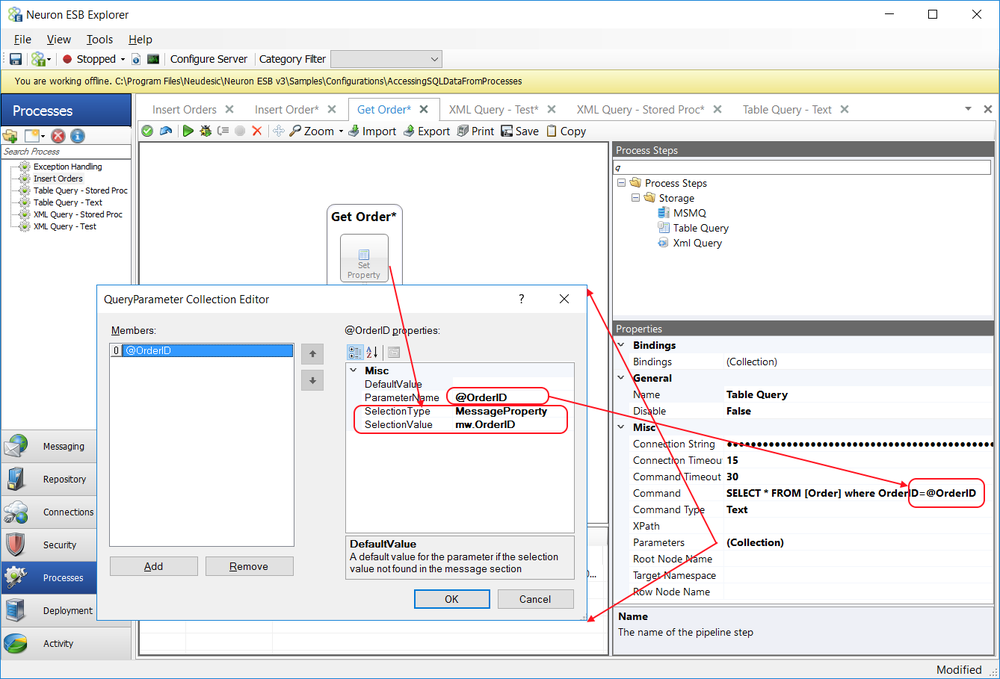
Xml Query
|
Category: |
Storage |
||||||||||||||||||||||||||||||||
Class: |
EsbMessageXmlQueryPipelineStep |
|||||||||||||||||||||||||||||||||
Namespace: |
Neuron.Esb.Pipelines |
|||||||||||||||||||||||||||||||||
Assembly: |
Neuron.Esb.Pipelines.dll |
|||||||||||||||||||||||||||||||||
Description: The Xml Query Process Step supports as query (i.e. Request/Response) type of message pattern against any Microsoft SQL Server database. The Xml Query Process Step differs from the Table Query Process Step as it is designed to leverage the SQL FOR XML clause, which provides the ability to aggregate the relational row set returned by theSELECTstatement into XML. NOTE: More about Microsoft SQL Server FOR XML can be found here: https://docs.microsoft.com/en-us/sql/relational-databases/xml/for-xml-sql-server The Xml Query Process Step provides a Parameter Mapped configuration model. The Parameter Mapped based model allows users to work directly with existing XML messages, Neuron ESB Message headers and custom properties to map values within them directly to SQL parameters for the call as shown below:
The Parameter Mapped based model allows developers to work with any existing message or meta-data without the need for creating specially formatted documents or template mapping. Besides the different configuration models, the Xml Query Process Step supports calling either Microsoft SQL Server Stored Procedures or Dynamic SQL. The Xml Query Process Step provides the Connection Properties user interface (UI) to assist users in constructing SQL connection strings. This can be launched by clicking the ellipsis button located on the Connection String property in the Process Steps property grid:
All connection strings built using the Connection Properties UI are stored as encrypted strings. Clicking the Test Connection button will use the settings to connect to the Microsoft SQL Server database as shown below:
Parameter MappingThe Xml Query process step uses a Parameter Mapper, which offers users the ability to decouple the SQL operation from the incoming Neuron ESB Message body format. The following four properties control how the parameter mapping is executed:
Each Parameter entry can have the following properties:
Note: The number of parameters in theQueryParameters Collection Editormust match the number of parameters in theCommandproperty. The SelectionType property provides the capability to decouple the SQL operation from the incoming Neuron ESB Message body. This property allows users to hard code parameter values, use any part of an incoming message as well as use any Neuron ESB Message or Header property as the value for a parameter. This property in concert with the SelectionValue property provides the mapping between the parameter and value. For Example:
In the following example, the Property Mapper is not used as the following FOR XML statement is used in the Command property:
The FOR XML clause controls the format of the XML message returned as shown below: <Orders> <Order> <OrderID>1234</OrderID> <OrderDate>2009-04-22T00:00:00</OrderDate> <OrderAmount>100.0000</OrderAmount> </Order> <Order> <OrderID>1235</OrderID> <OrderDate>2009-04-22T00:00:00</OrderDate> <OrderAmount>110.0000</OrderAmount> </Order> </Orders> In the next example, the following message is set as the Neuron ESB Message body: <GetOrder> <OrderID>1235</OrderID> </GetOrder> The Xpath property in the Property Mapper section of the property grid contains the XPATH 1.0 statement GetOrder, which returns the following child element to the Property Mapper for the QueryParameters Collection Editor to process: <OrderID>1235</OrderID> Within the QueryParameters Collection Editor, the SelectionType property is set to XPath and the SelectionValue property is set to the XPATH 1.0 statement OrderID/text()as displayed below. This ensures that the text property of the OrderID element is used as the Parameter value:
When executed, the Xml Query Process Step returns the following default XML message: <Order> <OrderID>1235</OrderID> <OrderDate>2009-04-22T00:00:00</OrderDate> <OrderAmount>110.0000</OrderAmount> </Order> Data TypesThe Xml Query Process Step passes all parameters to the Microsoft SQL Server as strings, which are interpreted as varchar data types. If the Dynamic SQL or Stored Procedure being called requires parameters of a different type (i.e. int, bool, etc.) Microsoft SQL Server will automatically attempt to do an implicit conversion between the parameter values and the target data types. Currently there is no support for passing Null values and working with Binary data types. Dynamic ConfigurationDirectly preceding the Xml Process Step could be a Set Property Process Step or a Code Step. If a Code Step was used, the following custom properties could be used: context.Data.SetProperty("sql","ConnectionString", " "); The sql.ConnectionString property can be used to dynamically set the ConnectionString design-time property at runtime, effectively changing the target database and server to execute against. The sql property can be accessed directly from the Neuron ESB Message object using the GetProperty() or GetProperties() methods. All Neuron ESB Message properties can also be set using the Set Property Process Step.
NOTE: Sample of using the Xml Process Step can be found here: http://www.neuronesb.com/neuron/Help3/Development/Samples_and_Walkthroughs/Process_Samples/Accessing_SQL_Data_From_Processes.htm |
||||||||||||||||||||||||||||||||||
Design Time Properties |
||||||||||||||||||||||||||||||||||
|
||||||||||||||||||||||||||||||||||

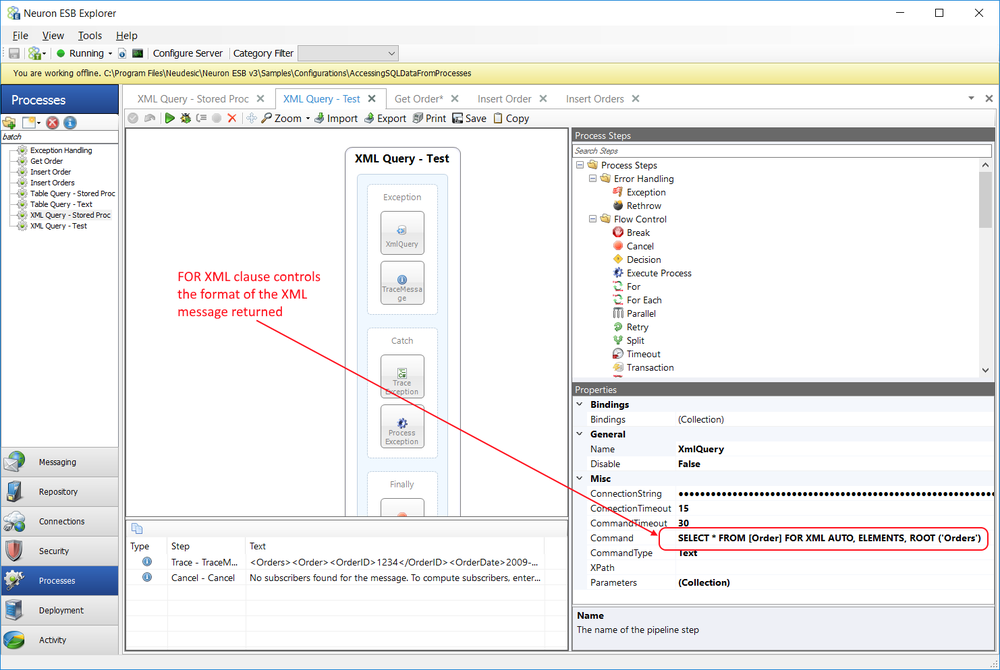
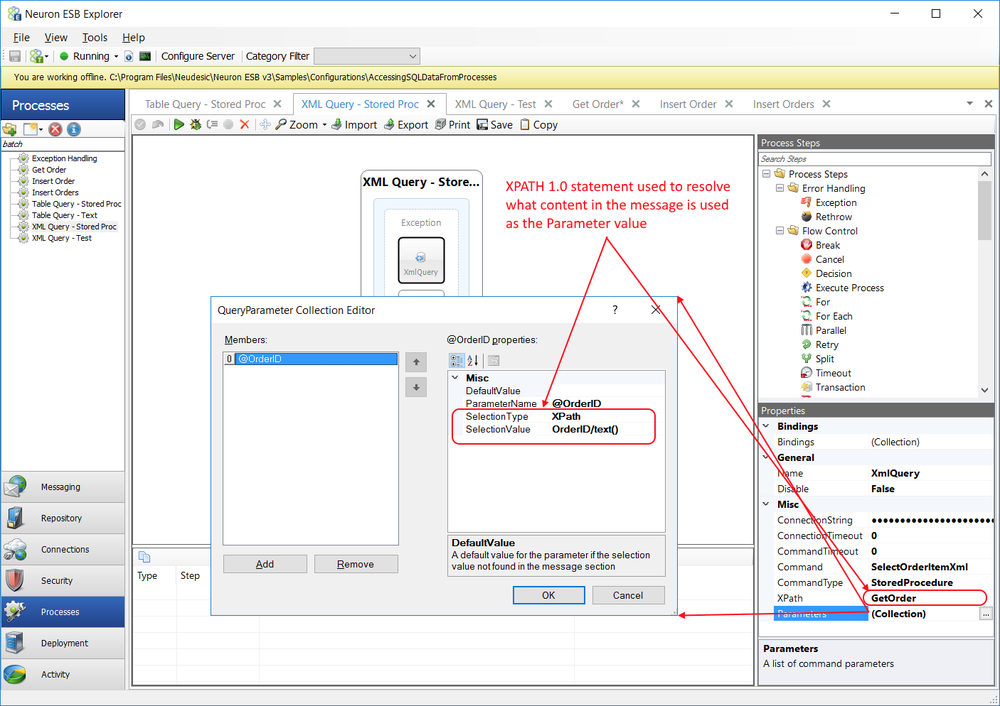
XML
Transform XSLT
|
Category: |
XML |
|||||||||||||||||||||||||||||||||||
Class: |
EsbMessageBodyXslTransformPipelineStep |
||||||||||||||||||||||||||||||||||||
Namespace: |
Neuron.Esb.Pipelines |
||||||||||||||||||||||||||||||||||||
Assembly: |
Neuron.Esb.Pipelines.dll |
||||||||||||||||||||||||||||||||||||
Description: TheTransform - XSLTProcess Step can be used to validate an incoming Neuron ESB Message body against any XSLT/XSL document. NOTE: More information regarding XSLT/XSL can be found here: https://msdn.microsoft.com/en-us/library/ms256069(v=vs.110).aspx https://msdn.microsoft.com/en-us/library/ms759096(v=vs.85).aspx There are two main ways of selecting an XSLT/XSL document for the Transform XSLT Process Step to use for runtime transformation, either:
XSLT Name ReferenceXSLT name reference is perhaps the most convenient and the more performant. The XSLT Name design time property displays a drop down box populated with all the XSLT/XSL documents stored in the Neuron ESB XSL Repository (navigate to Repository->Transformations->XSL Transformations in the Neuron ESB Explorer). Users can select any XSLT/XSL document from the dropdown list. When this drop down box is used, it essentially creates a link between the contents of the repository and the Process step. This means if the repository content changes, the Process Step will load the new XSLT/XSL document changes once the hosting endpoint recycles, refreshes its configuration. Using the XSLT Name design time property, the XslCompiledTransform object that will be created for runtime transformation will be cached between calls. XSLT DocumentsThe other way to select XSLT/XSL documents is through the TransformXML design time property. There is an ellipsis button on the design time property, which launches the XSLT Editor as shown below:
The XSLT Editor allows users to do one of three things:
Each option functionally will return a static copy of the XSLT/XSL document into the Editor window. When using the Import option, the Import Document form will appear containing a searchable list box of all the XSLT/XSLs stored in the existing Neuron ESB XSL Repository (see below). Users can select an XSLT/XSL, which will copy its contents into the editor.
Using the TransformXml design-time property decouples the process step from the repository. For instance, if the XSLT/XSL contents changes in the repository after the process step has been configured, the process step will always continue to run the XSLT/XSL that was copied into the editor. XSL Include SupportThe Transform - XSLT process step supports file based locations for XSL/XSLTs that contain include references (i.e. <xsl:include href="inlines"/>): <xsl:stylesheet xmlns:xsl="http://www.w3.org/1999/XSL/Transform" version="1.0" xmlns="http://www.w3.org/1999/xhtml"> <xsl:include href="C:\transforms\PaymentToOrder"/> <xsl:template match="chapter"> <html> <xsl:apply-templates/> </html> </xsl:template> </xsl:stylesheet> At runtime, if there is a Transform XSLT Step, the href attribute for includes would be resolved to file based locations. However, the Transform XSLT Process Step also supports resolving href locations referencing the Neuron ESB XSL Repository by using the esb prefix as shown in the example below: <xsl:stylesheet xmlns:xsl="http://www.w3.org/1999/XSL/Transform" version="1.0" xmlns="http://www.w3.org/1999/xhtml"> <xsl:include href="esb:PaymentToOrder"/> <xsl:template match="chapter"> <html> <xsl:apply-templates/> </html> </xsl:template> </xsl:stylesheet> At runtime, if the href attribute starts with esb: Neuron ESB will look for the XLST/XLS in the configurations XSL Repository. The name following the esb: must be the name of the XSLT/XSL document in the Neuron ESB Repository. XLST/XSL ParametersThe Transform XSLT supports XSL Parameters in XSLT/XSL documents. Either this can be statically set using the XsltParameter Collection Editor or, they can be dynamically set at runtime using values from Neuron ESB Message custom properties, Environmental Variables or XPATH 1.0 expressions evaluated against the incoming message. The Parameters design-time property has an ellipsis button that launches the XsltParameter Collection Editor, which allows users to add one or more Parameters. The Add button is clicked to create a Parameter entry as shown below:
Each Parameter entry has three properties:
The name property is required and must be set with the name of the Parameter as it appears in the XSL/XSLT document. In the following example, discount is the name of the Parameter: <xsl:stylesheet version="1.0" xmlns:xsl="http://www.w3.org/1999/XSL/Transform"> <p> <strong style="font-weight: bold;"> <em style="font-style: italic;"> <xsl:param name="discount"></xsl:param> </em> </strong> </p> <xsl:template match="/"> <order><xsl:variable name="sub-total" select="sum(//price)"></xsl:variable> <total> <xsl:value-of select="$sub-total"></xsl:value-of> </total> 15% discount if paid by: <xsl:value-of select="$discount"></xsl:value-of></order> </xsl:template> </xsl:stylesheet> The NamespaceUri property is optional and must contain the namespace of the parameter, if one is present. There is none in the previous example, so it can remain blank. The value property can be set with either a static value or a dynamic value that is evaluated at runtime. For example, if a static date (i.e. 10/1/2017) was used for the value, then the user can set the value at design time as shown below:
Using the following XML source document: <order> <book ISBN="10-861003-324"> <title>The Handmaid's Tale</title> <price>19.95</price> </book> <cd ISBN="2-3631-4"> <title>Americana</title> <price>16.95</price> </cd> </order> The following XML output would be produced, reflecting the inclusion of the static value: <order><total>36.9</total> 15% discount if paid by: 10/1/2017</order> However, values can be dynamically resolved if the appropriate syntax is entered into the Value property. To use a custom Neuron ESB Message property, the following syntax must be used as the Value property:
context.Data.SetProperty("mw","prop","9/1/2016");
Using the custom Neuron ESB Message property the value of the Parameter is evaluated at runtime, producing the following XML output: <order><total>36.9</total> 15% discount if paid by: 9/1/2016</order>
<person>
	<firstname>Michael</firstname>
	<lastname>Jones</lastname>
</person>
Dynamic ConfigurationDirectly preceding the Transform - XSLT Process Step could be a Set Property Process Step or a Code Step. If a Code Step was used, the following custom properties could be used:
context.Data.SetProperty("neuron","xslt","
							<xsl:stylesheet xmlns:xsl="ht/>");
context.Data.SetProperty("neuron ","xsltName","paymentToOrder");
The neuron.xslt property can be used to dynamically set the raw contents of the XSLT document to use for runtime transformation. This can be useful if the contents of the XSLT document is being loaded programmatically from an external location. Whereas the neuron.xsltName property can be used to dynamically set the name of the XSLT document stored in the Neuron ESB XSLT Repository that the Transform - XSLT Process Step should use for runtime transformation. This essentially provides the Process Step with a pointer to an XSLT document. If the latter property is used, the name will be resolved and its XSLT content will be retrieved from the configuration, an XslCompiledTransform object will be created and cached. The neuron property can be accessed directly from the Neuron ESB Message object using the GetProperty() or GetProperties() methods. All Neuron ESB Message properties can also be set using the Set Property Process Step.
NOTE: Sample of using the Validate - Schema Process Step can be found here: http://www.neuronesb.com/neuron/Help3/Development/Samples_and_Walkthroughs/Process_Samples/message_schema_validation_using_neuron_pipelines.htm Design Time Properties
|
|||||||||||||||||||||||||||||||||||||

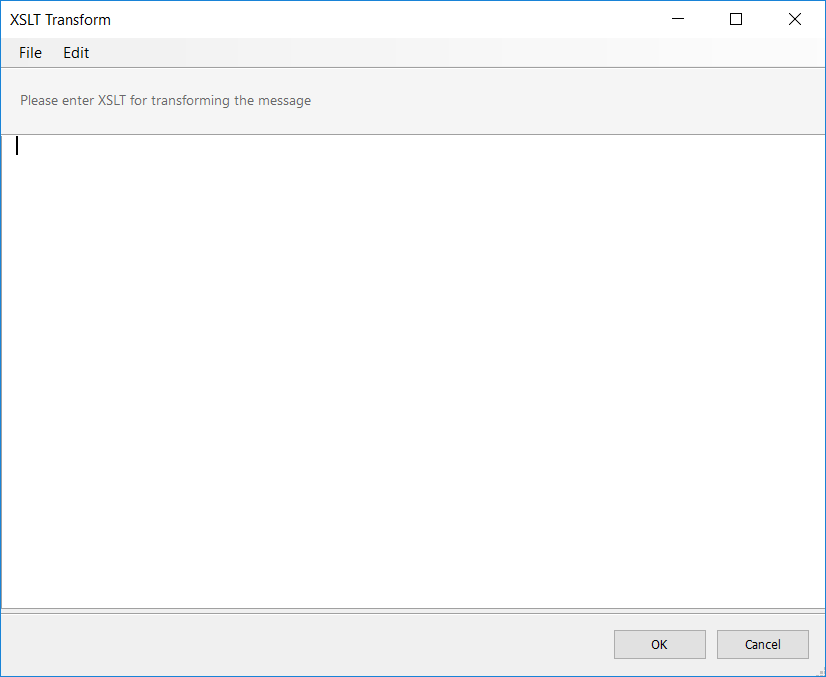
Validate Schema
|
Category: |
XML |
||||||||||||||||||||||||||||||||||||||||||||||||
Class: |
EsbMessageSchemaValidationPipelineStep |
|||||||||||||||||||||||||||||||||||||||||||||||||
Namespace: |
Neuron.Esb.Pipelines |
|||||||||||||||||||||||||||||||||||||||||||||||||
Assembly: |
Neuron.Esb.Pipelines.dll |
|||||||||||||||||||||||||||||||||||||||||||||||||
Description: TheValidate SchemaProcess Step can be used to validate an incoming Neuron ESB Message body against a set of XSD schemas. NOTE: More information regarding XSD Schemas can be found here: https://msdn.microsoft.com/en-us/library/ms256235(v=vs.110).aspx https://msdn.microsoft.com/en-us/library/aa468557.aspx TheValidate-SchemaProcess step is a composite step that has two branches (Execution Blocks) where other process steps can be placed. One branch (named Valid) is followed if the validation is successful and the other branch (named Invalid) is followed if the validation fails. The Invalid branch defaults to having a singleCancelProcess step but it can beremoved and other steps can be placed in that branch for execution. There are two main ways of selecting one or more XSD Schemas for the Validate Schema Process Step to use for runtime validation, either:
Schema Name ReferenceSchema name reference is perhaps the most convenient and the more performant. The Schema Names design time property displays a drop down box populated with all the XSD Schemas stored in the Neuron ESB Schema Repository (navigate to Repository->Data Contracts->XML Schemas in the Neuron ESB Explorer). Users can multi select from the dropdown list by holding control button while clicking with the mouse. When this drop down box is used, it essentially creates a link between the contents of the repository and the Validate Schema Process step. This means if the repository content changes, Validate Schema Process Step will load the new XSD Schema changes once the hosting endpoint recycles, refreshes its configuration. Using the Schema Names design time property, the XmlReaderSettings object that will be created for runtime validation will be cached between calls. Schema DocumentsThe other way to select schemas is through the Schemas design time property. There is an ellipsis button on the design time property, which launches the NeuronSchemasCollectionItem Collection Editor. The Collection Editor (displayed below) is used to select one or more XSD Schemas that the Validate Schema Process Step will use at runtime to validate incoming messages. Unlike the Schema Names property, this does not create a pointer/reference to the XSD Schemas stored in the Neuron ESB Schema Repository: :
The Collection Editor allows users to add one or more XSD Schemas. The Add button is clicked to create a Schema entry. Next to the Schema entry is an ellipsis button, which when clicked will launch the XSD Editor as shown below:
The XSD Editor allows users to do one of three things:
Each option functionally will return a static copy of the XSD Schema document into the Editor window. When using the Import option, the Import Document form will appear containing a searchable list box of all the XSDs stored in the existing Neuron ESB Schema Repository (see below). Users can select a schema, which will copy its contents into the editor.
Using the Schema design-time property decouples the process step from the repository. For instance, if the schema contents changes in the repository after the process step has been configured, the process step will always continue to run the schema that was copied into the editor. When multiple XSD Schemas are selected, the runtime validation process will search through the list of Schemas to find one that matches the incoming message to validate against. If one cannot be found, control will flow to the Invalid Branch of the Process Step. Schema Import SupportThe Validate - Schema process step supports file based locations for the schemaLocation attribute for schemas that contain import or include references. For example, when a WSDL is downloaded, the schemas included in that WSDL uses will often import from a different schema, using a schemaLocation attribute to direct the schema parser on where to find it, as shown below: <xsd:schema elementFormDefault="qualified" targetNamespace="urn:partner.soap.sforce.com" xmlns="http://www.w3.org/2001/XMLSchema" xmlns:ens="urn:sobject.partner.soap.sforce.com" xmlns:tns="urn:partner.soap.sforce.com" xmlns:xsd="http://www.w3.org/2001/XMLSchema"> <xsd:import namespace="urn:sobject.partner.soap.sforce.com" schemaLocation="C:\SchemaS\Account_sObject"></xsd:import> At runtime, if there were a Validate-Schema process step, the import (or include) would be resolved to the local file system. However, the Validate Schema Process Step also supports resolving schema locations referencing the Neuron ESB Schema Repository by using the esb prefix as shown in the example below: <xsd:schema elementFormDefault="qualified" targetNamespace="urn:partner.soap.sforce.com" xmlns="http://www.w3.org/2001/XMLSchema" xmlns:ens="urn:sobject.partner.soap.sforce.com" xmlns:tns="urn:partner.soap.sforce.com" xmlns:xsd="http://www.w3.org/2001/XMLSchema"> <xsd:import namespace="urn:sobject.partner.soap.sforce.com" schemaLocation="esb:Account_sObject"></xsd:import> At runtime, if the schemaLocation attribute starts with esb: Neuron ESB will look for the schema in the configurations Schema Repository. The name following the esb: must be the name of the XSD Schema in the Neuron ESB Repository. Dynamic ConfigurationDirectly preceding the Validate - Schema Process Step could be a Set Property Process Step or a Code Step. If a Code Step was used, the following custom properties could be used:
context.Data.SetProperty("neuron","schema",
						"<xs:schema id=Payments/>");
context.Data.SetProperty("neuron ","schemaNames",
						"SourceSchema;PaymentSchema");
The neuron.schema property can be used to dynamically set the raw contents of the XSD Schema document to use for runtime validation. This can be useful if the contents of the XSD Schema are being loaded programmatically from an external location. Whereas the neuron.schemaNames property can be used to dynamically set the name (or set of names) of the XSD Schema(s) stored in the Neuron ESB Schema Repository that the Validate Schema Process Step should use for runtime validation. This essentially provides the Validate Schema Process Step with a pointer to a set of schemas. If the latter property is used, their names will be resolved and their XSD content will be retrieved from the configuration, an XmlReaderSettings object will be created and cached. The neuron property can be accessed directly from the Neuron ESB Message object using the GetProperty() or GetProperties() methods. All Neuron ESB Message properties can also be set using the Set Property Process Step.
NOTE: Sample of using the Validate - Schema Process Step can be found here: http://www.neuronesb.com/neuron/Help3/Development/Samples_and_Walkthroughs/Process_Samples/message_schema_validation_using_neuron_pipelines.htm Design Time Properties
|
||||||||||||||||||||||||||||||||||||||||||||||||||
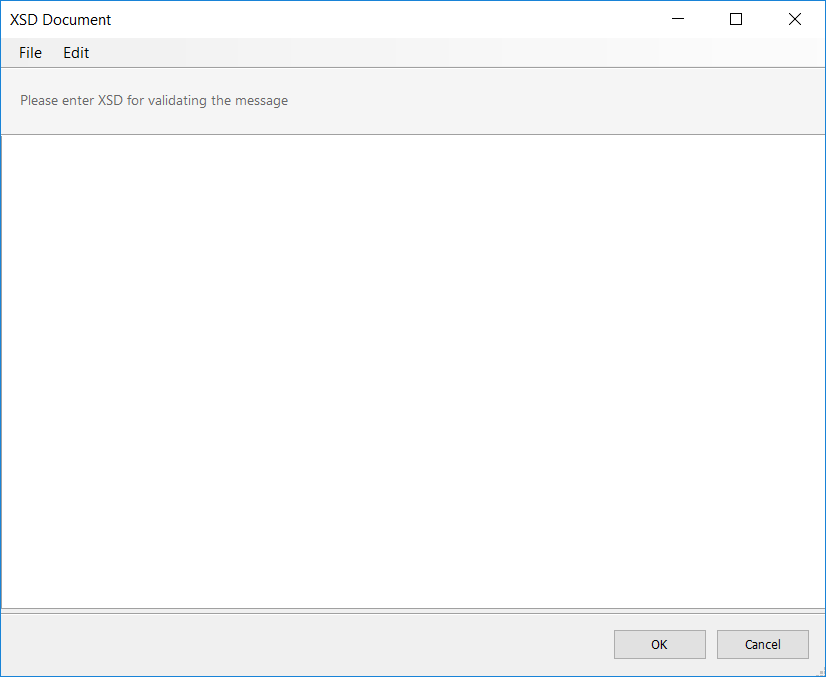
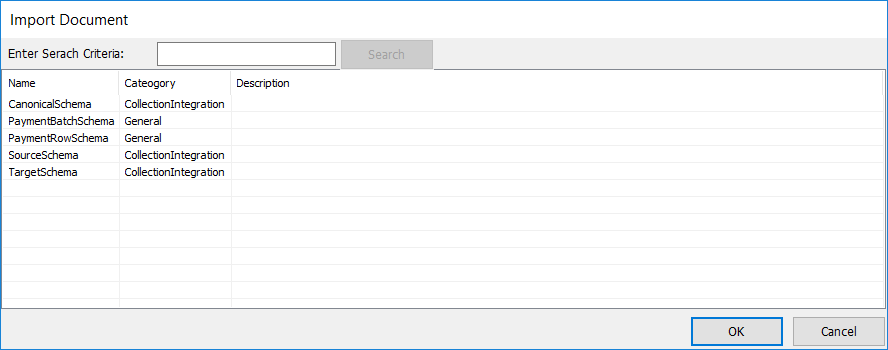
Business Process Tutorial
Overview
This tutorial will walk you through building your first Neuron ESB Business Process. It will demonstrate how to create a new Business Process, adding and configuring a few Process Steps, and testing the Business Process using the Business Process Designer design-time testing facilities as well as a runtime test using the Neuron ESB Test Client.
The Business Process you will develop implements a simple message validation transformation pattern, two of the components in the VETO pattern (Validate, Enrich, Transform and Operate).
Create a Neuron Business Process
- To create a Neuron ESB Business Process, navigate to the Processes tab in the Neuron ESB Explorer navigation area:
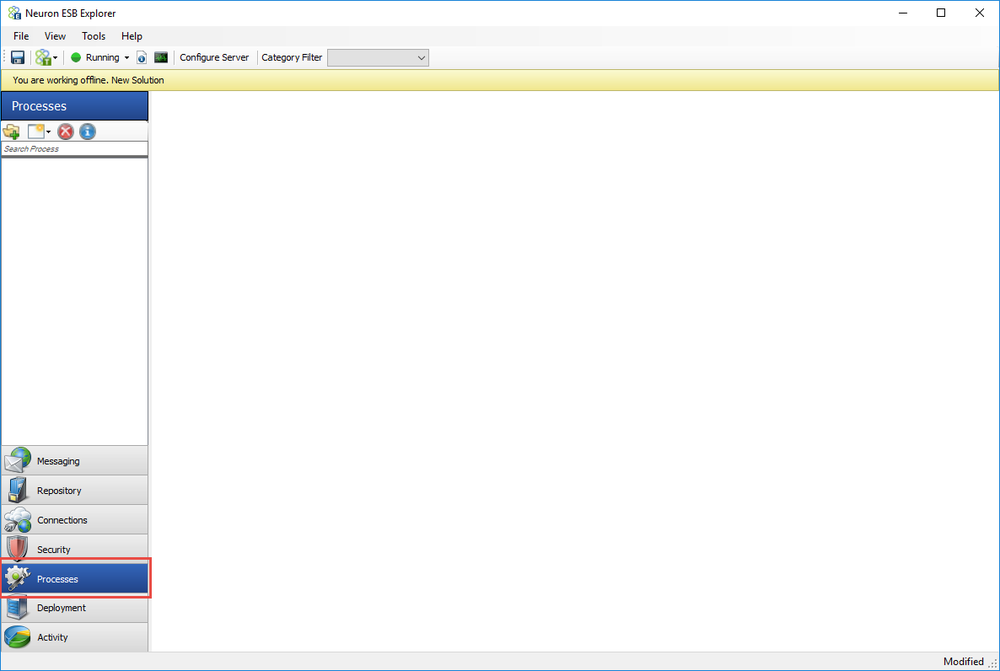
Figure 1: Processes Tab in Neuron ESB Explorer
- Click on the New button and select Create Process:
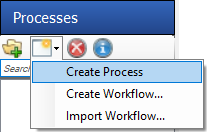
Figure 2: Creating a new Process
- On the newly created Business Process, select the execution block in the middle of the designer. The Business Process properties will appear in the lower-right corner of Neuron ESB Explorer. Change the Name property of the Process to VETO Pattern:
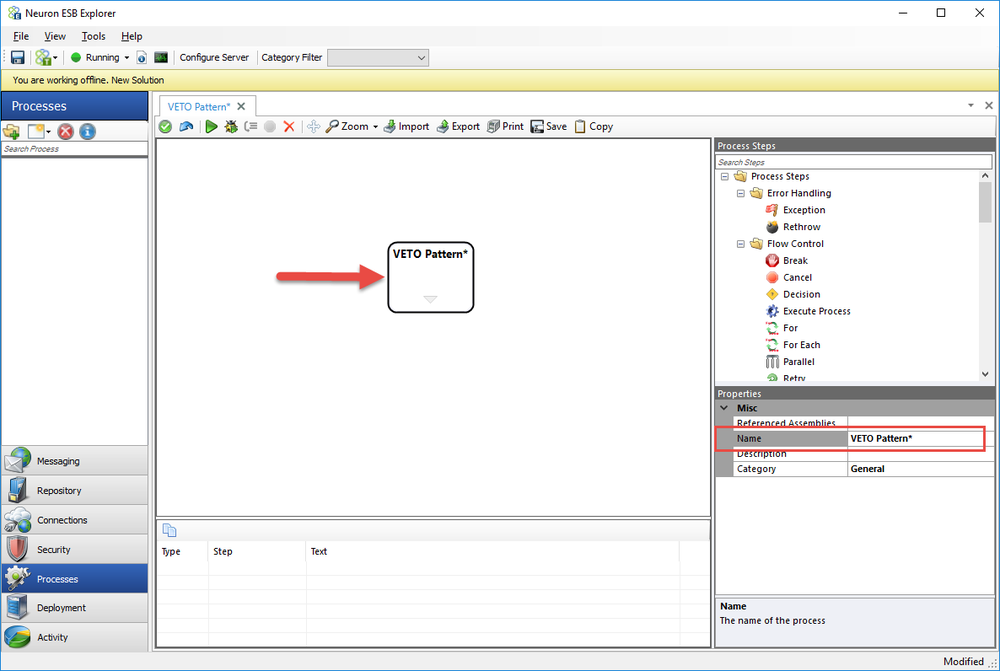
Figure 3: New Business Process
Add and Configure the Validate Schema Step
Click here for more information on the Validate Schema Step.
- In the Process Steps library in the upper-right corner, type val in the Search Steps area. This will limit the steps shown to those that match the search string:

Figure 4: Filtering in the Process Step Library
- Click on the Validate Schema step and drag it into the execution block on the design surface:
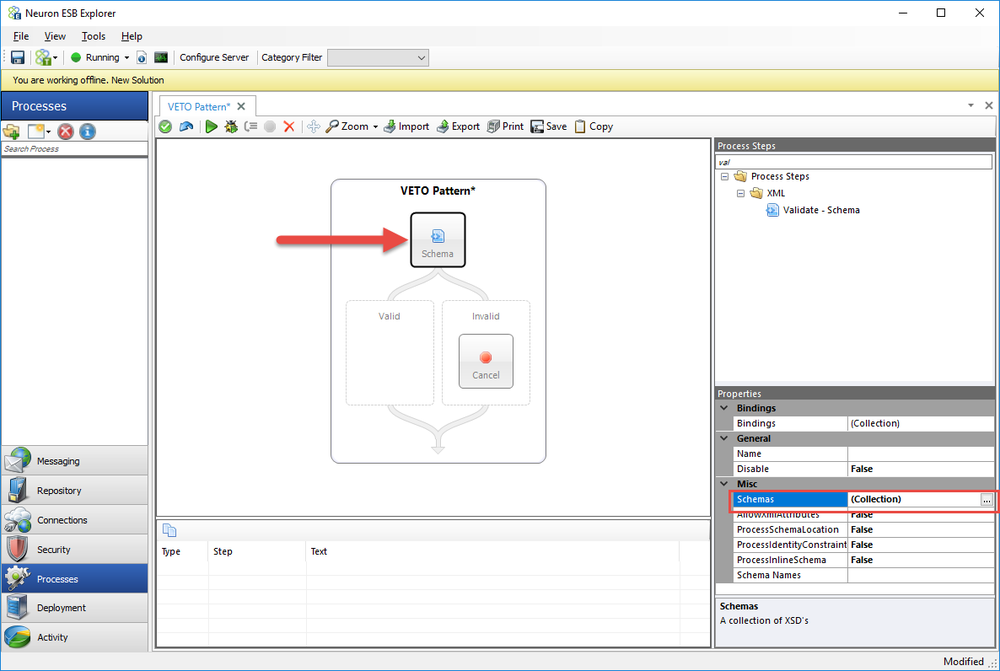
Figure 5: Validate Schema step added to designer surface
- As shown in Figure 5, click on the Schema step, and then click on the ellipsis () button that is displayed when you click on the Schemas property. The Schemas Collection Editor will display. This is where you can enter all of the schemas you want the message to validate against.
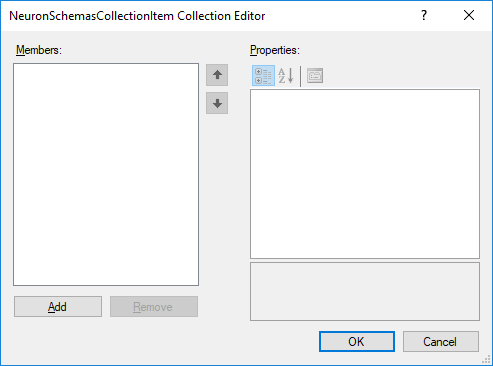
Figure 6: Schemas Collection Editor
- In the Schemas Collection Editor, click the Add button, then select the XmlSchema property and click on the ellipsis button:
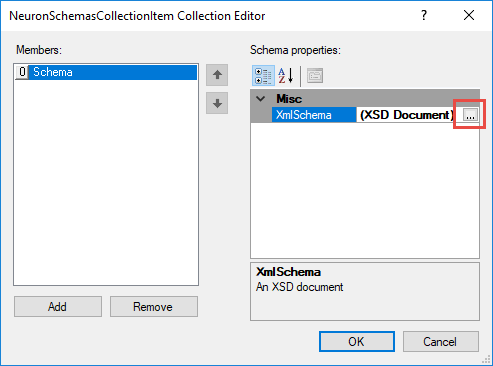
Figure 7: Schemas Collection Editor with one schema configured
- Copy the schema below and paste it into the XSD Document editor:
<?xml version="1.0" encoding="UTF-8"?>
<xs:schema xmlns:xs="http://www.w3.org/2001/XMLSchema">
	<xs:element name="book">
		<xs:complexType>
			<xs:sequence>
				<xs:element name="title" type="xs:string"></xs:element>
				<xs:element name="author" type="xs:string"></xs:element>
				<xs:element maxOccurs="unbounded" minOccurs="0" name="character">
					<xs:complexType>
						<xs:sequence>
							<xs:element name="name" type="xs:string"></xs:element>
							<xs:element maxOccurs="unbounded" minOccurs="0" name="friend-of" type="xs:string"></xs:element>
							<xs:element name="since" type="xs:date"></xs:element>
							<xs:element name="qualification" type="xs:string"></xs:element>
						</xs:sequence>
					</xs:complexType>
				</xs:element>
			</xs:sequence>
			<xs:attribute name="isbn" type="xs:string"></xs:attribute>
		</xs:complexType>
	</xs:element>
</xs:schema>
- The XSD Document editor should look like this:
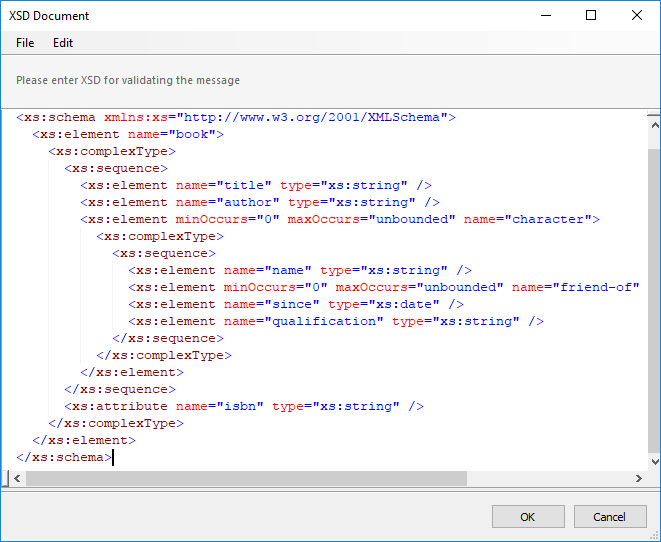
Figure 8: XSD Document Editor
- Click OK on the XSD Document Editor and then click OK again on the Schemas Collection Editor.
NOTE: As an alternative to selecting a Schema file from disk or copying a Schema into the editor, XSD Schemas can be stored in the Neuron ESB Schema Repository and then be selected in the Schema Names drop down box in the property grid.
Add and Configure the Transform XSLT Step
Click here for more information on the Transform XSLT Step.
- Next, we will configure the Valid branch of the Schema step. In the Process Steps Library, find the Transform XSLT step and drag it onto the Designer surface, into the Valid branch of the Validate Schema step:
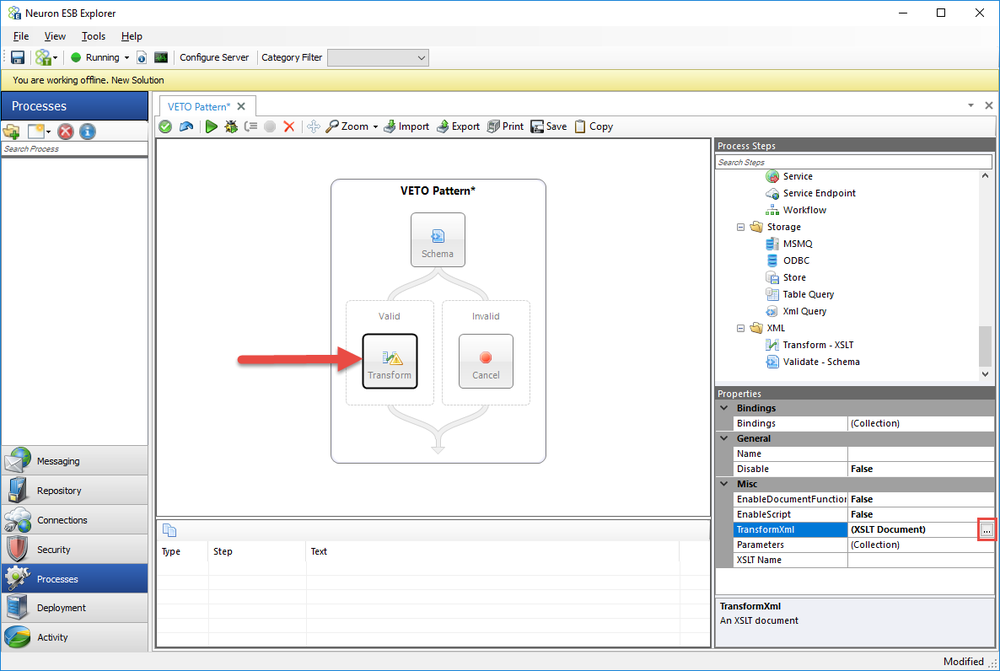
Figure 9: Adding the Transform XSLT step
- As shown in Figure 9, click on the Transform step, and then click on the ellipsis button that is displayed when you click on the XSLT Document property. The XSLT Transform Editor will display. Copy the XSLT below and paste it into the XSLT Transform Editor:
<xsl:stylesheet version="1.0" xmlns:xsl="http://www.w3.org/1999/XSL/Transform">
	<xsl:template match="/book">
		<html>
			<body>
				<h2>
					<xsl:value-of select="./title"></xsl:value-of>
				</h2>
				<h3>
					<xsl:value-of select="./author"></xsl:value-of>
				</h3>
				<table border="1">
					<tr bgcolor="#9acd32">
						<th align="left">Name</th>
						<th align="left">Since</th>
						<th align="left">Qualification</th>
					</tr>
					<xsl:for-each select="character">
						<tr>
							<td>
								<xsl:value-of select="./name"></xsl:value-of>
							</td>
							<td>
								<xsl:value-of select="./since"></xsl:value-of>
							</td>
							<td>
								<xsl:value-of select="./qualification"></xsl:value-of>
							</td>
						</tr>
					</xsl:for-each>
				</table>
			</body>
		</html>
	</xsl:template>
</xsl:stylesheet>
- The XSLT Transform editor should look like this:
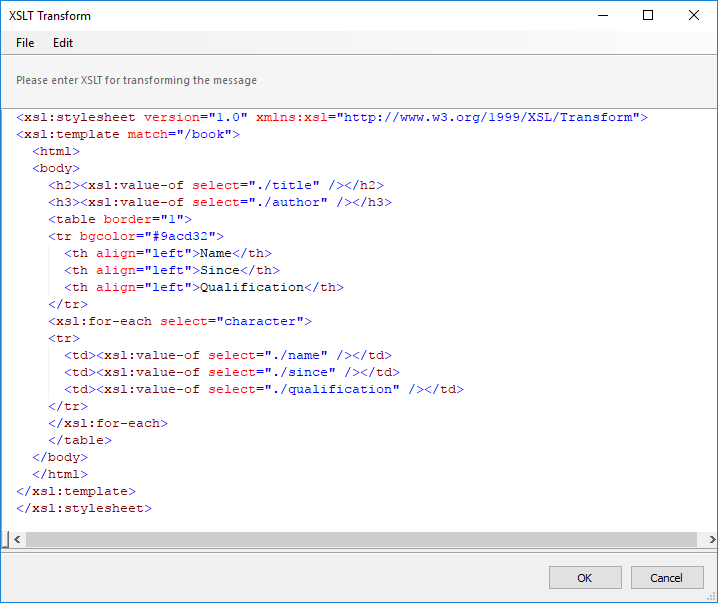
Figure 10: XSLT Transform Editor
NOTE: As an alternative to selecting an XSLT file from disk or copying a XSLT document into the editor, XSLT documents can be stored in the Neuron ESB Schema Repository and then be selected in the XSLT Name drop down box in the property grid.
- Click OK on the XSLT Transform editor.
- Next, in the Process Steps Library, find the Trace step and drag it onto the designer surface, after the Transform XSLT step:
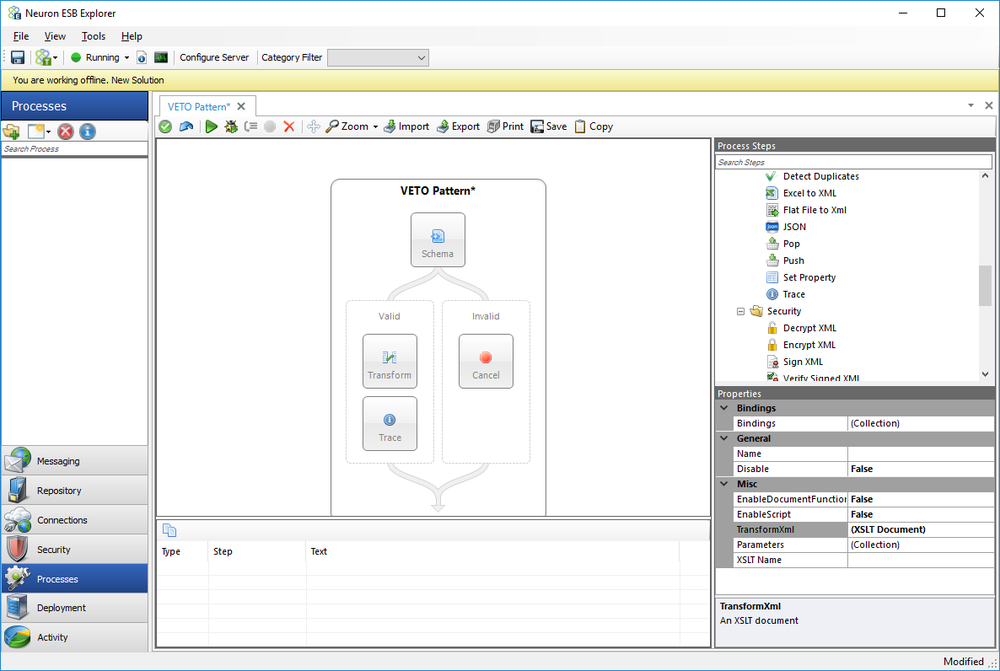
Figure 11: Adding the Trace step
Add and Configure the C# Step
Click here for more information on the C# Step.
- Now we will configure the Invalid branch of the Validate Schema step. In the Process Steps Library, find the C# step and drag it into the Invalid branch of the Validate Schema step, before the Cancel step that is already there:
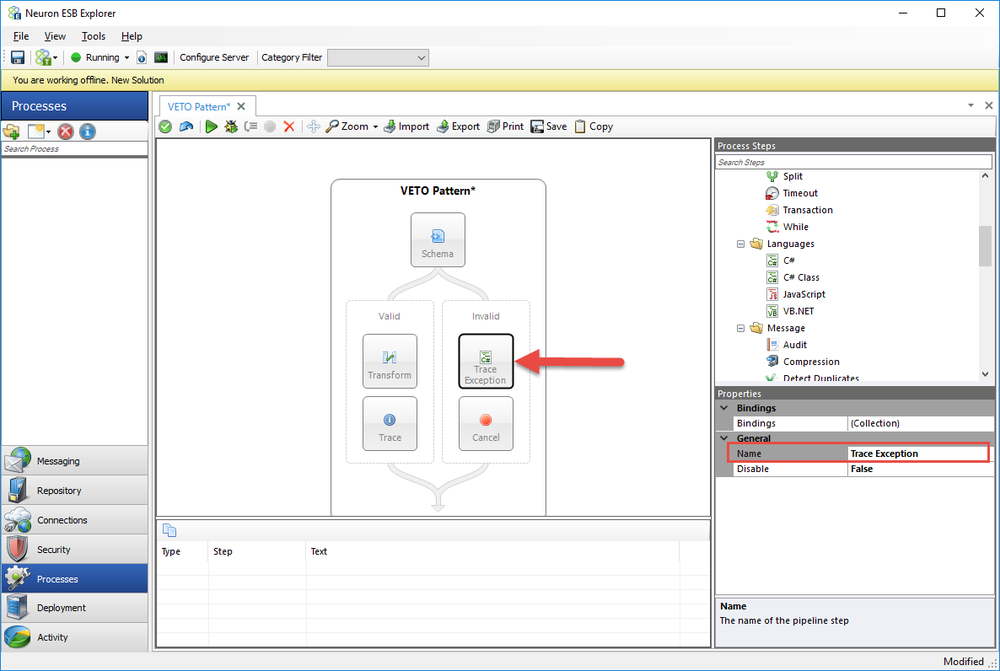
Figure 12: Adding a C# step
- As shown in Figure 12, click on the C# step, and change the Name property to Trace Exception. To edit the code for the C# step, either double-click on the C# step or right-click and select Edit Code The code editor will open. Copy the code below and paste it into the editor. Whenever a message fails validation, it enters the Invalid branch and a CurrentException is saved as a context property. The code below will retrieve that exception and Trace it to the Trace Window (at design time) or the Neuron application logs (at run time).
//get the current exception
Exception ex = (Exception)context.Properties["CurrentException"];
string msg = "Validation Exception: ";
if(ex.InnerException != null)
{
	msg += ex.InnerException.Message;
}
else
{
	msg += ex.Message;
}
//trace to designer window
context.Instance.TraceError(msg);
- The C# code editor should look like this:
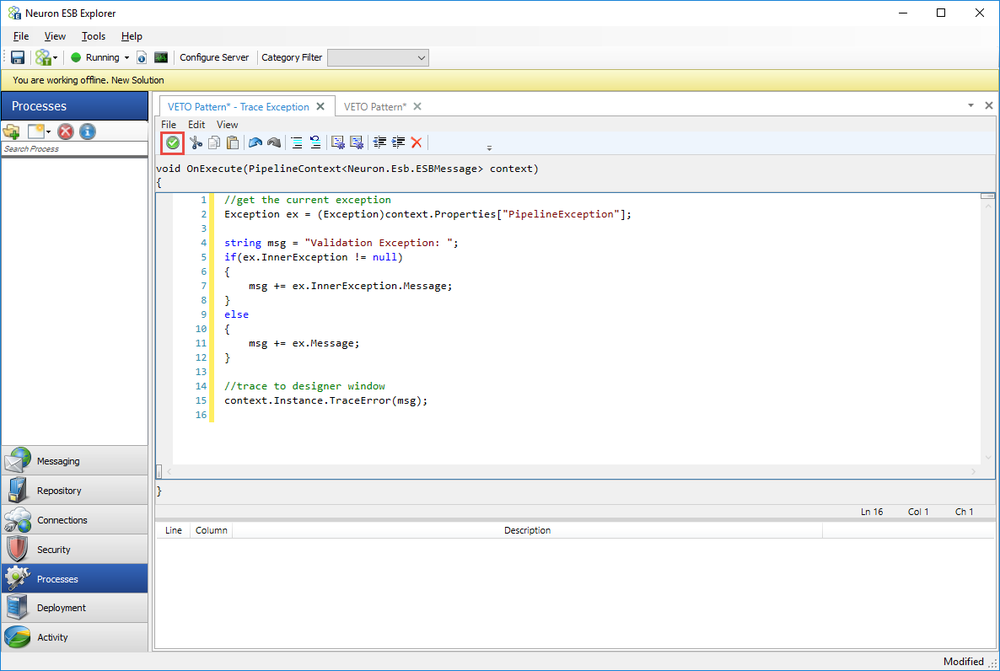
Figure 13: C# Code Editor
- Click the Save button in the code editor (in red in Figure 13).
Testing the Business Process
The Neuron ESB Process Designer includes a Test Utility. You will use it to test the business process we just created.
- If you have multiple tabs open in the process designer, navigate to the VETO Pattern tab. Click the Test Process button:

Figure 14: Navigate to the VETO Pattern tab and click the Test Process Button
- You may see a Warning message that states the ESB Service is not configured. This process does not require the ESB service to be configured. Click Yes.
- The Edit Test Message dialog will appear. Copy the XML below and paste it into the text box.
<book isbn="0836217462">
	<title>Being a Dog Is a Full-Time Job</title>
	<author>Charles M. Schulz</author>
	<character>
		<name>Snoopy</name>
		<friend-of>Peppermint Patty</friend-of>
		<since>1950-10-04</since>
		<qualification>extroverted beagle</qualification>
	</character>
	<character>
		<name>Peppermint Patty</name>
		<since>1966-08-22</since>
		<qualification>bold, brash and tomboyish</qualification>
	</character>
</book>
- The Edit Test Message dialog should look like this:
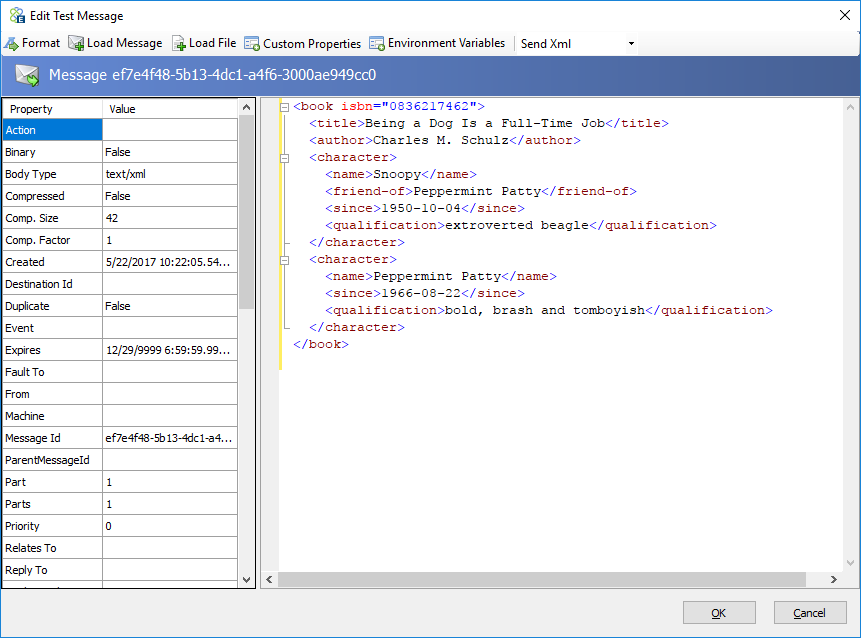
Figure 15: Edit Test Message
- Click the OK button. The process tester will navigate through each step, highlighting the current step in green as it progresses. The Trace step will output the results of the current Neuron ESB Message to the Trace Window:
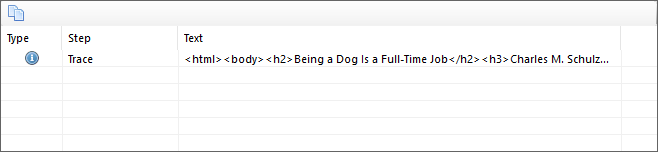
Figure 16: Test output window
- To test the Invalid branch of the Validate Schema step, run the Process Tester again using the XML below. Notice the difference between this XML and the XML previously used (the name element is missing):
<book isbn="0836217462">
	<title>Being a Dog Is a Full-Time Job</title>
	<author>Charles M. Schulz</author>
	<character>
		<friend-of>Peppermint Patty</friend-of>
		<since>1950-10-04</since>
		<qualification>extroverted beagle</qualification>
	</character>
	<character>
		<since>1966-08-22</since>
		<qualification>bold, brash and tomboyish</qualification>
	</character>
</book>
- This time the Trace Window displays an exception:
Figure 17: Test output window
- To see the entire exception, double-click on the row in the Trace Window:
Figure 18: Trace result displays when double-clicking on a row in the output window